1
Escenic Content Studio
User Guide
5.5.0.131978
Copyright © 2008-2012 Vizrt. All rights reserved.
No part of this software, documentation or publication may be reproduced, transcribed,
stored in a retrieval system, translated into any language, computer language, or
transmitted in any form or by any means, electronically, mechanically, magnetically,
optically, chemically, photocopied, manually, or otherwise, without prior written
permission from Vizrt.
Vizrt specifically retains title to all Vizrt software. This software is supplied under a license
agreement and may only be installed, used or copied in accordance to that agreement.
Disclaimer
Vizrt provides this publication “as is” without warranty of any kind, either expressed or
implied.
This publication may contain technical inaccuracies or typographical errors. While every
precaution has been taken in the preparation of this document to ensure that it contains
accurate and up-to-date information, the publisher and author assume no responsibility
for errors or omissions. Nor is any liability assumed for damages resulting from the use of
the information contained in this document.
Vizrt’s policy is one of continual development, so the content of this document is
periodically subject to be modified without notice. These changes will be incorporated
in new editions of the publication. Vizrt may make improvements and/or changes in the
product(s) and/or the program(s) described in this publication at any time.
Vizrt may have patents or pending patent applications covering subject matters in
this document. The furnishing of this document does not give you any license to these
patents.
Technical Support
For technical support and the latest news of upgrades, documentation, and related
products, visit the Vizrt web site at www.vizrt.com.
Last Updated
16.10.2012
Table of Contents
1 Introduction................................................................................................ 7
1.1 The Escenic Content Engine.............................................................. 7
1.2 The Escenic Publication Model.......................................................... 7
1.2.1 Your Publication..................................................................... 9
1.3 Content And Layout........................................................................ 10
1.4 Web Publication Characteristics...................................................... 10
1.5 Workflow, Permissions and Locking................................................. 11
1.6 System Requirements..................................................................... 12
1.6.1 Hardware............................................................................. 12
1.6.2 Software.............................................................................. 12
2 Using Content Studio................................................................................ 13
2.1 Starting and Ending Work Sessions................................................. 13
2.1.1 Starting................................................................................13
2.1.2 Ending..................................................................................14
2.2 The Application Window..................................................................14
2.2.1 The Menu Bar.......................................................................14
2.2.2 The Manage Tags Dialog....................................................... 19
2.2.3 The Navigation Area............................................................. 21
2.2.4 The Work Area..................................................................... 29
2.2.5 The Research Panel Area...................................................... 30
3 Using A Section Editor.............................................................................. 33
3.1 Section Header............................................................................... 33
3.2 Properties Panel............................................................................. 34
3.3 Attributes Panel..............................................................................35
3.4 Publishing Bar................................................................................ 36
4 Using A Section Page Editor...................................................................... 37
4.1 Section Page Header.......................................................................38
4.2 Section Page Content......................................................................38
4.2.1 Section Page Locking............................................................39
4.2.2 Section Page Structure......................................................... 40
4.3 Summary Details............................................................................ 41
4.4 Options and Controls...................................................................... 42
5 Using A Content Editor..............................................................................43
5.1 Formatting Bar............................................................................... 44
5.2 Field Panel..................................................................................... 44
5.2.1 Related Content Area........................................................... 45
5.2.2 Field Locking........................................................................ 47
5.3 Attributes Panel..............................................................................48
5.3.1 Sections............................................................................... 48
5.3.2 Tags..................................................................................... 51
5.3.3 Content Info......................................................................... 53
5.3.4 Element Properties............................................................... 54
5.4 Save/Preview/State Controls............................................................54
5.5 Editing Rich Text.............................................................................55
5.5.1 Editing Tables.......................................................................56
5.6 Editing Date Fields......................................................................... 57
5.7 Editing Images................................................................................57
5.7.1 Rotation............................................................................... 58
5.7.2 Cropping.............................................................................. 58
5.7.3 Image Enhancement............................................................. 59
5.7.4 Alternative Image Versions................................................... 59
5.8 Editing Schedule Fields................................................................... 60
5.8.1 Creating a Single Event........................................................ 60
5.8.2 Creating a Daily Event.......................................................... 61
5.8.3 Creating a Monthly Event..................................................... 61
5.8.4 Creating a Weekly Event.......................................................62
5.8.5 Adding Exceptions................................................................ 63
5.8.6 Adding More Dates............................................................... 63
6 Using A List Editor.................................................................................... 65
7 Keyboard Shortcuts...................................................................................67
Escenic Content Studio User Guide
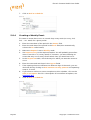
1 Introduction
Escenic Content Studio is the content creation, editing and management
application of the Escenic content management system. It is the system's
"front end", the most visible part of the system, and is intended to be used
on a daily basis by the writers and editors responsible for the content of an
Escenic-managed web site.
If you are reading this manual then you are probably an author, journalist or
editor who will be using Content Studio for one or more of the following tasks:
• Writing web content
• Editing web content
• Publishing web content (that is, making content actually visible on your web
site)
Vizrt has tried hard to make Content Studio as easy to use as possible, with
a modern, tabbed user interface, widespread use of drag-and-drop and lots
of keyboard shortcuts for experienced users. Nevertheless, it is probably
not a good idea to just start using it without knowing something about the
underlying system Content Studio depends on: the Escenic Content Engine.
If you spend half an hour now reading this chapter, you should find Content
Studio a lot easier to understand.
1.1
The Escenic Content Engine
The Escenic Content Engine is a system for managing and maintaining large
web sites such as newspaper web sites. The Escenic name for such a web site
is publication. When you see the word "publication" in this manual, it means
"web site managed by the Escenic Content Engine".
All access to the content of an Escenic publication is managed by the Escenic
Content Engine, which does not run on your computer, but on a server in the
network. Most of the content is stored by the Content Engine in a database
system, which also runs on a server in the network. This means that:
• You cannot use Content Studio unless your computer is connected to the
network.
• When you work with Content Studio, nothing important is stored on your
computer.
1.2
The Escenic Publication Model
The Content Engine has its own idea of how a web site or publication is
structured, called the publication model. All Escenic publications are based
on this publication model and therefore have the same basic structure, which
is reflected in Content Studio.
Copyright © 2008-2012 Vizrt
Page 7
Escenic Content Studio User Guide
An Escenic publication is made up of content and sections. Content is the
actual information that makes up your publication: news articles, images,
multimedia objects (audio and video files) and so on. The individual articles,
images and so on are collectively referred to as content items. Sections are
the subdivisions of the publication in which the articles appear and correspond
approximately to the sections of a print newspaper or magazine. The menu
system displayed in an Escenic publication is usually based directly on the
publication's section structure.
A publication must have one top section that corresponds to the whole
publication, and each section may contain 0 or more subsections. The sections
therefore form a tree structure like the folders in a computer file system.
A content item can belong to one and only one section, which is called its
home section. However, a content item may appear in many sections. A
news article concerning a football transfer, for example, might belong to the
sports section of a newspaper, but appear in both the sports and business
sections. A content item's home section determines its published appearance:
this article will look like a sports article even for users who arrive from the
newspaper's business section. The home section also determines part of the
content item's URL, so if you change a content item's home section then its
URL will also change.
A section has one or more section pages which contain links to some of
the content items in the section. One of these section pages is the section's
active page, and is displayed whenever a reader of the publication clicks
on a link to the section. The active page is, in other words, a kind of "front
page" for the section. Although a section may have many section pages,
only one of them can be active at any particular time. This enables editors
to have alternative section pages ready for activation and switch between
them instantaneously. It can be a useful means of preparing for alternative
outcomes to upcoming events such as elections and sporting competitions.
The links on a section page are called teasers. A teaser is a summary,
and usually rather more than a link. A typical teaser might consist of an
article headline, some summary text describing the content of the article, a
thumbnail image and a "read more.." link. A publication will normally have a
number of different teaser types ("large", "medium" and "small", for example).
The teasers are laid out on a section page in a grid layout. A grid layout is a
set rectangular areas, each of which has a predefined location and size and
can contain a predefined number of teasers. The areas in a grid layout have
names which usually describe their location on the page or their intended
content ("top stories", "left" "center" and "right", for example).
Teasers can be organized in groups. Teaser groups can then be placed in
areas in the same way as single teasers.
Content items can be interrelated in various ways. An image or video clip, for
example, can be made to appear in a news article by relating it to the article.
Lists of "related article" links can be generated in the same way.
Page 8
Copyright © 2008-2012 Vizrt
Escenic Content Studio User Guide
1.2.1
Your Publication
Escenic publications can be very different from one another, in order to meet
the particular requirements of different publishers, audiences and subject
matter. Each publication has its own particular structure and types of content
that have been defined by the publisher's designers and programmers, often
with assistance from Escenic consultants. The following things are publicationspecific:
sections
Each publication has its own section structure.
content types
A content item is composed of fields, and different content item types
have different fields. A news article content item, for example, might
consist of the fields "headline", "teaser-text" and "body" (the main
story), while a "review" content item might have the fields "headline",
"body", "subject" "verdict" and "rating". Each publication defines its own
article types along with rules specifying the sections in which they can
be used.
relation types
All relations between content items have a type which determines the
purpose of the relation. An image that is linked to a news article using
a "thumbnail" relation, for example, might be displayed as a thumbnail
image in summaries for the article, while an image that is linked using
a "top" relation might be displayed at the top of the article itself. Each
publication defines its own relation types and their meaning (i.e, what
they are used for).
layout types
Grid layout types determine the possible content of section pages - how
many areas the page contains, how many summaries of what type each
group can contain and so on. Each publication defines its grid layout
types and also defines which grid layout types can be used in each
section.
summary types
A summary type defines the content item fields from which a content
summary is composed. Summaries are used for teasers, relations, in
lists, search results etc.
Because all publications are different, so are many aspects of Content
Studio. The examples and screenshots you see in this manual will often
not exactly match what you see on your screen, because they are based
on Vizrt's internal test and demo publications, not your publication.
Copyright © 2008-2012 Vizrt
Page 9
Escenic Content Studio User Guide
1.3
Content And Layout
If you have previously mostly worked with a print document editor such as
Microsoft Word or even an HTML editor like FrontPage or Dreamweaver, then
one of the first things you will notice when you start Content Studio is that
there is no Format menu. Content Studio is a pure content editor. It allows
you to create, modify and publish content, but provides almost no direct
control over the final appearance of the content.
This is a deliberate choice, based on the belief that the layout of web pages is
the responsibility of web designers, not writers. For the same reason, Content
Studio provides you with a very simple editing environment in which you can
concentrate on content, and is definitely not a "What You See Is What You
Get" (WYSIWYG) editor. A preview function lets you see the article as it will
appear when published, but you cannot write in this view (previews are in fact
displayed in your browser). The preview function can sometimes be useful
to get an impression of what your finished article will look like. You might,
for example, want to know whether a heading you have written is "too long"
or not. It's worth remembering, though, that the web is not like a printed
newspaper or magazine and you cannot guarantee what your readers will
actually see. Someone using a different browser, a computer with a smaller
screen or a mobile phone will not see what you see.
Your publication designers may grant you some indirect control over certain
aspects of the final layout. You might, for example, be able to choose the
summary type used to display a particular article on a section page. In other
cases, however, the publication may not allow such choices. You may also
have some control over minor aspects of layout when editing articles: you
will probably have options for highlighting text (bold/italic/underline) and
creating lists of various types. You may also be able to insert headings within
your articles. Exactly what those headings will look like on the published web
pages, however, is outside your control.
1.4
Web Publication Characteristics
A web site, unlike a print publication, does not have a fixed number of pages,
and disk storage is so cheap that there is no practical limit to content. An
Escenic publication, like most large, active web sites will therefore usually
have far more content than is immediately visible, like an iceberg that
is mostly hidden below the surface of the water. If you are used to web
publishing then this is probably obvious; if you come from a print publishing
background then it may not be. It is useful to keep this aspect of web
publishing in mind when learning to use Content Studio.
Nothing you add to the publication using Content Studio is ever deleted.
Content Studio has a kind of delete function, but all it does is mark a content
item as deleted, so that it will no longer be returned by searches. It is still
there, and can be restored at any time. Normally, however, articles are not
deleted, with the result that the publication grows in size year by year. In this
sense, a web publication is like a print publication plus its archives. What
Page 10
Copyright © 2008-2012 Vizrt
Escenic Content Studio User Guide
readers see on the section pages of the publication corresponds approximately
to the "current issue" of a paper publication, but all the articles they can't see
there are still accessible in a variety of ways:
• Through links to related articles
• Through the publication's search function
• Through external search engines such as Google
When you work with the section pages in Content Studio, all you are doing is
determining how much exposure various articles will get. If you remove an
article summary from a section page, you haven't deleted the article from the
publication, just made it harder for readers to find.
The other aspect of this is that you have access to the whole publication when
working in Content Studio. When writing an article on a particular subject you
can use Content Studio's search function to find all previous articles on the
same subject and make use of them: read them as background, copy text from
them or include links to them in your article.
1.5
Workflow, Permissions and Locking
The maintenance of a large, dynamic website is a collective endeavor
involving many people with different skills and responsibilities. Therefore most
web site publishers have internal routines and procedures that formalize this
division of labor. The Escenic Content Engine can be configured to reflect the
varying internal procedures used by different website publishers.
In order to use Content Studio to work on a publication, you must have been
registered as a user by the publication's administrator and given a login user
name and password. When the administrator registers you as a user, he will
assign you to group which has an associated set of rights. You might, for
example, be assigned to the group "Sports Journalist", which gives you the
right to do lots of things in the sports section of the publication, but rather
more limited access elsewhere.
Permissions
The Content Engine's permissions system is very flexible, and is configured
in very different ways by different publishers, with completely different roles
and permissions that reflect their internal organization and corporate culture.
However, as a Content Studio user you will most probably have been assigned
to a group that is not allowed to do everything. That means that some of the
contents of this manual may not apply to you.
It is probably a good idea to find out what permissions you have before
you read any further or start using Content Studio, so that you don't
waste time learning about things that are not relevant for you, or
wondering why a particular function always seems to be disabled.
Locking
Copyright © 2008-2012 Vizrt
Page 11
Escenic Content Studio User Guide
When many people work together on a publication, conflicts where two
or more people need to work on the same content at the same time will
inevitably arise. The Content Engine resolves such conflicts by means of a
locking system, whereby the first person to start modifying some content
"locks" it so that other people cannot modify it until they have finished. These
locks are not applied to whole content items, but to the individual fields of
which a content item is composed. This means, for example, that it is possible
for an editor to add images to a news article while a journalist is still working
on the article's body text. Section pages are also locked in the same way. In
this case, a change to any part of a section page locks the whole page.
1.6
System Requirements
In order to run Content Studio you need a Windows-compatible PC or Apple
Mac with the hardware and software listed in the following sections.
1.6.1
Hardware
Content Studio requires the following minimum hardware configuration:
• 1024*768 display resolution (higher recommended)
• 1GB RAM (2GB recommended)
• 1.6GHz single-core processor (2GHz recommended)
1.6.2
Software
Content Studio is supported for use on computers running the following
operating systems/Java run-time environments:
• Microsoft Windows XP with Sun Java 6
• Microsoft Windows Vista with Sun Java 6
• Microsoft Windows 7 with Sun Java 6
• Mac OS X 10.5 (Leopard) with Apple Java 6
• Mac OS X 10.6 (Snow Leopard) with Apple Java 6
Page 12
Copyright © 2008-2012 Vizrt
Escenic Content Studio User Guide
2 Using Content Studio
Content Studio is a Java WebStart application. That means you do not need
to install it on your computer in the usual way - you just visit a web site with
your browser and click on a link there. Clicking on the link downloads and
installs the application to your computer, starts the application and leaves
behind an icon on your desktop which you can use to start the application in
future. You will notice that subsequently the application starts more quickly
because it is already downloaded.
Occasionally a new version of the application may be installed on your
company's servers. The new version will then be automatically downloaded to
your computer the next time you start the application.
In order to start using Content Studio you need the following items from your
publication/system administrator:
• The URL of the web page containing the WebStart link for Content Studio.
• A user name and password for the publication you are going to work on.
Content Studio will often let you do the same thing in many different
ways: selecting menu options, pressing keyboard shortcuts, clicking on
buttons or "dragging and dropping". This User Guide does not attempt
to describe every possible method. The menu option method is usually
described for most operations. The keyboard alternatives for all menu
options are displayed on the menu items themselves, so you can quickly
find out how to perform the operation using the keyboard.
Many operations can be carried out by dragging and dropping, and this
method is often described in the User Guide. The best way to find out all
the things you can do in this way, however, is trial and error.
Buttons that have icons rather than text labels can sometimes be
ambiguous, so they are described here. However, it's often enough to
hold your mouse pointer over the button for a few seconds: a short text
describing the button's purpose is then displayed.
2.1
Starting and Ending Work Sessions
2.1.1
Starting
To start a Content Studio session:
1.
If you are starting Content Studio for the first time, start your browser
and navigate to the URL given to you by your publication/system
administrator and click on the Content Studio link or button you see there.
Copyright © 2008-2012 Vizrt
Page 13
Escenic Content Studio User Guide
If you have already used it before, click on the Content Studio icon on
your desktop.
You might see a warning, asking if you want to trust Escenic AS and run
Escenic Content Studio. The easiest way to get rid of this warning, is to
check "Always trust content from this publisher" and press "Run". If you
have additional plug-ins installed, you might have to accept each plug-in
individually.
2.
2.1.2
Type your user name and password and press Enter.
Ending
To end a Content Studio session, select File > Exit.
Content Studio remembers what you were doing between work sessions.
The next time you start the application, all the items that were open when
you finished will still be there, the same tabs will be visible and so on.
2.2
The Application Window
The Content Studio window is divided into the following main areas:
• The menu bar at the top of the window.
• A navigation area on the left, containing three panels, Search, Sections,
and Clipboard.
• A work area on the right that is empty the first time you start Content
Studio, but will be used to display the content items and sections you open.
• The research panel area at the bottom of the window. This research
panel area is hidden by default. You can display it by selecting View > 5
Show research panels or by clicking on the expand button
center-bottom of the window.
2.2.1
at the
The Menu Bar
The menu bar contains five menus: File, Edit, View, Tools and Help.
2.2.1.1
The File Menu
The File menu contains the following options:
Page 14
Copyright © 2008-2012 Vizrt
Escenic Content Studio User Guide
New <default-content-type>
Creates a new item of the default type. This option is only present if a
default content type has been defined for this publication, so you may
not see it.
New
Creates a new item. A sub menu is displayed from which you can select
the type of item you want to create.
Upload local file(s)...
Uploads one or more files from your computer to the Content Engine on
the server. An Open File dialog is displayed, which you can use to find
the file you want to upload.
Open selected
Opens the currently selected item in an appropriate editor.
Close editor
Closes the active editor.
You can access a number of other "close" functions (Close others,
Close all and Close unmodified) by right-clicking on the tab of the
active editor.
Save
Saves any changes you have made in the active editor.
Duplicate as <content-type>
Copies the content in the active editor, and opens it in a new editor. The
duplicated content item is assigned the content type specified in the
menu option.
Duplicate as
Copies the content in the active editor, and opens it in a new editor. A
sub menu is displayed from which you can select the content type of the
duplicated item.
Delete
Deletes the currently selected item.
Rename
Lets you rename the currently selected item.
Refresh
Refreshes the contents of the Content Studio window. It may occasionally
be necessary to use this to ensure that you are viewing the most recent
version of an article rather than a locally-cached copy.
Log out
Logs you out from the Content Engine without stopping Content Studio,
and displays the login window so that you can log in again. This function
is useful if you have more than one login and switch between them
Copyright © 2008-2012 Vizrt
Page 15
Escenic Content Studio User Guide
frequently, as it is much faster than stopping and restarting Content
Engine.
Log out and exit
Logs you out and terminates Content Studio. The next time you start
Content Studio you will be asked for a user name and password, even if
you checked Log me in automatically on this machine in the login
window.
Exit
Terminates Content Studio.
2.2.1.2
The Edit Menu
The Edit menu contains the following options:
Undo
Reverses the last change you made.
Redo
Redoes a change you just reversed with Undo.
Cut
Cuts the selected item and stores it ready for pasting. This could be
some selected text in an editor, but it could also be a whole content
item.
Copy
Copies the selected item ready for pasting. This could be some selected
text in an editor, but it could also be a whole content item.
Paste
Pastes a previously cut or copied item to the currently selected location.
This option is only enabled if:
• The system clipboard contains something to paste.
• The system clipboard contents are suitable for pasting into the
currently selected location.
Paste HTML
Pastes some previously cut or copied HTML code to the currently
selected location. The main purpose of this option is to simplify the
insertion of things such as YouTube clips. Sites such as YouTube often
provide an Embed function that allows you to embed a video clip in your
site. The function simply displays some HTML code that you copy and
paste into your page at the required location. This Paste HTML function
allows you to paste such code into an article you are editing without first
switching to the "edit source" view (see section 5.5).
Clear formatting
Removes all formatting from the currently selected text. This option is
only enabled when the cursor is in a rich text field in a content editor.
Page 16
Copyright © 2008-2012 Vizrt
Escenic Content Studio User Guide
Remove/Delete selected item
Removes or deletes the selected item. The text of this menu item varies
according to the item selected. Delete selected item means that
the selected item will be completely deleted. Remove means that the
selected item will only be removed from the current context: it will still
be present in the publication.
2.2.1.3
The View Menu
The View menu contains the following options:
Reload
Reloads all content. It may occasionally be necessary to use this function
to correct display errors.
1 Search
Displays/hides the Search panel in the navigation area. See section
2.2.3.1 for further information.
2 Sections
Displays/hides the Sections panel in the navigation area. See section
2.2.3.2 for further information.
3 Clipboard
Displays/hides the Clipboard panel in the navigation area. See section
2.2.3.4 for further information.
5 Show research panels
Displays/hides the research panel area at the bottom of the screen. See
section 2.2.5 for further information.
6 Show relations
Displays/hides the related content area in content editors. See section
5.2.1 for further information.
Show fields
Displays/hides some fields in content editors. Some types of content
items may contain hidden fields that are not displayed by default. If this
is the case for the current content item, then this option's sub-menu
contains an option for each hidden field. You can display/hide the hidden
fields by selecting these options. This option is only enabled when the
current editor is a content editor.
Resize section editor
Reduces the width of the section content area in a section page editor to
50% of the available width, leaving the other 50% for displaying teaser
content.
Hide all panels/Restore panels
Displays/Hides both the navigation panels on the left of the window and
the research panel area at the bottom of the window.
Copyright © 2008-2012 Vizrt
Page 17
Escenic Content Studio User Guide
Configure research panels...
Displays the Configure research panels dialog. See section 2.2.5.1
for further information.
View keyboard shortcuts...
Displays a dialog containing a list of all keyboard shortcuts.
2.2.1.4
The Tools Menu
The Tools menu contains the following options:
Manage tags
Displays the Manage Tags dialog. See section 2.2.2 for further
information. If you do not have sufficient privileges to add and remove
tags, then this option is disabled.
Change layout
Displays the Change layout dialog, which lets you switch between
different section page layouts. See section 4.2.2.1 for further
information. This option is only enabled when the current editor is a
section page editor.
Enable spell checking
Enables/disables spell checking.
Spell checker language
Displays a sub-menu from which you can select the required language.
2.2.1.5
The Help Menu
The Help menu contains the following options:
Help
Displays help on using Content Studio.
Visit Vizrt Online
Opens the Vizrt web site in a browser window.
About
Displays version, copyright and legal information about Content Studio.
Page 18
Copyright © 2008-2012 Vizrt
Escenic Content Studio User Guide
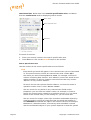
2.2.2
The Manage Tags Dialog
You can use the Manage Tags dialog to create and delete tags, and to edit
tag descriptions.
The dialog contains three panes, left center and right. Initially, all the tag
collections at your installation are listed on the left side of the dialog. When
you select one of these collections, all its top level tags are displayed in the
center pane. The right pane contains the name of the currently selected tag
collection, plus a Description and an Alias field. Above the panes are a
toolbar and a "breadcrumbs" bar.
If you click on a tag in the center pane, then it is moved to the left pane, and
all its child tags are displayed in the center pane. The name and description of
the currently selected tag is displayed in the right hand pane along with any
aliases that the tag may have. An alias is an alternative name for a tag.
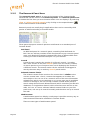
You can navigate down through the hierarchy in this way. You can navigate
back up by clicking on one of the "breadcrumb" buttons displayed in the
breadcrumbs bar:
Breadcrum bs bar
If more than 20 tags is listed in either the left or center pane, then a Filter
button is displayed below the pane. You can use this button to reduce the
number of tags in the column. Just click on the button and start typing the first
few characters of the tag you are interested in. This will reduce the number of
tags in the column, making it easier to locate the tag.
To add or change the Description of a tag just click on the existing
description (or where it says "Click to add description") and type the
description you want.
To add an Alias to a tag, click where it says "Click to add alias", type the alias
you want and press Enter. To remove an alias, click on the delete button to
the right of its name. The purpose of adding aliases to a tag is to provide
more user-friendly tag-based searching. If you add a "Leningrad" alias to a "St.
Copyright © 2008-2012 Vizrt
Page 19
Escenic Content Studio User Guide
Petersburg" tag, then users will be able to find articles that are tagged "St.
Petersburg" by searching for either "St. Petersburg" or "Leningrad".
Above the breadcrumbs bar is a toolbar containing the following buttons:
Edit tag
Click on this button to change the name of the selected tag (or
alternatively, just click on the tag name in the right hand pane). Type the
new name and then press Enter.
Move to
Click on this button to move the selected tag to another location in the
tag hierarchy. A menu is then displayed with two options: Move to and
Move to recent. Move to recent has a sub-menu containing tags you
have worked with recently. If you want to move the selected tag to be
a child of one of these tags, then just select the required parent. If not,
choose Move to. An OK and Cancel button are then displayed at the
bottom of the Manage tags dialog. Find the parent tag you require,
select it and then click on OK.
Merge
Click on this button to merge tags. See section 2.2.2.1 for details.
Add sub tags
Click on this button to create a tag, then enter a name for the tag in the
displayed dialog. The tag is created as a child of the currently selected
tag or tag collection.
Delete
Click on this button to delete the currently selected tag. If the tag has
child tags, then all of its child tags are also deleted. Any tags that are in
use are removed from the content items where they are used.
To edit the description of a tag:
1.
2.
3.
Click on the
button to the right of the Description label in the right
hand pane
Make the changes you require.
To save your changes, either:
• Press Enter or
• Click somewhere outside the Description field but inside the
Manage tags dialog.
You cannot create or delete tag collections from this dialog. This can only
be done from the server-admin web application, described in the Escenic
Content Engine Server Administration Guide.
2.2.2.1
Merging Tags
You may want to merge tags if you find several tags in your hierarchy that
you regard as having the same meaning. You might, for example, want to
merge "St. Petersburg" and "Leningrad". You can merge any number of tags,
Page 20
Copyright © 2008-2012 Vizrt
Escenic Content Studio User Guide
and when you do so, you have to choose which one of them they are are all
to be merged into. The merged tags then become aliases of the survivor. If,
for example, you chose to merge "Leningrad" into "St. Petersburg", then the
"Leningrad" tag would disappear from your hierarchy but be added as an alias
of "St. Petersburg".
All the children of the merged tags become children of the survivor. Any
merged tags that are in use in content items are replaced by the tag into
which they have been merged.
Tags cannot be merged if they contain any duplicate tag names in their
subtrees.
To merge tags:
1.
Select one or more of the tags you want to merge. (Hold down the Shift
key to select multiple tags.)
2.
Click on the Merge button. The Merge tags dialog is then displayed:
3.
You can add further tags to the Merge tags list by typing in the text
field and selecting tags from the options that are then displayed. You can
remove tags from the list by clicking on the
names.
2.2.3
buttons next to the tag
4.
When you are satisfied with the Merge tags list, choose a tag from the
Merge into list. In the example described above, you would choose "St.
Petersburg" so that "Leningrad" is removed from the tag hierarchy and
becomes just an alias for "St Petersburg".
5.
Click Merge.
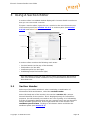
The Navigation Area
The navigation area contains four panels you can use to find and keep track
of the sections and articles you want to work with. You can switch between
the panels by clicking on the vertical tabs lined up down the left side of the
window.
2.2.3.1
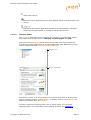
Search Panel
You can use the Search panel to search the publication for content. It
searches the entire publication database. At the very top of the panel is a
Copyright © 2008-2012 Vizrt
Page 21
Escenic Content Studio User Guide
search tool bar. Below that is the search specification area, and below
that the results area used for displaying search results.
Search toolbar
Search specification area
Results area
To search for articles:
1.
Enter your search criteria in the search specification area.
2.
Press Enter or click on the Search button in the tool bar.
Search Specification Area
Use the controls in the search specification area as follows:
Find
Enter words you think will appear in the content items you are interested
in. The search function will list all content items that contain all of
the words you enter. Entering Barack Obama, for example, will find all
articles containing both "Barack" and "Obama" (even if the words do not
appear together). It will not, however return articles that only contain
"Barack" or only contain "Obama".
To search for the exact phrase "Barack Obama", enclose the words in
quotation marks: that is, enter "Barack Obama".
You can search for any words in any content items fields and/or
properties: you can enter an author's name, for example, in order to
search for content items created by a particular person, or if you know
the ID of the content item you are looking for, you can enter that.
You can search for images, video clips and other multimedia objects by
entering words or strings of characters that you think may appear in
the metadata stored with the object: the name of the file, for example.
Metadata is "data about data", and exactly what metadata is stored
with the multimedia objects in your system depends on how the system
Page 22
Copyright © 2008-2012 Vizrt
Escenic Content Studio User Guide
has been set up. Typical items of metadata that might be stored with
an image include the name of the image file, its resolution, the date on
which it was taken, the name of the photographer, technical details such
as the focus and aperture settings used, comments and so on.
You can use the * character as a wild card in your search terms.
Date
You can restrict your search to content published during a particular
period by entering a date specification in this field.
A date specification consists of a date, a duration or a date followed
by a duration. Content Studio accepts dates in a wide range of formats.
A duration is a number preceded by a plus or minus sign: -n means
a period of n days prior to a date and +n means a period of n days
following a date. If you specify a duration on its own, then the date in
question is today's date; otherwise the date you specify is used. If you
specify both a date and a duration, then you must specify the date first
and leave a space between the date and the duration.
Here are some example date specifications:
• 05 or 5 - the 5th of this month.
• 0510 or 510 - in Europe, October 5th this year; in the US, May 10th
this year
• 05102007 - in Europe, October 5th 2007; in the US, May 10th 2007
• -31 - today and the preceding 30 days
• +7 - today and the following 6 days
• -5h - from 19:00 this evening until midnight
• +5h - from midnight last night until 05:00 this morning
• 0510 -31 - October 5th/May 10th this year and the preceding 30 days
• 0510 +7 - October 5th/May 10th this year and the following 6 days
You can include a variety of punctuation marks in dates: 05102007,
05.10.2007, 05/10/2007 and 05-10/2007 will all be accepted and
interpreted as the same date.
If you leave the field empty, then the whole publication history is
searched.
Advanced
Displays further controls that you can use to "fine tune" your search:
States
You can use this field to restrict your search to content items that
are in a particular state: only published documents, for example.
Select the state you are interested in. Hold down the Ctrl key and
click again to deselect it.
Sections
You can use this field to restrict your search to content items that
appear in a particular section of the publication. Select the section
Copyright © 2008-2012 Vizrt
Page 23
Escenic Content Studio User Guide
you are interested in. Hold down the Ctrl key and click again to
deselect it.
Search in all dates
If you have specified something in the Date field, then usually only
articles published in the specified period will be returned. If you
check this option, however, then all dates stored with an article
are used, and you will also get articles that changed in other ways
during the specified period (articles that were created, activated,
expired or last modified during the period, for example).
At the bottom of the search specification area are the following buttons: you
can use them to limit the types of content items returned by the search:
All
The search will return all kinds of content items.
Articles
The search will return content items with mainly textual content.
Images
The search will return content items containing images.
Video
The search will return content items containing video clips.
Attachments
The search will return content items containing multimedia attachments
such as video, sound, documents (PDFs, for example).
Other
The search will return content items with content that does not fall into
any of the other categories (personal profiles, for example).
Results Area
The results of your search are listed in this area. If many articles are found,
you can use the scroll bar on the right of the list to view the whole list. If more
than 1000 articles are found, only the first 1000 are listed: the approximate
number found is displayed at the bottom of the list.
You can change the layout of the results list by clicking on the layout buttons
(
) above the list. You can also sort the results in different ways using
the sort controls above the list. The "sort by" picker (
) lets you choose
which criterion to sort the results by, and the sort order button (
switch between ascending and descending sort order.
) lets you
Tool Bar
The Search tool bar contains the following tools:
Show previous search.
Page 24
Copyright © 2008-2012 Vizrt
Escenic Content Studio User Guide
Show next search.
Reset all search specifications to their default values, and execute a new
search.
Execute a new search. Note that the search is automatically executed
whenever you press enter, or change a search specification.
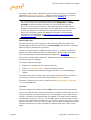
2.2.3.2
Sections Panel
The Sections panel gives you access to the sections of a publication and to
the components of each section (inboxes, section pages and lists).
At the top of the Sections panel is the section tree view. This contains all
the sections of the publication in an expandable tree view. Below this are the
section component tabs: Inboxes, Pages and Lists.
Section tree view
Section com ponent tabs
To select a section, click on its name in the section tree view. To display that
section's section pages, click on Pages. To display its lists, click on Lists. To
display its inboxes, click on Inboxes.
To open a section for editing, right-click on it and select Edit from the
displayed menu. For information about editing sections, see chapter 3.
Copyright © 2008-2012 Vizrt
Page 25
Escenic Content Studio User Guide
To create a new section, right-click on the section you want to be its parent
and select Create sub section.... The new section is opened in a section
editor. For information about how to editing it, see chapter 3.
If your publications are designed using the Widget Framework then
the section tree will contain Widget Framework templates or config
sections as well as ordinary sections. It is very likely that you will
not have access to these sections - they will only be accessible to the
designers responsible for the layout of your publications. If you do have
access, you should not modify them unless you know what you are
doing. For information about the Widget Framework, see the widget
framework documentation at http://documentation.vizrt.com/widgetframework-2.0.htmlwidget framework documentation.
Section Pages Tab
This tab lists all the section pages for the currently selected section. The
section page at the top of the list is the active page (the one that is actually
displayed in the publication at present).
To open a section page for editing, double-click on it, or select it and press
Enter. The section page will then be displayed in an editor tab in the work
area. For information about editing section pages, see chapter 4.
To rename a section page, open it for editing (see above), modify the Name
field and save your changes.
To create a new section page:
1.
Right-click anywhere in the section pages list.
2.
Select Create new page... from the displayed menu.
3.
Enter a name for the new section page and click OK in the displayed
dialog.
To set the active section page, open the section page you want to activate
(see above) and click on the section page editor's Publish button.
To delete a section page, select it and then select Edit > Delete selected
item or press Delete.
Lists Tab
This tab contains the names of all the lists in the currently selected section.
A list is an ordered list of content items that are related in some way (a list of
articles related to an ongoing news issue, for example). They can be used to
create a collection of summaries that can appear in several locations but be
maintained in one place. You can, for example set up a section page in which
item 1 from a particular list appears in one location, item 1 and 2 in a second
location and items 1 to 5 in a third location. You can then subsequently update
all these locations in a single operation by replacing list item 1 with a new
story.
Page 26
Copyright © 2008-2012 Vizrt
Escenic Content Studio User Guide
To open a list for editing, double-click on it, or select it and press Enter. The
list will then be displayed in an editor tab in the work area. For information
about editing lists, see chapter 6.
To rename a list, open it for editing (see above), modify the Name field and
save your changes.
To create a new list:
1.
Right-click anywhere in the list of lists.
2.
Select Create new list... from the displayed menu.
3.
Enter a name for the new list and click OK in the displayed dialog.
To delete a list, select it and then select Edit > Delete selected item or
press Delete.
Inboxes Tab
This tab contains the names of all the inboxes in the currently selected
section. For more information about inboxes, see section 2.2.3.3.
To delete an inbox, select it and then select File > Delete from the displayed
menu.
To rename an inbox, select it, select File > Rename and enter a new name.
To create a new inbox:
1.
Right-click anywhere in the inbox list.
2.
Select Create new inbox... from the displayed menu.
3.
Enter a name for the new inbox and click OK in the displayed dialog.
You cannot delete or rename the default inbox Inbox.
2.2.3.3
Inboxes Panel
An inbox is a list of content items. Each section of a publication can have
any number of inboxes, which can be used for any purpose. An inbox always
belongs to a single section. A content item can be moved between inboxes,
but cannot appear in two inboxes simultaneously.
Inboxes are generally used by section editors to organize publication work
flow. The editor might, for example, create an inbox for each person that
works on the section, and then assign jobs by adding content items to the
inboxes. Another editor might create inboxes that represent different stages in
a workflow, so that journalists can move content items between the inboxes as
a means of marking progress.
Most of the Inboxes panel is taken up by a display area for the currently
selected inbox. Above this is a pull-down list for switching between the
inboxes in the section and a View button for changing the layout of the inbox
display. Below the display area are push buttons that you can also use to
Copyright © 2008-2012 Vizrt
Page 27
Escenic Content Studio User Guide
switch between the inboxes in the section. The currently selected button is
highlighted.
You can change the layout of the inbox contents by clicking on the layout
buttons (
) above the list. If you choose the list layout then there are
column heading buttons at the top of the inbox that you can use to sort the
content items in various ways: clicking on Title, for example, sorts the content
items by their titles, and clicking a second time reverses the sort order.
To edit one of the content items in an inbox, either double-click on it, or select
it and press Enter. It will then open in an editor in the work area.
To move content items between inboxes:
2.2.3.4
1.
Select the content items you want to move.
2.
Drag them down to the push buttons at the bottom of the inbox and hold
them over the button for the inbox you want to move them to. After a
moment or two, the new inbox will open.
3.
Drag the content items up into the new inbox and drop them.
Clipboard Panel
The clipboard is your personal content list. You can use it to hold content items
you are working on or want to use for reference. Clipboard contents are saved
Page 28
Copyright © 2008-2012 Vizrt
Escenic Content Studio User Guide
between sessions: any items you leave on the clipboard when you log out from
the Content Studio will still be there the next time you log in.
The clipboard looks very similar to an inbox, and works in the same way. You
can change the layout of the clipboard contents by clicking on the layout
buttons (
) above the list. If you choose the list layout then there are
column heading buttons at the top of the inbox that you can use to sort the
content items in various ways: clicking on Title, for example, sorts the content
items by their titles, and clicking a second time reverses the sort order.
To edit one of the items on the clipboard, either double-click on it, or select it
and press Enter. It will then open in an editor in the work area.
2.2.4
The Work Area
When you open an item to work on it, it is displayed in the work area in a
tabbed panel called an editor. Each item you open is displayed in its own
custom editor: the controls in an editor vary according to the type of item it
contains. If you open more than one item, then the editors are stacked on top
of each other in the work area.
Each editor has a tab at the bottom, and you can:
• Switch between editors by clicking on the tabs.
• Close editors by clicking on the tab close buttons (
).
There are four different types of editors:
• Section editors (see chapter 3)
• Section page editors (see chapter 4)
• Content editors (see chapter 5)
• List editors (see chapter 6)
Copyright © 2008-2012 Vizrt
Page 29
Escenic Content Studio User Guide
2.2.5
The Research Panel Area
The research panel area is an area at the bottom of the Content Studio
window that can be used to hold research panels. The research panel area
is hidden the first time you start Content Studio. You can display it by selecting
View > 5 Show research panels or by clicking on the expand button (
at the center-bottom of the window.
)
Research panels are small plug-in applications that can be created by third
parties to add functionality to Content Studio:
Three general-purpose research panels are delivered as a standard part of
Content Studio:
RSS Feed
An RSS feed panel is a research panel containing links delivered via
RSS. You can add any number of RSS feed panels to your research panel
area, each displaying regularly updated links from a different RSS feed.
Clicking one one of the links will open it in your browser.
Search
A search panel contains the results of an Escenic search - it's rather
like a mini version of the main Search panel. You can add any number
of search panels to your live panel area, each displaying the results of
a different search. The search results can be selected and dragged in
exactly the same way as ordinary Search panel results.
Related Content Finder
The related content finder searches for content that is similar to the
current content item - that is, content that appears to be about the
same subject. You can use it as a research tool to find more information
related to an article you are working on, or to turn up a set of candidate
articles for linking to. You can set up a related content finder panel to
search using either Escenic Related Search (which searches your Escenic
database) or Google News Search (which searches news articles on the
web). You can, of course, add two related content finders to your live
panel area, one set up to search internally and the other set up to search
the web.
Web Browser
A web browser panel can display a web page. It provides an easy way to
make external information available in Content Studio.
There are two types of web browser panel:
Page 30
Copyright © 2008-2012 Vizrt
Escenic Content Studio User Guide
• User-defined browser panels that display pages you select yourself
by entering URLs.
• Live browser panels that display pages related to the content item or
section you are currently editing. This type of web browser panel is
only available this if your Content Engine has been set up to enable it.
For further information, see section 2.2.5.1.1.
All research panels have a refresh button at the right end of their title bars:
Clicking on this button refreshes the content of the panel. Note,
however, that you can configure research panels to refresh automatically
at specified intervals (see section 2.2.5.1.
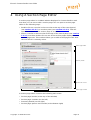
2.2.5.1
The Configure Research Panels Dialog
You can display the Configure research panels dialog by selecting View >
Configure research panels... from the menu. The dialog contains a tab for
each currently displayed research panel plus one tab marked
use to create a new panel.
that you can
To add a new panel:
1.
Select the
2.
Select the required panel type in the Type field.
3.
Fill in the remaining fields.
4.
Click on OK (to close the dialog) or Apply (to keep it open).
tab.
To modify an existing panel, select the required tab, make your changes and
click on OK or Apply.
To delete an existing panel, select the required tab and click on Remove
panel.
Copyright © 2008-2012 Vizrt
Page 31
Escenic Content Studio User Guide
The rest of the controls on the research panel configuration tabs vary
according to the type of the research panel.
When a publication administrator adds a research panel configuration
to Content Studio, the configuration takes effect for all users working
on that publication. In this way, publication administrators can create
global set-ups for their publications. If, for example, the administrator
of the sunday publication (user name sunday_admin) adds a BBC RSS
feed panel and a search panel to her research panel area, then those two
panels will also appear as default panels in the research panel areas of
all other users who log in to the sunday publication. These default panels
cannot be removed or modified by anyone other than the publication
administrator.
2.2.5.1.1
Configuring a Web Browser Panel
A web browser panel configuration dialog contains three web browser-specific
fields: Link relation, URL and Title:
Unless your Content Engine has been set up to provide information for driving
live web browser panels, the Link relation field will only contain one option:
User defined. When this option is selected, you must enter the URL of the
page you want to be displayed in the web browser panel in the URL field. You
can also optionally specify a title for the panel in the Title field.
If your Content Engine has been set up to provide information for driving live
web browser panels, then the Link relation field will contain other options as
well. If you select one of these options, then the URL field is disabled. What
other options the Link relation field might contain is installation dependent.
In general, the effect of choosing such an option is that the browser panel will
remain empty until you open a section or content item for editing. Once you
do so, the web browser window will display a page that is in some way related
to the item you are editing. If you have several items open for editing and
switch between them, then the content of the web browser panel will change
accordingly.
Page 32
Copyright © 2008-2012 Vizrt
Escenic Content Studio User Guide
3 Using A Section Editor
A section editor is a tabbed window displayed in Content Studio's work area
that you can use to edit a section.
To open a section editor, right-click on a section in the tree view at the top
of the search panel (see section 2.2.3.1) or sections pane (see section
2.2.3.2) and select Edit.
Header
Properties panel tabs
Properties panel
Attributes panel
Publishing bar
A section editor contains the following main areas:
•
•
•
•
Section header (at the top of the window)
Field editors (on the left)
Attributes panel (on the right)
Publishing bar(at the bottom right)
This description covers the basic section editor functionality delivered by
Vizrt. Your Content Studio installation may include additions that are not
described here.
3.1
Section Header
At the top of the editor window is a bar containing a combination of
information fields and buttons, called the section header.
At the left hand end of the header is the section's section id, a unique
internal identifier for the section. This is displayed purely for information
purposes. You will normally not need to use it for anything. It is followed by
a series of formatting buttons that are not currently used, and are therefore
always disabled (grayed out). At the right hand end of the header is the
attributes panel button. Clicking on this button shows and hides the
attributes panel (see section 5.3).
Copyright © 2008-2012 Vizrt
Page 33
Escenic Content Studio User Guide
3.2
Properties Panel
The section properties panel contains two tabs, Default and Section
parameters. Most of the editable section properties are displayed on the
Default tab:
Section name
The section name that will be displayed in the publication.
Section unique name
A unique internal name for this section. It is required because Section
name does not have to be unique.
Relative directory URI
The name of the server folder in which this section is to be stored. It is
appended to the Section URL of the parent section to form a default
URL for this section.
Section URL
You can enter an alternative URL for this section here, to be used instead
of the default URL formed from the parent section's Section URL and
the Relative directory URI of this section.
The URL you enter in this field may only consist of a host name. For
example:
http://news.mysite.com/
The following URL:
http://news.mysite.com/stories/
will not work, due to the inclusion of a path component (stories/) in the
URL.
This limitation may not apply in some Content Engine installations:
it is possible to work around it by setting up some kind of filtering
or redirecting in the application server or web server. In a standard
installation, however, only URLs with no path component will work.
Hide section
Check this option if you want this section to be hidden in Content Studio.
This can be useful, for example, for automatically generated or imported
sections that should not be edited.
Inherit access control
Check this option if you want this section to inherit the access controls of
its parent section. The section will then not appear in the list of sections
in the Web Studio Section Roles forms (see Escenic Content Engine
Publication Administrator Guide, section 2.1.4.3), since its access
controls do not need to be explicitly set.
Page 34
Copyright © 2008-2012 Vizrt
Escenic Content Studio User Guide
This option is checked by default. If you uncheck it, then any users who
had section access rights to this section and its subsections will lose
them and you will need to explicitly assign new section access rights
using Web Studio.
Warning: Changing this option triggers an automatic re-indexing of
all the content items in the section and in all subsections that inherit
access control from it. Re-indexing is a resource-intensive operation,
so you are strongly recommended not to change this option
during busy periods.
Allow shadowing
Check this option if you want to be able to use this section as the
basis for shadow sections (see Escenic Content Engine Publication
Administrator Guide, section 3.4.4). If Allow shadowing is already
checked and you uncheck it, then when you save your changes any
shadow sections based on this section will be converted to ordinary
sections.
Behind paywall
Check this option if you want reader access to this section to be
restricted (governed by an agreement). For information on how you
can implement your user access control, see Escenic Content Engine
Advanced Developer Guide, chapter 17 (requires Java programming
skills).
Agreement information
If Behind paywall is checked, then you must enter the appropriate
agreement information in this field.
Agreement type
If Behind paywall is checked, select the required type (Show page
or Hide page). The effect of this option depends upon the type of
agreement mechanism being used.
Section template
Select the required default section page template from the pull-down
field.
Content item template
Select the required default content item template from the pull-down
field.
3.3
Attributes Panel
The attributes panel appears to the right of the properties panel, and can be
shown/hidden by clicking on the attributes panel button at the right hand end
of the formatting bar:
It is divided into two sections:
Copyright © 2008-2012 Vizrt
Page 35
Escenic Content Studio User Guide
Content Info
This section contains general information about the section.
Element properties
This section is always empty.
You can open and close the sections by clicking on the
of the section name, and resize them by dragging the
3.4
/
icons to the left
icons up or down.
Publishing Bar
The publishing bar at the bottom of the editor window contains the following
controls:
Save
Saves any changes you have made. If you haven't made any changes
then the button is disabled.
Save & close
Saves any changes you have made and closes the content editor editor.
State
Lets you change the state of the content item. The following states can
be selected:
• Draft
• Published
A section that is in Draft states is not visible in the web publication. A
section in the Published state is visible. Note that you cannot currently
delete a section using Content Studio - you must use Web Studio
instead.
Page 36
Copyright © 2008-2012 Vizrt
Escenic Content Studio User Guide
4 Using A Section Page Editor
A section page editor is a tabbed window displayed in Content Studio's work
area that you can use to edit a section page. You can open a section page
editor in the following ways:
• Double-click on a section in the tree view at the top of the search panel
(see section 2.2.3.1) or sections panel (see section 2.2.3.2). This will
open the section's active section page in an editor.
• Select a section in the tree view at the top of the search panel (see section
2.2.3.1) and then double click on one of the section pages displayed in the
section pages tab. This method allows you to edit section pages other than
the one which is currently active.
Section page header
Sum m ary details
Options and controls
Section page contents
A section page editor contains the following main areas:
• Section page header (at the top of the window)
• Section page contents (on the left)
• Summary details (on the right)
• Section page options and controls (at the bottom right)
Copyright © 2008-2012 Vizrt
Page 37
Escenic Content Studio User Guide
This description covers the basic section page editor functionality
delivered by Vizrt. Your Content Studio installation may include additions
that are not described here.
4.1
Section Page Header
At the top of the section page editor window are the following items:
• The section page and section name.
• The URL of the section. Clicking on this link opens the published section
page in your browser. Note that the page displayed in the browser is the
section's active section page, which may not be the page you are editing.
• A View button that you can use to switch between a Rich View and a
Plain View of the section page content (see section 4.2).
4.2
Section Page Content
The left hand side of the section page editor shows the structure of the section
page as a tree view. You can change the appearance of this tree view using
the View button in the header: it lets you switch the tree between a Rich
View and a Plain View.
Both options display the names of the areas defined by the section page's
grid layout, and show which content items have been placed in each area.
Neither view shows the exact layout of the section page, although the names
of the areas are usually descriptive ("top", "left column" and "right column"
are typical examples). The rich view shows more of each teaser's content (and
therefore uses more space) than the plain view, which only shows the title of
each teaser. You can expand and collapse parts of the tree by clicking on the
and
buttons on the left.
The instructions below describe how to edit the section page content. In order
to save any changes you make you must click on the Save Content button at
the bottom of the editor window.
Adding Content Items
To add a content item to the section page:
1.
Select the content item you want to add (in the search results list, one of
the section's inboxes/lists or your clipboard).
2.
Hold down the left mouse button and drag the content item to the
required area in the section page area. The color of the area's title bar
changes to indicate that it is now a drop target.
3.
Drop the content item by releasing the mouse button.
If the target area already contains content items, you can drop the new
content item between existing items - a short black line appears between the
Page 38
Copyright © 2008-2012 Vizrt
Escenic Content Studio User Guide
existing content items to show where the content item will be inserted if you
drop it.
Removing Content Items
To remove a content item from the section page:
1.
2.
Select the content item to remove.
Select Edit > Remove or press the Delete key.
Note that when you remove a content item from a section page, all you
are doing is removing the content item's summary from the section page.
You are not deleting the item, nor are you removing it from the section readers will still be able to find it via other links (should there be any) and
via search functions.
Moving Content Items
To move a content item to a new location on the section page:
1.
2.
3.
4.2.1
Select the content item you want to move.
Hold down the left mouse button and drag the content item to the
required area in the section page area. The color of the area's title bar
changes to indicate that it is now a drop target.
Drop the content item by releasing the mouse button.
Section Page Locking
As soon as you make any change to a section page, the section page is locked,
so that nobody else can work on it while you are making your changes. You
will see that a lock icon like this appears to the left of the title:
The whole section is now locked until you save or publish the changes you
have made. When you do so, you will see that the pencil disappears from
the icon, indicating that you are no longer editing the section page, and it is
therefore not locked:
You can release your lock on the section page by right-clicking on the lock
icon and selecting Release lock from the displayed menu. Note, however,
that doing this will revert all your unsaved changes. If you want to keep your
changes you should save them instead; this will also release the lock.
If you see this icon next to the section page title:
Copyright © 2008-2012 Vizrt
Page 39
Escenic Content Studio User Guide
it means that one of your colleagues is currently working on the section page
and it is therefore locked. You will not be able to make any changes. If you
hold your mouse pointer over the lock icon, the name of the person who
has locked the section page will be displayed. Once the person finishes their
editing, the lock icon will disappear and you can start editing.
Occasionally, situations can arise where locks are not released properly even though a person has finished editing a section page, their lock is not
released, meaning that you cannot get on with your work. This usually occurs
as a result of network problems. If this situation arises, you can get around it
by "stealing" the lock. To do this, right-click on the lock icon and select Steal
lock from the displayed menu.
You should only use the Steal lock function to escape from situations
where a lock has not been properly released. If you steal a lock from
somebody who is actually working on a section page, all their unsaved
changes to the page will be lost. If a section page you need to work on is
locked, first contact the person who has locked the page and agree with
them how to resolve the situation. It may simply be that they have moved
on to something else and forgotten to save their changes.
If somebody steals your lock while you are working on a section page you will
see the following message:
If this happens, there is nothing you can do to recover your lost changes.
4.2.2
Section Page Structure
Depending on how the section page's grid layout is defined, you may be
able to change the structure of the section page by inserting groups of subareas into areas on the section page, or removing existing groups. To find out
whether an area can be subdivided in this way, place the cursor somewhere
inside it and click the right mouse button. If either of the options Insert or
Group to in the right-click menu is enabled, then the area can be subdivided.
If you select one of the enabled options, then a sub menu is displayed
containing the names of the groups you can use to subdivide the area.
Clicking on the Insert option, for example, might display a sub menu
containing the options Insert new Two-col group and Insert new Threecol group. Selecting Insert new Two-col group would insert a group called
Two-col into the area, which would own two areas (presumably) onto which
you could then drop content items. You can insert any number of groups
in this way, in any combination (although it may not be sensible to do so you need to have some idea of what the structures you add look like in the
publication, how much space is available and so on). In some cases, the areas
Page 40
Copyright © 2008-2012 Vizrt
Escenic Content Studio User Guide
in an inserted group may themselves offer the option of inserting further
groups, allowing you to build very complex page structures.
The Group to option can only be selected when you right-click on existing
content items and/or groups in an area. Its sub menu contains the names of
available groups. Selecting one of these options inserts a group and moves all
the selected items into the new group's first area.
The Ungroup option is only enabled in an area that contains groups. Selecting
it removes all groups from the area and moves all their child content items to
the area.
4.2.2.1
Changing the layout
A section page can have several different possible layouts, and you can switch
between them by selecting Tools > Change layout, which displays the
Change layout dialog:
Select the layout you want to switch to from the Layout pull-down list and
then click on OK.
Be careful when changing layouts. Different layouts have different sets
of possible groups and sub-areas, so it is not possible to maintain these
structures when switching between layouts. If you change the layout of a
page that has already been structured by adding groups and sub-areas,
then that structure will be lost. Any teasers on the page will be retained,
but they will all be moved to a top-level area.
4.3
Summary Details
Whenever you select one of the content items in the section page content
area, the content item's summary fields are displayed in the summary
details area on the right of the editor window, where you can edit them. The
particular fields that make up a summary vary from publication to publication.
Any changes you make to the summary fields here only affect this
section. The same article can appear with different summary headlines in
different sections.
In order to save any changes you make you must click on either the Save or
the Save & close button at the bottom of the editor window.
Copyright © 2008-2012 Vizrt
Page 41
Escenic Content Studio User Guide
4.4
Options and Controls
At the bottom of the editor window is a Page area and a set of control
buttons.
The Page area contains an Options button.
The options available in this list are publication-specific. Some grid layouts
may have options. If you select a grid layout with options, then the Options
button is enabled; if you select a grid layout without options, then the
Options button is disabled.
Clicking on the Options button (if it is enabled) displays a dialog containing
the current layout's options. These options are part of the layout definition,
and are therefore publication- and layout-specific.
The following control buttons are displayed:
Preview
Displays a preview of the current state of the section page in your
browser (including all changes you have made, even ones you haven't
saved).
Publish
Saves any changes you have made, and makes this section page the
active page (the one displayed in the publication). If you haven't made
any changes then the button is disabled.
Save
Saves any changes you have made. If you haven't made any changes
then the button is disabled.
Save & close
Saves any changes you have made and closes the section page editor.
Page 42
Copyright © 2008-2012 Vizrt
Escenic Content Studio User Guide
5 Using A Content Editor
A content editor is a tabbed window displayed in Content Studio's work area
that you can use to edit a content item. To open a content editor:
• Double-click on a content item or select one and press Enter. It doesn't
matter where you select the content item. You can select it in the search
results list in the search panel, in a section inbox/list, in your clipboard or in
a section page editor.
• Select File > New, and then select the type of content item you want to
create from the displayed sub menu. The options available in this sub menu
vary from publication to publication.
Form atting bar
Field panel tabs
Field editors
Related content
area
Attributes panel
Publishing bar
A content editor contains four main areas:
Formatting bar
One or two toolbars at the top of the content editor
Field panel
The main part of the window, containing a set of field panel tabs plus a
related content area.
Attributes panel
To the right of the field panel, may be hidden
Publishing bar
At the bottom of the window
This description covers the basic content editor functionality delivered by
Vizrt. Your Content Studio installation may include additions that are not
described here.
Copyright © 2008-2012 Vizrt
Page 43
Escenic Content Studio User Guide
5.1
Formatting Bar
At the top of the editor window is a bar containing a combination of
information fields and buttons, called the formatting bar:
Item sum m ary
Form atting buttons
Attributes panel button
Custom form atting buttons
By default it consists of a single row of controls, but it may have a second row
containing custom formatting buttons (as in the example shown above).
The top row contains three groups of controls:
• An item summary where the following information about the content item
is displayed:
Content type
The type of the content item (News in the example above)
Home section
The content item's home section (New articles in the example
above). If the content item belongs to more than one section then you
can change the home section by clicking on this button and selecting
a new section from the displayed list.
Think carefully before changing a published content item's home
section, as doing so will change its URI.
ID
The content item's ID. For a new article that has not been saved yet,
this field is blank.
• A row of buttons offering formatting options such as bold, italic, subscript
and superscript, text alignment, headings, lists, tables, links, images and
so on. The formatting buttons in the bar may vary from publication to
publication. The buttons are only enabled when a rich text field is selected
(see section 5.5).
• The attributes panel button. Clicking on this button shows and hides the
attributes panel (see section 5.3).
5.2
Field Panel
The field panel contains editors for all the fields that make up the content
item. The fields are usually organized into a few different groups, each of
which is displayed on a separate field panel tab. The fields that make up a
content item vary widely from publication to publication. A publication will also
usually contain a number of different types of content item, each of which has
different fields.
Page 44
Copyright © 2008-2012 Vizrt
Escenic Content Studio User Guide
The fields may all be displayed on a single tab card, or may be divided
among several. This also varies between publications (and within publications
according to content type). The following illustration shows a typical set
of field tabs (Main and Options). The field tabs in your publication may,
however, look quite different.
Some of the less commonly used fields in a content item may be defined as
hidden fields. They are then not displayed by default. You can see what
hidden fields a content item has by selecting View > Show fields from the
main menu. This displays a sub-menu containing an option for each hidden
field. You can show/hide the hidden fields by selecting these options.
At least one of the fields in a content item will often be a large text field
(often called body) that is used to hold the main body of the content item.
Otherwise, fields can vary widely. Some allow any kind of text to be entered,
others are more restrictive: they have a maximum length, or only allow you to
enter numbers, or only allow numbers within a particular range. Other fields
may only allow you to select an option from a pull-down menu, or switch an
option on by checking a box. One special type of field (called a gallery field)
looks and behaves like a relation (see section 5.2.1), in that you can drop
items on to it. This kind of field is intended to simplify the editing of picture
gallery content items.
The content item's related content (see section 5.2.1) are displayed in the
related content area below the field panel tabs, an expandable area that
you can show and hide by clicking on the Related content expander at the
top of the area, selecting View > Show Relations or pressing Ctrl+F7.
5.2.1
Related Content Area
A content item can have related content items. Related items can be used for
many different purposes. They can, for example, be:
• Other articles on the same subject, presented as links in the published
article
• Images used in the article
• Media objects used in the article. These can include:
• Video items stored in a Viz Media Engine (if the Video plug-in is installed
at your site and you have access to a Viz Media Engine installation).
• Template based graphics and Viz World maps (if the Online Graphics
plug-in is installed at your site and you have access to Viz Content Pilot/
Viz World systems).
• Profiles of persons associated with the article (authors, editors etc.)
• Links to external resources used in the article
Copyright © 2008-2012 Vizrt
Page 45
Escenic Content Studio User Guide
A content item's type determines what kinds of related content items it may
have, and how they are used. The related content items are referred to as the
content item's relations.
A content item's relations are displayed in the related content area below the
field panel tabs. This is an expandable area that you can show and hide by
clicking on the Related content expander at the top of the area, selecting
View > Show Relations or pressing Ctrl+F7.
The organization of the Related content area varies between publications
and content types. It is usually divided up into several groups, each with a
heading describing the group's purpose. For example:
• A group with the heading "More on this issue" might be intended to contain
other articles on the same subject, which are then presented as a list of
links in the published article.
• A group called "Front page image" might be intended to contain the image
that will be used if the article is included in the publication's top level
section page.
Each group is represented by a relation bar containing the name of the group
plus any related items that have been added to the group. This Related
content area, for example, contains three groups called Use on front
pages, Use on article pages and Items related to the leadText field:
The first group contains a related image, the others are currently empty.
In order to use relations successfully, you need to know their purpose in your
publication.
To add a relation to a content item:
1. Open the content item's Related content area if necessary.
2.
Find the content item you want to add as a relation (in the Search
panel's results list, an inbox/list or on your clipboard).
3.
Either:
• Drag it to the required relation group and drop it, or
• Press Alt + right and pick the required relation type from the
displayed pop-up dialog
To remove a relation from a content item:
1. Select the relation you want to remove.
2.
Select Edit > Remove or press Delete.
To see more details about one of a content item's relations:
1. Select the relation you are interested in.
2.
Page 46
Look at the Element properties section of the Attributes panel
(see section 5.3.4).
Copyright © 2008-2012 Vizrt
Escenic Content Studio User Guide
5.2.2
Field Locking
As soon as you make any change to a the contents of a field or relation, it is
locked, so that nobody else can work on it while you are making your changes.
You will see that a
appears next to the field/relation title. The field is now
locked until you save your changes. A similar icon will appear in every field/
relation you modify. When you save the content item, you will see that all
these icons disappear, indicating that you are no longer editing any of the
content item's fields or relations, and they are therefore not locked.
You can release your lock on on a field or relation by right-clicking on the
icon and selecting Release lock from the displayed menu. Note, however,
that doing this will revert the changes you made to the field. If you want to
keep your changes you should save them instead; this will also release the
lock.
If you see a icon next to a field or relation title, it means that one of your
colleagues is currently working it, and it is therefore locked. You will not be
able to make any changes. If you hold your mouse pointer over the lock icon,
the name of the person who has locked the field will be displayed. Once the
person finishes their editing, the lock icon will disappear and you can start
editing.
Occasionally, situations can arise where locks are not released properly even though a person has finished editing a field, their lock is not released,
meaning that you cannot get on with your work. This usually occurs as a
result of network problems. If this situation arises, you can get around it by
"stealing" the lock. To do this, right-click on the lock icon and select Steal
lock from the displayed menu.
You should only use the Steal lock function to escape from situations
where a lock has not been properly released. Stealing a lock from
somebody who is actually working on a field or relation is very disruptive.
If a field you need to work on is locked, first contact the person who has
locked it and agree with them how to resolve the situation. It may simply
be that they have moved on to something else and forgotten to save their
changes.
If somebody steals your lock while you are working on a field or relation you
will see a dialog something like this:
If this happens and you want to save the changes you have made, copy the
content of the field from the dialog, paste it into another editor and save it
Copyright © 2008-2012 Vizrt
Page 47
Escenic Content Studio User Guide
there. When you recover access to the field, you can copy your saved content
back into the field. Note, however, that the user who stole your lock has
presumably also made changes to the field. If you simply paste your content
back into the field it will overwrite his/her changes. You may therefore need to
find out what changes the other user made and carefully merge the two sets
of changes.
5.3
Attributes Panel
The attributes panel appears the right of the fields panel and can be shown/
hidden by clicking on the attributes panel button at the right hand end of the
formatting bar:
Attributes panel button
Sections section
Tags section
Attributes panel
Content info section
Elem ent properties section
It is divided into either three or four sections:
Sections
This section contains information about the sections to which the content
item belongs.
Tags
This section can be used for tagging the content item. It only appears for
content items belonging to types with associated tag schemes.
Content Info
This section contains general information about the content item.
Element properties
This section is used to display related content item summaries.
You can open and close the sections by clicking on the
of the section name, and resize them by dragging the
5.3.1
/
icons to the left
icons up or down.
Sections
This part of the attribute panel shows the sections a content item belongs
to, and allow you to control various aspects of its section membership. It
contains a section bar for each section in which the content item appears. If
Page 48
Copyright © 2008-2012 Vizrt
Escenic Content Studio User Guide
the content item has been cross-published to more than one publication, then
the section bars are grouped together by publication:
Publication nam es
Section bars
Inbox buttons
Hom e section indicators
List buttons
As well as the name of the section, each section bar contains:
• An inbox button that you can use to move the content item between in
boxes
• A list button, that you can use to add and remove the content item to/from
lists lists
• A home section indicator showing which of the sections is the content
item's home section. Only one section bar in each publication will contain
this icon.
In addition, a remove button (
over one of the bars.
) is displayed if you hold the mouse pointer
You can use the section bars for a variety of purposes, described below.
To add the content item to a section:
1. Display the Sections panel in the navigation area.
2.
Display the attributes panel in the content editor.
3.
Select the required section from the section tree in the Sections
panel.
4.
Either:
• Drag it into the content editor and drop it in Sections section of
the attributes panel, or
• Press Alt + right.
A new section bar representing the section appears.
To remove the content item from a section:
1. Hold the mouse pointer over the required section bar until the
button appears.
2.
Click on the
button.
The content item is removed from the section and the section bar
disappears.
You cannot remove a content item from its home section. If the
button on a section bar is selected, then the
button is always
disabled. (This is, however, not true for local home sections, see
section 5.3.1.1).
Copyright © 2008-2012 Vizrt
Page 49
Escenic Content Studio User Guide
To change a content item's home section:
1. Right-click in the section bar for the section you want the content
item to belong to.
2.
Select Make "xxx" Home Section from the displayed menu.
Think carefully before changing a published content item's home
section, as doing so will change its URI. It may also change the
layout/appearance of the content item (depending on how the
sections in your publication are defined).
To place the content item in a section inbox:
1. Click on the inbox button in the appropriate section bar.
2.
Select the inbox you want from the displayed list. Note that a
content item can only belong to one of a section's inboxes: if it was
in a different inbox, then it is moved to the one you select.
To add a content item to a section list:
1. Click on the list button in the appropriate section bar.
2.
5.3.1.1
Select the list you want from the displayed list. The content item
is added to the end of the selected list. If you want it in a different
position, then you will need to open the list and edit it (see chapter
6).
Cross-publishing and Local Home Sections
The Escenic Content Engine can be used to manage a family of related
publications, and may be set up to allow cross-publishing. A cross-published
content item is a content item that belongs to one publication (its home
publication), but appears in other publications. If a content item is crosspublished, then the Sections area will contain several blocks of section bars,
one for each publication in which the item appears, with the home publication
section block at the top:
Hom e publication
Cross- published to
Foreign publication section blocks behave slightly differently to the home
publication's section block. The main difference is that, while the home
publication section block must contain a home section, foreign publication
section blocks are not required to. However, if a content item appears in more
than one section of a foreign publication, you are recommended to ensure that
one of them is the local home section. The content item will then take its
published appearance from this section.
If you do not pick a local home section, then it is uncertain which section will
be used to determine the appearance of the cross-published content item.
Page 50
Copyright © 2008-2012 Vizrt
Escenic Content Studio User Guide
You can always see section blocks and bars for all the publications and
sections in which a content item appears, but you can only modify them if
you have sufficient access rights.
5.3.2
Tags
This section lists all the tags attached to the content item, and lets you add
and remove tags. Tags are keywords that you can attach to content items.
They provide a simple and flexible way of categorizing and grouping content
items for search and retrieval purposes. You might, for example tag a travel
article about Thailand with the tags Travel and Thailand.
Tags can be organized in hierarchies, in order to be able to represent logical
associations between the concepts they represent. If the tag Thailand,
for example, is organized under another tag called Asia, then a search for
content using the tags Travel and Asia would return your Thailand article
(possibly along with other travel articles about other Asian countries). Tags do
not have to be organized in this way however: you can just have a collection of
unrelated tags.
Collections of tags are called tag schemes, and the tag schemes you have
access to when tagging content items can vary with the type of the content
item. Some types of content item may have no associated tag schemes, in
which case no Tags section will appear in the attributes panel.
Adding tags to content items
To add a tag, click on Add and start typing the tag name in the tag field. As
you type, tags that match the characters you are typing are displayed in a
menu below the field:
Copyright © 2008-2012 Vizrt
Page 51
Escenic Content Studio User Guide
If the tags are organized in hierarchies, you will see that each tag in the list is
preceded by all its parent tags. As soon as you see the tag you want, click on
it to select it. The tag is then added to the content item:
The five bars to right of the tag represent the relevance of the tag to the
content item. All tags you add are initially assigned a relevance of five, but
you can change the relevance by clicking on these bars. Relevance can be
used to control the display of tags in your publications and to fine tune tagbased searching, in which case it is important to follow a consistent policy for
setting tag relevance. Use of tag relevance is, however, optional.
You can add as many tags as you wish to a content item.
If you add several tags from the same tag scheme to a content item, you can
change the order in which they appear by dragging and dropping. If tags are
displayed in your publication, they will usually appear in the same order you
select here, although this is not necessarily the case for all publications.
Tag relevance affects the order of tags: high-relevance tags are listed
before low-relevance tags. Therefore, changing the relevance of a tag
may cause it to move to a new position in the list. Conversely, moving a
tag in the list may change its relevance.
Creating new tags
If you have been granted sufficient privileges, then you can create new tags.
If the characters you type in the tag field do not match any existing tag and
you have tag creation rights, then a Create new tag option is displayed in
the menu below the field
Click on this option or press Enter, and the Create new tag dialog is
displayed:
The menu under the Where field lists the names of all the tag schemes you
can use with this content item. If your tags are not organized in a hierarchy
or you want to create a new "top-level" tag with no parents then you can just
Page 52
Copyright © 2008-2012 Vizrt
Escenic Content Studio User Guide
select one of these collection names and click Create. The tag will then be
created and added to the collection you selected.
However, if your tags are organized in a hierarchy, then you probably have
some idea of where in the hierarchy you want to add a new tag. You would
probably want to add the tag Bangkok, for example, under Thailand, in which
case you should start typing Thailand in the Where field of the dialog. If a
Thailand tag exists, then it will appear in a menu under the Where field, and
you can select it:
When you have selected the parent tag you want, click on Create to create
the new tag and add it to your content item.
Removing tags from content items
To remove a tag from a content item, hold your mouse over the tag and click
on the
button that appears next to it.
Managing tags
You can create and delete tags using the Tools > Manage tags option. For
details, see section 2.2.2.
5.3.3
Content Info
This section contains general information about the content item. Some of the
displayed information is read-only, but the following items (marked with a
are editable:
)
Published
A content item's published property is set automatically the first time it
is published. You can, however, use this field to modify the date and/or
time if you want to.
Activate date
You can use this field to set an activation date/time. If you do this,
then the content item will be de-activated until the specified date
and time arrives. A de-activated content item is neither visible in the
publication nor accessible to readers via searching, even if it has been
published. Once the activate date arrives, the content item becomes
visible/searchable in the normal way (assuming it is published).
Expires
You can use this field to set an expiry date/time. If you do this, then
the content item will be de-activated when the specified date and time
Copyright © 2008-2012 Vizrt
Page 53
Escenic Content Studio User Guide
arrives. A de-activated content item is neither visible in the publication
nor accessible to readers via searching, even if it has been published.
To edit one of these fields, click on its
button. Suitable edit controls are then
displayed for modifying the field. For example:
When you have finished editing, just click somewhere outside the edit controls
in the Content Studio window to close them and see the results of your
change.
5.3.4
Element Properties
This section is used to display related content item summaries. It is usually
empty and closed. If, however, you select one of the content items in the
Related content section at the bottom of the field panel (see section
5.2.1), then this section automatically opens to display the related content
item's summary fields. When you deselect the related content item, it closes
again.
5.4
Save/Preview/State Controls
At the bottom of the editor window are the following controls:
Preview
Displays the content item in your browser, showing any changes you
have made, even if you have not saved them yet.
Save
Saves any changes you have made. If you haven't made any changes
then the button is disabled.
Save & close
Saves any changes you have made and closes the content editor editor.
State
Lets you change the state of the content item. The following states can
be selected:
• Draft
• Approved
• Submitted
• Deleted
• Published
Page 54
Copyright © 2008-2012 Vizrt
Escenic Content Studio User Guide
A content item page that is in any of the first four states is not visible in
the web publication (even if it has been added to an active section page)
and cannot be found by searching; a content item in the Published
state is visible if added to an active section page and can at least be
found by searching. The first three states can be used to represent
various stages in your organization's work flow, but have no effect on
how a content item is handled by the Content Engine or Content Studio.
A content item is automatically switched to the Deleted state if you
delete it in the normal way. The difference between deleting it in the
normal way and changing the state using this control is that the delete
function takes immediate effect, whereas changing the state here only
takes effect when you save your changes. You can "undelete" a content
item by changing its state from Deleted to one of the other states.
5.5
Editing Rich Text
Some of the fields in a content item may contain rich text (that is, formatted
text). A typical textual content item has one such field (often called body) that
holds the main content. When you put the cursor in a field that contains rich
text, the formatting bar displayed at the top of the content editor (see section
5.1) is enabled:
You can then use the buttons in this bar to format the text you enter. The tools
available in the formatting bar may vary from publication to publication.
Internally, the formatted text is stored as XHTML.
Editing the Source XHTML
You can, if you wish, view the source XHTML and/or edit it. To do so:
1.
Right-click somewhere in the formatted field.
2.
Select Edit Source from the displayed menu. The source XHTML is then
displayed. An OK and a Cancel button is also displayed at the bottom of
the field.
3.
Examine/edit the displayed XHTML.
4.
To save your changes, click on OK, or click on Cancel to cancel any
changes you may have made.
This function allows you to Insert or modify XHTML code in ways that the
formatting bar does not allow.
If you enter Invalid code while you are using this function, the invalid code is
highlighted. You are not allowed to save your changes if the field contains any
invalid code: when you click OK, a message asking you to correct the invalid
code is displayed.
Pasting XHTML Code
Copyright © 2008-2012 Vizrt
Page 55
Escenic Content Studio User Guide
Sometimes you may need to paste in some XHTML code you have copied from
some source or other. This is often the means used to embed video clips from
other sites (YouTube, for example). You can do this using the Paste HTML
function. You can access this function from the Content Studio Edit menu or
by right-clicking in an XHTML field. To use it:
5.5.1
1.
Copy the code you need to paste.
2.
Switch to Content Studio.
3.
Put the cursor in the required location inside an XHTML field.
4.
Select the Paste HTML function.
Editing Tables
The formatting bar displayed at the top of the content editor usually includes
a
button for inserting tables. If you click on this button then a menu is
displayed from which you can select the number of rows and columns you
want to insert:
Once you have inserted a table you can easily make changes to it by selecting
rows and columns, then right-clicking and selecting Table from the displayed
context menu. This displays a complete set of table editing functions:
You can also paste tables into the rich text field from other sources: Word,
Excel and HTML documents, for example. Once you have pasted in such a
table you can edit in the same way as if you had created it with the
Page 56
button.
Copyright © 2008-2012 Vizrt
Escenic Content Studio User Guide
5.6
Editing Date Fields
A date field is displayed as two specialized entry fields: one that accepts a
date, and that accepts the time of day.
If you do not enter a time of day, then a default value of 12:00 AM is used.
12:00 AM means midnight at the start of the specified day (that is,
midnight the night before).
5.7
Editing Images
At the bottom of the image field in an image content item is an Edit button:
Edit button
Clicking on this button displays a set of image editing tools:
There are three groups of editing controls which you can use for rotation,
cropping and enhancement. Any changes you make using these functions
are not finally applied to the image in the Escenic database until you save
the content item by clicking on the Save button at the bottom of the content
editor tab.
If the Image dimensions in the Image edit controls tab are
displayed in red and followed by the warning (too large), you will
not be able to edit the displayed image, as it is too large to be loaded
into memory. Should this happen, report the problem to your system
administrator. The problem can be fixed by modifying a setting in the
StudioConfig.properties file on the Content Engine host. For details
Copyright © 2008-2012 Vizrt
Page 57
Escenic Content Studio User Guide
see Escenic Content Engine Server Administration Guide, section
14.3.
An image content item may also contain a "image versions" field containing
alternative, cropped versions of the same image. This field is often called
something like "Versions", "Image versions" or "Alternatives". If an image
content item contains this kind of field then you can modify the image
versions it contains.
For further information about image version fields, see section 5.7.4.
5.7.1
Rotation
There are two rotation controls:
Rotate left
Rotates the image 90° counter-clockwise.
Rotate right
Rotates the image 90° clockwise.
It is not possible to rotate the image in anything other than 90° increments.
5.7.2
Cropping
To crop the image:
1.
Select a crop mask from the Select crop mask list.
2.
If you want to resize or reshape the crop mask that is superimposed on
the image, you can do so by dragging the yellow handles displayed at the
corners of the mask. If you want to move it, you can do so by placing the
mouse pointer inside the mask and dragging.
3.
When you are satisfied with the crop location, click on Crop to crop the
image. Alternatively, click on Cancel to cancel the operation.
Most of the crop masks in the Select crop mask list have a fixed aspect ratio:
that is, you can change the size of the crop mask by dragging on its corner
handles, but you cannot change its shape. The Free crop mask, however, can
be reshaped as well as resized. The sides of this mask are draggable as well as
the corners.
Cropping an image in this way modifies the original image. Any changes
you make are permanent and will affect all other content items that
include the same image. If you don't want to change the original image
and just want to crop the image for use in a particular context, you should
probably use use an alternative image version instead (see section
5.7.4). When you use an alternative image version you just define a view
of the image that has no effect on the original.
Page 58
Copyright © 2008-2012 Vizrt
Escenic Content Studio User Guide
5.7.3
Image Enhancement
There are three image enhancement sliders: Sharpness, Brightness and
Contrast. Dragging a slider to the right increases the sharpness, brightness or
contrast of the image; dragging to the left decreases it.
5.7.4
Alternative Image Versions
Most publications are set up to support multiple versions of images in different
shapes and sizes for use in different contexts. You might want, for example,
a large version for displaying in articles, a small version for displaying in
headline teasers and a thumbnail version for displaying in other teasers; or
landscape and portrait versions for displaying in wide column and narrow
column layouts. Each version has a predefined width, height or width and
height, specified in pixels. A "landscape" version might be defined as 500
pixels wide and 400 pixels high, for example, a "portrait" version defined as
400 pixels wide and 500 pixels high, and a "narrow" version defined as 300
pixels wide but with no fixed height.
These alternative versions are displayed in a separate field from the original
image, usually with an appropriate name such as "Versions", "Image versions"
or "Alternatives". For example:
Display m ask
Resize handle
This field contains one copy of the image for each version that has been
defined. Superimposed over each image is a display mask that determines
which part of the image will actually be displayed.
If an alternative version defines both width and height, then its display mask
has a fixed aspect ratio, which means that you can resize it and move it, but
not change its shape. If it only defines one dimension (height or width), then
you can also change the shape of the display mask.
The display mask is initially set to include as much of the base image as
possible, and is centered.
If you click inside one of the display masks then it is highlighted, and yellow
handles appear at each corner. You can then:
• Resize/reshape the display mask by dragging on the handles
• Move the display mask by placing the mouse pointer inside it and dragging
Copyright © 2008-2012 Vizrt
Page 59
Escenic Content Studio User Guide
In this way you can select which part of an image is to appear in each of the
versions.
If you are working with an image where the main item of interest is not
centered, it's a good idea to check the placement of an alternative version's
display mask before using it, since it is just centered by default. If nobody else
has used that version before you then the display mask will not be correctly
positioned.
When you change the size of a fixed-aspect ratio display mask, you do not
affect the size of the image version in the publication, you simply select
what is to appear in it. Whatever you select is scaled up or down to fill the
image version's predefined area. Similarly, whatever selection you make
for a fixed width/height version is scaled up or down to fit the predefined
width or height.
5.8
Editing Schedule Fields
A schedule field is a specialized date/time field that lets you define the times
of events such as meetings or concerts. It can also be used to define series of
events such as film schedules, shop opening hours and so on. It can be used
to define quite complex schedules such as the following museum opening
hours:
From March 1st, 2011 to August 31st, 2011
Monday, Thursday, Saturday, Sunday: from 9 a.m. to 6 p.m.
Wednesday, Friday: from 9 a.m. to 10 p.m.
Every 1st Friday of the month: from 9 a.m to 2 p.m.
Closed on Tuesday
Closed on May 4th and May 17th
The schedule field editor makes the definition of such schedules as easy as
possible, hiding the more complex options unless you actually need them.
Initially, the schedule editor panel looks like this:
5.8.1
Creating a Single Event
To create a single event:
Page 60
1.
Enter the date of the event in the Starts field.
2.
Make sure the Ends radio button is set to On the same day.
3.
Enter the start and end times in the Opens fields.
Copyright © 2008-2012 Vizrt
Escenic Content Studio User Guide
4.
5.8.2
Click on Add to schedule.
Creating a Daily Event
To create an event that occurs every day for a given period:
5.8.3
1.
Enter the start date of the period in the Starts field.
2.
Enter the end date of the period in the Ends field (this automatically
selects the On radio button)
3.
Make sure Repeat is set to Daily.
4.
Enter the start and end times in the Opens fields.
5.
If you want to add one or more exceptions to this schedule, click on the
Add an exception link. For a description of how define exceptions, see
section 5.8.5.
6.
Click on Add to schedule.
Creating a Monthly Event
To create an event that occurs on a particular day each month for a given
period:
1.
Enter the start date of the period in the Starts field.
2.
Enter the end date of the period in the Ends field (this automatically
selects the On radio button)
3.
Make sure Repeat is set to Monthly.
4.
Select either a day of the month or a week number and a day of the
week.
5.
Enter the start and end times in the Opens fields.
6.
If you want to add one or more exceptions to this schedule, click on the
Add an exception link. For a description of how define exceptions, see
section 5.8.5.
Copyright © 2008-2012 Vizrt
Page 61
Escenic Content Studio User Guide
7.
5.8.4
Click on Add to schedule.
Creating a Weekly Event
To create an event that occurs on certain days every week (or every, 2nd,
3rd, ... etc. week) for a given period:
Page 62
1.
Enter the start date of the period in the Starts field.
2.
Enter the end date of the period in the Ends field (this automatically
selects the On radio button)
3.
Make sure Repeat is set to Weekly week.
4.
Set Repeat every to the required number. You will probably most often
want to set this to 1 (=every week). If, however, you were defining an
event that only occurs every fourth week, then you would set it to 4.
5.
In the Repeat on table, check the days on which you want the event to
occur.
6.
Enter the start and end times in the Opens fields.
7.
If the opening times are different on different days of the week, you can
deal with this by clicking on Add another weekly pattern and repeating
steps 4, 5 and 6.
8.
If you want to add one or more exceptions to this schedule, click on the
Add an exception link. For a description of how define exceptions, see
section 5.8.5.
9.
Click on Add to schedule.
Copyright © 2008-2012 Vizrt
Escenic Content Studio User Guide
5.8.5
Adding Exceptions
To add exceptions to recurring event definitions, click on the Add an
exception link next to the Cancel button. The following form is then
displayed:
Select the required type of exception from the Except section and fill in the
appropriate fields, then either select Closed all day or enter the different
opening hours that are to apply.
If you need to add more exceptions, then click on the Add another
exceptions lin
When you have added all the exceptions you need, click on Add to schedule.
5.8.6
Adding More Dates
When you have finished creating a series of event dates and click Add to
Schedule, the data is saved and a schedule summary panel like this is
displayed:
You can, however, extend the schedule by clicking on Add Another Date.
This allows you to add a whole new set of dates. In this way you can, for
example, create a schedule containing both summer and winter opening
hours.
Copyright © 2008-2012 Vizrt
Page 63
Escenic Content Studio User Guide
Page 64
Copyright © 2008-2012 Vizrt
Escenic Content Studio User Guide
6 Using A List Editor
A list editor is a tabbed window displayed in Content Studio's work area that
you can use to edit a list.
A list is an ordered list of content items that are related in some way (a list of
articles related to an ongoing news issue, for example). They can be used to
create a collection of summaries that can appear in several locations but be
maintained in one place. You can, for example set up a section page in which
item 1 from a particular list appears in one location, item 1 and 2 in a second
location and items 1 to 5 in a third location. You can then subsequently update
all these locations in a single operation by replacing list item 1 with a new
story.
To open a list editor:
1.
Open the Sections panel.
2.
Select a section.
3.
Click on the Lists tab.
4.
Either:
• Select a list and then select File > Open Selected to open it, or
• Right-click in the Lists tab card and select Create New List...
from the displayed menu; then enter a name for your new list in the
displayed dialog.
A list editor is very simple: all you can do with it is:
• Add content items to the list and remove them.
• Reorder the list.
Copyright © 2008-2012 Vizrt
Page 65
Escenic Content Studio User Guide
To add a content item to the list:
1. Select the content item you want to add (in the search results list,
one of the section's inboxes/ other lists or your clipboard).
2.
Hold down the left mouse button and drag the content item to the
required position in the list.
3.
Drop the content item by releasing the mouse button.
To remove a content item from the list:
1. Select the content item you want to remove.
2.
Select Edit > Remove or press Delete.
To reorder the list:
Select one or more content items in the list, drag them to a new position
and drop them.
You can change the layout of the list by clicking on the layout buttons (
) above the list. This only affects how you see the list in the editor. It has no
real effect on the list or its contents.
Page 66
Copyright © 2008-2012 Vizrt
Escenic Content Studio User Guide
7 Keyboard Shortcuts
Content Studio supports a number of keyboard shortcuts for experienced
users. These shortcuts are listed below. In some cases, the meaning of a
shortcut is changes slightly with the current context (the Delete key, for
example). Similarly, some shortcuts only work in certain contexts: the Ctrl+B
shortcut, for example, only works when editing text in an HTML field.
You can display a list of shortcuts at any time by selecting View > View
keyboard shortcuts....
Note that on Macs, some of the shortcuts may clash with OS X shortcuts.
If this is the case, then the operating system wins, and the shortcut
executes the OS X function, not the function listed below. For example, if
you have enabled the OS X Spaces feature and use the default shortcuts,
then the shortcuts Command+1 to Command+n will not affect Content Studio
at all, but will switch screens as defined in your Spaces configuration.
Function
Windows
Mac
Open selected item(s)
Enter
Create new content item of default
type.
If publication has no default type
then nothing happens.
Close active editor
Delete
Delete text in active editor field
Remove item(s) from list/inbox/
clipboard
Save
Reload search results
Reset search parameters to their
default setting
Undo
Redo
Cut
Copy
Paste
Paste HTML
Ctrl+N
Command+O (letter
O)
Command+N
Ctrl+F4
Ctrl+D
Delete
Command+W
Command+D
Delete
Ctrl+S
F5
Ctrl+Home
Command+S
Command+R
Command+Home
Ctrl+Z
Ctrl+Y
Ctrl+X
Ctrl+C
Ctrl+V
Ctrl+Alt+V
Clear formatting
Rename
Resize section editor
Select all text in active editor field
Select all items in list/inbox/clipboard
Show/hide all panels
Ctrl+SPACE
F2
Ctrl+F8
Ctrl+A
Command+Z
Shift+Command+Z
Command+X
Command+C
Command+V
Command+Option
+V
Command+SPACE
Enter or Return
Command+8
Command+A
Ctrl+F11
Command+9
Copyright © 2008-2012 Vizrt
Page 67
Escenic Content Studio User Guide
Page 68
Function
Windows
Mac
Log out and exit
Exit
Show/hide relations
Show help
Show "about" information
Show search panel
Upload local files
Ctrl+Shift+Q
Alt-F4
Ctrl+F7
F1
F8
Ctrl+F1
Ctrl+O (letter O)
Shift+Command+Q
Command+Q
Command+6
F1
Bold
Italic
Underline
Preview
Show/hide boxes
Open research panels configuration
dialog
Edit Source
Publish current content item and save
(if possible)
Ctrl+B
Ctrl+I
Ctrl+U
Ctrl+P
Ctrl+F6
Ctrl+F12
Ctrl+Shift+V
Ctrl+Shift+P
Command+1
Shift+Command+O
(letter O)
Command+B
Command+I
Command+U
Command+P
Command+5
Command+0 (digit
0)
Shift+Command+V
Shift+Command+P
Copyright © 2008-2012 Vizrt