1
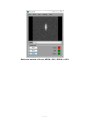
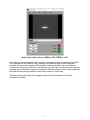
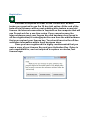
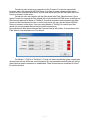
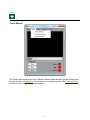
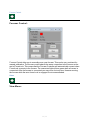
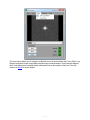
FocusLock Help
1 / 46
Table of contents
Introduction .................................................................................................................................... 3
Welcome .................................................................................................................................. 3
License ..................................................................................................................................... 5
System requirements .............................................................................................................. 9
What's new ............................................................................................................................ 10
Theory .................................................................................................................................... 12
Registration ........................................................................................................................... 16
Using FocusLock ....................................................................................................................... 17
Main View .............................................................................................................................. 17
Menus ..................................................................................................................................... 20
File ..................................................................................................................................... 21
Connection Settings ................................................................................................... 22
Saving and Loading Profiles ..................................................................................... 24
Tools .................................................................................................................................. 25
Focuser Control .......................................................................................................... 26
View .................................................................................................................................. 26
Settings ............................................................................................................................. 28
Help ................................................................................................................................... 29
Connection Methods ............................................................................................................ 30
Plots ....................................................................................................................................... 31
Calibration ............................................................................................................................. 32
Running the Lock .................................................................................................................. 34
Settings ....................................................................................................................................... 35
Filter Wheel ........................................................................................................................... 35
FocusLock ............................................................................................................................. 37
Calibration ............................................................................................................................. 39
Scripting ...................................................................................................................................... 41
Theory .................................................................................................................................... 41
API .......................................................................................................................................... 41
Examples ............................................................................................................................... 42
Help and Support ....................................................................................................................... 43
Accessing The Event Logger .............................................................................................. 43
Other Resources ........................................................................................................................ 46
2 / 46
Introduction
FocusLock
Welcome to the FocusLock Help
Chapter 1: Introduction
Welcome
License
System requirements
What's New
Theory
First Time Use
Registration
Please note: These help files are updated occasionally. The latest version can always be found online at:
http://www.optecinc.com/astronomy/downloads/focuslock.htm
Revisions to this help document:
Rev. 1.0.1 - 2015//9/3
Scripting
Updates and added descriptions on Focuser Control and
Rev. 1.0.0 - 2015/8/14
Initial Release updates
Rev. 0.9.5 - 2015/8/5
Initial Release
Welcome
What is FocusLock?
FocusLock is the first method of focus that uses real-time feedback. Most methods
of focus, including backlash compensation and temperature compensation, work by
modeling the focus against a correlated physical parameter. These models can then be
used to partially correct for changes in focus, however they cannot correct for any changes
that fall outside their models. FocusLock uses a different approach. By introducing an
3 / 46
astigmatism, an optical aberration, into the guide image FocusLock is able to detect drifts
in focus in real time and correct for them. This means that the system will correct for any
source of poor focus, even if that source has not been modeled.
Using the ONAG from Innovations Foresight both cameras, the main and guide, are
par focal and use the same focuser. This means that any change in the focus in for the
guide camera will also change the focus of the main camera. When FocusLock detects a
focus offset it will correct it for both systems, keeping the main camera in perfect focus.
4 / 46
License
Notice: this is a copy of the license agreement. If there are any
differences between this license and the license you agreed to on
installation the installation license takes precedence. The license
presented at purchase and during installation is a legally binding
agreement between you and Optec, Inc.
FocusLock - End User License Agreement
1.
Preamble: This End User License Agreement (EULA) is a legal agreement between You,
(hereinafter: Licensee) and Optec, Inc., a duly registered company whose principal place of business is 199
Smith Street, Lowell MI, 49331 United States of America (hereinafter: Licensor). This Agreement sets the
terms, rights, restrictions and obligations on using FocusLock (hereinafter: The Software) created and
owned by Licensor, as detailed herein. By installing, copying, or otherwise using The Software you agree to
be bounded by the terms of this EULA.
If you do not agree to the terms of this EULA, do not install or use The Software.
2.
License Grant: Licensor hereby grants Licensee a Personal, Non-assignable & Non-transferable,
Perpetual, Non-commercial, Without the rights to create derivative works, Non-exclusive license, all in
accordance with the terms set forth and other legal restrictions set forth in 3rd party software used while
running The Software.
2.1.
Limited: Licensee may use The Software for the purpose of:
2.1.1.
Operating optical equipment I.E. telescopes. You may not use this software in any life critical
applications.
2.1.2.
This license is granted perpetually, as long as you do not materially breach it.
2.2.
Non Assignable & Non-Transferable: Licensee may not assign or transfer his rights and duties
under this license.
2.3.
Non-Commercial: Licensee may not use Software for commercial purposes. For the purpose of
this license, commercial purposes means that a 3rd party has to pay in order to access Software or that the
Software is behind a paywall.
2.4.
Licensee may not:
2.4.1.
Work around any technical limitations in the software.
2.4.2.
Reverse engineer, decompile or disassemble the software, or otherwise attempt to derive the
5 / 46
source code for the software except, and solely to the extent permitted by applicable law, despite this
limitation.
2.4.3.
Remove, minimize, block or modify any notices from Licensor in the software.
2.4.4.
Use the software in any way that is against the law.
2.4.5.
Share, publish, lend the software, provide it as a hosted solution for others to use ortransfer the
software or this agreement to any third party.
3.
Term & Termination: The Term of this license shall be until terminated. Licensor may terminate
this EULA, including Licensee's license in the case where Licensee:
3.1.
Exported The Software to any jurisdiction where Licensor may not enforce his rights under this
agreements in; or
3.2.
Licensee was in breach of any of this license's terms and conditions and such breach was not
cured, immediately upon notification; or
3.3.
Licensee in breach of any of the terms of Clause 2 to this license; or
3.4.
Licensee otherwise entered into any arrangement which caused Licensor to be unable to enforce
his rights under this License.
4.
Payment: In consideration of the License granted under Clause 2, Licensee shall pay Licensor a
fee, via Credit-Card, PayPal or any other mean which Licensor may deem adequate. Failure to perform
payment shall construe as material breach of this Agreement.
5.
Upgrades, Updates and Fixes: Licensor may provide Licensee, from time to time, with Upgrades,
Updates or Fixes, as detailed herein and according to his sole discretion. Licensee hereby warrants to keep
The Software up-to-date and install all relevant updates and fixes, and may, at their sole discretion,
purchase upgrades or updates, according to the rates set by Licensor. Licensor shall provide any update or
Fix free of charge for the duration of the users license key, a term of one year after purchase; however,
nothing in this Agreement shall require Licensor to provide Updates or Fixes.
5.1.
Upgrades: for the purpose of this license, an Upgrade shall be a material amendment in The
Software, which contains new features and or major performance improvements and shall be marked as a
new version number. For example, should Licensee purchase The Software under version 1.X.X, an upgrade
shall commence under number 2.0.0.
5.2.
Updates: for the purpose of this license, an update shall be a minor amendment in The Software,
which may contain new features or minor improvements and shall be marked as a new sub-version number.
For example, should Licensee purchase The Software under version 1.1.X, an upgrade shall commence
under number 1.2.0.
5.3.
Fix: for the purpose of this license, a fix shall be a minor amendment in The Software, intended to
remove bugs or alter minor features which impair The Software's functionality. A fix shall be marked as a
new sub-sub-version number. For example, should Licensee purchase Software under version 1.1.1, an
upgrade shall commence under number 1.1.2.
6.
Support: Software is provided under an AS-IS basis and without any support, updates or
maintenance. Nothing in this Agreement shall require Licensor to provide Licensee with support or fixes to
any bug, failure or other defect in The Software.
6 / 46
6.1.
Bug Notification: Licensee may provide Licensor of details regarding any bug, defect or failure in
The Software promptly and with no delay from such event; Licensee shall comply with Licensor's request for
information regarding bugs, defects or failures and furnish him with information, screenshots and try to
reproduce such bugs, defects or failures.
6.2.
Feature Request: Licensee may request additional features in Software, provided, however, that (i)
Licensee shall waive any claim or right in such feature should feature be developed by Licensor; (ii) Licensee
shall be prohibited from developing the feature, or disclose such feature request, or feature, to any 3rd party
directly competing with Licensor or any 3rd party which may be, following the development of such feature,
in direct competition with Licensor; (iii) Licensee warrants that feature does not infringe any 3rd party patent,
trademark, trade-secret or any other intellectual property right; and (iv) Licensee developed, envisioned or
created the feature solely by himself.
7.
Liability: To the extent permitted under Law, The Software is provided under an AS-IS basis.
Licensor shall never, and without any limit, be liable for any damage, cost, expense or any other payment
incurred by Licensee as a result of Software's actions, failure, bugs and/or any other interaction between
The Software and Licensee's end-equipment, computers, other software or any 3rd party, end-equipment,
computer or services. Moreover, Licensor shall never be liable for any defect in source code written by
Licensee when relying on The Software.
8.
Warranty:
8.1.
Intellectual Property: Licensor hereby warrants that The Software does not violate or infringe any
3rd party claims in regards to intellectual property, patents and/or trademarks and that to the best of its
knowledge no legal action has been taken against it for any infringement or violation of any 3rd party
intellectual property rights.
8.2.
No-Warranty: The Software is provided without any warranty; Licensor hereby disclaims any
warranty that The Software shall be error free, without defects or code which may cause damage to
Licensee's computers or to Licensee, and that Software shall be functional. Licensee shall be solely liable
to any damage, defect or loss incurred as a result of operating The Software and undertake the risks
contained in running The Software on License's Computers. This applies even if the Licensor knew or should
have known about the possibility of the damages. The above limitation or exclusion may not apply to you
because your state or country may not allow the exclusion or limitation of incidental, consequential or other
damages.
8.3.
Prior Inspection: Licensee hereby states that he inspected The Software thoroughly and found it
satisfactory and adequate to his needs, that it does not interfere with his regular operation and that it does
meet the standards and scope of his computer systems and architecture. Licensee found that The Software
interacts with his environment and that it does not infringe any of End User License Agreement of any
software Licensee may use in performing his services. Licensee hereby waives any claims regarding The
Software's incompatibility, performance, results and features, and warrants that he inspected The Software.
9.
No Refunds: Licensee warrants that he inspected The Software according to clause 8.3 and that it
is adequate to his needs. Accordingly, as The Software is intangible goods, Licensee shall not be, ever,
entitled to any refund, rebate, compensation or restitution for any reason whatsoever, even if The Software
contains material flaws.
7 / 46
10.
Indemnification: Licensee hereby warrants to hold Licensor harmless and indemnify Licensor for
any lawsuit brought against it in regards to Licensee's use of The Software in means that violate, breach or
otherwise circumvent this license, Licensor's intellectual property rights or Licensor's title in The Software.
Licensor shall promptly notify Licensee in case of such legal action and request Licensee's consent prior to
any settlement in relation to such lawsuit or claim.
11.
Governing Law, Jurisdiction: Licensee hereby agrees not to initiate class-action lawsuits against
Licensor in relation to this license and to compensate Licensor for any legal fees, cost or attorney fees
should any claim brought by Licensee against Licensor be denied, in part or in full. Michigan law applies to
interpretation of and claims for breach of this agreement.
12.
Licensed Technology: The Software includes licensed technology from Innovations Foresight. The
Licensee agrees to the following terms from Innovations Foresight:
12.1.
SharpLock and ONAG® are proprietary technologies from Innovations Foresight.
The Licensee is put on notice of the existence of patent applications related to the above technologies,
which includes, but not limited to, processing (software) and related devices (hardware). Such devices are
not limited to the ONAG® technology, but also cover off axis guiding solutions (OAG), and other related
implementations (such as self-guiding).
12.2.
Under the terms of this License the Licensee may only use such Innovations Foresight patent
pending technologies for his own personal needs. The Licensee agrees not to sell, give, support, publish or
teach by any means, shapes, or forms, to any third party, or person, on the related technologies.
Innovations Foresight reserves its rights to enforce its current and future patent rights.
13.
Entire Agreement: This agreement, and the terms for supplements, updates and support services
that you use, are the entire agreement for the software and support services.
14.
Legal Effect: This agreement describes certain legal rights. You may have other rights under the
laws of your state or country. This agreement does not change your rights under the laws of your state or
country if the laws of your state or country do not permit it to do so.
15.
Updates to EULA: This EULA may be updated at any time. Use of The Software gives your
consent to the EULA included with The Software.
16.
Severability: The invalidity or unenforceability of any provisions of this Agreement shall not affect
the validity or enforceability of any other provision of this Agreement, which shall remain in full force and
effect.
FocusLock Licenses SharpLock technology from Innovations
Foresight
8 / 46
System requirements
FocusLock has been tested on Windows XP, Windows 7, Windows 8.1 and
Windows 10. However Windows XP is no longer officially supported.
System Requirements :
Microsoft .net platform 4.5.
ASCOM Platform 6.1.
If you wish to use the MaxIm integration:
MaxIm version 5 or higher.
If you wish to use TheSkyX integration:
TheSkyX with camera integration.
If you wish to use ASCOM integration:
The Optec ASCOM Server.
If you wish to use PHD 2 integration:
PHD 2 version 2.50 dev1.
Notice: MaxIm and the TheSkyX integrations may not be functional with all versions of
MaxIm and the TheSkyX.
Hardware Requirements :
FocusLock was designed to operate with Windows 7. If your computer can run this OS you
should be able to run FocusLock. If you suffer from performance issues try reducing the
size of your guider image.
Note, if you use the Optec ASCOM server it is best to sub frame the guide image to less
then 100x100 px to avoid having too much data throughput.
You will also need an On Axis Guider (ONAG) from Innovations Foresight.
This manual assumes that you have read the ONAG user manual and are familiar
with the proper use of the ONAG.
9 / 46
What's new
What's New
Version 1.0.1
Bug fixes:
Several minor UI bugs
New Features:
Improved plotting system for better performance
Now allows for remote scripting
New focuser control allows for manual focuser moves
Windows notifications and an icon in the system tray
ActiveX support for scripting
Improved Automatic calibration
Improved Manual calibration
Better handling of extremely tilted guide cameras
Version 1.0.0
First release version
Version 0.9.5
Bug fixes:
A issue with improper calibration introduced in 0.9.4 has been resolved
New Features:
Program now uses the Optec Licensing system
Now supports MaxIm and TheSkyX filter wheels directly
More settings stored in profiles.
Version 0.9.4
Bug fixes:
New threading, fixing collision bugs
New Features:
PHD2 support, requires the Developer's Snapshot build of PHD2 - 2.5dev1
The title now shows the loaded profiles name,
Program is now signed by Optec using a valid Code Signing Certificate. This
addition should fix most computer security issues.
Version 0.9.3
Bug fixes:
TSX bridge is now closed on disconnect and program exit, reducing memory
leaks and reconnect errors.
New method of monitoring filter wheel changes (in the settings form only).
10 / 46
Fixed a bug with MaxIm not releasing connection event handlers on disconnect
or close.
Several minor timing bugs.
Several minor UI bugs.
New features:
Added topmost feature.
Added auto start on connect all.
Added coloring to buttons to indicate if they are able to be pressed I.E start turns
green when you can click it.
UI now warns you if no Calibration Coefficient is found.
Several other small UI changes.
Other:
Program is now signed with a strong name. This will require you to reload your
settings (load profile) as the old windows settings storage is no longer valid.
Once you reload you settings everything should run normally. This improves
computer security and may resolve installation issues with some computers. The
strong name will also help prevent the windows settings (separate from the
Profiles) from resetting incorrectly.
Version 0.9.2
Initial Beta release
This document was generated for the Version 1.0.0 RC.
11 / 46
Theory
Theory
FocusLock uses astigmatic measurements to determine focus. The astigmatism is
generated through the On Axis Guider (ONAG). The shape of the guide star seen through
the ONAG® beam splitter is used to assess the focus position and to decide in which
direction the focuser needs to be moved (in or out). The star roundness (RDN) is the key
figure of merit. There are two types of RDN, the absolute ARDN and the relative RRDN.
The former is always a positive number and it used for calibration purpose. The later is a
signed number carrying directional information (+/-) and is used for the real time auto-focus
operation. Both RDN values are expressed in percent. The ARDN is independent of the
guider coordinate system versus the ONAG axes relationship (ONAG's body), or angle of
rotation. In other words, any guider camera rotation does not change the ARDN value. On
the other hand the RRDN is related to the actual guider camera rotation angle and must be
calibrated for retrieving this angle. The following pictures show the guide star at 3 different
focuser positions:
Guide star at best focus, ARDN = 0% , RRDN = 0%
12 / 46
13 / 46
Guide star outside of focus, ARDN = 50% , RRDN = +50%
14 / 46
Guide star inside of focus, ARDN = 50% , RRDN = -50%
In the above pictures the guider chip reference coordinate system is parallel to the ONAG
one (squared with the ONAG's body), leading to a reference angle of zeros degrees.
However this is just an example and it should be understood that is not a requirement,
FocusLock after proper calibration, can handle any guider chip coordinate system rotation.
However we recommend keeping both camera reference systems close to be parallel with
the ONAG's body when possible to make things easier for reasoning.
This theory is from Innovations Foresight's SharpLock Documentation. See other
resources for details.
15 / 46
Registration
A license is required in order to use FocusLock. All beta
testers are required to use the 30 day trial option. At the end of the
beta all trial licenses will be reset granting beta testers a new trial
license. An Internet connection is required on the computer that will
use FocusLock for a one time setup. If you cannot access the
Internet please send your license key and hardware key (found in
off-line registration) to [email protected] from the email address
that you received your license key. You should receive the off-line
activation information within three business days.
Once you have registered it is highly recommended that you
save a copy of you License Key and your Activation Key. Optec is
not responsible for, and not required to replace or reissue, lost
license keys.
16 / 46
Using FocusLock
Chapter 2: Using FocusLock
Main View
Menus
Connection Methods
Plots
Calibration
Running the Lock
Main View
This is the FocusLock Main View:
17 / 46
This contains all of the tools that you will need to control FocusLock.
Summary of Components :
1. Menus - These allow access to the adjustable parts of FocusLock.
2. Image display - This will show the last guide image enhanced and stretched according
to the user settings.
3. Image gain - This allows the user to suppress the background of the guide image. The
more gain the less visible the background.
4. Start - Once FocusLock is calibrated this button starts the Lock. Any on start options will
be executed when this button is pressed.
5. Stop - If the lock is started this button will stop the lock. It is best to terminate the lock
before shutting down.
6. Setup - This button launches the setup dialog. This dialog allows you to edit settings
based on the connection state. You cannot interact with the Main View if the settings dialog
is open. For more information see the Settings section.
7. Status - Messages will appear here if the program enters special states I.E. if it is in
calibration mode.
18 / 46
8. Focus - The Focus Status Indicator offers a visual indication of the focuser's status.
Green is ideal focus, yellow means that the focus remains in the Critical Focus Zone (CFZ)
and red indicates that the focus is outside the CFZ. There will be little or no difference in
main camera image quality between yellow and green.
9. SNR - The Signal to Noise Ratio indicator. Green means ideal signal to noise, allowing
short averaging constants. Yellow mean poor SNR and red is bad SNR. Even in bad SNR
the system should continue working, however it may require longer averaging constants
and require you to enable Ignore Low Signal to Noise.
10. Status - Overall status indicator. Green means all components are running normally.
Red means that a critical error may have occurred and should be logged. A pop up will
appear for most critical errors informing you of any action that you may need to take.
19 / 46
Menus
The FocusLock Menu:
The FocusLock menu's allow access to the features of FocusLock. The menus are:
File
Tools
View
Settings
Help
20 / 46
File
File Menu:
The file menu contains components related to connections and save files. It contains the
following:
Connection Settings
Connect All: Once connections have been setup through connection settings the
connect all option can automatically connect to the same devices with one click.
Save Profile
Load Profile
Exit: disconnects and exits FocusLock
21 / 46
Connection Settings
Connection Settings :
The connection settings form allows you to select the hardware that FocusLock will
use. FocusLock requires a method of accessing the guider images (actually just the guide
star and a few surrounding pixels). FocusLock offers several methods to gain access to
this data. FocusLock will work directly with several popular guiding programs: MaxImä,
PHD 2 and TheSkyXä. See the Connection Methods section for more details.
The other system (labeled ASCOM) uses the Optec ASCOM Server. This means
that FocusLock can connect with any other guide program provided that the guide camera
can connect to that program with a fully functional ASCOM driver. For any of the directly
supported guide programs with an ASCOM camera it is best to use the direct connection
rather than the Optec ASCOM Server. Simply select the method that you wish to use to
connect to your hardware (1.). If you choose ASCOM you will need to Select (2.) your
device from the ASCOM device list. You can mix and match connections to the different
devices.
22 / 46
FocusLock also requires a connection to the Focuser. FocusLock supports all
focusers with a fully functional ASCOM driver. If another program needs access to the
focuser and the manufacturers driver is not a local server you can use the Optec ASCOM
Server to connect to the driver.
FocusLock also can interact with the filter wheel (see Filter Wheel section). Once
again FocusLock supports all filter wheels with a fully function ASCOM driver as well as any
filter wheel supported in MaxIm or TheSkyX. If another program needs access to the filter
wheel and the manufacturers driver is not a local server you can use the Optec ASCOM
Server to connect to the driver. If you are using MaxIm or TheSkyX to control your filter
wheel it is recommended that you use the direct connections.
Once all devices have been selected the Connect buttons will enable. A connection to the
FIlter Wheel is not needed to run FocusLock.
For MaxImä, PHD 2 or TheSkyXä FocusLock assumes that the guide camera has
already been set up. When the connect buttons (3.) are pressed the status lights (4.) will go
green when a proper connection is established. Once all devices are connected it is time
to exit this window.
23 / 46
Saving and Loading Profiles
Saving and Loading Profiles
FocusLock allows you to save and load the system profile in XML format. These profiles
include all calibration data and most of your user settings. By saving and loading profiles
you can easily switch between several different hardware setups. You can also reset and
reload your settings if FocusLock encounters issues. Also if you need to switch computers
you can reload FocusLocks settings on the second computer. It is highly recommended
that you backup your profiles.
24 / 46
Tools
Tools Menu:
The Tools menu contains the Auto Calibrate, Manual Calibrate and Focuser Control tools.
See the section on Calibration for instructions on using these tools. The Focuser Control
tool allows you to move a connected focuser.
25 / 46
Focuser Control
Focuser Control:
Focuser Control allow you to manually move your focuser. This can be very continent for
manual calibration. The focuser control shares the same connection to the focuser as the
rest of FocusLock. This means that the Focuser Controller will automatically connect when
FocusLock connects to the focuser. The connected light will turn green when a focuser is
connected. After the focuser is connected you may move it at any time. However moving
the focuser while the auto focus Lock is engaged is not recommended.
View
View Menu:
26 / 46
The view menu allows you to toggle Log Stretch on or off and activate the Focus Plots. Log
Stretch is applied to the image and can help bring out faint details. View plots will display
the Focus history and contains further information as to the quality of the Lock. See the
section on Plots for more details.
27 / 46
Settings
Settings Menu:
The menu allows you to change the Setup. See the Settings section for more details.
28 / 46
Help
Help Menu:
The Help menu gives you access to support information.
Help: The Help button launches a CHM version of this document. Note, due to Windows
Security settings CHM files will not run on a network. If the Help button does not launch the
help files copy the FocusLockHelp.CHM to your local hard drive and run it from there.
About: the About option launches a window that summarizes program information.
License: This allows you to check your license status.
Check for Updates: Check for Updates will check the Optec Server for new versions of
FocusLock. It will direct you to the proper page to download the update. You may need to
renew your license to install updates. This feature requires an Internet connection.
Reset: This will reset all settings back to a clean install state. You can then reload your
settings from the Load Profile option.
29 / 46
Connection Methods
Connection Methods
FocusLock requires a method of accessing the guider images (just the guide star
and a few surrounding pixels). Focus Lock offers several methods to gain access to this
data. FocusLock supports several popular guiding programs: MaxImä, PHD 2 and
TheSkyXä. By using these program's external interfaces FocusLock can get copies of the
guide image frame.
To use one of these systems you will need a fully licensed copy of that guide
program. FocusLock does not include any of these programs.
The other system (labeled ASCOM) uses the Optec ASCOM Server. This allows
FocusLock to work with any other guide program provided you connect to your guide
camera to that program with a fully functional ASCOM driver. If you use one of the directly
supported guide programs with an ASCOM camera it is best to use the direct connection
rather then the Optec ASCOM Server. The Optec ASCOM server allows multiple client
programs to access the same ASCOM driver. Simply select Optec ASCOM Server from
the ASCOM chooser in both programs and then select your driver within the server. It is
best to sub frame the guide image if you use an ASCOM camera as this greatly reduces
the amount of data that FocusLock has to process. The Optec ASCOM Server will only
work with drivers that are fully ASCOM compliant. If it does not work try running the driver
through the ASCOM conform checker and report any errors.
30 / 46
Plots
Plots
The View Plots options displays this window. Above is a sample start of focus run where
the focuser was ~200 microns outside of ideal focus. The Roundness report gives the raw
numbers that FocusLock uses to maintain focus. This is needed if you are calibrating the
system. The Current pair shows the values from the last measurement. The Average shows
the values averaged across the number of frames. The SNR gives the current signal to
noise ratio in dB and the frame number gives the number of guide images used in this run.
The top plot gives the focuser's position as a function of frame and the bottom gives the
average and current relative roundness, as well as the statistical limits. Clear plots will
erase the plots. See the theory section for a more detailed explanation of what these
numbers mean.
31 / 46
Calibration
Calibration
You can view the calibration coefficients (Ks and Kc) in the FocusLock Tab
of the settings panel. Note that these values are a starting point for the system.
They can vary significantly from calibration to calibration. FocusLock constantly
updates and adjusts these values internally to find the true system coefficients
using the thousands of data points generated by the auto-focus method. See the
theory section for more details.
FocusLock offers two methods of calibration. The first is manual calibration.
This involves manually moving the focuser, causing changes in the roundness of
the guide star. The second method is automatic calibration. Both methods,
assuming proper use, will generate valid and useful preliminary calibration
coefficients for the Lock.
Calibration Checklist, for manual calibration:
1. Calibration should be done in relatively good seeing conditions when
possible.
2. Consider an averaging constant of at least 12 frames or more, especially if
the seeing is less than optimal.
3. Calibration requires moving the focuser for increasing the average absolute
roundness (AARDN) by at least 15%.
4. Calibration requires at least 15 guider camera frames to insure good AARDN
estimations. Take your time.
5. Use a bright star near the zenith.
6. If you use a filter wheel select the wider band filter, such as luminance.
7. Center the star on the imaging and guiding camera chips.
8. Imaging and guiding cameras should be at best focus.
9. Adjust the guider camera exposure time for good SNR, yet stay below the
chip saturation level.
10. Wait several guider frames and check that the AARDN is at least below 7%,
we recommend below 3%.
11. Hit the Manual Calibrate option.
12. Then move the focuser ~15 microns using your favorite focuser control
program, you can use the Optec ASCOM Server to share the driver.
13. Wait several guider frames and watch the average AARDN values. If the
AARDN does not change by much increase the step size.
14. If the AARDN decreases, then reverse focuser motion (very important)!
15. Continue by successive focuser moves in the direction of increasing
AARDN.
16. Wait several frames after each move to allow for a good AARDN and angle
estimations.
17. When the AARDN is at least 15% higher than its initial value, click on the
"Manual Calibration" option again.
32 / 46
Calibration Checklist, for automatic calibration:
1. Calibration should be done in relatively good seeing conditions when
possible.
2. Consider an averaging constant of at least 12 frames or more, especially if
the seeing is less than optimal.
3. Calibration requires moving the focuser for increasing the average absolute
roundness (AARDN) by at least 15%.
4. Calibration requires at least 15 guider camera frames to insure good AARDN
estimations. Take your time.
5. Use a bright star near the zenith.
6. If you use a filter wheel select the wider band filter, such as luminance.
7. Center the star on the imaging and guiding camera chips.
8. Imaging and guiding cameras should be at best focus.
9. Adjust the guider camera exposure time for good SNR, yet stay below the
chip saturation level.
10. Wait several guider frames and check that the AARDN is at least below 7%,
we recommend below 3%.
11. Adjust the settings in the Calibration Tab in the settings window as per the
instructions.
12. Click on the AutoCalibrate option under tools.
13. Click on the View Plots Option
14. Adjust the settings in the Calibration Tab in the settings window as needed.
15. When the system has enough data it will activate a pop up. You can abort by
hitting the AutoCalibrate option again. If it had enough data on abort it will ask if
you wish to save the data.
Calibration steps based on the calibration section from Innovations Foresight's
SharpLock Documentation.
33 / 46
Running the Lock
Running the Lock
Once the Calibration is complete running the lock is easy. All you need to do is start your
guide program, select a star (preferably a bright one with a good elevation for the initial
focus at the beginning of the night) and click on FocusLock's Start button. FocusLock will
refocus your system and maintain that focus for the rest of the night. It is best to tell your
guide software to avoid double stars. As long as the system is guiding and FocusLock
receives images the system will automatically adjust for any changes in focus detected in
the guide camera. Because the main camera and guide camera are parfocal and attached
to the same focuser your images will stay in focus all night long.
34 / 46
Settings
Chapter 3: Settings
Filter Wheel
FocusLock
Calibration
Filter Wheel
Filter Wheel
Notice: To edit this tab FocusLock needs to be connected to a Filter Wheel
You will only need filter access in FocusLock if there is an offset in focus between
35 / 46
the two cameras that is dependent on filters. This could occur if the filter wheel is only in
front of the main camera or if there is a wavelength specific offset for a given filter. No
matter the source the solution is very easy.
Steps to calibrate filters:
1. Connect FocusLock to your Filter Wheel through the Optec ASCOM Server if the
filter wheel driver is not a local server.
2. Start guiding
3. For the first filter (current filter shown in 3) bring the main camera into focus.
4. Once the Current Average Relative Roundness (7) has had a chance to settle,
either type the Current Average Relative Roundness into the the FocusLock Offset
Box (6) or hit the Set Equal button
5. Hit the Save button (8). Filters are saved in a separate file that is not erased on
reset. Filter offsets are stored by name so if you rename a filter you will have to re-enter
the offset.
6. Repeat the process for all filters. You can switch by selecting a filter from (3). You can
force a Refresh by hitting (5).
7. If you wish to use the Filter Wheel every time you should check (1).
8. If you want FocusLock to automatically apply these filter settings with Filter Wheel
changes check (2).
Note: FocusLock assumes that the program that called for the Filter Wheel change
applies the ASCOM focus offset for that filter.
36 / 46
FocusLock
FocusLock
The Focus Lock Settings tab allows you to edit the Lock Settings.
Stop Gap (1) - Determines the maximum drift in roundness allowed before the system
corrects for it. A value between 1 and 3 is useful for most weather conditions. The
current value can be seen off to the right.
Averaging Constant (2) - Determines how many frames are averaged together. A
higher value (~10) should be used for calibration and for poor seeing conditions. The
current value can be seen off to the right.
Save (3) - Saves any changes made to the Stop Gap and Averaging constant.
Ignore Low SNR in Lock (4) - Tells the lock to continue to operate on low signal to
noise levels. This is best left on (checked) except in very poor seeing conditions.
Find Focuser Offset (5)- If there is a constant offset in focus between the main
camera and the guide camera (I.E. not par focal) you will need to use the Find Focuser
Offset box. Click on Find and follow the instructions to find and save an offset. Reset
37 / 46
defaults back to zero offset.
Advanced Box (6) - These are the raw calibration coefficients found in the initial
calibration run. Do not edit these directly unless you need to reenter them. If you do
need to edit them press Save once you are finished. Kc is computed from Ks and
several other variables and will change based on the averaging constant.
38 / 46
Calibration
Calibration
The Calibration page controls the AutoFocus and AutoCalibrate methods.
AutoFocus Gain (1) - This controls the amount of gain used by the AutoFocus at start
method. This occurs when AutoFocus At Start is turned on. Gains greater then 1 can
cause overshoots when the AutoFocus routines are first started.
Auto Focus At Start option (2) - When this is on the first move after the start button is
pressed will correct more of the incorrect focus. This helps the system get into focus
faster at the start of the night but does not affect the Lock.
Steps Per Autocal (3) - This sets the number of steps the focuser moves per
AutoCalibration step. You want this to be around 15 microns for most systems. Make it
larger if it only changes the Absolute Roundness by less then 3 and make it smaller if
the roundness changes by more then 7. A change in Absolute Average Roundness per
AutoCal Step of about 5 is ideal.
Rest Time (4) - During auto calibration Rest Time determines the number of frames
FocusLock will wait after each auto calibration step. This value should be greater than
the Averaging Constant from the FocusLock Tab.
39 / 46
You only need to Save if you intend to use the Auto Calibrate function. See the
section on Calibration for details.
Backlash Compensation (5) This tells FocusLock to pre-solve for and compensate
for any mechanical backlash in the Focuser. This is not needed for most setups and
defaults off.
40 / 46
Scripting
Chapter 4: Scripting
Theory
API
Examples
Theory
Theory
As of version 1.0.1 FocusLock offers remote scripting. This allows for a much more
flexible use of FocusLock. Once you have setup the program you are able to integrate
FocusLock into your automated observatory setup. Scripting is accomplished through
ScriptFocusLock.dll and through COM and ActiveX as entry FocusLock.Scripting. This is
included by default in the installer package. This dll uses the Microsoft COM interface,
allowing it to be accessed by any COM or ActiveX capable programs. A few examples
include: Visual C++, Visual Basic, C#, JScript and VBscrict.
The FocusLock UI that is launched by the script will not have any of its settings set. If
you want your manual FocusLock settings to be the same as your scripted settings you will
need to load your profile into the scripted copy. You can manually register and unregister
FocusLock for COM and ActiveX by running the Register.bat and Unregister.bat files,
found in the install directory, as Administrator.
API
API
The API contains the following commands:
Note: This API is new and is subject to change as further development occurs.
public ScriptFocusLock()
This initializes the scripting object and starts the FocusLock UI.
41 / 46
public bool isLockAvailable()
This reports true when FocusLock is able to start focusing and engage the lock.
public bool isAtFocus()
This reports true when the guide image is in the Critical Focus Zone.
public bool isConnected()
This reports true if FocusLock is connected to the necessary devices.
public bool isLockRunning()
This reports true if FocusLock is maintaining the focus. This is called Lock mode.
public bool IsRunning()
This reports true if the scripted copy of FocusLock is running.
public void ConnectDevices()
This will instruct FocusLock to connect to the preselected devices. Any errors
will be displayed in FocusLock. A pop up Windows Notification will appear if all are
connected.
public void DisconnectDevices()
This will instruct FocusLock to disconnect from the preselected devices.
public void StartLock()
This will instruct FocusLock to begin focusing and to engage the lock.
public void StopLock()
This will instruct FocusLock to stop focusing and to disengage the lock.
public void CloseFocusLock()
This will tell the scripted copy of FocusLock to close.
Examples
Examples
FocusLock includes several example script files. These are found in the install directory in
the FocusLockScriptingExamples.zip file. Included are C#, VBS and JScript examples.
42 / 46
Help and Support
Help and Support
If you need assistance we recommend visiting the Optec website first. You can also submit a
report from the bug report form.
If you are unable to connect to the Internet, or you have any other questions at all, please feel
free to contact Optec Support by telephone at:
Optec Support:
616-897-9351
Contacting Optec Technical Support
If you encounter any problems, errors, or questions about using FocusLock that are not
addressed by this manual, the recommended next step is to contact Optec Technical Support
for assistance.
Providing certain resources when contacting Optec will greatly increase the speed and
completeness with which your problem is solved. When using email, these resources should be
included in text or spreadsheet files attached to the email. When contacting Optec by phone,
simply have the documents available for ready access, as our technical support team may need
you to refer to them. The resources you will need are as follows:
Description of Your Problem - Naturally, to solve a problem, Optec tech support must
know what the symptoms of the problem are.
How The Problem Occurs - If there is a specific procedure required for the problem to
appear, make a note of the steps for doing so.
Text Of Your Error - If your problem is related to an error message you should retrieve a
verbatim copy of the error message.
Error Logs - You should also retrieve your Error Logs as directed in the Accessing The
Event Logger section of the manual.
Accessing The Event Logger
Accessing The FocusLock Event Logger
While using FocusLock, if the program encounters any sort of problem, it will notify you with an
error message describing the problem. If this problem is happening consistently and preventing
you from using the program the way you need to use it, we highly recommend contacting Optec
43 / 46
Technical Support for assistance.
FocusLock has been programmed with the capability to log every major event that occurs during
normal program operations, as well as the full details of every error that is capable of occurring.
When preparing to contact Optec for support, having your FocusLock error log at the ready and,
if possible, sending that log to Optec can greatly increase our ability to solve your problem
quickly and completely.
Accessing Event Logs
Events logged by the event logger are stored in the Windows Event Viewer utility.
To access FocusLock event logs in the event viewer:
Open Event Viewer - Windows Vista and 7 users can find the Event Viewer can be found
by searching in the Start menu for Event Viewer.
44 / 46
Open Application Logs - On the left side of the viewer, a listing of all classes of events can
be found. Click the Applications And Services Logs folder to open it.
Find FocusLock Logs - In this folder, the FocusLock event log can be found under the title
FocusLock Optec Log. Click on this log to open it.
View Events - Now, the full list of FocusLock events is viewable in the center portion of the
Event Viewer window. By default, the events are organized chronologically from newest to
oldest.
Saving Event Logs
Open The Event Viewer - Follow the previously described steps to open your Windows
Event Viewer and access the FocusLock event log.
Save Events - Click the Save All Events As... button on the right side of the Event Viewer
to open a Save As dialog.
Save Events As A CSV - Using the Save As Type drop-down selection, choose the .csv
file extension. Choose a location to save the event log, and click Save to save it.
45 / 46
Other Resources
Other Resources
Optec Website:
http://www.optecinc.com/
ASCOM Website:
http://ascom-standards.org/
Innovations Foresight:
http://www.innovationsforesight.com/
46 / 46