1
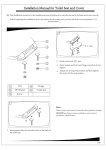
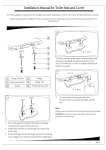
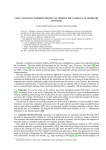
E L E C T R I C C O M B U S T I O N TO I L E T
User Guide
Contents
CONTENTS OF THE CARTON............................3
CONSTRUCTION................................................3
SAFETY...............................................................3
TRANSPORT LOCKING DEVICE........................4
INSTALLATION...................................................4
USE.....................................................................6
EMPTYING.........................................................7
MAINTENANCE..................................................7
TROUBLESHOOTING.........................................8
TECHNICAL SPECIFICATIONS...........................9
WARRANTY.........................................................9
SERVICE.............................................................9
The back page of the User Guide is an instruction sheet that you can cut out
and display in the toilet room!
VERSION 2.0
English
CONTENTS OF THE CARTON
The Cinderella Classic delivery includes:
• 1 Cinderella Classic
• 1 carton 500 bags
• 1 connection pipe Ø 110 mm x 430 mm
• 1 T-pipe (90°), Ø 110 mm
• 1 Rain Cap
• 1 User Guide
CONSTRUCTION
Cinderella is manufactured on the inside in acid-resistant steel and the bowl is manufactured in glass
fibre-reinforced plastic. The heat source is a specially manufactured heating coil designed to withstand
high temperatures and loads. The temperature is regulated by electronically-controlled sensors. The
intelligent "SENSE" combustion system detects when the combustion process is about to end and is
able to optimise combustion time and energy consumption.
Cinderella's inbuilt fan keeps the toilet cool during combustion and adds oxygen to the combustion
process. All of the toilet's components are of the highest quality. Each toilet undergoes comprehensive
testing before delivery.
Cinderella is tested and approved by SEMKO. Cinderella is also EMC tested in accordance with current
EU standards and is CE labelled.
SAFETY
• Combustion is NOT active when the toilet lid is open.
• When the toilet is warm, it is NOT possible to activate the flap motor when the lid is open. The lid
must be closed before it is possible to 'flush'.
• The flap CANNOT be set in the open position (e.g. for cleaning) as long as the toilet is warm.
This can only be done when the toilet has cooled down (the fan has stopped).
• If the temperature within the shell is too high, a fuse will be triggered and combustion will come
to a halt. The fuse must be reset manually before the toilet can be used again. Please refer to the
Troubleshooting section.
• The toilet's shell is manufactured in a fire-resistant material.
• Combustion will not start/will be halted if the combustion bowl is not in its correct position.
• The toilet's fan is activated until the temperature in the combustion bowl has cooled to 85°C.
In the event of a power cut, the fan will continue to operate on battery power.
• NEVER pour flammable liquids into the toilet.
w w w. f r i t i d s t o a . s e
|
3
TRANSPORT LOCKING DEVICE
The toilet's combustion bowl is provided with a transport locking device because of its weight.
This transport locking device must be removed
before the toilet can be used.
Instructions:
Remove the front panel.
Cut and remove the plastic strapping securing the
combustion bowl to the toilet's steel frame.
INSTALLATION
Correct installation of in/out ventilation is essential for good combustion
and for ensuring problem-free use!
Placement
Cinderella is approved for use in bathrooms but must never have water poured over it. The toilet
should stand on a hard, level surface; do not enclose the gap between the toilet and the floor.
Cinderella may be placed on a heated floor as it does not need to be bolted to the floor. There are
no restrictions on placement in relation to flammable materials and Cinderella can be placed in
unheated rooms.
Ventilation - IN
The air supply to the toilet room should come from outdoors.
The air intake should have a dimension of at least 160 mm.
In order to minimise cold draughts, the intake can be placed at floor level in the wall
close to the toilet or in the floor under the toilet. The necessary air will be sucked in
through the base of the toilet.
It is important to ensure that the toilet's air requirements do not come into conflict with
devices such as fireplaces or kitchen extractor fans For this reason, the toilet room door
should be be kept closed and should be airtight. There should be no extractor fan in the
toilet room for the same reason. Cinderella will extract any damp air in the toilet room.
4
|
w w w. f r i t i d s t o a . s e
English
Ventilation - Out
The inbuilt fan keeps the toilet cool and presses out humid air from combustion through a catalyst.
Venting is achieved partly by means of the fan and partly through natural pressure, known as the
chimney effect.
The exhaust pipe's total length must not exceed 3.5 metres. The exhaust pipe should extend
60 centimetres above the roof (at its exit point) in order to obtain the best possible pressure.
If bends are needed - to pass windows or eaves, for instance - up to 4 x 30° angles or no more
than 2 x 45° angles may be used. It is important that the dimension of the pipe is 110 mm all
the way between the toilet and the rain cap. The pipe should have a smooth inner surface and
preferably be PP model, standard exhaust pipe for internal installation. Flexible tubing and pipes
of smaller dimension do not work. If a longer pipe or more bends are required, it is possible to
install a more powerful fan in the toilet. Please contact your retailer or Fritidstoa ab.
60 cm
Max 3,5 m
41,5 cm
1. Create a hole for ventilation, either out through the wall (easiest) or up through the roof.
Use a Ø 111 mm piercing tool.
2. Assemble the necessary pipe parts. It is a good idea to use a little
detergent to make them easier to fit together. Trim the connection
pipe supplied to a suitable length. Feed approximately 5 cm of the
connection pipe into the back of the toilet and the same amount
into the T-pipe. It is a good idea to mark 5 cm on the pipe beforehand, so you can be sure that the pipe is correctly attached to the
toilet.
5 cm
3. Fit the rain cap. Press the rain cap down as far as it will go.
Please note! Do not fit any form of insect net over the end of the exhaust pipe.
4. Put the toilet into position and connect to an earthed socket, 220-230 V, own 10 A fuse.
5. Start Cinderella by pressing the ON/OFF switch down by the electrical connection on the
back of the toilet.
The manufacturer's warranty does not cover an incorrectly installed Cinderella.
Please contact your retailer or Fritidstoa ab for advice and helpful hints!
w w w. f r i t i d s t o a . s e
|
5
USE
1. Check that the green light on the control panel is on - this indicates that 230V is connected and the
mains switch is on.
2. Lift up the lid and the seat. The fan starts automatically.
3. Place one Cinderella bag in the bowl. A bag must be used every time the toilet is used.
4. Lower the seat.
5. Use the toilet. If very little is produced, or if a lot of paper is used, pour a few decilitres of water into
the bag to make sure that it will drop down properly.
6. Close the lid
7. Press the start button: you will hear an acknowledgement sound. The bag and its contents will fall
down into the combustion chamber.
8. The yellow light on the control panel indicates that combustion is in progress. The fan remains active
throughout the combustion process. When the yellow light goes out (combustion is complete) the fan
will continue to run until the temperature in the combustion bowl is down to around 85°.
9. Depending on the amount of waste, combustion time will vary from 30 to 110 minutes.
General remarks about use
The toilet may be used while combustion is in progress. New combustion is started after every visit
by pressing the START button. The toilet detects when combustion is complete.
The toilet lid must be kept closed when the toilet is not in use. Combustion will not start while the
toilet lid is up.
Before you leave, make sure that the bag and its contents have been 'flushed away' properly.
NEVER put in a new bag for the next user when you are finished. Just leave it on the lid.
When combustion is complete, the yellow light on the control panel will go out. The fan will deactivate
when the temperature in the combustion chamber is down to 85°.
If the toilet is not to be used for some time, disconnect the power cable to protect against lightning
strikes.
Flammable liquid or material must never be placed in the toilet and/or
'flushed' down.
6
|
w w w. f r i t i d s t o a . s e
English
EMPTYING
When Cinderella has been in use for some time, it is time to empty the ash.
Instructions:
1. Make sure that combustion is not in progress and the toilet is cool. The fan should not
be running.
2. Remove the lower front panel by pressing out the button and then pulling the panel
straight towards you.
3. Turn the combustion bowl so that the handle points straight forwards. Red and yellow
lights will now indicate that the combustion bowl is out of position.
4. Pull out the combustion bowl towards you.
5. Lift out the 'inner bowl' and empty the ash in a suitable place. The ash is completely
free from bacteria and can be used as fertiliser on flower beds.
6. Clean any urine crystals or burnt residue from the inner bowl.
Please refer to the Maintenance section. Make sure that both the inner and outer
bowls are dry and clean.
7. Replace the inner bowl and push in the entire combustion bowl until it is in place.
8. Turn the handle firmly to the left as far as it will go; the red and yellow lights will go
out.
9. Replace the front panel.
MAINTENANCE
The toilet can be cleaned using ordinary detergents, both in the bowl and on the outside. Never use
large amounts of water. Use a spray bottle or a moist cloth/sponge.
When urine is incinerated, urine crystals are formed. These are often found around the edges and look
like dried cement. To remove them and any burnt residue, remove the inner bowl, fill it with hot water
and leave it to stand for 20-30 minutes. Brush out the inner bowl, leave it to dry and then replace
everything in the toilet. A clean ash bowl ensures more efficient combustion.
To increase the catalyst's useful life, we recommend that you run one combustion cycle using only water
once the toilet has been emptied about 5 times or at least once a year. Instructions:
1. Empty and clean the combustion bowl in the usual way.
2. Pour one litre of water directly into the combustion bowl before re-installing it.
3. Start combustion without using a bag and/or paper. The water now boils away and the water vapour
created cleans the catalyst.
4. Once the combustion cycle is complete (yellow light off) the toilet can be used as normal once again.
Check at regular intervals to make sure that the hole for condensation water in the bottom of the T-pipe
has not become blocked. Check the entire length of the exhaust pipe as well, to make sure nothing is
blocking the flow of air.
In connection with normal cleaning or if someone has forgotten to use a bag, the bowl should be
cleaned as follows: Please note the toilet must be cold/unused (fan deactivated).
1. Open the lid so the fan starts.
2. Press START. The flap down to the ash bowl will open and will stay open until the lid is closed.
Please note! For safety reasons, this may only be done if the toilet is cold/unused.
3. Clean using moist paper. Clean the whole bowl carefully, including the 'wings' on the stainless flap.
Drop the paper into the combustion bowl.
4. When you have finished cleaning, close the lid.
w w w. f r i t i d s t o a . s e
|
7
TROUBLESHOOTING
ERROR
RED
Reset: Hold down the START button for 5 seconds to reset the toilet.
YELLOW
Loss of line
voltage
Fan error
Flashing
GREEN
AUDIO
SIGNAL
ACTION
Off
3 beeps
1
Check that power cable is connected.
2
Check that power is switched on.
3
Check that there is voltage in the socket.
4
Open and close the lid. Start combustion.
1
Reset the toilet: hold down the START button
for 5 seconds.
2
Open and close the lid. Start combustion.
Repeated errors: switch off all power and contact
your service centre.
1
If the toilet is hot: Press START several times without
putting in a bag. If this does not help, put in a new bag
containing 3-5 dl water and press START. If this does
not help, wait until the toilet cools (the fan stops).
2
If the toilet is cold: Open the toilet lid and press START.
The flap will open and any paper residue can be removed.
If the flap does not open and the motor makes a humming
noise for a few seconds, remove the ash bowl and knock
from the underside of the combustion lid at the top of the
combustion chamber to release it. The cover should have
a gap of about 1 mm.
Flashing
Flap will not open Flashing
/ bag does not
fall down
Ash bowl in
wrong position
Flashing
Interruption in
heating circuit
Lid open
|
10 beeps
Flashing
3 beeps
1
Fit ash bowl. Pull ash bowl handle firmly to the left.
It might be a bit stiff if the toilet is new.
Flashing
Cont.
beeping
1
Switch off mains power.
2
Wait until the toilet is cool (fan has stopped).
3
Check temperature monitor on the side of the toilet.
Unscrew the grey plug. Press the fuse with your finger until
you hear a click. Never use sharp objects. If the fuse has
been triggered, check the airflow (in and out). If it has not
been triggered, please contact your service centre.
1
Close toilet lid. Red light stops flashing.
1
Reset the toilet: hold down the START button for 5 seconds.
2
Open and close the lid. Start combustion.
Repeated errors: switch off all power and contact your
service centre.
Flashing
Temperature
sensor fault
8
10 beeps
w w w. f r i t i d s t o a . s e
Flashing
Flashing
Cont.
beeping
English
TECHNICAL SPECIFICATIONS
Seat height
540 mm
Total height
600 mm
Width
390 mm
Depth
590 mm
Weight
34 kg
Ventilation dimension
Voltage
Fan capacity
Ø 110 mm
220 - 240 VAC, 10 A
5.3 W, 49 db, 184 m3/hour
Combustion output
Energy consumption
2 kW
1.0 - 2.0 kWh/toilet visit
WARRANTY
The warranty is valid for two (2) years from the date of purchase.
The warranty covers manufacturing faults and faults in components that occur during the warranty
period.
Fritidstoa ab will cover the costs of spare parts, labour and transport between Fritidstoa and your nearest
retailer during the warranty period.
The warranty does not cover:
• incorrect installation
• incorrect utilisation
• transport
• lightning strikes
This warranty is valid in the Nordic countries. In other countries, the warranty is valid for one (1) year.
Costs related to service after the warranty period or faults caused as described above must be met in
full by the customer.
Any repairs must be made by authorised staff. In the event of any complaint, please quote the serial
number you will find on the back of the toilet.
The toilet must be cleaned for service and repairs.
SERVICE
When service is required, during or after the warranty period, please contact an authorised retailer or
Fritidstoa ab. You will find a list of authorised retailers at http://www.fritidstoa.se
You are always welcome to contact Fritidstoa ab on +46 (0)8-615 25 25
or [email protected] if you have any questions about your Cinderella.
w w w. f r i t i d s t o a . s e
|
9
Fritidstoa ab, Box 202 16, SE-161 02 Bromma
+46 (0)8 615 25 25 | [email protected] | www.fritidstoa.se
Please read this before using the toilet
1. Lift the lid and seat.
The fan will be activated.
4. Use the toilet. If very little is
2. Place one Cinderella bag in
3. Lower the seat.
the bowl. A bag must be used
every time the toilet is used.
5. Close the lid.
6. Press START.
produced, pour a few decilitres
of water into the bag to make
sure that it will drop down
properly.
Cinderella can be used in the normal way
even while combustion is in progress.