1
ProofMaster
Calibrator v3
User Guide
ProofMaster Calibrator User Guide
3
ProofMaster 3.0
LIMITED WARRANTY
PerfectProof warrants that for a period of ninety (90) days from the date of acquisition, the Software, if operated as directed, will substantially achieve the functionality described in the Documentation. PerfectProof does not warrant, however, that
your use of the Software will be uninterrupted or that the operation of the Software
will be error-free. PerfectProof also warrants that the media containing the Software,
if provided by PerfectProof, is free from defects in material and workmanship and
will so remain for ninety (90) days from the date you acquired the Software. PerfectProof's sole liability for any breach of this warranty shall be, in PerfectProof's sole
discretion: (i) to replace your defective media; or (ii) to advise you how to achieve
substantially the same functionality with the Software as described in the Documentation through a procedure different from that set forth in the Documentation;
or (iii) if the above remedies are impracticable, to refund the license fee you paid for
the Software. Repaired, corrected, or replaced Software and Documentation shall be
covered by this limited warranty for the period remaining under the warranty that
covered the original Software, or if longer, for thirty (30) days after the date (a) of
shipment to you of the repaired or replaced Software, or (b) PerfectProof advised
you how to operate the Software so as to achieve the functionality described in the
Documentation. Only if you inform PerfectProof of your problem with the Software
during the applicable warranty period and provide evidence of the date you
purchased a license to the Software will PerfectProof be obligated to honor this
warranty. PerfectProof will use reasonable commercial efforts to repair, replace,
advise or, for individual consumers, refund pursuant to the foregoing warranty
within 30 days of being so notified.
This is a limited warranty and it is the only warranty made by PerfectProof. PerfectProof makes no other express warranty and no warranty of noninfringement of third
parties' rights. The duration of implied warranties, including without limitation,
warranties of merchantability and of fitness for a particular purpose, is limited to the
above limited warranty period; some jurisdictions do not allow limitations on how
long an implied warranty lasts, so limitations may not apply to you. No PerfectProof
dealer, agent, or employee is authorized to make any modifications, extensions, or
additions to this warranty. If any modifications are made to the Software by you
during the warranty period; if the media is subjected to accident, abuse, or
improper use; or if you violate the terms of this Agreement, then this warranty shall
immediately be terminated. This warranty shall not apply if the Software is used on
or in conjunction with hardware or software other than the unmodified version of
hardware and software with which the software was designed to be used as
described in the Documentation. This warranty gives you specific legal rights, and
you may have other legal rights that vary by jurisdiction.
4
ProofMaster Calibrator User Guide
LIMITATION OF LIABILITY
TO THE MAXIMUM EXTENT PERMITTED BY APPLICABLE LAW, IN NO EVENT SHALL
PerfectProof, ITS EMPLOYEES OR LICENSORS OR AFFILIATES BE LIABLE FOR ANY
LOST PROFITS, REVENUE, SALES, DATA, OR COSTS OF PROCUREMENT OF SUBSTITUTE GOODS OR SERVICES, PROPERTY DAMAGE, PERSONAL INJURY, INTERRUPTION
OF BUSINESS, LOSS OF BUSINESS INFORMATION, OR FOR ANY SPECIAL, DIRECT,
INDIRECT, INCIDENTAL, ECONOMIC, COVER, PUNITIVE, SPECIAL, OR CONSEQUENTIAL DAMAGES, HOWEVER CAUSED AND WHETHER ARISING UNDER CONTRACT,
TORT, NEGLIGENCE, OR OTHER THEORY OF LIABILITY ARISING OUT OF THE USE OF
OR INABILITY TO USE THE SOFTWARE AND/OR THE DOCUMENTATION OR ARISING
OUT OF MISINTERPRETATION OR LACK OF CLARITY OF THE DOCUMENTATION, EVEN
IF PerfectProof OR ITS LICENSORS OR AFFILIATES ARE ADVISED OF THE POSSIBILITY
OF SUCH DAMAGES. BECAUSE SOME COUNTRIES/STATES/JURISDICTIONS DO NOT
ALLOW THE EXCLUSION OF LIABILITY, BUT MAY ALLOW LIABILITY TO BE LIMITED, IN
SUCH CASES, PerfectProof, ITS EMPLOYEES OR LICENSORS OR AFFILIATES' LIABILITY
SHALL BE LIMITED TO THE LICENSE FEE YOU PAID FOR THE SOFTWARE.
Nothing contained in this Agreement shall prejudice the statutory rights of any
party dealing as a consumer. Nothing contained in this Agreement limits PerfectProof's liability to you in the event of death or personal injury resulting from PerfectProof's negligence. PerfectProof is acting on behalf of its employees and licensors or
affiliates for the purpose of disclaiming, excluding, and/or restricting obligations,
warranties, and liability as provided in this clause, but in no other respects and for
no other purpose.
SCOPE OF GRANT
You may:
• Use the Software on any single computer;
• Use the Software on a network;
• Copy the Software for archival purposes, provided any copy must contain all
of the original Software's proprietary notices;
You may not:
• Permit other individuals to use the Software except under the terms listed
above;
• Modify, translate, reverse engineer, decompile, disassemble (except to the
extent applicable laws specifically prohibit such restriction), or create derivative works based on the Software;
• Copy the Software other than as specified above;
• Rent, lease, grant a security interest in, or otherwise transfer rights to the
Software; or
• Remove any proprietary notices or labels on the Software.
ProofMaster Calibrator User Guide
5
TITLE
Title, ownership rights, and intellectual property rights in the Software shall remain
in Graphic Mission BV and/or its suppliers. The Software is protected by the copyright laws and treaties. Title and related rights in the content accessed through the
Software is the property of the applicable content wner and may be protected by
applicable law. This License gives you no rights to such content.
TERMINATION
The license will terminate automatically if you fail to comply with the limitations
described herein. On termination, you must destroy all copies of the Software and
Documentation.
HIGH RISK ACTIVITIES
The Software is not fault-tolerant and is not designed, manufactured or intended for
use or resale as control equipment in hazardous environments requiring fail-safe
performance in which the failure of the Software could lead directly to death,
personal injury, or severe physical or environmental damage ("High Risk Activities").
Graphic Mission BV, PerfectProof and its suppliers specifically disclaim any express
or implied warranty of fitness for High Risk Activities.
APPLICABLE LAW AND COMPETENT COURT
This Agreement is governed by the laws of Belgium, with exception of the Belgian
legislation on international private law. All disputes arising from or relating to this
Agreement shall be settled by the Courts of Antwerp (Belgium) with explicit exclusion of any other court of any other country.
This is the entire agreement between PerfectProof and you relating to this software
and it supersedes any prior representations, discussions, undertakings, end-user
agreements, communications, or advertising relating to the Software.
© 2007 PerfectProof Europe NV. All rights reserved.
6
ProofMaster Calibrator User Guide
ProofMaster Calibrator User Guide
Contents
7
Contents
Chapter 1:
Calibrating printers ................................................................................ 11
Printer profiles ....................................................................................................................................12
1.1
Creating a printer profile for photo printing,
color proofing and 1-bit proofing queues .......................................................... 14
Preparing the printer, media and spectrophotometer........................................................15
Specifying the printer profile name and info ..........................................................................16
Printer linearization ..........................................................................................................................18
Color gamut of the printer: selecting a printer gamut optimization method.............21
Color gamut of the printer: adjusting ink limits (expert calibration only) ....................23
Color gamut of the printer: adjusting ink mixing curves (expert calibration only) ...25
Ink bleeding.........................................................................................................................................27
Color engine ........................................................................................................................................29
Finishing Calibration ........................................................................................................................33
1.2
Creating a printer profile for screen printing queues........................................ 34
1.3
Relinearizing the printer profile.......................................................................... 37
1.4
Regenerating the ICC profile ............................................................................... 38
1.5
Editing the dot gain or gray correction curve .................................................... 39
Chapter 2:
Advanced applications ........................................................................... 43
Selecting and editing substrates (Advanced Color option only) .....................................44
Editing dot gain correction and break-off percentage
(Advanced Color option only).......................................................................................................46
Using a DeviceLink profile..............................................................................................................48
Editing the paper color simulation (white point correction).............................................51
Editing the spot color list of a printer profile...........................................................................53
8
ProofMaster Calibrator User Guide
Contents
Chapter 1
ProofMaster Calibrator User Guide
Calibrating printers
11
Chapter 1:
Calibrating printers
Topics
In this chapter:
• Printer profiles 12
1.1 Creating a printer profile for photo printing,
color proofing and 1-bit proofing queues 14
• Preparing the printer, media and spectrophotometer 15
• Specifying the printer profile name and info 16
• Printer linearization 18
• Color gamut of the printer: selecting a printer gamut
optimization method 21
• Color gamut of the printer: adjusting ink limits (expert calibration only) 23
• Color gamut of the printer: adjusting ink mixing curves (expert calibration
only) 25
• Ink bleeding 27
• Color engine 29
• Finishing Calibration 33
1.2 Creating a printer profile for screen printing queues 34
1.3 Relinearizing the printer profile 37
1.4 Regenerating the ICC profile 38
1.5 Editing the dot gain or gray correction curve 39
ProofMaster Calibrator User Guide
Printer profiles
12
Printer profiles
About printer profiles
ProofMaster controls the output of inkjet printers through the use of printer profiles.
Printer profiles optimize output for printing and proofing applications by:
• Maximizing the color accuracy and quality of printed output
• Minimizing consumed quantities, and costs, of ink
A printer profile targets a highly specific combination of driver settings for a printer
model (the “printer setup”) and media. Each printer profile bundles interdependent
information into a neat package. Bundled information includes:
• Printer model-specific driver settings
• Compensation data for ink limits and linearization
• A custom-generated ICC profile
Printer profiles and ProofMaster queues
Each ProofMaster queue uses one printer profile. Many queues can use the same
profile. PerfectProof provides a library of printer profiles that target standard printer
setup/media combinations.
You can find existing printer profiles in:
• The ProofMaster library of printer profiles, which is distributed on CD, and
updated in the Support area of www.proofmaster.net.
• The ProofMaster 3/Calibration/ folder on your computer, which
can contain standard or user-defined printer profiles.
See also:
•
Creating and configuring ProofMaster queues > Output in the ProofMaster RIP
User Guide
ProofMaster Calibrator User Guide
Printer profiles
13
About calibration
Using ProofMaster Calibrator, you can create and maintain custom printer profiles
that target user-defined printer setup/media combinations. If you do so, you will
need to calibrate your printer. Calibration comprises the following major steps:
1
The calibration process proper describes unmanaged and managed behaviors
of the target printer setup/media combination by:
• Measuring unmanaged output, to capture nonlinearized results.
• Modeling ink limits and linearization, to optimize managed output.
2
The characterization process generates a custom ICC profile by:
• Measuring managed output, to capture linearized results.
• Generating and recording lookup data required for color conversion.
ProofMaster Calibrator User Guide
Creating a printer profile for photo printing,
color proofing and 1-bit proofing queues
14
1.1 Creating a printer profile for photo printing,
color proofing and 1-bit proofing queues
Process
The process of creating a printer profile for photo printing, color proofing and 1-bit
proofing queues goes as follows:
Calibration
1
Preparing the printer, media and spectrophotometer
2
Specifying the printer profile name and info
3
Printer linearization
4
Color gamut of the printer: selecting a printer gamut optimization method
5
Color gamut of the printer: adjusting ink limits (expert calibration only)
6
Color gamut of the printer: adjusting ink mixing curves (expert calibration
only)
Characterization
1
Ink bleeding
2
Color engine
3
Finishing Calibration
See also:
•
Creating a printer profile for screen printing queues on page 34
ProofMaster Calibrator User Guide
Preparing the printer, media and spectrophotometer
15
Preparing the printer, media and spectrophotometer
Preparatory steps
1
Prepare the following items:
• Printer, of the target model, and connected to the ProofMaster computer
• Media, of the target type
• Spectrophotometer, of a supported model
• Third-party ICC profiling software (Optional)
ProofMaster displays Lab values, but actually uses spectral data to perform
linearization. You must use a spectrophotometer to input spectral measurements
of linearization targets. Colorimeters do not provide spectral data.
On Windows PCs, driver software for the spectrophotometer must be installed on
the computer to which the printer is connected.
ICC profile generation by ProofMaster is a feature of the Advanced Color option.
2
Turn on the target printer and perform a nozzle check.
3
Log on with an administrator account to the ProofMaster computer.
4
Start ProofMaster RIP.
5
Set up the spectrophotometer:
• Configure the spectrophotometer for use by ProofMaster, if necessary.
• Calibrate the spectrophotometer. (Optional)
See also:
•
Setting up the spectrophotometer in the ProofMaster RIP User Guide
ProofMaster Calibrator User Guide
Specifying the printer profile name and info
16
Specifying the printer profile name and info
To define the printer profile
1
Do one of the following:
• Start ProofMaster Calibrator, select a queue and click Create printer
profile.
• If you’re in ProofMaster RIP, select a queue and click the Go to Calibrator
button ( ) in the main printer window.
Printers under calibration—and affected queues—can remain in use
during the calibration process.
Calibration respects all driver settings of the selected queue, and uses them
for profiling. It does not override or allow you to modify any driver settings.
However, calibration overrides all queue settings relating to color management. Affected items include:
• All settings on the Input tab
• Reference profile
• Solid black option
• Paper color simulation option
• Printer profile, if not already set to <none >
• Color edits
2
Enter a unique, descriptive file name for the new printer profile.
The default name includes the date and printer type. PerfectProof recommends also
including printer model and paper type, and using underscore characters (_)
instead of spaces to separate elements of the name. ProofMaster adds the “desktop
fingerprint” extension (.dfp) to the file name.
3
If necessary, provide a more detailed description of the printer profile in the
text box under the name of the profile.
For example, you may wish to enter record details of the target media.
4
Select Typical or Expert calibration.
Expert calibration allows you to perform the following additional tasks:
• Optimizing the printer gamut by adjusting individual ink channels
• Modifying mixtures of light and solid inks by adjusting mixing curves for
individual ink channels
5
Click Next.
ProofMaster Calibrator User Guide
Specifying the printer profile name and info
17
See also:
•
Printer linearization on page 18
•
Color gamut of the printer: adjusting ink limits (expert calibration only) on
page 23
•
Color gamut of the printer: adjusting ink mixing curves (expert calibration
only) on page 25
ProofMaster Calibrator User Guide
Printer linearization
18
Printer linearization
Previous steps
Make sure you have completed the previous steps:
1
Specifying the printer profile name and info, see page 16
Measuring the linearization chart
Measure the nonlinearized behavior of the target printer with the selected media.
Proceed as follows:
1
Load media in the printer.
2
Click Print to produce the linearization target.
ProofMaster starts a print job named Linear. The resulting linearization target contains one 18-patch step wedge for each channel/print head.
3
Allow at least 15-30 minutes for the linearization target to dry unless the chart
is obviously too wet.
4
Check the linearization target and make sure that it does not contain any
patches which are:
• Too wet to measure
• Dry, but too thick (too wet on application)
• Non-uniform in gloss
• Mottled
• Sticky
• Swollen
If the target shows any of these above-mentioned symptoms, you will have to cut
off patches and reprint it to be able to take accurate measurements. You are most
likely to observe these symptoms when printing on plastic media or with
ultraviolet-resistant inks, but they can also occur in other situations.
5
If necessary, use the cutter tool (
or too solid.
) and click the patches which are too wet
ProofMaster marks patches selected for cropping with an X, and does not
allow you to skip over adjacent patches.
ProofMaster Calibrator User Guide
Printer linearization
6
19
Measure the dry linearization target with the spectrophotometer.
A. Please Measure indicates that ProofMaster is waiting for you to measure
the next step wedge. This will change into Loading when ProofMaster is
reading the measured data. Do not go on until Please Measure reappears.
B. Before you start measuring, the Printer linearization window shows the
linearization target as gray. Each step wedge transforms into color patches as
you measure the printed chart.
C. The arrow indicates which step wedge to read next. If it is necessary to reread
a row (for example, because you read the wrong row, or the meter was tilted),
use the arrow to reset focus to the beginning of the target row.
7
If necessary, and if you are an expert user, use the cutter tool (
) and click
the patches which have an undesired Lab value. Print and remeasure the target.
8
Click Next.
ProofMaster Calibrator User Guide
Printer linearization
20
See also:
•
Color gamut of the printer: selecting a printer gamut optimization method on
page 21
•
Relinearizing the printer profile on page 37
ProofMaster Calibrator User Guide
Color gamut of the printer: selecting a printer gamut
optimization method
21
Color gamut of the printer: selecting a printer gamut
optimization method
Previous steps
Make sure you have completed the previous steps:
1
Specifying the printer profile name and info, see page 16
2
Printer linearization, see page 18
Defining the gamut of the target printer
Define the gamut that you want the target printer to use for the target media.
Proceed as follows:
1
Select one of the following options:
Option
Meaning
Maximum gamut
Maximizes the printer gamut by optimizing the
amounts of inks used. This option is generally
appropriate for photo printing queues.
Reference profile
Matches the color space of the printer as closely as
possible to that of the chosen reference profile, by
reduction. This option is generally appropriate for
proofing queues.
Select the target reference profile from the list of
available profiles.
Gray balance clipping This option is appropriate for some solvent printers
or if the other options do not produce satisfactory
results.
You may select a CMYK reference profile for a photo printing queue.
ProofMaster allows you to set up a reference profile that is incompatible with the
target printer setup/media combination, but warns you of incompatibility when you
advance to the next step in the calibration process.
The calibration process never modifies a reference profile, which represents a standard.
The reference profile is not embedded in the printer profile.
2
Click Next.
ProofMaster Calibrator User Guide
Color gamut of the printer: selecting a printer gamut
optimization method
22
See also:
•
Color gamut of the printer: adjusting ink limits (expert calibration only) on
page 23
•
Color gamut of the printer: adjusting ink mixing curves (expert calibration
only) on page 25
•
Ink bleeding on page 27
ProofMaster Calibrator User Guide
Color gamut of the printer: adjusting ink limits (expert calibration only)
23
Color gamut of the printer: adjusting ink limits
(expert calibration only)
Previous steps
Make sure you have completed the previous steps:
1
Specifying the printer profile name and info, see page 16
2
Printer linearization, see page 18
3
Color gamut of the printer: selecting a printer gamut optimization method,
see page 21
About adjusting ink limits
Inkjet printers sometimes cannot constrain output as required by the gamut of
reference profiles selected for calibration. You can manually increase or decrease
the channel-specific ink limits that ProofMaster sets for a printer profile on the
basis of the spectral measurements of the linearization strip.
To adjust ink limits
Proceed as follows:
1
Select an ink channel from the list.
2
Adjust the ink limit by moving the slider.
3
Observe the dynamic effects of the change.
A. Percentage shows the channel capacity
utilized at the current setting (position of the
slider).
B. Reference Lab shows the Lab value of the
selected channel at the current setting of the
slider.
C. You can click Reset to revert to the ink
limits set for all channels by ProofMaster.
D. The L slider shows a cross section of the
printer and reference gamuts at the requested
L value.
E. The chart shows the effects of the current
setting on the printer gamut, with the yellow
and green outlines delimiting the printer and
reference gamuts respectively.
4
Repeat steps 1 through 3 for each of the ink channels.
24
ProofMaster Calibrator User Guide
Color gamut of the printer: adjusting ink limits (expert calibration only)
See also:
•
Color gamut of the printer: adjusting ink mixing curves (expert calibration
only) on page 25
ProofMaster Calibrator User Guide
Color gamut of the printer: adjusting ink mixing curves
(expert calibration only)
25
Color gamut of the printer: adjusting ink mixing curves
(expert calibration only)
Previous steps
Make sure you have completed the previous steps:
1
Specifying the printer profile name and info, see page 16
2
Printer linearization, see page 18
3
Color gamut of the printer: selecting a printer gamut optimization method,
see page 21
4
Color gamut of the printer: adjusting ink limits (expert calibration only), see
page 23
About adjusting ink mixing curves
Ink mixing curves can sometimes direct printers to lay down more ink than target
media can absorb for sufficient drying. You can reduce ink output by manually
adjusting the channel-specific ink mixing curves that ProofMaster sets for a printer
profile. For example, you can correct over-inking by adjusting the mixtures of light
and dark inks applied by individual channels to low-quality paper or plastic media.
To adjust ink mixing curves
Proceed as follows:
1
Select an ink channel from the list.
2
Adjust the ink mixing curve in terms of light and solid ink utilization by moving
either handle of the ink-mixing lever (A).
A. The ink-mixing lever functions as a “virtual
border” that ink-mixing curves cannot cross.
Pulling the lever down changes the mixture
such that less light ink, and more solid ink, is
used.
B. The black diagonal line (B) models the
linearity of the ink channel given the
proposed settings. Pulling the ink-mixing
lever “too hard” can result in a non-linear
curve that compromises the quality of printer
output.
C. The colored background (C) models ink
laydown given the proposed settings.
D. You can click Reset to undo manual edits
performed on the curves themselves. This
action does not undo manipulation by the
ink-mixing lever.
ProofMaster Calibrator User Guide
Color gamut of the printer: adjusting ink mixing curves
(expert calibration only)
26
3
Repeat steps 1 through 2 for each ink channel.
See also:
•
Ink bleeding on page 27
ProofMaster Calibrator User Guide
Ink bleeding
27
Ink bleeding
Previous steps
Make sure you have completed the previous steps:
1
Specifying the printer profile name and info, see page 16
2
Printer linearization, see page 18
3
Color gamut of the printer: selecting a printer gamut optimization method,
see page 21
4
Color gamut of the printer: adjusting ink limits (expert calibration only), see
page 23
5
Color gamut of the printer: adjusting ink mixing curves (expert calibration
only), see page 25
Evaluating Managed Output
Evaluate the effects of the proposed ink limits and linearization on the behavior of
the target printer setup/media combination.
The ink bleeding chart demonstrates ink usage as limited by the previous steps in
this procedure. Visual examination is the basis for further limiting ink usage.
Proceed as follows:
1
If necessary, click Customize to customize the ink bleeding target.
You may wish to do customize ink combinations for proofers which can print
more than the four process colors, for example a seven-color proofer, because
you will otherwise have a (too) large number of color combinations.
2
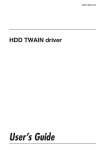
Set the ink combinations to be printed on the bleeding chart.
A. Ink names
B. Two-ink combination of red and blue
C. Three-ink combination of red, green and blue
D. Four ink combination of CMYK.
E. Select the inks and click the +, 2, 3 and 4 buttons to
add ink combinations
A
B
C
D
E
ProofMaster Calibrator User Guide
Ink bleeding
28
3
Select media size and source, if not already set up on the Layout tab of the target queue in ProofMaster RIP.
4
Load target media in the printer.
5
Click Print to produce the ink bleeding chart.
ProofMaster starts a print job named Inkbleeding.
6
Examine the ink bleeding chart immediately, without waiting for it to dry.
Study the patches from top to bottom, right to left (more ink to less ink). Paying
particular attention to the diagonal white lines that bisect each patch, identify physical problems, such as:
• Obviously wet
• Dry, but too thick (too wet on application)
• Non-uniform in gloss
• Mottled
• Sticky
• Swollen
7
Identify the first patches at which the above problems do not occur anymore.
8
Enter the values of these patches for each of the ink limits.
These data points are used for generating an ICC target.
9
Click Next.
See also:
•
Color engine on page 29
ProofMaster Calibrator User Guide
Color engine
29
Color engine
Previous steps
Make sure you have completed the previous steps:
1
Specifying the printer profile name and info, see page 16
2
Printer linearization, see page 18
3
Color gamut of the printer: selecting a printer gamut optimization method,
see page 21
4
Ink bleeding, see page 27
Characterizing Managed Output
Set up generation of the ICC target and custom ICC profile to embed in the printer
profile. ProofMaster complies with the Committee for Graphic Arts Technologies
Standards (CGATS) standards for data interchange format, and is compatible with
compliant applications such as GretagMacBeth ProfileMaker and Color Solutions
BasicColor.
Proceed as follows:
1
Select the preferred method for generating the ICC profile. Options include:
Option
Generation Methods
ICC Target
ICC Profile
ProofMaster Color Engine,
see page 30
ProofMaster-internal color engine
Combination of color
engines, see page 31
ProofMaster-internal
color engine
Any third-party,
CGATS-compliant
application
Third-party color engine,
see page 31
Existing third-party ICC
target
Any third-party
application
The ProofMaster Color Engine method is available if the Advanced Color
option is licensed. In this case, you do not need any third-party applications.
2
Click Next.
ProofMaster Calibrator User Guide
Color engine
30
ProofMaster Color Engine
Generate the ICC target for the compensated printer setup/media combination.
Proceed as follows:
1
Load media in the printer.
2
Select the number of patches required in the ICC target.
PerfectProof recommends 3000 patches as the upper limit.
3
Click Generate to produce a unique ICC target.
The Save and Load buttons support access to previously generated ICC
targets.
4
Click Print to produce the ICC target.
ProofMaster starts a print job named Target.
5
Click Next to advance to the Measure color chart window.
6
Using a spectrophotometer, measure the color patches in the ICC target.
Do not quit ProofMaster during the process of generating and calculating
the ICC profile. Instead, minimize the ProofMaster RIP and Calibrator
windows.
7
Specify the Black start value:
• If your printer has light black ink, you can leave the Black start value set at 0.
• If your printer does not have light black ink, it is recommended to set this
value between 40 % (for high-resolution printers) and 60 %.
8
Specify the Max. black value.
9
Select a color replacement technique:
• GCR (Gray Component Replacement), to replace process colors with black
over a greater tonal range
• UCR (Undercolor Removal), to replace process colors with black ink in the
shadow areas of an image and in neutral shades
ProofMaster Calibrator User Guide
Color engine
31
Combination of color engines
Generate the ICC target for the compensated printer setup/media combination.
Proceed as follows:
1
Load media in the printer.
2
Select the number of patches required in the ICC target.
PerfectProof recommends 3000 patches as the upper limit.
3
Click Generate to produce a unique ICC target.
The Save and Load buttons support access to previously generated ICC
targets.
4
Click Print to produce the ICC target.
ProofMaster starts a print job named Target.
5
Click Next to advance to the Measure color chart window.
6
Using a spectrophotometer, measure the color patches in the ICC target.
7
Click Export to export the reference CMYK values and measured data for
importing into the CGATS-compliant profiling application.
8
Generate the ICC profile:
• Through the CGATS-compliant profiling application, load the exported data
and generate the ICC profile.
• Through ProofMaster, click Choose to import the generated ICC profile.
Do not quit ProofMaster during the process of generating and calculating
the ICC profile. Instead, minimize the ProofMaster RIP and Calibrator
windows.
Third-party color engine
Generate the ICC target for the compensated printer setup/media combination.
Proceed as follows:
1
From ProofMaster, obtain the ink limit that the third-party application of your
choice should use for generating the ICC target.
2
Through the third-party application, generate the ICC target using the ink
limit.
3
Load media in the printer.
4
In ProofMaster Calibrator, click Choose to import and print the ICC target.
5
Browse to and select each of the files that comprises the ICC target.
ProofMaster Calibrator User Guide
Color engine
32
6
Through the third-party application, use the spectrophotometer to measure
the color patches in the ICC target.
7
Generate the ICC profile:
• Through the third-party application of choice, generate the profile.
• Through ProofMaster, import the generated profile.
Do not quit ProofMaster during the process of generating and calculating
the ICC profile. Instead, minimize the ProofMaster RIP and Calibrator
windows.
ProofMaster Calibrator User Guide
Finishing Calibration
33
Finishing Calibration
Previous steps
Make sure you have completed the previous steps:
1
Specifying the printer profile name and info, see page 16
2
Printer linearization, see page 18
3
Color gamut of the printer: selecting a printer gamut optimization method,
see page 21
4
Ink bleeding, see page 27
5
Color engine, see page 29
To finish calibration
Proceed as follows:
1
Click Finish to save the desktop fingerprint (*.dfp) file.
ProofMaster automatically sets this printer profile for your queue.
If necessary, you can now switch to ProofMaster RIP and test your queue to see
whether the printer profile produces satisfactory results.
The output of a color proofing queue can be verified if the ProofMaster Certify!
option is licensed.
See also:
•
Creating and configuring ProofMaster queues > Output in the ProofMaster RIP
User Guide
ProofMaster Calibrator User Guide
Creating a printer profile for screen printing queues
34
1.2 Creating a printer profile for screen printing
queues
Process
The process of creating a printer profile for screen printing queues goes as follows:
1
Preparing a linearization target, using ProofMaster RIP
2
Creating the printer profile, using ProofMaster Calibrator
Preparing a linearization target
ProofMaster provides a standard halftone step wedge whose percentages are read
by the densitometer. The name of this step wedge is Silk calibration
wedge.pdf and you can find it in the ProofMaster 3/Utilities folder.
Proceed as follows to prepare the linearization target:
1
Prepare the following items:
• Printer, of the target model, and connected to the ProofMaster computer
• Film media, of the target type
• Densitometer
2
Turn on the target printer, load film and perform a nozzle check.
3
Log in with an administrator account to the ProofMaster computer.
4
Start ProofMaster RIP.
5
Double-click the screen printing queue in the Output to pane.
6
Click the Input and Output tabs and make sure that all the profiles are set to
<none>.
7
Click the Screening tab and make sure that the halftone angle, frequency and
dot shape are set correctly.
8
Click OK to close the Queue Options dialog box.
9
In the main printer window, click the Add Job button (
10
Locate and select ProofMaster 3/Utilities/Silk calibration
wedge.pdf.
11
Select the appropriate print options and click OK.
).
ProofMaster Calibrator User Guide
Creating a printer profile for screen printing queues
35
See also:
In the ProofMaster RIP User Guide:
•
Creating and configuring ProofMaster queues > Input
•
Creating and configuring ProofMaster queues > Output
•
Creating and configuring ProofMaster queues > Screening
Creating the printer profile
1
In ProofMaster RIP, select the queue that you just configured for creating the
profile and where you printed the target on.
2
Click the Go to Calibrator button (
3
Enter a unique, descriptive file name for the new printer profile.
) in the main printer window.
The default name includes the date and printer type. PerfectProof recommends also
including printer model and paper type, and using underscore characters (_)
instead of spaces to separate elements of the name. ProofMaster adds the “desktop
fingerprint” extension (.dfp) to the file name.
4
If necessary, provide a more detailed description of the printer profile in the
text box under the name of the profile.
For example, you may wish to enter record details of the target media.
5
Click Next to advance to the Ink mixing window.
To create a printer profile for screening, you must generate a compensation curve
for the dot gain that occurs when printing halftone dots on film. The compensation
curve ensures that output managed by the queue is linearized.
6
Measure the patches using a densitometer.
7
Calculate the values to enter using this formula:
Compensation = StepPercentage * (StepPercentage/Measurement)
For example, if the densitometer measures 61% on the 50% patch, the calculation is
50*50/61 = 40.98, which rounds off to 41.
8
Enter the result of the calculation in the corresponding box and click Change.
9
Click Next to advance to the Build printer profile with external ICC window.
ProofMaster Calibrator User Guide
Creating a printer profile for screen printing queues
36
10
If necessary, click Choose to import an existing ICC profile, for a press or other
CMYK target, into ProofMaster.
The selected ICC profile is a CMYK profile that:
• Is chosen for embedding in the printer profile set on the Output tab of
the Queue Options dialog box.
• Serves as a “separation” profile.
ProofMaster produces rasterized CMYK output from RGB images by
converting incoming images’ colors:
• From those in the profiles set on the Input tab.
• To those in the embedded separation profile.
Do not quit ProofMaster during the process of generating and calculating
the ICC profile. Instead, minimize the ProofMaster RIP and Calibrator
windows.
11
Click Finish to save the desktop fingerprint (*.dfp) file.
ProofMaster automatically sets this printer profile for your queue.
If necessary, you can now switch to ProofMaster RIP and select input profiles for
your screen printing queue. This is not necessary, however, for applications that
rasterize only CMYK files.
See also:
•
Creating and configuring ProofMaster queues > Input and Output in the ProofMaster RIP User Guide
ProofMaster Calibrator User Guide
Relinearizing the printer profile
37
1.3 Relinearizing the printer profile
What does relinearizing mean?
Relinearization is the process of adjusting the existing calibration of the printer to
the color shift that this printer has gone through. This color shift can have various
reasons:
• Changing environmental conditions
• Degrading print heads
• Differences in media quality
When to relinearize?
You need to relinearize the printer profile in the following cases:
• When you notice a color shift in your prints
• When the printer shifts in such a way that the prints are out of tolerance of
the ISO specifications
To relinearize the printer profile
Proceed as follows:
1
If necessary, click the Printer tab.
2
Select the queue which contains the printer profile which needs relinearizing.
3
Click Relinearize profile > Edit.
4
Click Next to advance to the Printer linearization window.
5
Print and measure the linearization target.
6
Click Finish.
7
Check your proofs by means of certified jobs. Recalibrate your printer if the
results of the relinearization are not satisfactory.
See also:
•
Calibration on page 14
•
Printer linearization on page 18
•
Certifying a job (Certify! option only) in the ProofMaster RIP User Guide
ProofMaster Calibrator User Guide
Regenerating the ICC profile
38
1.4 Regenerating the ICC profile
About regenerating ICC profiles
You can regenerate the ICC profile if you wish to recalculate it with different settings
without having to go through the complete calibration process. You may wish to do
this to test which ICC profile produces the best results.
To regenerate the ICC profile
Proceed as follows:
1
If necessary, click the Printer tab.
2
Select the queue which contains the ICC profile which needs regenerating.
3
Click Regenerate ICC profile > Edit.
4
Follow the instructions in the Calibrate profile wizard to regenerate the ICC
profile.
See also:
•
Color gamut of the printer: selecting a printer gamut optimization method on
page 21
•
Color gamut of the printer: adjusting ink limits (expert calibration only) on
page 23
•
Color gamut of the printer: adjusting ink mixing curves (expert calibration
only) on page 25
•
Ink bleeding on page 27
•
Color engine on page 29
ProofMaster Calibrator User Guide
Editing the dot gain or gray correction curve
39
1.5 Editing the dot gain or gray correction curve
About dot gain correction
You can compensate for dot gain curves in the imagesetter or platesetter RIP. You
can also edit the dot gain curve if you want to make visual color adjustments.
The dot gain correction curve is saved in the ICC profile.
See also:
•
“Curves” in the Adobe Photoshop Help.
About gray balance correction
You can use gray balance correction to visually correct the gray balance.
To edit the dot gain or gray correction curve
Proceed as follows:
1
If necessary, click the Printer tab.
2
Select the queue of which you wish to edit the dot gain or gray correction
curve.
3
Do one of the following:
• Click Dot Gain correction > Edit.
• Click Gray correction > Edit.
4
Select an ink channel.
5
You can now do the following:
• Select the respective curve and drag it to the desired position
and/or
• Click on a point in the curve and fill in the input and output percentages of
this point.
6
Repeat steps 4 through 5 for each of the ink channels.
7
Click Save.
You can always click Reset to revert to the original position of the curves,
even after you have saved the curves.
ProofMaster Calibrator User Guide
Editing the dot gain or gray correction curve
40
8
If necessary, change the name of the printer profile.
You may wish to change the name of the printer profile to indicate that dot
gain compensation or gray correction has been used. If you do so, ProofMaster
will automatically use this new printer profile for the queue you selected in
step 2.
9
Click OK.
See also:
•
Creating and configuring ProofMaster queues > Output in the ProofMaster RIP
User Guide
Chapter 2
ProofMaster Calibrator User Guide
Advanced applications
43
Chapter 2:
Advanced applications
Topics
In this chapter:
• Selecting and editing substrates (Advanced Color option only) 44
• Editing dot gain correction and break-off percentage
(Advanced Color option only) 46
• Using a DeviceLink profile 48
• Editing the paper color simulation (white point correction) 51
• Editing the spot color list of a printer profile 53
ProofMaster Calibrator User Guide
Selecting and editing substrates (Advanced Color option only)
44
Selecting and editing substrates
(Advanced Color option only)
About substrates
If you have licensed the Advanced Color option, you can set up your ProofMaster
queue to simulate substrates. The process goes as follows:
1
You create an image of your substrate, for example by scanning it.
2
You select the substrate in ProofMaster Calibrator and edit it.
3
You select the option Substrate simulation for your queue.
To select and edit substrates
Proceed as follows:
1
Create a grayscale image of your substrate and save the file as PDF in the
ProofMaster 3/Substrates folder.
2
In ProofMaster Calibrator, click the Reference tab.
3
If necessary, select the queue for which you want to select and edit substrates.
4
Click Select and edit substrates > Edit.
5
Select your substrate from the list.
ProofMaster Calibrator User Guide
Selecting and editing substrates (Advanced Color option only)
6
45
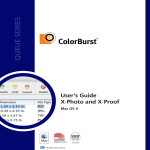
Adjust the curve, as shown in the examples below
C
D
A
E
B
Typical curve for lower-quality media used in
offset and gravure printing:
A. Intensity of the simulation
B. Tonal scale
C. Curve rises to 90 % in the midtones
D. Curve falls to 60 % in the shadows
E. Curve has 30 % effect in the highlights
Typical curve for textile printing: the effect of the
textile substrate is equally visible over the entire
tonal scale.
7
Click Save.
8
Type a name for the changed reference profile and click OK.
From now on, this reference profile will be used by your queue.
9
In ProofMaster RIP, double-click the queue, and then click the Proofing tab.
Notice that the reference profile is now the one with the information for substrate simulations.
10
Select the option Substrate simulation and click OK.
ProofMaster Calibrator User Guide
Editing dot gain correction and break-off percentage
(Advanced Color option only)
46
Editing dot gain correction and break-off percentage
(Advanced Color option only)
About dot gain correction and break-off percentage
For flexography or gravure printing, you can edit the dot gain curves of the reference profile of your queue and/or insert a break in the curve to simulate loss of
detail in the printing process, which is typical for these printing techniques.
To edit dot gain correction and break-off percentage
Proceed as follows:
1
In ProofMaster RIP, double-click a queue, then click the Proofing tab and
check which reference profile this queue uses.
This reference profile will be replaced by the reference profile with the edited
dot gain correction curves.
2
In the ProofMaster Calibrator, click the Reference tab.
3
If necessary, select the queue for which you want to edit a dot gain correction
curve.
4
Click Dot Gain correction and % break-off > Edit.
5
Select the ink channel for which you want to specify dot gain correction.
6
Specify the Break-off position and click Break to apply it.
7
Do one of the following:
• Enter the input percentage and measured output percentage in the In and
Out text boxes respectively.
• Click on the curve to add an adjustment point, and drag the point to the
required position. The input and output percentages change correspondingly in the In and Out text boxes.
8
Repeat steps 5 through 7 for all the ink channels.
9
Click Save.
10
Type a name for the changed reference profile and click OK.
ProofMaster Calibrator User Guide
Editing dot gain correction and break-off percentage
(Advanced Color option only)
11
47
In ProofMaster RIP, double-click the queue, and then click the Proofing tab.
Notice that the reference profile is now the one with the edited dot gain
curves.
ProofMaster Calibrator User Guide
Using a DeviceLink profile
48
Using a DeviceLink profile
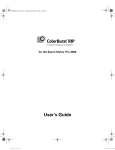
About DeviceLink profiles
✗
To improve the color accuracy of your proofs, you can create and use a DeviceLink
profile. A DeviceLink is a link between the reference profile and the printer profile of
your queue. The DeviceLink profile directly transforms color from one color space to
another, without using an intermediate, device-independent color space (CIELab).
Lab
CMYK
✗
CMYK
You can use a DeviceLink profile in the standard version of ProofMaster.
To create and tune a DeviceLink profile however, you need to license the
Advanced Color option.
To create a DeviceLink profile (Advanced Color option only)
Proceed as follows:
1
In ProofMaster RIP, make sure that the queue in which you want to use a
DeviceLink has a reference profile and a printer profile. Double-click the queue
and check the Proofing and Output tabs.
2
Click OK to close the Queue Options dialog box.
3
In ProofMaster Calibrator, click the DeviceLink tab.
4
If necessary, select the queue for which you want to create a DeviceLink.
5
Click Create DeviceLink > Create.
6
Type the name of the DeviceLink and click Generate.
7
In ProofMaster RIP, double-click the queue, and then click the Proofing tab.
Notice that the DeviceLink which you just created is now selected for this
queue.
ProofMaster Calibrator User Guide
Using a DeviceLink profile
49
To tune a DeviceLink (Advanced Color option only)
Tuning a DeviceLink can improve the delta E values for proofing and can make color
reproduction more accurate through an iterative process. However, tuning can only
be effective if the following conditions are met:
• The reference profile must be suitable for proofing on the printer with the
respective media. If not, the combination of the reference profile with the
printer profile may not be optimal.
• The quality of the printer profile must be good enough.
Proceed as follows:
1
Click the DeviceLink tab.
2
Click Tune DeviceLink > Tune.
3
Click Print target.
4
Select the target’s position and orientation and click OK.
5
Click Next.
6
Measure the printed DeviceLink target with a spectrophotometer.
7
Wait until all the rows of patches display the measured data, and then click
Next.
An overview of all measured patches is displayed, with their respective reference and measured Lab values, and the difference between both as delta E
values.
8
Click Next.
A summary of the delta E statistics is displayed:
• If this is the first proof which you printed and measured, this set of measurements will be called “Measurement0“. This is the current status “as is”,
without any adjustments made.
• If this is the second proof and measurement, the set of measurements will
be called “Measurement1“, indicating that these are the first adjustments
you have made.
9
You can now do one of the following:
• If the results are not satisfactory, click Refine. The target will automatically
be reprinted and you can then measure this refined target again. Repeat this
step a number of times, typically three to four times, until the results are
satisfactory.
50
ProofMaster Calibrator User Guide
Using a DeviceLink profile
• If the results of a particular set of measurements are satisfactory, select the
set in the list and click Finish. For example, you may have four sets of
measurements, of which the set “Measurement3” had the best results. If so,
select “Measurement3” in the list and click Finish.
ProofMaster Calibrator User Guide
Editing the paper color simulation (white point correction)
51
Editing the paper color simulation (white point correction)
About paper color simulation (white point correction)
If you selected the option Paper Color Simulation when you configured your
queue (Proofing tab of the Queue Options), you can change the simulation of the
paper color in ProofMaster Calibrator. This function changes the white point in the
printer profile in accordance with the reference profile.
To edit the paper color simulation (white point correction)
Proceed as follows:
1
In ProofMaster Calibrator, click the DeviceLink tab.
2
Select the queue of which you want to change the paper color simulation.
A reference profile and a printer profile need to be specified for this queue.
3
Fill in the target values ( in Lab or LCh) of the simulation of your choice.
Notice the CMYK values of the inks at the bottom of the White point
correction dialog box.
4
Click Print to print two patches: one with the current values and one with the
adjusted values.
A job named “paper white target” is added to the queue. If the values you
specified are out of the printer’s gamut, it will be indicated on the print.
52
ProofMaster Calibrator User Guide
Editing the paper color simulation (white point correction)
5
Adjust and print the values until the result is satisfactory.
6
Click Save and, if necessary, change the name of the printer profile.
The printer profile you have just saved will automatically be used by the
respective queue.
ProofMaster Calibrator User Guide
Editing the spot color list of a printer profile
53
Editing the spot color list of a printer profile
About editing the spot color list of a printer profile
You can add spot colors to a printer profile, and you can do this in various ways:
• You can load spot colors from an existing printer profile or a spot color
library.
• You can measure a spot color on a proof and save the measured values.
• You can specify the spot color’s values and opacity.
Once you have defined spot colors, you can also tune their visual representation.
The spot colors which you add to the printer profile take precedence over any other
custom or standard spot color libraries.
See also:
•
Spot color handling in the ProofMaster RIP User Guide
To edit the spot color list of a printer profile
Proceed as follows:
1
Click the Spot Color tab.
2
Select the queue which has a printer profile of which you want to edit the spot
color list.
3
Click Select and Tune Spot Colors > Edit.
4
You can now do one of the following:
• To add spot colors to the printer profile
• To remove a spot color from the printer profile
• To edit the properties of a spot color
• To tune the visual representation of the spot color
• To load spot colors from an existing printer profile or spot color library
To add spot colors to the printer profile
1
Click the plus button (
2
Type a name for your spot color.
) below the spot color list
ProofMaster Calibrator User Guide
Editing the spot color list of a printer profile
54
3
Do one of the following:
• To enter the values of your spot color manually, select CIELab or CMYK
values and specify the respective values. Specify the Opacity by moving the
slider or by entering a value.
• Measure the spot color using a spectrophotometer.
4
If you have purchased and installed the Advanced Color option, you can also
add tints of a spot color by specifying a percentage in the % box and clicking
the plus button (
).
A
A. Tint of a spot color
5
Click Change.
6
Click OK.
To remove a spot color from the printer profile
Select a spot color in the list and click the minus button (
).
To edit the properties of a spot color
1
Select a spot color in the list and click Edit.
2
You can now the following:
• Change the name of the spot color
• Select CIELab or CMYK and change the values of the spot color
• Change the Opacity of the spot color by moving the slider or by entering a
value.
To tune the visual representation of the spot color
1
Select a spot color in the list and click Tune.
2
If necessary, move the slider from Fine to Coarse to increase the variations.
3
Click Print to print the variations on the selected queue.
A job named “SpotColors” is added to the queue.
4
Check the proof and determine the printed patch which matches your reference spot color best.
ProofMaster Calibrator User Guide
Editing the spot color list of a printer profile
5
55
Indicate this “best match” Spot Color Tuning dialog box and click OK.
The values of the spot color are automatically adjusted to the values of the
patch you selected.
6
Click OK.
To load spot colors from an existing printer profile or spot color library
1
Click Load.
2
Select a printer profile (*.dfp) or spot color library (*.cxf ) and click Open.
The ProofMaster folders where you can find printer profiles and spot color
libraries are:
• ProofMaster/Calibration for printer profiles
• ProofMaster/Libraries for spot color libraries
You can also use cxf libraries from other cxf-compatible programs.
3
Click Done.
56
ProofMaster Calibrator User Guide
Editing the spot color list of a printer profile
ProofMaster Calibrator User Guide
Index
57
Index
Numerics
C
1-bit proofing queues
calibrating
creating printer profile 14
about ~ 13
printers 29
calibration
A
adding
spot colors to the printer profile 53
adjusting
ink limits 23
ink limits (expert calibration only) 23
ink mixing curves 25
ink mixing curves (expert calibration only) 25
finishing 33
characterizing
managed output 29
chart
measuring linearization ~ 18
color engines 29
combination 31
proofmaster 30
color gamut of the printer
B
bleeding
ink ~ 27
break-off
about ~ 46
editing ~ percentage 46
adjusting ink limits (expert calibration only) 23
adjusting ink mixing curves (expert calibration
only) 25
color proofing queues
creating printer profile 14
combination
~ of color engines 31
correction
dot gain ~ 46
gray balance ~ 39
white point 51
ProofMaster Calibrator User Guide
Index
58
creating
E
DeviceLink profile 48
printer profile for 1-bit proofing queues 14
editing
printer profile for color proofing queues 14
break-off percentage 46
printer profile for photo printing queues 14
dot gain correction 46
printer profile for screen printing queues 34
dot gain curve 39
curves
ink mixing ~ 25
gray correction curve 39
percent break-off 46
properties of a spot color 54
spot color list of a printer profile 53
spot color list of a printer profile, about ~ 53
D
defining
printer profile 16
DeviceLink profile
about ~ 48
substrates 44
engine
color ~ 29
evaluating
managed output 27
creating 48
tuning 49
using 48
dot gain correction
about ~ 39, 46
editing 46
dot gain curve
editing 39
G
gamut of the printer
defining 21
selecting a printer gamut optimization
method 21
gray balance correction 39
gray correction curve
editing 39
ProofMaster Calibrator User Guide
Index
I
59
media
preparing 15
ICC profiles
regenerating 38
mixing curves
ink ~ 25
ink limits
adjusting (expert calibration only) 23
ink mixing curves
N
about 25
adjusting (expert calibration only) 25
name
of the printer profile, specifying 16
L
P
linearization chart
measuring 18
linearization target
preparing 34
linearizing printer 18
paper color simulation 51
percent break-off
editing 46
percentage
editing break-off ~ 46
loading
spot colors from an existing printer profile or
spot color library 55
photo printing queues
creating printer profile 14
preparing
linearization target 34
M
media 15
printer 15
managed output
spectrophotometer 15
characterizing 29
evaluating 27
printer
linearization 18
measuring
preparing 15
linearization chart 18
printer gamut optimization method
selecting 21
ProofMaster Calibrator User Guide
Index
60
printer profile
relinearizing
creating 35
definition 37
creating ~ for screen printing queues 34
printer profile 37
defining 16
when 37
editing spot color list 53
relinearizing 37
removing
spot color from the printer profile 54
removing spot color 54
specifying name and info 16
printer profiles
about ~ 12
creating ~ for 1-bit proofing queues 14
creating ~ for color proofing queues 14
creating ~ for photo printing queues 14
profile
creating a printer ~ 35
DeviceLink ~ 48
printer ~ 12
profiles
regenerating ICC ~ 38
ProofMaster
color engine 30
properties of a spot color
editing 54
S
screen printing queues
creating printer profile 34
selecting
substrates 44
simulation
paper color 51
spectrophotometer
preparing 15
spot colors
adding ~ to the printer profile 53
editing properties 54
editing the list of ~ of a printer profile 53
loading from an existing printer profile or spot
color library 55
remove from printer profile 54
R
tuning the visual representation 54
substrates
regenerating
ICC profiles 38
about 44
editing 44
selecting 44
ProofMaster Calibrator User Guide
Index
T
target
preparing a linearization ~ 34
target printer
defining gamut 21
tuning
DeviceLink 49
visual representation of a spot color 54
W
white point correction 51
61
62
ProofMaster Calibrator User Guide
Index