1
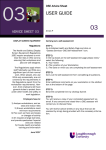
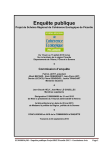
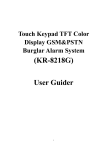
TFT Color Display Networking Alarm System
User Guide
1. Introduction
1.1 General Description
TFT Color Display Networking Alarm System is designed for both home and
business use and is built on leading microprocessor technology.It is a choice of
stability, reliability, security, and user friendliness.It has a built-in siren with super
high sound volume of 120 dB that is loud enough as an alert for most noisy
environment. The system allows at most 6 groups of phone number set up for calling
notification that make sure you will not miss any happening of incident. The LCD on
panel displays clear system message and the location of alert, together with the
keypad on board.Wireless connecting PIR,door contact,smoke detector,gas
detector,panic button etc.Widely used in homes, factories, schools, shops,
convenience stores, financial and banking workplace, community center and
residential area to provide protection to valuable assets.
1.2 System Features
■ Large TFT color display, humanized menu, voice prompt and easy to use.
■ Allow up to 99 wireless defense zones and 2 wired zones.
■ Each can be defined as one of the 8 zone types including NORMAL, STAY,
INTELLIGENT, EMERGENCY, CLOSED, HELP SENIOR, WELCOME and
CHIME ; And each zone can be realized switch alarm independently. Can realize
single defence zone or part of the defence zone to arm.
■ Four sets of scheduled arm/disarmed function, each timed arm/disarm you can
select the included period of time and different defense zone, eliminating of need of
the manual procedure, realizing the beauty of automatic controls.
■ The host will automatically rob line to call 6 groups preset telephone number
when alarm; not lost number without power.
■ Support ISD automatic voice mailbox for playback message upon alert.
Maximum length of voice message is 10 seconds.
■ Telephone (phone) long-distance telephone control for arming, disarming,
monitoring.
■ Wireless intelligent study coding, compatible with PT2262 normal encoding
and a 1527 encoding, convenient and flexible for adding or reducing accessories.
Maximum support 150 remote control and 150 sensors.
■ Integrated clock chip,time will not lose without power.
■ Unique black box features, display most recent 72 disarmed records and 102
recent alarm recording. Accurately shows the alarm time and zones number.
■ Compatible with the international alarm networking protocol CONTACT ID.
Can realize alarm network. With alarm dial-up and rob line functions.
2. Anatomy of the TFT Color Display Networking Alarm System
2.1 System Components and Usage
Arm
The system is at a fully ready status where all detectors are activated in a
working state, when the some events ( burglar, fire, gas leak, etc ) happened and
detected, , alarm system alarm right away. In a ARM status, LCD screen show
"Arming".
To activate using remote control: press [ ARM ] key once.
To activate using keyboard: on panel keyboard [ ARM ] keys once.
STAY ARM
This is for partial arming of the alarm system when there are people at home, only
some of the selected sensors are activated and could be triggered by events.
In a STAY ARM status, color LCD screen show " Stay arming".
To activate using remote control: press [STAY ARM] key once.
To activate using keyboard: on panel keyboard [ARM] keys twice.
DISARM
All sensors(except the detectors in Emergency and the emergency button on remote
control) are deactivated and will not be respond to any events.
In a DISARM status,color LCD screen show " Disarming ".
To activate using remote control: press [DISARM] key once.
To activate using keyboard: on panel keyboard [DISARM] keys once.
EMERGENCY
When an emergency occurs, press emergency button on the remote or the
EMERGENCY button on panel to activate alarm.
Remark:
If password on keyboard is enabled, you need to enter password before other
operations, the initial password is 1234.
2.2 System Setup
2.2.1
Panel Setup
Alarm panel should be installed at a central location with best transmission to all the
wireless sensors and accessories. Keep the panel well away from large metal objects
or household appliances with high-frequency interference, and avoid barriers such as
concrete walls with metal frame inside and fire doors.
Alarm Panel Diagram
2.2.
2.2.22
Summary of Indicators
Function
Built-in speaker
Power LED
Indications
short "beep" once
Description
Confirming key signal
received
"beep", "beep" two short Exit configuration or learn
tones
succeed
"beep", "beep", "beep" Error indication
three short tones
Voice prompt
The function and status of
the prompt voice
Light up
Panel
external
power
supply is normal
Is off
External AC blackout
internal
supply
ARM LED
TFT color display
battery
power
Light up
The panel is alarming
Is off
Without alarming
Flashing
Delay alarm
Show"Disarming"
In DISARM status
Show "Arming"
In ARM status
Show "Stay arming"
In STAY ARM status
3
Show "xx zone ALARM"
Enter
into
ALARM
status,LCD show the exact
zones information
Show "98 zones ALARM"
EMERGENCY button was
pressed
Show "97 zones ALARM"
The panel was detached or
moved,the
anti-detach
switch alarm
Installation of Panel
3.1 Alarm Panel Initial Setup
First connect telecom line to the panel outside interface, the inside interface connect a
telephone. Siren plug to the panel siren interface, the live power adapter output end
into panel hole. At this time,voice prompt "welcome to use intelligent voice alarm".
The power indicator light up.Finally,set the backup battery switch to [ON] state.
Remark: exterior line connect the telephone line from telecommunication bureau.
Inside connect telephone. Not interchangeable in case no dialing.
3.2 Setting Alarm Telephone Numbers
The model can support 9 groups of phone numbers. Each phone number shouldn't
exceed 31 digits.
If you want to set the first group phone number as 13812345678,do as follow:
Press【menu】to enter main menu.
Press【1】 to enter Alarm number settings
Press【1】again to choose alarm numbers ,and then input the number 13812345678
after Group 1 ,then press 【OK】to save .Press 【ESC】can back to the menu.The other
groups number by such analogy.
Remark : For users who use the telephone line extension,you should dial a number
(such as "9") to pick up a dialing tone, then with your command you should add to
this number a " * ". So the completed command becomes 9*13812345678#
Note : 7,8,9 group number for HELP SENIOR zone and panel will only dial these
three groups number when that specific zone alarming.
lete alarm telephone number
3.3 De
Delete
If you want to delete the first group alarm number ,please do as follows :
Press【menu】to enter main menu.
Press 【1】 to enter Alarm number setting
Press【1】again to choose alarm numbers ,and then press MENU to delete the first
group number 13812345678 ,then press【OK】to save the settings .Press 【ESC】can
back to the menu.The other groups number by such analogy.
3.4 Pre-record Voice Message
Alarm panel will play a pre-recorded voice message after the alarm call when a
pre-set phone number upon alarm. To record customized message:
Press 【menu】to enter main menu.
Press 【4】 to enter message recording,and then press【1】 to start recording , speak
your message to the panel for recording
System will record 10 seconds and then automatically exit; or press 【ESC】 to end
recording in advance when in the recording status.
3.5 Add remote control
Press【menu】to enter main menu.
Press 【2】 to enter Add accessories
Press【 1】 to enter add remote control ,the menu would be indicate that "type the
Number (00~99)",(if add 1st remote control ,please input 01,add 22th remote
control ,please input 22),then press【OK】to save the settings.Then press any key of the
remote control to send a signal to the alarm panel,voice prompt "Set successful" and
LCD display "has been saved" means successful.
If beep only once means this remote control has been configured before.Alarm panel
can configure up to 150 remote control of different addressing.
3.6 Delete the remote control
Press【menu】to enter main menu.
Press【2】 to enter Add accessories
Press【3】 to enter Del remote control ,then "type the Number (00~99)",if delete 1st
remote control ,please input 01;delete 22th remote control,then input 22,Press【**】to
delete all remote controls ,later press【OK】to delete certain zones remote control or all
remote controls.
3.7 Add detector
Press【menu】to enter main menu.
Press【2】to enter Add accessories
Press【2】to enter add detector ,the menu would be indicate that "type the Number
(00~99)",if add 1st detector ,please input 01;add 89th,,input 89,later press【OK】to save
the settings.Then press any key of the detector to send a signal to the alarm
panel,Panel beep twice ,voice prompt "Set successful" and LCD display "has been
saved" means successful.
If beep only once means this detector has been configured before.Alarm panel can
configure up to 150 detectors of different addressing.
3.8 Delete detector
Press【menu】to enter main menu.
Press【2】 to enter Add accessories
Press 【 4 】 to enter Delete detector ,then "type the Number (00~99)",if delete 1st
detector ,please input 01;delete 89th,,input 89,Press【**】to delete all detectors ,later
press【OK】to delete certain zones detector or all detectors.
4. Command Reference
Voice Open and When remote voice open or closed, 1 for open,2 for closed,
Closed
system default is open.
Syntax:
Example:when press arm/disarm on the remote control,the host horn
【Menu】>【3】>【3】 speech shut down.
>【1/2】
Press【Menu】+【3】+【3】, then press【2】to close the voice.
Remote
Control Press the remote control arm/disarm siren sound open or
Sound
closed,for 1 means open, zero means close, the system default is
open.
Syntax:
Example: to put the remote control Numbers for 01,press
【Menu】>【3】>
arm/disarm key,siren sound not ring.
【4】>【00-99】>【1/2】
Press menu first, press 3,then press 4, input 01 then press 【OK】,
then press 2 to shut off.
Enable or disable
of the anti-tampering
of telephone cord
Syntax:
【Menu】>【3】>【9】
>【1/0】
Set length of
Siren sound
Syntax:
【Menu】>【3】>【5】
> 【 sound time 00-20
minutes】
Set delay for
system arm
Syntax:
【Menu】>【3】>【1】
> 【 arm delay time
00-99seconds】
Set the time of
delay for alarming
Syntax:
【Menu】>【3】>【1】
> 【 alarm delay time
00-99 seconds】
Siren volume
adjustment
Syntax:
【Menu】>【3】>【5】
>【Siren sound 00-99】
Remote control
password
Syntax:
【Menu】>【3】>【2】
> 【 4digits new
password】
Cut the phone cord will trigger the alert. 0 is off and 1 on,
system defaults is off
off..
Example: telephone lines have been cut off, request the host siren
sound
Press menu,then press 3, then press 9, then press 1 to select
detection open, then press【OK】.
Set alarm length of sounding when panel alarm, could be set to
0-20 minutes, factory default is 1 minute.
Example: the user need to set up alarm time for five minutes after
the alarm
Press the menu, then press 3, then press 5;
Press menu key twice to delete the original time, then input 05 then
press【OK】. It was set for 5 minutes.
Upon armed from the remote control or alarm panel, the alarm
panel is set to delay 0 - 99 before at the ready status of ARM.
The system default is 00 seconds.
Example: users need to set the delay time for 60 seconds
Press menu, then press 3,then press 1;
Press menu key twice to delete the original time, then input 60, then
press【OK】 which was set for 60 seconds.
ar
m, it can be set to 0-99 seconds,
Set the time of delay upon al
alar
arm,
the system default is 00 seconds.
Example: the user need to set alarm delay time for 60 seconds
Press the menu, then press 3, then press 1;
Then press down key let the cursor moves down,press menu button
twice to delete the original time, then input 60, then press 【OK】
which was set for 60 seconds.
me is from 00 to 99 as largest, system default is the
Valid volu
lume
largest.
Example: users need to set volume to 50.
Press menu,then press 3,then press 5,then press down key let the
cursor moves down;
Press menu button twice to delete the original volume, then input 50,
then press 【OK】 which was set for 50.
This password for the user remote operation and keyboard lock
password. System default password is 1234.
Example: the users need to change the new password for 4321.
Press the menu,then press 3, then press 2;
Then press menu button four times to delete the original password,
then input 4321 and press 【OK】. The new password is changed to
4321.
Keyboard
password protection
function
Syntax:
【Menu】>【3】
> 【 2 】 > 【 keyboard
password 1/0】
To enable the password protect of keyboard. System default
password is 1234, default is off.
Example: the users need to open the keyboard password protection
function
Press the menu, then press 3, then press 2, and then press down key
let the cursor moves down to a New password column, then press 1
means open, then press【OK】.
Clock display Power
saving mode switch
Syntax:
【Menu】>【3】
>【2】>【Backlighting
switch 1/0】
Used to control the clock display energy saving mode,for 0
means close, for 1 means open. The default is open.
Open is when the alarm panel is in standby
standby,, after the clock
the alarm panel automatically shut down
display 20 seconds,
seconds,the
with color backlight to enter power saving mode.
Close is when the alarm panel is in standby
standby,, color screen will
light on with clock display.
Example: the user needs to close the clock display energy saving
mode.
Press menu, then press 3, then press 2, and then press down key
let the cursor moves down to Backlight column, then press 0 means
close, then press【OK】.
Number of ring
ringss The system default is 8 times. 0 means the remote operation is
not allowed and disabled
Syntax:
【Menu】>【3】>【6】 Example: the user needs to set up number of rings before picking up
to 6.
>【00-20】
Press menu,then press 3,then press 6;
Then press menu twice to delete the original times,then input
06,press【OK】.
Example:The users need to close remote control function.
Press menu,then press 3,then press 6;
Press menu twice to delete the original times,then input 00,then
press 【OK】.
Date and time Set the system date and time
settings
Example: the time now for 09:00 on 1st May,2012.
Syntax:
Press the menu, then press 6, input 2012-05-01 09:00:00 then press
【Menu】>【6】>【date 【OK】.
and time】
The weeks no need to input, the system will automatically
calculated.
Scheduled
Scheduled Arm/disarm to the alarm panel, alarm panel into the
Arm/Disarm
arm/disarm status in the set time, can be set four groups
Syntax:
【Menu】>【3】>【7】
> 【 01-04 】 >
【Arm/disarm time and
weeks selection and the
scheduled time/ week to
open or closed】
Restore factory
setting
settingss
Syntax:
【Menu】>【3】>【0】
Total
System
Rese
Reset
Syntax:
Press and hold
the menu key to power
on.
arm/disarm time. And defense zones and weeks can be selected
selected..
And can choose the group scheduled Arm/disarm with open or
closed.
Example: the user need from Monday to Friday, alarm system into
arm state at 23:00, the arm defence zone is set to 1-50 defense zone,
07:00 into the disarm state.
Press menu, then press 3, then press 7, then press 01, then press
【OK】;
Press the menu button four times to delete the original arm time,
input 23:00, then press down key;
Press the menu button four times to delete the original disarm time,
input 07:00, then press down key;
Press the menu button twice to delete Saturday and Sunday, then
press down key;
Press 1 to choose scheduled open, then press【OK】.
The system restore the factory Settings
(this function will restore all set to factory Settings: eliminate all of
the telephone number, no break detection, remote alarm sound when
open,the system will automatic answer after rang the bell eight
times.When Alarm siren sound time for 1 minute. Password
recovery for 1234, remote control and detector unchanged, speech
function open)
Under the condition of the customer forgot password, can
only use the method of Total System Reset to the factory state.
First break the power source of alarm panel, and then hold the
"menu key" to electricity. The panel will keep buzzer, five seconds
to loosen the menu key. At this time restore to empty state, the
password is1234, and delete all the remote control and detectors.
1. Defence zones of related parameter Settings
Settings::
Single defen
defencce zone
networking
events
code
Syntax:
【 Menu 】 > 【 5 】 >
【defence zones 00-99】
>【event code 101-631】
Used for setting 0-99 defence zone sending networking events
code (101-631) when connecting alarm with networking center,
the system default 0-99 defence zones are sending the burglar
alarm (130) information, the meaning of events code are as
follow:
100 means medical aid
110 means fire alarm
121 means robber alarm
122 means mute robbery alarm
130 means burglar alarm
Whether defen
defencce
zone alarm siren
Syntax:
【 Menu 】 > 【 5 】 >
【defence zones 00-99】
>【alarm siren 1/0】
Defence
Zone
Types
Syntax:
【 Menu 】 > 【 5 】 >
【defence zones 00-99】
>【zones type 1-8】
131 means peripheral burglar alarm
151 means gas alarm
Example: set the second defence zone alarm and center networking
sending medical aid information.
Press the menu, then press 5, input 02, then press【OK】;
Press the menu button three times to delete the original event code,
then input100, then press【OK】.
Remark:if the alarm panel is not connected with the alarm
center,then no need to set this.
Used for setting 0-99 defence zone alarm, the sirens need or not.
Can set ring or not ring, 1 for ring, zero for not ring. The system
default is 1.
Example:set the second defence zone alarm, the alarm panel will
dial-up, but no siren ringing.
Press the menu, then press 5, input 02, then press【OK】, press down
key let the cursor moves down to siren;
Then press 0, screen display "off", then press【OK】.
To set 99 zone type
typess, 00-99 represents 0-99 zone number
numberss, 1-8
represents one of the 8 zone type
typess:
1. NORMAL
2. STAY ARM
3. INTELLIGENT
4. EMERGENCY
5. CLOSED
6. CHIME
7. WELCOME
8. HELP SENIOR
Example: set the second defence zone for the stay arm zone.
Press menu,then press 5, input 02,then press【OK】;
Press down key let the cursor moves down to zone types;
Then press 2, screen display "STAY ARM", then press 【OK】.
Remark: About zone types details,please refer to the Definitions of
Zones instruction in this manual.
Set mode of wired Set wired alarm zone to NO
NO,, NC or EOL
EOL.. The zone number of
51-5
alarm zone
51-522 are wired defense zones, system default is 51-5
51-522 are wired
Syntax:
zones with NO mode.
【 51 】 + 【 wired zones 0 means NO, 1 means NC,2 means EOL
+【0/1
0/1
/2
+【##】 NO means short-circuit to alarm
51-5
51-522】+
0/1/2
/2】+
NC means open-circuit to alarm
EOL mens end of line to alarm
Example: Set 51 zone to NC
Press menu,then press5,input 51,then press【OK】, press down key
let the cursor moves down to Wired mode,then press 1, screen
display NC,then press【OK】.
Remark: 1)when set 51 defence zone to be NO,in arm status,it will
alarm from NC to NO between Z51 and GND;
2)when set 51 defence zone to be NC,in arm status,it will alarm
from NO to NC between Z51 and GND;Generally connecting with
two ends of ALARM of wired PIR detector.Or wired magnetic
door,infrared beams,wired accessories of NC alarm.
3)
3)When set 51 defence zone to be EOL,there is a 2.2K resistance
between Z51 and GND,the alarm panel will prompt 51 defence
zones alarm when in NO or NC between Z1 and GND,used to strict
engineering occasions.
Sub-zone dial
System default is 00-99 defense zone
zone,, all will make call from the
first to the sixth group phone number upon alarming.
Syntax:
【 Menu 】 > 【 5 】 > Example One: when setting 2 defence zone alarm, dial Numbers of
【defence zones 00-99】 123.
>【Points defense zone Press menu, then press 5, input 02, then press【OK】,then press down
key let the cursor moves down to sub-zone dial;
dial-up 123456】
Press the menu three times to delete 456, then press【OK】.
Example Two: set 3 defence zone alarm only dial Numbers of 5.
Press the menu, then press 5, input 03, then press 【OK】, then press
down key let the cursor moves down to sub-zone dial;
Press the menu six times to delete original numbers and then input 5
then press【OK】.
2. The related settings with alert-receiving center networking
networking::
Center
alarm
numbers
Syntax:
【Menu】>【1】>【2】
> 【 center alarm
numbers】
Used to set the alarm panel and the alarm center networking,
alarm receiving center of the number. If not connect with alarm
receiving center,please don't set the two groups of number.
Example: Set Networking center number for 233880065
Press menu, then press1, then press 2 【 center alarm numbers 】 ,
input 23840065 behind Group 1,then press【OK】. Means the first
group networking center alarm number has been set for 23880065.
Remark: if the alarm panel is not connect with the alarm receiving
center, no need to set this.
The related parameter
with alarm receiving
center networking
Syntax:
【Menu】>【3】>【8】
>【relevant parameter】
Used to set the alarm panel with alarm center networking. Set
CID user code, arm/disarm information is sending or not
not,, open
test
.The setting of self-test time
or close of the timing selfself-test
test.The
time,, to
test information
choose which several weeks when timing selfself-test
sending
sending..
Example:
User code: (0000-9999) 0000
Arm/disarm send: (0-3) :No send
Self-test (0-2) : Disable
Self-test time1: 08:00
Self-test time2:18:00
Self-test week: 1234567
Means CID user code is 0000, can move the cursor to change,
change range is (0000-9999).
Arm/disarm send with four options: 0 for no send, 1 for only arm
send, 2 for only disarm send, 3 for arm/disarm send.
The self-test setting means the panel will link with the alarm center
once for certain time,to check the panel and alarm receiving center
normally communication.
Self-test settings (0-2), 0 means self-test disable, namely the panel is
not timing communication with the center,
1:self-test time1,means with the alarm panel timing communication
according to self-test time 1 (08:00),
2:self-test time12,means with the alarm panel timing communication
according to self-test time 1 (08:00) and self-test time 2 (18:00) .
Self-test week means with alarm panel communication on number of
weeks,1234567 means with alarm panel communication from
Monday to Sunday, 23 means alarm panel and with the alarm
receiving center timing communication just Tuesday and
Wednesday.
Time 08:00 and 18:00 can be modified according to the customer's
requirement.
Remark: if the alarm panel is not connect with the alarm receiving
center, then no need to set this.
3. Commands of System Query
Query the
alarm
panel
arm/disarm
record
recordss
Syntax:
【Menu】>
【7】>【2】>【up key
and down key query】
Used to query the alarm panel arm/disarm records, system will
is
arm record
keep recently article72 pieces arm/d
arm/dis
isarm
recordss.
Press menu then press 7, then press 2, press up key to check last one,
press down key to check next one.
Example:
Article 001 record
Date: 05-02
Time: 00:30
The system state: 01 remote control disarm
Means on 0:30 a.m May 2nd., 01 remote control disarm.
Query the alarm
panel alarm records
Syntax:
【Menu】>
【7】>【1】>【up key
and down key query】
Used to query the alarm panel alarm records, system will keep
recently article 102 pieces alarm record
recordss.
Press menu then press 7, then press 1, press up key to check last
one , press down key to check next one.
Example:
Article 001 record
Alarm date:05-03
Alarm time: 21:30
Alarm defence zone: 01
Defence zone type:NORMAL
Means on 7:30 p.m May 3rd happened 1 defence zone alarm. 1
defence zone type is NORMAL defense zone.
5
5.1
Remote Control of Panel
After receiving the Panel Alert
After Panel alerts, it will automatically dial the preset telephone number for three
times until connected. When the user picks up the phone, a piece of pre-recorded
voice message will be played back immediately and let the receiver noted about the
event. Upon receiving the call, it can also control the alarm panel remotely via the
phone (according to the command below). User will not be asked for password upon
connected and alarm will automatically hang up call within receiving any instruction
within 20 seconds.
[1]: arming
[3]: monitoring open
[7]: siren on
[2]: disarming
[4]: monitoring closed
[8]: siren off
[*] key: exit and hang up, the system will not dial the next group receive-alarm
number. If not press "*" or "2", the system will continue to dial next group numbers.
Remark: monitoring time for 20 seconds,if need to continue,please press"3"key within
20 seconds.
5.2 Remote Dialing In Operation
Remote-control operations can be done via any phone. You can just dial into the alarm
panel and user will be asked for password upon connected and alarm will
automatically hang up call within receiving any instruction within 20 seconds or
password is incorrect. (original password 1234)
[1]: arming
[3]: monitoring open
[7]: siren on
[*]: Exit and Hang up
6
[2]: disarming
[4]: monitoring closed
[8]: siren off
Types of Alarm Zone
6.1 Definitions of Zones
The alarm supports 99 Wireless defense zones and each zone can be classified into 8
Zone Types with their respective characteristics.
Type Zone Type
ID
1
NORMAL Defense
Zone
2
STAY Defense zone
(AT-HOME Defense
zone)
3
INTELLIGENT
Defense zone:
4
EMERGENCY
Defense zone:
Interpretation
The Panel only works on the arming status. When
disarming, there is no response.
Can be shut off solely through the remote control
(Keypad) to avoid the Infrared Detectors and other
in-room detectors from misinformation when master is
resting at home.
If the detector in the Defense zone is triggered only
once, it will not immediately alarm. But if being
triggered once again within 30 seconds after the first
triggering, it will not alarm immediately.
No matter on arming or disarming status, if detector is
triggered it will alert. Usually used in connecting with
Smoke Detectors, Gas Detectors and emergency
5
button, etc.
No matter arming or disarming status, detectors will
not alert even being triggered.
No matter in what status, when sensor with this zone is
triggered, a welcome door bell will be ring as
notification.
6
CLOSED Defense
zone:
CHIME Zone
7
WELCOME Zone
On disarming status, when sensor with this zone is
triggered, a welcome voice message will be played.
8
HELP SENIOR
Defense Zone
This type of zone is for elderly safety, no matter in
what status, the panel will alarm once sensor with this
zone type is triggered.
6.2 System default zone types are
are::
Normal Stay
Intelligent
01-59
80-89
60-79
Help
Senior
90
Chime
Welcome
Emergency
91
92
93-99
6.3 Other System Default
Operation password
Remote Control
Telephone Line Anti-tampering
Siren Sound
Delay ARM
51-52 wired zones
Integrated Alarming
Number of rings before picking up
Audible
confirmation
for
remote
operation
Delay alarming
1-99 Zone alarm
1234
Enable
Disable
1 minute
No
Normal Open
Enable
8 rings
Enable
Disable
Siren sound enable
6.4 Fitting parameters:
-
-
7
Input voltage: DC9V-12V
Standby currents: < 20 m A
Alarm current: < 450 m A
� Wireless frequency: 315/433/868/915MHZ ,
2262/1.5-4.7M ,
EV1527/300K
� Backup battery: NI-HI AAA*6 DC7.2V
� Alarm loudness: 110dB
Accessories parameters: The alarm should be compatible with PT2262, PT2240
and EV1527. Using PT2262 encoding, the resistance is recommended 1.5M-4.7M;
using with EV1527 encoding, the resistance by 300K, data recommended 1010.
Guideline of Installation Sensors
7. 1
Guideline for Installing Door or Window Sensor
1. The surface for door sensor installation should be clean so door sensor can be
attached to the door and frame firmly with double faced adhesive.
2. Each door sensor is a pair of sensor and magnet. The sensor (A as in diagram)
should be installed on the fixed door frame and the magnet (B as in diagram)
should be placed on the movable door with a distance not exceeding 1 cm.
3. Upon installed, door sensor should be tested by open the door and check if the
indicator on door sensor flashes for 1 second.
4. In case the door sensor is running out of battery, the indicator should be kept lit as
a low-voltage notification.
7.2 Guideline for Installing PIR Motion Sensor
1. Before use, make sure the power switch of PIR motion sensors is at the ON
position.
2. Installation height is about 2.2 meters above ground and the optimized detection
angle for most motion sensor is 90 degree. The sensor should face the detected
area with this consideration for best coverage. It is advised to install with the face
of motion sensor perpendicular to the most probable moving detection of people
for the highest effective detection.
3. Within coverage of detection, there should be no any objects for obstruction.
4. There should be no two infrared detectors in the same as they will possibly
intervene with each other.
5. Avoid the detector facing window, cooling or warming machines, or other
appliances that cause the temperature changing sharply and thus cause false alarm.
6. Most infra-red detector needs about 5 minutes to heat up before READY for
normal operation.
7. Regular PIR motion sensor is for indoor use unless the specification stated
otherwise.
Unless specifies otherwise, most infra-red detector are indoor use and not reliable to
use outdoor.
8. Troubleshooting
Problem
1. cannot dial for
alarm
Diagnosis
• no arming
• alerting phone unsettled
• parts improperly installed
e.g. sensors installed too far
away
• code no match
Available Solutions
• do arming operation
• re-set according to the
specification
• coordinating the location of parts
• re-coding
2. cannot
long-distance
operation
3. no record
indication when
alerting
4. remote control
(keyboard) out of
order
5. infrared detector
out of order
6. Beam detector
out of order
7. siren without
sound
8. the distance for
host to receive the
infrared detector,
door status switch
and remote
controller is
shortened
9. Consistently
alarm once power
open
• password input wrongly
• Retype Password or reset
password
• voice message not recorded
• record voice message
• coding un-matched with the
Panel
• insufficient battery power or
battery contact no good
• battery pieces poor contact
or voltage un-matched with
Panel
• low power
• re-learn the remote control
• change battery to correct type
• polish the surface of contact of
battery
• contact the local dealer to change
the matched remote control
(keyfob)
• change to the same type battery
• Check power supply
• Replaced with a working power
adapter
• Check if cables short circuit.
• Check beam detector
• Re-cabling for perfect contact
alignment
• Make sure pair of sensors aligned
by observing the indicators.
• siren plug or jack in short
• repair or change plug or jack or
circuit or broken-line
change the jack line
• siren out of order
• use another siren to double check
• closed siren by command
• activate siren by command
• positive and ground wires of • reverse the wires to try adjust a
siren reversed
longer length of siren sounding
• a nearby emitter is sending • move one detector next to panel
code
and try
• Panel receiver stoppage
• identify the interfering source and
eliminate it
• standby battery of the Panel
insufficient
• check Panel power whether
plugged well
• Phone cord is not connected • Either disable the phone alert
but the phone alert function
function or connect the phone
is enabled
cord