1
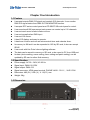
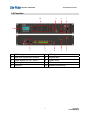
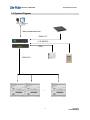
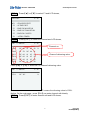
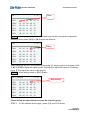
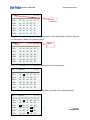
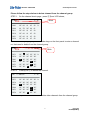
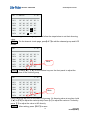
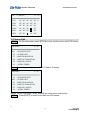
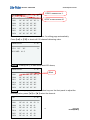
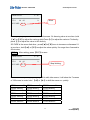
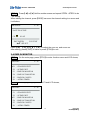
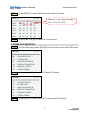
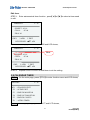
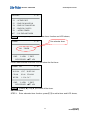
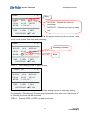
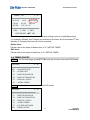
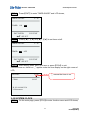
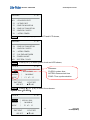
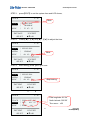
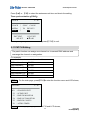
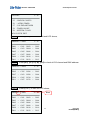
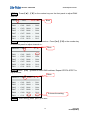
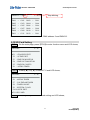
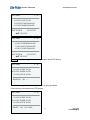
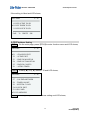
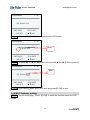
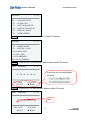
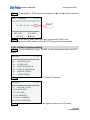
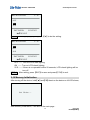
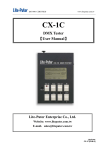
ISO 9001 CERTIFIED
www.liteputer.com.tw
DP-E6B
Ethernet to DMX Interface
【User Manual】
Lite Puter Enterprise Co., Ltd.
Website:www.liteputer.com.tw
Email:[email protected]
Lite-Puter
DP-E6B [EUM-A]
ISO 9001 CERTIFIED
www.liteputer.com.tw
Index
CHAPTER ONE INTRODUCTION.................................................................................................................... 2
1-1 FEATURE ....................................................................................................................................................... 2
1-2 SPECIFICATION .............................................................................................................................................. 2
1-3 DIMENSION ................................................................................................................................................... 2
1-4 FUNCTION ..................................................................................................................................................... 3
1-5 SYSTEM DIAGRAM ......................................................................................................................................... 4
CHAPTER TWO OPERATION .......................................................................................................................... 5
2-1 SOFTWARE VERSION CHECK .......................................................................................................................... 5
2-2 CHANNEL EDIT .............................................................................................................................................. 5
2-3 SCENE EDIT ................................................................................................................................................. 11
2-4 DMX IN MONITOR ........................................................................................................................................ 14
2-5 DMX OUT MONITOR ..................................................................................................................................... 15
2-6 DMX IN CONFIG ........................................................................................................................................... 16
2-7 ASTRO TIMER .............................................................................................................................................. 17
2-8 CALENDAR TIMER ....................................................................................................................................... 21
2-9 TIMER ON/OFF ............................................................................................................................................. 24
2-10 SYSTEM CLOCK ........................................................................................................................................ 25
2-11 PATCH EDITING .......................................................................................................................................... 28
2-12 SD CARD SETTING ..................................................................................................................................... 31
2-13 IP ADDRESS SETTING ................................................................................................................................. 34
2-14 MAC ADDRESS SETTING ............................................................................................................................. 35
2-15 LCD BACK LIGHTING SETTING ................................................................................................................... 37
2-16 MEMORY INITIALIZATION .......................................................................................................................... 38
2-17 CONNECTION WITH HOME LIGHTING SOFTWARE ........................................................................................ 39
2-18 CONNECT PC BY USB PORT ......................................................................................................................... 40
GUARANTEE..................................................................................................................................................... 41
1
Lite-Puter
DP-E6B[EUM-A]
ISO 9001 CERTIFIED
www.liteputer.com.tw
Chapter One Introduction
1-1 Feature
z
z
z
z
z
z
z
z
z
z
z
z
It accepts/outputs DMX-512 signal and controls 512 channels. It can monitor
DMX-512 signal status from DMX OUT/IN MONITOR function.
It accepts ECP series control panel and CP-2B/CP-3B control panel’s control.
It can save/recall 896 scenes and each scene can control up to 512 channels.
It can set each scene’s fade in/fade out time.
It can set accept/refuse DMX input.
It can set 128 zones.
It has LCD display and easy to operate.
It has timer function and can set astronomical timer and calendar timer.
Its memory is 8M and it can be expanded to 16G by SD card; it also can accept
SDHC.
It can work with Lite-Puter’s home lighting software.
The data can be saved to memory or SD card, or be coped to PC from USB port.
Its data (device setting, scene setting, timer setting and patch setting) can be
updated by SD card or other flash memory.
1-2 Specification
z
z
z
z
Power supply: AC 90 – 240V, 45-63 Hz
Signal input: DMX-512, EDX
Signal output: DMX-512
Signal connector: 4PIN green terminal, PHONE JACK(RJ11), XLR 5-PIN
z
z
Dimension: 482( W ) X 88 ( H ) X 112( D ) mm
Weight: 2Kg
1-3 Dimension
2
Lite-Puter
DP-E6B[EUM-A]
ISO 9001 CERTIFIED
www.liteputer.com.tw
1-4 Function
10
9
8
7
5
6
1
2
3
4
1
LCD display
2
DMX signal output terminal
3
DMX/EDX signal input terminal
4
Ethernet port
5
Power supply: AC 90 – 240V
6
Power on/off
7
DMX signal output terminal
8
SD card port
9
USB port
10 Number/function key
3
Lite-Puter
DP-E6B[EUM-A]
ISO 9001 CERTIFIED
www.liteputer.com.tw
1-5 System Diagram
(data upload/download)
(DMX-512)
(CP-3B EDX)
(EDX)
(DMX-512)
……
4
Lite-Puter
DP-E6B[EUM-A]
ISO 9001 CERTIFIED
www.liteputer.com.tw
Chapter Two Operation
2-1 Software Version Check
After turning on the device and LCD shows,
Version no.:V1.0.
Version 1.0
LITE-PUTER
DP-E6B
www.liteputer.com.tw
进入主界面,LCD
显示如下:
It will shift to main page after 3 seconds and LCD shows,
Lite-Puter
CP001
17 : 47
SCOF
D:192.168.003.234
L:Disconnect
2-2 Channel Edit
Channel group: a group that include several contious/discontious channels is called a
channel group.
On usual , user only can edit one channel at one time but with channel group function ,
user can edit several channels at one time.
STEP-1
On the main page, press【FCN】to enter function menu and LCD shows,
Lite-Puter
17 : 47
▶F1 : CHANNEL EDIT
F2
F3
F4
F5
F6
: SCENE EDIT
: DMX IN MONITOR
: DMX OUT MONITOR
: DMX IN CONFIG
: ASTRO TIMER
5
Lite-Puter
DP-E6B[EUM-A]
ISO 9001 CERTIFIED
STEP-2
Press【▲】or【▼】to select F1 and LCD shows,
Lite-Puter
▶F1
F2
F3
F4
F5
F6
www.liteputer.com.tw
17 : 47
: CHANNEL EDIT
: SCENE EDIT
: DMX IN MONITOR
: DMX OUT MONITOR
: DMX IN CONFIG
: ASTRO TIMER
STEP-3
Press【ENT】to check the channel and LCD shows,
CH +/-:mul-sel
17 : 47
Channel no.
C001
C006
C011
C016
C021
C026
NC
99
NC
NC
NC
NC
00
FL
00
00
00
00
01
NC
01
01
01
01
05
00
05
05
05
05
82 %
01
82
82
82
82
Channel’s dimming value.
Press【▲】or【▼】to check all 512 channel’s dimming value.
CH +/-:mul-sel
C511
NC NC
17 : 47
%
NC means the channel is useless and FL means the dimming value is 100%.
Notice: On the main page , press【CH】can enter channel edit directly.
STEP-4 Press【ENT】to enter channel edit and LCD shows,
6
Lite-Puter
DP-E6B[EUM-A]
ISO 9001 CERTIFIED
CH
C001
C006
C011
C016
C021
C026
www.liteputer.com.tw
Blink.
17 : 47
__
99
NC
NC
NC
NC
00
FL
00
00
00
00
01
NC
01
01
01
01
05
00
05
05
05
05
82 %
01
82
82
82
82
STEP-5 Press【▲】,【▼】 or the number keys on the front panel to adjust the
dimming value; press【◀】or【▶】select the channel.
CH
17 : 47
Blink.
C001
C006
C011
C016
C021
C026
NC
99
NC
NC
NC
NC
00
FL
00
00
00
00
01
NC
01
01
01
01
88
00
05
05
05
05
82 %
01
82
82
82
82
Press【▲】or【▼】once to increase or discrease 1% dimming value at one time ;hold
【▲】or【▼】to adjust the value quickly. Press【+】to adjust the value to FL directly,
press【-】to adjust the value to NC directly.
STEP-6 After setting, press to【ENT】save.
CH +/-:mul-sel
17 : 47
Stop blinking.
C001
C006
C011
C016
C021
C026
NC
99
NC
NC
NC
NC
00
FL
00
00
00
00
01
NC
01
01
01
01
88
00
05
05
05
05
82 %
01
82
82
82
82
Please follow the steps below to create the channel group.
STEP.1: On the channel check page , press【+】and LCD shows,
7
Lite-Puter
DP-E6B[EUM-A]
ISO 9001 CERTIFIED
+CH001
C001
C006
C011
C016
C021
C026
www.liteputer.com.tw
17 : 47
NC
99
NC
NC
NC
NC
00
FL
00
00
00
00
01
NC
01
01
01
01
05
00
05
05
05
05
Blink.
82 %
01
82
82
82
82
STEP.2: Press【▲】or【▼】,or the number keys on the front panel to enter a channel
no. that need to add in the channel group.
+CH032
C031
C036
C041
C046
C051
C056
STEP.3:
NC
NC
NC
NC
NC
NC
NC
NC
NC
NC
NC
NC
NC
NC
NC
NC
NC
NC
NC
NC
NC
NC
NC
NC
STEP.4:
NC %
NC
NC
NC
NC
NC
Press【ENT】to save the channel to the channel group.
CH +/-:mul-sel
C031
C036
C041
C046
C051
C056
Blink.
17 : 47
NC
NC
NC
NC
NC
NC
NC
NC
NC
NC
NC
NC
17 : 47
NC
NC
NC
NC
NC
NC
NC
NC
NC
NC
NC
NC
NC %
NC
NC
NC
NC
NC
Repeat STEP.1~STEP.3 to add other channels to the channel group.
CH +/-:mul-sel
17 : 47
C031
NC NC NC NC NC %
C036
C041
C046
C051
C056
NC
NC
NC
NC
NC
NC
NC
NC
NC
NC
NC
NC
NC
NC
NC
NC
NC
NC
NC
NC
NC
NC
NC
NC
NC
8
Lite-Puter
DP-E6B[EUM-A]
ISO 9001 CERTIFIED
www.liteputer.com.tw
Please follow the steps below to delete channel from the channel group.
STEP.1: On the channel check page , press【-】and LCD shows,
-CH001
C001
C006
C011
C016
C021
C026
Blink.
17 : 47
NC
99
NC
NC
NC
NC
00
FL
00
00
00
00
01
NC
01
01
01
01
05
00
05
05
05
05
82 %
01
82
82
82
82
STEP.2: Press【▲】,【▼】or the number keys on the front panel to enter a channel
no. that need to delete from the channel group.
-CH032
C031
C036
C041
C046
C051
C056
STEP.3:
NC
NC
NC
NC
NC
NC
NC
NC
NC
NC
NC
NC
NC
NC
NC
NC
NC
NC
NC
NC
NC
NC
NC
NC
STEP.4:
NC %
NC
NC
NC
NC
NC
Press【ENT】to delete the channel.
CH +/-:mul-sel
C031
C036
C041
C046
C051
C056
Blink.
17 : 47
NC
NC
NC
NC
NC
NC
NC
NC
NC
NC
NC
NC
17 : 47
NC
NC
NC
NC
NC
NC
NC
NC
NC
NC
NC
NC
NC %
NC
NC
NC
NC
NC
Repeat STEP.1~STEP.3 to delete other channels from the channel group.
9
Lite-Puter
DP-E6B[EUM-A]
ISO 9001 CERTIFIED
CH +/-:mul-sel
C031
C036
C041
C046
C051
C056
NC
NC
NC
NC
NC
NC
NC
NC
NC
NC
NC
NC
www.liteputer.com.tw
17 : 47
NC
NC
NC
NC
NC
NC
NC
NC
NC
NC
NC
NC
NC %
NC
NC
NC
NC
NC
After creating the channel group, Please follow the steps below to set their dimming
value.
STEP-1
shows,
On the channel check page ,press【ALT】to edit the channel group and LCD
CH
C031
C036
C041
C046
C051
C056
17 : 47
NC
NC
NC
NC
NC
NC
NC
NC
NC
NC
NC
NC
NC
NC
NC
NC
NC
NC
NC
NC
NC
NC
NC
NC
NC %
NC
NC
NC
NC
NC
Blink.
STEP-2 Press【▲】,【▼】or the number keys on the front panel to adjust the
dimmingvalue of the channel group.
CH
C031
C036
C041
C046
C051
C056
17 : 47
NC
NC
NC
NC
NC
NC
NC
NC
NC
NC
NC
NC
NC
NC
NC
NC
NC
13
NC
NC
NC
13
13
NC
NC %
NC
NC
NC
NC
NC
Blink.
Press【▲】or【▼】once to increase or discrease 1% dimming value at one time ;hold
【▲】or【▼】to adjust the value quickly.Press【+】to adjust the value to FL directly,
press【-】to adjust the value to NC directly.
STEP-3
After setting, press【ENT】to save.
10
Lite-Puter
DP-E6B[EUM-A]
ISO 9001 CERTIFIED
CH +/-:mul-sel
C031
C036
C041
C046
C051
C056
NC
NC
NC
NC
NC
NC
NC
NC
NC
NC
NC
NC
www.liteputer.com.tw
17 : 47
NC
NC
NC
NC
NC
13
NC
NC
NC
13
13
NC
NC %
NC
NC
NC
NC
NC
2-3 Scene Edit
STEP-1
On the main page, press【FCN】to enter function menu and LCD shows,
Lite-Puter
▶F1
F2
F3
F4
F5
F6
: CHANNEL EDIT
: SCENE EDIT
: DMX IN MONITOR
: DMX OUT MONITOR
: DMX IN CONFIG
: ASTRO TIMER
STEP-2
Press【▲】or【▼】to select F2 and LCD shows,
Lite-Puter
F1
▶F2
F3
F4
F5
F6
17 : 47
17 : 47
: CHANNEL EDIT
: SCENE EDIT
: DMX IN MONITOR
: DMX OUT MONITOR
: DMX IN CONFIG
: ASTRO TIMER
Notice: On the main page , press【SEQ】can enter scene edit directly.
STEP-3 Press【ENT】to enter scene edit and LCD shows,
]
11
Lite-Puter
DP-E6B[EUM-A]
ISO 9001 CERTIFIED
www.liteputer.com.tw
CP001 means zone 1.
CP001 SCOF
17 : 47
SCOF means scene off.
C001
C006
C011
C016
C021
C026
Notice:
NC
NC
NC
NC
NC
NC
NC
NC
NC
NC
NC
NC
NC
NC
NC
NC
NC
NC
NC
NC
NC
NC
NC
NC
NC %
NC
NC
NC
NC
NC
It will show the scene off of zone 1’s editing page automatically.
Press【▲】or【▼】to check all 512 channel’s dimming value.
CP001 SCOF
17 : 47
C511 NC NC
SC FADE:0.1 S
STEP-4
%
Press【ENT】to edit scene and LCD shows,
CP001 SCOF
17 : 47
Blink.
C001
C006
C011
C016
C021
C026
__
NC
NC
NC
NC
NC
NC
NC
NC
NC
NC
NC
NC
NC
NC
NC
NC
NC
NC
NC
NC
NC
NC
NC
NC %
NC
NC
NC
NC
NC
STEP-5 Press【▲】,【▼】or the number keys on the front panel to adjust the
dimming value; press【◀】or【▶】select the channel.
CH
C001
C006
C011
C016
C021
C026
17 : 47
NC
99
NC
NC
NC
NC
00
FL
00
00
00
00
01
NC
01
01
01
01
88
00
05
05
05
05
82 %
01
82
82
82
82
12
Lite-Puter
DP-E6B[EUM-A]
ISO 9001 CERTIFIED
CP001 SCOF
C511
00 00
SC FADE:0.1 S
www.liteputer.com.tw
17 : 47
Blink.
%
Press【▲】or【▼】once to increase or discrease 1% dimming value at one time ;hold
【▲】or【▼】to adjust the value quickly.Press【+】to adjust the value to FL directly,
press【-】to adjust the value to NC directly.
SC FADE is the scene fade time , press【▲】or【▼】once to increase or discrease 0.1
at one time ; hold【▲】or【▼】to adjust the value quickly. It’s range from 0 second to
99 minutes.
STEP-6
After setting, press【ENT】to save.
CP001 SCOF
C511
00 00
SC FADE:0.1 S
17 : 47
%
Stop blinking.
Notice: User can press【◀】or【▶】shift to edit other scene, it will show the 7 scenes
of 128 zones in order; hold 【◀】or【▶】to shift the scene no. quickly.
CP001 scene off
CP002 scene off
CP003 scene off
CP001 scene 1
CP002 scene 1
CP003 scene 1
CP001 scene 2
CP002 scene 2
CP003 scene 2
CP001 scene 3
CP002 scene 3
CP003 scene 3
CP001 scene 4
CP002 scene 4
CP003 scene 4
CP001 scene 5
CP002 scene 5
CP003 scene 5
CP001 scene 6
CP002 scene 6
CP003 scene 6
13
Lite-Puter
DP-E6B[EUM-A]
ISO 9001 CERTIFIED
STEP-7
www.liteputer.com.tw
Press【◀】or【▶】shift to another scene and repeat STEP4 ~STEP6 to do
the setting.
When editing the channel, press【SEQ】can save the channel setting to a scene and
it will show,
MESSAGE
17 : 47
SAVE TO SCENE
CP:001
SC:OF
ENT’ENTER
FCN’EXIT
/▲▼ SELECT
Press【▲】,【▼】and【◀】,【▶】to adjust the zone no. and scene no.
After setting, press【ENT】to save or press【FCN】to exit.
2-4 DMX IN MONITOR
STEP-1
On the main page, press【FCN】to enter function menu and LCD shows,
Lite-Puter
▶F1
F2
F3
F4
F5
F6
: CHANNEL EDIT
: SCENE EDIT
: DMX IN MONITOR
: DMX OUT MONITOR
: DMX IN CONFIG
: ASTRO TIMER
STEP-2
Press【▲】or【▼】to select F3 and LCD shows,
Lite-Puter
F1
F2
▶F3
F4
17 : 47
17 : 47
: CHANNEL EDIT
: SCENE EDIT
: DMX IN MONITOR
: DMX OUT MONITOR
F5 : DMX IN CONFIG
F6 : ASTRO TIMER
14
Lite-Puter
DP-E6B[EUM-A]
ISO 9001 CERTIFIED
STEP-3
Press【ENT】to enter DMX IN monitor and LCD shows,
DMX IN
C001
C006
C011
C016
C021
C026
17 : 47
00
99
00
00
00
00
STEP-4
www.liteputer.com.tw
00
FL
00
00
00
00
01
00
01
01
01
01
05
00
05
05
05
05
Channel 1 to 5’s dimming value
is 0, 0, 1%, 5%, 82%.
82 %
01
82
82
82
82
Press【▲】or【▼】to check all 512 channels.
2-5 DMX OUT MONITOR
STEP-1
On the main page, press【FCN】to enter function menu and LCD shows,
Lite-Puter
▶F1
F2
F3
F4
F5
F6
: CHANNEL EDIT
: SCENE EDIT
: DMX IN MONITOR
: DMX OUT MONITOR
: DMX IN CONFIG
: ASTRO TIMER
STEP-2
Press【▲】or【▼】to select F4 and LCD shows,
Lite-Puter
F1
F2
F3
▶F4
F5
F6
17 : 47
17 : 47
: CHANNEL EDIT
: SCENE EDIT
: DMX IN MONITOR
: DMX OUT MONITOR
: DMX IN CONFIG
: ASTRO TIMER
STEP-3
Press【ENT】to enter DMX OUT monitor and LCD shows,
15
Lite-Puter
DP-E6B[EUM-A]
ISO 9001 CERTIFIED
DMX OUT
C001
C006
C011
C016
C021
C026
www.liteputer.com.tw
17 : 47
Channel 1 to 5’s dimming value is
90%, 0, 0, 0, and 100%.
90 00 00 00 FL %
00 00 00 00 00
00 00 00 00 00
00 00 00 00 00
00 00 00 00 00
00 00 00 00 00
STEP-4 Press【▲】or【▼】to check all 512 channels.
DMX OUT
C511
80
17 : 47
00
%
2-6 DMX IN CONFIG
STEP-1
On the main page, press【FCN】to enter function menu and LCD shows,
Lite-Puter
▶F1
F2
F3
F4
F5
F6
: CHANNEL EDIT
: SCENE EDIT
: DMX IN MONITOR
: DMX OUT MONITOR
: DMX IN CONFIG
: ASTRO TIMER
STEP-2
Press【▲】or【▼】to select
Lite-Puter
F1
F2
F3
F4
▶F5
F6
17 : 47
F5 and LCD shows,
17 : 47
: CHANNEL EDIT
: SCENE EDIT
: DMX IN MONITOR
: DMX OUT MONITOR
: DMX IN CONFIG
: ASTRO TIMER
16
Lite-Puter
DP-E6B[EUM-A]
ISO 9001 CERTIFIED
STEP-3
www.liteputer.com.tw
Press【ENT】to enter DMX IN configration and LCD shows,
DMX IN CONFIG
17 : 47
DMX IN OFF
DMX IN ON
TO DMX OUT
ENT’ENTER
FCN’EXIT
/▲▼ SELECT
STEP-4
Press【▲】,【▼】or【◀】,【▶】to select the setting.
DMX IN CONFIG
17 : 47
DMX IN OFF
DMX IN ON
TO DMX OUT
ENT’ENTER
FCN’EXIT
/▲▼ SELECT
DMX IN OFF —— refuse DMX signal.
DMX IN ON —— accept DMX signal and monitor DMX IN signal in DMX IN
MONITOR function.
TO DMX OUT —— accept DMX signal and monitor DMX OUT signal in DMX OUT
MONITOR function.
STEP-5
After setting, press【ENT】to save or press【FCN】to exit.
2-7 ASTRO TIMER
STEP-1
On the main page, press【FCN】to enter function menu and LCD shows,
Lite-Puter
17 : 47
▶F1 : CHANNEL EDIT
F2 : SCENE EDIT
F3 : DMX IN MONITOR
F4 : DMX OUT MONITOR
F5 : DMX IN CONFIG
F6 : ASTRO TIMER
17
Lite-Puter
DP-E6B[EUM-A]
ISO 9001 CERTIFIED
www.liteputer.com.tw
STEP-2 Press【▲】or【▼】to select F6 and LCD shows,
Lite-Puter
F1
F2
F3
F4
F5
▶F6
17 : 47
: CHANNEL EDIT
: SCENE EDIT
: DMX IN MONITOR
: DMX OUT MONITOR
: DMX IN CONFIG
: ASTRO TIMER
STEP-3
Press to【ENT】enter astronomical timer and LCD shows,
TIMER
No astronomical timer.
17 : 47
It will show info alternatively as
below,
NO ASTRO-TIMER
1 DEL 2 ADD 3 EDIT
REVIEW/SEL ▲▼ ADJ
If there has astronomical timer and LCD will show the first timer.
TIMER 001
17 : 47
SUNRISE+ 01:00
CP:002
SC:01
FD:0.1S
1 DEL 2 ADD 3 EDIT
REVIEW/SEL ▲▼ ADJ
STEP-4
Press【◀】or【▶】to check other timer.
Add timer
STEP.1: Enter astronomical timer function , press【2】to add a timer and LCD shows,
18
Lite-Puter
DP-E6B[EUM-A]
ISO 9001 CERTIFIED
TIMER
www.liteputer.com.tw
Blink.
17 : 47
SUNRISE+ 01:00
CP:001
SC:OF
FD:0.1S
It will show info alternatively as
below,
1 DEL 2 ADD 3 EDIT
REVIEW/SEL ▲▼ ADJ
STEP.2 : Press【▲】or【▼】to select sunrise or sunset .
TIMER
17 : 47
Blink.
SUNSET + 01:00
CP:001
SC:OF
FD:0.1S
+: after sunrise time/sunset time
-:before sunrise time/sunset time
“Sunset +01:00” means 1 hour after
sunset time 17:13, it’s 18:13.
1 DEL 2 ADD 3 EDIT
REVIEW/SEL ▲▼ ADJ
STEP.3
Press【▶】to select + or -;press【▼】to change+to -.
TIMER
17 : 47
Blink.
SUNSET - 01:00
CP:001
SC:OF
FD:0.1S
“Sunset -01:00” means 1 hour
before sunset time 17:13, it’s 16:13.
1 DEL 2 ADD 3 EDIT
REVIEW/SEL ▲▼ ADJ
STEP.4
Press【▶】to set the time value; press【▲】or【▼】to adjust value.
TIMER
17 : 47
“Sunset -02:00” means 2 hour
before sunset time 17:13, it’s 15:13.
SUNSET - 02:00
CP:001
SC:OF
FD:0.1S
SUNRISE
SUNSET
06:42
17:13
19
Lite-Puter
DP-E6B[EUM-A]
ISO 9001 CERTIFIED
www.liteputer.com.tw
STEP.5:
Press【▶】to set the zone no., scene no. and fade time one by one; press
【▲】or【▼】to adjust the value.
TIMER
17 : 47
SUNSET - 02:00
CP:128
SC:06
FD:10 M
SUNRISE
SUNSET
STEP.6:
Blink.
06:42
17:13
After setting, press【ENT】to save.
TIMER 003
17 : 47
The scene 6 of zone 128 will be
call out at 15:13 and its fade time is
10 minutes.
SUNSET - 02:00
CP:128
SC:06
FD:10 M
1 DEL 2 ADD 3 EDIT
REVIEW/SEL ▲▼ ADJ
STEP.7
Repeat STEP.1~STEP.6 to add more timer.
Delete timer
STEP.1: Enter astronomical timer function , press【1】to delete a timer and LCD
shows,
MESSAGE
17 : 47
DEL THIS TIMER?
YES
NO
ENT’ENTER
FCN’EXIT
/▲▼ SELECT
STEP.2:
STEP.3:
Press【◀】,【▶】or【▲】,【▼】to select yes or no.
After setting, press【ENT】to save or press【FCN】to exit.
20
Lite-Puter
DP-E6B[EUM-A]
ISO 9001 CERTIFIED
www.liteputer.com.tw
Edit timer
STEP.1: Enter astronomical timer function , press【◀】or【▶】to select a timer need
to edit.
TIMER 002
17 : 47
SUNSET - 03:10
CP:010
SC:04
FD:01 M
1 DEL 2 ADD 3 EDIT
REVIEW/SEL ▲▼ ADJ
STEP.2:
Press【3】to edit the timer 002 and LCD shows,
TIMER 002
17 : 47
Blink.
SUNSET - 03:10
CP:010
SC:04
FD:01 M
1 DEL 2 ADD 3 EDIT
REVIEW/SEL ▲▼ ADJ
STEP.3:
Repeat STEP.2~STEP.6 of Add timer to do the setting.
2-8 CALENDAR TIMER
STEP-1
On the main page, press【FCN】to enter function menu and LCD shows,
Lite-Puter
▶F1
F2
F3
F4
F5
F6
17 : 47
: CHANNEL EDIT
: SCENE EDIT
: DMX IN MONITOR
: DMX OUT MONITOR
: DMX IN CONFIG
: ASTRO TIMER
STEP-2
Press【▲】or【▼】to select F7 and LCD shows,
21
Lite-Puter
DP-E6B[EUM-A]
ISO 9001 CERTIFIED
Lite-Puter
F2
F3
F4
F5
F6
▶F7
www.liteputer.com.tw
17 : 47
: SCENE EDIT
: DMX IN MONITOR
: DMX OUT MONITOR
: DMX IN CONFIG
: ASTRO TIMER
:CALENDAR TIMER
STEP-3
Press【ENT】to enter calendar timer function and LCD shows,
TIMER
No calendar timer.
17 : 47
NO TIMER
1 DEL 2 ADD 3 EDIT
REVIEW/SEL ▲▼ ADJ
If there has calendar timer and LCD will show the first timer.
TIMER 001
17 : 47
NOV/04 15:27 DATE:ON
CP:008 SC:06 FD:02M
WEEK:
1.2.3.4.5.6.7
1 DEL 2 ADD 3 EDIT
REVIEW/SEL ▲▼ ADJ
STEP-4
Press【◀】or【▶】to check all the timer.
Add new timer
STEP.1: Enter calendar timer function ,press【2】to add a timer and LCD shows,
22
Lite-Puter
DP-E6B[EUM-A]
ISO 9001 CERTIFIED
TIMER
17 : 47
JAN/01
CP:001
WEEK:
www.liteputer.com.tw
Blink.
00:00 DATE:ON
SC:OF FD:0.1S
1.2.3.4.5.6.7
DATE ON:Execute the timer on
month/day
DATE OFF:Execute the timer on week
day.
1 DEL 2 ADD 3 EDIT
REVIEW/SEL ▲▼ ADJ
STEP.2:
Press【▲】,【▼】or【◀】,【▶】to adjust month, day, hour, minute , date
on/off, zone, scene, fade time and week day.
TIMER
17 : 47
Monday’s selected.
NOV/05
CP:001
WEEK:
14:30
DATE:ON
SC:OF FD:0.1S
X.X.3.4.5.6.7
Blink.
1 DEL 2 ADD 3 EDIT
REVIEW/SEL ▲▼ ADJ
STEP.3:
After setting, press to【ENT】save.
TIMER
NOV/05
CP:001
WEEK:
002
17 : 47
14:30
DATE:ON
SC:OF FD:0.1S
1.2.3.4.5.6.7
1 DEL 2 ADD 3 EDIT
REVIEW/SEL ▲▼ ADJ
When the setting is DATE ON, the month/day setting is prior to week day setting.
For example, if Monday and Tuesday aren’t selected in this timer, but if November 5th
is Tuesday, the timer still be executed.
STEP.4: Repeat STEP.1~STEP.3 to add more timer.
23
Lite-Puter
DP-E6B[EUM-A]
ISO 9001 CERTIFIED
TIMER
NOV/05
CP:001
WEEK:
003
www.liteputer.com.tw
17 : 47
14:30
DATE:OFF
SC:OF FD:0.1S
X.X.3.4.5.6.7
1 DEL 2 ADD 3 EDIT
REVIEW/SEL ▲▼ ADJ
When the setting is DATE OFF, the week day setting is prior to month/day setting.
For example, Monday and Tuesday are selected in this timer, but if November 5th isn’t
Monday or Tuesday, the timer will not be executed.
Delete timer
Please refer to the steps of delete timer in 2-7 ASTRO TIMER.
Edit timer
Please refer to the steps of edit timer in 2-7 ASTRO TIMER.
2-9 TIMER ON/OFF
STEP-1
On the main page, press【FCN】to enter the function menu and LCD shows,
Lite-Puter
▶F1
F2
F3
F4
F5
F6
17 : 47
: CHANNEL EDIT
: SCENE EDIT
: DMX IN MONITOR
: DMX OUT MONITOR
: DMX IN CONFIG
: ASTRO TIMER
STEP-2
Press【▲】or【▼】to F8 and LCD shows,
Lite-Puter
17 : 47
F3 : DMX IN MONITOR
F4 : DMX OUT MONITOR
F5 : DMX IN CONFIG
F6 : ASTRO TIMER
F7 :CALENDAR TIMER
▶F8 :TIMER ON/OFF
24
Lite-Puter
DP-E6B[EUM-A]
ISO 9001 CERTIFIED
STEP-3
www.liteputer.com.tw
Press【ENT】to enter TIMER ON/OFF and LCD shows,
TIMER ON/OFF
TIMER ON
17 : 47
OFF
ENT’ENTER
FCN’EXIT
/▲▼ SELECT
STEP-4
Press【▲】,【▼】or【◀】,【▶】to set timer on/off.
TIMER ON/OFF
TIMER
17 : 47
ON OFF
ENT’ENTER
FCN’EXIT
/▲▼ SELECT
STEP-5 After setting, press【ENT】to save or press【FCN】to exit.
If set the timer on, there is a “_” appear under the time display on the right corner of
LCD,
Lite-Puter
CP001
“_” means the timer is on.
17 : 47
SCOF
D:192.168.003.234
L:Disconnect
2-10 SYSTEM CLOCK
STEP-1
On the main page, press【FCN】to enter function menu and LCD shows,
25
Lite-Puter
DP-E6B[EUM-A]
ISO 9001 CERTIFIED
Lite-Puter
▶F1
F2
F3
F4
F5
F6
17 : 47
: CHANNEL EDIT
: SCENE EDIT
: DMX IN MONITOR
: DMX OUT MONITOR
: DMX IN CONFIG
: ASTRO TIMER
STEP-2
Press【▲】or【▼】to select F9 and LCD shows,
Lite-Puter
F4
F5
F6
F7
F8
▶F9
www.liteputer.com.tw
17 : 47
: DMX OUT MONITOR
: DMX IN CONFIG
: ASTRO TIMER
:CALENDAR TIMER
:TIMER ON/OFF
:SYSTEM CLOCK
STEP-3
Press【ENT】to enter system clock and LCD shows,
CLOCK
CLOCK
ASTRO
SYNC
17 : 47
Submenu:
CLOCK: system time
ASTRO: Astronomical time
SYNC: Time synchronization
︱NOV/01/2010
︱
MONDAY
︱ 17:47:35
ENT’EDIT
SELECT
FCN’EXIT
▲▼ADJ
STEP-4 Press【▲】to 【▼】to select the submenu.
System time(CLOCK)
CLOCK
17 : 47
CLOCK
︱NOV/01/2010
ASTRO
SYNC
︱
︱
MONDAY
17:47:35
26
ENT’EDIT
SELECT
FCN’EXIT
▲▼ADJ
Lite-Puter
DP-E6B[EUM-A]
ISO 9001 CERTIFIED
STEP.1:
www.liteputer.com.tw
press【ENT】to set the system time and LCD shows,
CLOCK
17 : 47
Blink
CLOCK
ASTRO
SYNC
︱NOV/01/2010
︱
MONDAY
︱ 17:47:35
ENT’SAVE
SELECT
STEP.2:
FCN’EXIT
▲▼ADJ
Press【▲】,【▼】or【◀】,【▶】to adjust the time.
CLOCK
CLOCK
ASTRO
SYNC
17 : 47
︱NOV/05/2010
︱
FRIDAY
︱ 09:03:24
ENT’SAVE
SELECT
STEP.3:
FCN’EXIT
▲▼ADJ
After setting, press【ENT】to save.
CLOCK
CLOCK
ASTRO
SYNC
Blink.
17 : 47
︱NOV/05/2010
︱
FRIDAY
︱ 09:03:24
ENT’EDIT
SELECT
Stop blinking.
FCN’EXIT
▲▼ADJ
Astronomical time(ASTRO)
CLOCK
17 : 47
CLOCK
︱LON+
116°24’
ASTRO
SYNC
︱LAT+
︱ZONE
039°55’
+08
East longitude:116°24’
North latitude: 039°55’
Time zone:+08
27
ENT’EDIT
SELECT
FCN’EXIT
▲▼ADJ
Lite-Puter
DP-E6B[EUM-A]
ISO 9001 CERTIFIED
www.liteputer.com.tw
Press【▲】or 【▼】to select the astronomocal time and check the setting.
Time synchronization(SYNC)
CLOCK
17 : 47
︱ SYNC CLOCK
︱ TO DEVICE?
︱
OK
CLOCK
ASTRO
SYNC
ENT’EDIT
SELECT
FCN’EXIT
▲▼ADJ
Press【ENT】to synchronize the time; press【FCN】to exit.
2-11 PATCH Editing
The patch function can assign one channel no. to several DMX address and
rearrange the channel no assignation.
For example,
one channel no. to several channel address
DMX address 1
CH 001
DMX address 2
CH 001
DMX address 13
CH 001
DMX address 27
CH 001
DMX address 139
CH 001
DMX address 508
CH 001
STEP-1
On the main page, press【FCN】to enter the function menu and LCD shows,
Lite-Puter
▶F1
F2
F3
F4
17 : 47
: CHANNEL EDIT
: SCENE EDIT
: DMX IN MONITOR
: DMX OUT MONITOR
F5 : DMX IN CONFIG
F6 : ASTRO TIMER
STEP-2
Press【▲】or【▼】to select F10 and LCD shows,
28
Lite-Puter
DP-E6B[EUM-A]
ISO 9001 CERTIFIED
Lite-Puter
www.liteputer.com.tw
17 : 47
F5 : DMX IN CONFIG
F6 : ASTRO TIMER
F7 :CALENDAR TIMER
F8 :TIMER ON/OFF
F9 :SYSTEM CLOCK
▶F10 :PATCH EDIT
STEP-3
Press【ENT】to enter PATCH and LCD shows,
DMX001 = CH001
D001
D003
D005
D007
D009
D011
=
=
=
=
=
=
STEP-4
C001
C003
C005
C007
C009
C011
17 : 47
D002
D004
D006
D008
D010
D012
=
=
=
=
=
=
Press【▲】,【▼】or【◀】,【▶】to check all 512 channel and DMX address.
DMX505 = CH505
D505
D507
D509
D511
C002
C004
C006
C008
C010
C012
=
=
=
=
STEP-5
C505
C003
C005
C007
17 : 47
D506
D508
D510
D512
=
=
=
=
C002
C004
C006
C008
Press【ENT】to edit and LCD shows,
DMX001 = CH001
D001 = C001
D003 = C003
D002 = C002
D004 = C004
D005
D007
D009
D011
D006
D008
D010
D012
=
=
=
=
C005
C007
C009
C011
Blink
17 : 47
=
=
=
=
C006
C008
C010
C012
29
Lite-Puter
DP-E6B[EUM-A]
ISO 9001 CERTIFIED
www.liteputer.com.tw
STEP-6 Press【▲】,【▼】or the number keys on the front panel to adjust DMX
address.
DMX002 = CH002
D001
D003
D005
D007
D009
D011
=
=
=
=
=
=
STEP-7
C001
C003
C005
C007
C009
C011
Blink
17 : 47
D002
D004
D006
D008
D010
D012
=
=
=
=
=
=
C002
C004
C006
C008
C010
C012
Press【▶】shift to select channel no.. Press【▲】,【▼】or the number key
on the front panel to adjust channel no..
DMX002 = CH001
D001
D003
D005
D007
D009
D011
=
=
=
=
=
=
C001
C003
C005
C007
C009
C011
Blink
17 : 47
D002
D004
D006
D008
D010
D012
=
=
=
=
=
=
C001
C004
C006
C008
C010
C012
STEP-8 Press 【◀】 go back to select DMX address. Repeat STEP6~STEP7 to
adjust others.
Blink.
DMX012 = CH001
D001
D003
D005
D007
D009
D011
STEP-9
=
=
=
=
=
=
C001
C003
C005
C007
C009
C011
17 : 47
D002
D004
D006
D008
D010
D012
=
=
=
=
=
=
C001
C004
C006
C008
C010
C001
It shows the setting.
After setting, press【ENT】to save.
30
Lite-Puter
DP-E6B[EUM-A]
ISO 9001 CERTIFIED
DMX012 = CH001
D001
D003
D005
D007
D009
D011
=
=
=
=
=
=
C001
C003
C005
C007
C009
C011
www.liteputer.com.tw
Stop blinking.
17 : 47
D002
D004
D006
D008
D010
D012
=
=
=
=
=
=
C001
C004
C006
C008
C010
C001
Now, channel 1 control DMX address 1, DMX address 2 and DMX012.
2-12 SD Card Setting
STEP-1
On the main page, press【FCN】to enter function menu and LCD shows,
Lite-Puter
▶F1
F2
F3
F4
F5
F6
17 : 47
: CHANNEL EDIT
: SCENE EDIT
: DMX IN MONITOR
: DMX OUT MONITOR
: DMX IN CONFIG
: ASTRO TIMER
STEP-2
Press【▲】or【▼】to select F11 and LCD shows,
Lite-Puter
17 : 47
F6 :ASTRO TIMER
F7 :CALENDAR TIMER
F8 :TIMER ON/OFF
F9 :SYSTEM CLOCK
F10 :PATCH EDIT
▶F11 :SD CARD
STEP-3
Press 【ENT】to enter SD card setting and LCD shows,
31
Lite-Puter
DP-E6B[EUM-A]
ISO 9001 CERTIFIED
SD CARD
www.liteputer.com.tw
17 : 47
Detecting SD …
SD CARD
17 : 47
▶1:COPY SCENE TO SD
2:COPY TIMER TO SD
3:COPY PATCH TO SD
ENT’ENTER
FCN’EXIT
/▲▼ SELECT
If there isn’t a SD card and LCD shows,
SD CARD
17 : 47
NO SD!!!
STEP-4
Press【▲】or【▼】to select the operation.
SD CARD
17 : 47
1:COPY SCENE TO SD
▶2:COPY TIMER TO SD
3:COPY PATCH TO SD
ENT’ENTER
FCN’EXIT
/▲▼ SELECT
32
Lite-Puter
DP-E6B[EUM-A]
ISO 9001 CERTIFIED
SD CARD
www.liteputer.com.tw
17 : 47
4:COPY CONF TO SD
5:COPY SCENE FROM SD
6:COPY TIMER FROM SD
ENT’ENTER
FCN’EXIT
/▲▼ SELECT
SD CARD
17 : 47
6:COPY TIMER FROM SD
7:COPY PATCH FROM SD
8:COPY CONF FROM SD
ENT’ENTER
FCN’EXIT
/▲▼ SELECT
STEP-5
After setting, press【ENT】to save and LCD shows,
SD CARD
17 : 47
1:COPY SCENE TO SD
▶2:COPY TIMER TO SD
3:COPY PATCH TO SD
WRITING
SD …
When it’s writing the SD card, user can’t do any operation.
If the writing is succeed and LCD shows,
SD CARD
17 : 47
1:COPY SCENE TO SD
▶2:COPY TIMER TO SD
3:COPY PATCH TO SD
WRITE
SD
SUCCESS
33
Lite-Puter
DP-E6B[EUM-A]
ISO 9001 CERTIFIED
www.liteputer.com.tw
If the writing is failed and LCD shows,
SD CARD
17 : 47
1:COPY SCENE TO SD
▶2:COPY TIMER TO SD
3:COPY PATCH TO SD
FAIL To
WRITE
SD !
2-13 IP Address Setting
STEP-1
On the main page, press【FCN】to enter function menu and LCD shows,
Lite-Puter
▶F1
F2
F3
F4
F5
F6
17 : 47
: CHANNEL EDIT
: SCENE EDIT
: DMX IN MONITOR
: DMX OUT MONITOR
: DMX IN CONFIG
: ASTRO TIMER
STEP-2
Press【▲】to【▼】select F12 and LCD shows,
Lite-Puter
17 : 47
F7 :CALENDAR TIMER
F8 :TIMER ON/OFF
F9 :SYSTEM CLOCK
F10 :PATCH EDIT
F11 :SD CARD
▶F12 :IP ADDRESS
STEP-3
Press【ENT】to enter IP address setting and LCD shows,
34
Lite-Puter
DP-E6B[EUM-A]
ISO 9001 CERTIFIED
IP ADDRESS
www.liteputer.com.tw
17 : 47
192.168.003.234
ENT’EDIT
SELECT
STEP-4
FCN’EXIT
▲▼ADJ
Press【ENT】to edit the IP address and LCD shows,
IP ADDRESS
17 : 47
Blink.
_ _ _.168.003.234
ENT’SAVE
SELECT
STEP-5
FCN’EXIT
▲▼ADJ
Press【▲】or【▼】to adjust the value; press【◀】or【▶】shift to each bit.
IP ADDRESS
17 : 47
Blink
192.168.003.254
ENT’SAVE
SELECT
STEP-6
FCN’EXIT
▲▼ADJ
After setting, press【ENT】to save and press【FCN】to exit.
2-14 MAC Address setting
STEP-1
shows,
On the main page , Press 【FCN】to enter the function menu and LCD
35
Lite-Puter
DP-E6B[EUM-A]
ISO 9001 CERTIFIED
Lite-Puter
▶F1
F2
F3
F4
F5
F6
www.liteputer.com.tw
17 : 47
: CHANNEL EDIT
: SCENE EDIT
: DMX IN MONITOR
: DMX OUT MONITOR
: DMX IN CONFIG
: ASTRO TIMER
STEP-2
Press【▲】or【▼】to select F13 and LCD shows,
Lite-Puter
17 : 47
F8 :TIMER ON/OFF
F9 :SYSTEM CLOCK
F10 :PATCH EDIT
F11 :SD CARD
F12 :IP ADDRESS
▶F13 :MAC ADDRESS
STEP-3
MAC
Press【ENT】to enter MAC address setting and LCD shows,
ADDRESS
17 : 47
It will shoe the info alternatively
as below,
73 - 8B - 9E - 9F - 00 - 00
ENT’EDIT
SELECT
STEP-4
MAC
FCN’EXIT
▲▼ADJ
Press【ENT】to edit the MAC address and LCD shows,
ADDRESS
17 : 47
Blink.
_ _ - 8B - 9E - 9F - 00 - 00
ENT’SAVE
SELECT
FCN’EXIT
▲▼ADJ
36
Lite-Puter
DP-E6B[EUM-A]
ISO 9001 CERTIFIED
STEP-5
MAC
www.liteputer.com.tw
Press【▲】to 【▼】ajust the value;press【◀】or【▶】shift to each bit.
ADDRESS
17 : 47
Blink
73 - 8B - 9E - 9F – C9 – F7
ENT’SAVE
SELECT
FCN’EXIT
▲▼ADJ
STEP-6 After setting, press【ENT】to save and press【FCN】to exit.
Notice: The random MAC address set by【OFF】will be saved automatically.
2-15 LCD Back Lighting setting
STEP-1
shows,
On the main page , Press 【FCN】to enter the function menu and LCD
Lite-Puter
▶F1
F2
F3
F4
F5
F6
17 : 47
: CHANNEL EDIT
: SCENE EDIT
: DMX IN MONITOR
: DMX OUT MONITOR
: DMX IN CONFIG
: ASTRO TIMER
STEP-2
Press【▲】or【▼】to select F14 and LCD shows,
Lite-Puter
17 : 47
F9 :SYSTEM CLOCK
F10 :PATCH EDIT
F11 :SD CARD
F12 :IP ADDRESS
F13 :MAC ADDRESS
▶F14 :BACK LIGHTING
STEP-3
Press【ENT】to enter LCD back lighting setting and LCD shows,
37
Lite-Puter
DP-E6B[EUM-A]
ISO 9001 CERTIFIED
BACK LIGHTING
www.liteputer.com.tw
17 : 47
OFF
ON
20 S
ENT’ENTER
FCN’EXIT
/▲▼SELECT
STEP-4
Press【▲】,【▼】or【◀】,【▶】to do the setting.
BACK LIGHTING
17 : 47
OFF
ON
20 S
ENT’ENTER
FCN’EXIT
/▲▼SELECT
OFF —— Turn off LCD’s back lighting
ON —— Turn on LCD’s back lighting
20 S —— If there is no operation within 20 seconds, LCD’s back lighting will be
turn off.
STEP-5
After setting, press【ENT】to save and press【FCN】to exit.
2-16 Memory Initialization
After turning off the device, hold【▲】and【▼】then turn the device on till LCD shows,
Init
Device …
After memory initialization, it will shift to the main page .
38
Lite-Puter
DP-E6B[EUM-A]
ISO 9001 CERTIFIED
www.liteputer.com.tw
The default setting as below,
1. DMX IN CONFIG: DMX IN OFF
2. Timer ON/OFF:OFF
3. IP address:192.168.003.234
4. MAC address: 73-8B-9E-9F-00-00
5. LCD’s back lighting: ON
Notice: After memory initialization, the data of astronomical time will be initialized
too, but user can copy the data to the device by control software or flash memory.
2-17 Connection with Home Lighting Software
After install Home Lightingsoftware , user can do the following setting from software.
1. Recall scene
2. Timer ON/OFF
3. Time synchronization
4. Upload device’s scene data and PATCH data
5. Dowanlaod software’s scene data and PATCH data
6. UpdateAstronomical time
Upload data
STEP-1 After connecting software and device and LCD shows,
Lite-Puter
17 : 47
CP001
SCOF
PC’ s IP address.
D:192.168.003.234
L: 192.168.003.001
STEP-2
Execute the upload data function of software then device will upload the
data to the PC and LCD shows,
UP/DOWNLOAD
DEVICE
……
TO
17 : 47
PC
39
Lite-Puter
DP-E6B[EUM-A]
ISO 9001 CERTIFIED
STEP-3
www.liteputer.com.tw
When the loading is fininshed , it will go back to the main page.
Download data
STEP-1 Connect software with device.
STEP-2 Execute the download data function of software then PC will download the
data to the device and LCD shows,
UP/DOWNLOAD
PC TO
……
17 : 47
DEVICE
STEP-3 When the loading is fininshed , it will go back to the main page.
Press refer to the HomeLighting software user manual to do the setting for the device.
2-18 Connect PC by USB Port
When DP-E6B is connecting with PC, it will be 2 disks appear: one is memory and
other is SD card. User can save the data of scene, channel, timer, patch,
astronomical time and configuration to the memory.
Notice:
Scene file name: SC.DAT
Channel file name: CH.DAT
Calendar timer file name: TIMER.DAT
Astronomical timer file name: ASTRO.DAT
Astronomical timer data file name: ASTRO_SETUP.DAT, ASTRO_RISE.DAT,
ASTRO_SET.DAT
PATCH file name: PATCH.DAT
Configuration file name: CONF.DAT
40
Lite-Puter
DP-E6B[EUM-A]
ISO 9001 CERTIFIED
www.liteputer.com.tw
Guarantee
Lite-Puter promises to fulfill the following acceptances:
1. Lite-Puter is only responsible for DP-E6B itself.
2. Lite-Puter guarantees to keep Lite-Puter’s fault products caused by
techniques, materials and any other logical reasons in good repair for free
within a year since the distributing date.
3. We do not offer door-visiting service. If the trouble appears in
Lite-Puter’s products, please deliver the equipment to local distributors or
Taipei headquarter.
*** Special Statement***
Any fault caused by false usage, imprudence (collision or inadequate
installation) or force majeure factors are not in Lite-Puter’s service.
Revision Record
Version
A
Record
First version
Issued on: November, 2010
41
Lite-Puter
DP-E6B[EUM-A]
ISO 9001 CERTIFIED
www.liteputer.com.tw
World Headquarter:
Lite Puter Enterprise Co., Ltd.
Address: 11F, No. 189, Gangqian Rd., Neihu Dist., Taipei City, Taiwan
Zip Code: 11494
Tel: +886-2-27998099
Fax: +886-2-27993828
Website: www.liteputer.com.tw
E-mail: [email protected]
Shanghai Factory:
Lite Puter Technology (Shanghai) Co., Ltd.
Address: Building B5, No. 298, Lane 3509, Hongmei S. Road, Shanghai, China
Zip Code: 201108
Tel: +86-21-54408210
Fax: +86-21-64978079
Shanghai Sales Center:
Address: Room 701, Building Gem, No. 487, Tianlin Road, Shanghai, China
Zip Code: 201103
Tel: +86-21-33674316/33674850
Fax: +86-21-33674013
Website: www.liteputer.com.cn
E-mail: [email protected]
42
Lite-Puter
DP-E6B[EUM-A]