1
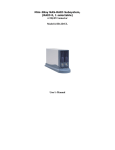
-0- Mini-2Bay RAID Subsystem, (RAID 0,1 selectable) w/ combo 1*USB 2.0 Connector and 1*eSATA (SATAII shielding) Connector User’s Manual -1- 1. Product Overview Features: * Aluminum housing, anodized surface, benefits for cooling and durability * Small, compact, and light weight * Backplane design for two removable SATA drive trays * Built-in thermo speed control fan for self-contained ventilation * Individual key lock of each HDD tray for physical security * LED indicators on each HDD tray, support HDD activity, HDD fail, RAID Level, FAN/TEMP (environmental monitoring) * Built-in microprocessor for hardware RAID 0, 1 (selectable) * Built-in buzzer alarm * Support RAID 1 mode capability of Hot-Swap, AUTO rebuilding Descriptions: External Dual 3.5” HDD Enclosure support Hardware RAID, Host Interface support USB 2.0 and Serial ATA. Specifications: Host Interface USB2.0 and SATAII HDD Interface SATA I, II Data Transfer Rate USB 2.0 480Mbps ( 60MB/sec ) SATA 1.5/3.0 Gbps RAID Level Hardware RAID 0 , 1 (selectable) Hot-Swap Both on Host and Device (RAID 1 only ) 1. LED for RAID RAID 0-->orange RAID 1-->green 2.LED for FAN/TEMP detect Normal-->green LED Display Fan failure-->red Over temperature-->orange 3.LED for each HDD Access-->blue Fail-->red Rebuilding-->pink/blue flashing -2- Alarm Buzzer beeping when any event occur Temperature too high (over 50°C), Fan fail and HDD Fail Thermo Detect.- threshold temperature is 50℃ Environment Fan Detect – Fan speed too low or fan stop Management Fan speed control according to detected temperature HDD status detect Power Supply External Power Adapter (AC input:100-240V~1.0A 50-60Hz / DC output:+5V/2A,+12V/2A) 4.0 x 4.0 x 1.0 mm cooling Fan with FAN speed control Cooling (If temperature goes up, fan will turn faster for better self-ventilation.) O.S. support Dimension Material OS independent Enclosure only: (L):23.5cm (W):6.5cm (H):12cm Including Stand: (L):26.9cm (W):8.7cm (H):14.1cm Plastic and Aluminum alloy Package Content: - Enclosure x 1 - Foot Stand x 1 - HDD Tray x 2 - USB2.0 Cable x 1 - SATAII Shielding x Cable x 1 - Power Adapter w/ Power Cord x 1 - Hard Disk Drive mounting screw x 8 - Key for HDD tray x 2 -3- 2. Quick Installation Guide 1. Installed Hard Drives 2. Stick the foot stand to where, the way you would like the enclosure to stand 3. Connection Procedure: a. Connect USB cable from host to USB port; or, connect SATA cable from host to eSATA port. b. Connect power cord from power adapter to DC power receptacle. c. Select RAID level, RAID 0(striping) or RAID1(mirroring). d. Turn on power switch, then you can start playing this unit. RS-232 Port RAID Switch USB Port eSATA Port Power Switch DC Power Receptacle -4- 3. RAID Level Re-configuration For re-configuring the RAID microprocessor, please 1. Change RAID level 2. Turn off power 3. Turn on power ※ CAUTION: After changing the RAID level, HDDs will be reconfigured on restarting the device. 4. AUTO-Rebuilding / Hard-Copy – RAID 1 support only Auto rebuilding can be applied for data security, which ensures the data recover with AUTO rebuilding function, Hot-Copy features HDD duplicating with or without host connection. For hot-swapping, 1. Remove one HDD from any of equipped subsystem without shutting down the Operating System. 2. Keep accessing with the HDD left, you’d hear the buzzer beeping due to the missing HDD. 3. Re-plug the removed HDD, then buzzer will stop beeping and you’ll see the LED for HDD flashing while AUTO rebuilding. For duplicating data to another disk, 1. Ensure the subsystem is under RAID 1 mode. 2. Ensure which HDD contains complete data and plug the HDD into any bay of it first, before or after powering on. 3. Ensure the firstly installed HDD has been recognized by subsystem – the firstly installed HDD will be regarded as SOURCE. Meanwhile, you’d hear the buzzer beeping due to the missing HDD. 4. Plug another HDD into another drive bay - the newly installed HDD will be regarded as DESTINATION Then buzzer will stop beeping and you’ll see the LED for HDD flashing while data duplicating. -5- 5. Frequently Asked Questions Q: Why RAID 0 works well, but RAID 1 seems not work? A: Please reconfigure the RAID chip – just refer to RAID Level Reconfiguration. Q: Why RAID 1 works well, but RAID 0 seems not work? A: Please reconfigure the RAID chip – just refer to RAID Level Reconfiguration. Q: Why does the Buzzer keep beeping? A: Please refer to LED Display of Product Overview to check: 1) if the fan/tempt error, the environment might be too hot, or you’ve run the subsystem too long. Æ please try to make your environment cooler or let your subsystem take a short rest higher rpm (i.e. Western Digital Raptor 10K rpm) or various brand HDDs may create more heat inside enclosure Æ according to our internal test, Seagate HDDs are less hot 2) if HDD fail, under RAID 1 mode you may just swap one HDD, Æ please plug another HDD ASAP ※ Caution: only RAID1 mode can support hotswap, the subsystem will start AUTO rebuilding after re-plugging the removed HDD Or, one HDD may fail, Æ please replace your HDD ※ Caution: only RAID1 mode can support hotswap, the subsystem will start AUTO rebuilding after re-placing HDD 3) if HDD fail, under RAID 0 mode you may just swap one HDD, or one HDD may fail, Æ unfortunately, we have to inform you the RAID volume just crashed, just kiss your data goodbye. ※ Caution: RAID0 mode can’t support hotswap, HDD fail or swap the HDD may cause data destroyed Q: If powering off during AUTO rebuilding will it start from beginning or continue from the last track? A: Continue from the last track.