1
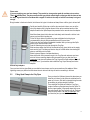
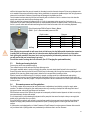
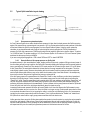
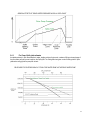
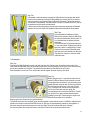
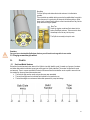
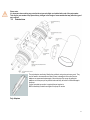
OWNERS MANUAL SPECIFIC TO TYPES P2A & P2B Spilla Aust Patent No 2010246912 CONTACT: PHONE 07 47592400 FAX 07 47592433 EMAIL [email protected] Thank you for choosing Spilla an Australian innovation in deep well pumping. You can expect many many years of reliable pumping from this simple device. “BUILT TO LAST LIKE A WINDMILL!” Immediately on receipt of your Spilla pump check the identifier code which is etched into the stainless steel sleeve of the pump has been entered onto the table in the back of this manual. If not do so. This is very important for any warranty claims and sourcing of any parts in the future. Retain this manual as part of your Spilla pump. 2 Table of Contents 1. Spilla Operating Principles 1.1 1.1 2. Over View Brief Description of Operation Installation Instructions 2.1 Fitting poly pipes to the Spilla 2.2 Fitting quad clamp to the poly pipes 2.3 Lowering and retrieving Spilla from bores 2.4 Surface plumbing 2.4.1 2.4.2 2.4.3 3. Spilla Pumping System Operation 3.1 3.2 3.3 3.4 3.5 Charging the system with water Charging accumulator pipe with air Starting and Running the Spilla Drive water pressure and flow guidelines Typical Spilla installation layout drawing 3.4.1 3.4.2 3.4.3 4. Tools required Method Parts 7.1 7.2 7.3 6. Over Pressure system description General effects of drive pump pressure on Spilla yield Fire pump / Spilla yield estimates Spilla disassembly and re assembly 4.1 4.2 5. Drive pump discharge plumbing Drive pump suction plumbing Return line plumbing and balance piping Serial and Model Numbers Exploded view Parts list Trouble Shooting Guides 6.1 Spilla not running 6.2 6.3 6.4 Diminished yield High noise and or vibration Loss of drive water 6.1.2 Back Flushing Spilla . 7. Warranty 8. Physical Specification 8.1 Spilla identifier code number 3 1. 1.1 Spilla Operating Principles Over View S.P.I.L.L.A Stands for: Surface Pump Impulsing Long Lift Adaptor. It is a means by which a normal surface low pressure delivery pump can be used to elevate water from very deep aquifers to the surface. Technically it is a water driven pump. Rather than using electricity or a mechanical means to deliver mechanical energy to a pumping device down the hole, water is used not only as a means of getting the energy down there but also as the means of elevating the water to the surface. The Spilla is a pump that is driven by water or the liquid being pumped. It uses the inertia of moving water as the mechanism for raising still water against the dynamic head of the system. In this regard, it is similar to a ram pump which uses the inertia of flowing water to ram a small quantity of water up a delivery line at regular intervals usually using flow as the trigger. However in this case, the inertia is created by a supply water pump and the means by which the inertia is harnessed is reversed. The supply water pump builds up water velocity in a dual looped piping system and uses this inertia to draw additional water into the loop once the flow rate reaches a predetermined level. 1.2 Brief Description of Operation The Spilla is primarily for deep well, high lift applications. The system requires a supply water pump to pump water down to the Spilla pump via a supply water pipe. This water passes through the Spilla and back up through one of two return pipes (riser lines). The Spilla is partially or totally submerged at the opposite end of the loops in the liquid being pumped. It is the task of the supply water pump to raise the velocity of the water in a loop, that is, down the supply water line and up via one of the riser pipes. Since it is a loop, the pump is not exposed to the dynamic head of the system. Only the weight of the water it is accelerating and friction. When the supply water pump has reached full flow it sees only friction head. Once the flow has been accelerated sufficiently, a diverter valve inside the Spilla switches over blocking the flow up the riser pipe previously in circuit and allows flow to be diverted up the alternate riser pipe. The inertia of the water rising up in the first riser draws harvest water into the loop via a check valve. At the same time the downward water inertia is being applied to water in the second riser. An accumulator in the Spilla absorbs the shock and this stored energy and the power of the supply water pump, causes flow to accelerate in the second riser pipe. Once it reaches the desired flow rate, the diverter operates again and the cycle repeats. 4 2. 2.1 Installation Instructions Fitting Poly Pipes to the Spilla Because of the nature of the way the Spilla pumps (See 1.2 Brief Description of Operation) the pipes connected to the Spilla are exposed to very high pressure spikes immediately followed by drops to negative pressure (vacuum) on each harvest. The four 316 stainless steel poly adaptors protruding from the top of the Spilla have been designed to be very tight. The poly pipe has to be expanded to fit over them. The pipe required is: 40 mm PN16 Class 100 Metric Poly Pipe. Please Note: The pipe required is not what is normally supplied at rural outlets as metric ‘Pressure Poly’, usually PN12.5. If you are supplying and fitting the poly to your Spilla yourself you must order: 40mm PN16 Class100 Poly Pipe This normally available in 150 meter and 300 meter rolls. The normal pressure poly fittings fit this pipe as they clamp on the outside. The extra wall thickness is on the inside. Consider what length you require to get the pump at the desired depth down the bore. It is important to remember the Spilla uses inertia to raise the water to the surface extra friction will reduce the amount of yield water raised on each diversion (harvest). Extra pipe length means extra friction. For best results you want the Spilla at about 2 to 3 meters below the pumping depth of the water. Putting the pump deeper than this reduces the pumps efficiency for no reason. If the Spilla pumps the water down to the pump check valves, you get bubbles and reduced yield, no harm will be done to the Spilla. The pipes have to be heated to get them on to the Spilla poly adaptors. Cut four lengths of poly allowing a couple of extra meters in case you cannot get one all the way on. This will allow you sufficient length to cut the failed attempt off the adaptor and have another go. Poke the two ends through diagonally opposite holes in the Frog Cap, slide the frog cap along the pipes a few meters so it is well out of the road. Use a pocket knife to cut a chamfer around the inside edge of the pipes to help them slide over the raised sections on the adaptor. Make sure you don’t leave swarf in the pipes. It would pay at this stage to go to the other end of the pipes and tape them up to minimise the risk of anything getting into the pipes. Frog Cap A multi ring gas burner and a crab cooking pot or twenty litre drum is best. You could also use a camp stove or a camp fire. It’s important you have a good quantity of water at least 300mm (1ft) deep and plenty of heating power. Make sure you are on a good flat solid surface and the water drum is set up so that it is stable and bumping it is not going to knock it over. Take the check valves off the bottom of the Spilla and put some tape over the holes to stop any dirt getting in. Stand the Spilla on its end on a block of timber. If you have not got anybody to lend a hand strap the Spilla to a post so it isn’t going to move when you are pushing the pipes on. Drop two hose clamps over each of the two short adaptors, these are the return lines (or Risers). 5 Please note: If you are supplying your own hose clamps. They need to be strong marine grade for resistance to corrosion . That is all stainless steel. They also need to be the type with the raised ridges not the type with the slots cut into the strap. A good check is to test them with a magnet if it sticks to the strap or bolt the hose clamp is not good enough. Bring the water in the drum to the boil, stick the end of a pipe in the drum and keep it there until the pipe is hot and soft. Quickly and carefully lift the pipe out of the drum and push it down over one of the short poly adaptors until it reaches the end of the narrow machined section of the adaptor closest to the Spilla. Repeat the procedure for the second return line adaptor. SPILLA Poly Adaptors Now follow these pipes to their other end and clearly mark them with a knife or hack saw so you know which two they are. Fit the Air Cap to either of the other two pipes and tighten the locking ring as recommended by the poly fittings manufacturer while you are there. Failing to do this could cause considerable frustration after you have got the Spilla down trying to work out what’s what! Poke the remaining two poly pipes through the Frog Cap. Slide two hose clamps over each of the second two poly pipes (which are the supply water and air line). Push them well back so they do not slide down when heating the pipes up and fitting onto the Spilla. Select a pipe and prepare it as described above. Now check which hole it passes through in the Frog Cap and make sure you know which of the two remaining adaptors the pipe needs to go on so that there is no crossovers in the pipe work between the Frog Cap and the Spilla adaptors. When all four pipes are on, you should be able to slide the Frog Cap all the way back to the adaptors. Once you have the four pipes fitted you can slide the hose clamps over the narrow sections of the adaptors. When tightening ensure you position the bolts where there is minimum risk they will catch on something in the bore. 2.2 Fitting Quad Clamp to the Poly Pipes Once you have the Spilla and pipes at the site where you intend to put it down run the pipes out and allow them to warm up in the sun. Pull them out straight tieing the ends to something to get them straight if need be. Then starting at the Spilla end, slide the Frog Cap a couple of meters up the pipes away from the Spilla. Tie the four pipes together in the square shape they are as they pass through the Frog Cap with a zip tie. Continue doing this every meter or so with no crossovers untill you reach the point you want to fit the Quad Clamp. 6 Warning: It is very important the quad clamp is fitted correctly. All the weight of Spilla and pipes should be shared evenly between the four pipes when it is installed down the bore. Failure to do this will cause the pump to hang at an angle making install and retrieval difficult. It also increases the risk of any sharp edges in old steel bores damaging the poly pipes or the Spilla getting stuck. Make sure the Frog Cap is between the Quad Clamp and the Spilla. The pulling loop on the Quad Clamp must be on the opposite side as the Frog Cap and the Spilla. When fitting the quad clamp always fit the return lines diagonally opposite one another and the air and supply water diagonally opposite one another. It does not matter if you get the two return lines mixed up nor does it matter if you get the air and supply water lines mixed up. But mixing up a supply water line with a return line means the Spilla will not work. By following this simple diagonal rule you only need to know what one pipe is at the surface to be able to correctly reconnect the pump if you need to. You usually know which the air line is because it’s capped and it rarely if ever would need to be taken off. Quad Clamp Tighten the Quad Clamp bolts keeping it square to the poly pipes taking care not to pinch them. Once the Quad Clap is fitted make sure the Air Cap is fitted correctly and the other 3 remaining pipes ends are taped up to prevent foreign objects finding their way in. Cut all the zip ties and dispose of properly. The Spilla is ready for installation in the bore. 2.3 Lowering and retrieving Spilla from bores Lowering and retrieving Spilla from a bore is relatively easy compared to a submersible where you have electrical cabling and safety wires that can get caught or damaged. The Spilla is heavier to pull because of the weight of water in the pipe work. The pipes are thick walled and will kink if insufficient care is taken when pulling the Spilla. If pulling over a wheel or roller it is important to maintain a large bending radius. Any kinking of the pipes raises the risk of them splitting and will increase restriction. Increased restriction means less yield. Because the Spilla does not have electrical cabling and safety wires it is possible for a person working on their own to retrieve the Spilla if an appropriate bore puller is used. The Quad Clamp is fitted with a pulling loop that is angled to enable the Quad Clamp to roll over a bore pulling wheel more easily. When setting up to lower or pull the Spilla ensure the Quad Clamp pulling loop is facing the puller wheel. 2.4 Surface plumbing 2.4.1 Drive pump discharge plumbing In order to be able to tune your system for the water and fuel economy you want it is a good idea to plumb in a pressure gauge somewhere in your supply water line. Since the surface supply water piping is not exposed to the large pressure fluctuations of the down hole piping a PN 12.5 rated pipe would be ok. If the supply water line from pump to bore is long say over 30 meters (100ft) it would be good policy to go up a size from 40mm to 50mm to reduce friction. Having an extra valved outlet at the pump will make priming the pump and discharging any unwanted air much easier. 7 Probably the most important thing to remember when setting up a Spilla system is the Spilla works best with a smooth supply pump flow. The Spilla will operate across a huge range of drive pump pressure and flows, basically if you push water down to it you will get more water back but the pump is much more efficient and yield will be higher if the supply pump flow is smooth. Because of the way the Spilla works (see section 1.2 Brief description of operation) the drive pump has to continually re accelerate the flow down to the Spilla as it diverts flow from one riser to the other. This means the supply pump has to deal with a load that is pulsing constantly. This causes big shifts in flows on some drive water pumps particularly as you get deeper. Plumbing an air tank into the supply water line is not essential but will get you better performance from your system. A large pressure gauge bounce when the system is running is a sure sign the system would benefit from an air tank. More powerful stacked centrifugals and positive displacement pumps are less affected. When a vessel of air is plumbed into the Spilla supply water line as shown in the illustration opposite a great deal of the pressure bounce can be illuminated. On charging the system with water air is trapped in the tank. This air is compressed and decompressed as the Spilla operates smoothing out the flow. The easiest and most inexpensive way to create the air tank is to use a length of 4” nominal (100mm) Gal water pipe about 1200mm long it can be threaded then capped one end with the reducers and 1½” BSP fittings screwed on to the other, or welded as shown in the illustration. As all pumps make a few bubbles the tank should be self replenishing however it would be good policy to drain the water out of the air tank once a year to ensure you are getting the maximum benefit for your system. 2.4.2 Drive pump suction piping Where possible position the drive pump close to the tank that the drive water is being drawn from. Keep the suction piping as short and as large as practicable certainly no smaller than 50mm. Precautions need to be taken to ensure no foreign objects find their way into the paddle chamber. We recommend a screen be used on all installations, this is particularly important when pumping from uncovered tanks dams and turkeys nests. Avoid drawing the water from the surface or close to the bottom about 300mm to 500mm below the surface is best. Use a float to keep the suction the correct depth below the surface. Please note: If drawing the drive water from a large storage tank you will need to consider the possibility of a trough float valve, or some other connected device, failing causing the loss of all the storage tank water. How difficult will it be to get sufficient water into the tank to cover the outlet so the Spilla can refill the tank? It could be good policy to have two outlets with valves one above the other and use the top one and keep the other lower one shut for use if things go awry. The same thing could be achieved by plumbing a vertical pipe into the suction a line up the outside of the tank to the top and have two valves plumbed into it. 2.4.3 Return line plumbing and balance piping Because the Spilla uses inertia to raise the yield water from the bore every extra meter of length of return lines and every elbow in there length has a negative effect. Best policy is keep them as short as possible avoid elbows where you can. If your storage is more than 30 meters from the bore going up a pipe size will reduce the friction, having the same effect as having much shorter return lines. We strongly recommend the use of a balance line when plumbing the return lines. This is simply a join between the two return lines slightly lower than their point of discharge. The easiest way is to plumb a Tee at the end of each riser and connect them together via bushing reducers and1”BSP (25mm) nipple. It is handy for diagnostic purposes and back flushing to have a 1”BSP valve between the two Tee’s, but not essential. A pre assembled Balance Kit (Part No. BK ###) can be supplied with the Spilla if preferred. 8 Balance Line Plumbing The main reason for the balance plumbing is to allow the system to self start in the event one return line level is lower than the other. This will happen when charging the system with water for the first time. When the drive pump is started for the first time water travels down the supply water line, into the paddle chamber. The paddle if not already to one side will move to one side as soon as the water starts finding its way up a riser line. As the water in one line rises it raises the pressure in the paddle chamber and causes the paddle to seal tightly against the other riser nozzle. Eventually the supply water returns to surface through one riser and the other remains near empty and sealed from the flow. The Spilla will not start because of the huge difference in the weight of water in the two risers. The second riser must be filled from the top. Funnelling, bucketing, and pumping water into this line from the top is tedious and if you go too quickly, can cause air locks in the riser which stops the riser weight becoming balanced and sometimes it seems to take forever for them to purge themselves from the pipe. If the balance piping is installed, as the water runs out of one riser a small quantity finds its way through the 1’BSP (25mm) nipple and down the other riser the flow is smooth and steady and does not trap air and in a few minutes the Spilla will start. If the Spilla watering point has not been used for a few months one check valve may have been weeping a little more water back into the bore than the other. With the balance piping installed it is not an issue the system will balance itself and the pump will start when the weight equalises. 3. 3.1 Spilla Pumping System Operation Charging the system with water Connect the pump discharge to the Spilla supply water line and leave the return lines and balance piping disconnected. Unscrew the pump filler cap and open the suction line valve from the tank. Allow the pump to fill screw the filler cap back on then open the supply water valve to the Spilla. Depending on the length it may be advantageous to crack the line open at the bore and let any air go as the system is filling. When you can no longer hear any gurgling etc all but close the supply water valve, start the pump at idle and open the valve a little. When it comes to charging the system slow and steady beats fast and furious every time! After a short while water will start returning via one riser pipe allow it to run for a while to purge any air out of the lines. The second riser will remain near empty at this stage. 3.2 Charging accumulator pipe with air Plumbed into the supply water chamber of the Spilla is a second pipe which is capped at the top and has a brass tractor tyre air valve fitted. When the Spilla is lowered into the water it fills via the check valves trapping a pocket of air in the air line. When the Spilla is running water rushes past the paddle and finds its way into one return line. The other line is sealed off by the paddle. When the velocity of the water rushing past the paddle gets high enough, it creates a low pressure area on that side of the paddle. The static higher pressure water on the other side pushes the paddle across cutting the flow up the return line. The rapidly rising water in the return line pulls the check valve open at its base and bore water is drawn in. At the moment the paddle diverts the flow there is water rushing down from the supply water pump at the surface it hits the static water in the other return line which is heavy and hardly moving. As you go deeper this impact becomes greater and greater increasing the water hammer and creates huge pressure spikes in the pump and pipe work. By having a second pipe in the supply water chamber of the pump with air trapped in it a lot of this hammer is absorbed by the air compressing and acting like a spring. Generally up to depths of 20 meters there is 9 sufficient air trapped when the pump is lowered into the water to cushion the water hammer. But as you go deeper extra air is needed to keep noise and vibration down. Having insufficient air exposes the paddle and pipe work to high pressure stress which could result in failures of pipes fittings and damage to the paddle over time. Once the water has been returning from the riser smoothly with no indication of air for a minute or two, shut down the supply water pump and close the pump discharge valve. Now is the best time to charge the system with air. A 12volt air compressor works very well or a foot pump or air compressor can be used. Please see table below for recommended pressures for depths to water. Once you start forcing the air in you will notice water will start overflowing from the full riser as the water in the air line is being displaced. Rule of thumb where DWM is Depth to Water in Meters: (DWM – 5) x10 = Recommended pressure in KPA Depth to water 25 meters 30 meters 35 meters 40 meters 45 meters 50 meters 82ft 100ft 114ft 131ft 147ft 164ft Pressure 200KPA 250KPA 300KPA 350KPA 400KPA 450KPA 29PSI 36PSI 43PSI 50PSI 58PSI 65PSI Air Cap Warning: Over charging the system with air will cause the air to find its way into the Spilla paddle chamber then expand as it rapidly rises up the supply water line. As it does the water displaced will be forced out of one of the return lines ejecting the contents of the return line in one large explosive jet followed by a whoosh of air. If this occurs you will need to find your hat and hang it up to dry! You will then need to recharge the riser with water. (See 3.1 Charging the system with water) 3.3 Starting and running the Spilla Connect your return lines and balance piping. Then restart the pump at idle and open the pump discharge valve. Once again remember when it comes to charging the system, slow and steady beats fast and furious every time! Some of the water returning via the full riser will find its way into the empty riser through the crossover plumbing and will gradually fill the riser at a gentle enough pace to allow the air to escape without creating air locks. After the second line is filled and any air in that line is purged, a pulsing sound like a heartbeat and water pulsing alternately from the return lines will indicate the Spilla has started. Allow it to run for a few minutes at idle to ensure all lines are full and all air has been purged. The Spilla normally takes a while to settle down to an even rhythm when started for the first time. 3.4 Drive water pressure and flow guidelines The Spilla is a water driven pump and as such performance is adjusted and controlled by varying the supply water pressure. The effects of changes in drive water pressure also vary according to the depth to water length and size of piping and number and size of pipe fittings such as elbows. While the basic concept of the Spilla is very simple and consequently reliable the actual dynamics of what is occurring in pump are extremely complex and variable. It is not important to try and understand the dynamics of the pump but there are a few simple rules you can apply that enable you to get the best from your Spilla. Since the Spilla is an entirely new concept in pumping there needs to be some new terms to describe the relationship between the supply water pressure and the pressure the Spilla is pumping against in order to get bore water to the surface. A Spilla system can be designed to run Under Pressure or Equal Pressure for various reasons. However this manual is only concerned with a Spilla type that runs predominantly on what we refer to as Over Pressure. 10 3.5 Typical Spilla installation layout drawing 3.4.1 Over pressure system description An Over Pressure System is one where the drive water pressure is higher than the head pressure the Spilla is pumping against. We express this as a percentage of over pressure. 100% is a system where the drive water pressure is the same as the head of water the Spilla is pumping against, that is an Equal Pressure System. Using the metric system the calculation is very simple because every meter of vertical height of water is equivalent to 10 KPA (Kilopascals) of pressure. So if the drive pressure was 110KPA and the total vertical height the Spilla has to raise the water is 10 meters i.e. 100 KPA of head. The system would be a 110% Over Pressure System. At 40 meters a 110% over Pressure System would see the drive pump running at 440KPA. If you are running imperial gauges etc: 1PSI is about 7KPA and 10FT is about 3 METERS 3.4.2 General effects of drive pump pressure on Spilla yield As stated previously in this manual depths to water, lengths and size of pipe work, numbers of fittings, size and power of the drive water pump all have an impact on the Spilla yield. Generally speaking the Spilla type that this manual applies to have a peak efficiency “Sweet Point” flow at about 100% equal pressure at 20 meters rising to about 115% at 50 meters. At this “Sweet Point” the most yield is attained for the least amount of energy imparted into the drive water. This is the most efficient hydraulic system. However when dealing with the drive water pump the pressures and flows required to see the Spilla achieve peak efficiency may not be where the drive water pump is most fuel efficient. It for example may be revving too hard or idling too low to get best fuel economy and engine life. If the drive pump pressure is increased above the “Sweet Point” there is a drop in efficiency as the internal operational dynamics of the Spilla change. Further increases in drive water pressure see the yield climb again to well above the “Sweet Point” yields. These increased flows tend to peak at about 150% over pressure and as with the “Sweet Point” will vary with the type of installation and drive water pump. Because of pipe friction the extra yield attainable through over pressuring the system diminishes with increased depth. Further increases in drive pump pressure will see the Spilla start to lose its rhythm and “misfire” the yield drops dramatically when this starts occurring. Increasing the drive water pressure still further will cause “Paddle Lock” when this happens the Spilla ceases to pump and all the drive water returns in one riser line. Since the Spilla is no longer running, the drive water pump does not have to re-accelerate the water flow so it is just pumping the water in a circle the only head being friction. As a consequence typically the drive water pressure drops and flow increases. This is high flow maintains the “Paddle Lock” situation and the Spilla will not restart until the supply pump pressure and flow returns to close to zero. Unlike generator driven pumps the Spilla system enables the operator to tune his system by varying the engine speed to achieve the right balance of fuel economy (litres of fuel burned against litres of water pumped) and engine run time for optimum overall performance. Every pumping site will be different so it’s best to use the pumping charts as a guide only and experiment with your drive water pump speed and pressure to find the best outcome for the site. 11 GENERAL EFFECTS OF DRIVE WATER PRESSURE ON SPILLA YIELD CHART 3.4.3 Fire Pump /Spilla yield estimates As stated previously in this manual depths to water, lengths and size of pipe work, numbers of fittings, size and power of the drive water pump all have an impact on the Spilla yield. The Yield guide chart gives a rule of thumb guide for Spilla yields when using typical fire pump with air tank. YIELD GUIDE FOR SYSTEMS USING A TYPICAL FIRE WATER PUMP AS THE DRIVE WATER PUMP 12 4. Spilla disassembly and re assembly 4.1 Tools required Alan Key Part No. AK ### (Supplied with Spilla) Locating Bolt (M8 x 120mm long) -Part No. AB ### (Supplied with Spilla) Small quantity of Vaseline Some clean rag Multi Grips (if removing the foot valves) Thread tape (if removing the foot valves) If it is the intension to pull the Spilla entirely apart such as would be required to change out the paddle or slide rods some additional tools that would make the job easier would be: Two screw drivers Phillips head or Flat with shanks about 200mm long G-Clamp 100mm (4”) 4.2 Method As can be seen from the 7.2 Exploded View in the Parts section of this manual the Spilla can be pulled apart simply by unscrewing eight Alan Screws, four at each end. However the Spilla is built to last and designed to cope with the very high pressures in high head applications. All the internal tolerances of the Spilla are very precise including the bolt alignment. Unless perfectly aligned the bolts will not screw into the riser blocks, any dirt or grit on the mating faces when re assembled will cause leaks, reduce yield and damage O-rings. The area chosen to pull the Spilla apart (usually the back of a work vehicle) should be clean and uncluttered. Spread out some rag to do the job on, and arrange and or mark the parts as you pull them out of the pump so you know which way they came out. When re assembling put them back the same way. There is no need to pull the poly pipes off the pump to disassemble it. Care and a little patience is required when re assembling the Spilla. Ensure all the parts are clean, correctly aligned and the O-rings are not damaged or lost. To Disassemble Step One: Once the work area has been prepared place the pump and using the Alan Key unscrew and remove all four Alan Screws at the poly adaptor end (top) of the pump. Grab the foot valves and pull the bottom of the Spilla away from the top. You can then remove the Cartridge Sleeve. At this point the paddle, Slide Rods and riser Nozzles can be inspected for wear. The paddle should be loose and able to be moved side to side by shaking the cartridge from side to side. There should be no foreign objects in the pump. If any have found their way in they can sometimes be found in the cylindrical recesses in the bottom of the paddle chamber where the two bungs screw in. If this is as far as the pump needs to be disassembled go to Step Seven. 13 Step Two: If the paddle or slide rods require changing the Spilla will need to be broken down further. Remove the foot valves from the base of the cartridge then use the Alan Key to unscrew and remove all four Alan Screws at that end (Bottom) of the pump. The two riser sections are then free to be separated. The slide rods are a snug fit in the Riser Blocks so it may not be possible to pull them apart with bare hands. If this proves to be the case gently prize them apart using two screw drivers as illustrated opposite. Work on both sides of the paddle and keep the two Riser Block faces parallel. Step Three: Once separated the Paddle and or Slide Rods can be replaced, usually the Slide Rods will end up shared between the two risers. If it is not intended they be replaced just leave them there. The Slide Rods are 316 stainless steel which is a very soft material. Grabbing them with the bare jaws of pliers or multigrips will ruin them. If they are to be removed but possibly used again later use a soft material in the tool jaws to protect them. Copper or aluminium sheet metal works well. To Reassemble Step Four: If replacing the Slide Rods make sure the rods and holes are clean. Smear a drop of Vaseline into the mouth of the holes. Push the Slide Rods firmly into the holes by hand, use a coin as a thimble if they are tight. Do not force them they do not have to bottom out in the hole. They will find there spot when the Riser Blocks are set in place. Slide the paddle on to the rods. Then mate the two sections together the same way they came apart. Step Five: Before fitting the riser O- rings mate the risers with the bottom End Block. Make sure the orientation is correct (the bunged holes should be the ones connecting to the paddle chamber) screw two Alan Screws into one Riser Block. Screw them all the way in then back off half a turn. The second riser will then have to be pushed in until it’s two Alan screw holes line up with the corresponding holes in the bottom End Block. The best way to do this is to gently squeeze the two sections together by working a G-clamp along the length of the Riser Blocks as shown in the illustration. Keep trying the Alan Screws until you get them started. Two pieces of soft wood can be used to gently tap them together but this tends to be slow, it is difficult to keep the faces parallel, which tends to cause the Slide Rods to bind up. Also they can be inadvertently pushed too close together. In both these cases the screw drivers have to be used as in Step Two to get the faces apart and in line again. Run the second two Alan Screws all the way in then back off half a turn as was done with the first two. 14 Step Six: Apply the same method to get the four Alan Screws fitted through the top End Block into the other end of the Risers Blocks. The Risers Blocks are now set at the correct distance apart. Carefully remove the four bottom Alan Screws and lift the Bottom End block clear. Ensure the mating faces are clean, apply a smear of Vaseline to the two Riser O-rings and the O-ring groove in the bottom End Block, use very sparingly. Put the O-rings in the grooves and check they are firmly fixed in place with no twists that might cause them to pop out when joining the two Riser Blocks with the bottom End Block. Mate the bottom end Block with the Riser Blocks again and run the Alan Screws all the way in but do not tighten. Step Seven: Apply a smear of Vaseline to the Cartridge Sleeve ORing grooves in the bottom End Block and roll the large O-Rings on. Apply another smear of Vaseline to the O-Rings and check they are not twisted and are sitting comfortably in the grooves. Stand the cartridge up on the lower End Block and slide the Cartridge Sleeve down over the top. Gently push the Cartridge Sleeve over the O-Rings being careful not to pinch or damage them. Step Eight: Apply a smear of Vaseline to the Cartridge Sleeve O-Ring grooves in the top End Block and roll the large O-Rings on. Apply another smear of Vaseline to the O-Rings and check they are not twisted and sitting comfortably in the grooves. Fit the two Riser ORings in to the top End Block using a smear of Vaseline on the O-Rings and in the groove to help secure them in place. Use the Vaseline sparingly! Carefully lower the top End Block into the Cartridge Sleeve making sure the End Block Riser O-Rings line up with the two Riser Blocks in the Cartridge Sleeve. It is possible to be 90˚ out! Double check that when assembled the two short Poly Adaptors (Riser Lines) will line up with the Foot Valves. Do not push the top End Block home at this stage. Drop the Alignment Bolt (M8 120mm long supplied with the Spilla) into one of the top End Block bolt holes and gently twist the End Block each way until the Alignment Bolt finds the thread in the Riser Block and screw it in a few turns. The top End Block can now be gently pushed down all the way home. Be careful not to pinch or damage the Cartridge Sleeve O-Rings. Look into the pump through the Foot Valve holes in the bottom End Block to make sure there is no riser O-Rings visible to ensure one has not moved out of place. Screw the Alan Bolts into the three free holes in the top End Block then remove the Alignment bolt and screw in the last. Tighten them up in stages diagonally like the wheel nuts on a vehicle. Then do the same with the four Alan Bolts in the bottom End Block. 15 Step Nine: Pick the Spilla up and shake side to side as shown in the illustration opposite. There should be an audible clacking sound as the paddle slides from side to side in the pump. It is good policy to always do this before putting a Spilla down a bore in case a foreign object or vermin have found their way into the pump and are fouling the paddle. Step Ten: Screw the nipples, socket and foot valves into the bottom End Block as shown. Take care not to allow thread tape to find its way into the pump. The Spilla is now ready to be put to work. Reminder: Once you have reinstated the Spilla down the bore you will need to recharge with air see section 3.2 Charging accumulator pipe with air 5. 5.1 Parts Serial and Model Numbers Etched into the stainless steel outer sleeve of the Spilla is a ten digit identifier code. It is made up of groups of numbers and letters that enable the individual pump type and its age to be quickly identified. This number is important for parts and warranty. There is a space provided at the back of this manual where this identifier can be copied in case over time the numbers on the pump sleeve become obscured. The first four digits are the month and year the pump was assembled The next three digits are the individual build number for that production run The last three digits are numbers and letters that represent the pump build design 16 Please note: It is important when ordering any parts the three type code digits are included at the end of the part number. This way the part numbers keep pace with any changes in the design of newer models that may affect the type of part required. 5.2 Exploded view The poly adaptors are factory fitted to the end block using a two part epoxy resin. They are not meant to be removed once fitted. If there is damage to the top end block or adaptors we recommend replacement of the whole top of the pump as getting the adaptors out of the pump is very difficult and most likely will result in further damage to the pump. If a new complete top section is required the part number is: EBPA followed by the last three digits of the pump ID number. Poly Adaptors 17 5.3 Parts list Please note: It is important when ordering any parts the three type code digits are included at the end of the part number. The three type code digits are the last three letters or numbers of the 10 digit identification code inscribed on the Spilla stainless steel cartridge sleeve. A copy of the identification number can be found at the back of this manual. See section 7.1 Serial and Model Numbers for more information on identification numbers Name Air Cap Air Tank Alan Key Alignment Bolt Alan Screw Balance Kit Bung Cartridge Sleeve End Block End Block & Poly Adaptors Foot Valves Frog Cap Hose Clamp Nipple Paddle Part No AC### Quad Clamp Riser Block Riser O-ring Socket Sleeve O-ring Slide Rods Spilla Manual Spilla Systems Guide Spilla Windmill Guide QC ### RB ### RO ### SB ### SO ### SR ### SM ### SSG ### SWG ### AK ### AB ### AS ### BK ### BB ### CS ### EB ### EBPA ### FV### FC ### HC ### NB ### P15 ### Description Poly end cap fitted with brass wet and dry tyre valve Made any size to order 6mm Hex Alan Key (Supplied as a tool to service the pump) M8 Bolt 120mm Long (Supplied as a tool for ease of reassembling pump) M8 316 Stainless Steel Alan Screw 60mm Long Group of poly fittings fitted to the risers to maintain a balance full level 1” BSP (25mm nom) Brass or Stainless Bung 4” Nominal 316 Stainless Steel Machined Sleeve Machined Brass End Block Machined Brass End Block fitted with Poly Adaptors Gunmetal bronze vertical gravity non return valve with screen Poly disc with four holes to vermin proof top of bore Stainless Steel (Marine Grade) Hose Clamp 1” BSP (25mm nom) Brass Nipple High Density Polyethylene machined disk. (Number after P is thickness in mm) Four pipe clamp to suspend the Spilla pump in a bore Machined Brass Riser Block with 316 Stainless Steel Nozzle Nitrile O-ring 92mm x 4mm (Ludowici Part No. RR0207) 1” BSP (25mm nom) Brass Socket Nitrile O-ring 29mm x 2mm (Ludowici Part No. RR0743) 6mm 316 Stainless Steel Rod Spilla Installation, Operation and Parts Manual Guide to Spilla plumbing systems for remote tanks, multiple tanks, and rivers Guide to fitting Spilla pumping systems to Windmills ### Denotes the last three digits of the ten digit Spilla Identification Code inscribed into the stainless steel Cartridge Sleeve. A copy can be found in the back of the Spilla Manual supplied with the pump. 18 6. Spilla Trouble Shooting Guides 6.1 Spilla not running 6.1.1 Back Flushing Spilla Please note: It is important to remember that raw bore water only finds its way into the paddle chamber when the Spilla is first lowered into the bore water. As can be seen from section 1.2 Brief Description of Operation, once the Spilla is started only water from the supply water pump passes through the paddle chamber. The raw bore water rises through the foot valves and bypasses the paddle chamber on its way to the tank. If any sand or grit is playing havoc with the pump it has been forced into the Spilla by the drive water pump. Use an appropriate screen on the drive water pump to prevent foreign objects sand etc entering the paddle chamber. See 2.4.2 Drive Pump Suction Piping In the event sand or grit has found its way into the paddle chamber causing the paddle to stick back flushing the Spilla may free the paddle without the need to pull the pump. Remove the balance piping from the end of the riser lines. Start the drive water pump, if all the water is returning up one riser stop the pump and disconnect the drive water pump discharge from the drive water line to Spilla and connect it to the riser that was not flowing. Forcing water into the paddle chamber this way may push the paddle back and free it up. If the water was returning up both risers connect the supply water pump to one riser give the drive water pump a run then do the same for the other riser. Reconnect all the plumbing correctly and start the drive water pump again. If the Spilla does not start or starts and stops again it will need to be pulled up and inspected. See section 4. Spilla Disassembly and Reassembly 19 6.2 Diminished yield 6.3 High noise and vibration Check the air pressure in the air line is as specified in Section 3.2 Charging accumulator pipe with air. If the Spilla is fitted with an air tank drain out all the water to recharge with air (See Section 2.4.1 Drive pump discharge plumbing) then restart the system. Check bore pumping level. The Spilla will run very erratically if the foot valves draw in any air. 6.4 Loss of drive water It is very unlikely drive water loss would occur as a result of a failure of the riser lines or foot valves (see section 2.4.3 Return line plumbing and balance piping) once the foot valve or riser in question drained the paddle will ensure no more water is lost down the bore. A loss of drive water down the bore hole could be caused by damage to the supply water or air line near the pump or a failure of the sleeve O-rings in the pump. 20 7. Warranty Two years spare parts supply warranty contact Bontech for details. 8. Physical Specification Length including foot valves Shipping length excluding foot valves Max width including foot valves Body maximum diameter excluding foot valves Total Weight 8.1 <820mm <620mm 108mm 102mm 15 Kilograms Spilla Identifier Code Number Immediately on receipt of your Spilla pump copy the identifier code which is etched into the stainless steel sleeve of the pump onto the table below. This is very important for any possible warranty claim and sourcing parts in the future. 21