1
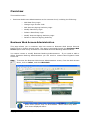
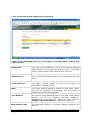
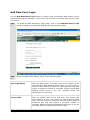
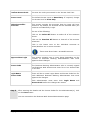
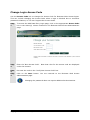
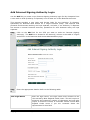
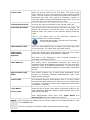
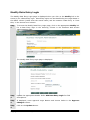
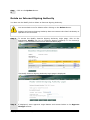
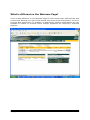
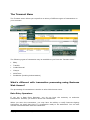
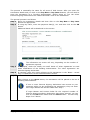
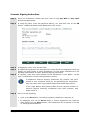
Business Viewpoint User
Guide.
If you have any questions or experience any difficulty in using
Business Web Access please don't hesitate to Contact our New
England Credit Union Telephone Service Centre on 132 067.
Copyright Ultradata Australia Pty Ltd
Business Web Access Administration - 1
Table of Contents
OVERVIEW.......................................................................................................... 3
BUSINESS WEB ACCESS ADMINISTRATION .................................................................... 3
ADD DATA ENTRY LOGIN ......................................................................................... 6
CHANGE LOGIN ACCESS CODE .................................................................................. 8
ADD INTERNET SIGNING AUTHORITY LOGIN ................................................................... 9
MODIFY DATA ENTRY LOGIN ................................................................................... 11
DELETE A DATA ENTRY LOGIN ................................................................................. 12
MODIFY INTERNET SIGNING AUTHORITY LOGIN ............................................................. 13
DELETE AN INTERNET SIGNING AUTHORITY .................................................................. 14
WORKING WITH BUSINESS WEB ACCESS ......................................................... 15
PROCESSING TRANSACTIONS WITH BUSINESS WEB ACCESS .............................................. 15
WHAT IS DIFFERENT ON THE WELCOME PAGE? .............................................................. 16
Pending Authorisations ................................................................................. 17
View a full list of Pending Authorisations ......................................................... 17
View detailed information on a single Pending Authorisation............................... 17
List of Accounts ........................................................................................... 17
Future Payments ......................................................................................... 17
THE TRANSACT MENU .......................................................................................... 18
What’s different with transaction processing using Business Web Access? ............ 18
UPLOAD (MULTITRANS) ........................................................................................ 21
Notes on Uploading Transactions.................................................................... 22
PENDING AUTHORISATIONS .................................................................................... 23
List of Pending Authorisations........................................................................ 23
View Detail of a Transaction .......................................................................... 25
Authorise a Pending Transaction from the Detail View screen ............................. 26
Authorise Transactions from the List............................................................... 26
Copyright Ultradata Australia Pty Ltd
Business Web Access Administration - 2
Overview
This module covers…
•
Business Web Access Administration at the customer level, including the following:
o
Add Data Entry Login
o
Change Login Access Code
o
Add Internet Signing Authority Login
o
Modify Data Entry Login
o
Delete a Data Entry Login
o
Modify Internet Signing Authority Login
o
Delete an Internet Signing Authority
Business Web Access Administration
This page allows you to examine who has access to Business Web Access Internet
Banking and to change access levels. This page is accessed through the Business Web
Access option and is only available to nominated Business Banking Administrators.
You cannot create or modify Business Banking Administrators. If you need to add or
delete Business Banking Administrators you will need to contact New England Credit
Union Ltd.
Step
1
To access the Business Web Access Administration screen, from the Web Access
Menu, click on Other, and then BB Admin
Some menu options may not be available. Menu names may differ
from those displayed above.
Copyright Ultradata Australia Pty Ltd
Business Web Access Administration - 3
Your screen will appear similar to the following:
Refer to the following table for a description of screen fields, Actions and
other options.
Select Client
This field is only displayed if you are the Business Banking
Administrator for more than one business client. To change
clients, select another client from the drop down list.
Administrators
This is a list of all Business Web Access Administrators for the
client.
Logins and ATO's
This table contains details of
Authorities To Operate (ATOs).
Name
This table contains details of logins for Data Entry (which
may also be restricted to View Only) and the names of
ATOs/Internet Signing Authorities.
Login Blocked
This column is only displayed if there is at least 1 login that is
blocked (e.g. due to excessive password violations).
Resetting the Access Code will unblock the login. Refer to
Change Login Access Code for additional information.
Authorisation Limit
The maximum amount an Internet Signing Authority can
approve.
Copyright Ultradata Australia Pty Ltd
Data
Entry
logins
and
Business Web Access Administration - 4
Accessible Accounts
This field will show ALL if all accounts for the Business client
can be accessed by the login or ATO. If only selected
accounts can be accessed, they will be displayed individually.
Action(s)
This column contains links to perform various actions on
Logins and ATOs. Refer to Actions and Other Options for
additional information.
Modify
Click on Modify to change an existing Access Level or change
the accounts that the user can access. You can also remove
access using this option.
If you are changing the details of a Data Entry login
(including 'View Only'), refer to Modify Data Entry Login.
If you are changing the details of an Internet Signing
Authority, refer to Modify Internet Signing Authority
Login.
Access Code
Click on Access Code to change the Access Code for a user.
See Change Login Access Code.
Add
Click on Add to make an ATO an Internet Signing Authority
and create a Login and Access Code for them. See Add
Internet Signing Authority Login.
Add Data Entry Login
(button)
Click on the Add Data Entry Login button to create a login
to Web Access, initial Access Code and provide access to
accounts. See Add Data Entry Login.
Copyright Ultradata Australia Pty Ltd
Business Web Access Administration - 5
Add Data Entry Login
Use the Add Data Entry Login option to create a login to Business Web Access, set the
initial Access Code for the login, control the level of access, and which accounts the Login
can access.
Step
1
To access the Add Data Entry Login page, click on the Add Data Entry Login
button located on the Business Web Access Administration page.
Step
2
Enter the appropriate details. Refer to the following table.
New Login Name
Enter the login name. The login name must conform to the
rules issued by New England Credit Union. This will require a
minimum and maximum number of characters and may also
require a minimum number of numerals. Please consult New
England Credit Union if you are uncertain about the
requirements for this field.
Access Code
Enter the access code for the new login. The access code
must conform to the rules issued by New England Credit
Union. This will require a minimum and maximum number of
characters and may also require a minimum number of
numerals. Please consult New England Credit Union if you are
uncertain about the requirements for this field.
Copyright Ultradata Australia Pty Ltd
Business Web Access Administration - 6
Confirm Access Code
Re-enter the code you entered in the 'Access Code' box.
Access Level
The default Access Level is Data Entry. If required, change
the Access Level to View Only.
Select Accessible
Accounts
This section controls the accounts that the Login will have
access to. By default, all accounts will be selected when you
create a new Data Entry Login.
Do one of the following:
Click on the Select All button to select all of the accounts
shown.
Click on the Unselect All button to clear all of the account
selections.
Click in the boxes next to the individual accounts to
select/deselect one or more accounts.
There must be at least 1 accessible account.
Approve New Login
This section contains one or more boxes depending on the
number of Business Banking Administrators that must
approve these changes.
Access Code
The Business Banking Administrator who is currently signed
into Business Web Access must enter his or her Access Code
in this box.
Login Name
Access Code
There will be an extra Login Name and Access Code box for
each additional Business Banking Administrator that must
approve the changes.
Each administrator must enter their Login Name and
Access Code before the changes are saved.
Step 3
After entering the details and the Access Codes for the administrator(s), click
on the Save button.
You are returned to the Business Web Access Administration page.
Copyright Ultradata Australia Pty Ltd
Business Web Access Administration - 7
Change Login Access Code
Use the Access Code link to change the Access Code for Business Web Access logins.
This can include changing the Access Code when a login is blocked due to excessive
password violations, or if a user forgets their Access Code.
Step
1
To access the Add Data Entry Login page, click on the appropriate Access Code
link in the Action(s) column located on the Business Web Access Administration
page.
Step
2`
Enter the 'New Access Code'. Note that rules for the access code are displayed
under the buttons.
Step
3
Step
4
Re-enter the code in the 'Verify New Access Code' box.
Click on the Save button. You are returned to the Business Web Access
Administration page.
Changing the password does not require additional authorisations.
Copyright Ultradata Australia Pty Ltd
Business Web Access Administration - 8
Add Internet Signing Authority Login
Use the Add link to create a new Internet Signing Authority login for My Viewpoint from
a user with an ATO (Authority To Operate) over at least one of the Business accounts.
This process provides a new Login and Access Code for the Authority To Operate,
specifically for Business Web Access for a single business entity. This ensures that
personal and business banking are kept separate, and also, if an Authority To Operate
has access to several business accounts, operations for each business entity are kept
separate.
Step
1
Click on the Add link for the ATO you want to make an Internet Signing
Authority. The Add link is located in the Action(s) column in the table of 'Logins
and ATO's' in the Business Web Access Administration page.
Step
2
Enter the appropriate details. Refer to the following table.
New Login Name
Enter the login name. The login name must conform to the
rules issued by New England Credit Union. This will require a
minimum and maximum number of characters and may also
require a minimum number of numerals. Please consult New
England Credit Union if you are uncertain about the
requirements for this field.
Copyright Ultradata Australia Pty Ltd
Business Web Access Administration - 9
Access Code
Enter the access code for the new login. The access code
must conform to the rules issued by New England Credit
Union. This will require a minimum and maximum number of
characters and may also require a minimum number of
numerals. Please consult New England Credit Union if you are
uncertain about the requirements for this field.
Confirm Access Code
Re-enter the code you entered in the 'Access Code' box.
Accessible Accounts
This section controls the access to accounts for the Login. By
default, all accounts on which the client is an ATO will be
selected when you create a new Internet Signing Authority
Login.
Click in the boxes next to the individual accounts to
select/deselect one or more accounts.
There must be at least 1 account with 'View Only'
or 'Full Access' selected.
Authorisation Limit
Enter the Authorisation Limit in dollars (the dollar sign itself
is not required). The value must be greater than 0.
Notify when
Authorisation
Required
Check the 'Notify when Authorisation Required' box if email
verification of pending authorisations is required.
Email Address
The 'Notify when Authorisation Required' box must be
checked and an email address entered for the user to receive
emails to notify of pending authorisations. This field is only
displayed if your financial institution is providing a notification
service.
Approve New Login
Name
This section contains one or more boxes depending on the
number of Business Banking Administrators that must
approve these changes.
Access Code
The Business Banking Administrator who is currently signed
into Business Web Access must enter his or her Access Code
in this box. This field is present only if Password confirmation
of updates is required.
Login Name
There will be an extra Login Name and Access Code box for
each additional Business Banking Administrator that must
approve the changes.
Access Code
This field is only displayed if your financial institution is
providing a notification service.
Each administrator must enter their Login Name and
Access Code before the changes are saved.
Step 3
After entering the details and the Access Codes for the administrator(s), click
on the Save button.
You are returned to the Business Web Access Administration page.
Copyright Ultradata Australia Pty Ltd
Business Web Access Administration - 10
Modify Data Entry Login
The Modify Data Entry Login page is displayed when you click on the Modify link in the
Action(s) for a Data Entry login. Data Entry logins can be identified by the Login Name in
the Name column (rather than the actual name) and the notation 'Data Entry' or 'View
Only' in the Access Level column.
Step
1
To access the Modify Data Entry Login page, click on the appropriate Modify link
for a Data Entry login in the Action(s) column in the Business Web Access
Administration page.
The Modify Data Entry Login page is displayed:
Step
2
Update the appropriate details. Refer Add Data Entry Login for field
descriptions.
Step
3
If displayed, enter approval Login Names and Access Codes in the Approve
Changes section.
Step
4
Click on the Update button.
Copyright Ultradata Australia Pty Ltd
Business Web Access Administration - 11
Delete a Data Entry Login
You also use the Modify link to delete a Data Entry Login.
You cannot back out of a deletion after clicking on the Delete button.
Step
1
To access the Modify Data Entry Login page, click on the appropriate Modify link
for a Data Entry login in the Action(s) column in the Business Viewpoint
Administration page.
The Modify Data Entry Login Page is displayed:
Step
2
Step
3
If displayed, enter approval Login Names and Access Codes in the Approve
Changes section.
Click on the Delete button.
Copyright Ultradata Australia Pty Ltd
Business Web Access Administration - 12
Modify Internet Signing Authority Login
The Modify Internet Signing Authority Login page is displayed when you click on the
Modify link in the Action(s) for an Internet Signing Authority. Data Entry logins can be
identified by the actual name of the user in the Name column (rather than the Login
Name) and the notation 'Internet Signing Authority' in the Access Level column.
Step
1
To access the Modify Internet Signing Authority Login page, click on the
appropriate Modify link for an Internet Signing Authority in the Action(s) column
in the Business Web Access Administration page.
The Modify Internet Signing Authority Login page is displayed:
Step
2
Update the appropriate details. Refer Add Internet Signing Authority Login
for field descriptions.
Step
3
If displayed, enter approval Login Names and Access Codes in the Approve
Changes section.
Copyright Ultradata Australia Pty Ltd
Business Web Access Administration - 13
Step
4
Click on the Update button.
Delete an Internet Signing Authority
You also use the Modify link to delete an Internet Signing Authority.
You cannot back out of a deletion after clicking on the Delete button.
Deleting an Internet Signing Authority does not remove the client’s Authority to
Operate on the accounts.
Step 1
To access the Modify Internet Signing Authority Login page, click on the
appropriate Modify link for an Internet Signing Authority in the Action(s)
column in the Business Web Access Administration page.
The Modify Internet Signing Authority Login page is displayed:
Step 2
If displayed, enter approval Login Names and Access Codes in the Approve
Changes section.
Copyright Ultradata Australia Pty Ltd
Business Web Access Administration - 14
Step 3
Click on the Delete button.
Working with Business Web Access
This module covers…
•
Processing Transactions with Business Web Access
•
What is different on the Welcome Page?
•
The Transact menu
•
Upload (MultiTrans)
•
Pending Authorisations
Processing Transactions with Business Web Access
In most respects, Business Web Access users will notice few differences when processing
transactions compared to other users, especially if they are familiar with performing
transactions in accounts where more than one signature is required.
This section concentrates on the additional functionality for Business Web Access users
and is written from the perspective of the Business Web Access customer.
Copyright Ultradata Australia Pty Ltd
Business Web Access Administration - 15
What is different on the Welcome Page?
There is little difference on the Welcome Page for Web Access users and Business Web
Access users although you may not be familiar with some of the functionality if you are a
previous Web Access user. For example, in Web Access, Pending Authorisations are only
available to holders of accounts where multiple signatures are required to authorise
payment.
Copyright Ultradata Australia Pty Ltd
Business Web Access Administration - 16
The following information highlights the main areas of interest as a Data Entry Operator
or an Internet Signing Authority for Business Web Access:
Pending Authorisations
The 'Pending Authorisations' section is displayed if you have access to Business Web
Access accounts as a Data Entry User or an Internet Signing Authority and there are
payments loaded but not fully authorised (referred to as Pending Authorisations). An
Internet Signing Authority is the Internet equivalent of an Authority to Operate.
As previously noted, the Pending Authorisations section is also displayed to other Web
Access users with an account where more than 1 signature is required to authorise
payment.
View a full list of Pending Authorisations
Click on the 'Full Pending Authorisations' link in the list of Pending Authorisations or
choose Transact, PendAuths from the menu to view a full listing of all Pending
Authorisations.
View detailed information on a single Pending Authorisation
Click on a 'Detail' hyperlink to view details of a single Pending Authorisation transaction.
Refer to Pending Authorisations for additional information.
List of Accounts
The ‘List of Accounts’ section by default displays the full list of your accounts available to
Internet Banking. If you are logged in as a Business Web Access user, these will include
the business accounts that you have access to, either to view the details or to operate on
the accounts as an Internet Signing Authority.
Future Payments
The ‘Future Payments’ section will display payments that are soon to be due. A link at the
end of each line will display more details about the Future Payment.
Copyright Ultradata Australia Pty Ltd
Business Web Access Administration - 17
The Transact Menu
The Transact menu allows you to perform a variety of different types of transactions on
your accounts.
The following types of transaction may be available to you from the Transact menu:
•
BPay
•
Transfer
•
Credit External
•
Cheque
•
MultiTrans
•
PendAuths (Pending Authorisations)
What’s different with transaction processing using Business
Web Access?
The processing of transactions is similar to other Web Access users.
Data Entry Operators
If you are a Data Entry Operator, you do not have the authority to authorise
transactions. Instead, you need to 'Store' the transactions.
When you store the transaction, you may have the ability to notify Internet Signing
Authorities via email that there is a transaction ready to be authorised. You can also
include notes associated with the transaction.
Copyright Ultradata Australia Pty Ltd
Business Web Access Administration - 18
The process is essentially the same for all users of Web Access. After you enter the
transaction details and you click on the Pay Now or Pay Later buttons, you will need to
store the transaction as a 'Pending Authorisation'. Before doing so, you can select
Internet Signing Authorities to be notified and add a note to the transaction.
The general process is as follows:
Step 1 Enter the transaction details and then click on the Pay Now or Pay Later
buttons as appropriate.
Step 2 If using Pay Later, enter the payment date(s), etc. and then click on the OK
button.
Additional detail will be displayed on the screen:
The information on screen will vary, depending on the number of
signatures required.
Step 3
Step 4
Step 5
If displayed, check the 'Notify via email' boxes of 'other signatories' to send
email notifications of the Pending Authorisation. The 'other signatories' are
Internet Signing Authorities.
If required, enter any notes relevant to this transaction in the 'Notes - record
only if Transaction is to be authorised later' section.
Click on the Store button.
After clicking on the Store button, the transaction will be placed in the list of
'Pending Authorisations'.
If one or more Internet Signing Authorities have access to your
computer while you are processing the transaction, they can enter
their Login Names and Access Codes after step 1.
If Login Names and Access Codes for the required number of
Internet Signing Authority Authorities have been entered, you can
click on the OK button rather than the Store button. You also skip
Steps 3 to 5 above.
Copyright Ultradata Australia Pty Ltd
Business Web Access Administration - 19
Internet Signing Authorities
Step 1
Enter the transaction details and then click on the Pay Now or Pay Later
buttons as appropriate.
Step 2
If using Pay Later, enter the payment date(s), etc. and then click on the OK
button. Additional detail will be displayed on the screen:
Step 3
Step 4
If displayed, enter ‘Your Access Code’.
If additional signatories are required and if check boxes are displayed check the
'Notify via email' boxes of 'other signatories' to send email notifications of the
Pending Authorisation to other Internet Signing Authorities.
If required, enter any notes relevant to this transaction in the 'Notes - record
only if Transaction is to be authorised later' section.
Step 5
If additional Internet Signing Authorities are present and have
access to your computer while you are processing the transaction,
they can enter their Login Names and Access Codes after Step 3.
If the Login Names and Access Codes for the required number of
Internet Signing Authority Authorities have been entered, skip
Steps 4 and 5.
Step 6
Do one of the following:
•
Click on the OK button if no further signatory details are required; or
•
If displayed, click on the Store button if further signatories are required.
After clicking on the Store button, the transaction will be placed in the list
of 'Pending Authorisations'.
Copyright Ultradata Australia Pty Ltd
Business Web Access Administration - 20
Upload (MultiTrans)
Business Web Access users have the additional ability over other Web Access users to
upload files with batches of transactions for multiple transaction processing. The files
may be in CEMTEX format produced by popular 3rd party programs such as MYOB.
Step
1
Click on the Upload button. The Load a Batch of Credit External Account
Transactions screen is displayed:
Step
2
Step
3
Select the appropriate 'Document Type' from the drop down list.
Step
4
Step
5
Step
6
Enter a 'Batch Description'.
Enter the 'File Location' including the file name, or click on the Browse button
and select the file.
Select the 'From Account'.
Check 'Post as Total' if you want the batch to appear as a single transaction in
your account.
Copyright Ultradata Australia Pty Ltd
Business Web Access Administration - 21
Step
7
Step
8
Enter the 'Reference (to Appear on Statement).'
Click on the Upload button.
After the batch has successfully uploaded, you are returned to the Transaction
Batch List.
Notes on Uploading Transactions
•
When you upload a batch, more than one batch may be created in the Transaction
Batch List, e.g. separate batches for Internal Transfer and External Transfer.
•
If there are any invalid entries (e.g. incorrect account numbers, BSB codes, etc), then
the Status will display as 'New - contains upload errors'. You will need to click on
Change link for the batch, and then the individual change links for the incorrect
Payees in the batch.
•
The whole batch may reject if there are discrepancies in the data, e.g. a mismatch of
transaction totals to the batch totals, or a mismatch of transaction count to total
transactions. For this type of error, you will need to determine the cause, fix the
source data and upload the batch again. To view details of the Uploaded Batch, click
on the Show Errors link for the batch. If required, you can delete the details from
the 'Uploaded Batches' list by using the Delete button for the appropriate item.
Copyright Ultradata Australia Pty Ltd
Business Web Access Administration - 22
Pending Authorisations
The Pending Authorisations function is available to Web Access users with access to
accounts where more than 1 signature is required to authorise payment. It allows
signatories to view pending transactions and to authorise those transactions at a later
time, even though not all signatories are available at the same time.
In addition, Business Web Access users may also:
•
Allow Data Entry Operators to enter payment details and create a pending
authorisation transaction, even when only one signature is required.
•
Generate an email alert to a signatory (i.e. an Internet Signing Authority), to notify a
transaction or batch of transactions is ready to be authorised.
•
Enter, review and edit notes that have been entered for a pending authorisation.
•
Authorisation of transactions is limited to a pre-set value for each Internet Signing
Authority as well as daily debit limit on an account limit that is set by New England
Credit Union Ltd.
List of Pending Authorisations
Step
1
Do one of the following:
•
On the Welcome Page, click on the Full Pending Authorisations link in the
list of Pending Authorisations.
Copyright Ultradata Australia Pty Ltd
Business Web Access Administration - 23
•
Choose Transact, PendAuths from the menu.
Your page will look similar to the following:
A check box in the Select column appears only if you can add your
authorisation to the payment, i.e. you are an Authority to Operate on the
account, have full access to the From account as the Internet Signing Authority,
you authorisation limit is sufficient to authorise the payment amount and you
have not yet authorised it.
How long do transactions remain in the List of Pending
Authorisations?
New England Credit Union has pre-defined a period of time that transactions will remain
on the system. This is displayed near the bottom of the page when you are viewing the
List of Pending Authorisations.
Copyright Ultradata Australia Pty Ltd
Business Web Access Administration - 24
View Detail of a Transaction
Step
1
From the List of Pending Authorisations page, or the Pending Authorisations
section of the Welcome Page, click on the Detail link for the transaction.
•
The details displayed will vary according to the type of transaction.
•
If you are able to authorise this transaction, and password confirmation on
updates is required by the financial institution, an 'Access Code' box will be
displayed.
Copyright Ultradata Australia Pty Ltd
Business Web Access Administration - 25
Authorise a Pending Transaction from the Detail View screen
Step 1
Click on the Detail link for the transaction in the List of Pending Authorisations.
Step 2
Enter your 'Access Code'.
Step 3
Click on the Pay Now button.
Authorise Transactions from the List
Step 1
Check the box in the Select column for the transactions you want to authorise.
Step 2
Enter your 'Access Code'.
Step 3
Click on the Authorise button.
Copyright Ultradata Australia Pty Ltd
Business Web Access Administration - 26