1
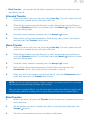
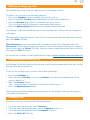
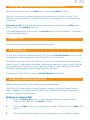
VIRTUAL PBX
USER GUIDE
All you need to know
Sales & Enquiries – 1300 733 995
Business Support – 1300 887 899
www.mynetfone.com.au/business
P. 1
Customer Service
At MyNetFone, we pride ourselves on delivering friendly and prompt customer service &
technical support.
So if you run into any questions or problems, do not hesitate to give our helpful Team a call:
1300 733 995
Business Sales & Enquiries:
(Monday to Friday 8:30am – 5:30pm)
1300 887 899
Business Technical Support:
(Monday to Friday 8:00am – 5:30pm)
You can also access a few handy MyNetFone features using our Free Service Numbers:
121 - Voicemail collection & setup
151 - Account balance & recharge
Online Resources
Our website provides a wealth of information & resources to help you out, including a troubleshooting matrix, setup guides, terminology and more.
Simply visit www.mynetfone.com.au/support and help yourself!
MyNetFone Business Team 2011
P. 2
Table of Contents
1
Customer Service
2
Table of Contents
3
How to Get Started
4
Useful Features
5
Phone Features
Cisco SPA5xx Series
11
Snom 3xx Series
18
Polycom IP Series
24
Advanced Features
Voicemail & Voicemail to Email
25
Remote Pickup
Call Park and Pick
26
Follow Me
27
Call Groups
29
Auto Attendant
31
Global Access Callback
32
Enhanced Voice Services
Keep your Existing Business Number
33
Direct In-Dial Numbers
1300 Numbers
34
Gold Numbers
Virtual Fax
35
Meet-Me Conferencing
White Pages Listings
36
MyText SMS
38
Broadband Features
Data Usage & History
Data Boost
Additional Features
39
Account Management Features
42
Important Information you should know about VoIP
P. 3
How to Get Started
The basic use of your new phone is like using any other – simply pick up the handset and dial
a number.
If that’s all you need out of your phone, then your manual-reading is complete!
However, the handsets provided by MyNetFone have a lot of handy features to enrich your
phone usage experience and make call handling easier.
To find out more about your handset, simply flick to the relevant handset brand in this User
Guide: Cisco (p.5), Snom (p.11) or Polycom (p.18).
Cisco SPA500 Series Handsets
Snom 300 Series Handsets
Polycom Desktop Handsets
P. 4
Useful Features
Our customers tell us that there are a few key Virtual PBX features that they tend to use most
frequently.
We hope that you will find these useful as well!
Voicemail & Voicemail to Email
Now you can not only get voicemail messages, but you can also receive them as audio files to
your email address. If your mobile phone is set up to receive emails, this means you never
miss an important message, even if you are out of the office.
Plus, each Virtual PBX user in your company has their own Voicemail Box. This means you
don’t have to spend time listening to other messages to get to the ones left for you, and other
people will not accidentally delete your important voicemails.
To set up Voicemail & Voicemail to Email for your phone, please refer to page 23.
Follow Me
Ever worry about stepping away from your desk and missing an important call? With Follow
Me, you can set calls to automatically be forwarded to another number, either landline or
mobile. You set the calls to be forwarded either when there’s no answer, or if the line is busy.
To set up Follow Me on your phone, please refer to page 25.
Call Transfers
This feature makes managing incoming calls very easy.
With Virtual PBX, you can transfer calls to any other phone number, not just a phone in the
same office. Plus, you have the option of either talking to the transfer receiver first, and then
transferring the call, or directly transferring the call without waiting for the transfer receiver to
answer.
Call Transfers work differently on various phone brands. To find out how to transfer calls on
your phone please refer to: Cisco phones – page 7; Snom phones – page 14; Polycom
phones – page 20.
Virtual PBX also delivers plenty of other useful features! Read through this User Guide to
decide which ones are most handy for you.
P. 5
Phone Usage: Cisco SPA5xx Series
Cisco phones share the same physical characteristics across different models, with only minor
differences in the number of Line Keys and the type of LCD Screen used.
The following image illustrates the physical layout of your Cisco phone:
Cisco SPA502G / 504G / 508G
2
1
3
4
5
6
7
8
9
10
11
14
13 12
1
2
3
4
5
6
7
8
9
10
11
12
13
14
Handset
Message Waiting Indicator (MWI)
Display
Line Keys (not available on SPA502G)
Soft Key button
Navigation button
Messages button (see p.24)
Hold button
Menu button
Mute button
Volume button
Headset button
Speakerphone button
Keypad
Note: The Cisco SPA525G model has a slightly different phone
interface and some extra features are available via the on-screen
menu. However, the button layout and operation is the same as
presented in diagram above.
Making Outgoing Calls
The available lines on the phone will be shown as solid green Line Keys.
To start a call, use one of the following methods:
• Pick up the Handset - the first available Line will be used, or
• Press one of the solid green Line Keys - the Speakerphone will be used by default, or
• Press the Speakerphone button - the first available Line will be used, or
• Press the Headset button - the first available Line will be used. This is only applicable if a
Headset is connected to the phone.
You will hear a dial tone. The Line Key that is being used will change to a solid red.
Dial the number using the keypad. If the call does not automatically start after a few seconds,
you can press the ‘dial’ Soft Key.
Phone Directory: If you would like to dial a number from the phone directory, press the ‘dir’
Soft Key instead of dialling the number. Then select the number from the list and press the
‘dial’ Soft Key.
For instructions on setting up the Phone Directory, refer to www.mynetfone.com.au/phone-use
P. 6
Answering an Incoming Call
An incoming call will appear on the phone as a fast-flashing red Line Key. The Message
Waiting Indicator will also flash.
To pick up the incoming call, use one of the following methods:
• Pick up the Handset, or
• Press the ringing Line Key - the Speakerphone will be used by default, or
• Press the Speakerphone button, or
• Press the Headset button - this is only applicable if a Headset is connected to the phone.
Once the call is answered, the corresponding Line Key will appear solid-red.
Ending a Call
To end an active call, use one of the following methods:
• If you are using the Handset, simply hang it up, or
• If you are using the Speakerphone, press the Speaker button, or
• If you are using the Headset, press the Headset button
Placing Calls on Hold & Retrieving Calls from Hold
While on an active call, press the Hold button.
The call will now be on hold, and the other party will be hearing the ‘Music on Hold’. The Line
Key that is being used for the call will change to a slow-flashing red to indicate this.
Retrieving a Call: To retrieve a call that has been placed on Hold, press the slow-flashing red
Line Key. If you are using the SPA502G phone model, press the ‘resume’ Soft Key to retrieve
the call.
Missed Calls
To view the missed calls on your phone, press the Menu button, select ‘Call History’ using
the Navigation button arrows, then press the ‘Select’ Soft Key.
Do Not Disturb
To stop your phone from receiving incoming calls, press the ‘DND’ Soft Key. You will still be
able to make outgoing calls while ‘Do Not Disturb’ is activated.
The phone screen will show ‘Do Not Disturb’. The phone will behave the same way as when
the line is ‘busy’: callers dialling the phone’s direct line will hear a ‘busy’ tone, or the ‘Follow
Me’ call forwarding will activate if it is setup (see p.26 for details), callers dialling the Call Group
number will be redirected to other phone within the Call Group. To switch off ‘Do not Disturb’,
press the ‘Clr DND’ Soft Key.
P. 7
Setting up and Using Speed Dials
Speed Dials can be used to quickly dial frequently used numbers.
The Cisco IP Phones have 8 configurable Speed Dial entries which correspond to the numbers
on the Keypad (from 2 to 8).
Setting up a Speed Dial
1.
2.
3.
4.
5.
Press the Menu button. Use the Navigation button to select ‘Speed Dial’ and then
press the ‘select’ Soft Key.
Use the Navigation button to select the Speed Dial entry that you wish to set up and
then press the ‘edit’ Soft Key.
Enter the destination number using the keypad. You may have to press a key several
times to input the correct number.
After the number is entered, press the ‘ok’ Soft Key.
For Cisco SPA525G, use the Navigation button to highlight different fields, then use
the Keypad to enter text or numbers. You may have to press a key several times to
input the correct letter/number. When finished, press the ‘Save’ Soft Key.
Press the Menu button to return to the main screen.
Using a Speed Dial
Press the number corresponding to the Speed Dial entry that you wish to call, and press the
‘dial’ Soft Key.
Example: If you have configured Speed Dial entry #2 with the number ‘0280088000’,
then you only need to press ‘2’ on the keypad, and ‘0280088000’ will automatically be
dialled.
Changing Ring Tones
Cisco IP Phones come with several ring tones, and different tones can be selected for
different lines on the phone.
Changing the Ring Tone
1.
Press the Menu button. Use the Navigation button to select ‘Ring Tone’ and press
the ‘select’ Soft Key.
For Cisco SPA525G, press the Menu button. Use the Navigation button to select
‘User Preferences’ and then press the ‘select’ Soft Key. Select ‘Audio Preferences’
and press the ‘select’ Soft Key again.
2.
Use the Navigation button to select the Line for which you want to set up the Ring
Tone and press the ‘change’ Soft Key.
For Cisco SPA525G, use the Navigation button to select the Line for which you want
to set up the Ring Tone and press right on the Navigation button.
P. 8
3.
Use the Navigation button to select a Ring Tone and press the ‘play’ Soft Key to
listen to a preview of the selected Ring Tone. To confirm the selected Ring Tone,
press the ‘select’ Soft Key.
4.
Press the Menu button to return to the main screen.
Transferring Calls
There are 3 methods to transfer calls:
• Attended Transfer – you call the person to whom you are transferring the call, at which
point you can either:
− Transfer the call while the phone is ringing, or
− Wait for the person to answer, talk to them, then transfer the call.
• Warm Transfer – you call the person to whom you are transferring the call and join all 3
parties together (the caller, the transfer receiver and you), then you disconnect your phone
from the call to allow the other 2 parties to continue their call.
• Blind Transfer – you transfer the call without speaking to the person to whom you are
transferring the call.
Attended Transfer
1.
While on an active call, press the ‘xfer’ Soft Key. The call is placed on hold, a new
Line is opened and you will hear a dial-tone.
2.
Either dial the number using the keypad, or select the number from the Directory
(using the ‘dir’ Soft Key). If you misdial, you may press the ‘delChr’ or the ‘clear’
Soft Key to correct the mistake.
3.
Press the ‘dial’ Soft Key.
4.
At this point, you can press the ‘xfer’ Soft Key while the phone is ringing in order to
transfer the call immediately, or you can wait until the call has been answered by the
3rd party and/or talk to them before you press the ‘xfer’ Soft Key.
Warm Transfer
1.
While on an active call, press the ‘conf’ Soft Key. The call is placed on hold, a new
Line is opened and you will hear a dial-tone.
2.
Either dial the number using the keypad, or select the number from the Directory
(using the ‘dir’ Soft Key). If you misdial, you may press the delChr or the clear Soft
Key to correct the mistake.
3.
Press the ‘dial’ Soft Key.
P. 9
4.
Wait until the call has been answered by the 3rd party, then press the ‘conf’ Soft
Key – all 3 parties will be connected into one call.
5.
When you want to disconnect yourself from the call, press the ‘join’ Soft Key.
Blind Transfer
1.
While on an active call, press the right direction on the Navigation Button, then
press the ‘bxfer’ Soft Key. A new Line is opened and you will hear a dial-tone.
2.
Dial the number using the Keypad and then press the ‘dial’ Soft Key.
3.
The call is now transferred and you can hang up the phone.
Starting a Conference Call
There are 2 methods to start a Conference call:
• Start a new Conference call – call both parties and then join the calls together
• Join a new call to a held call – call a new party and then join it to an existing call that is
on hold
Starting a new Conference call
1.
Make an outgoing call to the 1st party and wait until they have answered the call.
2.
Press the ‘conf’ Soft Key. The call is placed on hold, a new Line is opened and you
will hear a dial-tone.
3.
Make an outgoing call to the 2nd party.
4.
Either while the call is ringing, or after it has been answered, press the ‘conf’ Soft
Key to join both parties and start the Conference call.
Note: When you hang up, both of the other parties will also be disconnected.
Joining a new call with a held call
You need to have at least 1 call on hold to use this method.
1.
Make an outgoing call to the 2nd party.
2.
Either while the call is ringing, or after it has been answered, press the ‘confLx’ Soft
Key.
−
If you only have 1 call on hold, both parties will be joined and the
Conference call will begin.
P. 10
−
If you have 2 or more calls on hold, you will be asked to select the held line
that you wish to use. Press the Line Key that contains the held call that you
wish to use, and the Conference call will begin.
Note: When you hang up, both of the other parties will also be disconnected.
Using the Expansion Console
The Expansion Console provides additional Line Buttons that can be used for 2 purposes:
Speed Dial
An additional Line Key can be set as a Speed Dial to a phone number of your choosing.
Press the Speed Dial Key and the outgoing call is made.
If the Speed Dial Key is pressed while on an active call, the call will be Blind Transferred to that
Speed Dial destination.
Monitor Line
An additional Line Key can be set as a Monitor Line. This key will then monitor the status of a
line from another phone within the same Virtual PBX.
Solid green light on the Monitor Line indicates that there is no call in progress and no
incoming call is ringing on the monitored line.
Flashing red light indicates that an incoming call is ringing on the monitored line. Pressing
the flashing Monitor Line at this point will answer the incoming call from your phone.
Solid red light indicates that a call is currently in progress on the monitored line. Pressing the
Monitor Line at this point will make an outgoing call to the monitored phone.
If the Monitor Line Key is pressed while on an active call, the call will be Blind Transferred to
that Monitor Line destination.
To set up the Line Buttons on the Expansion Console, please call our Support Team on
1300 887 899 between 8am - 5:30pm Mon - Fri (AEST), or speak to your office IT Manager.
P. 11
Phone Usage: Snom 3xx Series
Snom phone share the same physical characteristics across different models, with only minor
differences in the number of Line Keys and the type of LCD Screen used. The Snom 300
model is an exception, and usage notes for this model are provided where relevant.
The following image illustrates the physical layout of your Snom IP Phone:
Snom 300
1
1
2
3
9
4
5
6
7
8
2
3
4
5
6
7
8
9
Navigation, Accept ( ) and
Cancel ( ) buttons
Message Waiting Indicator (MWI)
Line Keys
Redial button
Directory button
Transfer button
Mute button
Keypad
Volume / Speaker buttons
Snom 320 and 370
(Snom 320 shown)
1
2
7
1
2
3
3
4
5
4
5
6
6
7
Soft Keys
Navigation, Accept ( ) and
Cancel ( ) buttons
Message Waiting Indicator (MWI)
Line Keys
Function Buttons: Messages (see p.24)
Redial, Directory, Conference, Transfer,
Hold, DND, Help
Keypad
Volume / Speakerphone buttons
Making Outgoing Calls
Available lines will be shown on the phone as unlit Line Keys.
To start a call, use one of the following methods:
• Pick up the Handset (the first available Line will be used), or
• Press an available Line Key (the Speakerphone will be used by default), or
• Press the Speakerphone Button (the first available Line will be used).
P. 12
You will hear a dial-tone. The Line Key that is being used will change to a solid orange.
Dial the number using the Keypad. If the call does not automatically start after a few seconds,
press the Accept ( ) button.
Phone Directory: If you would like to dial a number from the built-in Directory, press the
Directory button instead of dialling the number. Select the number from the list and press the
Accept ( ) button.
For instructions on setting up the Phone Directory, refer to www.mynetfone.com.au/phone-use
Answering an Incoming Call
An incoming call will be shown on the phone as a fast-flashing orange Line Key. The
Message Waiting Indicator may also flash, depending on your phone model.
To answer the call, use one of the following methods:
• Pick up the Handset, or
• Press the ringing Line Key (the Speakerphone will be used by default), or
• Press the Headset Button (not available on Snom 300), or
Note: This is only applicable if a Headset is connected to the phone.
• Press the Speakerphone Button.
The incoming call will be answered and the Line Key will change to a solid-orange to indicate
this.
Ending a Call
To end an active call, use one of the following methods:
• If you are using the Handset, simply hang up, or
• If you are using the Speakerphone, press the Speaker button, or
• If you are using the Headset, press the Headset button.
Placing Calls on Hold & Retrieving Calls from Hold
While on an active call, press the Hold button or press the solid orange Line Key.
The call will now be on hold, and the other party will be listening to the ‘Music on Hold’. You
will hear a dial-tone to indicate this, and the Line Key that is being used for the call will change
to a slow-flashing orange.
Retrieving a Call: To retrieve a call that has been placed on Hold, press the slow-flashing
orange Line Key.
P. 13
Missed Calls
To view missed calls on your phone:
•
•
Snom 320 & 370: Press the ‘Call History’ Soft Key
Snom 300: Press the Up arrow and then press the Accept (
) button
Do Not Disturb
For Snom 320 & 370, to stop your phone from receiving incoming calls, press the DND
button. You will still be able to make outgoing calls when ‘Do Not Disturb’ is activated.
The phone screen will either show a ‘stop sign’ or DND, depending on model.
The phone will behave the same way as when the line is ‘busy’: callers dialing the phone’s
direct line will hear a busy tone, or the ‘Follow Me’ call forwarding will activate if it is set up
(see p.26 for details); callers dialing the Call Group number will be redirected to other phones
within the Call Group.
To switch off ‘Do Not Disturb’, press the DND button again.
Setting Up and Using Speed Dials
Speed Dials can be used to quickly dial frequently used numbers.
The Snom IP phones require that Speed Dial entries be configured using the Web Interface,
therefore you need a computer to proceed.
Configuring a Speed Dial
1.
Snom 370: Press the Help button.
Snom 320: Press the Help button, then press the ‘IPAdr’ Soft Key.
Snom 300: Press the Down and then Up arrow on the Navigation button, then press
the Accept ( ) button.
2.
Make a note of the IP Address that is now displayed on the screen.
3.
Open a Web Browser (such as Internet Explorer or Mozilla Firefox) and type the IP
Address from Step 2 into the Address Bar, then press Enter on your keyboard.
The Web Interface for your phone should now appear.
4.
Click on the ‘Speed Dial’ link on the left-hand side.
Enter the phone number into the Speed Dial Entry that you want to set up, and click
‘Save’ at the bottom of the page.
Using a Speed Dial
Dial the number of the Speed Dial entry that you wish to use, and press the Accept (
button.
)
P. 14
Example: If you have configured Speed Dial entry #2 with the number ‘0280088000’,
then you only need to press ‘2’ on the keypad, and ‘0280088000’ will automatically be
dialled.
Changing Ring Tones
The Snom IP phones come with several ring tones, and different tones can be selected for
different lines on the phone.
The Snom IP Phones require that Ring Tones be configured using the Web Interface, therefore
you need a computer to proceed.
Changing the Ring Tone
1.
Snom 370: Press the Help button.
Snom 320: Press the Help button, then press the ‘IPAdr’ Soft Key.
Snom 300: Press the Down and then Up arrow on the Navigation button, then press
the Accept ( ) button.
2.
Make a note of the IP Address that is now displayed on the screen.
3.
Open a Web Browser (such as Internet Explorer or Mozilla Firefox) and type the IP
Address from Step 2 into the Address Bar, then press Enter on your keyboard.
The Web Interface for your phone should now appear.
4.
Click on the required ‘Identity’ link on the left-hand side – ‘identities’ refer to the
individual Lines on your phone.
5.
Use the ‘Ringtone’ drop-down menu to select a Ring Tone. Press the ‘Play Ringer’
button to listen to a preview of the selected Ring Tone.
To confirm the selected Ring Tone, click ‘Save’ at the bottom of the page.
Transferring Calls
There are 3 methods to transfer calls:
• Attended Transfer – you call the person to whom you are transferring the call, at which
point you can either:
−
Transfer the call while the phone is ringing, or
−
Wait for the person to answer, talk to them, then transfer the call
• Warm Transfer – you call the person to whom you are transferring the call and join all 3
parties together (the caller, the transfer receiver and you), then you disconnect your phone
from the call to allow the other 2 parties to continue their call.
P. 15
• Blind Transfer – you transfer the call without speaking to the person to whom you are
transferring the call.
Attended Transfer
1.
While on an active call, press the solid orange Line Key. The call is placed on hold,
a new Line is opened and you will hear a dial-tone.
2.
Either dial the number using the Keypad, or select the number from the Directory
(using the Directory button). If you misdial, press the Cancel ( ) button to cancel
and start dialling again.
3.
Once the correct number is entered, press the Accept (
4.
Wait until the call has been answered by the 3rd party, talk to them if you need to,
and then press the Transfer button twice.
) button.
Warm Transfer
1.
While on an active call, press the solid orange Line Key. The call is placed on hold,
a new Line is opened and you will hear a dial-tone.
2.
Either dial the number using the Keypad, or select the number from the Directory
(using the Directory button). If you misdial, press the Cancel ( ) button to cancel
and start dialling again.
3.
Once the correct number is entered, press the Accept (
4.
Wait until the call has been answered by the 3rd Party, and then press the
Conference button – all 3 parties will be connected to one call.
5.
When you wish to disconnect yourself from the call, press the Conference button
again, and then press the Transfer button twice.
) button.
NOTE: You will not be able to perform a Warm Transfer if you have more than 2 concurrent
calls active on your phone (this includes calls on hold).
After you have completed Step 3, you will not be able to make any additional outgoing calls
or receive any additional incoming calls on your phone until you have completed Step 4.
Blind Transfer:
1.
While on an active call, press the Transfer button. A new Line is opened and you will
hear a dial-tone.
2.
Dial the number you wish to transfer the caller to using the keypad and press the
Accept ( ) button.
3.
The call is now transferred and you can hang up the phone.
P. 16
Starting a Conference Call
There are 2 methods to start a Conference call:
• Start a new Conference call – call both parties and then join the calls together
• Join a new call to a held call – call a new party and then join it to an existing call that is
on hold
NOTE: You will not be able to start a Conference call if you have more than 2 concurrent
calls active on your phone (this includes calls on hold).
When the Conference call has started, you will not be able to make any additional
outgoing calls or receive any additional incoming calls on your phone until the
conference call has been disconnected.
Starting a new Conference call
1.
Make an outgoing call to the 1st party and wait until they have answered the call.
2.
Press the Hold button or press the solid orange Line Key. The call is placed on
hold, a new Line is opened and you will hear a dial-tone.
3.
Make an outgoing call to the 2nd party.
4.
After the call to the 2nd party has been answered, press the Conference button (or
for Snom 300, press the Accept ( ) button) to join both parties and start the
Conference call.
Joining a new call with a held call
You will need to have at least 1 call on hold to use this method.
1.
Make an outgoing call to the 2nd party.
2.
After the call to the 2nd party has been answered, press the Conference button (or
for Snom 300, press the Accept ( ) button) to join both parties and start the
Conference call.
Disconnecting a Conference call
Press the Conference button (or for Snom 300, press the Accept (
) button).
The 2 other parties will be placed on Hold. You can then individually retrieve the calls from
Hold and either talk to them one by one, or drop the call.
P. 17
Using the Expansion Console
The Expansion Console provides additional Line Buttons that can be used for 2 purposes:
Speed Dial
An additional Line Key can be set as a Speed Dial to a phone number of your choosing.
Press the Speed Dial Key and the outgoing call is made.
Monitor Line
An additional Line Key can be set as a Monitor Line. This key
will then monitor the status of a line from another phone within
the same Virtual PBX.
No light on the Monitor Key indicates that there is no call in progress and no incoming call is
ringing on the monitored line.
Flashing light indicates that an incoming call is ringing on the monitored line. Pressing the
flashing Monitor Line at this point will answer the incoming call from your phone.
Solid light indicates that a call is currently in progress on the monitored line. Pressing the
Monitor Line at this point will make an outgoing call to the monitored phone.
To set up the Line Buttons on the Expansion Console, please call our Support Team on
1300 887 899 between 8am - 5:30pm Mon - Fri (AEST), or speak to your office IT Manager.
P. 18
Phone Usage: Polycom IP Series
Polycom SoundPoint IP 560 / 670
1
2
(Polycom SoundPoint IP 670 shown)
1
14
2
13
4
12
5
11
6
3
3
7
10
8
9
4
5
6
7
8
9
10
11
12
13
14
1
Polycom VVX1500
(Keypad shown)
2
3
4
10
9
8
7
1
2
3
11
6
5
5
6
7
8
9
10
11
Message Waiting Indicator (MWI)
Navigation buttons:
Arrows, Select, Delete
Function buttons:
Directories, Applications, Conference,
Transfer, Redial, Menu, Messages,
(see p.24) Do Not Disturb
Mute button
Headset button
Speakerphone button
Microphone
Volume button
Keypad
Hold button
Speaker
Soft Key buttons
Line Keys & Indicator Lights
LCD Screen
Navigation buttons:
Arrows, Select, Delete
Volume buttons
Mute button
Function Button:
Video button, Redial button,
Transfer button, Conference button,
Hold button, Do Not Disturb button.
Speakerphone button
Headset button
Applications button
Menu button
Directories button
Messages button (see p.24)
Keypad
4
Note: On the Polycom VVX1500 the Line Keys, Soft Key Buttons and Line Key Indicator
lights are replaced by a Touch Screen. When the instructions mention Line Keys, Soft
Key Buttons and Line Key Indicator lights - use the Touch Screen instead.
P. 19
Making an Outgoing Call
An available Line will be shown on the phone as a solid green Line Key.
To make a call, use one of the following methods:
• Pick up the Handset (the first available Line will be used), or
• Press an available Line Key (the Speakerphone will be used by default), or
• Press the Headset Button (the first available Line will be used).
This is only applicable if a Headset is connected to the phone, or
• Press the Speakerphone Button (the first available Line will be used).
You will hear a dial-tone and the Indicator for the Line Key that is being used will change to a
solid green.
Dial the number using the Keypad. If the call does not automatically start after a few seconds,
press the ‘Send’ Soft Key.
Phone Directory: If you would like to dial a number from the built-in Directory, press the
Directories button instead of dialling the number. Choose the desired Directory by using the
Arrow buttons and the ‘Select’ Soft Key. When you have located the number that you wish to
dial, press the ‘Dial’ Soft Key.
For instructions on setting up the Phone Directory, refer to www.mynetfone.com.au/phone-use
Answering an Incoming Call
An incoming call will be shown on the phone as a fast-flashing green Indicator on the Line Key
that the call is being received on.
To pick up the incoming call, use one of the following methods:
• Pick up the Handset, or
• Press the ringing Line Key, or press the ‘Answer’ Soft Key (the Speakerphone will be
used by default), or
• Press the Headset Button.
This is only applicable if a Headset is connected to the phone, or
• Press the Speakerphone Button.
The incoming call will be answered and the Indicator for the relevant Line Key will change to
solid-green to indicate this.
Ending a Call
To end an active call, use one of the following methods:
•
•
•
•
If you are using the Handset, simply hang up, or
If you are using the Speakerphone, press the Speaker button, or
If you are using the Headset, press the Headset button, or
Press the ‘End Call’ Soft Key.
P. 20
Placing Calls on Hold & Retrieving Calls from Hold
While on an active call, press the Hold button, or press the ‘Hold’ Soft Key.
The call is now on hold, and the other party will be listening to the ‘Music on Hold’. The
Indicator for the Line Key that is being used for the call will change to a slow-flashing red to
indicate this.
Retrieving a Call: To retrieve a call that has been placed on Hold, press the Hold button
again, or press the ‘Resume’ Soft Key.
If you have multiple calls on hold, press the Line Key that you wish to retrieve – it will have a
slow-flashing red Indicator.
Missed Calls
To view missed calls on your phone press the Down arrow.
Do Not Disturb
To stop your phone from receiving incoming calls, press the Do Not Disturb button. You will
still be able to make outgoing calls when ‘Do Not Disturb’ is activated.
The phone screen will show ‘Do Not Disturb’. The phone will behave the same way as when
the line is ‘busy’: callers dialing the phone’s direct line will hear a busy tone, or the ‘Follow Me’
call forwarding will activate if it is set up (see p.26 for details); callers dialing the Call Group
number will be redirected to other phones within the Call Group.
To switch off ‘Do Not Disturb’, press the Do Not Disturb button again.
Setting Up and Using Speed Dials
Speed Dials can be used to quickly dial frequently used numbers.
The Polycom IP phones assign ‘Speed Dial Index’ numbers to existing Contact Directory
entries. Therefore, you need to create a new Contact Directory entry before being able to
assign it a Speed Dial Index number.
Setting up a Speed Dial
1.
Press the Directories button. Use the Navigation buttons to select ‘Contact
Directory’ and then press the ‘Select’ Soft Key.
2.
Press the ‘Add’ Soft Key. If you do not see the ‘Add’ Soft Key, press the ‘More’ Soft
Key first.
3.
Fill out the required information using the Navigation buttons to highlight different
P. 21
fields, and the Keypad to enter text/numbers. You may have to press the Keypad
keys multiple times to input the correct letter/number.
The ‘Speed Dial Index’ is automatically selected, but can be changed if desired.
4.
When finished, press the ‘Save’ Soft Key. Press the Directories button to return to
the main screen.
Using a Speed Dial
Press the Up Arrow – the list of Speed Dial Indexes will appear. Select the desired Speed Dial
entry and press the ‘Dial’ Soft Key.
Alternatively, if you remember the Speed Dial Index number, press the Up Arrow and simply
enter the Speed Dial Index number using the Keypad.
Changing Ring Tones
The Polycom IP Phones come with several ring tones, and different tones can be selected for
different lines on the phone.
Changing the Ring Tone
1.
Press the Menu button. Use the Navigation buttons to select ‘Settings’ and press
the ‘Select’ Soft Key.
2.
Select ‘Basic’ and then press the ‘Select’ Soft Key.
3.
Select ‘Ring Type’ and then press the ‘Select’ Soft Key.
4.
Use the Navigation buttons to select the Line for which you want to set up the Dial
Tone and press the ‘Select’ Soft Key.
5.
Use the Navigation buttons to select a Ring Tone. Press the ‘Play’ Soft Key to listen
to a preview of the selected Ring Tone.
To confirm the selected Ring Tone, press the ‘Select’ Soft Key. A tick will appear
next to the selected Ring Tone.
6.
Press the Menu button to return to the main screen.
Transferring Calls
There are 3 methods to transfer calls:
• Attended Transfer – you call the person to whom you are transferring the call, at which
point you can either:
−
−
Transfer the call while the phone is ringing, or
Wait for the person to answer, talk to them, then transfer the call
P. 22
• Warm Transfer – you call the person to whom you are transferring the call and join all 3
parties together (the caller, the transfer receiver and you), then you disconnect your phone
from the call to allow the other 2 parties to continue their call.
• Blind Transfer – you transfer the call without speaking to the person to whom you are
transferring the call.
Attended Transfer
1.
While on an active call, press the Transfer button, or press the ‘Trnsfer’ Soft Key.
The call is placed on hold, a new Line is opened and you will hear a dial-tone.
2.
Either dial the number using the Keypad and press the ‘Send’ Soft Key, or select the
number from the Directory (using the Directories button).
If you misdial, press the ‘Cancel’ Soft Key and start again from Step 1.
3.
To transfer the call immediately, press the ‘Trnsfer’ Soft Key while the phone is
ringing. Alternatively, wait for the 3rd party to answer the call, talk to them, then press
the ‘Trnsfer’ Soft Key.
Warm Transfer
1.
While on an active call, press the Conference button, or press the ‘Confrnc’ Soft
Key. The call is placed on hold, a new Line is opened and you will hear a dial-tone.
2.
Either dial the number using the Keypad and press the ‘Send’ Soft Key, or select the
number from the Directory (using the Directories button).
If you misdial, press the ‘Cancel’ Soft Key and start again from Step 1.
3.
Wait until the call has been answered by the 3rd Party and then press the
Conference button or the ‘Confrnc’ Soft Key - all 3 parties will be connected to
one call.
4.
When you wish to disconnect yourself from the call, press the ‘End Call’ Soft Key.
Blind Transfer
1.
While on an active call, press the Transfer button, or press the ‘Trnsfer’ Soft Key.
The call is placed on hold, a new Line is opened and you will hear a dial-tone.
2.
Press the ‘Blind’ Soft Key.
3.
Either dial the number using the Keypad and press the ‘Send’ Soft Key, or select the
number from the Directory (using the Directories button).
If you misdial, press the ‘Cancel’ Soft Key and start again from Step 1.
4.
The call is now transferred, and you can hang up the phone.
P. 23
Starting a Conference Call
There are 2 methods to start a Conference call:
• Start a new Conference call – call both parties and then join the calls together
• Join a new call to a held call – call a new party and then join it to an existing call that is on hold
Starting a new Conference call
1.
Make an outgoing call to the 1st party and wait until they have answered the call.
2.
Press the Conference button, or press the ‘Confrnc’ Soft Key. The call is placed on
hold, a new Line is opened and you will hear a dial-tone.
3.
Either dial the number using the Keypad and press the ‘Send’ Soft Key, or select the
number from the Directory (using the Directories button).
If you misdial, press the ‘Cancel’ Soft Key and start again from Step 2.
4.
After the call to the 2nd party has been answered, press the Conference button, or
press the ‘Confrnc’ Soft Key. Both parties will be connected to one call and the
Conference call will start.
NOTE: When you hang up, both of the other parties will remain connected to each other
Joining a new call with a held call
You will need to have at least 1 call on hold to use this method.
1.
Make an outgoing call to the 2nd party and wait until they have answered the call.
2.
Press the ‘More’ Soft Key and then press the ‘Join’ Soft Key. Both parties will be
connected to one call and the Conference call will start.
NOTE: The ‘More’ and ‘Join’ Soft Key Buttons will not be available if you have more
than 2 concurrent calls being handled on your phone (this includes calls on hold).
P. 24
Advanced Features
Voicemail & Voicemail to Email
MyNetFone provides a free voicemail service with all Virtual PBX Plans. Plus, we can deliver
your voicemail messages straight to your inbox as an audio file that you can conveniently
download wherever you are.
Voicemail Setup
Dial 121 from your MyNetFone service, press ‘0’ for Voicemail Setup and follow the
prompts to record your voicemail greeting.
Note: For Call Groups, dial 171 instead. ‘Mailbox’ number is the call
group number and ‘Password’ is the PIN code for that Call Group.
The PIN code is available from the ‘Call Group’ page in the
MyAccount Portal.
Login to the MyAccount Portal and select 'My Voice Service’.
Click 'Follow Me and Voicemail' in the top menu and select 'Redirect to Voicemail
on Busy or No Answer'. Click 'Update'.
The Voicemail service is now active. To also set up ‘Voicemail to Email’ redirection, follow a few
extra steps:
In the 'Voicemail to Email' box on the same page, select either:
a) 'Forward Voicemail to Email, Delete from Server' – the voicemail will be automatically forwarded to your nominated email address and the voicemail content
will be erased immediately from our server,
b) 'Forward Voicemail to Email, Leave on Server (Collect via 121)' – the voicemail
will be automatically forwarded to your nominated email address, but will also be
retained on our server, which you can access by dialing 121 from your VoIP line.
Enter your email address and recipient name and click 'Update'. You’re done!
To switch OFF the 'Voicemail to Email', select 'No Follow Me' at Step 2.
Accessing Voicemail
Each Line on your phone has its own Voicemail Box, so depending on the number of Lines on
your phone, you may have up to 8 separate Voicemail Boxes.
NOTE: The Message Waiting Indicator will light up if new Voicemail messages have been
received. For Cisco and Polycom phones, a small envelope icon will appear next to the
line on which the message was received.
P. 25
Press the Line Key on your phone for which you want to check messages
Press the Messages button or dial 121 on the Keypad.
An audio cue will inform you if there are any new Voicemail messages, and will
provide a list of options to proceed.
Simply follow the voice prompts to listen to, save or delete messages.
If you have set up Voicemail to Email, you will also receive an email with attached voicemail
files to the nominated email address.
Remote Pickup
The Remote Pickup feature is useful if another phone is receiving an incoming call, and you
want to answer that call on your own phone instead (for example, if the other phone is
unattended but you cannot leave your desk).
NOTE: Remote Pickup only works if your phone and the other phone are a part of the
same Virtual PBX Account.
How to use Remote Pickup
To pickup an incoming call from another phone, simply dial ** and then either the Short Code
(similar to extension number) or the MyNetFone number of the phone that you want to pick up
the call from.
For example: Phone ‘A’ has a Short Code of 2000 and a MyNetFone Number of 09001234.
If Phone ‘A’ receives an incoming call, you can remotely pick it up from any phone on the
same Virtual PBX account by dialing either **2000 or **09001234.
HINT: Ask your office IT Manager or the person who looks after the phone system to
provide you with the list of Short Codes for phones you frequently call within the Virtual
PBX.
Call Park and Pick
The Call Park and Pick feature is useful if you pick up a call, but then decide to move to a
more private, quiet location.
You can park a call without specifying a receiving extension, and then pick up this call from
any other phone on the same Virtual PBX Account and continue to talk.
P. 26
NOTE: Both incoming and outgoing calls can be parked and picked up again. A
maximum of 10 calls can be parked at the same time.
Parking a Call
While on an active call, dial the following code on the keypad of your phone: *2700#
The call will be placed on hold and the other party will hear the ‘Music on Hold’.
An audio cue will tell you what ‘Parking Slot’ number the call has been parked in.
Note down or memorise this Parking Slot number (Example: 701).
The audio cue will be repeated, so don’t worry if you miss the number the first time.
Once you have the Parking Slot number, disconnect the call as per normal.
Picking up a Previously Parked Call
Find a phone from which you want to continue the call – the location of the phone
does not matter, as long as it is on the same Virtual PBX as the original phone.
Dial the Parking Slot number.
The call that was previously parked will be picked up and you can continue to talk.
Follow Me
Follow Me is a handy call‐directing feature that allows you to forward incoming calls to
multiple numbers or to voicemail.
For example, you can redirect calls coming in to your desk phone to your mobile when you go
out, so you can still answer calls when people try to call your office. The next step might be to
redirect to your business partner's mobile or to voicemail.
Login to the MyAccount Portal and select ‘My Devices’ in the left menu.
Click on the ‘Follow Me and Voicemail’ tab in the top menu and then ‘Add Follow
Me’ and select one of the following:
• ‘Redirect immediately to Follow Me list’ ‐ sends calls to the numbers
on your Follow Me list straight away,
• ‘Redirect to Follow Me on busy or no answer’ ‐ sends calls to your
Follow Me list if you don't answer after a certain amount of time (you can
adjust the time),
P. 27
• Follow Me & Voicemail: ‘Redirect to Follow Me list then Voicemail on
busy or no answer’ ‐ sends calls to the numbers on your follow me list,
and if none answer, sends the call to voicemail.
To switch OFF the 'Follow Me' directions, select ‘No Follow Me’.
Note: The 'Follow Me' feature is free but does not include call costs, so if you redirect
the calls to mobile or international destinations, these will be charged to your account
at MyNetFone’s great low rates. The caller will only pay for the call to the original
destination number.
Call Groups
Call Groups are a convenient way to ensure calls are made directly to a specific department.
For example, you could have a Call Group that includes all members of your Sales Team – you
can promote the Call Group’s number and sales enquiries will come directly to this team,
rather than going through the main reception line.
How Call Groups Work
A Call Group is created from one of your unused DIDs in your Virtual PBX Account.
Each Call Group contains ‘Members’. A Member can be one of the extensions of your Virtual
PBX, a normal Landline number or even an International number. When a Call Group receives
an incoming call, it passes the call on to all its members.
Creating a New Call Group
To create a new Call Group:
Login to the MyAccount Portal and select ‘Call Groups’ in the left menu.
Click on ‘Create New Call Group’ button on this page and select appropriate
settings (see table on next page for details).
When you have finished setting up the Call Group, click on the ‘Create Call Group’
button.
To add members to the Call Group, on the main ‘Call Groups’ page, click on the
‘Number’ of the Call Group to add members. Then click on the ‘Add New Member’
button.
Two additional options will appear:
• ‘Extension’ – to add an internal line from your Virtual PBX, choose the Line and
click on the ‘Add Call Group Member’ button,
P. 28
• ‘External Number’ ‐ to add an external number (such as a mobile phone or an
external landline number), enter the phone number and press the ‘Add Call Group
Member’ button.
Table: New Call Group Settings
PBX
If you have only 1 Virtual PBX subscription, this setting does not need to be
changed. If you have more than 1 Virtual PBX in your Account, please select
the correct one
Name
Give the Call Group a descriptive name
Country
Select the country of the DID that you want to use for this Call Group
Region
Select the region of the DID that you want to use for this Call Group
Number
Select the DID that you want to use for this Call Group
Diversion
Option
Select what the Call Group will do with the incoming call if it is unanswered:
divert the call to Voicemail or no diversion. If you choose to not divert the call
to Voicemail, and the incoming call is unanswered, the incoming call will
receive a busy tone.
Ring
Select how you want the Call Group to pass the incoming call to its Members:
Sequence ‘Sequential’ setting will call each Member of the Call Group one after the
other,
‘Simultaneous’ will call all Members of the Call Group at the same time
Ring
Timeout
Select how long the incoming call will ring (in seconds) before it is
considered ‘unanswered’
Deleting Members
To delete existing Members, simply tick the box for the Members that you want to delete, and
press the ‘Delete Selected Members’ button.
Call Group Voicemail Settings
Each Call Group has its own Voicemail – for setup instructions, please see the Voicemail
section of this guide.
Voicemail PIN: allows you to specify the PIN Number for your Call Group, and is required
when you access your Call Group Voicemail by dialing 171.
Note: When creating or making any changes to a Call Group, it takes approximately 1‐2
minutes for the changes to be applied.
P. 29
Auto Attendant
Auto Attendant (also known as IVR) provides a spoken menu for callers to pick the appropriate
option (e.g. ‘Press 1 for Sales, 2 for Technical Support’ etc). You can record your own greeting
to reflect the layout of your call routing setup. Additionally, separate menus can be configured
for Office Hours and After Hours.
The user then presses a number on their keypad to select the appropriate option, and their
call is forwarded to the associated number or Call Group.
An Auto Attendant is created from an unused DID in your Virtual PBX Account.
Creating a New Auto Attendant
Login to the MyAccount Portal and select ‘Auto Attendants’ in the left menu.
Click on ‘Create New Auto Attendant’ button on this page and select the
appropriate settings (see table on next page for details).
Once you have finished setting up, click ‘Create Auto Attendant’.
On the main ‘Auto Attendants’ page, click on the ‘Number’ of the new Auto
Attendant.
In the ‘PIN’ field, set a PIN number – you will need this to record a greeting message
for your Auto Attendant. Click ‘Update’.
Setting up Auto Attendant Menu
You need to configure different options which the Auto Attendant will accept when it receives
an incoming call.
Each Auto Attendant has 2 different menus:
• Default Menu ‐ used for calls received outside of Office Hours
• Office Hours Menu ‐ used for calls received during Office Hours
Each menu has spaces for Options 1 to 9, which correspond to the numbers on a phone
keypad.
On the main ‘Auto Attendants’ page, click on the ‘Number’ of the new Auto
Attendant.
In the ‘Office Hours Menu’ simply enter your office’s opening hours in 24 hour
format for each day of the week.
Note: By default, Monday to Friday is configured as ‘09:00 to 17:00’, Saturday and
Sunday is ‘00:00 to 00:00’. This means the Office Hours are 9AM to 5PM, Monday
to Friday, and the office is closed Saturday & Sunday.
P. 30
Enter the phone number to which you want to divert the incoming call for each
Option 1‐9 of the Default and Office Hours menus. Leave blank any options you do
not want to program.
You can enter a MyNetFone number from one of your phones, a DID, a Call Group,
an external Mobile phone or Landline, or even another Auto Attendant.
Click ‘Update’ to save any changes.
Table: New Auto Attendant Settings
PBX
If you have only 1 Virtual PBX subscription, this setting does not need to be
changed. If you have more than 1 Virtual PBX in your Account, please select the
correct one
Name
Give the Auto Attendant a descriptive name
Country Select the country of the DID that you want to use for this Auto Attendant
Region
Select the region of the DID that you want to use for this Auto Attendant
Number Select the DID that you want to use for this Auto Attendant
Recording Voice Menu
Call your own Auto Attendant phone number (as shown on the ‘AutoAttendants’
page of the MyAccount portal).
To set up the ‘Default Menu’ message, dial ‘99’ on your keypad. For the ‘Office
Hours Menu’ dial ‘98’ on your keypad.
Follow the prompts to record and save the message. Note: You will require the PIN
number for your Auto Attendant.
Note: When creating or making any changes to an Auto Attendant, it takes approximately
1‐2 minutes for the changes to be applied.
P. 31
Global Access Callback
Get low VoIP rates while using any phone or mobile. Simply register your phone number or
mobile number on our website and you’re ready to use this service.
This feature is ideal for people ‘on the go’ who often use their mobiles, especially if calling
overseas. It is also handy for those frequently visiting sites in remote areas which are not
connected to VoIP, where using Global Access Callback will help avoid STD charges.
Register your mobile, landline or any other phone from which you frequently make
calls ‐ simply login to the MyAccount Portal, select:
• ‘My Voice Service’, then
• If you have multiple VoIP devices, select the device you want your VoIP calls billed
to, then
• Select the ‘Global Access’ tab in the top menu and enter up to 5 numbers you
want to add.
Dial one of the Global Access Callback Numbers:
1800 158 039 or 02 8094 1881
from any of the numbers you registered in step 1 – you will hear a ‘busy’ tone, you
should press ‘#’ on your keypad and hang up.
You will not be charged for the call by us or any third party provider, as it is not
answered by our system.
Our system will call you back in a few seconds ‐ you then simply pick up the call
and hear an automatic prompt to enter your destination number.
The call will then go through at low VoIP call rates ‐ this will involve two charges: one
VoIP call charge for the ‘call back’, and a local or international VoIP call charge to the
destination number.
Also available: Global Access Dial-in service is ideal for making calls from a landline to a
local Access Number - you only pay for a local call to the landline provider, and then low
MyNetFone rates for the rest of the call.
HINT: Remember to enter the full international code if calling overseas, or the area
code if calling within Australia (e.g. 02 9999 8888).
P. 32
Enhanced Voice Services
MyNetFone Voice Services are not just about cutting your business phone bills. We also
provide easy‐to‐use features & enhanced services that will help you improve both internal
company communication and external customer service.
Have a look through the features & enhanced services listed here and make the most of our
feature‐rich service.
Keep your Existing Business Number
We understand that keeping your existing number is important for many businesses when
considering changing telecommunications providers.
MyNetFone provides Local Number Portability (LNP) which allows you to keep your existing
phone number when moving to any of our Business Voice services.
For most numbers, it only takes 3 working days to move the number to our service (but some
types of ports require longer lead times).
Plus, you can also rest assured that if for any reason you decide to leave MyNetFone (but with
such great service features & phone spend savings, why would you?), you can take your
number with you*.
Find out more about Number Porting – call our Team on 1300 733 995
or visit www.mynetfone.com.au/number-porting
* As long as your new provider has their own capability to port numbers from the MyNetFone network.
P. 33
Direct In-Dial Numbers
A Direct In‐Dial (DID) number is simply a landline telephone number that is attached to your
MyNetFone service for you to receive calls on. All our business plans include a number of
these for free, and you can get additional DIDs for a monthly fee if required.
Give your Business Nation-Wide Presence
Even if you move your existing number to MyNetFone, it can still be handy to get additional
DIDs! Unlike your normal landline number, you can select DID numbers in any region, of
any state in Australia or New Zealand, regardless of your physical location.
This means, you can set up additional DIDs in as many regions as you need, so your interstate
customers can call you for the cost of a local call – a service customers appreciate & value.
How do I choose my DID number?
Login to the MyAccount portal at www.mynetfone.com.au, then:
• Select ‘Phone Numbers’ in the left menu
• Click on ‘Lease New Number’ (bottom right of page)
• Select the Region where you require a local number (Note: ‘Group Size’ defines
how many DIDs you want to lease – ‘1’ is sufficient for most businesses)
• The available number and charge (if applicable) will appear – to confirm, click
‘Lease Selected Group’
• Now go to ‘My Voice Service’ in the left menu
• Click on ‘Direct In-Dial Numbers’ in the top menu
• Click ‘Add DID’ on the right of the page – the DID you just ‘leased’ will appear
• Select the DID and confirm
Alternatively, our Technical Support Team is happy to help you out with this process – give
them a call on 1300 887 899.
HINT: Travelling overseas? Your colleagues and customers can call you for the cost of a
local call! Simply get a DID number for your town of origin, then take your MyNetFone
handset or softphone & set it up overseas.
1300 Numbers
Enhance your customer service with MyNetFone Special Service Numbers
1300 numbers, also known as ‘Local Call’ numbers, allow your customers to call you for the
cost of a local call from any location Australia-wide (New Zealand Special Service
Numbers also available).
Additionally, 1300 numbers offer many other benefits for businesses:
P. 34
• Give your business a professional image
• Demonstrate your focus on Customer Service, by making it more economical for
customers to call you
• Make relocating easy, as you do not need to reprint promotional material with new
numbers
• Help a business expand outside its local area by overcoming ‘location’ prejudice
of potential callers
• Provide a single, national point of contact for businesses of any size
How 1300 Numbers Work
1300 numbers are more economical for customers to call because they only pay for a local
call from any fixed line phone anywhere in Australia to call the 1300 number of a business
which can be located anywhere. For mobile phones, however, the caller will pay a rate that is
determined by their mobile service provider.
The rest of the call cost is picked up by the '1300 number account holder'.
We also provide 13 and 1800 numbers.
For Special Service Number details and pricing
please contact our Business Team on 1300 733 995
Gold Numbers
Ensure your customers never forget your phone number with MyNetFone Gold Numbers.
With Gold Direct-In-Dial Numbers you can choose a number that’s easy to remember or that
spells out a specific word.
Gold Direct-In-Dial numbers are available upon request for a once-off fee, and you can choose
up to the last four digits* of the number only.
Contact our Business Team on 1300 733 995
to find out more about MyNetFone Gold Numbers
Virtual Fax
MyNetFone’s Virtual Fax service delivers faxes directly to your email address as PDF
documents and sends faxes directly from your computer – no need for printing.
• De-clutter your desk from piles of received fax papers
• Store faxes together with emails from the sender for easy management
• Save paper & help the environment
Find out more – call our Team on 1300 733 995
or visit www.mynetfone.com.au/faxmail
* Availability of specific number cannot be guaranteed.
P. 35
Meet-Me Conferencing
Meet-Me Conferencing simply links any number of telephone calls from different locations
into the one call.
As a MyNetFone Voice-service customer you automatically have access to this service. Plus,
frequent users can sign up for a Conferencing Plan to get even better value.
Benefits
• Make informed decisions fast and collaborate with others without leaving your
desk
• Ideal for remote workers or offices - no need to travel
• Save on travel costs and time
• Local Access Numbers so most participants can dial in for the cost of a local call
• Low per minute cost with no commitments for casual users
• No special equipment needed - use your normal phone or mobile
Login to the MyAccount Portal and select ‘Conferences’ in the left menu.
In ‘Conference Roles’ section, note down your Convenor, Speaker and Listener PIN
Numbers.
Also, in ‘Conference Access Numbers’ section, find the suitable local numbers for
participants to dial in – or email them the link to the entire list of Access Numbers:
www.mynetfone.com.au/conference-numbers
Set a conference date and time with your participants, and give them the relevant
PIN Numbers (Speaker or Listener) and Access Numbers.
Call your local Access Number at the set time, enter your Convenor PIN Number
and start the conference!
Note: We recommend you call 5 minutes earlier to make sure you, as the organiser,
are there first.
For more information about Meet-Me Conferencing, visit
www.mynetfone.com.au/conferencing or call our team on 1300 733 995
White Pages Listings
You can list your business phone and location on White Pages - this makes it easier for
potential customers to reach you!
It is important to update your location address, even if you do not want to list on White Pages.
The location information is submitted to the IPND (Intergrated Public Number Database),
P. 36
which is used by emergency services such as ambulance or fire brigade to send help if you
call ‘triple 0’ from this number.
If you would like your details to be listed in printed White Pages directories, make
sure to activate the listing by following the steps below at least 2 weeks before the
White Pages Directory Deadline for printing.
How to Update Location Information for Emergency Calling
Login to the MyAccount Portal and select ‘My Customer Details’ in the left menu.
Click on the ‘Service Address’ tab in the top menu.
Enter the building and locality (address) details for the location where you use this
MyNetFone service from.
Click ‘Submit’ and you’re done!
How to List Your Number on White Pages
Complete the above steps then click on ‘Directory Address’ in the top menu.
Tick the box for ‘Use Service Address for Directory Address’ and click ‘Submit’.
Call us on 1300 887 899 to process the White Pages listing - the listing will only
be submitted once you contact us (not when you click ‘Submit’ in the above step).
A once-off White Pages Listing processing fee applies - if you need to update
the location information in the future, you will not be charged again.
The listing should appear on White Pages 2 weeks after submission.
Note: White pages is a service provided by Sensis. MyNetFone only provides the
location data, and is not responsible for the appearance of the listing, bold listings or
any other features of the White Pages service.
MyText SMS
Send SMS from your MyNetFone account!
SMS can be handy for your business to keep in touch with your clients, staff or suppliers.
You can use MyText SMS to easily confirm appointments or send reminders of upcoming
meetings and more.
MyText SMS allows you to send instant SMS messages to single or multiple recipients with
one quick sweep across the keyboard. You simply register your mobile number, so it is
P. 37
displayed as the sender ID, and you can receive replies to your mobile handset.
MyText SMS is available to all MyNetFone customers automatically. Frequent users can even
get extra value by signing up to an SMS Bundle – call our Business Team on 1300 733 995 to
find out more about SMS Bundles.
How to send MyText SMS
From the MyAccount portal
Login to the MyAccount portal, then select ‘SMS’ in the left menu.
Enter your mobile number and click ‘Register’ – you will receive an SMS with a
Confirmation Code on your mobile, which you then enter in the Portal.
To send SMS, add single or multiple recipients (separated by a comma ‘,’ and no
spaces), type your message and click ‘Send’.
Quick MyText SMS
If you run your own web page or internet, you can include our ‘Quick SMS’ form on it to
make it easy for you and your staff to send SMS messages. There’s no need to login to the
MyAccount portal! To find out more, visit www.mynetfone.com.au/quick-mytext
P. 38
Broadband Features
We try to make it as easy as possible to track and manage your data usage by offering realtime data usage tracker & data boosts for better value excess downloads.
Plus, you can benefit from enhanced services including Reverse DNS Service & Additional IP
Addresses to lend credibility to your online presence & simplify management.
Data Usage & History
Our Online Portal allows you to easily keep track of your business data usage, so there are no
surprise excess download fees at the end of the month.
To check your data usage, simply
Login to the MyAccount Portal and select ‘My Data Service’ in the left menu.
The ‘Summary’ page is automatically shown – check the ‘Plan Remaining’ row at
the bottom of the page for remaining peak and off-peak data.
You can also view your day-by-day Data History by going to the ‘My Data Service’
menu, clicking on the ‘Data History’ tab in the top menu and selecting a date range.
Data Boost
We understand that internet usage can vary from month to month. So if you expect to exceed
your plan quota by a fair bit in a given month, it’s a good idea to get a Data Boost for better
value on your excess downloads!
Boost your quota with a 20GB Data Boost for just $20 (that’s $60 value!)
Once you have signed up for a MyNetFone high-speed broadband plan, simply get your Data
Boost through the MyAccount Portal:
Login to the MyAccount Portal and Select ‘My Data Service’ in the left menu.
Click on the ‘Data Boosts’ tab in the top menu.
Select the Data Boost you require.
If you find you’re exceeding your quota almost every month, perhaps it’s time to
upgrade to a higher plan! Visit our website www.mynetfone.com.au for information
on all ADSL plans.
Additional Features
Other handy features such as Reverse Domain Name System (DNS) service
and Additional IP Addresses are also available from MyNetFone
Contact our Business Team on 1300 733 995
to find out more about these Enhanced Data Services
P. 39
Account Management Features
You can easily manage your MyNetFone account through the online portal, including viewing
call history, invoices, making payments & more.
Accounts
Select ‘Accounts’ in the left menu to make payments and view past invoices. Across the top
menu of this section, you will see sections including:
Summary
Includes Account Name, Number, Balance, Next Billing Date and Currency.
Invoices
View current and past invoices.
Payment
You can make payments by credit card, Bpay or direct debit.
Paying by credit card: you need to register a credit card on your MyNetFone Account. To
do this, enter your credit card details in the ‘Register Credit Card’ section of ‘Payment’ page,
and click ‘Register’.
To make a payment, select the amount that you wish to pay, select the registered credit card
you want to use, and click ‘Make Payment’.
Paying by Bpay: The Bpay section of the ‘Payment’ page provides the Biller Code and
Customer Reference for Bpay payments. Note: These payments typically take up to 3 days to
appear in your MyNetFone account.
Paying by Direct Debit: To setup direct debit payments, please contact our Accounts
Department by calling 1300 733 995 and selecting the ‘Accounts’ option.
Auto Payments
You can take the hassle out of bill-paying by setting up automatic payments to your
MyNetFone account.
On the ‘Auto Payments’ page, nominate a credit level and after each billing period, your credit
card will be debited with the amount required to top up your account to the nominated credit
level.
For Example: If your nominated call credit level is $40, and at the end of your billing cycle
your account balance is $10, MyNetFone will automatically debit $30 from your credit card
and credit it to your account, topping up your account balance back to $40.
Payment History
View previous payments that you have made to your account. You can filter the display of
payments to show only those that were made on the current date, during the current billing
period, during the previous billing period, or a specific date range.
P. 40
Users
‘Users’ are all the staff that need to access the MyAccount Portal including to change settings,
set-up redirects or make payments.
By default, you have only 1 User assigned to your Virtual PBX Account, and this User has full
access to all of the Account Portal features and settings.
To view and modify the details including name, contact number and email address, select
‘Users’ in the left menu and click on the username.
Creating New Users
Login to the MyAccount Portal and select ‘Users’ in the left menu.
Click ‘Create New User’.
Fill in details and assign a ‘Role’:
The Administrator role allows you to view and change all settings on your Virtual PBX
Account.
The User role only allows you to view and modify the ‘Follow Me’ and ‘Voicemail’
options for the lines that have been specifically assigned to this User.
Select the notifications the user should receive – these can include invoices, payment
receipts etc.
Calls
You can access a log of all outgoing calls made from your Virtual PBX Account, including the
date and time of call, number that made the call, the destination number, the duration of the
call, and the cost of the call.
You can filter the results by the current day, the current billing period, the previous billing period,
or a specific date range that you can set. You can alsoexport all of the displayed statistics to a
“.csv” file for easy management via a spreadsheet program (e.g. Microsoft Excel).
My Business
You can add and update the details of your company, including:
•
•
•
•
‘Basic Details’ - Business Name, Trading Name, and ABN
‘Street Address’ - current physical Street Address of your business
‘Billing Address’ - preferred Billing Address
‘Shipping Address’ - preferred Shipping Address
P. 41
Logout
Remember to log out of the MyAccount Portal to protect your information.
The MyAccount Portal also has an inactivity timeout of 30 minutes for security purposes. If
you login to the MyAccount Portal, but do not use it for 30 minutes, you will automatically be
logged out.
Have a Question? Our Team is happy to help!
For Sales-related questions, please call 1300 733 995.
For Technical Support (including Setup questions), call 1300 887 899.
P. 42
Important information
you should know about VoIP
EMERGENCY CALLS
With VoIP services, calls to emergency services 000 may not work at all times – for example
when the power is out or the Internet is down. Emergency service operators are also unable to
identify your physical location so you will need to inform them. We do not recommend using
MyNetFone as your only telephone service and suggest you keep another form of telephone –
mobile or landline – available for calling emergency services. Due to the nature of the Internet
and other factors which are outside our control, MyNetFone cannot provide faultless
emergency call services.
CALL QUALITY
MyNetFone provides award-winning quality service. However, the voice quality may vary due
to the performance of your broadband Internet connection. If you encounter this problem,
check with your Internet Service Provider or contact our Customer Care Centre.
Conditions of service
Use of the MyNetFone service is subject to our Terms and Conditions. Please refer to our
website:
www.mynetfone.com.au/terms-and-conditions