1
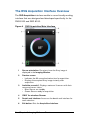
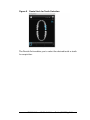
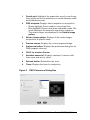
RVG 5100 and RVG 6100
User Guide
Notice
The User Guide for the RVG 5100 and RVG 6100 includes information on the
devices as well as their usage. We recommend that you thoroughly familiarize yourself
with this Guide in order to make the most effective use of your system.
The RVG 5100 and RVG 6100 are intended to produce images of the dental area at
the direction of health care professionals of dento- maxillo-facial region of the human
anatomy.
We recommend that you consult the “Safety,
Regulatory and the Technical Specification User
Guide” before using the RVG 5100 and RVG 6100.
No part of this Guide may be reproduced without the express permission of
Carestream Health, Inc.
U.S. Federal law restricts this device to sale by or on the order of a dentist or
physician.
This document is originally written in English.
Manual Name: RVG 5100 and RVG 6100 User Guide
Part Number: SM775
Revision Number: 01
Print Date: 2012-02
The Brand names and logos reproduced in this Guide are copyright.
KODAK is a trademark of KODAK used under Licence.
RVG 5100 & 6100 comply with Directive 93/42/EEC relating to medical equipment.
0086
Manufacturer
Care stream Hea lth, Inc.
150 Verona Street
Roche ster, NY 1 4 60 8, USA
Authorized Representative in the European Community
EC REP
TROPHY
4, Rue F. Pelloutier, Croissy-Beaubourg
77435 Marne la Vallée Cedex 2, France
Contents
Chapter 1
Conventions in this
Guide
Conventions in this Guide . . . . . 1
Chapter 2
RVG 5100 and RVG
6100 Overview
Functional Components Overview
RVG Sensor . . . . . . . . .
Sensor Remote Control . . . .
Sharing the Sensor Between
Workstations . . . . . . . . . .
Using the different Positioning
Systems. . . . . . . . . . . . .
X-Ray Generator Compatibility . .
. 3
. 3
. 4
Computer System Requirements .
General Software Overview . . .
The RVG Acquisition Interface
Overview . . . . . . . . . . . .
The FMS Acquisition Interface
Overview . . . . . . . . . . . .
. 7
. 7
Chapter 3
Imaging Software
Overview
. 5
. 5
. 6
. 8
.10
Chapter 4
Acquiring an Image
Acquiring an Image with the RVG
Sensor . . . . . . . . . . . . .
Preparing the RVG Sensor . .
Preparing for Acquisition . . .
Launching the X-Ray . . . . .
.15
.15
.16
.18
Chapter 5
Acquiring an Image
with FMS Interface
Acquiring an Image with the RVG
Sensor . . . . . . . . . . . . .
Preparing the RVG Sensor . .
Preparing for Acquisition . . .
Launching the X-Ray . . . . .
Retaking Images . . . . . . .
.21
.21
.22
.23
.24
Chapter 6
Troubleshooting
Images
Troubleshooting . . . . . . . . . .27
RVG 5100 and RVG 6100 User Guide (SM775)_Ed01
iii
Chapter 7
Maintenance
iv
The RVG Sensor . . . . . . . . .29
Cleaning and Disinfecting the RVG
Sensor . . . . . . . . . . . . .29
Cleaning the Cable and Sensor
Remote Control . . . . . . . . 30
Maintaining the Life of the Sensor .31
Cleaning Positioning Accessories .32
Preventing Electrostatic Discharge .32
1
Conventions in this
Guide
Conventions in this Guide
The following special messages emphasize information or
indicate potential risk to personnel or equipment.
WARNING:
Warns you to avoid injury to
yourself or others by following the safety
instructions precisely.
Important: Alerts you to a condition that might
cause problems.
Tip: Provides extra information and hints.
Note: Emphasizes important information.
RVG 5100 and RVG 6100 User Guide (SM775)_Ed01
1
2
Chapter 1 Conventions in this Guide
2
RVG 5100 and RVG
6100 Overview
Functional Components Overview
RVG Sensor
The sensor is radio-sensitive. The sensor active surface is the
flat surface marked with #0, #1 or #2 indicating the size.
•
Size 1, universal, sensor — Use for regular periapical
and retro-coronary procedures.
Size 2 sensor — Use for bitewings and peri-apical
procedures.
Size 0 sensor (only RVG 6100) — Use for pediatric
intraoral exams. The Size 0 sensor requires less X-ray
doses and has a very small size to fit in a child’s mouth.
•
•
The sensor non-reactive to X-rays surface, is rounded and
contains the cable attachment.
Figure 1 RVG Sensor
1
Sensor non-reactive to X-rays surface
2
Sensor active surface
RVG 5100 and RVG 6100 User Guide (SM775)_Ed01
3
Sensor Remote Control
The sensor remote control contains all the electronics of the
sensor. The button (1) on the remote control activates, at a
distance, the acquisition interface in the CS imaging software.
The remote control is connected to the computer with its
USB 2.0 connector.
Important: DO NOT disconnect the remote
control when you are acquiring an image. This
can damage the sensor.
Remote Control
Figure 2 RVG 5100
1
4
Figure 3 RVG 6100
•
Pre-orients the sensor orientation
•
Activates the sensor for X-ray acquisition
Chapter 2 RVG 5100 and RVG 6100 Overview
Sharing the Sensor Between Workstations
You can share the sensor between several workstations to
provide access for several practitioners based on an
agreed-upon arrangement. The workstation must have the
CS imaging software and corresponding drivers.
To share the sensor between several computers, move it from
workstation to workstation. When you connect the sensor to a
USB 2.0 port on the computer, the sensor is recognized
automatically and is operational.
To share images between workstations, you can connect them
to a network without having to change the configuration
described above. The CS imaging software needs only to
access a shared database on the same workstation or on a
remote workstation.
You can print images either on a printer attached to each
computer or to a printer shared on the network.
WARNING:
Do not disconnect the sensor
after you click on the RVG Acquisition button.
This can damage your sensor.
Using the different Positioning Systems
Apply the same rules for positioning the sensor in the mouth
that you use in classic radiology. You may require time to adapt
due to the rigidity of the sensor.
You can use different systems for positioning the sensor in the
mouth. None, however, can fulfill by itself all possible needs.
How you position the sensor is dictated by the morphology of
the patient, the habits of the practitioner and what needs to be
seen, rather than the positioner itself. Use the tools according to
the restrictions dictated by the external parameters. You can
switch from the paralleling technique to the bisecting technique,
from holding the sensor with the finger to using the holders.
RVG 5100 and RVG 6100 User Guide (SM775)_Ed01
5
X-Ray Generator Compatibility
The sensor is compatible with all X-ray generators that meet the
current standard of intraoral radiology. You can use a
high-frequency or conventional X-ray generator. The X-ray
generator must operate with a voltage of 60 to 70 kV.
Important: The RVG sensor is not compatible
with X-ray generators that have a voltage less
than 60 kV.
The CS X-ray generators meet the requirements.
You can connect the CS X-ray generators directly to the
electronics of the sensor to synchronize image acquisition with
the trigger action. This link provides an ergonomic advantage
that eliminates the need for the operator to click on the
acquisition icon prior to each exposure (see the Installation
Guide (SM776).
6
Chapter 2 RVG 5100 and RVG 6100 Overview
3
Imaging Software
Overview
Computer System Requirements
For the minimum computer system requirements for RVG 5100
and RVG 6100, see the RVG 5100 and RVG 6100 Safety,
Regulatory and Technical Specifications User Guide (SM777). If
necessary you must update your computer system
configuration.
Important: It is MANDATORY to check that the
computer system configuration is compatible
with the computer system requirements for the
RVG 5100 and RVG 6100 software
Important: The screen with the proper
technical display characteristics for visualization
of radiological images will avoid any diagnostic
error.
General Software Overview
RVG 5100 and RVG 6100 operate with the following software:
•
•
CS imaging software
RVG 5100 and RVG 6100 Acquisition interface
RVG 5100 and RVG 6100 User Guide (SM775)_Ed01
7
The RVG Acquisition Interface Overview
The RVG Acquisition interface module is a user-friendly working
interface that was designed and developed specifically for the
RVG 5100 and RVG 6100.
Figure 4 RVG Acquisition Main Interface
1
2
Sensor orientation: Pre-orients how the X-ray image is
displayed in the Imaging Window.
Preview screen:
Indicates the 90 second activation time for acquisition.
Displays the acquired X-ray image instantly after
acquisition.
•
•
8
3
Available sensor(s): Displays maximum 3 sensors with their
name and sensor status.
• Blue: Sensor on standby
• Green: Sensor ready for acquisition
4
ONLY for wireless Sensor
5
Dental arch interface: Accesses the dental arch interface for
tooth selection
6
Exit button: Exits the Acquisition Interface.
Chapter 3 Imaging Software Overview
Figure 5 Dental Arch for Tooth Selection
The Dental Arch enables you to select the desired tooth or teeth
for acquisition.
RVG 5100 and RVG 6100 User Guide (SM775)_Ed01
9
The FMS Acquisition Interface Overview
The FMS Acquisition interface module is a user-friendly
working interface that was designed and developed specifically
for the RVG 5100 and RVG 6100. The Full Mouth Series (FMS)
is a static representation of the patient's mouth using a series of
intraoral images. The images are placed in fixed numbered
frames.
Figure 6 FMS Acquisition Interface Home Page
10 Chapter 3 Imaging Software Overview
1
Dental arch: Highlights the acquisition zone (in near future,
there will be an icon to enable you to switch between adult
and child dental arch).
2
FMS template: Displays frame templates for acquisition.
• Green highlight: Frame ready for new acquisition
• Blue highlight: Frame in the revue and retake mode. This
mode interrupts the automatic acquisition sequence.
The retake images are displayed in the Retake Image
gallery.
3
Retake Image gallery: Displays all the retake images
acquired for a specific frame.
4
Preview screen: Displays the current acquired image.
5
Preference button: Displays the preference dialog box for
FMS template selection.
6
ONLY for wireless Sensor
7
Available sensor(s): Displays maximum 3 sensors with
their name and sensor status.
8
Refresh button: Relaunches the timer.
9
Timer: Displays the timer for acquisition.
Figure 7 FMS Preference Dialog Box
RVG 5100 and RVG 6100 User Guide (SM775)_Ed01
11
The preference dialog box enables you to select:
Enhancement applied at
acquisition
Image enhancement type
applied to acquired images:
• Perio: Optimizes the display
of periodontal tissues.
• Endo: Optimizes the contrast
values over the entire range
(by default).
• Dentin-Enamel Junction:
Optimizes the values at the
crown, the amelo-dentinal
junction and the roots.
Sharpness filter
Image filtering to increase image
contrast applied to acquired
images.
FMS templates
FMS template options to select
for acquisition.
Sensor activation duration
(minutes)
Acquisition timer duration
(maximum 30 minutes)
depends on the FMS template
choice and it can be adjusted
using the minutes drop-down
list.
You can select your preferences before starting to acquire
images.
If you try to change the FMS template after you finished your
acquisitions you are prompted with a warning that indicates that
you risk loosing some of the images.
12 Chapter 3 Imaging Software Overview
Figure 8 FMS Retake Image Gallery
The FMS retake image gallery displays only the images
acquired for the frame highlighted in blue in the FMS template.
A blue tag on the corner of the FMS frame indicates that there
are retake images for this specific frame.
Figure 9 FMS Template and Preview Toolbar
The FMS image enhancement toolbar applies either to a single
selected frame (highlighted in blue) or to the entire FMS
template.
Perio: Optimizes the display of periodontal tissues.
RVG 5100 and RVG 6100 User Guide (SM775)_Ed01
13
Endo: Optimizes the contrast values over the
entire range.
Dentin-Enamel Junction: Optimizes the values at
the crown, the amelo-dentinal junction and roots.
Sharpness enhancement: Optimizes
Brightness enhancement: Optimizes the
brightness of the acquired image.
Contrast enhancement: Optimizes the contrast of
the acquired image.
Refresh button: Resets to the initial state of the
current image.
Important: All the image enhancements
applied to the images as well as all the retake
images will be transferred to the CS Imaging
Software when you close the FMS acquisition.
14 Chapter 3 Imaging Software Overview
4
Acquiring an Image
Acquiring an Image with the RVG Sensor
To acquire an image with the RVG sensor, follow the
instructions in the presented order.
Preparing the RVG Sensor
To prepare the RVG sensor, follow these steps:
1
Select an appropriate positioner for the region of interest
and the sensor size.
2
Cover with a disposable hygienic sleeves specifically
designed for each sensor size.
Important: To prevent
cross-contamination, use a new hygienic
barrier for each new patient.
RVG 5100 and RVG 6100 User Guide (SM775)_Ed01 15
3
Place the protected RVG sensor in the sensor positioner’s
biteblock.
Preparing for Acquisition
To prepare for acquisition, follow these steps:
1
Open the patient file. Access the Imaging Window.
2
Click
to access the RVG Acquisition interface or
press F2 on the computer keyboard.
16 Chapter 4 Acquiring an Image
(Optional) Press on the remote control button several times
to pre-orient the sensor orientation. The acquired image is
displayed with the last selected orientation on the Imaging
Window.
(Optional) Click
Click
To select the tooth or teeth number.
to return to the RVG Acquisition interface. The
selected tooth number is displayed on the RVG Acquisition
interface.
3
Select the X-ray timing according to the region of interest
and the patient type (follow the user instructions of your
X-ray generator).
RVG 5100 and RVG 6100 User Guide (SM775)_Ed01
17
4
Insert the sensor holding it horizontally in the patient’s
mouth. Positioning in the patient’s mouth depends on the
region of interest.
5
Approach the X-ray generator tube head to the patient.
6
Align the X-ray tube head with the patient’s tooth and the
sensor and make sure that the tube head is not shaking.
Launching the X-Ray
To launch the X-ray, follow these steps:
1
Ask the patient to remain still.
2
Position yourself either 2 meters behind the X-ray generator
or outside the door.
3
Keep visual contact with the patient during the X-ray.
4
Trigger the X-ray with the remote control of the X-ray
generator.
The image appears in the preview screen of the RVG
Acquisition interface.
When the acquisition ends, the RVG Acquisition interface
disappears and the acquired image is displayed in the
Imaging Window.
18 Chapter 4 Acquiring an Image
5
Check the image quality. If not satisfactory, redo the X-ray.
6
If satisfactory, remove the X-ray generator tube head.
7
Remove the RVG sensor from the patient’s mouth. Remove
the hygienic sensor protection.
Important: DO NOT pull the sensor by its
cable when you remove the hygienic
protection.
RVG 5100 and RVG 6100 User Guide (SM775)_Ed01
19
20 Chapter 4 Acquiring an Image
5
Acquiring an Image
with FMS Interface
Acquiring an Image with the RVG Sensor
To acquire an image with the RVG sensor, follow the
instructions in the presented order.
Preparing the RVG Sensor
To prepare the RVG sensor, follow these steps:
1
Select an appropriate positioner for the region of interest
and the sensor size.
2
Cover with a disposable hygienic sleeves specifically
designed for each sensor size.
Important: To prevent
cross-contamination, use a new hygienic
barrier for each new patient.
RVG 5100 and RVG 6100 User Guide (SM775)_Ed01 21
3
Place the protected RVG sensor in the sensor positioner’s
biteblock.
Preparing for Acquisition
To prepare for acquisition, follow these steps:
1
Open the patient file. Access the Imaging Window.
2
In the Imaging window, click
and click
to
access the FMS Acquisition interface. The timer is
launched indicating the duration for the selected FMS
template. You can click
3
to relaunch the timer.
Align the X-ray tube head with the patient’s tooth and the
sensor and make sure that the tube head is not shaking.
22 Chapter 5 Acquiring an Image with FMS Interface
Launching the X-Ray
To launch the X-ray, follow these steps:
1
Ask the patient to remain still.
2
Position yourself either 2 meters behind the X-ray generator
or outside the door.
3
Keep visual contact with the patient during the X-ray.
4
Select a frame in which to insert the image. The frame is
highlighted in green.
5
Trigger the X-ray with the remote control of the X-ray
generator.
The image appears in the preview screen of the FMS
Acquisition interface. The light on the remote control button
blinks blue indicating the image transmission.
The next frame is automatically highlighted in green ready
for the next acquisition.
RVG 5100 and RVG 6100 User Guide (SM775)_Ed01
23
The RVG sensor is automatically reactivated after each
acquisition and ready for the next acquisition.
Note: To rearm the timer, only use the refresh
button of the timer. Do not use the remote control
button of the RVG sensor.
6
Continue acquiring until all the FMS template is finished.
Retaking Images
If you need to retake images either while you are going through
the FMS template acquisition sequence or after the FMS
template acquisition is finished.
To retake images, follow these steps:
1
Click on the frame you want to retake images. Check the
image quality in the preview screen. If not satisfactory,
retake another image or images.
24 Chapter 5 Acquiring an Image with FMS Interface
The retake image gallery displays all the acquired images of
that frame. The images are automatically saved unless you
wish to select and delete them. A blue tag on the corner of
the FMS frame indicates that there are retake images for
this specific frame.
2
Select an image and apply image enhancement. The image
enhancements will be saved automatically.
Note: If you need to relaunch the automatic
acquisition, click on the next frame in the acquisition
sequence.
3
Exit the FMS Acquisition interface when you have finished all
the acquisition sequences.
The FMS template with the acquired images and the
applied image enhancements are saved and displayed in
the Imaging Window.
The retake images are also saved in the Imaging Window
but not as a part of the FMS template.
4
Remove the X-ray generator tube head.
5
Remove the RVG sensor from the patient’s mouth. Remove
the hygienic sensor protection.
Important: DO NOT pull the sensor by its
cable when you remove the hygienic
protection.
RVG 5100 and RVG 6100 User Guide (SM775)_Ed01
25
26 Chapter 5 Acquiring an Image with FMS Interface
6
Troubleshooting
Images
Troubleshooting
Troubleshoot images using the troubleshooting table below.
If the problem persists, or if it is not outlined below, contact your
representative.
Important:
If the malfunction persists or more
serious conditions occur, contact your
representative
Malfunction
After triggering the
X-rays, no image is
displayed.
Possible Cause & Action
•
•
Make sure a patient record is open in
imaging mode.
If the system is not connected to the timer:
Check that the RVG Acquisition button is
active, not grayed out. If the button is
grayed out, check the connection of the
sensor on the USB 2 port.
•
The acquisition function was not activated,
click on the RVG Acquisition button. The
button turns green or use the button on the
remote control, take the X-ray image within
90 seconds.
If the system is connected to the timer:
Check the connection with the timer.
Check that the hub is powered properly.
Contact your dealer
RVG 5100 and RVG 6100 User Guide (SM775)_Ed01 27
(Continued)
Malfunction
The image is pale
and grainy.
Possible Cause & Action
•
•
•
•
The image is too
dark.
•
•
•
The image is blurred.
•
•
•
The image is white.
•
•
•
•
The exposure time is too short; increase it.
The selected acquisition mode does not
correspond to the X-ray dose used.
The X-ray generator voltage is too low
(<60 kV rms); have the X-ray generator
checked.
The X-ray generator is too far from the
patient with respect to the selected dose.
Check the monitor contrast and brightness
settings and ensure there are no
reflections on the screen.
The exposure time is too high; lower it.
The selected acquisition mode does not
correspond to the X-ray dose used.
Check the monitor settings (contrast and
brightness) and ensure there are no
reflections on the screen
Patient moved during exposure.
X-ray generator head was not stable.
Use an image filter.
Active face of sensor was not exposed to
X-rays.
X-ray dose is insufficient.
Sensor is not connected, or is improperly
connected.
Ensure the X-ray generator is producing
X-rays; have it checked by a certified
technician.
28 Chapter 6 Troubleshooting Images
7
Maintenance
This chapter describes the maintenance task that you need to
perform regularly for your RVG 5100 and RVG 6100 and the
accessories.
The RVG Sensor
Single-use disposable protective hygienic sleeves must cover
the RVG sensor before placing it in the patient’s mouth.
To prevent cross-contamination, use a new hygienic barrier for
each new patient and disinfect the RVG sensor.
Cleaning and Disinfecting the RVG Sensor
WARNING:
Never place the sensor and/or
remote control in an autoclave as this could result
in serious damage to the sensor.
You must first clean the RVG sensor before disinfecting it. To do
so, follow these steps:
1
Remove the protective hygienic sleeves.
WARNING:
Do not move the sensor using its
cable when you remove the protective hygienic
sleeves.
2
Remove debris or organic matter from the sensor surfaces
with a disposable wipe or surface brush.
RVG 5100 and RVG 6100 User Guide (SM775)_Ed01 29
3
Inspect the sensor for debris. Repeat cleaning if there is any
debris left.
WARNING:
You must first clean the RVG
sensor before disinfecting it.
4
Disinfect with disinfecting wipes or solution with
intermediate-level hospital disinfectant with label claims of
tuberculocidal activity (for example: a chlorine containing
product, a quaternary ammonium compound with alcohol, a
phenolics, an iodophors, an EPA-registered chlorine-base
product).
WARNING:
You must use the disinfectant
according to the manufacturer instructions.
Cleaning the Cable and Sensor Remote Control
WARNING:
Never immerse the RVG sensor
remote control in any solution.
The cable and sensor remote control must be cleaned with
disposable disinfecting wipes with intermediate-level hospital
disinfectant with label claims of tuberculocidal activity.
WARNING:
Clean all parts carefully using a
disinfecting wipe.
30 Chapter 7 Maintenance
Maintaining the Life of the Sensor
To maintain the life of the sensor, do the following:
•
Do not place the sensor in a sterilizer or autoclave.
•
Do not pull on the cable, even when removing the
disposable protective sheath.
•
Do not walk on or roll objects over the cable.
•
Do not request the patient to bite on the sensor or the
cable.
•
Do not disconnect the sensor during the 90-second
delay, in non-synchronized mode, or during acquisition.
•
Do not force, bend, or pull the sensor cable.
•
Do not immerse the sensor remote control.
RVG 5100 and RVG 6100 User Guide (SM775)_Ed01
31
Cleaning Positioning Accessories
WARNING:
Do not use chemical autoclave for
the toothbrush holders and avoid direct contact
with the metallic part of the autoclave.
Positioning Accessories Daily Maintenance Tasks
Accessories
Toothbrush
holders
Bite blocks
RINN Arm &
ring
Maintenance Tasks
1. Remove any residue with hot water and soap.
2. Put the metal and plastic parts in separate
sterilization pouches and autoclave up to
132°C (273° F) before the next patient.
1. Disassemble the metal arm and the plastic ring.
2. Remove any residue with hot water and soap.
3. Put the metal and plastic parts in separate
sterilization pouches and autoclave up to
132°C (273° F) before the next patient.
Preventing Electrostatic Discharge
To prevent electrostatic discharge, do the following:
•
When the sensor is not connected, store it in its case.
•
Never touch the monitor’s screen and the sensor
simultaneously. This can result in serious damage to the
sensor.
•
Never touch the contact points of the USB connector
of the sensor.
32 Chapter 7 Maintenance