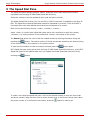
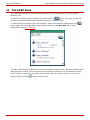
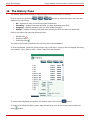
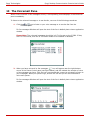
1
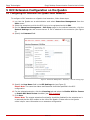
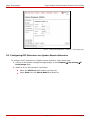
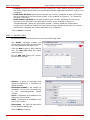
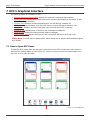
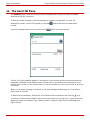
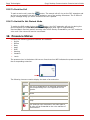
Epygi Technologies
Epygi Desktop Communication Console User's Guide
Epygi Technologies
Epygi Desktop Communication Console User's Guide
Table of Contents:
About This User’s Guide ............................................................................ 4
1
Introducing the Epygi Desktop Communication Console ..................... 6
2
Requirements...................................................................................... 6
2.1
System Requirements .................................................................................. 6
2.2
Quadro Software Requirements ..................................................................... 6
3
Installation ......................................................................................... 6
4
DCC Licensing ..................................................................................... 7
5
DCC Extension Configuration on the Quadro ..................................... 10
5.1
Configuring DCC Extension as a Quadro Local Extension.................................. 10
5.2
Configuring DCC Extension as a Quadro Remote Extension .............................. 11
6
Configuring DCC Connection with Epygi IP PBX ................................ 13
7
DCC’s Graphical Interface ................................................................. 17
8
7.1
How to Open DCC Panes ............................................................................. 17
7.2
How to Close DCC Panes............................................................................. 18
The Watched Extensions Pane (WEP) ............................................... 19
8.1
8.1.1
To Change the WEP Card Position .......................................................... 19
8.1.2
To Update or Remove the WEP Card Picture ............................................ 19
8.1.3
To Change the WEP Card Frame Color .................................................... 19
8.1.4
To Change the WEP Card Frame Style .................................................... 20
8.1.5
To Rename the WEP Card ..................................................................... 21
8.1.6
To Remove the WEP Card ..................................................................... 22
8.2
9
How to Change the WEP Card Design............................................................ 19
How to Handle the Calls via WEP.................................................................. 22
8.2.1
To Make a Call .................................................................................... 22
8.2.2
To Park the Call................................................................................... 22
8.2.3
To Pick-up the Parked Call .................................................................... 22
8.2.4
To Page ............................................................................................. 22
8.2.5
To Join a Conference............................................................................ 22
8.2.6
To Intercept a Ringing Call.................................................................... 23
8.2.7
To Barge-in, Listen-in or Whisper........................................................... 23
The Speed Dial Pane ......................................................................... 24
10 The Contacts Pane ............................................................................ 25
11 The LDAP Pane.................................................................................. 26
12 The History Pane............................................................................... 27
PAGE 2
12-Sep-12
Epygi Technologies
Epygi Desktop Communication Console User's Guide
13 The Voicemail Pane ........................................................................... 28
14 The Send IM Pane ............................................................................. 30
15 The Phone Control Pane .................................................................... 32
15.1 To Make a Call........................................................................................... 32
15.2 To Blind Transfer a Call............................................................................... 32
15.3 To Transfer a Call with Consultation.............................................................. 32
15.4 To Transfer a Call to Voice Mail .................................................................... 32
15.5 To Park the Call ......................................................................................... 33
15.6 To Switch Do Not Disturb Mode.................................................................... 33
16 Presence Status ................................................................................ 33
16.1 To Change Presence Status Text .................................................................. 34
17 Disconnect/Reconnect the DCC......................................................... 35
PAGE 3
12-Sep-12
Epygi Technologies
Epygi Desktop Communication Console User's Guide
About This User’s Guide
This guide gives step-by-step instructions on the setup and operation of the DCC. The guide is
divided into the following chapters:
Introducing the Epygi Desktop Communication Console gives a basic idea of the DCC.
Requirements will outline the system and Quadro software requirements.
Installation explains how to install the DCC.
DCC Licensing explains DCC license activation for an extension.
DCC Extension Configuration on the Quadro gives step-by-step instructions on configuring the
DCC as a local or remote extension of a Quadro.
Configuring DCC Connection with Epygi IP PBX gives step-by-step instructions on configuring the
DCC with Epygi IP PBX.
DCC’s Graphical Interface explains the graphical user interface of the DCC and the operations that
can be executed directly from its panes.
CONFIDENTIAL
PAGE 4
12-Sep-12
Epygi Technologies
Epygi Desktop Communication Console User's Guide
Document Revision History
Revision
Date
Description
Valid for SW
1.0
July 31, 2012
Initial Release
5.3.x
1.1
Aug 27, 2012
Updated software
requirements list
5.3.x
1.2
Sep 12, 2012
Updated system
requirements list
5.3.x
PAGE 5
Valid for models
QX1000, QuadroM IP PBXs
and Quadro4L
QX1000, QuadroM IP PBXs
,Quadro4L, Quadro2x2 and
Quadro2x/4x/16x
QX1000, QuadroM IP PBXs
,Quadro4L, Quadro2x2 and
Quadro2x/4x/16x
12-Sep-12
Epygi Technologies
Epygi Desktop Communication Console User's Guide
1 Introducing the Epygi Desktop Communication Console
The Epygi Desktop Communication Console (DCC) is a PC-based tool that can be configured to
work with a remote or local extension of a Quadro IP PBX. DCC allows users to have internal
chats, see the status of other employees' phones and completely control their desktop handset.
The graphical user interface of the DCC is specifically designed to integrate with the Quadro’s
receptionist features, such as extension status watching.
The extension status watching allows the status of specified Quadro extensions to be viewed to
show ringing, busy or not-registered. This simplifies the call handling procedure in a number of
ways. When transferring a call to or setting up a conference call with a watched extension, the
receptionist can see the current state of the extension and based on that state to decide whether
or not to proceed.
2 Requirements
2.1 System Requirements
The following system specifications are the minimum required for the proper operation of the
DCC:
•
•
•
•
•
Operating systems: Windows XP, Vista, Windows 7, Windows server 2008 and 2003
10 MB free space on hard drive.
50 MB RAM.
Internet connection.
Microsoft Office Outlook installed and properly configured.
Please note: Depend on the version of used MS Office Outlook (32-bit or 64-bit) the
appropriate executable file (x86.exe or x64.exe) should be selected when installing DCC.
2.2 Quadro Software Requirements
The DCC is compatible with the following Quadro devices beginning with the software version
listed:
•
•
•
•
•
•
QX1000: SW-5.3.12
QuadroM32x: SW-5.3.13
QuadroM8L/26x/26xi/12Li: SW-5.3.12
Quadro4L: SW-5.3.11
Quadro2x2: SW-5.3.11
Quadro2x/4x/16x: SW-5.3.10 and higher
3 Installation
Before starting the installation of the DCC, ensure no previous versions are currently running.
To install the DCC, run the executable file “setup.exe” and follow the instructions of the Desktop
Communication Console Setup wizard.
Later you can launch the DCC by running its executable file “dcc.exe” that is by default installed
in the C:\Program Files\Epygi Technologies\DCC directory. You may also launch the DCC by
clicking on its shortcut in the Start-up menu (by default Epygi Technologies\DCC), or by doubleclicking on its icon on the desktop, or by clicking on its quick launch icon.
PAGE 6
12-Sep-12
Epygi Technologies
Epygi Desktop Communication Console User's Guide
4 DCC Licensing
DCCs (lines) can be registered to the same Epygi PBX only for a trial period of 30 days counted
from the DCC installation day. After this period expires, the DCC will require that the
corresponding PBX extensions use a license.
To allow the DCC to be used on an Epygi PBX, an optional software feature key should be
purchased to expand the number of available licenses. The DCC is available in two versions but
are almost identical in appearance. For normal office users, the basic license will allow most of
the features that can be used on a normal phone directly from the DCC application. Features
restricted to the professional version include call intercept, barge-in, silent monitoring and
whisper. The total number of watched extensions will also be lower on the basic version versus
the professional which is intended for the main answering position for the company like a
receptionist. The professional DCC version includes all the options found with the basic license
plus a few additions. Features unique to the professional license include call intercept, barge-in,
silent monitoring and whisper. Most of the advanced features listed will require the one-time
activation of the Barge-in Activation Key on the Epygi PBX which enables these features for the
entire system. Also increased are the number of watched extensions that can be displayed at a
single time. Most offices will only need a few of the professional licenses, and the majority of
users will require the basic version. To purchase a key, please contact your distributor. In your
request, include the Unique ID displayed on the Features page of the Quadro web management
(see Figure 1).
Figure 1 - The Features page on the Quadro
PAGE 7
12-Sep-12
Epygi Technologies
Epygi Desktop Communication Console User's Guide
After receiving a software key, follow these steps to activate the feature. For more information on
Quadro feature keys and their activation, please refer to the Quadro online help.
1.
Open the SystemÆFeatures page and click the Add button (see Figure 1).
2.
Enter the key in the Feature Key text field and Click Save.
Figure 2 - DCC support activated
Activated DCC licenses should be allocated to the corresponding extensions explicitly.
The following steps describe how to allocate a license to an extension:
1. Select Extensions Management from the Users menu.
2. Select the extension to which the DCC line is registered and click Edit.
3. On the Extensions Management – Edit Entry page for the selected extension, click the
Licensing tab and select the Enable DCC Pro license or Enable DCC Basic license
checkbox (see Figure 3).
4. Click Save to submit the changes.
PAGE 8
12-Sep-12
Epygi Technologies
Epygi Desktop Communication Console User's Guide
Figure 3 - DCC License Settings for extension 132
PAGE 9
12-Sep-12
Epygi Technologies
Epygi Desktop Communication Console User's Guide
5 DCC Extension Configuration on the Quadro
5.1 Configuring DCC Extension as a Quadro Local Extension
To configure a DCC extension as a Quadro local extension, follow these steps:
1. Log into the Quadro as an administrator and select Extensions Management from the
Users menu.
2. Select the extension to which the DCC line is to be registered and click Edit.
3. On the Extensions Management – Edit Entry page for the selected extension, click the
General Settings tab and ensure that an IP line is attached to the extension (see Figure
4).
4. Specify the Password field.
Figure 4 - Extensions Management – Edit Entry – General Settings page
5. Specify the User Name field in the SIP Settings tab (see Figure 5).
Please Note: The same User Name and Password should be specified in the DCC
configuration.
6. For the selected extension, click the Licensing tab and select the Enable DCC Pro license
or Enable DCC Basic license checkbox (see DCC Licensing).
7. Click Save.
Please Note: The remote extension functionality should be disabled for the extension as it
is assumed that the DCC resides on the LAN of the Quadro. Please refer to the Quadro
online help for more information on an extension configuration.
PAGE 10
12-Sep-12
Epygi Technologies
Epygi Desktop Communication Console User's Guide
Figure 5 - Extensions Management – Edit Entry – SIP Settings page
5.2 Configuring DCC Extension as a Quadro Remote Extension
To configure a DCC extension as a Quadro remote extension, follow these steps:
1. Connect to the Quadro management page and go to the TelephonyÆLine SettingsÆIP
Line Settings page.
2. Select an IP line and configure it as follows:
•
Select the SIP Phone radio button (see Figure 6).
•
Select Other from the Phone Model drop down list.
PAGE 11
12-Sep-12
Epygi Technologies
Epygi Desktop Communication Console User's Guide
Figure 6 -Configuring the IP Line
3. Select Extensions Management from the Users menu.
4. Select the extension to which the DCC line is to be registered and click Edit.
5. On the Extensions Management – Edit Entry page for the selected extension, click the
Remote settings tab and enable the Remote extension settings (see Figure 7).
6. Specify the Username and the Password fields.
7. Click Save.
Figure 7 - Extensions Management – Edit Entry – Remote Settings page
PAGE 12
12-Sep-12
Epygi Technologies
Epygi Desktop Communication Console User's Guide
6 Configuring DCC Connection with Epygi IP PBX
Once an extension is configured on the Quadro, you may continue the DCC setup with the DCC
Configuration Wizard.
PAGE 1 – GETTING STARTED
The DCC Configuration Wizard allows
navigating through the following basic
configuration parameters and settings
(see Figure 8):
•
External connection settings
•
Watched extension settings
•
Routing rules settings
•
LDAP settings
Click on Next to continue.
Figure 8 – Getting started
PAGE 2 - CONNECTION SETTINGS
The input fields in the Connection Settings window are as follows (see Figure 9):
• Server Address is the IP address
of the Epygi IP PBX used by DCC for
making the calls.
• Port is the 3pcc port of the Epygi IP
PBX. For details on how to configure
this port on the Epygi IP PBX, see
the IP PBX manual. The default
value of the 3PCC port on all Epygi
IP PBX products is 4849.
• The User Name and Password
(the same specified on the Quadro)
are
identification
parameters
required for registration to the
Quadro.
• The Request Timeout text field
requires the timeout (in seconds)
during which the Quadro should
receive a response to the request
from the call controlling application.
The default value is 30 seconds.
Figure 9 - DCC Settings: Connection Settings page
PAGE 13
12-Sep-12
Epygi Technologies
Epygi Desktop Communication Console User's Guide
• Secure Connection checkbox allows to establish a secure connection with Epygi IP PBX if
appropriate checkbox is set in Epygi IP PBX 3PCC settings.
Click on Next to continue.
PAGE 3 - WATCHED EXTENSIONS
DCC can watch only the extensions on the IP PBX it is connected to; extensions located on
another PBX cannot be watched by DCC.
• Press
Download
button.
The
extensions
and
corresponding
display names will be displayed in
the window below.
• Select the extensions to be watched
(see Figure 10) and click on Next to
continue.
Please Note: If you are already
watching some extensions then DCC
will open the list of extensions which
are not watched yet.
Figure 10 -DCC Settings: Watched extensions page
PAGE 4 - LDAP SETTINGS
The input fields in the LDAP Settings window are as follows (see the example on Figure 11):
• Server Address text field requires
the IP address of the LDAP server.
• Port requires the listening port of
the LDAP server. The default value
is 389.
• The User Name and Password are
the binding username and password
for the LDAP server. If your LDAP
server allows anonymous binds then
this settings can be left empty.
• Base specifies the LDAP search
base, which corresponds to the
location in the directory from which
the LDAP search should start. Please
consult
with
your
system
administrator
regarding
the
configuration in this field.
• Max. Hits requires the maximum
number of search results to be
returned by the LDAP server.
Figure 11 -DCC Settings: LDAP Settings page
PAGE 14
12-Sep-12
Epygi Technologies
Epygi Desktop Communication Console User's Guide
• Protocol requires the LDAP protocol version used by DCC when sending the bind request to
the server. Please consult with your system administrator regarding the protocol version to be
configured.
• LDAP Name Attribute can be used to specify the “number” attributes of each record which
are to be returned in the LDAP search results. In the example on Figure 11, “cn” stands for
full name of the user.
• LDAP Number Attribute can be used to specify the “number” attributes of each record
which are to be returned in the LDAP search results. In the example on Figure 11
“telephoneNumber” stands for office phone number; “mobile” stands for mobile phone
number and “homePhone” stands for home phone number. Please consult with your system
administrator regarding the number attributes to be configured.
Click on Next to continue.
PAGE 5 – ROUTING TABLE
The following instructions describe how to set up the Routing Table:
The Enable checkbox enables the
Route Table functionality and activates
the related buttons (see Figure 12).
Click the New button to add a dialing
rule. The Add rule dialog box opens
(see Figure 13).
On the Add rule dialog box, specify
the following settings:
Figure 12 - DCC Settings: Routing Table page
Pattern - a series of characters and
wildcards comprising a template for
dialed numbers.
Discarded Symbols - the number of
characters to trim from the beginning
of
the
selected/specified
phone
number.
Prefix - characters to be added to the
beginning of the number.
Suffix - characters to be added to the
end of the number.
Description - an optional description
for the specified dialing rule.
Figure 13 - DCC Settings: RouteTable page
Click on Next to continue.
PAGE 15
12-Sep-12
Epygi Technologies
Epygi Desktop Communication Console User's Guide
PAGE 6 – SUMMARY
The next page of the wizard is a
Desktop Configuration Wizard Summary
where
the
configured
settings for the DCC should be verified.
Click on Finish to complete the wizard.
Figure 14 - DCC Settings: Summary page
PAGE 16
12-Sep-12
Epygi Technologies
Epygi Desktop Communication Console User's Guide
7 DCC’s Graphical Interface
The following panes are available in DCC:
• Watched Extensions Pane (WEP) displays the extension cards and their statuses.
• Speed Dial Pane displays short codes and phone numbers populated from the Epygi IP PBX
Global Speed Dial Directory.
• Contacts Pane displays contacts populated from the MS Outlook contacts list.
• LDAP Pane displays contacts from the LDAP server, such as MS Active Directory, etc.
• History Pane displays records of calls that have occurred while DCC is running.
• Voicemail Pane displays new voicemail or fax messages immediately.
• Send IM Pane displays the sent/received instant messages.
• Phone Control Pane allows making a call and using some PBX services during a call.
Please Note: The WEP pane is always open. Other panes can be opened and closed during the
DCC session.
7.1 How to Open DCC Panes
To open the DCC panes place the mouse on the bottom of the DCC window and wait a second
until the DCC toolbar slides up (see Figure 15). Then move the mouse to the desired pane icon
and click on it to open the pane.
Figure 15 - DCC WEP pane
PAGE 17
12-Sep-12
Epygi Technologies
Epygi Desktop Communication Console User's Guide
Please Note: Only four panes (except WEP) can be displayed at any time in the DCC window.
Thus, if you have already opened four panes (except WEP), and want to open a new pane, you
have to close one of the opened panes to free up the space.
Exceptions are the Speed Dial, Contacts and LDAP panes, which are replacing each other.
These three panes cannot be open at the same time in DCC window. For example, if the Speed
Dial pane is open and you click on the icon to open the Contacts pane then it will replace the
Speed Dial pane.
7.2 How to Close DCC Panes
To close the DCC pane, use one of the following procedures:
1. Click the x in the upper right corner of the pane window (see Figure below).
2. Open the toolbar and click on the corresponding pane icon you want to close (see Figure
15).
PAGE 18
12-Sep-12
Epygi Technologies
Epygi Desktop Communication Console User's Guide
8 The Watched Extensions Pane (WEP)
The Watched Extensions Pane (WEP) displays the extension cards to be watched (see Figure 15).
These are extensions selected either with the DCC Configuration Wizard when creating the
active profile or by configuring the Watched Extensions settings. After the Watched Extensions
configuration DCC will automatically arrange the cards in the WEP pane. The DCC extension’s
card (IP PBX extension connected to DCC) is always located in the top-left corner of the pane.
The following operations can be executed within this pane. The instructions on executing these
operations are described below.
8.1 How to Change the WEP Card Design
8.1.1 To Change the WEP Card Position
To change the WEP card position, place the mouse pointer over a WEP card and drag the card to
a new position. The card occupying that new position will be highlighted (outlined) in red. After
releasing the mouse button the cards will swap positions.
8.1.2 To Update or Remove the WEP Card Picture
To update the picture right-click anywhere within the WEP card, choose Picture in the pop-up
menu and click on Update. This opens a new window to browse for the picture file on your PC
and save.
You can also add or update the picture dragging it from the “Contacts” pane to the desired card.
In this case the picture assigned to a contact in MS Outlook is being assigned to the card in WEP.
To remove the picture right-click anywhere within the WEP card, choose Picture in the pop-up
menu and click on Remove.
8.1.3 To Change the WEP Card Frame Color
To change the WEP card frame color right-click anywhere within the WEP card, choose Design in
the pop-up menu and select the color in the opened color palette.
PAGE 19
12-Sep-12
Epygi Technologies
Epygi Desktop Communication Console User's Guide
WEP cards with the same extension type have the same frame color: changing the color of one
card will change the color for all others.
The following IP PBX extension types are available:
•
•
•
•
•
•
•
DCC extension
User extension (virtual or real)
Auto Attendant extension
Conference extension
Call Park extension
Paging extension
ACD Group extension
8.1.4 To Change the WEP Card Frame Style
To change the WEP card frame style right-click anywhere within the WEP card, choose Frame
Style in the pop-up menu and select the desired style (currently only “Style1” and “Style2” are
available, see below).
PAGE 20
12-Sep-12
Epygi Technologies
Epygi Desktop Communication Console User's Guide
Style1:
Style2:
8.1.5 To Rename the WEP Card
By default, DCC assigns the display names of the IP PBX extensions to the corresponding card
names.
To change the default card name right-click anywhere in the WEP card, choose Rename Card in
the pop-up menu and click on Change existing.
This opens a new window, where the new name of the WEP card should be specified (see Figure).
Press OK to save the settings.
To restore the default card name (extension display name) right-click anywhere in the WEP
card, choose Rename Card in the pop-up menu and click on Restore Default.
PAGE 21
12-Sep-12
Epygi Technologies
Epygi Desktop Communication Console User's Guide
8.1.6 To Remove the WEP Card
Right-click anywhere within the WEP card and choose Remove Card in the pop-up menu.
8.2 How to Handle the Calls via WEP
8.2.1 To Make a Call
To make a call from the WEP pane, use one of the following procedures:
1. Drag the DCC card into the destination extension’s card outlined in red and the call should
be placed immediately. As soon as you answer, the destination extension’s phone starts
ringing.
2. Double-click on the WEP card to immediately place a call
Please Note: User can make calls from the WEP pane only to other IP PBX extensions.
To end the call press the end call button
on the Phone Control pane.
8.2.2 To Park the Call
To park an active call on the DCC extension, drag the DCC card into the parking extension card
and the call will be parked to the DCC extension immediately.
8.2.3 To Pick-up the Parked Call
To pick-up the parked call, place the mouse on the DCC card, press the left button and drag the
DCC card to the desired parking extension’s card. After releasing the mouse button, DCC
extension will ring. Upon answering, the call will be connected to a call on the parking extension.
8.2.4 To Page
To page from WEP, drag the DCC card into the paging extension’s card and the DCC extension
will ring immediately. Upon answering, the call will be connected to the paging extension for
making an announcement.
8.2.5 To Join a Conference
To join a conference, drag the DCC card into the desired conference card and the DCC extension
will ring. Upon answering, the call will be connected to the conference extension.
PAGE 22
12-Sep-12
Epygi Technologies
Epygi Desktop Communication Console User's Guide
8.2.6 To Intercept a Ringing Call
To intercept a call ringing on an extension, drag the ringing extension card into the DCC card. The
DCC extension will intercept the call.
8.2.7 To Barge-in, Listen-in or Whisper
During an active call, drag the extension card into the DCC card. After releasing the mouse
button, a pop-up menu will appear containing the following items: “Listen in”, “Whisper” and
“Barge in”. Select an item from a pop-up menu and the DCC extension will start ringing. Upon
answering the call, the DCC extension will be connected to the existing call in the mode selected
from the pop-up menu.
PAGE 23
12-Sep-12
Epygi Technologies
Epygi Desktop Communication Console User's Guide
9 The Speed Dial Pane
The Speed Dial pane displays contacts’ names, speed dial short codes and phone numbers
populated from the Epygi IP PBX Global Speed Dial Directory.
Select the contact to see the speed dial short code and phone number.
The Global Speed Dial Directory file is a text file in a CSV format that is uploaded to the Epygi IP
PBX. The Speed Dial code and destination should be separated by commas. There should be a
line break after each code defined where each line corresponds to a contact.
Each line has the following format: <code>, <number>, <name>;
where <code> is a short code (speed dial code) that a user would dial to reach the contact;
<number> is a routing number of the contact and <name> is the name of the contact.
The Search field allows the user to find the needed contact by entering the search string and
button. The search result will include all contacts containing the entered string
pressing the
in the contact’s name, short number or the phone number.
To open the full contacts list clear the search field and press the
button again.
DCC Speed Dial pane synchronizes with the Epygi IP PBX Global Speed Dial Directory, so the DCC
Speed Dial pane will be updated each time you update the Global Speed Dial Directory file by
pressing the
button.
To make a call using the Speed Dial pane, click on the selected contact to open the short code
and phone number, drag the short code or phone number over to the Phone Control pane. When
the phone number is in the Phone Control pane, press the
CONFIDENTIAL
PAGE 24
button to make a call.
12-Sep-12
Epygi Technologies
Epygi Desktop Communication Console User's Guide
10 The Contacts Pane
The Contacts pane displays contacts populated from the MS Outlook contacts list. DCC Contacts
pane synchronizes with MS Outlook, so the DCC Contacts pane will be updated each time you
update the MS Outlook contacts list.
The Search field allows the user to find the needed contact by entering the search string and
button. The search result will include all contacts containing the entered string
pressing the
in the contact’s name.
To open the full contacts list clear the search field and press the
button again.
To make a call using the Contacts pane, click on the selected contact to open the phone number
and drag the phone number over to the Phone Control pane or double-click on the selected
contact phone number to paste it to the Phone Control pane. When the phone number is in the
Phone Control pane, press the
CONFIDENTIAL
button to make a call.
PAGE 25
12-Sep-12
Epygi Technologies
Epygi Desktop Communication Console User's Guide
11 The LDAP Pane
The LDAP pane allows the user to search contacts from the LDAP server, such as MS Active
Directory, etc.
button. The search result will
To search for contact, type the search string and press the
include all contacts containing the entered string in the contact’s name.
To open the first N contacts from LDAP directory, clean up the search field and press the
button again. N is a configurable number which is defined in the Max Hits field in LDAP
configuration (see LDAP Settings).
To make a call using the LDAP pane, click on the selected contact to open the phone number and
drag the phone number over to the Phone Control pane or double-click on the selected contact
phone number to paste it to the Phone Control pane. When the phone number is in the Phone
Control pane, press the
CONFIDENTIAL
button to make a call.
PAGE 26
12-Sep-12
Epygi Technologies
Epygi Desktop Communication Console User's Guide
12 The History Pane
The History pane shows records of calls that have occurred while DCC is running.
Click on one of the following
display in the call history.
•
•
•
•
buttons to select the type of call record to
All – displays all calls of the various types listed below.
Incoming – displays incoming calls that you have answered using DCC.
Outgoing – displays outgoing calls you have made using DCC.
Missed – displays incoming calls that have alerted your DCC but were not answered.
Calls in the history log have the following icons:
•
•
•
Missed Calls:
Outgoing Calls:
Incoming Calls:
The calls in the list are ordered by the time they were received/dialed.
To show call details, place the mouse pointer over a call entry. A pop-up box will appear providing
more details: Type, Status, Caller, Callee, Date/Time and Duration.
To remove the displayed entries from the History pane, click on the
button.
To make a call using the History pane, drag the call entry over to the Phone Control pane and
press
CONFIDENTIAL
button.
PAGE 27
12-Sep-12
Epygi Technologies
Epygi Desktop Communication Console User's Guide
13 The Voicemail Pane
When a new voicemail or fax messages arrives, a corresponding record displays in the Voicemail
pane immediately.
To listen to the voicemail message or to see the fax, use one of the following procedures:
or
icon to listen to your voice message or to see the fax from the
1. Click the
Voicemail pane.
For fax messages Windows will open the text of the fax in default photo viewer application
window.
Please Note: The voicemail messages should be in G.711 format on the IP PBX. If they
are in G.729 format, then the G.729 codec needs to be installed in Windows.
2. When you have voicemail or fax messages,
icon will appear near the right-bottom
corner of the Phone Control pane (see figure below) and will indicate the number of voice
or fax messages you have. Click the icon to automatically connect to voicemail to listen to
your messages. When your phone rings, answer the call and you will be connected to
voice mail system.
For fax messages Windows will open the text of the fax in default photo viewer application
window.
CONFIDENTIAL
PAGE 28
12-Sep-12
Epygi Technologies
Epygi Desktop Communication Console User's Guide
To delete the voicemail or fax messages from the Voicemail pane click on the
icon.
This opens a confirmation dialog box. Press Yes to delete the selected voicemail/fax message.
The Voicemail pane is synchronized with the voice mailbox on the IP PBX. When a voicemail or
fax message is being removed from the voice mailbox on the IP PBX, it is being removed
immediately from the Voicemail pane and vice versa. When a voicemail or fax message is being
played on the IP PBX, the corresponding line in the Voicemail pane will be changed from red color
to black.
To show voicemail/fax message details, place the mouse pointer over a voicemail/fax entry. A
pop-up box will appear providing more details: Type, Status, Sender, Recipient, Date/Time and
Message.
PAGE 29
12-Sep-12
Epygi Technologies
Epygi Desktop Communication Console User's Guide
14 The Send IM Pane
The Send IM pane is used for sending instant messages and viewing the instant messages
received on the DCC extension.
To send an instant message, enter the destination number in the To field. To enter the
button and enter the destination
destination number, use the PC keypad or press the
number.
Type the message below the line and press the
button (see Figure below).
The list of IM conversations appears in the bottom of the IM pane and the complete contents of
messages exchanged in the window above. Double-click on the desired IM conversation in the
bottom-pane to view it in the window above. From this window you can view the next or previous
IM session.
When a new instant message is received, an IM alert message window pops up in the bottomright corner of the DCC.
To delete IM conversations, double-click on the desired IM conversation and click the
icon.
To show an IM conversation details, place the mouse pointer over an IM entry. A pop-up box will
appear providing more details: Type, Status, Sender, Recipient, Date/Time and Message (see
Figure below).
CONFIDENTIAL
PAGE 30
12-Sep-12
Epygi Technologies
Epygi Desktop Communication Console User's Guide
DCC does not support XMPP. DCC uses SIP standard for sending and receiving instant messages.
PAGE 31
12-Sep-12
Epygi Technologies
Epygi Desktop Communication Console User's Guide
15 The Phone Control Pane
15.1 To Make a Call
To make a call, use one of the following procedures:
1. Click the
and click the
button, type the destination number in the Phone Control pane entry field
button.
button, dial the destination number and click the
button. The DCC
2. Press the
extension will ring and upon answering, the call will be established.
Attention: The destination (PBX number, SIP address or PSTN number) will be parsed through
the DCC Routing Table to modify the dialed number if needed. The resulting number needs to
match a valid entry in the Epygi IP PBX Call Routing table.
15.2 To Blind Transfer a Call
During an active call press the
button and drag the DCC card into another extension’s card
to transfer the call. As soon as the transfer is made (the other phone starts ringing), DCC
extension will be disconnected automatically.
15.3 To Transfer a Call with Consultation
During an active call press the
button. Double-click on the extension’s card to where you
button again to transfer the
want to transfer the call. Once the call is established press the
call. As soon as the transfer is made, DCC extension will be disconnected automatically.
15.4 To Transfer a Call to Voice Mail
During an active call press the
button and drag the DCC card into another extension’s (user
extensions only) card. DCC extension will be connected to that extension voice mail system.
CONFIDENTIAL
PAGE 32
12-Sep-12
Epygi Technologies
Epygi Desktop Communication Console User's Guide
15.5 To Park the Call
To park an active call, press the
button. The second call will ring on the DCC extension and
as soon as you answer, the call will be parked on one of the parking extensions. The IP PBX will
play a message telling you which extension the call is parked.
15.6 To Switch Do Not Disturb Mode
To switch the DND mode click on the
button. Your DCC extension will not ring during the
period indicated on the Do Not Disturb Settings page (User loginÆ Supplementary
ServicesÆBasic Services) and all incoming calls will be directly forwarded to your DCC extension
voice mail if the voice mail service is activated.
16 Presence Status
Currently the following presence statuses are available:
• Online
• Offline
• Busy
• Away
• DND
• Meeting
• Vacation
• Lunch
The presence icon in the bottom-left corner of each card on WEP indicates the presence status of
the corresponding extension.
The following icons are used to display the state of an extension:
Icon
State
The icon is displayed for all watched extensions if
the corresponding line is not registered on the
Quadro.
Online
Busy
Away
The extension has switched on the DND feature.
All calls will be forwarded to the voice mailbox of
the extension.
PAGE 33
12-Sep-12
Epygi Technologies
Epygi Desktop Communication Console User's Guide
In a meeting
On vacation
At lunch
The Presence Server running on the IP PBX allows to maintain the presence statuses of all
extensions and to notify DCC of the status changes immediately.
Presence statuses are applicable only for user type extensions (real or virtual). For the extension
types other than User Extension (such as Auto Attendant, etc.) the presence statuses are not
available.
User can set and view the presence status of the DCC extension and view the presence statuses
of the watched extensions. User can set the presence status of the DCC extension to any of the
above listed statuses except for “Offline”. The extension is set to “Offline” automatically by the IP
PBX in case if the attached IP line (IP phone) becomes un-registered.
16.1 To Change Presence Status Text
To update the presence status text, use one of the following procedures:
and select Update status text.
1. Right-click on the DCC card presence icon
2. Open the hidden icons in the Windows tray, move to Epygi DCC icon, right-click the mouse
button. In the pop-up menu select Status and choose Update status text from the
opened list.
3. Right-click in the title bar, from the context menu select Status and choose Update
status text from the opened list.
For each of these selections the following dialog box opened.
Type the new status text in the New message field. The Old message field shows the old
status text.
PAGE 34
12-Sep-12
Epygi Technologies
Epygi Desktop Communication Console User's Guide
17 Disconnect/Reconnect the DCC
To disconnect the DCC from the IP PBX click the
icon on the Phone Control pane (see Figure
below). To reconnect the DCC to IP PBX, click the same icon again.
Attention: When DCC is connected, the Find Me/Follow Me feature will be disabled on that
extension (if configured). When DCC is disconnected, the Find Me/Follow Me feature will be
enabled automatically.
PAGE 35
12-Sep-12
Epygi Technologies
Epygi Desktop Communication Console User's Guide
THIS DOCUMENT IS PROVIDED TO YOU FOR INFORMATIONAL PURPOSES ONLY. The information
furnished in this document, believed by Epygi Technologies, Ltd. to be accurate as of the date of
publication, is subject to change without notice. Epygi Technologies, Ltd. assumes no responsibility for
any errors or omissions in this document and shall have no obligation to you as a result of having made
this document available to you or based upon the information it contains.
Epygi is a registered trademark of Epygi Technologies, Ltd. All other products and services are the
registered trademarks of their respective holders.
PAGE 36
12-Sep-12
Copyright 2003 - 2012
Epygi Technologies, Ltd.
All rights reserved