1
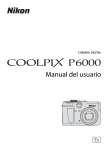
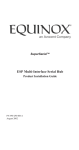
Chapter 19: The IDEXX I-Vision CR* Digital Imaging System
• The screen is very flexible. Handle with care to avoid dropping it.
• Hold screen by the edges and by the back side (The side that faces away from the x-ray tubes).
• Wipe the screen with a clean, nonabrasive, lint-free cloth and screen-cleaning solution.
• Take care not to scratch the active surface during cleaning.
Note: The scanner manufacturer recommends using Kodak screen cleaner to clean the imaging
screens. To obtain screen-cleaning solution, contact Carestream Health at 1-800-328-2910 and
request catalog number 845 4977.
IMPORTANT: Kodak screen cleaner should be used only with Kodak screens.
CAUTION: Do not use alcohol or alcohol-based products on Kodak screens. Avoid letting
the imaging screen come in contact with isopropyl alcohol (isoprapanol, rubbing alcohol),
hydrogen peroxide and other peroxides, citrus-based cleaners, hand lotions and waterless
hand sanitizers, as well as surfacants and lubricants. These materials may cause visible or
hidden damage to the screen and could result in immediate or future image artifacts.
Figure 19-5: The extraction tool
Extraction
tool
Slider
To remove and clean an imaging screen:
1.Slide the edge of the extraction tool (provided with your scanner) over the back edge of the
cassette. Pull the tool down until it enters the square slots in the back of the cassette.
2.Hold the cassette horizontally. Locate the cassette slider in the extraction tool’s central
opening.
Figure 19-6: Installing the extraction
tool onto the back of the cassette
3. Push the slider towards the edge of the cassette until the edge of the screen is visible.
4.Carefully pull the screen out and place it on a clean, dust-free surface.
Tube side
ote: Observe which side of the screen faces the top side (toward the x-ray tube). This is the
N
side to be cleaned.
5. Fold a nonabrasive, lint-free wipe or cloth, and dampen with a small amount of cleaning
solution. Do not pour the cleaner directly onto the screen! Excessive amounts of solution
may damage the screen.
6. Wipe the screen gently and thoroughly, one section at a time. Fold the cloth to expose a fresh
area for each section of the screen.
Extraction
tool
Figure 19-7: The edge of the screen
emerging from the cassette
7. If necessary for the removal of persistent dirt, apply pressure while cleaning.
8. After cleaning, wipe the screen thoroughly dry with a clean, dry, nonabrasive lint-free cloth or
wipe to remove residual cleaner. Do not leave the screen to air dry.
CAUTION: Never insert a screen into a cassette unless it is completely dry.
161