1
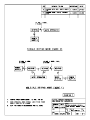
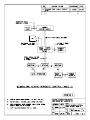
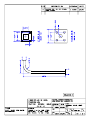
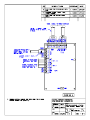
PROPERTY SENTINEL STANDALONE PROGRAMMABLE KEYPAD USER'S GUIDE SENTINEL SYSTEMS CORPORATION Rev. 1.25 9/9/99 TABLE OF CONTENTS 1.0 Overview........................................................................................................................................................ 3 2.0 Installation Instructions ............................................................................................................................... 3 2.1 Conduit Installation.................................................................................................................................. 3 2.2 Automatic Gate Applications................................................................................................................... 4 2.2.1 Gate Installation............................................................................................................................. 4 2.2.2 Pedestal Stand Installation............................................................................................................. 4 2.3 Keypad Installation .................................................................................................................................. 4 2.3.1 Pedestal Mount, Gate Control Application.................................................................................... 4 2.3.2 Wall Mount, Door Control Application......................................................................................... 6 2.4 Remote Office Equipment Installation (Mode 2 Only) ............................................................................ 6 2.4.1 Modem........................................................................................................................................... 7 2.4.2 Communications Interface Module................................................................................................ 7 2.4.3 Power Supply................................................................................................................................. 7 3.0 Programming Instructions ........................................................................................................................... 7 3.1 Programming Mode Access ..................................................................................................................... 8 3.2 Display Function Codes........................................................................................................................... 8 3.3 Set Keypad Address................................................................................................................................. 8 3.4 Set Keypad Type...................................................................................................................................... 9 3.5 Set Time................................................................................................................................................... 9 3.6 Set Date.................................................................................................................................................. 10 3.7 Define Time Zones ................................................................................................................................ 10 3.8 Add User Codes..................................................................................................................................... 11 3.9 Delete User Codes ................................................................................................................................. 11 3.10 Display User Codes ............................................................................................................................. 12 3.11 Lockout User ....................................................................................................................................... 12 3.12 Re-admit User ...................................................................................................................................... 13 1 3.13 Set Relay Timeouts .............................................................................................................................. 13 3.14 Set Passcode......................................................................................................................................... 13 3.15 Set Defaults.......................................................................................................................................... 14 3.16 Copy Database ..................................................................................................................................... 14 4.0 User Operating Instructions....................................................................................................................... 14 5.0 Mode 2 Operation ....................................................................................................................................... 15 5.1 Remote Functions .................................................................................................................................. 15 6.0 Service/Repair Instructions........................................................................................................................ 16 2 1.0 OVERVIEW The standalone keypad is a microprocessor controlled device capable of operating in three different modes: 1. Single keypad mode (Mode 0). 2. Multiple keypad mode (Mode 1). 3. Multiple keypad mode with remote control (Mode 2). Single keypad arrangements (Mode 0) are powered using two wires connected to a small, 12 VDC power source or UPS (uninterruptible power supply). Multiple keypad configurations (Modes 1 and 2) are accomplished using a five wire connection between each keypad. The cable is used to supply power and provide communications between keypads. Additionally, Mode 2 requires an on-site modem to facilitate communications with the remote PC. The keypad itself features a twelve key, telephone style keypad, a 32 character English-language display, and a built-in, piezoelectric transducer that provides audible feedback to the operator or user. Each keypad can support a maximum of 1024 user codes. Two relays provide output to actuate gates, doors, etc. Programming can be a accomplished locally via the unit's keypad. In all modes, just a few key presses allow access to the manual programming mode. Here the operator can add user codes, change user time zone assignments, change time zone definitions, set the date and time, program relay timeouts, etc. Mode 2 allows for the additional convenience of remote programming using SSC's Remote Site Control Module. See the Remote Site Control Module Operations Manual for more details. In Mode 1 operation, a unique "copy" function allows programming modifications to be easily transferred to other "clone" keypads. There is no need for multiple data entry for keypads with identical databases. 2.0 INSTALLATION INSTRUCTIONS 2.1 Conduit Installation Underground conduit should be set in place according to Dwg. 1, System Block Diagram, Modes 0 and 1 or Dwg. 2, System Block Diagram, Mode 2. All equipment locations for items such as keypads and gate operators must be interconnected with conduit. A very important rule of thumb must be followed in the installation of the Property Sentinel (and digital communications systems in general): NO LINE AND LOW MIXING in conduits or in junction boxes. Low voltage signal wiring associated with the keypads, intercom, etc. may be run together in the same conduit. Under no circumstances may AC power wiring associated with the gate operators, etc. be run with the low voltage wiring. Use separate conduits for power wiring. If PVC conduits are used for the underground conduit, low voltage conduits should be physically separated from line voltage conduits by a minimum of 6". It is actually ideal if the conduits approach the gate operator from completely different directions. Note: It defeats the purpose of having separate conduits if the conduits terminate to a common junction box. Low and line voltage conduits must terminate to distinct, metal junction boxes separated by at least 6". WARNING: Failure to observe the above wiring guidelines will void the warranty. 3 2.2 Automatic Gate Applications 2.2.1 Gate Installation Gates and gate operators are supplied, installed, and wired by others in accordance with the manufacturer's instructions. Use 12 AWG, three conductor, shielded cable for powering the gate operator. WARNING: Electromechanical gate operators without built-in relay, contactor, and motor surge suppression can cause keypad latchups. Example manufacturers of these types of gate operators are APE, John Greene, Stanley, etc. Solid-state gate operators generally have built-in surge suppression and generally will not cause keypad latchups. Example manufacturers are Allister, Elite, Door King, etc. If you choose to utilize an electromechanical operator be advised that suppression may be required. 2.2.2 Pedestal Stand Installation 1. As part of the concrete pad or island pouring operation, set four 1/2" x 5" L-bolts (supplied by others) in a 2-7/8" square pattern centered around the conduit stub. See Dwg. 3, Pedestal Stand, View B-B for the correct bolt pattern. The bolts should protrude 1" above the surface of the concrete. Note: For the mounted stand to be perpendicular, the pad surface must be level and flat. 2. After the concrete has set, place the stand over the conduit stub and mounting bolts. Using 1/2" hex nuts and flat washers secure the stand base to the mounting bolts. Use shim washers under the base to correct for any irregularities in the pad surface. 2.3 Keypad Installation 2.3.1 Pedestal Mount, Gate Control Application 1. Mount the housing to the pedestal stand using four 1/4-20 x 1/2" carriage bolts, hex nuts, flat washers, and a socket wrench. 2. Four types of cable runs are required to properly install the keypads. See Dwg. 1 or 2. a. One 12 gauge, stranded wire "bonding" the pedestal stand to the gate operator housing (not shown on Dwg. 1 or 2). This wire is necessary so that the stands and the gate operator will be at the same potential. b. For Modes 1 and 2, one or more 18 gauge, four conductor, shielded, communication cable runs linking each keypad location with the other keypads. For Mode 2, one comm. cable run to the office or modem location will be required. c. One 22 gauge, 2 conductor cable run from each keypad location to the gate operator (for switching). d. For Modes 0 and 1, one 18 gauge, 2 conductor cable run from the gate operator to one keypad (for power). Note: Check for ground faults. Since the drain wire for the shield is not insulated, this conductor is the most prone to making contact with earth ground potential. Places where this can occur is inside gate operator or keypad housings, inside underground conduits, etc. Ground faults can cause 60 Hz "hum" to be induced into the system thus causing erroneous data transmission, and can attract surges from lightning strikes making the system more susceptible to damage. 4 It is suggested that resistance checks using an ohmmeter are performed for each run of cable as outlined below: Ground Fault Checking Procedure: The following checks should be performed for each cable run. 1. 2. 3. 4. 5. 6. 7. Ensure that the cable is unconnected at both ends. The cable should be “floating”. Obtain a digital, auto-ranging multimeter, e.g., Fluke 77. Set meter to ohms. Set red probe on red wire Set black probe on AC ground obtained from an AC outlet or grounded chassis. Measure resistance. Meter should indicate OL, -1 or some other symbol meaning infinite resistance (no connection). Measure the resistance of the other wires (black, white, and green) with respect to earth ground. All readings should be infinite. 3. Connect the 12 gauge, bonding wire to the gate operator housing and to the keypad pedestal stand base. 4. Prepare the communication cable ends by removing 1" of the gray, outer jacket from the cable to expose the red, black, white, and green wires and the uninsulated drain (shield) wire. Remove the exposed part of the foil shield and 1/4" of insulation from each conductor end. Place 1/16" OD heat shrink tubing over the exposed drain wire to prevent it from making contact with the keypad housing or other conductors. WARNING: For good noise immunity, the exposed, unshielded length at each terminated end should be limited to 1" maximum. 5. Connect the incoming comm. cable to TB1 according to Dwg. 4, Wiring Diagram, Keypad, Modes 0-2 as applicable. Connect the outgoing comm. cables to TB2 and TB3 as required. 6. For Modes 0 and 1, connect the power cable from the 12 VDC power source to TB3 of one keypad only according to Dwg 4. 7. Consult the manufacturer's installation manual for the gate operator for wiring details. When running the power wiring to the gate operator, be sure to utilize a separate, dedicated conduit solely for this purpose. Do not run the power wiring with the communication cables. Do not terminate power conduits and communication cable conduits to the same junction box. Also, be sure to run a dedicated, service ground (green) wire out to the operator. Connect the power and ground wires to the operator according to the manufacturer's instructions. 8. Wire the keypad relay contacts, TB4-1 (NO) and TB4-2 (C), to the Pulse Open and Common terminals of the gate operator. See Dwg. 4 and Dwg. 5, Fig. 1. If any uncertainty exists concerning gate operator wiring, contact Technical Support for assistance. WARNING: The keypad relay contacts are rated at 1A @ 120 VAC. Do not exceed the contact rating. It is not recommended that the keypad relay contacts be used to switch 120 VAC control circuits. Under these conditions, the keypad relay should be used to pilot an auxiliary, 12 VDC relay. 9. The keypad faceplate and gasket are mounted to the sheet metal housing assembly using eight, 6-32 x 3/8" button head screws. 10. Using an ohmmeter, do a resistance check between the gate operator housing and faceplate for each keypad. The reading should be approximately zero ohms (continuity). 5 2.3.2 Wall Mount, Door Control Application Below is a typical wall-mount installation procedure assuming masonry construction. The door strikes are assumed to be provided by others and previously installed. 1. Drill a 1 3/8" conduit passage hole through the wall at the point where the keypad housing is to be mounted. Typically this point would be at a distance of 52" vertically from the ground and 36" horizontally from the door to be controlled. 2. Run the comm. cable to the keypad location. 3. To energize the door strike, run an 18 AWG, two conductor cable from the keypad location to the door strike. Run another cable from the keypad to the source of low voltage power (possibly another strike location). Note: Door strikes are typically powered by low voltage DC or AC. One 40 VA transformer can be installed at each strike location or a larger capacity transformer can be located in the building electrical distribution panel. A low voltage bus cable (12 gauge, 2 conductor) can then be run interconnecting all the strike locations in a building. 4. Use a 3/4" PVC terminal adapter, O-ring, bushing, and 6" piece of 3/4" PVC conduit (supplied by others) to provide a short, watertight conduit through the wall and into the back of the enclosure. 5. Drill four 3/16" x 3/4" holes into the wall for mounting the housing. All mounting and conduit passage holes in the wall and in the back of the housing should be properly aligned. 6. Insert #8 x 3/4" plastic anchors (supplied) into the mounting holes in the wall. 7. Apply a circular bead of silicone sealant to the back wall of the keypad enclosure. 8. Mount the housing (with conduit stub) to the wall using #8 x 3/4" self-tapping screws, flat washers and a socket wrench. On the other side of the wall, seal any openings around the conduit with caulk. 9. Pass the comm. cables, electric strike cable, and power cable through the conduit into the housing. 10. Terminate the comm. cables to TB1-3 according to Dwg. 4. 11. Wire the door strike and low voltage supply cable to TB4 of the keypad according to Dwg. 5, Figs. 2 or 3. 12. Mount the keypad faceplate and gasket to the housing using eight, 6-32 x 3/8" button-head screws. 2.4 Remote Office Equipment Installation (Mode 2 Only) Additional remote site equipment is required to implement remote control (Mode 2) operation. See Dwg. 2 and the list below. 1. Modem. 33.6K baud recommended. 2. Communications Interface Module (CIM), #430. This device provides level translation and surge suppression for interfacing with the modem. 6 3. +12VDC Power Supply. Provides power for the keypads and CIM. This additional equipment would preferably be located in the remote site office. If no office exists, it can be placed in a NEMA 12 (dust, watertight) electrical box mounted near the gate. 2.4.1 Modem 1. Install the modem as per the manufacturer's instructions and Dwg. 6, Wiring Diagram, Communications Interface Module (CIM), #430. 2. Connect the telephone cable to the modem as per the manufactuer’s instructions. 2.4.2 Communications Interface Module (CIM), Model #430 1. Connect the Communications Interface Module to the modem using the "straight through", 25 conductor, flat cable provided. 2. Connect the outgoing communication cable to the Communications Interface Module according to Dwg. 6. 3. Connect TB1-7 to a cold-water-pipe or AC ground using 12 AWG, stranded, copper wire. The ground lead must be kept as short as possible (20 ft. max.). WARNING: Failure to provide adequate grounding will void the warranty. 2.4.3 Power Supply 1. Connect the positive lead to TB1-5 and the negative lead to TB1-6 of the CIM according to Dwg. 6. 3.0 PROGRAMMING INSTRUCTIONS The Property Sentinel Standalone Keypad provides a complete set of programming functions which allows the operator to obtain the maximum amount of flexibility and control from the system. The programming functions are invoked using function numbers. A listing of the supported commands follows: COMMAND FUNCTION 1 2 3 4 5 6 Display Function Codes Set Keypad Address Set Keypad Type Set Time Set Date Define Time Zones 7 Add/Edit User Codes 8 9 Delete User Codes Display User Codes DESCRIPTION Scrolls listing of various function codes. Uniquely identifies each keypad. Assigns keypad as Enter or Exit type. Sets current hours, minutes, and seconds. Sets current month, day, and year. Sets start/stop times for four, seven-day, time zones. Adds user codes or change time zone assignments. Removes user from memory. Scrolls user code and time zone assignments. 7 10 11 12 13 Lockout User Re-admit User Set Relay Timeouts Set Passcode 14 Set Defaults 15 Copy Data Temporarily disables user access. Restores access privileges. Sets relay on-time when access is granted. Sets operator access code to programming functions. Sets default parameters. Clears all user codes. Copies all data to target keypad. (Mode 1 operation only.) 3.1 Programming Mode Access To enter the programming mode perform the following steps. Note that power must be applied to the keypad in order to program it. Hence, it is suggested that the keypad installation be complete before performing these steps. 1. At the "Code: 000000000" prompt, press '*'. 2. The display will show "Programming Mode" and then Enter Passcode: 0000 3. Enter your previously programmed passcode. Note that the default, factory-set passcode is 0. 4. If the passcode was valid the display will show Select Function: (Exit=0) 00 5. At this point you are now ready to enter a programming function code. Below are listed detailed descriptions of how to perform all the various programming functions. To exit the programming mode enter a 0 function selection. 3.2 Display Codes 1. At the "Select Function" prompt, press '1' and '#'. 2. A listing of all codes will be shown two lines at time. 3.3 Set Keypad Address 1. At the "Select Function" prompt, press '2' and '#'. 2. The prompt 2. Keypad Addr.: 00/00 will appear. 3. The number to the left of the slash is the old address. Press '#' to retain the old value. 8 4. Enter the new address in the two digit field to the right of the slash. Valid addresses are 0-99. Press the '#' key to accept the entry. 5. The default keypad address is zero. Note: At each site, multiple keypads are addressed in consecutive order starting at 0. For example, for a four keypad site, the keypads would be addressed 0-3. 3.4 Set Keypad Type 1. At the "Select Function" prompt, press '3' and '#'. 2. The prompt 3. Keypad Type: 01/00 will appear. 3. The number to the left of the slash is the old keypad type. Press '#' to retain this value. 4. Enter the new type in the two digit field to the right of the slash. Valid types are listed below. Press the '#' key to accept the entry. Type 1 2 5. Description Enter Exit The default keypad type is 1. 3.5 Set Time 1. At the "Select Function" prompt, press '4' and '#'. 2. The following display will appear: 12:35:04 PM 00:35:04 3. The top line shows the current time and the second line consists of three, two-digit, data entry fields for the new time. 4. Enter the new hour value (in military time) in the leftmost two digit field. Press '#' to accept the new value. If only the '#' is pressed without any digits being entered, the old value is retained. 5. Repeat step 4 for the minutes and seconds fields. 3.6 Set Date 1. At the "Select Function" prompt, press '5' and '#'. 9 2. The following display will appear: Wed. 09/08/99 00/08/99 3. The top line shows the current date and day of the week. Below are three, two-digit, data entry fields for the new date. 4. Enter the new month value in the leftmost two digit field. Press '#' to accept the new value. If only the '#' is pressed without any digits being entered, the old value is retained. 5. Repeat step 4 for the day and year fields. Note: It is not required to enter the day of the week. This value is calculated based upon a hundred year calendar starting Jan. 1, 1990 and ending Dec. 31, 2089. 3.7 Define Time Zones 1. At the "Select Function" prompt, press '6' and '#'. 2. The following display will appear: Enter TZ 0 (*=Exit) 3. Enter the time zone desired (0-3). Press '*' to exit. 4. The current start-stop times for Sunday for the time zone entered appear on the top line. A four digit entry field for the new start time appears on the second line. Sun. 0800-1800 0000 5. To retain the old start time simply press '#'. Otherwise, enter the new starting time for Sunday. Accept the entry by pressing '#'. 6. The display now shows a four digit entry field for the new stop time. Sun. 0800-1800 0700-0000 7. To retain the old stop time simply press '#'. Otherwise, enter the new stop time for Sunday. Accept the entry by pressing '#'. 8. Repeat steps 4-7 for Monday through Saturday, if desired. To exit, press '*'. You will then be returned to the "Enter TZ" prompt in step 2. 9. Program other Time Zones as necessary. 10. The default time zone setup makes Time Zone 0 24-hour for each day of the week. The other three time zones are cleared. 10 3.8 Add/Edit User Codes 1. At the "Select Function" prompt, press '7' and '#'. 2. The following display will appear: Code 000000000 TZ (Exit=0) 3. Enter the user code desired (1-999999999). Possible code choices might be the user's social security no., telephone no., or birthday. Press '#' to accept the code. To exit, enter a zero code. Note: For Mode 2 applications used in conjunction with SSC's Property Manager, the user code must have a specific unit/passcode format. That is, the last four digits of the user code are interpreted as the "passcode" and any previous, non-zero digits are interpreted as the "unit no.". For example, for the user code 10045, "45" would be interpreted as the passcode and '1' would be the unit no. See Sec. 5.0, Mode 2 Operation and the Remote Site Control Module Operations Manual. 4. Next enter the time zone assignment for the user. Code 325868158 TZ 0/0 (Exit=0) The current time zone appears to the left of the slash. Enter the new time zone (0-3) in the one digit field to the right of the slash. Press '#' to accept the entry. Pressing '#' before entering any digits retains the old value. 5. The display will show an "Ok" to indicate the user data has been saved. Code 325868158 TZ 0/0 Ok 6. Repeat steps 2-5 for other user additions or time zone reassignments. 3.9 Delete User Codes 1. At the "Select Function" prompt, press '8' and '#'. 2. The following display will appear: Code: 000000000 (Exit=0) 3. Enter the code you wish to have deleted. Press '#' to accept the entry. 4. The display will show an "Ok" to indicate the user data has been removed from memory. Code: 848074626 (Exit=0) Ok 5. Repeat steps 2-4 to delete more codes. In step 2, enter a zero code to exit. 11 3.10 Display User Codes 1. At the "Select Function" prompt, press '9' and '#'. 2. A listing of all user codes and time zone assignments will be shown two at a time. For example, the first "frame" might be: 590533913-0 652129429-1 The format for each entry is UUUUUUUUU-T where UUUUUUUUU is the user code and T is the time zone assignment. 3. Press keys '1' - '4' to slow down or '6'-'0' to speed up the display scrolling. '5' is the default setting (3 sec. per frame). 4. Press '#' to freeze the display. Press the appropriate numerical key to restart scrolling. 5. Press '*' to exit the function. 3.11 Lockout User 1. At the "Select Function" prompt, press '10' and '#'. 2. The following display will appear: Code: 000000000 (Exit=0) 3. Enter the code you wish to have temporarily disabled. Press '#' to accept the entry. 4. The display will show an "Ok" to indicate the code has been disabled. Code: 922733279 (Exit=0) Ok 5. Repeat steps 2-4 to lockout more codes. In step 2, enter a zero code to exit. 3.12 Re-admit User 1. At the "Select Function" prompt, enter "11" and press '#'. 2. The following display will appear: Code: 000000000 (Exit=0) 3. Enter the code you wish to re-enable. Press '#' to accept the entry. 4. The display will show an "Ok" to indicate the code has been re-enabled. Code: 059283012 (Exit=0) Ok 12 5. Repeat steps 2-4 to re-enable more codes. In step 2, enter a zero code to exit. 3.13 Set Relay Timeouts 1. At the "Select Function" prompt, enter "12" and press '#'. 2. The following display will appear: Relay #0 On-Time 001/000 3. The current on-time is shown to the left of the slash. Press '#' to retain this value. Enter a new on-time (0-30 sec.) in the three digit field to the right of the slash. Press '#' to accept the entry. 4. Repeat step 3 for Relay #1. 5. The default on-times are one sec. for Relay #0 and zero sec. (not used) for Relay #1. 3.14 Set Passcode 1. At the "Select Function" prompt, enter "13" and '#'. 2. The following display will appear: Enter Passcode: 4321/0000 3. The current passcode is shown to the left of the slash. Press '#' to retain this value. Enter a new passcode in the four digit field to the right of the slash. Press '#' to accept the entry. 4. The default passcode is zero. WARNING: The passcode must be set to some non-zero value to prevent unauthorized entry into the programming mode. 3.15 Set Defaults 1. At the "Select Function" prompt, enter "14" and '#'. 2. Default values will be set for each data type as mentioned in the above sections. 3. Additionally, this function clears out all user codes. WARNING: Use this function with extreme care. Remember, all user data will be lost after its execution. 3.16 Copy Database (Mode 1 Operation Only) 1. At the "Select Function" prompt, enter "15" and '#'. 13 2. The target keypad address prompt appears: Target Addr.: 00 3. Enter the keypad address you want to copy to and press '#'. 4. The display will show Copying... 5. If for any reason communications cannot be established or maintained, the message Communication Failure will be posted and the process will be aborted. 4.0 USER OPERATING INSTRUCTIONS The following instructions will allow users to operate the keypads and gain access through a controlled gate or door. 1. Entry must begin with the keypad displaying the initial prompt: 2:53:35 PM Code: 000000000 2. Enter your code number (1-9 digit) followed by the "#" key. 3. The keypad will process the entry and if the access is valid, it will display the message Access Granted and open the gate or door. 4. If the access attempt failed, the keypad will display Access Denied followed by a brief error message as to why access was denied. 5. Error messages are as follows: a. Invalid Code. User entered a code not in the keypad's database. b. Lockout. User has been temporarily denied access. c. Invalid Time. User is trying to enter or exit outside the range of his time zone assignment. 5.0 MODE 2 OPERATION 14 Remote control of the standalone keypad can be implemented using Sentinel System Corporation's Remote Site Control Module (RSCM) and some additional remote site equipment. The following list outlines the remote functions which can be performed. Mode 2 primarily allows for remote implementation of the manual programming functions common to all modes. However, additional functionality exists above and beyond what is available in the manual-only modes (Modes 0 and 1). 5.1 Remote Functions 1. Add/Delete/Edit Users. Users can be added, removed, locked out, re-admitted, or have their time zone assignments changed. 2. Set Keypad Data. RSCM can set the following parameters for any remote keypad. a. b. c. d. Date and Time. Time Zone Definitions. Relay Timeouts. Security Code. 3. Set Keypad Default Parameters. 4. Retrieve Keypad Data. RSCM can obtain the following information from any remote keypad. a. b. c. d. e. User Status. RSCM can "read" the current time zone setting and lockout status for any user. Date and Time. Time Zone Definitions. Relay Timeouts. Security Code. 5. Backup Keypad Data. Download of user and setup information from keypad to host PC. 6. Restore Keypad Data. Upload of user and setup information from host PC to keypad. 7. Open Gate/Door. A remote access gate or door can be opened by the host computer. 8. Dump Event Data. In Mode 2, the following events are stored for eventual transmission and logging on the host computer. RSCM will take the received event data and generate activity reports based upon a variety of formats. See RSCM documentation. a. User-Operation-Related Events. Enter. Exit. Bad Code. Invalid Time. Deny. b. Manual-Programming-Related Events. Add User. Delete User. Lockout User. Re-admit User. 6.0 SERVICE/REPAIR INSTRUCTIONS 15 The device shipping cartons (and anti-static bags) should be stored for re-use in the event any system part should require return to the factory for service or repair. The procedure for returning a damaged piece of equipment is outlined below: 1. 2. Contact Technical Support at (800) 456-9955. a. Explain your problem. There is a good possibility the equipment is not damaged and your system can be brought back "on line" with assistance from one of our technicians without having to return the equipment. b. If it is determined that the equipment should be returned, you will be issued an RMA number (returned material authorization). Pack the units in their appropriate, previously saved, shipping cartons. Label the cartons with your RMA number and the following shipping address: Sentinel Systems Corporation 1620 Kipling St. Lakewood, CO 80215 3. Insure the equipment at the purchased value. (The customer is responsible for all undocumented damage to equipment arriving at the factory.) Note: All returned equipment must have an RMA number labeled on the outside of the shipping carton. The RMA number is essential for the proper tracking, repair, and return of the equipment. 16