1
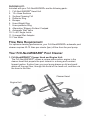
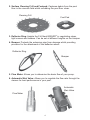
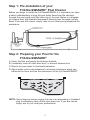
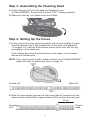
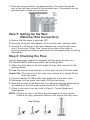
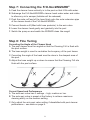
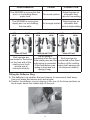
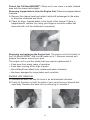
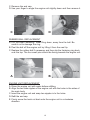
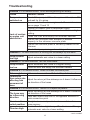
Automatic Pool Cleaner Installation and Operating Instructions Please pass these instructions on to the operator of this equipment. Rainbow Pool Products PO Box 2388, Mansfield Qld 4122 Telephone STD 61-7-3849 5385 E-mail: [email protected] Facsimile STD 61-7-3849 5384 Email: [email protected] Website: davey.com.au Web: www.rainbowpoolproducts.com.au Automatic Pool Cleaner Congratulations on the purchase of your Davey Frill-NeckWIZARD® automatic pool cleaner. Your new Frill-NeckWIZARD® has been designed for hassle-free surface maintenance of all popular above and below ground pools, so you can simply relax and enjoy swimming in a clean pool! INDEX: Packing List .................................................................................................. 3 Flow Rate Requirement ................................................................................ 3 Your Frill-NeckWIZARD® Pool Cleaner ......................................................... 3 Step1: Pre-Installation of your Frill-NeckWIZARD® ...................................... 5 Step 2: Preparing your pool for the Frill-NeckWIZARD® ............................... 5 Step 3: Assembling the Cleaning Head ........................................................ 6 Step 4: Setting Up the Hoses ....................................................................... 6 Step 5: Setting Up the Skimmer Box Connection ......................................... 7 Step 6: Checking the Flow............................................................................ 7 Step 7: Connecting the Frill-NeckWIZARD® ................................................. 8 Step 8: Fine Tuning ...................................................................................... 8 Caring for your Frill-NeckWIZARD® ............................................................ 10 Maintenance & Service Tips ....................................................................... 10 Trouble Shooting ........................................................................................ 13 Accessories ................................................................................................ 14 Spare parts ................................................................................................. 15 Davey Water Products Guarantee .............................................................. 16 IMPORTANT NOTE: PLEASE READ THESE INSTALLATION & OPERATING INSTRUCTIONS. To get the best performance from your Frill-NeckWIZARD® it is essential that you set up the pool cleaner properly. 2 PACKING LIST: Included with your Frill-NeckWIZARD® are the following parts: 1. Frill-NeckWIZARD® Head Unit 2. 12 x Hose Sections 3. Surface Cleaning Frill 'HÀHFWRU5LQJ 5. Bumper 6. Hose Weight Ring 7. Hose protector Ring 8. Alternative ‘Slippery Surface’ Footpad 9. Automatic Weir Valve 10. 2 x 45º Angle Joints 11. Universal Weir Adaptor 12. Flow Meter Flow Rate Requirement For optimum cleaning performance, your Frill-NeckWIZARD® automatic pool FOHDQHUUHTXLUHVOLWUHVSHUPLQXWHOSPRIÀRZIURPWKHSRROSXPS Your Frill-NeckWIZARD® Pool Cleaner 1. Frill-NeckWIZARD® Cleaner Head and Engine Unit: The Frill-NeckWIZARD® utilises a unique piston-action engine in the cleaner head that propels the pool cleaner in a strong and constant forward motion. Suction from your pool pump draws up dirt and small GHEULVRIIWKHSRROÀRRUWKURXJKWKHWKURDWRIWKHKHDGXQLWDQGWKHQYLD WKHKRVHWRWKH¿OWHU Cleaner Head Engine Unit 3 2. Surface Cleaning Frill and Footpad: Captures debris from the pool ÀRRULQWKHYDFXXP¿HOGZKLOVWVFUXEELQJWKHSRROÀRRUFOHDQ Cleaning Frill Foot Pad 'HÀHFWRU5LQJ Assists the Frill-NeckWIZARD® in negotiating steps, tight corners and ladders. Can be set at different heights on the bumper. 4. Bumper: Protects the extension pipe from damage whilst providing SURYLVLRQIRUWKHDWWDFKPHQWRIWKHGHÀHFWRUZKHHO 'HÀHFWRU5LQJ Bumper 5. Flow Meter:$OORZV\RXWRGHWHUPLQHWKHEDVLFÀRZRI\RXUSXPS 6. Automatic Weir Valve:$OORZV\RXWRUHJXODWHWKHÀRZUDWHWKURXJKWKH cleaner for best performance in your pool. Automatic Weir Valve Flow Meter 4 Step 1: Pre-installation of your Frill-NeckWIZARD® Pool Cleaner Before you begin to install the Frill-NeckWIZARD® it is important you have DEDVLFXQGHUVWDQGLQJRIKRZWKHSRROZDWHUÀRZVIURPWKHVNLPPHU WKURXJKWKHSRROSXPSDQG¿OWHUUHWXUQLQJWRWKHSRRO%HORZLVDGLDJUDP of a typical pool with standard equipment showing how the water usually ÀRZV,I\RXDUHVWLOOXQVXUHVLPSO\UHIHUWR\RXUORFDOSRROSURIHVVLRQDOIRU assistance. Step 2: Preparing your Pool for the Frill-NeckWIZARD® $&OHDQWKH¿OWHUDQGHPSW\WKHVNLPPHUEDVNHWV B. Completely close off main drain and / or second skimmer box C. Ensure the pool water is chemically balanced D. Adjust water returns jets sideways to minimise turbulence which can LQÀXHQFHWKHKRVHDQGWKHIUHHPRYHPHQWRIWKH)ULOO1HFN:,=$5'® NOTE: Some skimmer boxes require the use of an expanding or threaded plug to effectively close off the main drain line. If you are unsure, simply ask to your local pool professional. 5 Step 3: Assembling the Cleaning Head A. Fit the Cleaning Frill over the base and footpad of your Frill-NeckWIZARD®. Ensure that the word “TOP” is facing upwards. %0DNHVXUHWKDWWKH)ULOOURWDWHVIUHHO\RQFH¿WWHG Step 4: Setting Up the Hoses A. Firmly connect the hose sections together with enough lengths to reach from the skimmer box to the furthest point in the pool, plus additional OHQJWKV)RUDVHFXUH¿WWKHIHPDOHVRFNHWPXVWFRYHUWKHWKULQJ (corrugation) of the male end. If the furthest point from the skimmer box is the steps, use the lowest step as the furthest point. NOTE: If you require extra lengths, please contact your Frill-NeckWIZARD® dealer and refer to spare parts code on page 15. Female cuff Male cuff %6OLGHWKHKRVHZHLJKWULQJRYHUWKH¿UVWKRVHWKDWZLOOFRQQHFWRQWRWKH cleaner head) and position it approximately 30cm up from the male end. 30 cm Female Cuff Cleaner Head 6 C. Place the hose protector ring approximately 10cm from the female end of the last hose (closest to the skimmer box). The position can be adjusted later for best hose protection. Step 5: Setting Up the Weir (Skimmer Box Connection) A. Ensure that the pump is switched OFF. %3ODFHWKH8QLYHUVDO:HLU$GDSWRU¿UPO\LQWRWKHZHLUVNLPPHUSODWH C. Connect 2 x 45 elbows to the weir adaptor and insert the weir valve into it. Ensure the “Water Flow” arrow on the side of the valve is SRLQWLQJWRZDUGVWKHVNLPPHUSODWHDQGWKHYDOYHE\SDVVÀDSLVSRLQWLQJ downwards. Step 6: Checking the Flow 8VHWKHÀRZPHWHUVXSSOLHGWRPHDVXUHWKHÀRZJRLQJWKURXJK\RXU Frill-NeckWIZARD® before you attach the cleaning head. $$WWDFKWKHÀRZPHWHUWRWKH¿UVWOHQJWKRIKRVHWKDWFRQQHFWVWRWKH cleaning head). %)HHGWKHFOHDQHUKRVHYHUWLFDOO\LQWRWKHSRROVRWKDWLW¿OOVZLWKZDWHU Helpful Tip:3ODFHWKHHQGRIWKHKRVHRYHUDUHWXUQMHWWRTXLFNO\¿OOWKH hose with water. &&RQQHFWIHPDOHFXII¿WWHGZLWKKRVHSURWHFWRUWRWKHZHLUYDOYH '6XEPHUJHWKHÀRZPHWHUDQGVZLWFK21WKHSRROSXPS E. Read the location of the black disc. For optimum cleaning performance WKHUHDGLQJRQWKHÀRZPHWHUVFDOHVKRXOGEH0(',80 ),IÀRZLVWRRKLJKRUWRRORZUHIHUWR6WHS&RUUHFW6SHHGDQG Performance. NOTE:,IÀRZLVWRRORZLWZLOODIIHFWWKHSHUIRUPDQFHRI\RXUFOHDQHU ,IÀRZLVWRRKLJKSUHPDWXUHIDLOXUHRIWKHHQJLQHXQLWPD\RFFXU Ideal Range 7 Step 7: Connecting the Frill-NeckWIZARD® $)HHGWKHFOHDQHUKRVHYHUWLFDOO\LQWRWKHSRROVRWKDWLW¿OOVZLWKZDWHU B. Submerge the Frill-NeckWIZARD® cleaner head under water and rotate to allow any air to escape (bubbles will be released) &3XVKWKHPDOHFXIIHQGRIWKHKRVH¿UPO\RQWRWKHRXWHUH[WHQVLRQSLSH of the cleaner head of the Frill-NeckWIZARD®. '&RQQHFWIHPDOHFXII¿WWHGZLWKKRVHSURWHFWRUWRWKHZHLUYDOYH E. Lower the cleaner head gently and gradually into the pool F. Switch the pump on and watch the WIZARD clean like magic! Step 8: Fine Tuning Correcting the Angle of the Cleaner Head $7KHSRROFOHDQHUPXVWEHDQJOHGVRWKDWWKH&OHDQLQJ)ULOOLVÀXVKZLWK the pool surface. B. The hose weight is used to neutralise the buoyancy of the pool hoses. C. Correcting the angle of the head must be done in the deepest area of the pool. D. Adjust the hose weight up or down to ensure that the Cleaning Frill sits ÀXVKZLWKWKHSRROVXUIDFH Correct Speed and Performance A. The auto weir valve has 3 settings – high, medium or low. B. The auto weir valve is preset at the factory to achieve maximum cleaning ability on the medium setting. &2QO\DGMXVWWKHDXWRZHLUYDOYHVHWWLQJLIGLVVDWLV¿HGZLWKSRROFOHDQHU performance – see table on page 9. 8 PERFORMANCE CAUSE CORRECTION The WIZARD is moving too fast and / or is climbing above water level Too much suction Adjust springs on automatic weir valve to Low setting The WIZARD is moving too slowly and / or not climbing the low walls Not enough suction Adjust springs on automatic weir valve to High setting LEFT VIEW RIGHT VIEW LOW SETTING LEFT VIEW RIGHT VIEW MEDIUM SETTING LEFT VIEW RIGHT VIEW HIGH SETTING The left spring is Both springs are connected to the free end Both springs are connected to the button of the rotating arm and the FRQQHFWHGWRWKH¿[HG on the free end of the right spring is connected buttons of the rotating rotating arm (both WRWKH¿[HGEXWWRQRQH arms (both springs are springs are at spring is short and one at maximum stretch) minimum stretch) spring is long). )LWWLQJWKH'HÀHFWRU5LQJ $7KHGHÀHFWRUULQJHQDEOHVWKHSRROFOHDQHUWRPDQRHXYUHLWVHOIDZD\ from pool steps and severe pool wall angles. %3RVLWLRQWKHGHÀHFWRUULQJE\FOLSSLQJLWLQWRRQHRIWKHWKUHHSRVLWLRQVRQ the bumper below the lowest step of the pool. 9 Improving Suction Performance Your Frill-NeckWIZARD® has been supplied with an alternative footpad (Dark Silver / without channels) that is designed to give better suction on VOLSSHU\SRROVXUIDFHVVXFKDV¿EUHJODVVJHOFRDWYLQ\OOLQHUVDQGWLOHV 6LPSO\UHPRYHWKHVWDQGDUGIRRWSDGDQG¿WWKHDOWHUQDWLYHIRRWSDGIRU better suction performance. Correcting Pool Surface Coverage All return jets should be adjusted sideways however it is sometimes SRVVLEOHWRDGMXVWWKHÀRZIURP\RXUUHWXUQMHWVVRDVWRJXLGHWKH Frill-NeckWIZARD® away from steps, ladders and corners. Caring for your Frill-NeckWIZARD® DO NOT EVER: 1. Remove the Frill-NeckWIZARD® from the pool while the pump is running as this will introduce air to the pump and cause it to lose Prime. 2. Put any oil, grease or other lubricants on the engine unit. Water is the only lubricant required. 3. Leave the pool cleaner in the pool when “shocking” it with aggressive chemical treatments. This could lead to chemical damage. 4. Store cleaner hose in a coiled position. It is manufactured using special materials which enables hose memory and may cause the hose to lie awkwardly on the water preventing the Frill-NeckWIZARD® from moving freely around the pool. Maintenance & Service Tips Operating Time: It is good practice to operate your Frill-NeckWIZARD® for the amount of time required to clean your pool only, to maximise the life of the product. Ladder (Above Ground Pools): To prevent Frill-NeckWIZARD® being caught behind ladders in above ground pools, the ladder could be removed when the Frill-NeckWIZARD® is operating, or an obstacle placed on pool ÀRRURQERWKVLGHVRIWKHODGGHUIHHWWRSUHYHQW)ULOO1HFN:,=$5'® moving behind the ladder. Remove Frill-NeckWIZARD® pool cleaner when backwashing: To allow RSWLPXPÀRZUDWHWKURXJK¿OWHUDQGWRDYRLGGHEULVFORJJLQJWKH¿OWHU backwash system. 10 Protect the Frill-NeckWIZARD®: When not in use, store in a safe, shaded area with the hoses laid straight. Removing trapped debris from the Engine Unit: Removing trapped debris is simple. A. Recover the cleaner head and rotate it while still submerged in the water to show the underside and throat. B. Check for large, trapped debris in the throat of the cleaner. If there is WUDSSHGGHEULVUHPRYHLWE\XVLQJ\RXU¿QJHUWRPRYHWKHUXEEHUEDOO back and forth until the obstruction is removed. Removing and replacing the Engine Unit: The engine unit is the heart of the Frill-NeckWIZARD® and the ball beats up to 7 times per second as it propels the cleaner around your pool. The engine unit or just the rubber ball may require replacement if: ,WKDVZHDUIURPPDQ\\HDUVRIRSHUDWLRQ ,WKDVEHHQUXQQLQJDWWRRKLJKDVSHHG +DVVXIIHUHGIURPDWWDFNIURPXQEDODQFHGZDWHUFKHPLVWU\ +DVEHHQGDPDJHGE\ODUJHGHEULVVXFKDVVWLFNV ENGINE UNIT REMOVAL A. Unscrew the back nut two full turns in an anticlockwise direction. B. Firmly hit the back nut with the palm of your hand forcing it towards the main body. Remove the back nut by continuing to unscrew it. A B 11 C. Remove the end cap. '8VH\RXU¿QJHUWRDQJOHWKHHQJLQHXQLWVOLJKWO\GRZQDQGWKHQUHPRYHLW C D RUBBER BALL REPLACEMENT A. Pull the clear Fastening / Wear Ring down, away from the ball. Be careful not to damage the ring. B. Peel the ball off the engine unit by lifting it from the seal lip. C. Replace the rubber ball if necessary and then slip the fastening ring back over the top. The four small pins should be facing towards the engine unit. A B ENGINE UNIT REPLACEMENT $5LQVHWKHHQJLQHXQLWZLWKZDWHUEHIRUHUH¿WWLQJ B. Align the two side nipples of the engine unit with the holes in the sides of the main body. C. Insert the engine unit and snap two nipples in to the holes. '5H¿WWKHHQGFDS E. Firmly screw the back nut back onto the engine unit in a clockwise direction. 12 Troubleshooting Problem 1: Frill-NeckWIZARD® is not working/moving too slowly: Cause Solution / Action Pump not switched on Check if the pump is ON and / or primed. If not, turn ON and wait for it to prime Remove obstruction from engine unit. See maintenance tips on page 11 and 12 Ensure the cleaner hose is assembled tightly Adjust the automatic weir valve to medium or high Lack of suction setting Clean the filter and empty the skimmer baskets or engine unit obstruction Ensure the universal weir adaptor is seated properly in the skimmer vacuum plate Ensure the vacuum plate is correctly seated in the skimmer Check that pump is in good working order Problem 2: Frill-NeckWIZARD® is moving too fast/always up the walls: Pump suction too high Adjust automatic weir valve to a lower setting Problem 3: Frill-NeckWIZARD® will not climb walls: Pump suction too low Adjust automatic weir valve to a higher setting &OHDQWKH¿OWHUDQGHPSW\WKHVNLPPHUEDVNHWV Problem 4: Frill-NeckWIZARD® does not clean the whole pool: Not enough hose Add more hose sections. Refer to Step 4 of instructions Turbulence from return jets $GMXVWWKHUHWXUQMHWÀRZVLGHZD\VVRLWGRHVQ¶WLQÀXHQFH affecting free the direction of the hoses movement of hose Problem 5: Frill-NeckWIZARD® moves in a repetitive pattern: $GMXVWWKHUHWXUQMHWÀRZVLGHZD\VVRLWGRHVQ¶WLQÀXHQFH the direction of the hoses Twist each hose a half-turn in the opposite direction to each connection point Hose is set in a Straighten hose and pour hot water over it to relieve coiled position hose memory ,IZDWHUÀRZLVWRRKLJKLWPD\VWLIIHQWKHKRVHV&KDQJH Flow too high automatic weir valve to a lower setting. The hose may EHLQÀXHQFLQJ direction 13 ...cont. overleaf Troubleshooting continued Problem 6: Air bubbles are noticeable in return jets: Cause Solution / Action Ensure the cleaner hose is assembled tightly Ensure cleaner head is not removed from the water Air has been while pump is running introduced into Ensure the automatic weir valve flap points towards the system the bottom of the pool and is under water. Ensure the hoses are not damaged. Accessories Part Description Davey Code Is installed on to the hose and is designed to assist the Frill-NeckWIZARD /DUJH'HÀHFWRU5LQJ LQDYRLGLQJVWDLUVGLI¿FXOWFRUQHUVRU ladders in above ground Pools. 32605 Is installed on the hose line and catches large leaves and debris before they get to the pump, preventing build up in the pump In-line Leaf Snatcher basket. This is ideal for pools with heavy leaf litter and where the cleaner is connected to a dedicated XQ¿OWHUHGYDFXXPSRUW M5975 14 Spare Parts Part Davey Code Surface Cleaning Frill 401819 Standard Footpad (Silver) 401820 Footpad for slippery surfaces (Dark Silver) 401821 Bumper 401822 'HÀHFWRU5LQJ 401827 Engine Unit M5958 Engine Rubber Ball M5959 Ball Ring M5970 Grey Cleaner Hose x 12 M5910ST Grey Cleaner Hose x 1 M5911ST Hose Protector Ring M5963 Hose Weight Ring M5964 Weir Elbow x 45 degrees M5966 Automatic Weir Valve M5967 Universal weir Adaptor M5972 NOTES _____________________________________________________________ _____________________________________________________________ _____________________________________________________________ _____________________________________________________________ _____________________________________________________________ _____________________________________________________________ _____________________________________________________________ _____________________________________________________________ _____________________________________________________________ _____________________________________________________________ 15 Davey® Repair or Replacement Guarantee In the unlikely event in Australia or New Zealand that this Davey product develops any malfunction within warranty periods beginning from the date of original purchase due to faulty materials or manufacture, Davey will at our option repair or replace it for you free of charge, subject to the conditions below. Davey Guarantee Period Cleaner Head - Three Years Cleaner Hose - One Year only :OV\SK`V\L_WLYPLUJLHU`KPMÄJ\S[PLZ^P[O`V\Y+H]L`WYVK\J[^LZ\NNLZ[PU[OLÄYZ[PUZ[HUJL[OH[`V\JVU[HJ[ the Davey Dealer from which you purchased the Davey product. Alternatively you can phone our Customer Service line on 1300 367 866 in Australia, or 0800 654 333 in New Zealand, or send a written letter to Davey at the address SPZ[LKILSV^6UYLJLPW[VM`V\YJSHPT+H]L`^PSSZLLR[VYLZVS]L`V\YKPMÄJ\S[PLZVYPM[OLWYVK\J[PZMH\S[`VY defective, advise you on how to have your Davey product repaired, obtain a replacement or a refund. Your Davey Guarantee naturally does not cover normal wear or tear, replacement of product consumables (i.e. mechanical seals, bearings or capacitors), loss or damage resulting from misuse or negligent handling, improper use for which the product was not designed or advertised, failure to properly follow the provided installation and operating instructions, failure to carry out maintenance, corrosive or abrasive water or other liquid, lightning or high voltage spikes, or unauthorized persons attempting repairs. Where applicable, your Davey product must only be connected to the voltage shown on the nameplate. Your Davey Guarantee does not cover freight or any other costs incurred in making a claim. Please retain your receipt as proof of purchase; you MUST provide evidence of the date of original purchase when claiming under the Davey Guarantee. +H]L`ZOHSSUV[ILSPHISLMVYHU`SVZZVMWYVÄ[ZVYHU`JVUZLX\LU[PHSPUKPYLJ[VYZWLJPHSSVZZKHTHNLVYPUQ\Y`VM any kind whatsoever arising directly or indirectly from Davey products. This limitation does not apply to any liability of Davey for failure to comply with a consumer guarantee applicable to your Davey product under the Australian or New Zealand legislation and does not affect any rights or remedies that may be available to you under the Australian or New Zealand Consumer Legislation. In Australia, you are entitled to a replacement or refund for a major failure and for compensation for any other reasonably foreseeable loss or damage. You are also entitled to have the goods repaired or replaced if the goods fail to be of acceptable quality and the failure does not amount to a major failure. Should your Davey product require repair or service after the guarantee period; contact your nearest Davey Dealer or phone the Davey Customer Service Centre on the number listed below. For a complete list of Davey Dealers visit our website (davey.com.au) or call: AUSTRALIA NEW ZEALAND Rainbow Pool Products Customer Service Centre Customer Service Centre 6 Lakeview Drive, 7 Rockridge Avenue, PO Box 3179 2388, Mansfield Qld 41221061 Scoresby, Australia Penrose, Auckland Ph: 1300 367 866 Ph: 0800 654 333 Telephone 5385 Fax: 1300 369 119STD 61-7-3849 Fax: 09 527 7654 Website: davey.com.au Website: daveynz.co.nz Davey Water Products Pty Ltd Member of the GUD Group ABN 18 066 327 517 Facsimile STD 61-7-3849 5384 Email: [email protected] Web: www.rainbowpoolproducts.com.au ® Davey & Frill-NeckWIZARD are registered trade marks of Davey Water Products Pty Ltd. © Davey Water Products Pty Ltd 2011. P/N 401823-1 supersedes P/N 401823 * Installation and operating instructions are included with the product when purchased new. They may also be found on our website.