1
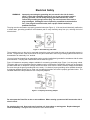
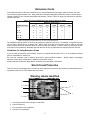
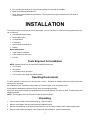
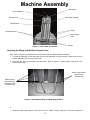
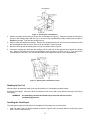
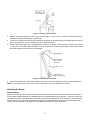
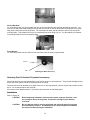
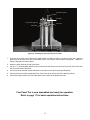
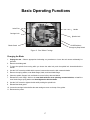
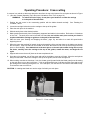
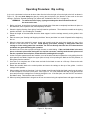
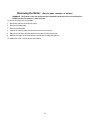
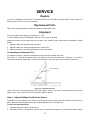
OWNER’S MANUAL and OPERATING INSTRUCTIONS Model Pro2k If you are missing parts or have questions please contact us at: Panel Pro • 1-800-599-1655 or 763-755-1600 [email protected] www.panelpro.com A message from all of us at Panel Pro: Thank you for purchasing a Panel Pro vertical panel saw. We take pride in building these fine products in the U.S.A. Each Panel Pro product is designed to give years of dependable service. Our saws are built from the finest components we can specify, and every machine is individually assembled by our employees some of whom have been building panel saws for more than 35 years. We appreciate you purchasing our product. The employees of Panel Pro Ham Lake, Minnesota Warranty Panel Pro warrants the parts and workmanship of this tool, except for the electric motor, for one year from the date of manufacture. Panel Pro will repair or replace, at our cost, any component that is determined to be defective. Such repair or replacement is limited to providing satisfactory replacement parts from the factory. Panel Pro assumes no responsibility for making repairs on site. Any parts returned to the factory must be returned freight prepaid. All saw motors are warranted for 90 days. Panel Pro assumes no responsibility for any damage or accidents resulting from the misuse of this tool, its misapplication, or failure to follow precautionary safety measures. Panel Pro assumes no responsibility for any consequential damage or loss of production. Panel Pro will not be responsible for claims made for machines that are not used or maintained in the normal course of business, used for applications not intended, or modified in any way. 2 CONTENTS Safety ..........................................................................................4-7 Electrical Safety......................................................................................... 7 Extension Cords ........................................................................................ 8 Short-Circuit Protection ............................................................................. 8 Warning Labels Identified…………………………………………………….. 8-9 Installation ................................................................................... 9 Tools Required for Installation .................................................................. 9 Operating Environment ............................................................................. 9 Unpacking.................................................................................................. 9 Machine Assembly ................................................................................... 10-15 Operation .................................................................................... 16 Limitations of the Tool ............................................................................... Selecting a Saw Blade .............................................................................. Basic Operating Functions ........................................................................ General Operating Tips ............................................................................. Operating Procedure: Crosscutting.......................................................... Operating Procedure: Rip cutting............................................................. Removing the Motor .................................................................................. 16 16 17 18 19 20 21 Maintenance................................................................................ 22 General Maintenance ................................................................................ Cleaning .................................................................................................... Maintaining the Motor................................................................................ Lubricating the Guides .............................................................................. 22 22 22 22 Service ........................................................................................ 23 Repairs ...................................................................................................... 23 Replacement Parts.................................................................................... 23 Alignment................................................................................................... 23-25 READ AND SAVE ALL INSTRUCTIONS FOR FUTURE REFERENCE November 2010 3 SAFETY WARNING: When using electric tools, always follow basic safety precautions to reduce the risk of fire, electric shock, and personal injury. READ AND SAVE ALL INSTRUCTIONS FOR FUTURE USE. Before use, be sure everyone using this tool reads and understands this manual as well as any labels packaged with or attached to the tool. 1. KNOW YOUR POWER TOOL. Read this manual carefully to learn your power tool’s applications and limitations as well as potential hazards associated with this type of tool. 2. DO NOT ALLOW UNQUALIFIED PEOPLE TO OPERATE the tool. 3. AVOID DANGEROUS ENVIRONMENTS. Do not use your power tool in rain, damp or wet locations, or in the presence of explosive atmospheres (gaseous fumes, dust, or flammable materials). Remove materials or debris that may be ignited by sparks. 4. KEEP WORK AREA CLEAN AND WELL LIT. Cluttered, dark work areas invite accidents. Provide at least 200 watts of lighting at the front work area of the tool. Eliminate all shadows that could interfere with clear viewing of the work area. 5. DRESS PROPERLY. Do not wear loose-fitting clothing or jewelry. Wear a protective hair covering to contain long hair, as it may be caught in moving parts. When working outdoors, wear rubber gloves and insulated, nonskid footwear. Keep hands and gloves away from moving parts. 6. USE SAFETY EQUIPMENT. Everyone in the work area should wear safety goggles or glasses with side shields that comply with current safety standards. Wear hearing protection during extended use and a dust mask for dusty operations. Hard hats, face shields, safety shoes, etc. should be used when specified or necessary. Keep a fire extinguisher nearby. 7. KEEP BYSTANDERS AWAY. Keep children and bystanders at a safe distance from the work area to avoid distracting the operator and contacting the tool or extension cord. 8. MAKE THE WORKSHOP CHILD PROOF with padlocks, master switches, etc. 9. NEVER LEAVE THE TOOL RUNNING UNATTENDED. Turn the power off. Do not leave the tool until it comes to a complete stop. 10. PROTECT OTHERS IN THE WORK AREA from debris such as chips and sparks. Provide barriers or shields as needed. 11. SECURE THE WORK. Use a clamp, vise, or other practical means to hold your work securely, freeing both hands to control the tool. 12. USE THE RIGHT TOOL. Do not use a tool or attachment to do a job for which it is not recommended. For example, do not use a circular saw to cut tree limbs or logs. Do not alter the tool, remove guards, or operate the saw when removed from the carriage and frame. 13. USE PROPER ACCESSORIES. Using unrecommended accessories may be hazardous. Be sure accessories are properly installed and maintained. Do not defeat a guard or other safety device when installing an accessory or attachment. 14. CHECK FOR DAMAGED PARTS. Inspect guards and other parts before use. Check for misalignment, binding of moving parts, improper mounting, broken parts, and any other conditions that may affect operation. If abnormal noise or vibration occurs, turn the tool off immediately and have the problem corrected before further use. Do not use a damaged tool. Tag damaged tools “DO NOT USE” until repaired. Repair or replace a damaged guard or other part. For all repairs, insist on identical replacement parts. 15. REMOVE ALL ADJUSTING WRENCHES AND TOOLS from the tool before turning it on. Make this a habit. 16. GROUND YOUR TOOL. See “Grounding,” page 7. 4 17. AVOID ACCIDENTAL STARTING. Be sure your tool is turned off before plugging it in. Do not use the tool if the power switch does not turn it on and off. Observe correct lockout/tag out procedures when performing maintenance on the tool. 18. DO NOT FORCE THE TOOL. Your tool will perform best at the rate for which it was designed. Excessive force only causes operator fatigue, increased wear, increased risk of binding or sudden breakage, and reduced control. 19. KEEP HANDS AWAY FROM ALL CUTTING EDGES AND MOVING PARTS. 20. DO NOT ABUSE THE CORD. Never unplug the cord by yanking it from the outlet. Pull the plug rather than the cord to reduce the risk of damage. Keep the cord away from heat, oil, sharp objects, cutting edges, and moving parts. 21. DO NOT OVERREACH. MAINTAIN CONTROL. Keep proper footing and balance at all times. Maintain a firm grip. 22. STAY ALERT. Watch what you are doing, and use common sense. Do not use a tool when you are tired, distracted, or under the influence of drugs, alcohol, or any medication causing decreased control. 23. UNPLUG THE TOOL when it is not in use, before changing items such as blades, and before performing recommended maintenance. Observe appropriate lockout/tag out procedures. 24. MAINTAIN TOOLS CAREFULLY. Keep handles dry, clean, and free from oil and grease. Keep cutting edges sharp and clean. Follow instructions for lubricating and changing accessories. Periodically inspect tool cords and extension cords for damage. Have damaged parts repaired or replaced. 25. MAINTAIN LABELS AND NAMEPLATES. These carry important information. If unreadable or missing, contact Panel Pro for a free replacement. 26. AVOID KICKBACK. Kickback is a violent reaction to a pinched or binding saw blade. It throws the saw upward when crosscutting and throws the work piece out when ripping. Firm control, proper support of the work piece, and concentration on the job are essential to reduce the risk of injury from kickback: a. KEEP SAW BLADE CLEAN AND SHARP. A dull or improperly sharpened blade produces a narrow kerf and is likely to be pinched by the work piece. Any blade with a small set, even though sharp, may be likely to kick back. A dull blade encourages you to force the saw, causing reduced control and blade binding. The excessive friction generated can cause the blade to warp or bind. Use only blades that are recommended for use with your tool. Do not use blades with mounting holes that are not the correct size or shape. Never use defective or incorrect blade washers or bolts. Be sure the blade bolt is tight. Select the proper blade for the application. Blade speed specifications must be at least as high as the nameplate RPM. b. DO NOT FORCE THE TOOL. Let the saw do the work. A saw is more easily controlled and will do a better job when used in the manner for which it was designed. c. SECURE WORK PROPERLY. If a piece is supported on both sides of the cut in such a way that it allows the material to bow and pinch the blade, it may produce kickback. Do not cut pieces smaller than the saw carriage. Support large panels properly. d. IF THE BLADE BINDS, the saw or work piece may kick back. Keep hands, body, and bystanders out of the path of the blade and material. e. STAY ALERT. Watch what you are doing and use common sense. Do not allow yourself to be distracted. Do not operate the tool when you are tired or under the influence of drugs or alcohol. Hold the tool and material firmly and exercise control at all times. Position yourself and co-workers out of the kickback path. Repetitive cuts that lull you into careless movements can also cause kickback. A brief “stretch” may be all that is necessary to avoid a problem. f. RESTARTING IN MID-CUT. If the saw is stopped in mid-cut, allow the blade to stop. Then back up the saw (if crosscutting) or the board (if rip cutting) before restarting. g. IF THE BLADE STALLS, DO NOT TURN THE SWITCH ON AND OFF. A dull blade or excess pressure may cause stalling. Push the stop button or emergency switch immediately if the blade binds or the saw stalls, and remove the saw from the cut. h. AVOID CUTTING NAILS OR OTHER FASTENERS. Inspect for and remove all metal fasteners before cutting. 5 i. SUPPORT THIN MATERIAL. Large sheets such as paneling, Formica, etc., tend to warp or sag and must be well supported over their entire length to avoid pinching the blade. 27. HANDLE THE COUNTERBALANCE WITH CARE. The counterbalance cable is under tension. Always attach the cable to the saw carriage before removing the cable clip. Do not pull on the cable by hand or attempt to disassemble or repair the counterbalance. Replacement counterbalances can be purchased directly from Panel Pro. 28. DO NOT USE PUSH STICKS. 29. CROSSCUTTING (VERTICAL CUTTING) MUST ALWAYS BE DONE FROM THE TOP DOWN. Raise the saw carriage to the uppermost position on the guides and lock it into position with the carriage lock whenever the tool is not in use. See “Operating Procedure: Crosscutting”, for more information. 30. RIPPING (HORIZONTAL CUTTING) MUST ALWAYS BE DONE WITH THE DIRECTION OF THE ARROW. Raise the saw carriage to the top of the guides and lock it into position with the carriage lock whenever the tool is not in use. See “Operating Procedure: Rip cutting”, for more information. 31. ALWAYS WAIT FOR THE BLADE TO STOP COMPLETELY BEFORE CHANGING POSITIONS. Unplug the tool before transporting or moving it. 32. DO NOT PLACE YOUR HANDS ON OR UNDER THE SAW CARRIAGE OR IN THE PATH OF THE BLADE. Do not try to retrieve a piece of cut material while the blade is rotating. This symbol is to remind you: 33. DO NOT DEFEAT THE GUARDS OR OPERATE THE TOOL WITHOUT THE GUARDS IN PLACE. Do not remove the saw motor from the carriage. 34. NEVER STAND ON THE TOOL. Serious injury could occur if the tool is tipped or if you unintentionally contact the cutting tool. 35. DIRECTION OF FEED. Always feed work into the blade or cutter against the direction of the rotation of the blade or cutter. 36. DISCONNECT AND LOCK THE POWER OFF before changing saw blades or making any adjustments. 37. KEEP THE CARRIAGE LOCK SECURELY TIGHTENED when the machine is not in use. Please Read Before Operating the Saw WARNING! Some dust created by power sanding, sawing, grinding, drilling, and other construction activities contains chemicals known to cause cancer, birth defects or other reproductive harm. Some examples of these chemicals are: • Lead from lead-based paint. • Crystalline silica from bricks and cement and other masonry products. • Arsenic and chromium from chemically treated lumber. Your risk from these exposures varies, depending on how often you do this type of work. To reduce your exposure to these chemicals: work in a well ventilated area, and work with approved safety equipment, such as those dust masks that are specifically designed to filter out microscopic particles. 6 Electrical Safety WARNING: Improperly connecting the grounding wire can result in the risk of electric shock. Check with a qualified electrician if you are not sure that the outlet is properly grounded. Do not modify the plug provided with the tool. Never remove the grounding prong from the plug. Do not use the tool if the cord or plug is damaged. If damaged, have it repaired by a qualified electrician before use. If the plug will not fit the outlet, have a proper outlet installed by a qualified electrician. The plug must be connected to a properly grounded outlet (see Figure 1). If the tool should electrically malfunction or break down, grounding provides a low-resistance path to carry electricity away from you, reducing the risk of electric shock. Figure 1: Grounded Plug and Outlet The grounding prong on the plug is connected through the green wire inside the cord to the grounding system in the tool. The green wire in the cord must be the only wire connected to the tool’s grounding system and must never be attached to an electrically “live” terminal. Your tool must be plugged into an appropriate outlet, properly installed and grounded in accordance with all codes and ordinances. The plug and outlet should look like those in Figure 1. Figure 2 illustrates a temporary adapter available for connecting grounded plugs (Figure 1) to two-prong outlets. The green rigid ear or lug extending from the adapter must be connected to a permanent ground such as a properly grounded outlet box or receptacle. Simply remove the center screw from the outlet, insert the adapter and reattach the screw through the green grounding ear to the outlet. If in doubt of proper grounding, call a qualified electrician. A temporary adapter should only be used until a qualified electrician can install a properly grounded outlet. The Canadian Electrical Code prohibits the use of temporary adapters. Figure 2: Temporary Grounding Adapter Do not expose the Panel Pro to rain or wet conditions. Water entering a power tool will increase the risk of electric shock. Do not abuse the cord. Keep cord away from heat, oil, sharp edges or moving parts. Replace damaged cords immediately. Damaged cords increase the risk of electric shock. 7 Extension Cords Grounded tools require a three-wire extension cord. As the distance from the supply outlet increases, you must use a heavier-gauge extension cord. Using extension cords with inadequately sized wire causes a serious drop in voltage, resulting in loss of power and possible tool damage. Refer to Table I on page 8 to determine the required minimum wire size. Table I: Recommended Minimum Wire Gauge for Extension Cords Extension Cord Length * Nameplate Amps 25 ft 50 ft 75 ft 100 ft 150 ft 200 ft <5 16 16 16 14 12 12 5-8 16 16 14 12 10 8 - 12 14 14 12 10 12 - 15 12 12 10 10 15 - 20 10 10 10 * based on limiting the line voltage drop to 5V at 150% of the rated amperes. The smaller the gauge number of the wire, the greater the capacity of the cord. For example, a 14-gauge cord can carry a higher current than a 16-gauge cord. When using more than one extension cord to make up the total length, be sure each cord contains at least the minimum wire size required. If you are using one extension cord for more than one tool, add their nameplate amperes and use the sum to determine the required minimum wire size. Guidelines for Using Extension Cords If you are using an extension cord outdoors, be sure it is marked with the suffix “W-A” (“W” in Canada) to indicate that it is acceptable for outdoor use. Be sure your extension cord is properly wired and in good electrical condition. extension cord or have it repaired by a qualified person before using it. Always replace a damaged Protect extension cords from sharp objects, excessive heat, and damp or wet areas. Short-Circuit Protection This tool must only be plugged into a circuit that has a short-circuit protection device which is located ahead of the equipment in the circuit, in accordance with local codes. Warning Labels Identified 5 5 4 7 6 3 1 2 1. Do not place hands under carriage or near blade. 2. Kick back warning. 3. Do not operate in wet conditions. 4. Direction to feed material. 8 5. Do not place your hands on or under the saw carriage or in the path of the blade. 6. Blade guard warning and blade size. 7. Motor serial tag with electrical specifications. The machine serial tag is mounted on the left corner of machine frame. INSTALLATION The Panel Pro saw comes from the factory prealigned. You will only have to mount the following parts before you can run this tool: Left and right support wings Base support panel Counterbalance Cord keeper Vertical and horizontal rulers Wheels Optional Equipment Upper extension brackets Lower extensions with rulers Dust Kit Tools Required for Installation NOTE: Additional tools may be required for installing accessories. 7/16” wrench 5/8” wrench 9/16” blade wrench (provided) 5/16” nut driver (for upper extension brackets) Operating Environment For safe operation, install the tool in an area that is well lit. Eliminate all shadows that could interfere with clear viewing of the work area. Do not locate the tool in a damp or wet location, or a location where it may be exposed to rain. Avoid explosive atmospheres (gaseous fumes, dust, or flammable materials). Secure the area so that children and bystanders are kept a safe distance from the work area. Provide barriers and shields as needed. NOTE: The average noise level of Panel Pro saws is less than 80 dB. Unpacking 1. Lay the carton flat with the label side facing up. Open the carton. 2. Remove all the plastic sheeting and protective cardboard crating. 3. Remove the prealigned center section of the Panel Pro, the two wings, wheels, and the base support panel. 4. Remove upper extension brackets, lower extensions, and the dust kit. (optional accessories) 9 Machine Assembly Cord Keeper Counter Balance Carriage Lock Saw Motor Carriage Vertical Rulers Wings Horizontal Rulers Base Support Panel Figure 3: Overall View of Panel Pro Wheels Attaching the Wings and the Base Support Panel Note: Refer to Figure 3 to see what the unit will look like with the additional panels installed. 1. For ease of assembly, lay the saw frame face-up on a workbench (or across a pair of sawhorses), with the bottom extending over the edge of the bench. 2. Attach the two wings to the sides of the saw frame. Refer to Figure 4. Attach loosely, using three 7/16” bolts for each wing. Attach wings to base support panel (16 fasteners) Attach wings to main saw frame (6 fasteners with 3 on each side) Figure 4: Attaching the Wings and Base Support Panel 1. Attach the base support panel to the front of the unit. Attach loosely, using four 7/16” bolts to attach the 10 support panel to each wing, and eight to attach the panel to the saw frame. 2. Tighten the fasteners. Attaching the Lower Extensions (optional accessory) Using the four 7/16” bolts provided, attach the left and right lower extensions to the base support panel. The holes are pre-set at the factory for easy positioning and installation on the base support. Attaching the Upper Extension Brackets (optional accessory) Using a 5/16” nut driver, attach the upper extension brackets to the back side of the machine frame using the four ¼” self tapping screws. The brackets should be installed approximately 14” from the top of the left and right wings for the best support on larger material. Lower Extensions Building the Upper Extensions 1. Start by cutting a standard 2x4x8 to make two 34” long pieces. Upper Extension Brackets 2. Attach each 34” piece using three 2” wood screws to each end of another full sized 2x4x8. 3. Next, take a ½” thick piece of material and cut two pieces so that they measure 3 ½” wide x 34” long. Attach each 34” piece to the shorter 2x4’s from step one using 2” wood screws. 4. Your upper extensions are now complete and are ready to mount into the upper extension brackets on the back of the machine. Upper Extensions ******* Additional brackets can be purchased to add more material back support if necessary. Attaching the Counterbalance WARNING: To reduce the risk of injury or damage to components, do not attempt to disassemble or repair the counterbalance. Do not pull on the counterbalance cable. The cable is under strong spring force: the unit must be properly assembled before you remove the cable clip. A counterbalance is used to offset the weight of the saw. The counterbalance is shipped with the necessary hardware. Remove the two 1/4-20 x 5/8” carriage bolts, nuts, and washers from the counterbalance. Do not remove the bolt and nut that are on the counterbalance cable. 1. Pull the end of the cable from the inside of the counterbalance. Set the counterbalance on top of the tool frame, slightly off-center to either the left or right, so that the cable is aligned vertically with an oval hole near the top of the carriage. See Figure 5. 2. Secure the counterbalance to the top of the tool frame, using the two attached carriage bolts, washers, and nuts. Tighten the nuts securely. 11 Figure 5: Attaching the Counterbalance 3. Hold the carriage securely while you loosen the red carriage lock (Figure 3). Raise the carriage until the hole in the top of the carriage aligns with the eye in the end of the counterbalance cable, making sure the cable is behind the carriage. Then lock the carriage rip lock. 4. Hold the cable end behind the carriage. Remove the carriage bolt and nut, and use them to attach the end of the counterbalance cable end to the oval hole in the carriage. Tighten securely. 5. Bend the cable clip tabs forward by hand, so they look like the ones in Figure 6. 6. Loosen the carriage lock and lower the carriage until the cable clip is fully exposed, then tighten the carriage lock. Remove the cable clip from the counterbalance cable and save it for future use (e.g., if you remove the counterbalance in the future, you will need the cable clip to support the tension in the counterbalance). Figure 6: Attaching the Counterbalance Cable Standing Up the Tool With the help of an assistant, stand up the tool and position it in its intended operating location. Extend the rear support. If the tool is to be mounted to the floor or to a wall or post, attach it securely to avoid injury from tipping. WARNING: A freestanding saw must be located away from areas where it could be accidentally tipped over. Installing the Cord Keeper The cord keeper keeps the cord away from the blade or bit and away from your work piece. 1. Pinch the ends of the cord keeper together as shown in Figure7 while you slowly slide the ends into the guide tubes. Seat the ends securely. 12 Figure 7: Installing the Cord Keeper 2. Remove the rubber stopper from the ring in the cord keeper. See Figure 8. Uncoil the cord from the motor, and place the plug end through the ring as shown. 3. Loosen the carriage lock and lower the carriage to the bottom of the guide tubes (the farthest that the cord will have to be extended). Lock the carriage lock in this lowered position. 4. Pull the cord keeper down so it is roughly parallel to the floor as shown. Pull the cord up to remove any slack in it. Then open the rubber stopper and pull it over the cord with the small end of the taper on the bottom. Press the rubber stopper into the ring on the cord holder. Rubber Stopper Pull cord keeper so it is parallel to the floor. No slack in cord. Carriage (at the bottom of the guides) Figure 8: Installing the Cord Keeper 5. Loosen the carriage lock. Allow the carriage to return to the top of the guide tubes, then lock the carriage lock. NOTE: If you discover there is too much or not enough slack in the cord, readjust as necessary. Attaching the Rulers Horizontal Rulers Attach your horizontal rulers on your machine by mounting the metal extrusions with the rulers in them to the top of the face base support panel that your material slides across (Measurement facing operator). Once this is done you can adjust your rulers to the thickness of the blade you are using by sliding them in the extrusions. We recommend that you then fix the rulers into the position once adjusted. The optional lower extensions come with longer rulers. These rulers are mounted in the same manner as above but on the face of the extensions. 13 Vertical Rip Ruler To mount the rip ruler you want to attach the ruler to the metal banding with eye bolts attached at each end. You then want to attach the metal banding to the left side of the motor on the top and bottom end brackets of the guide tube plates (Just inside the left guide tube). The next step is to attach the rip indicator to the left, top side of the mounting plate. This indicator will tell you your measurement when doing a rip cut. You then adjust your indicator in the slot provided to the correct ripping height. Frame Wheels To mount the wheels, bolt one wheel to each end of the frame as shown in photo below. Washer Bolt Installing the Wheel Accessory Attaching Dust Collection Kit (optional accessory) Dust Collection Kits are recommended if the tool will be used in an enclosed area. They include discharge tubing and a hose roller system to hold the outboard end of the tubing. The dust hose must be attached to an SSC Vacuum or to any high-pressure vacuum source that provides at least 90” to 110” of static pressure and 100 CFM. All machines come standard with a 2” (50.8mm) hose connection on the blade guard. Installation Refer to Figure 39. CAUTION: Before beginning installation, disconnect the power supply to the motor, raise the carriage to the top of the guides, and lock the carriage in place with the lock knob. CAUTION: Be sure the tool frame is securely supported and cannot be tipped over during this installation procedure. An additional person should support and stabilize the frame at all times during the installation. 14 Hose Roller System Dust Hose Dust Collecting Bonnet Dust Tube Dust Elbow Figure 39: Installing the Dust Collection Kit on a Saw 1. Insert the clear plastic inner tube into the blade guard, and align the tube’s slot with the inner tab. Slide the tube further in (the slot will fit around the blade), until it is as close to the work piece as possible. Tighten the clamp to hold the inner tube in place. 2. Mount the hose rollers to the top of the frame. 3. Lay the 11/2” (40.6mm) black flexible vacuum hose across the rollers, with one end to the front of the frame and one end to the back of the frame. 4. Connect the hose end that is toward the back of the frame to the vacuum (see specifications). 5. Connect the hose end that is toward the front of the frame to the narrow end of the steel tube elbow. 6. Connect the tapered end of the steel tube elbow to the outside of the plastic dust tube. Your Panel Pro is now assembled and ready for operation. Refer to page 17 for basic operation instructions. 15 OPERATION WARNING: The following are suggestions that give you a general idea of how a panel saw is intended to be operated. No instructions can replace common sense and experience. Be sure you and all operators have enough time and material to become familiar with the general operating characteristics of this tool, and have FULLY READ AND UNDERSTOOD all general operating and safety instructions. Limitations of the Tool Small Work pieces Do not cut pieces that are so small that your hand must be behind the carriage to hold the piece in place. Use a tool better suited to these applications, such as a table saw, radial arm saw, or band saw. Work piece Height (Crosscutting) The Panel Pro is limited to a crosscut capacity of 50”. Work piece Thickness Maximum thickness of a work piece to be cut with the Panel Pro is 1-1/2”: Crosscutting Limitations When crosscutting (vertical cuts), the work piece must be supported on both sides of the blade for safe operation and accurate cutting. Ripcutting Limitations The maximum rip length is 96” if the tool is used with the optional lower and upper extensions. For single-operator use, a maximum rip length of 48” is recommended unless used in conjunction with an assistant. Pieces of material shorter than 48” can be rotated 90 degrees and crosscut. You must ensure that the board is properly supported at all times. Selecting a Saw Blade The Panel Pro uses standard 7-1/4” diameter saw blades with a 5/8” arbor, available in most retail stores. The saw blade must be carefully matched to the materials being cut. Improper blade selection can result in reduced tool life, inaccurate and poor quality cuts, and safety risks. If in doubt, consult with your machinery dealer, or with our customer service department (800-599-1655), to determine the best blade for your cutting needs. Always keep blades clean and sharp for the best performance. A dull or dirty blade can bind and pinch, resulting in kickback and poor quality cuts. If in doubt, replace your saw blade with a new one. 16 Basic Operating Functions Index Pins Handle Carriage Lock Spindle Lock Blade Guard On/Off Switches Emergency Stop Switch Figure 9: Saw Motor Carriage Changing the Blade 1. Unplug the saw. Observe appropriate lockout/tag out procedures to insure the tool cannot accidentally be powered. 2. Remove the blade guard. 3. To keep the spindle from turning while you loosen the arbor bolt push the spindle lock located behind the handle. 4. Use the 9/16” wrench provided with the saw to loosen and remove the bolt counterclockwise. 5. Remove the spring washer, outer blade flange, blade, and inner blade flange. 6. Clean the spindle, flanges, bolt, and blade to remove built-up dust and debris. 7. Reinstall the inner flange, slide on the new blade with the arrow pointing counterclockwise, reinstall the outer blade flange, spring washer and hand-tighten the bolt clockwise. 8. Use the 9/16” wrench to tighten the bolt while pushing the spindle lock. 9. Reinstall the blade guard. 10. Loosen the carriage lock and allow the saw carriage to return to the top of the guides. 11. Reconnect the power. 17 Starting and Stopping the Motor To start the motor push the green button on the control panel. To stop the motor push the red button on the control panel. The saw is also equipped with an emergency stop which is the large red button on the control panel. Rotating the Turntable on the Carriage Pull out the indexing pins, and pivot the turntable until they snap into the appropriate holes. Moving the Carriage Up or Down Use the handle on the motor. Locking the Carriage Lock the carriage by tightening the red carriage lock knob (Figure 9). General Operating Tips For smooth, clean, chip-free cuts, you must use industrial carbide saw blades that are sharp. Dull or improperly sharpened blades will cause chipping, unclean cuts, chatter, and motor overloading. If you are not sure that a blade is sharp, replace it with a new one. When you feed the material through the tool horizontally, or move the carriage over the material vertically, do it slowly, smoothly, and (whenever possible) without stopping. Overfeeding results in poor-quality cuts, shortened blade life, and motor overloading. For best results when sawing, place the work piece onto the tool with its backside facing you. This provides the smoothest possible cut on the face side of the panel. Panels being cut horizontally or vertically must always be fed against the rotation of the saw blade. Panel saws are intended for cutting large panels down to size. As the overall panel size becomes smaller and smaller, other types of sawing tools become more convenient and safer to use. Refer to the Maintenance section for regular maintenance procedures. 18 Operating Procedure: Cross cutting A crosscut is a vertical cut that must always be done from the top to the bottom of a work piece as shown in Figure 11. (See also “General Operating Tips” above and “Limitations of the Tool” on page 16.) WARNING: To reduce the risk of injury, do not place your hands on or under the carriage or in the path of the saw blade. 1. Position the saw motor in the crosscutting position with the blade oriented vertically. Turntable,” above. See “Rotating the 2. Loosen the carriage lock and move the carriage to the top of the guides. 3. Place the work piece in the machine. 4. Slide the work piece to the desired position. 5. Make certain that the work piece is adequately supported and stable in the machine. Refer also to “Limitations of the Tool”. The work piece can be held with one hand; do not hold the work piece so that your hand is anywhere behind the carriage or guides or in the path of the saw blade. 6. Start the motor (see “Starting and Stopping the Motor,” page 18), and allow it to reach full speed before beginning the cut. 7. When the motor has reached full speed, slowly and smoothly pull the carriage down so the blade runs through the work piece. Keep one hand on the handle at all times. Be careful not to force the saw through the work piece, to avoid binding. If the blade binds in the work piece, or the work piece shifts during the cut, stop the motor, carefully move the carriage to the top of the guides, restart the motor, and begin the cut again. 8. Support and remove the cut-off piece as the saw completes its cut. 9. Once the cut is complete, turn off the motor and wait for the blade to come to a full stop. Move the work pieces away from the blade. Return the carriage to the top of the guides, and lock the carriage lock. 10. When making cuts that are less than 1 inch, the chatter guard (located inside the blade guard) must be resting on the work piece, not on the cut-off piece. If it is not positioned this way, it will jam the work piece and prevent the carriage from continuing through the cut. If the saw jams, turn the tool OFF and wait for the blade to stop. Then back the saw out of the cut. CAUTION: A coasting saw blade can mar the edge of a freshly cut work piece. Figure 11: Cross cutting 19 Operating Procedure: Rip cutting A rip cut is a horizontal cut that can be done either from the left to the right or from the right to the left, as shown in Figure 12. Rip cuts must always be done by moving the work piece in the direction of the arrow on the saw carriage. (See also “General Operating Tips” above and “Limitations of the Tool.” on page 16) WARNING: To reduce the risk of injury, ripping must always be done with the direction of the arrow on the saw. 1. Before you begin, be sure there is enough space on both sides of the saw to completely load the work piece on the saw frame, move it past the saw, and completely off-load it. 2. Select the ripping direction, from right or from left, based on preference. Then rotate the turntable to the ripping position as shown. See “Rotating the Turntable”. 3. Select the height of the saw blade above the base support. Lock the carriage securely to the guides in this position. 4. Start the motor (see “Starting and Stopping the Motor” above) and allow it to reach full speed before beginning the cut. 5. When the motor has reached full speed, slowly and smoothly push the work piece through the saw, in the direction of the feed arrow on the saw. Avoid placing your hands, clothing, or body parts under the carriage or in the cutting path of the saw blade. Do not look directly down the line of cut because dust and debris are generated during this operation. Be careful not to force the work piece through the saw, to avoid binding. If the saw blade binds in the work piece, or the work piece shifts during the cut, stop the saw motor, carefully back the work piece out of the saw, reposition the work piece, restart the motor, and begin the cut again. 6. As the work piece passes across the machine, move to the other side and complete the cut by pulling the work piece past the saw blade. Support the upper piece to keep it from pinching the blade or the kerf protector, or falling away from the machine. 7. Once the cut is complete, turn off the motor and wait for the blade to come to a full stop. Remove the work pieces from the machine. 8. Rotate the turntable back to the vertical position and return the carriage to the top of the guides. Lock the carriage in this position. 9. When making cuts that are less than 1 inch, the chatter guard (located inside the blade guard) must be resting on the work piece, not on the cut-off piece. See Figure 13. If it is not positioned this way, it will jam the work piece and prevent the carriage from continuing through the cut. If the saw jams, turn the tool OFF and wait for the blade to stop. Then back the saw out of the cut. 10. When rip cutting material that is longer than 48” we recommend using the optional lower and upper extensions. Figure 12: Rip cutting 20 Removing the Motor: (Only to repair, maintain, or replace) WARNING: The guards on the saw motor have been modified specifically for use on the Panel Pro. NEVER use the saw motor as a hand-held unit. To remove the motor from the turntable: 1. Disconnect and lock off the power supply. 2. Remove the blade guard. 3. Remove the saw blade. 4. Support the motor by hand, and loosen the rear motor mount nut. 5. Remove the two lower nuts and bolts from the saw mounting bracket/foot. 6. Remove the upper nut, bolt and spacer from the saw mounting bracket/foot. To reattach the motor, reverse the above procedure. 21 MAINTENANCE WARNING: To reduce the risk of injury, always unplug the tool before doing any maintenance. Never disassemble the tool or try to do any rewiring to its electrical system. Contact a qualified electrician for electrical repairs. Always follow lockout/tag out procedures when servicing electrical equipment. General Maintenance Keep the tool in good repair by adopting a regular maintenance program. Before each day’s use, examine the general condition of the tool, and inspect the guards, switches, power cord, and extension cord for damage. Check for loose screws, misalignment, binding of moving parts, improper mounting, broken parts, and any other condition that may affect its safe operation. If abnormal noise or vibration occurs, turn the tool off immediately and have the problem corrected before further use. Do not use a damaged tool. Tag damaged tools “DO NOT USE” until repaired (see “Repairs” page 23). Cleaning Daily, clean all dust and debris from the vents in the motor housing. Keep the handles clean, dry and free from oil and grease. Use only mild soap and a damp cloth to clean the tool, because certain cleaning agents and solvents are harmful to plastics and other insulated parts. Some of these include: gasoline, turpentine, lacquer thinner, paint thinner, chlorinated cleaning solvents, ammonia, and household detergents containing ammonia. Never use flammable or combustible solvents around tools. WARNING: To reduce the risk of injury, electric shock, and damage to the tool, never immerse the saw in liquid or allow a liquid to flow inside it. Maintaining the Motor Under normal conditions, motor maintenance is not necessary until the brushes need to be replaced. Every six months: Inspect the brushes, and replace as necessary. Mechanically inspect and clean the gears, spindles, bearings, housing, etc. Electrically inspect the switch, cord, armature, etc. Test to assure proper mechanical and electrical operation. Lubricating the Guides The carriage should move smoothly up and down the guide tubes or rails. However, if the guides become caked with dust or debris, the carriage may get stuck or it may not slide smoothly. Periodically clean the guides with a damp cloth, following the directions under “Cleaning” above. Then use a dry lubricant such as a spray silicone. Other lubricants cause dust and debris to collect on the guides and contaminate the bearings. 22 SERVICE Repairs If your tool is damaged, call Panel Pro at 1-800-599-1655 or 763-755-1600 for technical advice or for the name of a dealer near you who can service your machine. Replacement Parts Refer to the separate replacement parts information provided with the tool. Alignment The tool is aligned at the factory to a tolerance of 1/32”. It needs realignment only if mishandled or abused, or if the motor is replaced. Alignment consists of three steps that must be done in the following order (these steps are explained in detail below): 1. Adjust the blade so it is parallel with the guides. 2. Adjust the blade so it will be perpendicular to the work piece. 3. Adjust the guides so they are perpendicular to front base support. Constructing an Alignment Tool For maximum accuracy, construct a test square to check the full movement of the saw. See Figure 14. Construct the square using a 6-ft metal ruler and two 4-ft metal rulers. (Using the 3-, 4-, and 5-ft measurements assures squareness.) Drill holes and attach the rulers with pop rivets or small nuts and bolts. 4’ Frame Support 5’ 4’ Line up on 36” mark. 3’ 6’ Figure 14: Field Alignment Tool Use the 6-ft ruler to check squareness of the base support. Use the 4-ft ruler to check squareness of the guide tubes or rails. The tool also can be used as a giant square for layouts. Step 1: Adjust the Blade Parallel to the Guides The blade must move parallel to the guides, or tail burning may occur and the kerf will be wider than the set of the blade. Make the following adjustment only if the blade appears to be out of alignment. To check the blade parallelism: 1. Adjust the guides (see Steps 1 and 2 above). 2. If the blade “heels”, or leaves burn marks on the cut, position the carriage for a crosscut and make a sample 23 cut. Check both sides of the cut to determine which side of the blade is causing the problem (you will need this information for adjusting the blade). To adjust the blade parallelism: 1. Unplug the tool. 2. Position the Adjustment Tool on the base support. Lower the carriage so the Adjustment Tool overhangs the blade. 3. Place the Adjustment Tool against the blade. The entire face of the blade should contact the Adjustment Tool. If it does not, then the blade is not parallel to the work piece and you should: a. Loosen (but do not remove) the two hex-head nuts holding the indexing pin assemblies. b. If burn marks appear on the left side of the work piece, rotate the saw slightly clockwise until the entire face of the blade contacts the Adjustment Tool. If burn marks appear on the right side of the work piece, rotate the saw slightly counterclockwise until the entire face of the blade contacts the Adjustment Tool. Make only a slight adjustment at a time. 4. Securely tighten the two hex nuts holding the index pin assembly or assemblies. 5. Make a sample cut and adjust if necessary. Step 2: Adjust the Blade Perpendicularity To adjust for perpendicularity: 1. If the tool does not cut at 90 to the surface of the work piece, loosen the two motor mount nuts. An adjusting screw (26) is located to the right of the lower nuts. 2. Loosen the adjusting screw lock nut. Tighten or loosen the adjustment screw depending on the angle adjustment required. Make only a slight adjustment. 3. Retighten the lock nut; making sure the screw is against the plate. 4. Retighten the motor mount nuts. Make a sample cut and readjust if necessary. For perpendicular cuts, be sure the saw motor is against the factory-set adjustment screw (26). Step 3: Align the Guides WARNING: Unplug the tool before beginning this adjustment. If the tool does not cut at 90, the guides may not be perpendicular to the base support. To check the guide alignment: 1. Unplug the tool before testing alignment or making adjustments. 2. Remove the blade guard to expose the blade. Mark a tooth to use as a reference. If you are using a high- 24 speed steel blade, mark a tooth that points toward the edge of the Alignment Tool (described above). 3. Clamp the Alignment Tool to the base support. 4. Pull the carriage down slowly until the marked reference tooth just touches the vertical edge of the Alignment Tool. Continue to pull the carriage down: if the blade does not contact the square, or if the blade binds on the square, the guides are not aligned. Shown with the Guide Tube Bracket Nuts counterbalance removed for clarity Figure 34: Aligning the Guide Tubes To align the guides: 1. Mark the frame on the outside of the guide tube bracket for a starting reference point. Loosen the guide tube bracket nuts (Figure 34), but do not remove the bracket. Using a dead blow mallet, strike the bracket on the side and in the direction you wish the guides to go. Do not strike the guides. 2. Recheck the squareness of the guides to the rollers, using the procedure outlined above. necessary. 3. Securely retighten the guide bracket nuts. 25 Readjust if