1
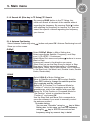
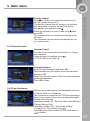
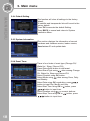
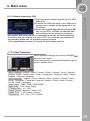
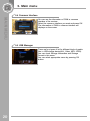
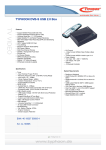
USER`s MANUAL
DS400-HDM
12V / 24VDC (230VAC)
High Definition Digital Satellite Receiver
PVR Ready
ENGLISH
All the safety and operating instructions should be read before operating this
product. The safety and operating instructions should be retained for future reference.
All warnings on the product and in the operating instructions should be adhered to.
All operating and usage instructions should be followed.
Unplug this product from the wall outlet before cleaning.
-Do not use liquid or aerosol cleaners. Use a damp cloth for cleaning and place
the receiver in well ventilated and no-heat environment.
-Do not use attachments not recommended by the product manufacturer as they may
cause hazards.
-Do not use this product near water for example, near a bath tub, wash bowl,
kitchen sink or laundry tub, in a wet basement, or near swimming pool, and
the like.
-Do not place this product on an unstable cart, stand, tripod, bracket, or table.
The product may fall, causing serious injury to a child or an adult and serious
damage to the product.
-Use only with a cart, stand tripod, bracket, or table recommended by the
manufacturer or sold with the product.
-Any mounting of the product should follow the manufacture's instructions, and should
use a mounting accessory recommended by the manufacturer.
-This apparatus shall not be exposed to dripping or splashing and that no object
filled with liquids, such as vases, shall be placed on the apparatus.
-The main plug is used as the disconnect device. The disconnect device shall
remain operable.
Instruction about the ‘WEEE’ Symbol
Disposal of Old Electrical & Electronic Equipment (Applicable in the
European Union and other European countries with separate collection
systems)
This symbol on the product or on its packaging indicates that this product shall not be
treated as household waste. Instead it shall be handed over to the applicable collection
point for the recycling of electrical and electronic equipment. By ensuring this product is
disposed of correctly, you will help prevent potential negative consequences for the
environment and human health, which could otherwise be caused by inappropriate
waste handling of this product. The recycling of materials will help to conserve natural
resources. For more detailed information about recycling of this product, please contact
your local city office, your household waste disposal service or the shop where you
purchased the product.
01
CONTENTS
1. Introduction
1-1 Main Features
1-2 Accessories
2. Controls & Features
2-1 Front Panel
2-2 Rear Panel
2-3 Remote Control Unit(RCU)
3. Connection Diagram of the Receiver
3-1 Connecting to the antenna
3-2 Connecting to TV and VCR
3-3 Connecting to HiFi system
3-4 Connecting to TV with VCR and Motorized System (DiSEqC 1.2 / USALS)
4. Function Guide
4-1 Channel Information
4-2 Changing Channels
4-3 Volume Control
4-4 Channel List for TV/Radio/Favorite
4-5 Program Guide
4-6 Teletext
4-7 Subtitles
4-8 A/V Selection
5. Main Menu
5-1 Installation
5-2 System Setting
5-3 User Preference
5-4 Common Interface
5-5 USB Manager
6. PVR Ready
6-1. Recommended Device
6-2. Recording function
7. Troubleshooting
8. Technical Specifications
02
1. Introduction
1-1 Main Features
64 programmable satellites / 6,000 programmable channels
950~2150 Mhz IF range
2 Slot Common Interface
DVB-S/DVB-S2 Compliant (EN 300307)
MPEG2 MP@HL, MPEG4 Part10/H.264
1 LNB input, IF loop through for 2nd receiver
Variable input symbol rate 1 ~ 45Msps
Easy auto satellite program searching
Multi language menu
Electronic Program Guide
8 favorite channel group selection / parental lock
Auto NTSC / PAL switching
Teletext supported by OSD and VBI
USB / RS 232 downloading
Data transfer / PC-to-receiver
DiSEqC version 1.0/1.1/1.2/1.3 supported
USB 2.0 Master
HDMI
Video Resolution 1080i, 720p, 576i, 576p, 480i, 480p
1-2 Accessories
User's manual : 1
Remote control unit : 1
Batteries (AAA Type) : 2
AC/DC Adaptor: 1 (including power cord)
Cigarette Lighter: 1
External IR Sensor: 1
HDMI Cable: 1
SCART Cable: 1
Mounting Brackets: 1
03
2. Controls & Features
2-1 Front Panel
Display
Power ( )
Power on & off
CH. ▲,▼
Channel up & down.
VOL. ▲,▼
Volume up & down.
Menu
Used to display the main menu.
OK
To show TV/Radio channel list and to select a program.
2 slots Common Interface
USB Port
Connect to the USB memory or external HDD
04
IF INPUT :
Satellite broadcasting signal input socket.
LOOP :
IF loop-through output to second receiver
RS232C :
Serial port for upgrade and data transfer.
AUDIO L/R :
Stereo audio output socket for the television set or the audio system. (White/red)
Video RCA Connector :
Composite Video Output
COMPONENT :
For Connection to LCD or PLASMA TV
S/PDIF :
Dolby Digital output socket for the audio system.
HDMI :
Audio and video output socket for the high definition television set.
TV (SCART) :
Audio and video output socket for the television set.
Power On/OFF Switch
IR INPUT :
External IR sensor
DC12V~24V :
For connection to AC/DC Adaptor or Cigarette Lighter
05
2. Controls & Features
2-3 Remote Control Unit (RCU)
06
2. Controls & Features
2-3 Remote Control Unit (RCU)
(POWER) : turns the receiver on and off.
(MUTE) : switches the sound on and off.
V.Format : changes the video format.
Pause : pauses the screen while viewing but audio remains active.
EPG : shows program information about the selected channel.
FAV : opens Filter box for favorite channel.
: selects TV mode or Radio mode.
Numeric (0~9) : enables to select channel directly.
A-Z : used for channel sorting.
MENU : displays the main menu
BACK : returns to the previous mode or menu.
EXIT : returns to the viewing mode from any menu mode.
INFO : displays channel information.
OK : selects a program, the highlighted line or parameter value or shows the TV/radio
channel list while watching TV or listening to the radio.
VOL. , : moves the highlighted line or changes volume up/down.
CH. , : moves the highlighted line or changes channel up/down.
FTA/CAS : opens Filter box for FTA/CAS.
SAT : opens Filter box for satellites.
OPTION : displays Multifeed box.
A/V : displays the audio and video configuration.
(+100), (-100)(Page up/down button)s : moves the highlighted line to the next page
or changes the channel up/down by 100 channels.
+, - : Used to move the highlight bar, change parameters, and volume up/down.
F1(SLEEP) : Sleep function in the viewing mode.
: displays teletext available.
: displays subtitle available.
T.SHIFT : setup Time-Shift function On/Off
(Rewind) : Rewind video play speed to 2X4X8
(Play) : playing files.
(Stop) : stop playing files.
(Fast Forward) : fast forward Play speed by 2X4X8
(Pause) : pause playing file.
: jumps backward.
: jumps forward.
(Record) : starts recording
(Bookmark) : Bookmark function under view mode Go to the bookmarked position.
: play slow backward playing file
(Slow) : play slow forward playing file
RED, GREEN, YELLOW, BLUE : These color buttons are used to select
functions such as Delete, Move, Rename, Sort.
07
3. Connection Diagram of the Receiver
3-1 Connecting the antenna
Connect the antenna cable to the IF INPUT connector.
If you have another digital receiver, link it to the LOOP THROUGH connector.
3-2 Connecting to a TV
HDMI : Plug one side of the HDMI cable into the HDMI socket on the digital
receiver and the other side of it into the matching socket on TV.
If you have a high definition TV set, HDMI gives the best results.
In addition, you don't have to make audio connections because the
HDMI connector can output stereo audio or Dolby digital audio.
SCART (TV) : Plug side end of the SCART cable into the TV socket on the
digital receiver, and the other side of it into the matching socket on TV.
You do not have to make audio connections unless you use a
conversion cable, such as SCART-to-Component. If not, you have
to make audio connections.
08
3. Connection Diagram of the Receiver
Component connector (YPbPr) : Plug each side of the RCA cables into the
matching color sockets (BLUE, GREEN and RED) on the digital receiver,
and the other side into the matching color sockets on TV.
You have to make audio connections.
VIDEO : Plug one side of the RCA cable into the
VIDEO(yellow) socket on the digital receiver and the other side into
the matching socket on your TV.
You cannot view high definition video with the composite connector.
In addition, you have to make audio connections.
3-3 Connecting to HiFi System
You can enjoy Dolby digital audio by connecting S/PDIF cable to your digital
audio systems. In this case TV or audio system must be able to decode
Dolby digital audio.
In order to get stereo sound, you need to connect RCA cable from the AUDIO
L/R sockets on the receiver to the LINE, AUX, SPACE or EXTRA input sockets
on your HiFi system.
3-4 Connecting to Motorized System (DiSEqC / USALS)
Connect a coaxial cable to the IF input connector on the receiver and the other to
the REC or receiver connector on the DiSEqC / USALS motor.
Please refer to DiSEqC / USALS connection.
09
4. Function Guide
4-1 Channel Information
Every time you change channels, program information will be displayed for
a few seconds.
The information may include :
1)Current time
2)Current channel number & name, satellite name &
TP information
3)Symbol for CAS, Teletext, Alternate Audio, EPG,
Parental lock information
4)Signal meter(Power, Quality)
5)Program information : Whenever you press the INFO
button, the program information window will appear.
6)Resolution of the screen
(1080i, 720p, 576i, 576p, 480i, 480p)
4-2 Changing Channels
You may change the channel by simply entering the channel number using your
RCU 0~9 buttons. Alternately, you may use the , buttons on the RCU and/or the
front panel of the receiver.
4-3 Volume Control
Press , buttons on the RCU to control the volume.
The volume indicator will show whenever you
control the volume on the screen for a few seconds
and disappear automatically.
10
4. Function Guide
4-4 Channel List for TV/Radio/Favorite
Press OK to display the channel list on the screen.
Select channel you want by moving the highlighted
line using , , , and press OK.
Press
to open the favorite filter list and select one.
(Refer to the Favorite channel menu in page 17 to set
favorite channel.)
Whenever you press the
button, Filter Box for favorite
channel is opened automatically.
You can select a favorite channel on Filter box using
, , .
(Refer to Edit Channel menu in page 16)
[Color Keys]
1)RED(FTA/CAS) :
Press RED button to open Filter box for FTA/CAS and
select one using , , and press OK
2)GREEN(Satellite List) :
Press GREEN button to open Filter box for Satellite
and select one using , , and press OK.
3)YELLOW(Sort) :
Press Yellow button to open sort box and select one
(Normal / Alphabetical) using , and press OK.
-In case of selection of “Normal”, you can sort channel
using by numeric key on RCU.
-In case of selection of “Alphabetical”, you can sort
channel using by alphabetical key on RCU.
11
4. Function Guide
4-5 Program Guide
Program Guide shows the current and scheduled
programs that are or will be available on each
channel with a short summary for each program.
Press EPG button, EPG box will be displayed on the
screen. Press , , , buttons to check the
information of other programs and channels.
You can reserve the time of watching a TV program
you want.
Select the program you want using , , , .
Press RED button to ADD Event of reserving
program for watching, program name would be
changed to RED color after adding event of program.
Press RED button again to cancel the Event.
(Refer to Event Timer in page20 for detail
Event setting.)
Press Green button to move -24hours of EPG.
Press Yellow button to move +24hours of EPG.
4-6 Teletext
The display of Teletext is based on the transmitted
data using the EBU teletext specification and DVB
Bitmap. It is available only when the current channel
carries teletext service data. VBI insertion mode and
OSD(On Screen Display) mode are supported.
In the VBI insertion mode, which is always on, can
only be viewed on TV which supports teletext using
your TV's RCU.
In the OSD mode, you can view teletext even
though your TV does not support teletext.
To watch teletext in OSD mode, press button on
the RCU.
0 ~ 9 : Press page number.
, : Page up and down.
, : Page left and right list.
, : Page number increase and decrease by 1.
12
4. Function Guide
4-7 Subtitles
You can see the
symbol active when the current
channel provides subtitle service.
Press
button and select language you want in
the language selection menu.
Press OK button to display subtitle on the screen in the
language you select.
Press
button again to cancel.
4-8 A/V Selection
Quick adjustment for setting Audio / Video can be done by pressing Blue
button in the viewing mode. You can use , buttons to change the setting
modes of audio or video.
Output Mode : select the audio output mode
among stereo(LR), Mono(LL)
and Mono(RR)
Alternate Audio : select the audio channel in case
that several audio channels input.
Alternate Video : select the video channel in case
that several video channels input.
13
5. Main menu
5-1 Installation
You can install the TP Setup, Antenna positioning and the other related to Satellite
Setup in this section.
Press RED button to delete the highlighted SAT.
Press GREEN button to add the SAT.
Press YELLOW button to rename the highlighted SAT.
Press BLUE button to search all TP in the highlighted SAT. Move to LNB Frequency,
DiSEqC, Network Search, FTA only, PID Filter, 22KHz Tone, LNB Power using , , ,
and adjust the types of them using , .
There are 3 groups of channels you might be
interested in. Press F1, F2 or F3 button to select a
group you want. The channels in the group you
select will be searched and saved in channel list.
Only the channels in the group you select will
remain in channel list after FAST SCAN.
5-1-1 TP Setup
Select TP Setup using , , and press OK.
TP Setup box will show up on the screen.
Select Frequency, Symbol Rate, Polarity,
Demodulation, Code, Pilot using , , , and adjust
the types of them using , , , .
Press RED button to delete the highlighted TP.
Press GREEN button to add TP.
Press YELLOW button to edit PID.
Press BLUE button to search all channels.
5-1-2 Edit PID (Yellow button in TP Setup)
Use this in case of a specific Transponder which
has non-DVB standard channels and which only
can be found when you have entered the
necessary settings.
You can also add or delete channels from a
specific TP.
PCR PID : Enter PID (Packet Identifier) for the PCR
(Program clock Reference).
Video PID : Enter PID for the video signal.
Audio PID : Enter PID for the audio signal.
14
5. Main menu
5-1-3 Search All (Blue key in TP Setup)/TP Search
By pressing BLUE button in the TP Setup, this
mode will search all channel of the satellite without
regarding the frequency. By pressing Right( ) button
and adjusting the frequency or leave as it is, you can
search the specific channel regarding the frequency
you choose.
5-1-4 Antenna Positioning
Select Antenna Positioning using , button and press OK. Antenna Positioning box will
Show up on the screen.
DiSEqC
Select DiSEqC Motor in Motor Setting box.
Select appropriate Satellite, Frequency, and Step
size (1,2,3,4STEP / Continuous)
Select Move Dish menu and press , buttons to move
West or East.
Antenna will move to the direction you press
(West, East) as per the Step Size you select in Step
Size menu. Select appropriate option in Command
Mode(Save, Reset, Go To Sat Position, Go To Position
0, Set East Limit, Set West Limit, Disable Limits, Enable
Limits, Recalculate).
USALS
Select USALS in Motor Setting box.
Move to Satellite and press OK to select Satellite.
Press RED button to change the satellite position
(My Longitude and My Latitude).
Select Go To Position 0 in Command Mode for
“Position 0” which is the imaginary point on the
geostationary orbit of the satellite and press OK.
Select Go To Sat Position in Command Mode for
“Sat Position” which is calculated from the
“Position 0” and press OK.
Use the Step Size and Move Dish commands to
move the antenna if you want to manually control
the antenna position.
*Unicable setting
-You can use “Unicable” using by , key in Motor
Setting box. In this case, you can set frequency
using by , key in SCR ID box and can set
frequency using by numeric key, in detail.
15
5. Main menu
5-2 System Setting
5-2-1 Edit Channel
The factory set password is 0000.
You can edit channel lists in this section.
Press RED button to delete the selected channel.
WARNING box will display on the screen, select the type of deletion you want
using , .
( Selected Channel : deletes only the selected channel / Selected TP Channel :
deletes all channels in the same TP / Selected Sat. Channel : deletes all channels in
the same satellite / All channels : deletes all channels)
Press OK to delete. Press BACK to cancel of deletion.
Move Channels
Select the channel you want to move to other
position in the channel box using , .
Press GREEN button to move the channel you want.
Move the selected channel to where you want using
, .
Press OK to confirm the position.
*Move Channel Group
-You can move channel group. Select channels,
you want to move, using by F1 key and press
GREEN key in where you want to locate.
Rename Channels
Select the channel you want to rename using , .
Press YELLOW button. Keypad will display on the
screen.
Select the characters(A…Z, 0…9) using , , , .
Press OK for typing.
Select OK on the Keypad and press OK to save.
Channel Lock
Select the channel you want to lock using , .
Press BLUE button to lock the channel.
will show up at the end of the channel name.
16
5. Main menu
Favorite channel
Press to create and change the number of the
favorite channel lists up to 8.
The favorite channel box will display on the screen
and the number of favorite channel box will be
changed as you repeat to press .
Select the channel you want to add using , and
press OK.
The channel name you selected will display in the
FAV box.
The information will be saved automatically as you
go to other menu.
5-2-2 Parental Control
Parental Control
You can set the censorship classification or change
the password.
Select the type of limitation using , .
(7/12/15/18/Lock All/ View All)
Change Password
Select Change Password and press OK.
New Password box will display. Enter the password
and press OK.
Verify Password will display. Enter the same password
as the new password.
Press OK to save.
5-2-3 Time Adjustment
The time set will be used as the standardized time for
TV Guide, Wake up / Sleep time.
The current time is based on the TDT(time description
table) in the stream of the current program(Automatic
Update should be ON)
-Automatic Update ON : Set Time Offset with GMT and
Daylight Saving Time.
-Automatic Update OFF : Select Date Setting /
Current Time / Time Offset using , .
Press OK and numeric button for time, date, year or
, for Month.
17
5. Main menu
5-2-4 Default Setting
This function will clear all settings to the factory
default.
All satellite and transponder lists will be set to the
factory default.
Press OK to execute the default Setting.
Press BACK to cancel and return to System
Installation Menu.
5-2-5 System Information
This section displays the information of current
hardware and software version, loader version,
Manufacturer ID and update date.
5-2-6 Event Timer
There is four kinds of event type (Change CH/
Wake Up / Sleep / Record CH)
Press Green(Add) button to add event.
Select Event Type using , utton among Change
CH, Wake Up, Sleep and Record CH.
Select Channel using OK button.
Select Mode using , utton among Once, Daily
and Weekly.
Select Date using OK or button, press , , ,
button to input Day, Month and Year.
Select Start Time using OK or button, press
, , , button to input time.
Select Duration using , or numeric buttons.
Select Stop Time using OK or , button, press
, , , button to input time.
18
5. Main menu
5-2-7 Software Upgrade by USB
(1)Copy the latest firmware upgrade file to a USB
flash drive.
(2)Connect the USB flash drive to the USB port in
receiver, and a window will be appeared in the
TV Monitor.
(3)Select the firmware upgrade file and press OK
key on your RCU, and then the selected data
are transferred to the receiver and upgrade
gets started. When the upgrade is completed,the receiver will be automatically
rebooted. If you do not press any key on RCU for 5 seconds, the upgrade will
automatically started with the presently selected firmware.
(4)The upgradeable firmware is Program file and Channel data file
5-3 User Preference
Select appropriate settings by pressing Left/Right( / )
buttons at each menu.
All the settings will be automatically applied by going
back to the Main Menu.
- Menu Language : English / Arabic / Persian / Turkish / German / French / Spanish /
Russian / Polish / Czech / Greek / Dutch / Portuguese / Hungarian / Italian / Slovak /
Swedish / Slovenian / Bulgarian
- Audio Language : English / French / German / Italian / Russian / Turkish / Czech /
Danish / Hungarian / Portuguese / Spanish / Swedish / Polish / Arabic / Persian /
Finnish / Dutch / Rumanian
- Video Output : CVBS / RGB / COMPONENT
- Digital Audio : PCM / Dolby Digital
- TV Aspect Ratio : 4:3 / 16:9
- Display Format : Letterbox / Center / Full
- Display Time : 1~20 / Enable / Disable
- Transparency : 25% / 50% / 75% / Disable
19
5. Main menu
5-4 Common Interface
You can see the information of CAM in common
interface of the receiver.
Select the common interface you want and press OK.
The information of CAM in common interface will
displays on the screen.
5-5 USB Manager
There are four types of list for different kinds of media
files in USB storage device(ALL, Video, MP3, JPEG).
You can check Storage Information and Storage
Format in this menu.
You can select appropriate menu by pressing OK
button.
20
6. Personal Video Recorder
6-1. Recommended Device
-External USB Hard Disk Drive. (Recommended HDD : 7200RPM)
-USB Flash memory stick.
-Format Type : FAT16/FAT32 (The System does not support NTFS and
other file system)
6-2. Recording fucntion
6-2-1. Recording
Press
button to start recording a program.
6-2-2. Stop recording
Press button or button to stop recording.
After then, it shows a message to ask whether
you want to stop or not. Use OK button to stop
recording and use Back button to continue
recording.
6-2-3. Play mode
Recorded files(*.ts), MP3 and JPEG files can played with external USB memory
(HDD).
File List
Press button to show file list.
21
6. Personal Video Recorder
Select a file
Use the ▲,▼ button to select the file you want
to watch and press OK button.
INFO window
During playing of recorded file, if you want to
check file name, play time, total recorded time,
press INFO button.
Stop playing
Press button to stop playing.If you press
BACK or EXIT button, then you can stop
recording after selection of “OK” in the message
window.
Change playing mode
Press Green button repeatedly to change playing mode in MP3 as
Repeat once, Repeat all, Repeat once within folder, Repeat all within
folder.
(Press Green button to start and stop Slideshow within folder during JPEG
file playback.)
22
6. Personal Video Recorder
6-2-4. Trick Play Function
Fast foward
Press button during playing of recorded file,
the file will be played at 2X speed maximum up
to 32X.
Rewind
Press button during playing of recorded file,
the file will be rewind at 1X speed maximum
down to 32X.
Skip forward
Press button during playing of recorded file, the file will be forwarded at
5% from current point.
Skip backward
Press button during playing of recorded file, the file will be back-warded
at 5% from current point.
23
6. Personal Video Recorder
6-2-5. Function in List
Filter
In the file list, press RED button to show Filter window.
You can select different media type for list as below.
- All: Show all supported file in folder.
- Video: Show all recorded files in PVR folder.
- MP3: Show all MP3 files in current folder.
- JPEG: Show all JPEG files in current folder.
Strorage information
In the file list,press GREEN button to show storage
information. You can check total size, occupied size
and empty size etc.
*. You can see file list using by
recording a program.
button while
Delete
In the file list, press YELLOW button to delete file or
folder. If you delete some folder, files in the folder will
be deleted accordingly.
Format(Only HDD)
In the file list, press BLUE button to format HDD.
This function is concerned only related to HDD.
6-2-6. Time Shift Recording function
You can perform Time Shift Recording function
with using the trick play buttons while playing a
program.
Press T.SHIFT button to start and stop Time Shift
recording function.
Trick Play functions can perform in limited
condition depends on the size of Time Shift
Recording file.
24
7. Troubleshooting
There may be various reasons for abnormal operation of the unit. Therefore, if the
unit dies not work properly, check the unit according to the procedures shown in
the table below.
Problem
Possible causes
What to do
*The display on the front *Main cable is not connected. *Check that the main cable
is plugged into the power
panel does not light up.
socket
*No sound or picture.
*Wrong connection of the
video/audio output to the
TV input terminal.
*Wrong connection of
satellite antenna cable.
*Wrong direction of satellite
antenna.
*Black-and-White screen *No signal or weak signal.
or V-Hold problem
*Wrong setting of channel
information in System
Installation Menu.
*Your TV mode is different
from satellite broadcasting
mode.
*The RCU is not working *Battery exhausted.
*Fluorescent light interfering
with the remote controller.
*RCU is incorrectly aimed
*Connect two terminals correctly with a SCART cable
or RCA or RF cable.
*Connect the antenna cable
correctly.
*Adjust the direction of
antenna.
*Check the cable connections
LNB and other equipment
connected between the LNB
and the receiver or adjust
the antenna.
*Type the setting value
correctly.
*Use TV of same mode. Use
a NTSC/PAL converter
connected to the receiver TV.
*Change the batteries.
*Switch off the light.
*Aim the RCU at the receiver.
25
8. Technical Specifications
Tuner & Channel
Input Connector : F-type, IEC 169-24, Female
Frequency Range : 950MHz to 2150Mhz
Input Impedance : 75ohm or 75 . Unbalanced
Signal Level : -25 to -65dBm
LNB Power & Polarization : Vertical - +13V / Horizontal - +18V
Current : 500mA Max overload Protection
22KHz Tone : Frequency - 22KHz ± 4KHz
Amplitude : 0.65V± 0.2V
DiSEqC Control : Version 1.0/1.1/1.2/1.3 compatible
Demodulation : DVBS-QPSK, DVBS2-QPSK, DVBS2-8PSK
Input Symbol Rate : DVBS 1-45 Ms/s
DVBS2-QPSK 20 - 45MSPS
DVBS2-8PSK 10 - 45MSPS
FEC Decoder : DVBS Code Rate 1/2, 2/3, 3/4, 5/6, 7/8 and Auto
DVBS2 Code Rate 1/2, 2/3, 3/4, 3/5, 4/5, 5/6, 8/9, 8/10 (QPSK)
DVBS2 Code Rate 2/3, 3/4, 3/5, 5/6, 8/9, 9/10 (8PSK)
MPEG Transport Stream A/V Decoding
Transport Stream : MPEG-2 ISO/IEC 13818
Transport Stream : Specification
Profile Level : MPEG-2 MP@HL, MPEG-4 part 10 H.264
Input Rate : 160 Mbit/s Max
Audio Decoding : MPEG / MusiCam Layer Ⅰ&Ⅱ
Audio Mode : Single channel / Dual channel joint stereo / Stereo
Sampling : 32, 44.1 and 48KHz
Memory
Main Processor : STi 7100 SH4 core( 350MIPS)
Flash Memory : 8 MByte
Program DRAM : 192 Mbyte
Common Interface
2 full independent module capability common interface standard compliant
DVB_CI (CENELEC EN-50221)
Up to 20Mbits/s on Common Interface
Up to 100Mbits/s on Transport Stream
MPEG ll Transfer Stream compliant
3.3V or 5V l/O buffer for direct interface with FEC and DEMUX lcs
26
8. Technical Specifications
A/V & Data In / Out
TV SCART : Output (CVBS, RGB, Component, Audio R/L)
VIDEO OUT : 1 X RCA Cinch
AUDIO OUT : 2 X RCA Cinch
S/PDIF : COAXIAL Digital Audio Output
RS232C : Transfer rate 115,200 bps / 9 pin D-sub Type
COMPONENT OUT(YPbPr) : 3 X RCA Cinch
USB 2.0 Master
HDMI
Power Supply
Input Voltage : 10.5V ~ 30VDC
Type : SMPS
Power consumption : Max. 45W
Standby mode: Less than 1W
Protection : Use Internal Fuse and Electric Shock Protection
Physical Specification
Size (WxDxH) : 280 x 215 x 50mm
Weight (Net) : Approximately 1.5 Kg,
Operating Temp : 0 C to + 45 C
Storage Temp : -10 C to + 70 C
Storage Humidity : 5% ~ 95% RH (Non-Condensing)
27
MEMO
MEMO
28
DS400-HDM