1
(2) Using the existing screws from your junction box,
or the machine screws from the hardware package,
secure the hanging bracket to the ceiling junction
box.
CAUTION: The fan must be mounted onto a
structural member capable of carrying at least
100kg.
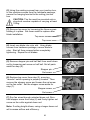
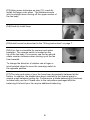
(3) Remove top cover by loosening the three screws
holding it in place. Set cover aside to replace after
blade installation.
Top cover screws
Top cover
(4) Insert one blade into rotor slot. Using blade
screws from hardware package, secure blade to
rotor. Start all three screws before completely
tightening. Repeat for all blades.
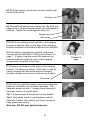
(5) Remove stopper pin and half ball from small down
rod by loosening set screw on half ball. Set all parts
aside for step (9).
Stopper pin
Set screw
(6) Replace top cover from step (3), ensuring
“reverse” switch opening is properly located. Then
remove the stopper screw and loosen the set screw
on the fan collar. Set the stopper screw aside for
step (7).
Stopper screw
Set screw
(7) Run fan wires through selected down rod. Reinstall stopper screw from step (6) and firmly tighten set
screw on fan collar against down rod.
Note: If ceiling height allows, using a longer down rod
will increase airflow and efficiency.
4