1
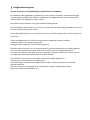
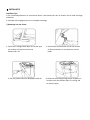
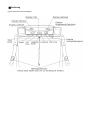
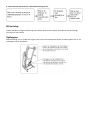
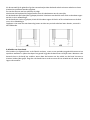
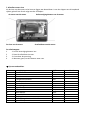
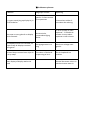
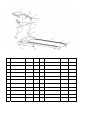
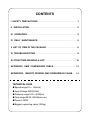
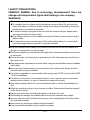
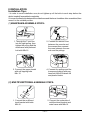
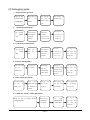
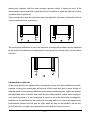
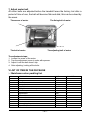
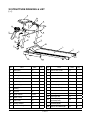
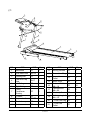
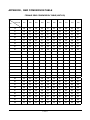
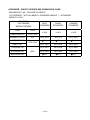
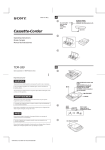
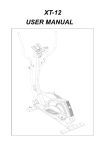
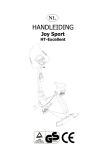
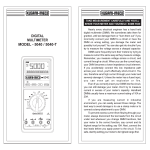
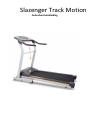
Slazenger Track Motion
Gebruikershandleiding
INHOUD
Ⅰ Veiligheidsmaatregelen
Ⅱ Installatie
Ⅲ Bediening
Ⅳ Dagelijks onderhoud
Ⅴ Lijst van onderdelen in het pakket
Ⅵ Probleemoplossing
Technische gegevens:
● Snelheidsbereik: 0.5—14(km/h)
● Stroominvoer: 220V(50Hz)
● Afstandsbereik: 00.0—99.9(km)
● Tijdsbereik: 00:00‐‐99:59(min:sec)
● Verbruik: 1500W
● Maximaal gebruikersgewicht: 130 kg
Ⅰ Veiligheidsmaatregelen
Lees de instructies in de handleiding voor gebruik van de loopband.
De loopband moet opgeklapt en gezekerd zijn voor transport of optillen. Raak de bevestiging
niet aan tijdens transport. Om letsel te voorkomen de loopband niet bij de armsteunen vast
pakken tijdens het opklappen of laten zakken..
Laat kinderen en huisdieren niet bij de loopband tijdens gebruik.
Het is belangrijk voor gebruikers van 35 jaar en ouder met een medische geschiedenis om vooraf
contact met de huisarts op te nemen.
Plaats de loopband binnen in een schone en stofvrije ruimte waar geen kans is dat er water over
heen komt.
Plaats de loopband op een vlakke ondergrond met voldoende ruimte er omheen.
Steek de stekker in een geaard stopcontact.
Draag geschikte kleding en schoeisel tijdens gebruik.
Nooit de machine starten als u op de band staat en houd de handsteunen vast tijdens gebruik.
Als u zich tijdens gebruik niet goed voelt druk op stop of trek het veiligheidskoord los.
De sensor voor de hartslag is geen precisie instrument maar geeft alleen een indicatie van uw
hartslag, door allerhande redenen kan de waarde afwijken.
Hart patiënten kunnen beter niet zonder toezicht de loopband gebruiken.
Selecteer een snelheid die bij uw conditie past.
Overbelasting zal schade aan de loopband veroorzaken. Overschrijd nooit het maximale
gebruikersgewicht.
Stof kan het meten van de apparatuur beïnvloeden, houd de loopband dus stofvrij.
Raak nooit draaiende onderdelen aan.
Ⅱ INSTALLATIE
Installatie Tips:
1 Om installatieproblemen te voorkomen dient u de bouten pas aan te draaien als de hele montage
voltooid is
2 Verwijder de borgingsstrip pas na complete montage.
(1)Montage van het frame:
1. Schuif de 7 aderige kabel door de rechter paal
en zet deze vast op het frame met
bouten m8 x 16.
3. Zet het paneel vast met zelftappers M4×12.
2. Verbind de sensordraden tussen de console
en de armsteunen en zet deze vast aan de
palen.
4. Plaats de verbindingsstang tussen de palen en
zet deze vast met bouten m8 x 50, vulring m8
en plastic kapjes.
Ⅲ Bediening
(‐) Een overzicht van het display:
Gebruik loopband:
1. Voorbereiding voor bediening:
Zet de
knop aan
na het
monteren.
Bevestig de
veiligheidsclip
aan uw kleding.
De display
piept, en dan
staan alle
waarden op
nul.
De loopband
staat in standby‐
modus.
2. Normale bedieningsmodus:
De loopband
staat in
standby‐
modus.
Druk op de
startknop, de
loopband start
met 0.5km/h.
3. Tijdmodus:
4. Afstand modus
5. Hartslaggestuurde snelheidsmodus:
Pas snelheid aan
van 0.5‐16km/h
door op de
snelheids knoppen
te drukken.
Druk op stop‐knop
voor pauze‐stand,
druk 2 keer voor
standby‐modus.
6. 5 Verschillende automatische snelheidsafwisseling modus:
(3) Hartslag:
Tijdens stand‐by of lage snelheid, leg uw handen op de sensors op de armsteunen en de hartslag
verschijnt in het scherm.
Opklappen:
Waarschuwing: Let er op dat uw vingers niet tussen de armsteunen komen te zitten tijdens het in‐ en
uitklappen van de loopband.
Ⅳ Dagelijks onderhoud.
1. Plank en loopband
● Deze gemotoriseerde loopband is uitgerust meteen band met een lage wrijvingsweerstand.
De loopplank is uitgevoerd met een dubbel schokabsorberend systeem om het lopen comfortabeler te
maken.
● Houd de loopband schoon, het kan de levensduur bevorderen, Maak de loopband schoon met
zeepwater. Gebruik zo weinig mogelijk water en zorg dat het niet onder de loopband of in het
motorcompartiment komt.
2. Smering.
De loopband dient periodiek gesmeerd te worden met een special smeermiddel.
De methode is als volgt:
(1) Haal de spanning van de band door het tegen de klok in draaien van de inbusbouten
aan het einde van de band.
(2) Breng een paar druppels olie aan op de onderzijde van de banden verdeel deze zo
veel mogelijk.
(3) Breng de spanning terug op de band door de inbusbouten weer aan te draaien.
(4) Laat de band draaien, onbelast en op lage snelheid, waardoor de olie zich nog beter
verdeeld.
Voorbeeld:
Loopband wordt minder dan 3 uur in de week gebruikt, olie dan ieder half jaar.
Loopband wordt 3 tot 6 uur per week gebruikt, olie dan iedere 3 maanden. Loopband werkt meer dan 6
uur per week, olie dan iedere maand.
Overdaad schaadt,maar periodiek olieën verlengt de levensduur aanzienlijk.
3. Schoonmaken.
Stofzuig regelmatig om stof in het regelpaneel en op de sensoren te voorkomen.
4. Weerstand.
De weerstand tussen de band en de loopplank kan te groot worden door te weinig olieof te veel stof.
Dit kan schade aan de motor veroorzaken.
Dit kan men op de volgende manier controleren:
(1) Na uitschakelen van de stroom moet men de band met de hand of de voet kunnen draaien, zo niet ,
dan is de weerstand te hoog.
(2) Bij motorschade zal de zekering er uit gaan.
5.Afstellen als de loopband scheef gelopen is.
Alle loopbanden zijn afgesteld voordat ze de fabriek verlaten. Maar na een periode van gebruik kan de
band losser komen te liggen door de volgende oorzaken:
(1) Loopband staat niet vlak.
(2) De loper gaat niet over het midden van de band.
(3) De kracht per voet is verschillend.
Als de oorzaak bij de gebruiker ligt kan normalerwijze door de band enkele minuten onbelast te laten
draaien het probleem worden opgelost.
Zo niet dan kunnen we het oplossen als volgt:
We kunnen de loopband als volgt afstellen met de inbusbouten aan de voorzijde.
Als de band naar de linkerzijde is gelopen,draai de linkerbout met de klok mee of de rechterbout tegen
de klok in als in afbeelding a.
Als de band naar rechts is gelopen, draai de linkerbout tegen de klok in of de rechterbout met de klok
mee, als in afbeelding b.
Opgepast: niet meer dan een kwartslag ineens en dan een periode onbelast laten draaien, meestal is
dat voldoende.
6.Afstellen van losse band.
Alle banden zijn afgesteld voor ze de fabriek verlaten , maar na een periode van gebruik kunnen ze iets
oprekken waardoor u tijdens het lopen het gevoel krijgt dat de band even stil blijft staan. Wanneer u dit
bemerkt kunt u de band iets strakker zetten door de bouten aan het einde van de band iets aan te
draaien, beide zijden gelijk. Zorg dat u de band niet te strak zet want dit kan schade aan de motor en de
lagers veroorzaken.
7. Afstellen motor riem
Als de riem van de motor te los komt te liggen wat bemerkbaar is aan het slippen van de loopband
tijdens gebruik kan dit als volgt worden verholpen.
de sensor van de motor
De riem van de motor
de bevestigingsbouten van de motor
de afstelbout van de motor
De afstelstappen:
1
1. Los de bevestigingsbouten iets.
2
2. Draai de afstelbout iets aan.
3
3. Controleer de spanning.
4
4. Wanneer goed ,zet alle bouten weer vast.
Ⅴ Lijst van onderdelen.
NO
1
2
3
4
5
6
7
8
9
10
11
12
13
14
omschrijving
Hoofdframe
Steunen
Console
veiligheidsschakelaar
Boven paneel
Steunverbinder
Plastic kapjes
Specificatie
Siliconen Olie
Bout M8×16
Bout M8×50
Vulring 8 mm
Self‐tapping schroeven M4×12
gereedschap
UNIT
SET
set
stuk
stuk
set
stuk
stuks
blad
flesje
stuks
stuks
stuks
stuks
set
hoeveelheid
1
1
1
1
1
1
2
1
1
6
2
2
6
1
Ⅵ Problemen oplossen:
Probleem
Er is geen aanwijzing op display bij in
of uitschakelen.
Mogelijke oorzaak
1. De stekker zit er niet
goed in.2 .Geen stroom
op stopcontact
Oplossing
1.controleer stekker.2.
controleer de zekering
1. Druk op stop en start
opnieuw . 2 .Schakel de
stroom uit en probeer
opnieuw na een minuut
Het stopt na even gebruik en display
werkt normaal.
Automatische
systeembeveiliging
werkt..
De loopband werkt niet normaal, en
piept terwijl de displays normaal
weergeven
De ingangstroom is te
laag
Wacht tot voltage weer
goed is
De band loopt normaal maar slipt als
u er op stapt
Controleer of de band‐
enspanning te los is
Zet de loopband iets
strakker
Geen display of display werkt niet
goed
Schakel de stroom uit en na
enkele minuten weer in.
NR.
Omschrijving
Soort
Aantal
NR.
Omschrijving
Soort
Aantal
1
Hoofdframe
Stuk
1
12
Wiel
Stuk
2
2
Beschermrand
Set
1
13
Sensor Plug
Stuk
1
3
Band
Stuk
1
14
Sensor Outlet
Stuk
1
4
Eindkappen
Set
1
15
Motorkap
Stuk
1
5
Linker paal
Stuk
1
16
Bout M8 X 16
Stuk
10
6
Rechter paal
Stuk
1
17
Bout M8 X 50
Stuk
2
7
Verbindingsbuis
Stuk
1
18
Ring
Stuk
2
8
Computer
Stuk
1
19
Zelftapper
Stuk
6
9
Plastic kapje
Set
1
20
Kabel
Stuk
1
10
Plastic opvulbus
Set
1
21
Kabel
Stuk
1
11
Stelpoot
Stuk
4
TREADMILL
Owner’s Guide
CONTENTS
Ⅰ SAFETY PRECAUTIONS⋯⋯⋯⋯⋯⋯⋯⋯⋯⋯⋯⋯⋯⋯⋯⋯⋯⋯⋯1
Ⅱ INSTALLATION⋯⋯⋯⋯⋯⋯⋯⋯⋯⋯⋯⋯⋯⋯⋯⋯⋯⋯⋯⋯⋯⋯⋯2
Ⅲ OPERATION⋯⋯⋯⋯⋯⋯⋯⋯⋯⋯⋯⋯⋯⋯⋯⋯⋯⋯⋯⋯⋯⋯⋯⋯3
Ⅳ DAILY MAINTENANCE⋯⋯⋯⋯⋯⋯⋯⋯⋯⋯⋯⋯⋯⋯⋯⋯⋯⋯⋯5
Ⅴ LIST OF ITEM IN THE PACKAGE⋯⋯⋯⋯⋯⋯⋯⋯⋯⋯⋯⋯⋯⋯⋯8
Ⅵ TROUBLESHOOTING⋯⋯⋯⋯⋯⋯⋯⋯⋯⋯⋯⋯⋯⋯⋯⋯⋯⋯⋯⋯9
Ⅺ STRUCTURE DRAWING & LIST⋯⋯⋯⋯⋯⋯⋯⋯⋯⋯⋯⋯⋯⋯⋯10
APPENDIXⅠ:SBW COMPARISON TABLE⋯⋯⋯⋯⋯⋯⋯⋯⋯⋯⋯12
APPENDIXⅡ:OBESITY DEGREE /BMI COMPARISON TALBE⋯⋯14
TECHNICAL DATA
●Speed range:0.5—14(km/h)
●Input Voltage:220V(50Hz)
●Distance range:0.00—9.99(km)
●Time range:00:00--99:59(min:sec)
●Power:1500W
●Biggest supporting value:130(kg)
Ⅰ SAFETY PRECAUTIONS
FRIENDLY REMIND: Due to technology development,if there are
changes,all interpretation rights shall belong to our company.
WARNINGS:
●Read all precautions and instructions in the manual before using the treadmill.
●The treadmill must be folded and locked before moving or lifting .Do not touch the
safety lock when you lift the treadmill. Lifting and moving the treadmill is strictly prohibited when it is unfolded or unlocked.
●To aovid accidentlly injury,please do not touch the armrest with your fingers when
opening and folding the main frame.
●Keep children away from the treadmill at all times.Children or pets should be kept 3
meters away.
●It is important for users over the age of 35 or with medical history to consult physician before beginning any exercise or using the treadmill.
●Keep the treadmill indoors,away from moisture and dust.Do not put the treadmill in a
garage or covered patio,or near the water.
●Place the treadmill on a level surface with eight feet of clearance behind it and two feet
on each side.
●Ensure the power cord is plug into a grounded circuit.No other appliance should be on
the same circuit.
●Wear appropriate sportswear and shoes while using the treadmill.Bare feet is forbidden
while using.
●Never start the machine when you are standing on the running belt. Always hold the
handrails while using the treadmill.
●If you feel incompatible or uncomfortable while using, press STOP or pull out the SAFETY KEY immediately.
●The sensor of heart rate is not a medical device, a lot of reasons can be caused and
measured inaccurately, it is only for reference to measure the result.
●Heart disease patient should not use the treadmill alone or use the QuickSpeed function.
●Select the speed according to your physical condition. Patient should use the treadmill
under doctor’s advice.
●Always remove the key and unplug the power cord when not in use.
●Overloading will damage the treadmill.Never exceed the maximum user weight.
●Sensors covered in dust will affect the accuracy of the reading.Wipe off the dust with a
dry cloth when needed.
●Never touch any moving part while using the treadmill.
●Keep long hair tied-up when using to prevent accident.
—1—
Ⅱ INSTALLATION
Installation Tips:
1 In order to avoid installation error,do not tighten up all the bolts in each step before the
whole treadmill assembled completely.
2 Loosen the fixed strip between the mainframe and the base fundation after assembled,then
move it to the suitable position.
(1)MAINFRAME ASSEMBLE STEPS:
1. Through the 7 core line
into the right poling, then
tighten the poling and the
mainframe with panhead
bolt with M8×16.
3. Connect the upper sheath
with self-tapping bolts
M4×12.
2. Connect the sensor lines
between the console and
the armrest,then,connect
the ones between the console and the polings.
4. Connect the polings and the
transverse bracing with panhead bolt M8×50,wahserΦ8
and plastic blocks.
(2) MULTIFUNCTIONAL ASSEMBLE STEPS:
2. Connect the underside of
multifunctional bracket and
main frame with M8×16.
1. Connect the multifuncitonal bracket with bolts
M8×16.
—2—
3. Connect the multifunctional head of bracket and
main frame with M8×16.
4. Fix the massager on the
fixed pipe with the bolts on
it.
Ⅲ OPERATION
(1)The parts name of console:
;04,+0:73(@>05+6>
7<3:,+0:73(@>05+6>
+0:;(5*,+0:73(@>05+6>
796.*(3+0:73(@>05+6>
:7,,++0:73(@>05+6>
:;672,@
:7,,++09,*;2,@
-(:;2,@ :,;2,@ :(-,;@2,@ :36>2,@
:;(9;2,@
/(5+3,7<3:,:,5:69
.907;/,/(5+3,:*(5;,:;@6<97<3:,
—3—
(2) Debugging guide:
1、Preparation for operation:
Turn on the
switch after
installation
Keep safety key
The meter has a
The machine in
clip
moo, then all
standby mode
your
display data is
clothes
zero
2
Normal operation mode X
The machine
Press start key,
Adjust speed
in
the treadmill
0.5-12km/h
pause state, press
start with
through press fast
two times into
0.5km/h
and slow speed key
standby state
Standby
mode
Press stop key in
3\ Count down running modeX
Press set key
Press
fast
or
Press start key,
Adjust speed
Press stop key in
in
slow
key
set
the treadmill
0.5-12km/h through
pause
state,
press
start with
press fast and slow
two
times
into
0.5km/h
speed key or quick
standby state
standby
time
state
4\ Distance running mode:
Press two times
Press fast or slow
set
key set distance
key
in
standby state
Press start
key, the
Adjust speed
Press stop key in
0.5-12km/h through
pause
state,
press
treadmill start
press fast and slow
two
times
into
with 0.5km/h
speed key or quick
standby state
speed key
5\ Pulse control speed mode:
Press three times
Pulse
set
key
standby state
in
control
Press fast or slow
Press START key to
Press STOP key
speed initial date
key to set pulse
start
to
is 100,speed is
50-160/min
speed,0.5-6kn/h
pulse control
pause,Press
twice to stop
2.8km/h
6\ 5 Kinds aut omatic variable speed mode :
Press set key to choose P1-P5
speed programs
Press start key,
speed change
every 200m
It
stop
automaticall
y after 2km
Press stop key in
pause
state,
press
two
times
into
standby state
—4—
(三) Pulse test:
When in standby or low speed state,grip the handle pulse sensor on the armrest
with two hands,we can test the user’s pulse by this methods.
(四)Operation on folding:
Warning:When folding or opening the machine,please do not touch the armrest with
your fingers to avoid accidentally injury.
When folding the mainframe ,grip
the waling piece in the back of the
mainframe,uplift it until the locking
apparatus locks automatically.
(Make sure that it is locked.)
On the condition of folding,the
mainframe will land slowly under
the function of the hydro cylinder if
you spurn the locking apparatus.
Ⅳ DAILY MAINTENANCE
1. Running board and running belt
●Brief:
The motorized treadmill use imported running belt, it’s with lower friction coefficient, higher
intensity of tension, the running board is specially with double shock absorption system,
its special smoothness and abrasion prevention make the movement more comfortable
and fluent .
●Clean
Keep cleanness of treadmill, it can prolong treadmill’s life, please usually clean the exposed
running board both side of the running belt and foot board. Reduce the accumulation of
the dust and trash under the running belt. Clean the running belt by dipped soap water;
please note not to let water flow into machine and under the running belt.
—5—
2. Lubricating
The running board/belt must be lubricated by special lubrication after a period of use.
The methods and steps are in the following:(You’d better do it under the instruction of the
professional person)
(1) Loosen the adjusting bolts of the back adjust ware on the both sides by inner hexagon
spanner. Make the running belt loose.
(2) Slime the lubricant on the sport zone of the running board homogeneously.
(3) Adjust the running belt refer to the‘adjust slanted running belt’as a reference.
(4) Let the treadmill works for some time in a low speed after adjusting the running belts.
Make sure that the running belt is unbiassed.
Suggestion:
Treadmill works less than 3 hours every week. It’s lubricated one time every half of year.
Treadmill works from 3 to 6 hours every week. It’s lubricated one time every 3 months.
Treadmill works more than 6 hours every week. It’s lubricated one time every month.
Superfluous lubrication is not ok, it’s not good with more lubrication. Please remember:
reasonable lubricating is an important factor for prolonging treadmill’s life!
3. Clean
Please eliminate the dust regularly after a period of use, to keep the power panel and the
head of the sensor clean.
4. Evaluation of friction
The friction between running belt and board will be increased as dust or reduced lubrication,
this perhaps can harm motor, controller increased friction is with following character:
(1) When shut off power of treadmill, the running belt can’t be moved or it’s difficult for user
to move by foot.
(2) Causing harm of motor of controller, open circuit and the fuse blows.
5.Adjust slanted running belt
All running belt are adjusted before the treadmill leaving the factory, but after
after a period of time of using, the belt will become slanting, it may be caused by the
following reasons:
(1) The engine frame is not steady.
(2) The user’s feet are not in the middle of the running belts when they are using it.
(3) The force on the feet is not even.
If the running belt is slanted by the user, it can return to normal after running without anyone
for a few minutes.If the running belt can not return to normal by itself, we can adjust the
—6—
running belt regulator with the inner hexagon spanner, adjust it semicycle once. If the
running belt is near the left side, adjust the left bolt clockwise or adjust the right bolt counter
clockwise.(look at picture a)
If the running belt is near the right side, adjust the right bolt clockwise or adjust the left bolt
counter clockwise.(look at picture b)
The running belt deflection is not in the insurance coverage,this problem can be maitained
by the clients.The deflection can damage the running belt,so we must solve it in time when
we find it.
6.Adjust flab or tight belt
All the running belts are adjusted brfore leaving the factory and after installation,but after
a period of using, the running belt will become a little longer and give us some feeling of
stopping when we are running. When this kind of phenomenon appears, adjust the running
belt adjustable bolts clockwise and make the two sides equable, adjust them semicycle
once.(look at picture c). If the running belt is loose,it is not in the insurance coverage,this
problem can be maitained by the clients.If the running belt is too loose,it will appare skid
phenomenon between the belt and the roller when we step on the belt.But it will be not
good if the belt is too tight,it may damage the motor,belt and roller,and so on.
—7—
7. Adjust motor belt
All motor belts are adjusted before the treadmill leave the factory, but after a
period of time of use, the belt will become flab and skid, this can be solved by
the users.
The sensor of motor
The fixing bolt of motor
The belt of motor
The adjusting bolt of motor
The adjustment steps:
1. Loosen the screw of the motor.
2. Turn the adjustment screw in order with spanner.
3. Adjust it until the belt doesn’t slip.
4. After adjusting ,locking all the bolts.
Ⅴ LIST OF ITEM IN THE PACKAGE
㈠ Mainframe carton packling list:
NO
1
2
3
4
5
6
7
8
9
10
11
12
13
14
DESCRIPTION
Mainframe
Poling
Console
Safety Switch
Upper Sheath
Poling Transverse Bracing
Plastic Lump
Specification
Silicon Oil
Panhead Bolt M8×16
Panhead Bolt M8×50
Washerφ8
Self-tapping Screw M4×12
Special Purpose Tools
UNIT
SET
SUIT
PC
PC
SUITE
PC
PC
PAD
BOTTLE
PC
PC
PC
PC
SUIT
—8—
QUANTITY
1
1
1
1
1
1
2
1
1
6
2
2
6
1
㈡Attachment carton packing list:
NO
DESCRIPTION
UNIT
QUANTITY
1
Support Lying Bracket(upper)
PC
1
2
Support Lying Bracket(lower)
PC
1
3
Massager
SET
1
Ⅵ TROUBLESHOOTING:
Problems
Possible Causes
There is no display when treadmill
is turned on or off.
1. The power cord is
not plugged well.
1.Plug in again.
2 .The plug head is not
2. Connect it once more.
inserted well.
3. Change the fuse.
3.
The
fuse
is
damaged..
It stops by itself when using even.
All displays are normal.
The automatic system
protection.
1. Press the ‘STOP’ key,
then start it.
2 .Turn off the power
switch, and start it in one
minute.
The running belt is not working
normal, and buzzes even all
displays are normal.
The input voltage is too Use it when the voltage
low.
returns normal.
The running belt runs normal by
Check whether the
itself but disoriented when setpped running belt is too
on.
loose.
No display or display not
functioning properly.
The plug head not
working because of
external disturbance .
Solution
Adjusts the running belt
accordingly.
Turn off the power switch,
then turn it on in one
minute
●Because of some reasons, the technical parameter may has a little difference. So
we can not take it as criterion to measure our state of health, all the data is just as a
reference.
●Cut off the power immediately and call our customer service if you need further
asistance. We will provide you the best service in time.
—9—
Ⅺ STRUCTURE DRAWING & LIST
(一)
NO.
DES
UNIT
Qty
NO.
DES
UNIT
Qty
1
Mainframe
PC
1
14
Sensor line Outlet
PC
1
2
Side Rails Sets
SUITE
1
15
Motor cover
PC
1
3
Running belt
PC
1
16
Panhead Bolt M8×16
PC
11
4
Rear End Cap Sets
SUIT
1
17
Panhead Bolt M8×50
PC
2
5
Left Poling
PC
1
18
Washerφ8
PC
2
6
Right Poling
PC
1
19
Self-tapping bolt M4×12 PC
6
7
Poling Transverse
Bracing
PC
1
20
7 Core Line Plug
PC
1
8
Console
PC
1
21
7 Core Line Outlet
PC
1
9
Upper sheath
SUITE
1
22
Massager
SET
1
10
Plastic Lump
PC
2
23
Massager Belt
PC
1
11
Foot screw
PC
4
24
PC
1
12
Moving Wheels
PC
2
25
PC
1
13
Sensor line Plug
PC
1
26
PC
3
—10—
Support Lying
Bracket(lower)
Support Lying
Bracket(upper)
Bolt On The Massager
(二
NO.
DES
UNIT
Qty
NO.
DES
UNIT
Qty
1
Mainframe
PC
1
12
Moving Wheels
PC
2
2
Side Rails Sets
SUITE
1
13
PC
1
3
Running belt
Rear End Cap
Sets
Left Poling
PC
1
PC
1
SUIT
1
PC
1
PC
1
PC
1
Sensor line Plug
Sensor line
Outlet
Motor cover
Panhead Bolt
M8×16
Panhead Bolt
M8×50
Washerφ8
Self-tapping bolt
M4×12
7 Core Line Plug
7 Core Line
Outlet
PC
10
PC
2
PC
2
PC
6
PC
1
PC
1
4
5
6
PC
1
8
Right Poling
Poling
Transverse
Bracing
Console
PC
1
9
Upper sheath
SUITE
1
10
Plastic Lump
PC
2
11
Foot screw
PC
4
7
14
15
16
17
18
19
20
21
—11—
APPENDIXⅠ:SBW COMPARISON TABLE
FEMALE SBW COMPARISON TABLE(UNIT:KG)
HEIGHT(CM)
152
156
160
162
164
166
168
170
172
176
19
46
47
49
50
51
52
54
56
57
60
21
46
47
49
50
51
52
54
56
57
60
23
46
47
49
50
51
52
54
56
57
60
25
46
48
49
50
51
53
55
56
57
61
27
47
48
50
51
52
53
55
56
58
61
29
47
49
51
52
53
54
56
58
59
62
31
48
49
51
52
53
54
56
58
59
62
33
48
50
51
52
53
55
57
58
59
63
35
49
50
52
52
53
55
57
59
60
63
37
49
51
53
53
54
56
59
60
61
64
39
50
52
53
53
55
57
59
650
61
65
41
51
52
54
54
55
57
59
61
62
65
43
51
53
55
55
56
58
60
62
63
66
45
52
53
55
55
57
58
60
62
63
66
47
52
53
57
57
57
58
60
62
63
67
49
52
53
56
56
57
59
60
62
63
67
51
52
54
56
56
57
59
61
62
63
67
53
53
54
56
56
58
59
61
62
64
67
55
53
54
56
57
58
60
61
63
64
67
57
53
55
56
57
58
60
61
63
64
68
59
53
55
56
57
58
60
61
63
64
68
61
53
54
56
56
57
59
61
63
64
67
63
52
54
55
56
57
59
61
62
63
67
65
52
54
55
56
57
59
61
62
63
66
67
52
54
55
56
57
59
61
62
63
66
69
52
54
55
56
57
59
61
62
63
66
AGE
—12—
MALE SBW COMPARISON TABLE(UNIT:KG)
HEIGHT(CM)
152
156
160
164
168
172
176
180
184
188
19
50
52
52
54
56
58
61
64
67
70
21
51
53
54
55
57
60
62
65
69
72
23
52
54
55
56
58
60
63
66
70
73
25
52
54
55
57
59
61
63
67
71
74
27
52
55
55
57
59
61
64
67
71
74
29
53
55
56
57
59
61
64
67
71
74
31
53
56
56
58
60
62
65
68
72
75
33
54
56
57
58
60
63
65
68
72
75
35
54
56
57
59
61
63
66
69
73
76
37
55
57
58
59
61
63
66
69
73
76
39
55
57
58
60
61
64
66
70
74
77
41
55
57
58
60
62
64
67
70
74
77
43
56
57
58
60
62
64
67
70
74
77
45
56
58
59
60
62
64
67
70
74
77
47
56
58
59
61
63
65
67
71
75
78
49
56
58
59
61
63
65
68
71
75
78
51
57
58
59
61
63
65
68
71
75
78
53
57
58
59
61
63
65
68
71
75
78
55
56
57
59
61
63
65
68
71
75
78
57
56
57
59
60
62
65
67
70
74
77
59
56
57
58
60
62
64
67
70
74
77
61
56
57
58
60
62
64
67
70
74
77
63
56
57
58
60
62
64
67
70
74
77
65
56
57
58
60
62
64
67
70
74
77
67
56
57
58
60
62
64
67
70
74
77
69
56
57
58
60
62
64
67
70
74
77
AGE
—13—
APPENDIXⅡ:OBESITY DEGREE /BMI COMPARISON TALBE
BMI=WEIGHT(KG)/SQUARE OF HEIGHT
FAT DEGREE=(ACTUAL WEIGHT-STANDERD WEIGHT)÷STANDERD
WEIGHT×100%
BMI DATE
FAT DEGREE
WEIGHT DEGREE
THIN
<20%
LOWER WEIGHT
<10%~20%
NORMAL SCOPE
10%
OVERWEIGHT
EARLY FAT
﹥10%~20%
ⅠDEGREE FAT
ⅡDEGREE FAT
ⅢDEGREE FAT
﹥20%
WHO
STANDERD
ASIAN
STANDERD
CHINESE
STANDERD
<18.5
<18.5
<18.5
18.5~24.9
18.5~2.9
18.5~23.9
25.0
23.0
24.0
25.0~29.9
23.0~24.9
24.0~26.9
30.0~34.9
25.0~29.9
27.0~29.9
35.0~39.9
30.0~39.9
30.0~39.9
40.0
40.0
40.0
—14—