1
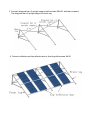
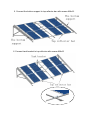
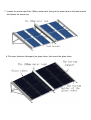
INSTALLATION MANUAL
SG 60 WATER HEATER
CAUTION
When working with this equipment:
Shut off water supply to prevent scalding and burning
3/3 Techno Park Drive Williamstown North VIC Australia 3016
Phone: 03 9397 3993 Fax: 03 9397 3994
Email: [email protected]
Web: www.ultimatesolar.com.au
1. NOTICE
The same series number can be found on package, user manual and the storage tank.
If there is no series number or the series number is damaged, this product is probably
Fraud.
Supply water in the evening or in the next morning when the solar water heater is
Being used at the first time or has shined for a long time without water in the collector,
Doing so will avoid breakage of tubes by thermal shock.
During continuous snow in Winter, please fill the water tank completely and empty the
Tank once very two days without sunshine.
Consult or hire professionals in your area before and for installation. The lightening
Arrester should be considered in installation.
The system MUST BE MOUNTED FACING NORTH.
All exposed pipeline should be insulted properly to prevent heat loss and provide
Freezing protection. In the areas with ambient temperature under -5C, electric
Heating wire can be served as the solution of pipeline freezing.
Switch off power before operation.
Any modifications on the structures of water heater might lead to problems during service
System controller combines auxiliary electric heater can be installed together wth the
Solar water heater.
2. INSTALLATION
1. Connect reflector and top reflector bar with screws M6x25
2. Connect front leg and back leg with screws M6x45, then connect diagonal bar 1,
Diagonal bar 2 on front leg and back leg with screws M8x16, at last connect baseboard
To front leg and back leg with screws M6x45
3. Connect diagonal bar of upright support with screws M6x25, and then connect
The diagonal bar of upright support to back leg
4. Connect reflector and top reflector bar to front leg with screws Mx16
5. Connect the bottom support to top reflector bar with screws M8x16.
6. Connect tank bracket to top reflector with screws M8x16
7. Loosen the screw cap of the 190mm water tank, then put the water tank on the tank bracket
And fasten the screw cap
8. Put some lubricant (detergent) on glass tubes, then insert the glass tubes
3. PLUMBING INSTRUCTION - SOLAR COLLECTOR CONNECTION
The connecting of the collectors to a collector array can be designed according to
The location and position of the system. Different ways of the connecting reflects
The different operation efficiency. Generally parallel connection and in series
Connection is suitable for the collectors. MAKE SURE that the length of the inlet
Pipeline is the same and should set check valve in the inlet pipeline. You should
Also set u-pipe and air vent in the outlet pipeline, the height is 100mm than collector
To prevent tube breakage.
SENSOR
Air relief
Solar Control Panel
Hot water
Solar collectors
SENSOR
Oneway Valve
Circulation pump
Buffer Tank
Makeup
Water Supply
Choose suitable controller.
Choose suitable circular pump and accessories according to the circulation flow rate and
Pump lift.
Connect the pipeline and check it.
The pipeline should be closed and not leaking.
The pipe outside should be insulation.