1
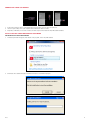
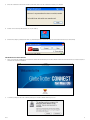
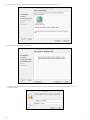
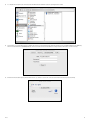
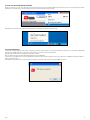
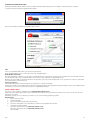
LJ<I
>L@;<
USB Modem
virginbroadband.com.au
V2.0
Table of
contents
Welcome to Mobile Broadband
3
Using your E-mail
12
Features of your USB Modem
3
Outlook Express
12
System Requirements
3
Outlook
13
Apple Mail
13
Package Contents
3
13
Connecting your USB Modem
4
Checking Your Usage
14
Installing the Virgin Broadband
software
Troubleshooting
14
4
Software installation for Windows
4
Detailed Technical Specifications
15
Software installation for Mac
5
Your First Connection
9
LED Status Information
9
Using the software
9
10
Checking Status
CLOSING the Virgin Broadband software
11
11
SIM Card Information
Changing the Program Settings
12
APN
Enable/ Disable the PIN Code
Technology Preference
12
12
12
WINDOWS Mail
virginbroadband.com.au
V2.0
Welcome to Mobile Broadband
Virgin Broadband offers a simple, easy to use connection: simply plug it into any PC or Laptop via its USB connector and shortly thereafter you are ready to
surf the Web using the latest HSDPA wireless network technology (where available).
Your USB Modem combines the convenience of high-speed wireless connectivity with extreme ease of use. There is no need to configure advanced settings
or parameters, just plug the USB Modem in and let the installer work its magic!
You are then one click away from access to the Internet, E-mail, Instant Messaging, Downloading, Streaming and more…
Your USB Modem is a truly versatile device for easy Internet access.
Features of your USB Modem
-
-
-
-
-
-
-
Easy Installation thanks to the Zero CD Plug ‘N’ Play software.
Easy connection, either directly to the PC or Mac or by using the provided extension cable.
Download and upload speeds:
High Speed HSPDA and UMTS data with backwards compatibility for EDGE/GPRS/GSM data connectivity.
Connectivity:
Global Connectivity with Triple-Band HSDPA / UMTS (850/1900/2100 MHz) and Quad-Band EDGE / GPRS / GSM (850/900/1800/1900 MHz).
Always gets the best out of the network, even on the borders of coverage, thanks to its Advanced Receiver Technology incorporating Receiver
Diversity and Equalisation.
Visual feedback on connection status with the LED (Status Indicator Light) and the easy connection software, including signal strength indication.
Compatible with nearly all modern desktop and laptop PC’s equipped with Microsoft operating systems (XP and Vista, excluding 64-bit editions) and
Mac OS X.
System Requirements
-
-
Free USB Port (Type A)
20 MB of free hard disk space
Mac OS X 10.x
• Macintosh™ computer with an Intel, PowerPC G3, G4 or G5 processor
• 512MB of RAM
Windows XP*
• Pentium™ 300MHz processor or equivalent
• 128MB of RAM
Windows Vista Home Basic*
• 1 GHz 32-bit (x86) or 64-bit (x64) processor
• 512 MB of RAM
Windows Vista Home
Premium/Ultimate*
• 1 GHz 32-bit (x86) or 64-bit (x64) processor
• 1 GB of RAM
*64-bit editions of Windows are not currently supported
Package Contents
-
-
-
V2.0
USB Modem
USB extension cable
Quick Start Guide and User Guide CD
Connecting your USB Modem
1
1.
2.
3.
2
3
Connect the extension cable to your USB Modem if you need more space around your USB ports.
Insert in a spare USB port on your computer with or without the extension cable.
Depending on whether you use a PC or a Mac, follow the steps below to install the Virgin Broadband Software.
Installing the Virgin Broadband software
Software installation for Windows
1.
An AutoPlay window will appear. Under Install or run program, click on Virgin Broadband.
2.
Click Install. The software will start to install and a Progress screen will be displayed.
V2.0
3.
Once the software and drivers have installed, click Finish, then close the software and restart your computer.
4.
Double click on the Virgin Broadband icon on your desktop.
5.
Click Connect. Open your Internet browser (e.g. Internet Explorer). You are now connected to the Internet and ready to start surfing!
Software installation for Mac
1.
After connecting the USB Modem, the installation software will automatically be mounted. Double click the GlobeTrotter Connect icon at the bottom of
the window to begin the installation.
2.
You will be prompted to allow the software package to be installed. Click Continue to proceed.
V2.0
3.
The following screen outlines some installation instructions. Please note that you are using a Zero-CD Installation, which requires the USB Modem to
be connected throughout the install process. Click Continue to proceed.
4.
Please read the Software Licence Agreement and click Continue to proceed.
Note: You can print or save a copy of the agreement for later reference.
5.
If you agree to the terms of the Software Licence Agreement, click Agree to proceed.
V2.0
6.
Select the disk drive where you wish to install the Globetrotter software and click Continue to proceed.
7.
Click Install to proceed with the current install.
8. You may be prompted to enter your OS X user name and password in order to authenticate. Enter the details and click OK to proceed.
Click Close to finish.
V2.0
8.
To complete the setup and get connected, start the Globetrotter software located in your Applications folder.
9.
The first time you run the GlobeTrotter software the preferences window will be automatically displayed. Type ‘VirginBroadband’ in the APN field,
which is located under the 3G/EDGE/GPRS tab. Leave Username and Password blank. Close the preferences window to save the changes.
10. Click the Connect button. Open your Internet browser (e.g. Safari). You are now connected to the Internet and ready to start surfing!
V2.0
Your First Connection
The first time you connect, you will be taken to a special page to activate your broadband service. Enter your first name and last name.
It will also allow you to create your first e-mail address, which will become the primary e-mail address that Virgin will send notifications to from time to time.
You will also have 4 additional e-mail addresses available. To create these additional e-mail addresses, simply give us a call on 1300 555 100.
LED Status Information
1
1.
LED status indicator
Off:
The Modem is not powered – unplug it, and plug it in again, or try using a different USB port on your computer
Fast blinking:
The Modem is searching for a network
Slow blinking:
Registered on the network and ready to connect
Always on:
Connected to the Internet
Fast continuous blinking: A problem has occurred. Unplug the Modem and plug it back in, or call us for technical support on 1300 555 100.
Advanced use info; Single blinking indicates that the USB Modem is registered to the Network (e.g., getting signal on the mobile network); Double blinking
indicates that it is also connected to the data network.
Using the software
Click here to connect to the Internet
This button will close the software
Click here to change settings. Note: you may not be
able to connect if you change these settings.
Status messages Registered to Virgin Mobile: You have signal and are ready to connect to the
Internet. Connected to Virgin Mobile: You are connected to the Internet.
Device not found: The Modem has not been detected. Try pulling it out and plugging it back in,
or use a different USB port.
No network: You do not have sufficient signal strength. Try moving to another area – remember,
physical barriers like thick walls will affect your signal strength.
Connection method and signal strength,
the more bars the better!
HS is Broadband
2G is dial-up speeds
If you get 2G whilst connected to the Internet, try moving locations to improve your connection.
Once you’ve installed the software, here’s how to use your Virgin Broadband connection:
1. Plug in your USB Modem
a) Windows - Double click on the Virgin Broadband icon on your desktop. You can also click on the “Virgin Broadband” icon in the System Tray
and click “Connect”.
or
V2.0
b) Mac OS X - Start the Globetrotter software located in your Applications folder.
2.
Click Connect, and you’re online! If you close the software whilst connected, it will stay connected and will remain in the system tray.
3.
When you’re finished, click Disconnect and close the software, or simply remove the USB Modem. In Windows, you can also click on the Virgin
Broadband system tray icon, and then select Disconnect.
Checking Status
The USB Modem will immediately look for the network upon being plugged in. You can check the status of the connection by moving your mouse pointer
over the Virgin Broadband icon in the System Tray to get a quick status report showing the Network Name, Technology being used and the signal quality:
The letters in the bottom left corner of the software will display whether you are connected to a GPRS/EDGE (2G) or HSDPA (HS) network. The bars to the
right of this indicate signal strength (the more bars, the better!).
If you only get 2G when connected to the Internet, try moving locations to improve your connection. Like any mobile, physical location and barriers (walls,
etc) will affect signal.
V2.0
10
CLOSING the Virgin Broadband software
When you click “Close” or the “X” (found in the top right of the application) on the Virgin Broadband application, this does not exit the application. It simply
minimises to the System Tray. To end the application, right click on the Title Bar and choose ‘Exit’.
Alternatively you can right click on the Virgin Broadband Icon displayed in the Task Bar and select Exit.
SIM Card Information
To help protect against damage from electronic discharge (e.g. static electricity) please do not touch the SIM card connectors. As a precaution, always make
sure that your USB Modem device is already in your hand before you insert or remove the SIM card.
Removing the SIM card may cause damage and should be avoided.
Only the SIM card provided by Virgin Broadband will work in your USB Modem.
If you remove your SIM and try to use your USB Modem it will not be able to find the network. If you do this, remove the USB Modem, replace the SIM and
plug in your Modem again.
If the SIM is not properly inserted, you will see the following error message. Remove and re-insert the SIM and try again.
V2.0
11
Changing the Program Settings
Although the Virgin Broadband software comes pre-configured with the optimal settings, there are a number of settings that can be configured.
To change the settings, launch the Virgin Broadband software.
Click on “Show Settings” to make the Configuration Options Visible.
APN
The Access Point Name (APN) defines your connection to the Internet.
For the Virgin Broadband service to connect, this needs to be: “VirginBroadband”.
Enable/Disable the PIN Code
By clicking on ‘Enabled’ or ‘Disabled’, you can enable or disable the PIN code on your SIM. For security reasons you will have to provide the PIN code before
you can disable the PIN code. If you enable the PIN code you’ll have to enter a new PIN code. (Default PIN is 0000)
Warning: if you enter a PIN code and then enter this incorrectly 3 times, your service will be disabled. If this occurs you will need to contact us on Customer
Service 1300 555 100 to remove the block.
Technology Preference
Setting to the UMTS preferred will result in the best possible speed of connection at all times.
However, local conditions can sometimes make connecting to the Internet difficult, particularly where high-speed network coverage is not available. In these
circumstances you can try forcing the data connection on to “EDGE/GPRS Preferred”.
Using your E-mail
You can access your e-mail via our webmail page at: webmail.virginbroadband.com.au
Simply enter your username (the first part of your e-mail address before the @) and your password to send and receive e-mail. You can access this from
any Internet connection!
Alternatively, you may choose to configure your e-mail to use one of the following popular mail programs:
Outlook Express
1.
Click Tools, then Accounts
2. Click Add, then Mail
3. Type in your preferred display name, then click Next
4. Type in the e-mail address you created when you activated your broadband, then click Next
5. Leave mail server type as POP3
Type in the incoming mail server: mail.virginbroadband.com.au
Type in the outgoing mail server: smtp.virginbroadband.com.au
Then click Next
V2.0
12
6. In the Account name section, enter your full e-mail address
Enter your e-mail password
Leave “Log on using Secure Password Authentication” unticked
Click Next
7. Click Finish, then Close. You have now completed setting up your mailbox and are ready to start sending and receiving e-mail!
Outlook
1.
Click Tools, then E-mail Accounts
2. Select Add new e-mail account and click Next
3. Select POP3 and click Next
4. Under User Information, type in your name, and your e-mail address
5. Under Server Information:
Type in the incoming mail server: mail.virginbroadband.com.au
Type in the outgoing mail server: smtp.virginbroadband.com.au
6. Under Logon Information:
Type in User Name as your full e-mail address
Type in your e-mail password
Leave “Log on using Secure Password Authentication” unticked
7. Click Finish. You have now completed setting up your mailbox and are ready to start sending and receiving e-mail!
Apple Mail
If this is your first time using Apple Mail:
1.
Open Apple Mail from your dock
2. Enter the details as below from after step 3
If you already have Apple Mail setup with a different e-mail provider:
1.
Open ‘apple mail’ from your dock
2. Go Mail, Preferences, click the account tab
3. Click the plus symbol at the bottom left
Account Type: POP
Account Description: Virgin mail
Full Name: Your full name
E-mail Address: Your full e-mail address
Click Continue
4. Incoming mail server: mail.virginbroadband.com.au
User Name: Type in your full e-mail address
Password: Your e-mail password
Click Continue
5. Leave ‘use secure sockets layer’ unticked
Leave Authentication as: Password
Click Continue
6. Outgoing Mail Server: smtp.virginbroadband.com.au
Leave Authentication unticked
Leave ‘use secure sockets layer’ unticked
Click Continue
7. Check that settings are correct on the summary page. You have now completed setting up your mailbox and are ready to start sending and
receiving e-mail!
Windows Mail
1.
From the Tools menu, select Accounts
2. Click the Add button
3. Select E-mail Account and click Next
4. Enter a Display Name and click Next
5. Enter your Virgin Broadband E-mail address and click Next
6. Ensure that POP3 is selected in the Incoming e-mail server type field and enter the following server details:
Incoming mail (POP3 or IMAP) server: mail.virginbroadband.com.au
Outgoing e-mail server (SMTP ) name: smtp.virginbroadband.com.au
Click Next
7. Enter your full email address in the E-mail username field. Enter your password and click Next
8. Click Finish, then Close to save the settings and access your email
V2.0
13
Checking Your Usage
To check your usage, log onto “My Account” at virginbroadband.com.au and select “My Broadband Usage”.
Troubleshooting
Symptom
Possible Cause
Possible Solution
No Active LED on USB Modem
USB Modem is not connected To a
working USB port
Check if the USB Modem is well
Plugged into the USB Port or check
the connection of the cable if you
are using this. Perhaps try another
USB port.
LED does not Start blinking (USB
Modem does not attach to GPRS or
UMTS)
No SIM inserted
Disconnect the USB Modem. Insert
the SIM and reconnect the USB
Modem to USB port.
Insufficient signal
Try moving the USB Modem to a
better coverage location (eg. Near
a window). The extension cable may
be helpful in this situation. Refer
the signal strength tool.
Drivers are not properly installed
(USB Modem will show a yellow
exclamation mark in Device
Manager)
Try removing ALL USB devices
plugged in and close all software
applications associated.
The APN is not correct
Check the settings with the ones
that you’ve been provided with from
Virgin.
You are trying to Global roam with
this USB Modem Device
This functionality is not supported.
No or Weak UMTS/HSDPA network
where you are situated
Check in the Virgin Broadband
Connect tool, under settings and
confirm UMTS preferred is selected.
Check also signal strength meter
for network coverage (UMTS/ HSDPA
or GPRS/ EDGE).
Faulty Driver Installation
Remove previously installed
connection software. Then
re-install USB Modem software.
Conflicting with other programs
Disable or Remove any other
communication based program that
may conflict with the USB Modem.
No or Weak UMTS/ HSPDA network
Where you are situated
Check in the Virgin Broadband
Connect tool, under settings and
confirm UMTS preferred is selected.
Check also signal strength meter
for network coverage (UMTS/ HSDPA
or GPRS/ EDGE).
LED does Blink, but does not connect
Your Connect software doesn’t
detect the USB Modem
Slow Speeds
V2.0
14
Detailed Technical Specifications
-
-
-
-
-
-
-
-
V2.0
HSDPA/ UMTS Air Interface:
•
Triple-band WCDMA 850/ 1900/ 2100 MHz for USB Modem
•
Single Band WCDMA 2100 MHz for icon
•
UMTS: 384 Kbps in downlink, 384 Kbps in uplink
•
HSDPA: 7.2 Mbps in downlink, 384 Kbps in uplink
•
Dual Antenna Receiver diversity (on 2100 MHz): Only for USB Modem
•3GPP FDD Compliant, up to 7.2 Mbps Peak Rate
•
UE Power Class 3
•
Receiver Equalisation
EDGE/ GSM Air Interface:
•
Quad-Band: 850/ 900/ 1800/ 1900Mhz (US-Cellular, EGSM, DCS and US-PCS brands)
•
EDGE Power Class E2, GSM Power Class 1 at 1800/ 1900 MHz and Power Class 4 at 850/900 MHz
•
GPRS/ EDGE coding Scheme support: CS1-4 and MCS1-9
•
Multislot GPRS/ EDGE Class 12
Powering is done though the USB Interface
USB 2.0 Full speed Interface (USB 1.1)
Status LED, indicating the Connection status
SIM Card Interface Compliant with 3GPP 31.101 and 31.102 supporting 1.8 and 3V UICC’s
Environmental Operating Temperature: 0o to +40o C
RoHS Complaint
15