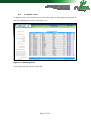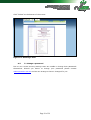
1
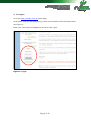
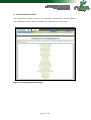
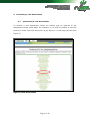
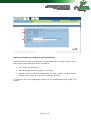
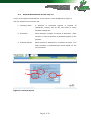
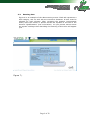
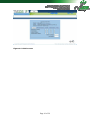
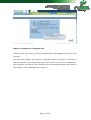
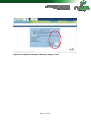
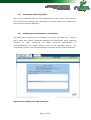
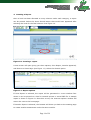
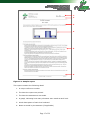
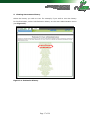
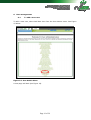
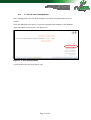
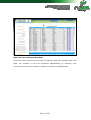
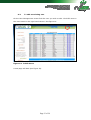
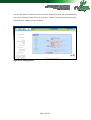
Assessment Centre
User Manual
… Doing HR Differently
NEOS Pty Ltd
March 2011
© Neos Pty Ltd 2010
This manual is copyright. Apart from and fair trading for the purposes of private
study, research criticism, or review as permitted under the Copyright Act, no part
may be reproduced, stored in a retrieval system, or transmitted in any form by
means electronic, mechanical, photocopying, recording or otherwise, without prior
written permission.
All enquiries to:
Neos Pty Ltd
PO Box 70
Mt Gravatt Central
QLD 4122, Australia
Phone: +61 07 3420 8200
Fax: +61 07 3849 8944
Table of Contents
1.
TO LOG IN ................................................................................................................................. 4
2.
THE ASSESSMENT CENTRE .............................................................................................. 5
3.
CONDUCTING A NEW ASSESSMENT........................................................................... 6
3.1.
3.2.
3.3.
3.4.
3.5.
CONDUCTING A NEW ASSESSMENT ............................................................................... 6
GENERAL ASSESSMENT SCREEN LAY OUT.................................................................... 8
ENTERING DATA ................................................................................................................. 9
CONFIRMING AND SAVING DATA ................................................................................ 13
ADDING SPECIAL COMMENTS TO YOUR REPORT ..................................................... 13
4.
CREATING A REPORT ....................................................................................................... 14
5.
VIEWING ASSESSMENT HISTORY ............................................................................ 17
6.
USER MANAGEMENT ......................................................................................................... 19
6.1. TO ADD A NEW USER ....................................................................................................... 19
6.2. TO ACCESS USER MANAGEMENT.................................................................................... 21
6.3. TO EDIT AN EXISTING USER .......................................................................................... 23
6.4. TO DELETE A USER ........................................................................................................... 25
6.5. TO CHANGE A PASSWORD .............................................................................................. 26
7. ADDITIONAL ADVICE .......................................................................................................... 27
DON’T ............................................................................................................................................... 27
ALSO REMEMBER ............................................................................................................................ 28
8.
SUPPORT ................................................................................................................................. 29
-3-
1. To Log In
Go to the http://neoshr.com.au home page.
Scroll down, and you will find the log in form at the bottom of the left hand menu.
See Figure 1.
Enter your user name and password and click User Login.
Figure 1: Login
Page 4 of 29
2. The Assessment Centre
The Assessment Centre is where you undertake assessments, review histories
and download records. Figure 2 displays the Assessment Centre page.
Figure 2: Assessment Centre Page
Page 5 of 29
3. Conducting a new Assessment
3.1.
Conducting a new Assessment
To conduct a new assessment, select the module type as required on the
Assessment Centre home page. For example, if you wish to conduct a new Exit
Interview, select “New Exit Interview” as per Figure 3. A new page will load (see
Figure 4).
Figure 3: New Assessment
Page 6 of 29
1.
2.
3.
Figure 4: Example of creating a new assessment
Depending on the type of assessment you are performing, a slight variation of the
above screen will load. Each screen consists of:
1. Title (type) of Assessment
2. Details of Assessment (company, user, date)
3. Details needed to perform Assessment (eg. job number, job title, award,
stream, risk number, set, activity, employee, position)
To proceed enter the appropriate details for the assessment being made. Hit
Submit.
Page 7 of 29
3.2.
General Assessment Screen Lay out
A copy of the general assessment screen layout is now displayed in Figure 5.
The key aspects of the screen are:
1. Category tabs:
A
position
is
evaluated
against
a
number
of
categories. Simply click on the tab name to move
between categories.
2. Elements:
Each category contains a number of elements. Each
element is used to describe a particular aspect of the
position.
3. Element Points:
Each element is assessed on a number of levels. The
total provides a predetermined result based on the
level selected
1.
2.
3.
Figure 5: General layout
Page 8 of 29
3.3.
Entering data
Figure 6 is an example of the data entering screen. Each tab represents a
skill category, and on each tab are numerous elements. A level must be
selected for each element. After reviewing the position requirements
slowly move the mouse or pointer across the squares to the left of the
element “Qualifications” (see circle below). As your pointer moves across
the square a dialogue box describing the meaning of this value will appear
(see
Figure 7).
Page 9 of 29
Figure 6: Initial screen
Page 10 of 29
Figure 7: Example of a dialogue box
Check the tick box when you have identified the most appropriate level for the
element.
NB: Only one selection per element is allowable. Once an element is checked, a
total will appear on the right hand side of the screen. As a level is nominated for
each element, the total for that element will be presented and the total value of
the category will be displayed as in Figure 8.
Page 11 of 29
Figure 8: Completed category showing category total
Page 12 of 29
3.4.
Confirming and Saving Data
Once you are satisfied that you have selected the correct level for each element,
move onto the next category by selecting the next tab. Make a level selection for
each element under all categories.
3.5.
Adding Special Comments to Your Report
The Notes tab is provided for the inclusion of free text (see Figure 9). Use this
tab to make any special comments regarding the assessment, some qualifying
remarks,
or
other
comments
(ie
salary
/Personal
Classification)
recommendations. The “Notes” section prints on the automatic reports.
or
The
“Comments” section is for internal/assessor comments and are kept confidential.
Figure 9: Recording notes and comments
Page 13 of 29
4. Creating a Report
Once a level has been allocated to every element under each category, a report
can be printed. Select the Store Record button that would have appeared after
selecting the level for the final element. See Figure 10.
Figure 10: Creating a report
A new screen will open giving you three options; Print Report, Another Appraisal,
and Return to Home Page (see Figure 11). Select the desired option.
Figure 11: Report options
If Print Report is selected, the report will be generated in a new window from
where it can be printed to a local or network printer or saved PDF file. A sample
report is shown in Figure 12. Once this occurs, the internet explorer window will
return the user to the home page.
If Another Report is selected, the browser will direct you back to the starting page
to create another assessment under the same module.
Page 14 of 29
1.
2.
3.
4.
5.
6.
Figure 12: Sample report
This report contains the following detail:
1. A unique reference number
2. The date the report was printed
3. The date the assessment was made
4. A graph, indicating how many elements were rated at each level
5. Word descriptions of each level selected
6. Notes as made by the assessor (if applicable)
Page 15 of 29
This report can then be printed, saved under a general directory of an electronic
management system or emailed. This document should be stored/processed as
per your company’s policies.
Page 16 of 29
5. Viewing Assessment history
Select the history you wish to view. For example, if you wish to view the history
for Job Evaluation, select Job Evaluation History on the User Administration menu
(see Figure 13).
Figure 13: Evaluation History
Page 17 of 29
A new page will open containing the records that you have access to. These
records can be sorted by clicking on the drop down filter column headings. This
enables records to be filtered by job no., job title, date, award, stream or level.
Choose the report you wish to review, and click “Show” (see Figure 14). A box
will appear asking you to Save or Open the file.
Figure 14: Evaluation History record list
Page 18 of 29
6. User management
6.1.
To add a new user
To add a new user, select Add New User from the User Admin menu. See Figure
15 below.
Figure 15: User Admin Menu
A new page will load (see Figure 16).
Page 19 of 29
1
2
.
3
.
4
.
Figure 16: New User
To complete a new user:
1. Fill out all the appropriate details
2. NB. Email address: [email protected]
3. Ensure the box marked “Active” has been checked
4. Check all applicable module boxes
5. Click Add at the bottom of the screen
NEOS will issue an email to the new user providing their username and password
for log-in.
Page 20 of 29
6.2.
To access user management
User management can only be accessed if you have the appropriate level of
access.
From the Add New User menu, click User Management located on the bottom,
right-hand side of the screen. See Figure 17.
Figure 17: User Management
A new screen will load (see Figure 18).
Page 21 of 29
Figure 18: User Management Menu
From here each column can be sorted by clicking a particular heading within the
table. For example, to sort all employees alphabetically by surname, click
Surname and the list will refresh to display all employees alphabetically.
Page 22 of 29
6.3.
To edit an existing user
On the User Management screen find the user you wish to edit. Click Edit next to
the users name in the right hand column. See Figure 19.
Figure 19: To Edit Users
A new page will load (see Figure 20).
Page 23 of 29
You will be able to amend the user’s details. Please note that the User password
can not be changed. Ensure the “User Active” button is checked before saving the
changes. Click Update to save changes.
Figure 20: Editing Users
Page 24 of 29
6.4.
To delete a user
To delete a user, click Delete next to the users name on the right hand column in
the User Management menu. See Figure 21.
Figure 21: Deleting Users
A new page will load as per Figure 22.
Page 25 of 29
Click “Delete” at the bottom of the screen.
Figure 22: Deleting a User
6.5.
To change a password
Due to our current security settings users are unable to change their passwords
themselves. Should you desire to change your password please contact
[email protected] and we can arrange to have it changed for you.
Page 26 of 29
7. Additional Advice
Do
Look for the general overall scope of the job
Ie: Supervise V’s manage, type of qualification needed
Interpret and place your value judgement on the written position
description
Look for consistency across the categories and elements
Refer to the company policy if necessary
Scroll over the pop up just near the probable element level
After generating a report, click on <return to menu> to return to
members page
Complete every assessment you start. Cancelling part way through
will “crash” the system
When researching the role ask, “show me evidence”, “show me an
example of the work” and “demonstrate”
Don’t
Use the Internet Explorer <Back> key when processing
Use single or double quote symbols (‘’ “”)
Trust
reports
where
multiple
reports
have
been
incorrectly
generated from the one specific assessment you have completed.
The data in the report will probably be corrupted
Cancel an assessment part way through
Page 27 of 29
Also remember
Check you have ticked all elements – otherwise the report and level
will be wrong and the report will generate with NUL
Check you have put in any necessary “additional notes” before you
generate a report
Data cannot be amended after it is saved. You need to add a new
appraisal, evaluation, or competency assessment
Jobs with incorrectly generated data because of using the <back>
key or other issues will generate incorrect reports
If all else fails, log out of internet explorer and log in again
Use the notes area to explain variance
Page 28 of 29
8. Support
Initially, all support calls to:
Neos Pty Ltd:
Phone: 07 3420 8200
Email: [email protected]
Technical Support
Starvision IT:
Phone: (07) 3822 1717
Email: [email protected]
Page 29 of 29