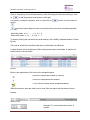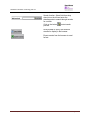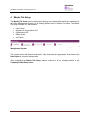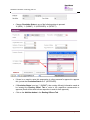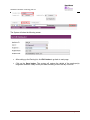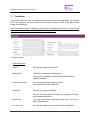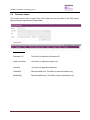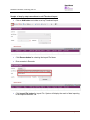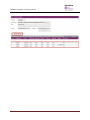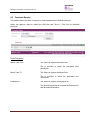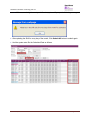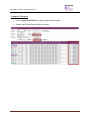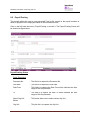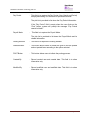
1
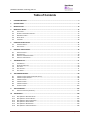
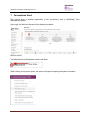
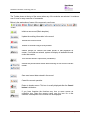
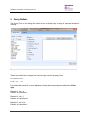
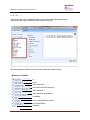
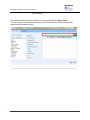
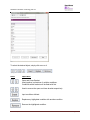
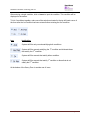
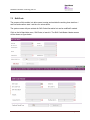
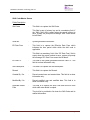
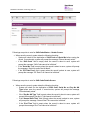
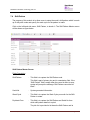
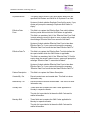
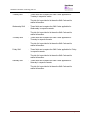
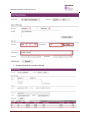
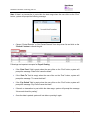
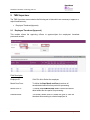
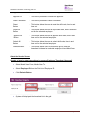
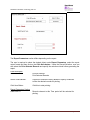
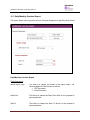
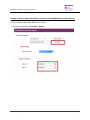
Mobile E-Commerce Web Intelligent Solutions for Enterprises MECWISE® TIME MANAGEMENT User Guide For Administrators Developed & Published by StarVision Information Technology Pte. Ltd. Table of Contents 1 CONVENTIONS USED .................................................................................................................................. 3 2 QUERY BUILDER ......................................................................................................................................... 6 3 INTRODUCTION ........................................................................................................................................ 14 4 MASTER FILE SETUP .................................................................................................................................. 15 4.1 4.2 4.3 4.4 4.5 5 COMPANY DETAILS SETUP ........................................................................................................................ 31 5.1 5.2 6 TIMESHEET IN/OUT IMPORT (FROM TIME CLOCK) ................................................................................................. 85 TIMESHEET IN/OUT ENQUIRY ............................................................................................................................ 88 TIMESHEET EXPORT ......................................................................................................................................... 91 TIMESHEET IMPORT ......................................................................................................................................... 94 TIMESHEET ENQUIRY ....................................................................................................................................... 97 PAYROLL POSTING ......................................................................................................................................... 104 TMS SUPERVISOR ................................................................................................................................... 112 9.1 10 CARD MASTER ................................................................................................................................................ 52 REPORTING STRUCTURE.................................................................................................................................... 55 SHIFT CODE ................................................................................................................................................... 58 SHIFT PATTERN ............................................................................................................................................... 71 SHIFT GROUP ................................................................................................................................................. 78 TMS ADMINISTRATION ............................................................................................................................. 84 8.1 8.2 8.3 8.4 8.5 8.6 9 EMPLOYEE PROFILE ......................................................................................................................................... 37 BANK ACCOUNT .............................................................................................................................................. 39 EMPLOYEE’S NEW APPOINTMENT ...................................................................................................................... 42 EMPLOYEE’S RESIGNATION................................................................................................................................ 46 TMS MASTER FILE ..................................................................................................................................... 51 7.1 7.2 7.3 7.4 7.5 8 COMPANY MASTER ......................................................................................................................................... 32 CPF ACCOUNT ............................................................................................................................................... 35 EMPLOYEE PROFILE SETUP ........................................................................................................................ 36 6.1 6.2 6.3 6.4 7 COST CENTRE ................................................................................................................................................. 16 SEGMENT FOR ORGANIZATION UNIT ................................................................................................................... 17 ORGANIZATION UNIT ....................................................................................................................................... 20 SALARY SCALE ................................................................................................................................................ 23 JOB FAMILY .................................................................................................................................................... 28 EMPLOYEE TIMESHEET (APPROVAL) .................................................................................................................. 112 TMS REPORTS ......................................................................................................................................... 118 10.1 10.2 10.3 10.4 10.5 10.6 DAILY/MONTHLY OVERTIME REPORT................................................................................................................ 121 DAILY/MONTHLY LATENESS REPORT ................................................................................................................. 124 DAILY/MONTHLY UNDER TIME REPORT ............................................................................................................. 127 DAILY/MONTHLY ABSENT REPORT ................................................................................................................... 130 DAILY/MONTHLY ERROR REPORT ..................................................................................................................... 133 DAILY/MONTHLY TIME CLOCK REPORT ............................................................................................................. 136 User Manual | Version 1.0 Page 2 StarVision Information Technology Pte. Ltd. 1 Conventions Used This section gives a detailed explanation of the conventions used in MecWise® Time Management System. Upon login, the Welcome Screen will be displayed as below. Welcome Screen The left hand side of the Window contains the Menu. When clicking on any menu option, the option will expand to display sub-system’s modules. Modules User Manual | Version 1.0 Page 3 StarVision Information Technology Pte. Ltd. The Toolbar shows at the top of the screen when any of the modules are selected. It contains a row of icons for easy execution of commands. Below is the explanation of some of the commonly used icons: Toolbar Initiate a new record (Blank template). Update the existing information in the record. Deletes the current record. Search for records using a Query Builder. Search records for records with fields similar to that displayed on screen. If no fields are entered, system will display all available records under that module. Print current record in report form (if available). Access the previous/next record without having to exit from the current screen. Save most recent data entered in the record. Cancel the current operation. Return to header screen. This icon is usually displayed after the Cancel button is clicked on. If you have forgotten the functions any icon or come across an unfamiliar icon, place the mouse cursor over the icon for a few seconds. A description of the function will be displayed. User Manual | Version 1.0 Page 4 StarVision Information Technology Pte. Ltd. The Collapsible Panel is located under the Toolbar. It displays a browser listing the different records according to the user’s specifications. Collapsible Panel (OR) Add new detail record Query Builder to query, filter and sort records for display in the browser. Export records from the browser to excel format. User Manual | Version 1.0 Page 5 StarVision Information Technology Pte. Ltd. 2 Query Builder The Query Form is for setting the criteria so as to display only a range of required records for viewing. Query Form These are some basic concepts and various signs used in the query form: For Alphabetical Values: a < b < c < ... < z. For values that contain 2 or more alphabets, always start comparing the values from left-toright. Example 1: ad < ar Reason: d is less than r Example 2: bd < d Reason: b is less than d Example 3: bcd < bcf Reason: d is less than f. User Manual | Version 1.0 Page 6 StarVision Information Technology Pte. Ltd. For Numerical Values: 1 < 2 < 3 < ... ... Using the Query form is essentially forming sentences specifying search criteria. Firstly select the subject criteria from the screen on the left. Select the desired condition from the column beside the subject screen. Meaning of Condition Is Is not Value more than. Value more than and equals to. Value less than. Value less than and equal to. Containing. Has no values/Does not exist. Has values/Exists, Including. User Manual | Version 1.0 Page 7 StarVision Information Technology Pte. Ltd. Not including. Next, enter the data in the field located in the top right hand of the Query Form. You can choose to enter the data manually or select from the pick list by clicking on the selection button beside the field. User Manual | Version 1.0 Page 8 StarVision Information Technology Pte. Ltd. Pick List To select the desired object, simply click once on it. Query Form Icons Icons Implication Open and Close Bracket. Used together in situations of multiple conditions. Conditions within brackets will be dealt with first. Used to remove the open and close bracket respectively. Input conditions defined. Replace any highlighted condition with another condition. Remove the highlighted condition. User Manual | Version 1.0 Page 9 StarVision Information Technology Pte. Ltd. After entering a single condition, click on Insert to input the condition. This condition will be displayed in the screen. To link 2 conditions together, make use of the selections located in the top left hand corner of the form after the 1st condition has been entered before entering the 2nd condition. Icon Implication System will filter only records satisfying both conditions. System will filter records satisfying the 1st condition and eliminate those that satisfy the 2nd condition. System will filter records that satisfy either condition. System will filter records that satisfy 1st condition or those that do not satisfy the 2nd condition. At the bottom of the Query Form is another row of icons. User Manual | Version 1.0 Page 10 StarVision Information Technology Pte. Ltd. Icon Implication Confirm conditions set. Exit Query Form. By clicking on the Order By tab, the user can pre set the order in which the records filtered will be listed. Order By Tab User Manual | Version 1.0 Page 11 StarVision Information Technology Pte. Ltd. Click on the property (From left hand screen), which the listing will be done according to. Click on to add the property to the screen on the right. Conversely, to unselect a property, click on it and click on the left. to return it to the screen on moves the property higher or lower in position/priority in the case of multiple properties selected. Ascending Order: a, b, c, ......, z / 1, 2, 3…9 Descending Order: z, y, x, ..., a / 9, 8, 7…1 To start the filtering with conditions and order defined, click on OK. (Located at bottom of Order By tab) The records, which fit the conditions laid down, will be listed in the Browser. A typical browse screen constitutes of titled columns and rows of stored data. A sample of a browse screen is shown below. Browser Below is the explanation of the icons on the collapsible panel: Click this to expand the browser for viewing. Click this to collapse/hide the browser. To lock current browser status (Expanded/Hidden). Within the browser, there are other icons to view, filter and export the information from the browser. Browser Icons Navigator. To view next/previous screen of records. User Manual | Version 1.0 Page 12 StarVision Information Technology Pte. Ltd. Search function. Select field from drop down list on the left and enter the data/keywords to search through records for a match. Click on the button process. to start search Query Builder to query, filter and sort records for display in the browser. Export records from the browser to excel format. User Manual | Version 1.0 Page 13 StarVision Information Technology Pte. Ltd. 3 Introduction The system is designed primarily set up the planned time attendance for each employee weekly basis and import the time attendance based on these data. System processes the time attendance and automates the posting payable units to Payroll modules. Functions to be performed by the system: a) Flexible roster assignment based on self-defined shift plans. b) Allows administrators to import clock data (Text File Format) from Reader system or data stored in Excel files to TMS. c) Provide data entry/edit facility for user to add/amend/delete the timesheet data and facilitate electronic timesheet submission to supervisor for approval. d) On time Supervisor approval for unmatched time records ensures compliance. e) Seamless interface with MecWise® Payroll system allows posting the processed Time In/Out records to payroll and provide accurate results in payroll processing. f) Seamless interface with MecWise® Leave system provide accurate workforce attendance details relating to total work hours, early hours, lateness and OT hours which are crucial for payroll processing. g) Generate comprehensive daily and monthly statistical reports such as Time Clock Report, Overtime Report, Lateness Report, Under-time Report, Absent Report, etc. User Manual | Version 1.0 Page 14 StarVision Information Technology Pte. Ltd. 4 Master File Setup The Master File Setup menu contains the following set of master data which are necessary for the Claim Management System. Go to Getting Started Guide Master File Setup. The Master File Setup consists of 5 sub-modules: • • • • • Cost Centre Segment for Organization Unit Organization Unit Salary Scale Job Family Note: For more details on these modules refer to User Manual for Employee Profile Management System. The system comes with default setup data. If the setup data are appropriate, then please click Next button to view next setup screen. After completing the Master File Setup, please continue to fill up company details in the Company Details Setup menu. User Manual | Version 1.0 Page 15 StarVision Information Technology Pte. Ltd. 4.1 Cost Centre This master file captures the different cost center of the employee. Note: Effective Date From and Effective Date To fields are auto-generated by system and is used for information purposes. The Cost Centre code and Description can be expressed as a combination of alphabets and numbers i.e. alpha numeric. Payroll reports are available by Cost Center Code. Click the Add button to add a new record. Click on the Save button to save the record. Then click on the Cancel button. User Manual | Version 1.0 Page 16 StarVision Information Technology Pte. Ltd. 4.2 Segment for Organization Unit This file allows entry of different segment code. The different segment code will help to form the organization unit code in the Organisation Unit Master file. Note that the organization unit code can accept max 40 characters only. Click the Add button to add a new record. Enter Segment Name, Segment Code and Description. User Manual | Version 1.0 Page 17 StarVision Information Technology Pte. Ltd. Click the Save button to save the record. Then click on the Cancel button. This allows users to set the Segment Codes relevant to an Organization’s structure. Segment Codes form the levels that make up the Organisation units exists in an organization. User Manual | Version 1.0 Page 18 StarVision Information Technology Pte. Ltd. Note: The Segment Name is not unique for each organization unit, i.e. multiple segment codes exist for a single segment name. Segment 0 Finance Department (FIN) Segment 1 Accounting Section (ACC) A Organisation Unit 1 FIN-ACC-ACC1 Segment 2 Accounting Team 1(ACC1) Segment 0 Human Resource Dept.(HR) Segment 1 Support Team (SPT) A Organisation Unit 2 HR-SPT-CS Segment 2 Customer Service (CS) User Manual | Version 1.0 Page 19 StarVision Information Technology Pte. Ltd. 4.3 Organization Unit This module captures different organization units within the company. Click the Add button to add a new record. User Manual | Version 1.0 Page 20 StarVision Information Technology Pte. Ltd. Enter Cost Centre Code, Segment 0 Code, and Segment 1 Code etc… Click the Save button to save the record. Then click on the Cancel button. User Manual | Version 1.0 Page 21 StarVision Information Technology Pte. Ltd. The following is the default organization structure, which is set up in the system: User Manual | Version 1.0 Page 22 StarVision Information Technology Pte. Ltd. 4.4 Salary Scale This master file stores salary scale for each level of employee progression. User Manual | Version 1.0 Page 23 StarVision Information Technology Pte. Ltd. Click the Add button to add a new record. Enter Information such as Salary Code, Salary Scale, Salary Mode, Effective Date From, Effective Date To and NWC Type fields. User Manual | Version 1.0 Page 24 StarVision Information Technology Pte. Ltd. To add the Salary Scale details, click on the Add New button. When the Add New button is clicked, the system checks if the required fields empty. If the field is empty, system will prompt message (shown below). Click on the OK button to close the message box and fill in the indicated field. Then click on the Add New button to add the Salary Scale details. User Manual | Version 1.0 Page 25 StarVision Information Technology Pte. Ltd. System will show as follows: Enter Information such as Basic Salary, NPC Amt and Salary Point fields. Click the Save button to save the detail record. User Manual | Version 1.0 Page 26 StarVision Information Technology Pte. Ltd. Click on the Cancel button and the Exit button to go back to its previous screen. If the information entered is correct, the record will be saved into the system. User Manual | Version 1.0 Page 27 StarVision Information Technology Pte. Ltd. 4.5 Job Family This master file is used to capture details about the Job Families that exist in the company. It stores different Appointments (Job designation) tagged to each job family. Click the Add button to add a new record. Enter the Job Family Code, Probation Period, Job Family Description and Remark and Effective Dates Fields. User Manual | Version 1.0 Page 28 StarVision Information Technology Pte. Ltd. Click the Save button to save the record. Before the record is saved, the system checks if the required fields are empty. If these fields are empty, system will prompt the following messages: Or User Manual | Version 1.0 Page 29 StarVision Information Technology Pte. Ltd. Or Click on the OK button to close the message box and fills the indicated fields. Then Save the record again. If the information entered is correct, the record will be saved into the system. User Manual | Version 1.0 Page 30 StarVision Information Technology Pte. Ltd. 5 Company Details Setup This is to set up the company information. It includes information like Bank account details and CPF Account. Go to Getting Started Guide Company Details Setup. The following master files are available under this setup menu: • • Company Master – to store company information CPF Account – to setup CPF Account information User Manual | Version 1.0 Page 31 StarVision Information Technology Pte. Ltd. 5.1 Company Master This is to set up the company information. It includes information like Bank account details, Government Rates and Business Info. Click on the Update button to update the company details. Company Master File–Company Info tab User Manual | Version 1.0 Page 32 StarVision Information Technology Pte. Ltd. Bank A/C Tab This tab is to store details on Company/Employer’s Bank account. Payment to employees in the form of GIRO Banking, Cheques and Cash are done through this account. Company Master File–Company-Bank A/C tab Govt Rates Tab This tab captures contributions by employer such as SDF (Skill Development Fund) and MSO (Medisave-Cum-Subsidised Outpatient Scheme). Company Master File–Company-Gov Rates Tab User Manual | Version 1.0 Page 33 StarVision Information Technology Pte. Ltd. Business Info Tab The tab captures the details on Company business information. Modify the necessary fields and click on Save button to save the changes. User Manual | Version 1.0 Page 34 StarVision Information Technology Pte. Ltd. 5.2 CPF Account This master file stores CPF A/C representing the type of CPF Account employees are covered by. Click the Add button to add a new record. Enter Information such as CPF A/C # field. Click the Save button to save the record. User Manual | Version 1.0 Page 35 StarVision Information Technology Pte. Ltd. 6 Employee Profile Setup Employee Profile Setup is to maintain employee’s information, such as personal particulars, payroll details, personal details, bank details, career progression etc. Go to Getting Started Guide Employee Profile Setup. The following files are available under this setup menu: Employee Profile – to store employee information Bank Account – to store employee’s bank account information Employee’s new appointment – to store employee’s appointment information when employee first joins the organization Employee’s Resignation - to store employee’s resignation information when employee resigns from the organization Note: For more details on this module refer to User Manual for Employee Profile Management System. User Manual | Version 1.0 Page 36 StarVision Information Technology Pte. Ltd. 6.1 Employee Profile This module captures and maintains employee’s information such as personal particulars, payroll details, and career progression. It allows creation, amendment or viewing of an employee’s record. Each employee is assigned with a unique identification number (Employee ID), which can later be used in timesheet entry as employee’s Card ID/Card No. To update existing employee information Click on the desired record to view pre-setup employee information. Then click on the Update button to update. User Manual | Version 1.0 Page 37 StarVision Information Technology Pte. Ltd. To add new employee information Click on the Update button to update the employee profile details. Update employee information under Name, Address, Personal, and Identification, Foreigner (if the Employee is non-local), NS, Payroll, Remark tabs. Before you can save the whole record, you may need to fill up those highlighted fields, as they are the mandatory fields. System will prompt message box to notify user any missing. If such message prompts, click on the OK button to close the message box and fills the indicated fields. Then save the record again by clicking on Save button. If the information entered is correct, the record will be saved into the system. User Manual | Version 1.0 Page 38 StarVision Information Technology Pte. Ltd. 6.2 Bank Account This module captures employee’s Bank Account details. User Manual | Version 1.0 Page 39 StarVision Information Technology Pte. Ltd. Click on the Add button to create a new record. Enter the Employee ID, Account name, Bank code, Bank account etc. Click on the Save button. User Manual | Version 1.0 Page 40 StarVision Information Technology Pte. Ltd. User Manual | Version 1.0 Page 41 StarVision Information Technology Pte. Ltd. 6.3 Employee’s New Appointment After updating/creating Employee profile, make sure you create a new appointment record for capturing employee(s) appointment details. Click on the Add button to create a new record. User Manual | Version 1.0 Page 42 StarVision Information Technology Pte. Ltd. Define all the fields highlighted in purple accordingly. These are the mandatory fields. Note: Those fields with pick-list are defined under the Company Details Setup. Add/amend the necessary details to suit your Organization needs. User Manual | Version 1.0 Page 43 StarVision Information Technology Pte. Ltd. After completion, click on the Save button User Manual | Version 1.0 Page 44 StarVision Information Technology Pte. Ltd. User Manual | Version 1.0 Page 45 StarVision Information Technology Pte. Ltd. 6.4 Employee’s Resignation This module allows you to capture the information of the resigned staffs in the Organization. Click on the Add button to create a new record. User Manual | Version 1.0 Page 46 StarVision Information Technology Pte. Ltd. Click on the List Employees button to view all Employees with their retirement dates and the filtering defined at the Organisation Unit, Job Family, Grade, Appointment From and Appointment To. Select Employee and click Close button to retire the service. The selected Employee(s) are added automatically under the Employees Tab. Under the Employees Tab, click the Employee record link to set different retirement date for individual Employee. Then select the New Tab to update the Notice Date, Last Day of Service and Effective Date. User Manual | Version 1.0 Page 47 StarVision Information Technology Pte. Ltd. Click on the Save button. Click on the Exit button to return to the previous page. User Manual | Version 1.0 Page 48 StarVision Information Technology Pte. Ltd. Change Circulation Status to one of the following status to proceed: ‘0’ (NEW), ‘1’ (SUBMIT), ‘3’ (APPROVED), ‘4’ (REJECT) If there is no need to route this progression to other personnel’s approval to approve this, just set the Circulation Status as ‘3’ (APPROVED). If Circulation Status is set as ‘1’ (SUBMIT), then routing officer(s) information needs to be inserted the Routing Officer Tab to route to the respective recommender or approver (Email will be send to them respective to seek for their approval). Click on the Add New button in the Routing Officers Tab. User Manual | Version 1.0 Page 49 StarVision Information Technology Pte. Ltd. The System will show the following screen: After setting up the Routing list, click Exit button to go back to main page. Click on the Save button. The system will capture the details of the employee(s) resignation and their salary will be pro-rated according to their last day of service. User Manual | Version 1.0 Page 50 StarVision Information Technology Pte. Ltd. 7 TMS Master File This sub-system contains Master Files that capture data used in the TMS modules. There are a total of 5 modules in the TMS Master Files: • Card Master - to manage card numbers (Card ID) issued to the employees • Reporting Structure – to view the subordinates and supervisors of an employee. • Shift Code - to setup and maintain the working hour start time / end time and overtime start / end time for various shifts. • Shift Pattern - to setup the week’s shift pattern which is made up of daily shift codes and specify the week cycle for the pattern to rotate. • Shift Group - to setup the Shift Group information. A shift group is created for a group of employees working under the same shift pattern for a period of time. User Manual | Version 1.0 Page 51 StarVision Information Technology Pte. Ltd. 7.1 Card Master This module allows the user to manage card numbers issued to the employees. On issuing a card to an employee, the user should use this module to keep a record of the card number issued to the employee. Note: Card Master Setup is mandatory step in the Time Management Process. If Card System is not followed please enter the Card ID same as Employee ID. Card Master Screen Fields Description Card ID : This field is to capture the Card ID. Employee ID : This field is to capture the Employee ID. The pick list is provided to list down the Employee and its related information. Follow Shift Pattern : YES for employees following shift pattern. NO for employees using roster plan. Issued By : This field is to capture Issued By. The pick list is provided to list down the employee of Issued and its related information. Issued Date : This field is the system generated Issued Date. This field is show information only. Eff. Date From : This field is to capture the start date Card ID is applicable. User Manual | Version 1.0 Page 52 StarVision Information Technology Pte. Ltd. This field is a mandatory field. If the “Eff. Date From” field is empty when the record is about to save, system will prompt the message “Eff. Date From cannot be left blank”. Eff. Date To : This field is to capture the end date Card ID is applicable. OT Approver ID : Indicate the approver for this employee. OT Type : Normal : For normal employees Non-Workman Com (Front/Back Office) : For employees under Non-Workman Com Workman Com (Back Office) : For back office employees under Workman Com Remarks : Information only. Sample of step by step transactions to add the Card Master Screen: Click on the “Add” button. System default today date in Effective Date From field, Issued Date and Follow Shift Pattern is default value “YES” and OT Type is default value “Normal” will fill. User Manual | Version 1.0 Page 53 StarVision Information Technology Pte. Ltd. Key in other necessary information. Save the record by clicking “Save” button on the toolbar. User Manual | Version 1.0 Page 54 StarVision Information Technology Pte. Ltd. 7.2 Reporting Structure This module allows the user to view the subordinates and supervisors of an employee. User can also make use of this module to change the supervisor of an employee with a new supervisor. Reporting Structure Field Description Employee ID: This field is to capture the Employee ID. If Active Employees is selected in the dropdown list, the system will search the employee id from the active employees list. If All Employees is selected in the dropdown list, the system will search the employee id from the all employees list. Appt Code: Appointment code of the employee. Org Unit: Organisation Unit which the employee belongs. Enter the Employee Id and click on the Refresh button. Click on Subordinates or Supervisors tab to view the subordinates or supervisors of the employee. Click the Replace Supervisor tab to change the supervisor of the employee. User Manual | Version 1.0 Page 55 StarVision Information Technology Pte. Ltd. Subordinates Tab Employee Reporting Structure : Subordinates The Subordinates tab shows all the subordinates of the employee. Supervisors Tab Employee Reporting Structure : Supervisors The Supervisors tab shows all the supervisors of the employee. Replace Supervisor Tab Employee Reporting Structure : Replace Supervisor The Replace Supervisor tab allows user to change the supervisor of the employee. To change the employee’s supervisor, enter the current approving office id in the Approver ID field and the new approving officer id in the New Approver ID field. Click on Replace button. System will prompt up the message “Approver ID replaced successfully”. User Manual | Version 1.0 Page 56 StarVision Information Technology Pte. Ltd. Field Description Approver ID: This field is to capture the Approver ID. Name: Name of the employee Appt Code: Appointment code of the Approver. Org Unit: Organization Unit which the employee belongs. New Approver ID: This field is to capture the New Approver ID. User Manual | Version 1.0 Page 57 StarVision Information Technology Pte. Ltd. 7.3 Shift Code The purpose of this module is to allow users to setup and maintain the working hour start time / end time and overtime start / end time for various shifts. The system comes with pre-set data for Shift Code information but can be modified if needed. Click on the left hand side menu, Shift Code, to launch it. The Shift Code Master Header screen will be shown as figure below. User Manual | Version 1.0 Page 58 StarVision Information Technology Pte. Ltd. Shift Code Master Screen Fields Description Shift Code : This field is to capture the Shift Code. This field is part of primary key and is a mandatory field. If the “Shift Code” field is empty when the record is about to save, system will prompt the message “Shift Code cannot be left blank”. Serial No : System generated information. Eff. Date From : This field is to capture the Effective Date From which indicates the time period within which the shift code is applicable. This field is a mandatory field. If the “Eff. Date From” field is empty when the record is about to save, system will prompt the message “Eff. Date From cannot be left blank”. Eff. Date To : This field is the system generated Effective Date To. This field is to show information only. Shift Description : This field is to capture the Shift Description. Remark : This field is to capture the Remark. Created By / On : Record created user and created date. This field is to show information only. Modified By / On : Record modified user and modified date. This field is to show information only. Duplicate Details From : This field is to capture the Shift Code and Serial No from which shift code details is copied. The pick list is provided to list down the Shift Code and its related information. User Manual | Version 1.0 Page 59 StarVision Information Technology Pte. Ltd. Duplicate Button : This button allows users to copy shift code detail from the specified Shift Code and Serial No in Duplicate Details From field. System will check whether Duplicate Details From field is empty. If yes, system will prompt the message “Please select the shift code from which you want to duplicate first”. About the Detail Screen – Shift Code Details This screen allows users to set up and maintain working hours, break hours, and OT details for each day of the week. User Manual | Version 1.0 Page 60 StarVision Information Technology Pte. Ltd. User Manual | Version 1.0 Page 61 StarVision Information Technology Pte. Ltd. Shift Code Details Screen Fields Description Shift Code : Shift code information from header screen. Serial No : System generated information. Day No & Type : This field is to capture the Day No and Type. The pick list is provided to list down the Day No & Type and its related information. This field is part of primary key and is a mandatory field. If the “Day No & Type” field is empty when the record is about to save, system will prompt the message “Day No & Type cannot be left blank”. Normal Start Time : This field is to capture the shift working hour start time. This field is a mandatory field. If the “Normal Start Time” field is empty when the record is about to save, system will prompt the message “Normal Start Time cannot be left blank”. End Time : This field is to capture the shift working hour end time. This field is a mandatory field. If the “End Time” field is empty when the record is about to save, system will prompt the message “End Time cannot be left blank”. Normal Start Time 2 : This field is to capture the shift’s second working hour start time. End Time 2 : This field is to capture the shift’s second working hour end time. Non Work Day : This field is to define whether the shift day is a working day or not. OT From : This field is to capture the start time of Overtime. OT To : This field is to capture the end time of Overtime. OT Type : These fields are to identify the OT rates transaction code. The values available for this field are as follows: OT-1.0 OT-1.5 OT-2.0 OT-OFF User Manual | Version 1.0 Page 62 StarVision Information Technology Pte. Ltd. Break From : These fields are to capture the start time for Break. Break To : These fields are to capture the end time for Break. Min Break Hrs : This field is to capture the minimum hours for Break. Meal From : These fields are to capture the start time for Meal. Meal To : These fields are to capture the end time for Meal. Min Meal Hrs : This field is to capture the minimum hours for Meal. First Half Day From : This field is to capture the start time for half-day leave. First Half Day To : This field is to capture the end time for half-day leave. Second Half Day From Second Half Day To : This field is to capture the start time for second half-day leave. Overtime : This field is to define whether overtime is supported or not. Under time : This field is to define whether under time is supported or not. Early Time : This field is to define whether early time is supported or not. Late Time : This field is to define whether late time is supported or not. Absent Time : This field is to define whether absent time is supported or not. Break Time : This field is to define whether break time is supported or not. Meal Time : This field is to define whether meal time is supported or not. Remark : This field is to capture the Remark. Created By / On : Record created user and created date. This field is to show information only. Modified By / On : Record modified user and modified date. This field is to show information only. User Manual | Version 1.0 : This field is to capture the end time for second half-day leave. Page 63 StarVision Information Technology Pte. Ltd. About the Detail Screen – Shift Preference This screen allows users to set up and maintain the shift preference setting for the shift code. The shift preference defined for the shift code will overwrite the TMS Preference setting. Shift Preference Screen Fields Description Shift Code : This field is to capture the Shift Code, retrieved from Shift Code Master Header Screen. This field is to show information only. Preference Code : This field is to capture the Preference Code. The pick list is provided to list down the Preference Code and its related information. This field is a mandatory field. If the “Preference Code” field is empty when the record is about to save, system will prompt the message “Preference Code cannot be left blank”. Value : This field is to capture the Value. This field is a mandatory field. If the “Value” field is empty when the record is about to save, system will prompt the message “Value cannot be left blank”. Description : This field is to capture the Description. This field is to show information only. Created by : Record created user and created date. This field is to show information only. Modified by : Record modified user and modified date. This field is to show information only. User Manual | Version 1.0 Page 64 StarVision Information Technology Pte. Ltd. Sample of step by step transactions to add the Shift Code Master: Click on the “Add” button. System default today date in Effective Date From field and disables Effective Date To field. Key in Shift Code and system will automatically fill Serial No and Eff. Date To. User Manual | Version 1.0 Page 65 StarVision Information Technology Pte. Ltd. Key in other necessary information. Save the record by clicking “Save” button on the toolbar. Shift Code Master in Add Mode Adding Shift Code Details Record Click “Add New” button in top of the grid in “Shift Details” Tab. Shift Code Master – Shift Details Tab User Manual | Version 1.0 Page 66 StarVision Information Technology Pte. Ltd. Choose Day No from pick list and system will automatically fill Day Type. Key in mandatory fields, Normal Start Time and End Time, and other necessary information Save record by clicking “Save” button on the toolbar. Alternatively, user can copy the shift details from another Shift Code. Key in Duplicate Details From by choosing from pick list. Duplicate the record by clicking “Duplicate” button. User Manual | Version 1.0 Page 67 StarVision Information Technology Pte. Ltd. Shift Code Master Shift Details will be filled as below: Adding Shift Preference Record Click “Add New” button in top of the grid in “Shift Preference” Tab. Shift Code Master – Shift Preference Tab Choose Preference Code from pick list and system will automatically fill Value and Description User can change the Value. Save record by clicking “Save” button on the toolbar. User Manual | Version 1.0 Page 68 StarVision Information Technology Pte. Ltd. Followings are points to note for Shift Code Master – Header Screen: • When save the record, system takes the following checking: o System will check for the duplication of Shift Code and Serial No before saving the record. If record exists, system will prompt the message “Record already exists”. o If the “Shift Code” field is empty when the record is about to save, system will prompt the message “Shift Code cannot be left blank”. o If the “Serial No” field is empty when the record is about to save, system will prompt the message “Serial No cannot be left blank”. o If the “Eff. Date From” field is empty when the record is about to save, system will prompt the message “Eff. Date From cannot be left blank”. Followings are points to note for Shift Code Details Screen: • When save the record, system takes the following checking: o System will check for the duplication of Shift Code, Serial No and Day No && Type before save the record. If record exists, system will prompt the message “Record already exists”. o If the “Day No && Type” field is empty when the record is about to save, system will prompt the message “Day No & Type cannot be left blank”. o If the “Normal Start Time” field is empty when the record is about to save, system will prompt the message “Normal Start Time cannot be left blank”. o If the “End Time” field is empty when the record is about to save, system will prompt the message “End Time cannot be left blank”. User Manual | Version 1.0 Page 69 StarVision Information Technology Pte. Ltd. Followings are points to note for Shift Preference Screen: • When save the record, system takes the following checking: o If the “Preference Code” field is empty when the record is about to save, system will prompt the message “Preference Code cannot be left blank”. o If the “Value” field is empty when the record is about to save, system will prompt the message “Value cannot be left blank”. User Manual | Version 1.0 Page 70 StarVision Information Technology Pte. Ltd. 7.4 Shift Pattern The purpose of this module is to allow users to setup the week’s shift pattern which is made up of daily shift codes and specify the week cycle for the pattern to rotate. Click on the left hand side menu, Shift Pattern, to launch it. The Shift Pattern Master screen will be shown as figure below. Shift Pattern Master Screen Fields Description Shift Pattern : This field is to capture the Shift Pattern code. This field is part of primary key and is a mandatory field. If the “Shift Pattern” field is empty when the record is about to save, system will prompt the message “Shift Pattern cannot be left blank”. Serial No : System generated information. Week Cycle : This field is to capture the Week Cycle per month for the Shift Pattern to rotate. Duplicate From : This field is to capture the Shift Pattern and Serial No from which shift pattern details is copied. The pick list is provided to list down the Shift Pattern and its User Manual | Version 1.0 Page 71 StarVision Information Technology Pte. Ltd. related information. Duplicate Button : This button allows users to copy shift pattern detail from the specified Shift Pattern and Serial No in Duplicate From field. System will check whether Duplicate From field is empty. If yes, system will prompt the message “Duplicate Shift Pattern is empty”. Effective Date From : This field is to capture the Effective Date From which defines the time period within which the Shift Pattern is applicable. This field is a mandatory field. If the “Effective Date From” field is empty when the record is about to save, system will prompt the message “Effective Date From cannot be left blank”. System will check whether Effective Date From is later than Effective Date To. If yes, system will prompt the message “Effective Date From cannot be later than Effective Date To”. Effective Date To : This field is to capture the Effective Date To which defines the time period within which the Shift Pattern is applicable. This field is a mandatory field. If the “Effective Date To” field is empty when the record is about to save, system will prompt the message “Effective Date To cannot be left blank”. System will check whether Effective Date From is later than Effective Date To. If yes, system will prompt the message “Effective Date From cannot be later than Effective Date To”. Pattern Description : This field is to capture the Pattern Description. Created By / On : Record created user and created date. This field is to show information only. Modified By / On : Record modified user and modified date. This field is to show information only. Sunday Shift : These fields are to capture the Shift Codes applicable for Sunday in respective weeks. The pick list is provided to list down the Shift Code and its related information. Monday Shift : These fields are to capture the Shift Codes applicable for Monday in respective weeks. The pick list is provided to list down the Shift Code and its related information. User Manual | Version 1.0 Page 72 StarVision Information Technology Pte. Ltd. Tuesday Shift : These fields are to capture the Shift Codes applicable for Tuesday in respective weeks. The pick list is provided to list down the Shift Code and its related information. Wednesday Shift : These fields are to capture the Shift Codes applicable for Wednesday in respective weeks. The pick list is provided to list down the Shift Code and its related information. Thursday Shift : These fields are to capture the Shift Codes applicable for Thursday in respective weeks. The pick list is provided to list down the Shift Code and its related information. Friday Shift : These fields are to capture the Shift Codes applicable for Friday in respective weeks. The pick list is provided to list down the Shift Code and its related information. Saturday Shift : These fields are to capture the Shift Codes applicable for Saturday in respective weeks. The pick list is provided to list down the Shift Code and its related information. User Manual | Version 1.0 Page 73 StarVision Information Technology Pte. Ltd. Sample of step by step transactions to add the Shift Pattern Master: Click on the “Add” button. Shift Pattern Master in Add Mode Key in Shift Pattern and system will automatically fill Serial No for the shift pattern. Key in Week Cycle and system will enable Shift fields according to the number of week cycle entered. User Manual | Version 1.0 Page 74 StarVision Information Technology Pte. Ltd. Note: The valid value for Week Cycle field is from 1 to 5. If user enters the value that is less than 1, system will prompt the following message: If user enters the value that is more than 5, system will prompt the following message: Key in Effective Date From, Effective Date To and other necessary information. User Manual | Version 1.0 Page 75 StarVision Information Technology Pte. Ltd. Save the record by clicking “Save” button on the toolbar. Alternatively, user can copy the shift pattern details from other Shift Pattern. Key in Duplicate From by choosing from pick list. Duplicate the record by clicking “Duplicate” button. Shift codes fields will be filled as below. Save the record by clicking “Save” button on the toolbar. User Manual | Version 1.0 Page 76 StarVision Information Technology Pte. Ltd. User Manual | Version 1.0 Page 77 StarVision Information Technology Pte. Ltd. 7.5 Shift Group The purpose of this module is to allow users to setup the Shift Group information. A shift group is created for a group of employees working under the same shift pattern for a period of time. Click on the left hand side menu, Shift Group, to launch it. The Shift Group Master Header screen will be shown as figure below. Shift Group Master Screen About the Header Screen Shift Group Master Screen Fields Description Shift Group : This field is to capture the Shift Group code. This field is part of primary key and is a mandatory field. If the “Shift Group” field is empty when the record is about to save, system will prompt the message “Shift Group cannot be left blank”. User Manual | Version 1.0 Page 78 StarVision Information Technology Pte. Ltd. Shift Description : This field is to capture the Shift Description. Created By : Record created user and created date. This field is to show information only. Modified By : Record modified user and modified date. This field is to show information only. About the Detail Screen – Shift Group Plan This screen allows users to set up and maintain the information of Shift Patterns which belong to the Shift Group. Shift Group Plan Screen Fields Description Shift Group : Information from header screen. Serial No : System generated information. Remark : This field is to capture the Remark. Shift Pattern : This field is to capture the Shift Pattern. The pick list is provided to list down the Shift Pattern and its related information. After user enters the “Shift Pattern” field, system will check for the validity. If record does not exist in related master file, system will prompt the message “Shift Pattern does not exist”. EffectiveDate From User Manual | Version 1.0 : This field is to capture the Effective Date From which indicates the time period within which the shift group is applicable. Page 79 StarVision Information Technology Pte. Ltd. Effective Date To : This field is to capture the Effective Date To which indicates the time period within which the shift group is applicable. Created By : Record created user and created date. This field is to show information only. Modified By : Record modified user and modified date. This field is to show information only. About the Detail Screen – Shift Group Employee This screen allows users to set up and maintain the information of employees who belong to the Shift Group. Shift Group Employee Screen Fields Description Shift Group : Information from header screen. Serial No : System generated info. Employee ID : This field is to capture the Employee ID. The pick list is provided to list down the Employee and its related information. After user enters the “Employee ID” field, system will check for the validity. If record does not exist in related master file, system will prompt the message “Employee ID does not exist”. This field is part of primary key and is a mandatory field. If the “Employee ID” field is empty when the record is about to save, system will prompt the message “Employee ID cannot be left blank”. Remark : This field is to capture the Remark. Effective Date From : This field is to capture the Start Date when employee is User Manual | Version 1.0 Page 80 StarVision Information Technology Pte. Ltd. assigned to the current shift group. Effective Date To : This field is to capture the End Date when employee is assigned to the current shift group. Created By : Record created user and created date. This field is to show information only. Modified By : Record modified user and modified date. This field is to show information only. Sample of step by step transactions to add the Shift Group Master: Click on the “Add” button Key in mandatory fields, Shift Group and other necessary information. Save the record by clicking “Save” button on the toolbar. User Manual | Version 1.0 Page 81 StarVision Information Technology Pte. Ltd. Adding Shift Group Plan Record Click “Add New” button in top of the grid in “Plan” Tab. Shift Group Master – Plan Tab Key in mandatory field, Serial No, and other necessary information. Save record by clicking “Save” button on the toolbar. Click “Add New” button in top of the grid in “Employee” Tab. Shift Group Master – Employee Tab User Manual | Version 1.0 Page 82 StarVision Information Technology Pte. Ltd. Key in mandatory fields, Employee ID, Effective Date From and Effective Date To, and other necessary information. Save record by clicking “Save” button on the toolbar. Shift Group Employee in Add Mode Note: If the time period defined (Effective Date From/To) overlaps with the existing date range for the Employee, system will prompt the following message: User Manual | Version 1.0 Page 83 StarVision Information Technology Pte. Ltd. 8 TMS Administration This TMS Administration allows capturing and managing the data used in the TMS modules. There are a total of 5 modules in the TMS Administration: • Timesheet In/Out Import (From Time Clock) - to import the Timesheet In/Out import file in the standard text format • Timesheet In/Out Enquiry - to enquire on time attendance for individual employee • Timesheet Export - to download the excel templates with default time entry based on shift planned time which will be used to import the Timesheet data • Timesheet Import - to import Time In/Out data from the excel files to the TMS system • Payroll Posting - to post the processed Time In/Out records to the MecWise® Payroll module. User Manual | Version 1.0 Page 84 StarVision Information Technology Pte. Ltd. 8.1 Timesheet In/Out Import (From Time Clock) This module allows the admin to import the Timesheet In/Out import file in the standard text format (as shown in download sample file). This standard text format is the format that used by most Time Clock or Reader System to export time data. Fields Description Document No. : This field is to capture the Document No. Document : This field is to capture the Document. Remark : This field is to capture the Remark. User Manual | Version 1.0 Page 85 StarVision Information Technology Pte. Ltd. Sample of step by step transactions to download Timesheet In/Out Import text file Click the Download Sample File Link The Timesheet In/Out sample file form will appear. Right click on the line “Timesheet In/Out Log Sample” and choose “Save Target As”. User Manual | Version 1.0 Page 86 StarVision Information Technology Pte. Ltd. Sample of step by step transactions to add Timesheet In/Out Import Click on Add button on toolbar to set up Timesheet In/Out Import User Manual | Version 1.0 Page 87 StarVision Information Technology Pte. Ltd. 8.2 Click Browse button for selecting the Import File Name. Enter remarks in Remark. Click Import File button for Import File. Timesheet In/Out Enquiry This module allows the admin to enquire on time attendance for individual employee. User Manual | Version 1.0 Page 88 StarVision Information Technology Pte. Ltd. Fields Description Date From : This field is to capture the Month/Year. This is provided to select the processed start month/year. Date To : This field is to capture the Month/Year. This is provided to select the processed end month/year. Organization Code : This field is to capture the Organization Code. This pick list is provided to list down the Organization Code and its related information. Employee ID : This field is to capture the Employee ID. This pick list is provided to list down the Employee ID and its related information. Sample of step by step transactions to enquiry Timesheet In/Out Enquiry Select Date From and Date To. Select Organization Code from the pick list of Organization Code. Select Employee ID form the Pick list of Employee ID. User Manual | Version 1.0 Page 89 StarVision Information Technology Pte. Ltd. Click the Refresh button, system will generate appropriate data with selected employee id in the list. The system will check imported Time In/Out against with planned time attendance/Shift Plan Time and displays (Y/N) in “As Planned Status” field User Manual | Version 1.0 Page 90 StarVision Information Technology Pte. Ltd. 8.3 Timesheet Export The purpose of this module is to allow administrators to download the excel templates which will be used to import the Timesheet data. The system will generate the Excel template with details on Time In/ Out data based on the Shift Plan specified in the TMS Master Setup Shift Group. Field Description Date From : This field is to capture the Start Date. Date To : This field is to capture the End Date. Organization Code : This field is to capture the Organization Code. The pick list is provided to list down the Organization Code and its related information. Employee ID : This field is to capture the Employee ID. The pick list is provided to list down the Employee ID and its related information. User Manual | Version 1.0 Page 91 StarVision Information Technology Pte. Ltd. Timesheet Export Screen The Timesheet Export screen will be showed as figure below: Sample of step by step transactions to download the Timesheet Export Select Date From, Date To. Click the Organization Code from the pick list of Organization Code. Click the Employee ID from the picklist of Employee ID. Click on Export button. User Manual | Version 1.0 Page 92 StarVision Information Technology Pte. Ltd. File Download Dialog Box Click on the “Open” button to directly open the excel format file or click on the “Save” button in the File Download dialog box to save the file in the computer. User Manual | Version 1.0 Page 93 StarVision Information Technology Pte. Ltd. 8.4 Timesheet Import This module allows user to import Time In/Out data from the excel files to the TMS system. Below shows the input screen to import data. Field Description Document ID : This field is to capture the Document ID. Import File Name : This field is to capture the Import File. Remarks : This field is to capture the Remarks. Created By : Record created user. This field is to show information only. Modified By : Record modified user. This field is to show information only. User Manual | Version 1.0 Page 94 StarVision Information Technology Pte. Ltd. Sample of step by step transactions to add Timesheet Import Click on Add button on toolbar to set up Timesheet Import. Click Browse button for selecting the Import File Name Enter remarks in Remarks. Click Import File button for Import File. System will display the result of data importing in the Imported Records Tab. User Manual | Version 1.0 Page 95 StarVision Information Technology Pte. Ltd. User Manual | Version 1.0 Page 96 StarVision Information Technology Pte. Ltd. 8.5 Timesheet Enquiry This module allows the admin to enquire on time attendance for individual employee. Admin can approve, reject or submit the Shift plan and Time in / Time Out for individual employee. Fields Description Month/ Year From : This field is to capture the Month/Year This is provided to select the processed start month/year. Month/ Year To : This field is to capture the Month/Year. This is provided to select the processed end month/year. Employee ID : This field is to capture the Employee ID. This pick list is provided to list down the Employee ID and its related information. User Manual | Version 1.0 Page 97 StarVision Information Technology Pte. Ltd. Timesheet Enquiry – Timesheet List This screen show the individual employee time attendance list. The admin can adjust the time in/ time out and approve / reject the timesheet for the individual employee. Field Description Employee ID : This field is to capture the Employee ID. This pick list is provided to list down the Employee ID and its related information. Employee Type This field is to capture the Employee Type Month/ Year This field is to capture the Month/Year This is provided to select the processed month/year. Grade This field is to capture the Grade Pay Mode : This field is to capture the Pay Mode Submitted Date : This field is provided the Submitted Date Approved Date : This field is provided the Approve date Approver ID : This field is provided the approver Reset Timesheet : This field is to reset Timesheet Entry. User Manual | Version 1.0 Page 98 StarVision Information Technology Pte. Ltd. Reset : This button allows the user to reset the shift code, time in and time out. Reject All Button : This button allows the user to reject shift code, time in and time out for the selected employee. Approve All Button : This button allows the user to approve shift code, time in and time out for the selected employee. Submit All Button : This button allows the user to submit shift code, time in and time out for the selected employee. Refresh Button This button allows users to refresh the grid to view the timesheet list based on selected Employee ID and Month/Year. About the Header Screen Sample of step by step transactions of Timesheet Enquiry Select Month from drop down list of Month From/ Month To and Enter Year From/ Year To. Select Employee ID form the Pick list of Employee ID. Click the Refresh button, system will generate appropriate data with selected Employee ID in Timesheet List. About the Detail Screen Sample of step by step transactions of Timesheet List Select Employee ID form the Pick list of Employee ID. System will generate Employee Type for selected employee Enter the Month/Year details User Manual | Version 1.0 Page 99 StarVision Information Technology Pte. Ltd. Click Refresh button. System will show the selected employee‘s timesheet list. Enable check show shift from/to, System will show Shift From, Shift To column in the list. Enable check show detail approval info, system will show Status, Submitted Date, Approved Date and Approver ID column in the list. User Manual | Version 1.0 Page 100 StarVision Information Technology Pte. Ltd. Changing Shift Code and Enter Time In, Time Out information Select the Shift Code from shift drop down list. Modify the Time In, Time Out if needed. Resetting Time In/Out and Shift Plan Entry in the Timesheet To retrieve/reset Time In/Out and Planned Shift Time from Time Clock/Reader System, choose Shift Plan and Time In/Out (from Time Clock) and click Reset Button. To retrieve/reset Time In/Out data from Time Clock/Reader System, choose Time In/Out (from Time Clock) and click Reset Button. To retrieve/reset Time In/Out Entry with planned Shift Time then, choose Shift Plan and Default Time In/Out and click Reset Button. To Submit Timesheet Click Submit All button to submit timesheet records to supervisor to approve/reject. User Manual | Version 1.0 Page 101 StarVision Information Technology Pte. Ltd. If there are missing time entry or shift code, system will prompt the following message: After updating the Shift for every day of the month, Click Submit All button to submit again. And the system auto fills the Submitted Date as follows: User Manual | Version 1.0 Page 102 StarVision Information Technology Pte. Ltd. To Approve Timesheet Click on Approve All Button for approving timesheet records. System auto fills the Approved Date as follows: User Manual | Version 1.0 Page 103 StarVision Information Technology Pte. Ltd. 8.6 Payroll Posting This module allows the user to post processed Time In/Out records to the payroll modules to allow for payment to the employee based on the timesheet records. Click on the left hand side menu, Payroll Posting, to launch it. The Payroll Posting Screen will be showed as figure below. Payroll Posting Screen Fields Description Document No. : This field is to capture the Document No. Post Date Date From : : This field is to capture the Post Date. This field is to capture the Date From which indicates the time range to filter the plan date. To : This field is to capture the Date To which indicates the time range to filter the plan date. Select Org.Unit Button : This button allow user to select various Org.Unit. Org.Unit : This pick list is to capture the Org.Unit. User Manual | Version 1.0 Page 104 StarVision Information Technology Pte. Ltd. Pay Period : This field is to capture the Pay Period (Year, Month and Period) that payment/billing is to be made for processed records. The pick list is provided to list down the Pay Period information. If the “Pay Period” field is empty when the user clicks on the “Post” button, system will prompt the message “Pay Period cannot be blank”. Payroll Mode : This field is to capture the Payroll Mode. The pick list is provided to list down the Payroll Mode and its related information. Posting Remark : This field is to capture the Posting Remark. Refresh Button : This button allows users to refresh the grid to view the posted and not posted items according to the option selected. POST Button : This button allows users to initiate the posting process. Created By : Record created user and created date. This field is to show information only. Modified By : Record modified user and modified date. This field is to show information only. User Manual | Version 1.0 Page 105 StarVision Information Technology Pte. Ltd. Sample of step by step transactions to add Payroll Posting Screen Click on the “Add” button. As soon as the user clicks Add button, system fill Post and Year field. User Manual | Version 1.0 Page 106 StarVision Information Technology Pte. Ltd. Key in Date From and Date To. User Manual | Version 1.0 Page 107 StarVision Information Technology Pte. Ltd. Click on the “Select Org. Unit” button to select Org. Unit. User Manual | Version 1.0 Page 108 StarVision Information Technology Pte. Ltd. Key in Pay Period, Payroll Mode and Posting Remark. Click on the “Post” button to initiate the posting process. User Manual | Version 1.0 Page 109 StarVision Information Technology Pte. Ltd. System will show the records in the grid. User Manual | Version 1.0 Page 110 StarVision Information Technology Pte. Ltd. Note: If there’s no transaction to post within the date range when the user clicks on the “Post” button, system will prompt the following message: Choose “Posted Records” or “Not Posted Records” from drop down list and click on the “Refresh” button to refresh the grid. Followings are important concepts for Payroll Posting: If the “Date From” field is empty when the user clicks on the “Post” button, system will prompt the message “Date From cannot be blank”. If the “Date To” field is empty when the user clicks on the “Post” button, system will prompt the message “To cannot be blank”. If the “Pay Period” field is empty when the user clicks on the “Post” button, system will prompt the message “Pay Period cannot be blank”. If there’s no transaction to post within the date range, system will prompt the message “No records found for posting”. Once the data is posted, system will not allow re-posting it again. User Manual | Version 1.0 Page 111 StarVision Information Technology Pte. Ltd. 9 TMS Supervisor The TMS Supervisor menu contains the following set of data which are necessary to approve or reject timesheet entry. • 9.1 Employee Timesheet(Approval) Employee Timesheet (Approval) This module allows the approving officers to approve/reject the employees’ timesheet processed records. Field Description Employee ID: Click Pick list to Select the employee Month/Year From: To define the Start Month and Year to retrieve all records dated within this time period for processing. Month/Year To: To define the End Month and Year to retrieve all records dated within this time period for processing. Refresh Button: This button allows users to refresh the grid to view the timesheet list according to selected employee id. User Manual | Version 1.0 Page 112 StarVision Information Technology Pte. Ltd. Employee Timesheet (Approval) – Timesheet List This screen show the individual employee time attendance list. The admin can adjust the time in/ time out and approve / reject the timesheet for the individual employee. Field Description Employee ID : This field is to capture the Employee ID. This pick list is provided to list down the Employee ID and its related information. Employee Type : This field is to capture the Employee Type Month/ Year From : This field is to capture the Month/Year This is provided to select the processed start month/year. Month/ Year To : This field is to capture the Month/Year. This is provided to select the processed end month/year Grade : This field is to capture the Grade Pay Mode : This field is to capture the Pay Mode Submitted Date : This field is provided to indicate the Submitted Date User Manual | Version 1.0 Page 113 StarVision Information Technology Pte. Ltd. Approved Date : This field is provided to indicate the Approve date Approver ID : This field is provided to indicate the approver Reset Timesheet : This field is provided to Reset Timesheet Reset Button : This button allows the user to reset the shift code, time in and time out. Reject All Button : This button allows the user to reject shift code, time in and time out for the selected employee. Approve All Button : This button allows the user to approve shift code, time in and time out for the selected employee. Submit All Button : This button allows the user to submit shift code, time in and time out for the selected employee. Refresh Button : This button allows users to refresh the grid to view the timesheet list based on selected employee id and Mont/Year. About the Header Screen Sample of step by step transactions to approve Employee Timesheet (Approval) Select Month/Year From, Month/Year To. Select Employee ID from the Pick list of Employee ID. Click Refresh Button. System will displayed the timesheet list in the grid. User Manual | Version 1.0 Page 114 StarVision Information Technology Pte. Ltd. About the Detail Screen – Employee Timesheet detail Select Employee ID to approve/ reject timesheet list. Enable check show shift from/to, System will show Shift From, Shift to column in the list. User Manual | Version 1.0 Page 115 StarVision Information Technology Pte. Ltd. Enable check show detail approval info, System will show Status, Submitted Date, Approved Date and Approver ID column in the list. User Manual | Version 1.0 Page 116 StarVision Information Technology Pte. Ltd. Click Approve All/ Reject All as required. User Manual | Version 1.0 Page 117 StarVision Information Technology Pte. Ltd. 10 TMS Reports The purpose of this module is to allow users to produce various reports on Time Management information. There are six different reports under this sub-system: Fig: TMS Reports To print the various reports, simply click on any of the reports. A screen as below will be displayed User Manual | Version 1.0 Page 118 StarVision Information Technology Pte. Ltd. The Report Parameters section differs depending on the report. The user is required to select the desired object under Report Parameters, select the report output format and then click on the Click Here button. Under the Record Selection, user can also select the Print Selected Records and specify the selection criteria before generating the report. Field Description Record Selection: Print All Records Print Selected Records Select Criteria Button: Click this to launch the Query Builder to specify conditions to filter the desired records for printing. Click Here Button: Click this to start printing. Report Parameters Section Date From/To: User Manual | Version 1.0 Records relevant to this Time period will be selected for printing. Page 119 StarVision Information Technology Pte. Ltd. After the user clicks on the Click Here button, the below screen will show. Once the report generation has been completed, a preview of the report will be shown. User Manual | Version 1.0 Page 120 StarVision Information Technology Pte. Ltd. 10.1 Daily/Monthly Overtime Report This report allows users to produce a list of Overtime Employee for specific period of date. Daily/Monthly Overtime Report Fields Description Select Report Type : This field is to capture the format of the report output. The values available for this field are as follows: • PDF Document • Excel Document Date From : This field is to capture the Date From which is to be passed as report parameter. Date To : This field is to capture the Date To which is to be passed as report parameter. User Manual | Version 1.0 Page 121 StarVision Information Technology Pte. Ltd. Click Here Button : This button allows users to produce report. Sample of step by step transactions to produce the Daily/Monthly Overtime Report: Key in Report Parameters: Date From, Date To Print report by clicking “Click Here” button. User Manual | Version 1.0 Page 122 StarVision Information Technology Pte. Ltd. Daily/Monthly Overtime Report Daily/Monthly Overtime Report Status Report will be produced in selected Report Type (PDF Document in this case). User Manual | Version 1.0 Page 123 StarVision Information Technology Pte. Ltd. 10.2 Daily/Monthly Lateness Report This report allows users to produce a list of Employee who arrive to office lately. Daily/Monthly Lateness Report Fields Description Select Report Type : This field is to capture the format of the report output. The values available for this field are as follows: • PDF Document • Excel Document Date From : This field is to capture the Date From which is to be passed as report parameter. Date To : This field is to capture the Date To which is to be passed as report parameter. Click Here Button : This button allows users to product report. User Manual | Version 1.0 Page 124 StarVision Information Technology Pte. Ltd. Sample of step by step transactions to produce the Daily/Monthly Lateness Report Key in Report Parameters: Date From, Date To Print report by clicking “Click Here” button. Daily/Monthly Lateness Report User Manual | Version 1.0 Page 125 StarVision Information Technology Pte. Ltd. Daily/Monthly Lateness Report Status Report will be produced in selected Report Type (PDF Document in this case). Daily/Monthly User Manual | Version 1.0 Page 126 StarVision Information Technology Pte. Ltd. 10.3 Daily/Monthly Under time Report This report allows users to produce a list of Employee who work less than total office hour. Daily/Monthly Undertime Report Fields Description Select Report Type : This field is to capture the format of the report output. The values available for this field are as follows: • PDF Document • Excel Document Date From : This field is to capture the Date From which is to be passed as report parameter. Date To : This field is to capture the Date To which is to be passed as report parameter. User Manual | Version 1.0 Page 127 StarVision Information Technology Pte. Ltd. Click Here Button : This button allows users to product report. Sample of step by step transactions to produce the Daily/Monthly Undertime Report Key in Report Parameters: Date From, Date To Print report by clicking “Click Here” button. Daily/Monthly Under time Report User Manual | Version 1.0 Page 128 StarVision Information Technology Pte. Ltd. Daily/Monthly Under time Report Status Report will be produced in selected Report Type (PDF Document in this case). s Report User Manual | Version 1.0 Page 129 StarVision Information Technology Pte. Ltd. 10.4 Daily/Monthly Absent Report This report allows users to produce a list of Employee who does not attend to work in office day. Daily/Monthly Absent Report Fields Description Select Report Type : This field is to capture the format of the report output. The values available for this field are as follows: • PDF Document • Excel Document Date From : This field is to capture the Date From which is to be passed as report parameter. Date To : This field is to capture the Date To which is to be passed as report parameter. Click Here Button : This button allows users to product report. User Manual | Version 1.0 Page 130 StarVision Information Technology Pte. Ltd. Sample of step by step transactions to produce the Daily/Monthly Absent Report Key in Report Parameters: Date From, Date To Print report by clicking “Click Here” button. Daily/Monthly Absent Report User Manual | Version 1.0 Page 131 StarVision Information Technology Pte. Ltd. Daily/Monthly Absent Report Status Report will be produced in selected Report Type (PDF Document in this case). User Manual | Version 1.0 Page 132 StarVision Information Technology Pte. Ltd. 10.5 Daily/Monthly Error Report This report allows users to produce a list of error status in TMS Process such as (invalid shift code, No Timeout, No Timein , etc.. . Daily/Monthly Error Report Fields Description Select Report Type : This field is to capture the format of the report output. The values available for this field are as follows: • PDF Document • Excel Document Date From : This field is to capture the Date From which is to be passed as report parameter. Date To : This field is to capture the Date To which is to be passed as report parameter. Click Here Button : This button allows users to product report. User Manual | Version 1.0 Page 133 StarVision Information Technology Pte. Ltd. Sample of step by step transactions to produce the Daily/Monthly Error Report Key in Report Parameters: Date From, Date To Print report by clicking “Click Here” button Daily/Monthly Error Report User Manual | Version 1.0 Page 134 StarVision Information Technology Pte. Ltd. Daily/Monthly Error Report Status Report will be produced in selected Report Type (PDF Document in this case). User Manual | Version 1.0 Page 135 StarVision Information Technology Pte. Ltd. 10.6 Daily/Monthly Time Clock Report This report allows users to produce a list of clock in and clock out hour of Employee. Daily/Monthly Time Clock Report Fields Description Select Report Type : This field is to capture the format of the report output. The values available for this field are as follows: • PDF Document • Excel Document Date From : This field is to capture the Date From which is to be passed as report parameter. Date To : This field is to capture the Date To which is to be passed as report parameter. User Manual | Version 1.0 Page 136 StarVision Information Technology Pte. Ltd. Show Time Clock : This field is to capture to Show Clock in and out information for each record Show Rest and Off Day : This field is to capture to Show Rest and Off Day Show Approver Remark : This field is capture to show Approver Remark for each record Job Family : This field is capture to Job Family Click Here Button : This button allows users to product report. Sample of step by step transactions to produce the Daily/Monthly Time Clock Report Key in Report Parameters: Date From, Date To, Show Time Clocked, Show Rest and Off Day, Show Approver Remark and Job Family. Print report by clicking “Click Here” button. User Manual | Version 1.0 Page 137 StarVision Information Technology Pte. Ltd. Daily/Monthly Time Clock Report User Manual | Version 1.0 Page 138 StarVision Information Technology Pte. Ltd. Daily/Monthly Time Clock Report Status Report will be produced in selected Report Type (PDF Document in this case). Daily/Montly Time Clock Report ( Show Time Clocked= ‘Y , Show Reset and Off Day =’Y’ , Show Approver Remark =’Y’) User Manual | Version 1.0 Page 139