1
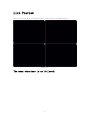
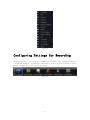
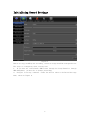
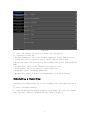
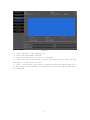
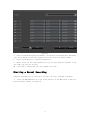
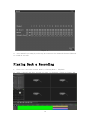
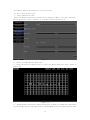
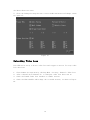
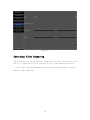
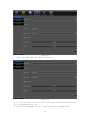
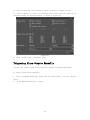
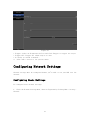
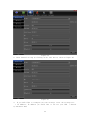
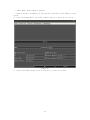
DVR USER’S MANUAL
Version 3.0
1
Contents
1. Startup 、Shutdown
、Reboot and Lock......................................3
2. Live Preview ........................................................................................3
3. Configuring Settings for Recording............................................5
3.1
Initializing
Record
Settings................................................................................................Error! Bookmark not
defined.
3.2
Scheduling
a
Recording......................................................................................................Error! Bookmark
not defined.
3.3 Starting a Manual Recording .............................................................................................8
3.4 Playing Back a Recording...................................................................................................9
3.5 Backing up record files......................................................................................................11
3.6 Configuring Alarms...........................................................................................................11
3.7 Configing Network Settings...............................................................................................20
2
Startup 、Shutdown
、Reboot and Lock
Startup in menu
Proper startup and shutdown procedures are crucial to expanding the life of your
DVR.
To startup your DVR:
1. login :deault user:admin
deault passward:null
2. Ensure the power supply is plugged into an electrical outlet. It is HIGHLY
recommended that an Uninterruptible Power Supply (UPS) be used in conjunction with
the unit.
3. Turn on the switch on rear panel
4. After startup, the Status indicator LED will remain green.
Shutdown in Menu
1. Enter the Shutdown menu, shown in Figure 1 by clicking on Menu > Shutdown.
2. Select the Shutdown button.
3. Turn off switch on rear panel.
Figure 1
While in the Shutdown menu, you may also reboot or lock your DVR. Locking your DVR
will return you to the Live Preview mode, which will require an user name and password
to exit out of it. The Reboot button will reboot your DVR.
To reboot or lock your DVR:
1. Enter the Shutdown menu by clicking Menu > Shutdown.
2. Select the Lock button to lock the DVR or the Reboot button to reboot the DVR.
3
Live Preview
The Live Preview mode is automatically started after the DVR boots up.
Figure 2
The menu structure is as followed:
4
Figure 3
Configuring Settings for Recording
There are multiple ways to setup your DVR for recording. They include setting up
a recording schedule, triggering a recording by motion detection and/or a sensor
alarm, and manually starting the recording.
Figure 4
5
Initializing Record Settings
Figure 5
Before setting your DVR up for recording, certain settings should be configured first.
The steps to configuring these settings are:
1. If you have not initialized a HDD either through the Setup Wizard or through
HDD management, you must do so before proceeding.
2. Navigate to Setting > Channel > Video You will be taken to the Record Settings
menu, shown in Figure 6.
6
Figure 6
3. Select the channel you would to configure the settings for.
4. Configure settings for:
• Encoding Parameters: Select the encoding parameters, either Normal or Event.
• Stream Type: Type of stream to record, either video or video & audio.
• Resolution: Select the resolution of the recording. The options include CIF and
QCIF.
• Bit Rate Type: Select either Variable or Constant bit rate.
• Video Quality: Select the quality to record cameras at.
• Frame Rate: Select recordings frame rate.
• Max Bit Rate: Select or define custom maximum bit rate for recordings.
Scheduling a Recording
Scheduling a recording allows you to setup the DVR to only record when you want it
to.
To setup a recording schedule:
1. Enter the Record Settings menu and select the Schedule tab to open the Schedule
menu, (Setting > Channel > Schedule Record), shown in Figure 7.
7
Figure 7.
2. Select Channel to edit schedule for.
3. Click and check Enable Schedule.
4. Click the Record Type you want (i.e. schedule);
5. Select the day you would like to setup the schedule for or select All Day
Recording to record the entire week.
6. Select to record the entire day by clicking Setting after Record Time, up to
8 time periods can be scheduled. It is important to note that time periods cannot
be overlapped.
8
Figure 8
7. Select a periods and click on Schedule, you can chose a recording Type. Recording
type can be based on time and triggered by motion detection and/or alarm.
8. Click the OK button to finish configuration.
9. Repeat steps 3-9 for other channels or copy settings from one schedule to the
next under the Copy To section.
10. Click OK to finish and save the schedule settings.
Starting a Manual Recording
A manual recording can be started at any time. To start a manual recording:
1. Press the REC/SHOT button on the front panel or in the Main menu to bring up
the Record menu (shown in Figure 9).
9
Figure 9
2. Start manual recording by selecting On or Off for the channels desired (default
is Schedule record).
Playing Back a Recording
1. Enter into the Video Search menu by clicking Menu > Playback.
2. Select channel and date records you want to playback. (shown in Figure 10).
10
Figure 10
3. Click the Play button or double click on schedule below to start playback of
all the files found.
Playing Back Frame-by-Frame
To playback frame-by-frame in the Playback interface: click the Frameplay button
on the Playback Control Pane.
Using Digital Zoom
To use digital zoom in Playback mode: roll mousewheel on a desired magnification area,
as shown in Figure 11. The selected area will be zoomed in.
Figure 11-A
Figure 11-B
11
Backing up Recorded Files
Recorded files can be backed up to various devices, such as USB flash drives, USB
HDDs.
Exporting Files To export recorded files:
1. Enter the Export Video menu (shown in Figure 12) by clicking Menu > backup.
2. Select desired parameters (i.e. channel no., start time and end time) to search
for files to export.
3. Click the Refresh button.
4. The size of the currently selected files is displayed in the lower window.
5. Click Start to begin backup process, shown in Figure 12.
Figure 12
Configuring Alarms
Setting up Motion Detection
Set up properly, using motion detected recording will increase the number of days
your DVR is able to record. It will only record relevant events rather than recording
12
everything, making searching for an event easier.
To set up motion detection:
1. Enter Channel Setting:
Enter the Channel Settings interface by navigating to Menu > Setting > Channel >
Motion Detection. Select channel to configure motion detection on..
Figure 13
2. Click on Enable Motion Detection.
3. Click the Area Settings button to enter the Motion Detection area, shown in
Figure 14.
Figure 14
4. The Motion Detection area, shown in Figure 14, allows you to mask out areas where
you would like motion to be detected in. The maximum area is the whole screen. Mask
13
the Motion Detection area.
5. Click the Linkage Settings button to enter the Motion Detection linkage, shown
in Figure 15.
Figure 15
Detecting Video Loss
Your DVR can be setup to detect video loss and trigger an action. To setup video
loss detection:
1.
2.
3.
4.
16.
Enter Camera Settings menu by clicking Menu > Setting > Channel > Video Lost.
Select channel after Channel No. to configure video loss detection fo.
Check the Enable Video Loss checkbox to enable feature.
Check the Alm Schedule and Linkage tab to enable feature, as shown in Figure
14
Figure 16
Detecting Video Tampering
Video tampering (i.e. moving camera to a different position) can also be detected
and set to trigger an action on your DVR. To setup video tempering detection:
1. Enter Video tampering Management/Settings menu by clicking Menu > Setting >
Channel > Video Tampering.
15
Figure 17
2. Select channel after Channel to configure video loss detection for and click
Enable Video Tampering checkbox.
3. Click the Area Settings button to enter the area setup.
4. Setup tampering area, as shown in Figure 18. Only one tampering area can be set,
with the full screen being the maximum area.
16
Figure 18
5. Click OK to return to the Video tampering Settings/Management menu.
Detect Videomask
1. Enter Videomask Management/Settings menu by clicking Menu > Setting > Channel >
Videomask.
2. Select channel after Channel to configure videomask detection for and click
Enable Videomask checkbox.
3. Click the Area Settings button to enter the area setup.
4. Setup mask area, as shown in Figure 19. Only one mask area can be set, with the
full screen being the maximum area.
17
Figure 19
Setting up Sensor Alarm and Exception
Recordings can also be triggered from an external sensor alarm device. To setup
sensor alarms:
1. Enter into the Alarm and Exception Management menu by navigating to Menu >
Setting > Alarm > Input, shown in Figure
18
Figure 20
2. Select the Alarm Input No, shown in Figure 21.
Figure 21
3. Set the alarm input type after status. The options available are Normally Open
(N.O.) and Normally Close (N.C.).
4. Click the Alarm Handle button to enter the Alarm Input Handle menu.
19
5. Click Setting tab after Linkage to enter in alarm in trigger setting.
6. Select cameras to trigger for recording when alarm occurs by checking the
checkboxes under the desired channel, as shown in Figure 22.
Figure 22
6. Click the OK button to complete setup.
Triggering Alarm Outputs Manually
You may also trigger alarm outputs manually through the Manual Alarm menu.
To trigger alarm outputs manually:
1. Enter the Manual Alarm menu (Figure 20) by clicking Menu > Setting > Alarm >
Output.
2. In the Manual Alarm menu, you may:
20
Figure 23
• Trigger: Select an alarm from the list and click Trigger to trigger its output.
• Trigger All: Trigger all alarm outputs at once.
• Set delay in second or manual..
3. Select OK to return to the previous menu.
Configuring Network Settings
Network settings must be configured before you‟re able to use your DVR over the
network.
Configuring Basic Settings
To configure basic network settings:
1. Enter the Network Settings menu, shown in Figure 24 by clicking Menu > Setting >
Network.
21
Figure 24
2. Enter General setting by clicking on Net info button, shown in Figure 25:
Figure 25
3. If you would like to configure your own settings, enter the settings for:
• IP Address: IP address you would like to use for your DVR. ( default
ip:192.168.1.188)
22
• Subnet Mask: Subnet Mask of network.
• Default Gateway: IP address of your Gateway. Typically the IP address of your
router.
4. Click the Enable Wi-Fi and click on Wi-Fi button to enter wi-fi setting.
Figure 26
5. Click the Enable 3G and click on 3G button to enter 3G setting.
23
Figure 27
6. Select the Advanced tab. This will take you to the advanced network settings
menu, shown in Figure 28:
Figure 28
24
7. Click OK to save and exit the Network Settings menu..
Configuring DDNS
If your DVR is setup to use PPPoE as its default network connection, you may setup
Dynamic DNS (DDNS) to be used
in conjunction.
To setup DDNS:
1. Enter the Network Settings menu by clicking Menu > Setting > Network > DDNS
Figure 29
2. Check the DDNS checkbox to enable feature.
3. Select DDNS Type. There are five different DDNS type to choose from, IpServer,
PeanutHull, 3322, DynDNS and no-ip(3322 is the only type supported here ).
Email Setting
You may also set email sending automatic through the Email Setting, if you have set
video motion detection, video lost and alarm in.trigger record..
1. Enter the Email Settings menu, shown in Figure 30 by clicking Menu > Setting >
Network > Email.
25
Figure 30
2. Fill in an email account as transmitter and its password upper.
.SSL: encrypting the content of the email;
.Attachment: attaching the snap pictures of video motion detection, video lost
and alarm in.
3. Fill in receiver email address, with three accounts being the maximum number.
26