1
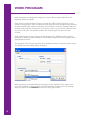
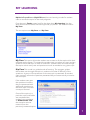
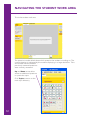
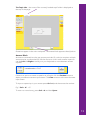
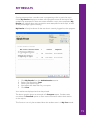
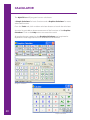
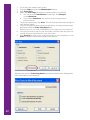
USER’S MANUAL v7.1
TABLE OF CONTENTS
Add a User
4
Edit a User
5
Work Programs
6
My Learning
7
Selecting a Topic
8
Search
10
My Activity
11
Navigating the Student Work Area
12
Scoring
17
My Results
19
Calculator
20
Print Topic
21
Program Maintenance
23
Help
25
Support and Sales Assistance
26
Revision 2.0
ADD A USER
From the main logon screen click the New User button.
This will bring up the new user dialogue box.
Choose a User ID and enter your name.
You must select a work program for each student user. The work programs are
designed to match the official school syllabus in your chosen state.
You can change the work programs later if you need to.
Click Update to save your new student user details.
Now you can logon to the program. From the logon screen, enter your User ID
and click Logon.
4
EDIT A USER
From the opening screen enter your User ID and click Edit User.
You can now update your name and change your work program.
Click Update to save your changes, or Cancel to discard.
Edit a user while logged in
You can also access your user details while you are logged into the program. Go
to the Tools tab and select the Administration section.
Now click My Profile. From here you can update your name.
5
WORK PROGRAMS
Work programs are designed to display the topics that are applicable for each
student’s particular needs.
Each work program has been written to match the official school syllabus in your
chosen country and/or state. Students should select the work program that matches
(or best matches) the maths course they are enrolled in at school. Student users can
change work programs if required. For instance, when you move from Year 8 to Year
9, you can edit your user profile to select the work program for the new level
of work.
Each student user on the program can be assigned to a different work program.
Students in different years or streams will be able to select the work program that is
appropriate for them.
The program will also track the work each student has done, indicating which topics
and questions have already been answered.
Work programs are loaded when the program is first installed. Then, when each
new user is added, a work program must be selected. Student users can change
work programs via the Edit User function on the logon screen.
6
MY LEARNING
KipMathsExpert@home (KipME@home) has two learning modes for student
users to access the topics in the work programs.
From the main Topics screen look for the drop down My Learning. Use the
drop down menu to select the learning mode you prefer – the default mode is
My Pace.
The two options are: My Pace and Kip Pace.
My Pace This option allows the student user access to all the topics within their
selected work program. This means the student user can select any topic and any
question within that topic to work on and learn. Student users can work through
the topics at their own pace and practise as much as needed on any given topic.
Kip Pace This mode is a guided mode of learning. The program guides
the student user through the topics in order and in order of difficulty of the
questions. A group of five questions for the set topic is presented. As student
users correctly answer the questions presented they are automatically moved to
the next topic.
If the student user gets
the questions incorrect
they are presented with
additional questions on
the same topic until that
concept is learned.
Once all the topics in a
particular topic sub-folder
are completed the
student user completes
an Achievement Test
that contains revision
material from the
previously answered topics.
7
SELECTING A TOPIC
The main Topics selection screen functions as a standard directory tree. Click any
top level Topic to see the topics below it.
‘Hover’ the mouse over any sub-topic level to see the folders below it.
The question folders are prefaced by a number. Click on one of these to load the
topic folder you wish to begin working in.
You can return to a higher level in the directory by using the single and double
arrow keys as shown.
8
Return to the topic window
When you have loaded a topic folder and wish to return to the main Topics
Directory, click the Topics button as shown.
The directory structure window will then be displayed. The directory will be at the
level of the last loaded topic.
9
SEARCH
The search function allows student users to search for topics within the program.
The search results will display any topic that is available within the selected work
program that fits the search parameters.
The search function searches for key word matches to question folder topics only.
From the directory window click the Search button.
Enter a key word or key word combination and Click
The search results will be displayed as shown below. You can click through to any
of the topic folders listed using the Find links in the Results box.
10
MY ACTIVITY
This function allows the student user to see at a glance which of any question
folders within a sub-topic have been completed or partially completed. It also
indicates whether the student is having difficulty with a topic by indicating if any
of the questions have been answered incorrectly.
1. From the directory tree
2. Drill down to the sub-folder topic on which you wish to view your activity
3. Then click My Activity
The markers for each question topic folder will highlight red, green or yellow if
questions within that folder have been answered.
The traffic light system indicates how well the student is progressing within
that folder.
•
If the student user answered all attempted questions within the topic
folder correctly, the highlight bulb will be green.
•
If 75% or more of the attempted questions were answered correctly the
highlight bulb will turn orange.
•
If 74% or less of the attempted questions were answered correctly the
highlight bulb will be red. This indicates topics that may require
additional practise.
11
NAVIGATING THE STUDENT WORK AREA
This is the student work area.
The question number block shows which question the student is working on. The
current question is indicated by the number displaying in a larger bold font. Ticks
and crosses indicate whether
previously answered questions
were correctly answered.
Up and Down arrows allow
access to additional questions
in a particular topic.
Click Topics to return to the
main topic directory.
12
The Topic title – the name of the currently loaded topic folder is displayed at
the top of the page.
Questions appear in the main workspace. The answer block appears directly below.
Answer Block
Answers are entered into the grey spaces provided. If a solution requires multiple
answer entries, as shown below, use the mouse to click in each answer square or
use the Left and Right arrow keys on your keyboard to move between answer
squares.
If there is an option to answer a question as a fraction click the Fraction button to
display an alternative answer input screen. Click Clear to return to the normal answer
input screen.
To input a superscript in your answer press Ctrl + 6, and then enter the number.
Eg: 3 Ctrl + 6 2 = 3²
To return to normal entry, press Ctrl + 6 and then Space.
13
Symbols
Under the Tools tab are the mathematical
symbols and functions that can be
included in the answer screen if required.
Place your cursor in the correct answer
space and then click the required symbol
to insert it.
Intro
The Intro button provides an
introduction to the topic that
has been loaded. It explains the
mathematical concept and how
the problems are to be solved.
14
Eg
The Eg or example button gives an example of a typical problem and a
fully worked solution for the topic that has been loaded. The example is
representative of the type of question the student user will have to answer.
Hint
The hints are specific to the question – not to the topic. By clicking the Hint
button student users will see a partial working out of the solution to the question
they are attempting to answer.
When the Hint button is clicked the partial solution will display on the screen for
several seconds before returning the student to the question. Clicking the Hint
button a second time will reveal a little more of the solution to that question.
Hints can be accessed twice for each question. The Hint feature is available for
most of the topics within the program.
15
Multiple Choice
The Multiple Choice bar is part of the answer block. This section will activate
automatically when the system encounters a question that has a multiple
choice answer.
Review the question and click the correct letter to submit your answer.
Mark
This section is to be used for questions where an exact answer cannot be
entered into the answer block. Primarily, these questions are those encountered
in advanced levels of senior maths where the working out is the answer. These
questions are designated Self Assessment questions.
When a Self Assessment question is displayed the regular answer block will be
inactive and the Mark block will become active.
The student user completes their own solution to the best of their ability.
The student user then clicks to view the solution provided in the program. Students
then compare their solution against the solution provided. Students click the Tick
or Cross to indicate whether their solution was correct or incorrect.
16
SCORING
There are two key ways for students to track their progress in KipME@home from
the main student work area.
Question Grid
The question grid contains a series of ticks and crosses representing the student’s
attempts to answer the questions.
The ticks represent the student’s ability to answer questions with or without
assistance or help.
A Green Tick means the student
got the question correct on the
first attempt without assistance.
A Yellow Tick means the student
got the question correct on the
second attempt OR the student
got the question correct but used
the Hint feature for help.
A Red Tick means that either the
student got the answer correct on
the second attempt AND used the
Hint feature, OR the student used
the Hint feature twice and
answered correctly.
A Red Cross “X” means the student
answered incorrectly on both attempts.
The Small Blue Cross indicates a
knowledge builder question was
attempted and also answered
incorrectly.
17
Progress Bar
The second area to measure and track student’s progress is on the Progress Bar.
There are three things to look at here:
Attempted shows how many questions have been attempted out of the total
number of questions in the folder – in this case 6 of 15 attempted.
Percentage is based on the percentage correct of the total scoring of questions
answered in that topic folder. This student is running at 44%.
Score (8 out of 18) represents a total
scoring based on the points the
student has received.
Each question is worth a total of 3
points depending on whether the
tick is green, yellow or red.
0 points are awarded for a red X
1 point is awarded for a red tick
2 points are awarded for a yellow tick
3 points are awarded for a green tick
By using all these features students can
measure their progress within a topic.
18
MY RESULTS
Scoring measures how a student user is progressing within a particular topic
folder, My Results displays a student user’s progress across all the topics that
student has attempted. It does not matter whether a topic was completed, My
Results will indicate how many questions were attempted in each topic, as well
as the percentage right and wrong.
My Results will only be shown for the user that is currently logged in to the program.
1.
2.
3.
4.
5.
Click My Results from the Administration section
Select your Results by Topic
Select your Report Style
Now select the date filter for your report
Click View
Your results are displayed and can be printed.
The above graphic shows an example of a Compact report. Student users
can select the Detailed option to show more information about their results
on the report.
This function can only be accessed when the student user is in My Pace mode.
19
CALCULATOR
The KipME@home™ program has two calculators.
A Simple Calculator for basic functions and a Graphics Calculator for more
advanced functions.
From the Tools tab, click on either calculator button to launch the calculator.
A tutorial is provided to demonstrate some of the functions of the Graphics
Calculator. Click on the Help menu to access this tutorial.
All graphs that are created on the Graphics Calculator can be printed or
exported to other applications such as MSWord and MSExcel.
Graphics Calculator
20
Simple Calculator
PRINT TOPIC
When you have a topic loaded in the program you can print it out to do extra
practise. The Print Topic function allows you to either:
Print out a hard copy or;
Save the topic as a Word file that can then be emailed
or printed later.
(the second option is only available for printing the Question topic itself)
There are various print options to choose from. You can print the topic
Introduction only, or the Example associated with that topic only. Alternatively,
you can print all the Questions in that topic. Choosing this option allows more
customisation of your printing choices.
The program allows you to print Questions, Questions and Answers, Full
Solutions etc. You can also print a completed, or partially completed topic,
choosing to print only questions answered incorrectly, allowing for targeted
extra practise.
21
1.
2.
3.
4.
5.
6.
7.
8.
9.
Go to the main student work screen
From the Tools tab go to the Administration Section
Click Print Topic
When the Print Topic dialogue box opens select your options:
a. You can print the Introduction to the topic, the Example
or the Questions
b. If you select Questions, the options for printing questions
become active
To print the document, click Print. This will send the document straight to
your default printer.
To print using Word (which gives you the option of creating and saving a
Word file) check the Print using Word box.
Before you print you must close MSWord if it is open on your computer.
You can now enter a title for your document. You also have the option to
include the topic Introduction in your document.
Click Save As to save a copy of the document on your computer, or click
Print to send the document straight to the printer.
Selecting the option to Print Using Word generates the below print dialogue box.
Follow the steps as outlined above.
22
PROGRAM MAINTENANCE
Setup
The Setup function accessed via the main logon screen enables you to change
your regional settings and to add new license keys if you purchase additional
software modules.
From the drop down menu select the country and/or state you wish to upload and
click OK.
To add a new license key, click Add. Enter the new license key provided by Eduss
Learning and then click OK.
23
Update
This function is designed to be used when a new version or updates of the
software are made available to you.
To successfully download updates to the program you must have an active
internet connection. Click Update and follow any prompts given to complete
the process.
24
HELP
The Help menu on KipMathsExpert@home™ contains the following
forms of assistance.
Manual
Selecting this option will allow you to launch a PDF version of this
instruction manual.
Website
This option contains a link which will take you through to the Eduss
Support website.
Tutorials
This option contains a link to tutorials that demonstrate some of the
functions of the program.
About
This option will tell you the version of the product you have purchased.
This information may be needed if you contact Eduss for support.
25
SUPPORT & SALES ASSISTANCE
Contact Details
This product is distributed by Eduss Learning.
Mailing Address:
PO Box 1053, Ashmore City, QLD 4214
Address:
Suite 29, 207 Currumburra Road, Ashmore, QLD 4214
Phone: 07 5597 4600
Fax: 07 5597 4666
Sales Email: [email protected]
Support
Support Email: [email protected]
Support Phone: 1800 334 633
Support Hours: Monday to Friday, 8:00am to 8:00pm AEST
26
27