1
User Manual
© 2011 HirePOS Pty Ltd
Table Of Contents
....................................................................................... 1
User Manual ................................................................................................ 1
................................................................. 1
Table Of Contents........................................................................................ 2
License Agreement...................................................................................... 5
Installation ................................................................................................. 6
How to install HirePOS ............................................................................... 6
Installing on Multiple computers and sharing the database .............................. 6
Open Database ............................................................................................ 7
How to Open a Database ............................................................................ 7
Exit Program ............................................................................................... 7
Backup Database ........................................................................................ 8
How to backup your database ..................................................................... 8
How to backup your database to two locations in one step............................... 8
Customers ................................................................................................. 10
How to add new Customers ...................................................................... 10
How to add a new Customer at sale time .................................................... 10
Customer Codes (Optional) ....................................................................... 10
How the Sales Prompt field works .............................................................. 10
Suppliers ................................................................................................... 12
How to add new Suppliers ........................................................................ 12
Item Categories ........................................................................................ 13
How to add a new Item Category............................................................... 13
Item Components ..................................................................................... 14
Setup Item Type ..................................................................................... 14
Setup Component item ............................................................................ 14
Setup the Component Item as a Companion ................................................ 14
Add the Component Item to an Invoice....................................................... 14
Bank Accounts .......................................................................................... 15
How to add a new Bank Account ................................................................ 15
Income & Expenditure Accounts ............................................................... 16
How to set up Income and Expenditure Accounts ......................................... 16
Reminders List .......................................................................................... 18
2
Bookings ................................................................................................ 18
Expenses ............................................................................................... 18
Maintenance Services............................................................................... 18
Booking & Invoices ................................................................................... 19
How to add a new booking or invoice ......................................................... 19
Receiving Deposits and Payments .............................................................. 20
Previewing or Printing the Invoice .............................................................. 20
Save & Close the Invoice .......................................................................... 20
Partial Returns .......................................................................................... 21
How to complete a partial return ............................................................... 21
Stand Downs ............................................................................................. 22
How to record a Stand Down against a Hire................................................. 22
Cash Book ................................................................................................. 25
How to open the Cash Book ...................................................................... 25
How to change the date range................................................................... 25
View transactions by Income & Expenditure account..................................... 25
How to view or edit a transaction............................................................... 25
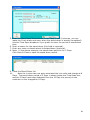
How to create a new Withdrawal, Deposit or Account transfer ........................ 26
New Withdrawal or Expense ..................................................................... 27
How to create a New Withdrawal or Expense ............................................... 27
New Bank Deposit (for Multiple Transactions).......................................... 29
How to complete a New Bank Deposit......................................................... 29
Bank Reconciliation................................................................................... 30
How to reconcile a new bank statement ...................................................... 30
How to setup a new opening balance.......................................................... 31
HirePOS PDF Writer - How To Install ........................................................ 32
PDF Email (Third Party) ............................................................................ 33
How to install PrimoPDF and print to PDF format .......................................... 33
Is your report printing an extra blank page? ................................................ 33
Barcode Labels Module ............................................................................. 34
How to install the barcode labels module .................................................... 34
Install the barcode font ............................................................................ 34
How to print barcode labels....................................................................... 34
Pets Module .............................................................................................. 35
How to setup a new Pet............................................................................ 35
How to Add a Pet to a Booking .................................................................. 35
Test & Tag ................................................................................................. 37
How to record an electrical safety test that has passed ................................. 37
How to record an electrical safety test that has failed ................................... 37
Payment Terms ......................................................................................... 38
How to setup default payment terms for your business ................................. 38
How to setup payment terms for a particular customer ................................. 38
Comments ............................................................................................. 38
Installation Issues .................................................................................... 39
Btnplus1.ocx Registration Error on Windows Server 2003 .............................. 39
HirePOS_SQL Installation ......................................................................... 40
Install SQL Server ................................................................................... 40
Set SQL Server to SQL Server and Windows Authentication mode................... 40
HirePOS_SQL Program Installation ............................................................. 40
Security ................................................................................................. 40
SQL Native Client .................................................................................... 41
Windows 7 & Vista Issues ......................................................................... 41
3
Item Price Adjustments ............................................................................ 43
Filter Options .......................................................................................... 43
Adjustment Percentage ............................................................................ 43
Increase or Reduce.................................................................................. 43
User Restrictions....................................................................................... 44
General Restrictions................................................................................. 44
Restriction Settings ................................................................................. 44
User Passwords....................................................................................... 44
Database Optimization .............................................................................. 45
Agency Module .......................................................................................... 45
Autocalculating Remittance Agency (Management) Fee ................................. 45
Branches Module....................................................................................... 46
Register the Branches module ................................................................... 46
Setup Branches....................................................................................... 46
Link a Branch to an Item .......................................................................... 46
Link a Branch to a Booking or Invoice......................................................... 46
Show Item Availability by Branch............................................................... 46
Show all Items for a particular Branch ........................................................ 47
How To Repair Database Errors In SQL..................................................... 48
How to: Set a Database to Single-user Mode (SQL Server Management Studio) 48
DBCC CHECKDB (Transact-SQL) ................................................................ 49
ePad Installation....................................................................................... 50
Database Corruption ................................................................................. 52
4
License Agreement
•
•
•
•
•
•
THE GRANTING OF LICENCE
HirePOS Pty Ltd grants the user of the originally allocated program,
nonexclusive and non-transferable use of one copy of the program, the
manual/Help File and any subsequent upgrades (subject to valid
membership) which may be issued, solely for your own purpose.
COPIES OF THE PROGRAM
You may not take copies of the program other than as a backup or other
archival purposes. You may not take copies of the manual/Help File or other
written material issued from time to time in conjunction with upgrade
releases.
SINGLE SITE LICENSE ONLY
You are licensed to use HirePOS on up to 5 computers (for Access Database)
12 computers (for SQL Server Database) at one business address/site only.
Should you have the need to exceed these restrictions then you must have
written consent from HirePOS Pty Ltd to do so.
TRANSFER OF SOFTWARE
You may not lend or rent the software to another person or entity. You may
not transfer ownership of the software or written material without first having
authority to do so from HirePOS Pty Ltd. In the event that a transfer is
agreed upon, you will retain no copies of the original software, any upgrades
or written material and the person to whom the software is transferred must
agree to the terms of the License Agreement.
THE TERM OF THIS AGREEMENT
The contents of the License Agreement will remain in force until it is
terminated by either party and the copies of the original software, any
upgrades or written material will either be destroyed by you or returned to
the supplier. Automatic termination will also take effect if you fail to comply
with any of the terms and conditions of the agreement.
LIMITED WARRANTY & DISCLAIMERS
HirePOS Pty Ltd warrants that the form on which the software is supplied and
the manual/Help File is free from defects in workmanship or material for a
period of 90 days from the original purchase date.
With the exception of the limited warranty above the program is sold in its
existing format and the quality and performance is at your own risk. You
undertake to ensure that the information obtained as a result of using the
program is correct. Any claims against HirePOS Pty Ltd as a result of this
agreement, including warranty claims, shall not exceed the amount of the original
license fee paid by you.
This License encompasses the entire agreement between you and HirePOS Pty
Ltd and super cedes any prior agreements between the parties. This agreement
can not be changed without the written authority of HirePOS Pty Ltd.
5
Installation
How to install HirePOS
If you need to install HirePOS from scratch then go to
www.hirepos.com.au/install.htm and complete the online form to receive an
installation link via email.
1. Click the link, and when prompted by your Web browser choose to RUN the
file.
2. Ignore any security warnings that your Web browser may prompt you with.
3. Step through the setup wizard and complete the installation process.
Installing on Multiple computers and sharing the
database
This section explains how to install HirePOS on multiple computers and share a
common database between each computer user. If you have multiple computers
that are shared on a network then you should have a main computer (Server)
which will store the database and provide backup facilities such as a removable
hard disk or a tape drive (see Backup Database for further information).
1. Install HirePOS on each computer via the installation link provided to you
(see www.hirepos.com.au/install.htm)
Note: If you do not wish to use the HirePOS program on the Server
computer than there is no need to install the program on the Server. You
only need to move the database file to the Server, as explained in the next
step.
2. Copy the database from the C:\Program Files\HirePOS\Database\ folder to a
folder on the Server computer. It is best to store the database in a folder on
the Server that is in a shared network drive other than C:\Program Files\.
For example, you could setup a folder C:\HirePOS Data\ or better still, in a
separate drive D:\HirePOS Data\. You could then map this drive on the other
computers to an S:\ drive. So the other computers open up
S:\HirePOS_Database.mdb. Consult with a network technician if you are in
any doubt.
3. One computer at a time, open HirePOS, then go to File > Open Database.
4. Using the file browser, locate the HirePOS database file on your Server
computer.
The directory and filename of the database that is currently opened is shown
on the 'title bar' at the very top on the main HirePOS screen.
Note: You should remove the databases from each of the other computers
(installed in C:\Program Files\HirePOS\Database\ by default). This will save
confusion if there is a network failure, as there will only be one database
(which is on the Server) and users won't attempt to open the database
located on their local computers.
6
Open Database
When using HirePOS you will generally be working with a single database.
By default, the database is located at
C:\Program Files\HirePOS\Database\HirePOS_Database.mdb.
However, you may need to open one of the demo databases supplied with
HirePOS, or open a database located over a network or a different location to the
original.
How to Open a Database
1. Choose File > Open Database from the menu bar located at the top of the
main screen. This will open a file browser style window where you can locate
the database you wish to open.
2. Click and highlight the file you wish to open, then click Open (located bottom
right of window).
Exit Program
You can use one of the following methods to exit the HirePOS program:
•
•
•
Choose File > Exit Program from the main screen, or
Click the cross located on the title bar at the top right side of the main
screen, or
Click the Exit Program button located at the bottom right of the Main Menu.
Note: You will always be prompted to Backup Database when you exit the
program. It is extremely important that you backup the database regularly
(normally on a daily basis).
7
Backup Database
All the data that you enter through the program
is stored in one physical file called a database.
Your entire business history is stored in this one
single file. Therefore, it is absolutely CRITICAL
that you make a backup copy of this file on a
regular basis. If your computer has a hardware
failure or is stolen or destroyed by fire then any
data since your last backup will need to be rekeyed back in. So it is important that you
backup on a daily basis every time you exit the
program.
How to backup your database
1. From the Main Menu, choose File then Backup Database.
2. The Backup Database window will open and ask if you wish to Save the
default File Name with today’s date, e.g. HirePOS_Backup 260306.mdb and
the specified location to save it in (File name:).
If you wish to change this do so here, if not….
3. Click Save and you will be advised that the database was backed up, then
click OK to close prompt.
How to backup your database to two locations in
one step
Firstly, you will need to make a once-off change in the program's setup
preferences.
1. From the Main Menu, choose Setup > Preferences.
2. On the Restrictions tab, check the Use Dual Backup screen when backing up
database box.
You will now be prompted with a different
window when backing up your database.
1. From the Main Menu, choose File then
Backup Database to open the Backup
window.
2. Use the Browse buttons to specify the
location to send your database backups to.
3. The backup filenames default to your
database name with the current data appended at the end of the filename.
You can click the Custom Suffix option if you do not wish to use the date, e.g.
you could enter the word Laptop if you were backing up to your laptop
computer.
4. Click the Backup Now buttons individually and select OK when prompted. You
will be advised that the database was backed up.
8
5. Click Close to exit the database backup window and return to the Main Menu.
9
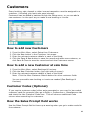
Customers
Every booking, sale, deposit or other income transaction must be assigned to a
customer, (including your bank who pays interest).
Customers can be added in batches though the Setup menu, or you can add a
new customer 'on the spot' as you make a new booking or invoice.
How to add new Customers
1.
2.
3.
4.
From the Main Menu, select Setup then Customers.
Click the New button in the Customer List screen.
Enter the relevant customer details in each of the fields.
Click the Save & New button to save the record and add a new customer, or
click Save & Close to save the record and exit the Customers screen.
How to add a new Customer at sale time
1. From the Main Menu, select Bookings & Invoices.
2. Click the New Customer button (top right side of screen).
3. Enter the relevant customer details in each of the fields.
Note: Click the More Customer Details button for other customer fields.
You can now add a new booking or invoice as needed (See Bookings &
Invoices).
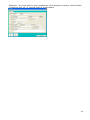
Customer Codes (Optional)
If you require customer codes (either auto generated or your own for bar-coded
customer cards for example) then go to Setup > Preferences > Miscellaneous tab
and check the Use Customer Codes box. This will show an additional Code
column when searching for customers.
How the Sales Prompt field works
Use the Sales Prompt field to throw up a warning when you go to make a sale for
the customer.
10
Example: You may wish to warn customers of an account overdue, remind them
of parts to pick up, or remind staff of a bad debtor.
11
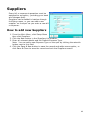
Suppliers
Every bill or expense transaction must be
assigned to a supplier, (including your bank
who charges fees).
Suppliers can be added in batches though
the Setup menu, or you can add a new
supplier 'on the spot' as you enter a new bill
or expense.
How to add new Suppliers
1. From the Main Menu, click Setup Menu
then click Suppliers.
2. Click the New button in the Suppliers List window.
3. Enter all relevant details and the Default Expense Type.
Note: You can add a new Expense Type on the spot by clicking the asterisk
button next to this field.
4. Click the Save & New button to save the record and add a new supplier, or
click Save & Close to save the record and exit the Suppliers screen.
12
Item Categories
The purpose of Item Categories is to allow you to group items into the same
category so that when you lookup availability you can hire out an alternative item
of the same category should the original requested item be booked out.
Example: If your business hires out ride-on lawn mowers, you could put all your
different ride-on mowers into a 'Ride-on Mowers' category. When you open the
Availability window you can look up availability for the 'Ride-on Mowers'
category. All ride-on mowers in your inventory will show in the availability list.
Any sections of the availability list that are white means the item is available.
Any coloured bars means the item is booked for that period.
How to add a new Item Category
1. From the Main Menu, click Setup then Item Related, then Item Categories.
This opens the Item Categories window, which lists all the existing categories
that have been setup.
2. In the >* row of the grid, type in the new category.
3. Click Close when completed.
4.
Note: After categories have been added, you can assign a category to an
item through the Items window.
13
Item Components
You can set an Item as a Component so the Item is not visible on the customer’s
printed Invoice and is only visible on the Invoice screen and Delivery/Pickup
Dockets for tracking purposes.
Setup Item Type
1. Go to Setup > Item Related > Item Types and create a new Item Type.
2. Select the Drop Down Arrow in the Hire Item field and select Yes, then go
to View > Component Column, then click Yes, then Close.
Setup Component item
1. Go to Setup > Items and create your new component item. Ensure you
select the correct Item Type and Category if appropriate. Note; there is no
need to add a Hire Rate. This will then hide the Component on the Printed
Invoice. If a Hire Rate is added it will show as per normal.
Setup the Component Item as a Companion
1. Go to Tools > Companions, then select the Item you wish to make this a
Component of, eg ‘Table’ then OK. Then, Yes and Save and Close then Close.
Please note this Component can be added to any number of other items. If
so, just select these as well.
Add the Component Item to an Invoice
1. Create the Invoice, then from the Item Field select the main item eg; ‘Table’
and the Item Companions Window will open. Next select the Component item
and Ok.
2. This item will then appear on the Invoice screen. However when you preview
the Booking/Invoice it will not appear. However it will appear when you
preview the Delivery Docket/Pickup Docket. This will enable these Component
item/items to be selected for that particular Delivery and Pickup. Often a
main item can made up of numerous Components and would thus fill the
printed invoice and look messy. That is why it is processed in this manner.
3. The Component item is treated like any other Hire Item and is thus available
in both the Invoice and Returns screen.
14
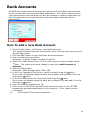
Bank Accounts
HirePOS can record financial transactions against your individual bank accounts
which can then be reconciled with bank statements. You need to setup a list of
your bank accounts so that when you pay an expense or receive a payment you
can nominate which bank account the money has been withdrawn from or
deposited to.
How to add a new Bank Account
1. From the Main Menu, click Setup, then Bank Accounts.
This opens the Bank Accounts List window, which lists any bank accounts you
have already setup.
2. Click the New button to open the Bank Accounts window.
3. Enter the Bank Account Name.
Examples: AnyDay Cheque, AnyDay Visa Card.
4. Check the Credit Account box if it is a credit account (such as credit cards).
Note: The screen surrounds change to red when credit account is
selected.
5. Enter the Bank Name.
Examples: NAB, Bendigo Bank, CBA, ANZ
6. In the Link Charges & Fees to box, select the bank using the button.
If you have not already setup the bank as a supplier you can add it here by
clicking the button.
7. In the Link Interest to box, select the bank using the button.
If you have not already setup the bank as a customer you can add it here by
clicking the button.
8. Enter the BSB No. and Account No.
9. Click in the Link EFTPOS transactions to this account box if your EFTPOS
transactions are deposited directly to this account. If not, leave this box
unchecked.
10.
Click Save & Close when completed.
15
Income & Expenditure Accounts
Each financial transaction has a category recorded against it so they can be
summarized for accounting purposes. HirePOS refers to these categories as
Income & Expenditure Accounts. Some other systems refer to them as the Chart
of Accounts.
Examples: Accountancy Fees, Bank Charges, Bank Interest, Telephone, Repairs
& Maintenance.
HirePOS already has some Income & Expenditure Accounts setup to save you
some data entry time, but these accounts should be reviewed with your
accountant or bookkeeper, and any adjustments made as necessary.
Account Types
Each Income & Expenditure Account will also fall into one of the following
categories:
Operational Expense, Capital Expense, Personal/Drawings, Sales Income or Other
Income. There are also two special categories used by the system, Opening
Balance and Account Transfer. Transactions recorded against accounts of this
type are transfers between your business accounts and are not actual income or
expenses to the business.
Note: You do not need to setup an account for Sales Income. Any payment
received through Bookings and Invoices is classed as Sales Income.
Tax Defaults
A default tax code can also be nominated against each Income & Expenditure
Account.
How to set up Income and Expenditure Accounts
1. From the Main Menu, click Setup Menu, then Income & Expenditure
Accounts.
This opens the Income & Expenditure Accounts List, which lists any accounts
already added.
16
2. Click New to open the Income & Expenditure Accounts window.
3. Enter the Income/Expense Description.
4. Nominate a default tax code (GST or FRE) from the Tax Default drop-down
list.
Note: The tax code can always be overridden when you enter a new
expense or receive a payment.
5. For taxation purposes, you need to select whether the account is an
Operational Expense, Capital Expense, Personal/Drawings or Other Income,
or whether it is an Opening Balance or Account Transfer.
Note: You do not need to setup an account for Sales Income. Any
payment received through Bookings and Invoices is classed as Sales Income.
6. Click Save & Close when completed.
17
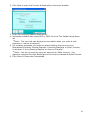
Reminders List
The right side of the Main Menu shows the Reminders List that notifies you of
tasks due for the following records.
•
•
•
•
•
Bookings
Returns
Expenses
Maintenance Services
General Reminders
If any of these records are overdue a yellow circle with an exclamation mark will
appear to the left of the record in the list. The Reminders List also allows you to
view and edit these records directly without having to manually search for them.
Bookings
All Bookings that do not have a Date From will show in the Reminders List.
Double-click the booking to edit and enter the Date From when the customer
begins hiring the item.
See Also: Bookings & Invoices
Expenses
All bills that are in Pending mode will show in the Reminders List. Double-click
the expense when you need to edit or pay the bill. To pay the bill and remove it
from the reminders list you need to switch the bill from pending to paid.
See Also: Pay Bills
Maintenance Services
All items that are scheduled for servicing will show in the Reminders List.
Double-click the maintenance record edit and enter the new service details.
See Also: Maintenance, Service & Repairs
18
Booking & Invoices
Booking & Invoice details are recorded through the same window. You can enter
a new booking and later change it over to an invoice, or you can enter a new
invoice immediately.
Most of the data entry for bookings and invoices are the same, but the the key
difference is that a booking does not allow you to record Actual dates and times,
only Estimated dates and times.
When the customer returns or is finished with the item/s, the Actual Date To
should be completed.
How to add a new booking or invoice
1. From the Main Menu, click Bookings & Invoices to open the Sales window.
The Sales window is similar to the Customers window and allows you to select
an existing customer, or setup a new customer on the spot.
2. Select the customer from the Find Customer box, or click the New Customer
button if the customer has not been previously set up.
3. Click the New Booking or New Invoice button as required. If this is an
advanced booking and you are not charging out the item/s to the customer
immediately then you should choose New Booking.
4. Enter the Estimated Date/Time FROM and Estimated Date/Time TO.
19
5. Select the Staff Member who has taken this Booking (if you are tracking
Staff).
6. Select the item to book from the Item column. To do this, on the row of
the grid, click the button in the Item column, or begin typing the item
description. Select the item from the list.
Note: You will be prompted if the item is double-booked. This will open
the availability window and allow you to select an alternative item.
7. Ensure that the Qty is correct by reviewing the Time Span (Estimated) and
check that the $ Each, $ Total, and Tax fields are correct.
Receiving Deposits and Payments
Click here for information on receiving deposits and payments.
Previewing or Printing the Invoice
Click the Print button to print the invoice out immediately, or click the drop-down
arrow next to the Print button, then click Preview Invoice.
Save & Close the Invoice
Click Save & Close when completed. The Sales window will show the full history
of invoices to the customer, with the latest invoice shown first.
20
Partial Returns
When you complete returns for multi-hire items (items where the Quantity For
Hire in Setup is greater than 1) you are prompted with a second returns screen
after you locate the customer and invoice via the normal Returns screen. The
second screen makes it easier to process partial returns.
How to complete a partial return
1. The Actual Date/Time defaults to the current date/time. Verify and alter the
Act Date/Time Returned if required.
2. Click the green tick button for all items that are returned in full.
3. For items that are partially returned, enter the quantity returned in the Qty
Returned box.
The amount still on hire is calculated.
4. Enter the Estimated Date/Time To that you expect the items still on hire to be
returned.
5. Click OK to complete the return.
21
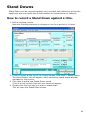
Stand Downs
Stand Downs can be recorded against a hire to track and deduct any period the
equipment was not usable due to bad weather or maintenance for example.
How to record a Stand Down against a Hire.
1. Edit an existing invoice.
Note the following example is a Kanga on hire for a period of 10 days.
2. From the menu at the top of the Invoice screen, click View > Stand Downs.
The Stand Downs List will appear, which shows any stand downs already
recorded on this invoice.
3. Click New to add a new Stand Down record.
A list of all the invoice lines with hire items will appear.
4. Double-click the hire item you wish to stand down.
This will open the Stand Down screen.
22
5. Enter the Start Date/Time and the Finish Date/Time (if unknown, you can
leave the Finish blank and enter when the stand down is actually completed).
Use the Time Span dropdown if you prefer to enter the period of stand down
time.
6. Enter a reason for the stand down (this field is required).
7. Enter any notes or details about the stand down (optional).
8. Note: In the above example, the stand down period is for 2 Days.
Click Save & Close to save the stand down record.
9. Close the Stand Down list.
10.
Note the invoice has now auto-calculated the hire units and charge as 8
Days. The stand down period of 2 Days is shown below the Time Span box,
and the 2 Days have been deducted from the 10 Day hire period, so the
customer is now charged for 8 Days.
23
11.
Save & Close the invoice. Note the stand down is now shown on the
reminders list.
The stand down will remain on the reminders list until completed. To
complete the stand down you simply double-click the reminder to open the
relevant invoice. Then go to View > Stand Downs to open the stand down list
for the invoice. Double-click the stand down to edit, tick the 'Completed' box,
then Save & Close.
24
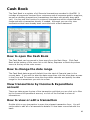
Cash Book
The Cash Book is a register of all financial transactions recorded in HirePOS. It
includes all payments received from customers and all expenses paid to suppliers,
as well as pending transactions (transactions that have not actually been paid
yet). You can use this function to review all transactions within a specified date
range and edit a transaction directly if needed. Although you can only view
transactions that have already been reconciled with a bank statement.
How to open the Cash Book
The Cash Book can be opened in three ways from the Main Menu. Click Cash
Book at the bottom of the menu list on the Sales, Expenses or Bank drop-down
menu at the top of the main screen.
How to change the date range
The Cash Book date range will default from the start of financial year to the
current date. If you wish to alter the date range then click the drop-down arrows
in the From and To boxes to show the drop-down calendar and specify the date
range for the transactions you wish to review.
View transactions by Income & Expenditure
account
There are tabs across the top of the transaction grid that you can click on to filter
by the Income & Expenditure account, or click on the first tab to show all
transactions.
How to view or edit a transaction
Double-click on any transaction to open the relevant transaction form. You will
not be able to edit all of a transactions details if it has been reconciled with the
bank.
25
How to create a new Withdrawal, Deposit or
Account transfer
Select the appropriate button on the bottom part of the screen and complete as
you would for new withdrawal, deposit or account transfer.
26
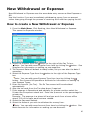
New Withdrawal or Expense
New Withdrawal or Expense uses the same data entry screen as New Expense or
Bill.
Use this function if you are immediately withdrawing money from an account
rather than going through the process of receiving a bill and then paying the bill.
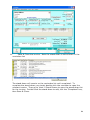
How to create a New Withdrawal or Expense
1. From the Main Menu, Click Banking, then New Withdrawal or Expense.
This opens the Expenses window.
2. Select the Supplier from the
button to the right of the Pay To box.
Note: You can add a new Supplier from here by clicking the button. See
Suppliers for information on setting up new suppliers.
3. The Payment Date will default to today's date, but you can alter the date if
necessary.
4. Select the Expense Type from the button to the right of the Expense Type
box.
5.
6.
7.
8.
9.
Note: You can add a new Expense Type from here by clicking the
button. See Income & Expenditure Accounts for information on setting up
new Expense Types.
Enter the Amount (Inc Tax). The Ex Tax amount will be calculated
automatically.
Alter the tax code from the Tax drop-down if required.
If the expense is Operational and partially for private use then select the
Private Use Component check box. Enter the $ amount or the percentage for
private use.
Example: The expense is a phone bill and you work from a home office
where 70% of the calls were business related.
Select the Payment Method.
Select the Account you wish to withdraw the money from.
Note: You can add a new Account from here by clicking the
Bank Accounts for information on setting up new accounts.
button. See
27
10.
Enter a Reference number or cheque number if applicable.
11.
Add a note in the Memo box for a detailed explanation on what the
expense if for, particularly if the expense is something out of the ordinary
that you want to bring to your accountants attention.
12.
Click Save & Close when completed.
28
New Bank Deposit (for Multiple
Transactions)
This function transfers multiple transactions from the till or money safe to the
bank account. The bank deposit will then show as one single transaction in the
Bank Reconciliation and will therefore match your bank statement.
Only cash and cheques should show in the list of transactions to deposit.
Transactions recorded against the EFTPOS and Online methods should go directly
into a bank account, NOT the Till, Money Safe or Petty Cash Tin.
How to complete a New Bank Deposit
1. From the Main Menu, click Banking, then New Deposit (for Multiple
Transactions).
This opens the Bank Deposits window.
2. The Deposit Date will default to today's date. Alter the date if required.
3. Select the bank account to deposit to from the Deposit to Bank Account dropdown.
4. Select the cheques and other transactions to be deposited to the account by
clicking the box to the left of them.
5. Enter the reference for the deposit in Reference box, if required.
6. Click Save Deposit & Close.
29
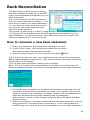
Bank Reconciliation
The Bank Reconciliation function ensures
that the transactions made within HirePOS
match the withdrawals and deposits on your
bank statements.
You should reconcile HirePOS transactions
with your bank statements regularly, i.e. as
soon as you receive your bank statements,
or if you have an online bank account you
can print out your bank statement and
reconcile more frequently.
The process of reconciling is simply a matter
of 'checking off' the transactions in HirePOS against the transactions on your
bank statement. You will also need to enter bank fees and bank interest, and
make any adjustments if errors are found.
How to reconcile a new bank statement
1. Firstly, you need have your latest bank statement on hand.
2. From the Main Menu, click Banking then Bank Reconciliation.
This opens the Bank Reconciliation window.
3. Select the Bank Account from the Account drop-down button.
If this is the first time you have reconciled this account you will be prompted to
add an Opening Balance adjustment. (See How to setup a new opening balance
at the bottom of this page).
Click the New Reconcile button (bottom left of window).
Note: If it is a Credit Account reconciliation the screen surrounds will be red.
Select the statement date, and enter the closing balance on the bank statement.
4. Go through each transaction of the Bank Reconciliation screen and click the
transaction with the left mouse button to check it off. Use the right mouse
button to uncheck the transaction if needed. Double-click the transaction to
make any adjustments required to balance with the statement.
Add any bank interest or bank charges using the New Withdrawal and New
Deposit buttons.
5. When all transactions have been reconciled with the bank statement, click the
Reconciled button to complete the reconciliation. If the closing balance in
HirePOS does not match up with the closing balance on your bank statement
30
then you will not be able to reconcile. Cross-check your HirePOS transactions
with the bank statement transactions to find any mistakes.
6. Press Leave & Return when you are finished.
How to setup a new opening balance
If you are carrying over a balance from a previous system and need to start with
an opening balance other than zero then you will need to enter a new Opening
Balance transaction.
1. Click on New Deposit to set up a new payment, choosing Opening Balance as
the Payment Type. (See New Bank Deposit for further information on
entering a new deposit transaction).
31
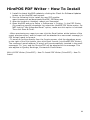
HirePOS PDF Writer - How To Install
1. Install the latest HirePOS update by clicking the Check for Software Updates
button on the HirePOS main screen.
2. Run the following link to install the new PDF module:
www.hirepos.com.au/downloads/HirePOS_PDFSetup.exe
3. After the module is installed, restart your computer.
4. Open HirePOS and go to Setup > Preferences > Printing. In the PDF Printer
(for emailing reports) dropdown list, select the HirePOS PDF Writer option. Do
NOT tick the "Use Integrated Email" option, make sure this option is unticked.
Then click Save & Close.
- When previewing any report you can click the Email button at the bottom of the
report preview screen, and the report will be attached to a new email message (in
PDF format) ready to be sent.
- To email an Invoice directly from the Invoice screen, click the dropdown arrow
to the right of the Print button, then click Email Invoice (via HirePOS PDF Writer).
The customer's email address (if setup) will be automatically inserted in the email
message's 'To:' box, and the Invoice PDF will be attached to the message. This
also applies to Quotes, Bookings, Contracts & Credit Notes.
NULL 49 PDF Writer (PrimoPDF) - How To Install PDF Writer (PrimoPDF) - How To
Install
32
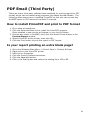
PDF Email (Third Party)
There are many third-party software tools available for printing reports to PDF
format, which can be viewed using programs like Adobe Acrobat Reader. The
following offers some tips on installing PrimoPDF so that you can convert any
HirePOS report to PDF and send via email if required.
How to install PrimoPDF and print to PDF format
1. Go to www.primopdf.com
2. Click the Download Now link to install the PrimoPDF program.
Once installed, a new printer will appear in your list of printers.
3. Preview any report in HirePOS, then click the Select Printer button in the
Preview Report window.
4. Select PrimoPDF as the printer, then click OK.
5. Click the Print button to print the report to PDF format.
Is your report printing an extra blank page?
1.
2.
3.
4.
5.
6.
Go to the Windows Start Menu > Control Panel > Printers & Faxes.
Right-click on the PrimoPDF printer.
Left-click on Properties.
Click the Printing Preferences button.
Click the Advanced button.
Click in the Scaling box and reduce the scaling from 100 to 95.
33
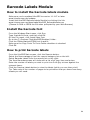
Barcode Labels Module
How to install the barcode labels module
Make sure you've updated HirePOS to version 1.1.147 or later:
www.hirepos.com.au/updates
Install the HirePOS Barcode Labels Module by clicking this link:
www.hirepos.com.au/downloads/HirePOS_BarcodeLabels.exe
(Choose to RUN or OPEN the file when prompted by your Web Browser)
Install the barcode font
From the Windows Start menu, click Run.
Type %windir%\fonts, and then click OK.
On the File menu, click Install New Font.
Go to the C:\Program Files\HirePOS\Modules\ folder.
Click the IDAutomationHC39M font to add it.
Make sure the Copy Fonts To Fonts Folder checkbox is checked.
Click OK.
How to print barcode labels
From the HirePOS Main screen, click the Reports button.
Select the Items category from the reports category list on the left.
Select Barcode Labels from the reports list on the right.
The Item Barcodes screen will show with a list of all your item and prices.
Enter the number of labels you wish to print into Print Qty column against the
relevant items.
Click the Preview Labels button to view the labels (which you can then print).
Tip: Take note of the number of pages to be printed so that you know how many
sheets you will need.
34
Pets Module
Pets can be setup within a Customer record. Each pet will have its own specific
details recorded. For instance a customer may have 2 Dogs or cats. These will
need to be added as separate Pets. You can enter both of these pets on the one
booking.
How to setup a new Pet
1. From the Main Menu, select Setup, Customers, select the customer from the
Find Customer box, or select New Customer button if the customer is not in
the database.
2. Select the Pets tab and select Add New Pet, then add all relevant details in
the four Pet Details tabs.
How to Add a Pet to a Booking
1. Select the New Booking or New Invoice button as required. If this is an
advanced booking and you are not charging out the item/s to the customer
immediately then you should choose New Booking.
2. Ensure the appropriate Pet tab is selected, and enter the Estimated
Date/Time FROM and Estimated Date/Time TO; as well select the Staff
Member who has taken this Booking (if you are tracking Staff).
3. Select the Item to book from the Item column, click the arrow next to the
asterisk in the Item box and select it from the drop down menu or simply
begin typing in its description in the Description box. Once again, double click
on the Item or when it is highlighted simply click Select.
(Note if you are advised that this item is Double Booked you will need to
select a substitute Item. The system will promt you to check the Availabilty
screen. Click Yes if you do, double click a substitite Item, click Yes again and
the substitute Item will be added).
4. Ensure that the Qty is correct by reviewing the Time Span (Estimated box)
and that the amount is shown in the Total Amount box.
5. If you require a Deposit or Payment for this booking, select the Payment
button and enter the amount of the Deposit and or Payment directly in the
35
appropriate part of the Receive Payment screen and select the Payment
method.
6. Next select the Put in Till button or the arrow next to it to select the Account
you wish to receive the payment in and click on that button.
7. (If you wish to Preview this booking in its printed format), Select the arrow
next to the Print button,and select Preview.
8. Select Close if you don’t wish to print it, then select Save & Close to finish
then Save & Close in the Sales screen which will show the booking at the top
of the records for that customer. Note the latest booking or invoice is always
at the top.
(Note there are a number of other ways of finding the Item you want to book
To do this click drop down arrow under Item then the Description drop down
arrow box next to the cross.
Select the appropriate method and begin typing as you did above, then click
Select when found).
36
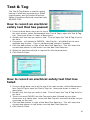
Test & Tag
The Test & Tag feature is used to record
testing of electrical equipment for OH&S
requirements, and to produce Electrical
Safety Compliance Records compliant with
AS/NZS 3760.
How to record an electrical
safety test that has passed
1. From the drop-down menu at the top of
the main screen, select Maintenance then Test & Tag to open the Test & Tag
List. Items are shown in order of description.
2. Double-click the item you wish to test. This will open the Test & Tag form for
the item.
3. Comments - will default to PASSED. New Tag No - will default to the next
available tag number. Type in a different tag number if needed.
4. Click the date button to right of the New Test Date box. This will insert the
current date shown on the button into the New Test Date box.
5. Select the test Interval that is required for the electrical item.
6. Click Save & Close.
How to record an electrical safety test that has
failed
1. From the drop-down menu at the top of the main screen, select Maintenance
then Test & Tag to open the Test & Tag List. Items are shown in order of
description.
2. Double-click the item you wish to test. This will open the Test & Tag form for
the item.
3. Type in the word FAILED into the Comments box followed by any other
comments, e.g. faulty lead. Leave the New Tag No. box blank and do not put
a new tag on the item.
4. Click the date button to right of the New Test Date box. This will insert the
current date shown on the button into the New Test Date box.
5. Click Save & Close.
37
Payment Terms
How to setup default payment terms for your
business
1. From the menu at the top of the main screen, go to Setup > Preferences.
2. Enter your default payment terms in the Payment Terms box.
3. Click Save & Close.
How to setup payment terms for a particular
customer
1. From the menu at the top of the main screen, go to Setup > Customers.
2. Lookup a customer, then double-click to edit (or click the Edit button at the
bottom).
This will open the customer details screen.
3. Enter the customer payment terms in the Payment Terms box.
Note: Any payment terms you have entered previously for other customers
can be selected via the dropdown button to the right of the Payment Terms
box.
4. Click Save & Close.
An alternative is to click the Bookings & Invoices button on the main screen,
then lookup the customer, click the More Customer Details tab, and enter the
payments terms in the field provided.
Comments
If a payment term is setup against a particular customer then that payment term
will overwrite any payment terms you have entered in Setup > Preferences as the
business default.
38
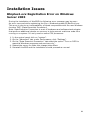
Installation Issues
Btnplus1.ocx Registration Error on Windows
Server 2003
During the installation of HirePOS the following error message may be seen:
An error occurred while registering the file c:\windows\system32\BtnPlus1.ocx
This error is due to an incompatibility of these components with the new Windows
function 'DEP' (Data Execution Prevention)
Note: Data Execution Prevention is a set of hardware and software technologies
that perform additional checks on memory to help prevent malicious code from
running on a system. It's only used on some CPU processors.
1. In the control panel click on "system".
2. On the "Advanced" tab, under Performance, click "Settings".
3. On the "Data Execution Prevention" tab select the option "Turn on DEP for
essential Windows programs and services only".
4. Reboot the server to make this change take effect.
5. Reinstall HirePOS and the installation should proceed as normal.
39
HirePOS_SQL Installation
Install SQL Server
Firstly, you will need to install SQL Server. It is recommended that you install
SQL Server 2005 Express or later, as well as the SQL Server Management Studio
Express, which are freely available from the Micosoft website at
http://msdn.microsoft.com/en-us/express/bb410792
- Microsoft SQL Server 2005 Express Edition Download* (36.5 MB)
- SQL Server Management Studio Express Download** (43.1 MB)
For SQL Server 2008: http://www.microsoft.com/Sqlserver/2005/en/us/expressdown.aspx#SP3
Review the following articles for details on configuring SQL Server. In particular,
you need to create Firewall exceptions for the SQL Server and the SQL Browser.
C:\Shayne Cooper\Client
Projects\HirePOS\Website\help/pdf/Microsoft_HowToConfigureSQLServer.pdf
C:\Shayne Cooper\Client
Projects\HirePOS\Website\help/pdf/Microsoft_HowToConnectToSQLServer.pdf
Set SQL Server to SQL Server and Windows
Authentication mode.
1. Open SQL Server Management Studio Express and view the properties for the
SQL Server, i.e. right-click the first object in the Object Explorer on the left
then left-click Properties.
2. Click Security, then change the Server authentication to SQL Server and
Windows Authentication mode.
3. Click OK, then restart the SQL Server.
HirePOS_SQL Program Installation
Install HirePOS_SQL via the following link:
www.hirepos.com/downloads/HirePOS_SQL_Setup.exe
The following folders are created:
C:\Program Files\HirePOS_SQL\HirePOS.exe (Program File).
C:\Program Files\HirePOS_SQL\ReportsXI\ (Crystal Report XI Files).
C:\Program Files\HirePOS_SQL\Database\HirePOS_ODBC.mdb (Database
Connection File).
Open SQL Server Management Studio Express and attach the HirePOS.mdf file,
which is located in the C:\Program Files\HirePOS_SQL\Database folder.
Security
You will need to create a new user on the SQL Server called HirePOS. Use a
blank password and untick the "Enforce password policy" box. Once the
connection has been established from all the client computers you can then
increase security accordingly. Tick all the boxes in the "Server Roles" section. In
40
"User Mapping" tick the "HirePOS" database and tick all the database role
memberships.
SQL Native Client
Each satellite computer needs to have the SQL Native Client installed, which
allows the computer to connect to the SQL Server via the Windows Control Panel
> Administrative Tools > Data Sources (ODBC).
SQL Native Client can be installed via the following link:
http://www.hirepos.com.au/downloads/sqlncli.msi
OR
http://www.microsoft.com/downloads/details.aspx?FamilyId=50b97994-84534998-8226-fa42ec403d17&DisplayLang=en
1. After installation, go to the Windows Control Panel > Administrative Tools >
Data Sources (ODBC).
2. Click the "System DSN" tab.
3. Click "Add".
4. Enter the "Name" and "Description" as HirePOS.
5. Select the "Server", e.g. SERVER\SQLEXPRESS
6. Click "Next".
7. Select the "With SQL Server authentication..." option.
8. Enter the "Login ID" as HirePOS, and leave the "Password" blank.
9. Click "Next".
10.
Tick "Change the default database to" box.
11.
Select the HirePOS database from the dropdown then click "Next".
12.
Click "Finish".
13.
Click "Test Data Source...". Message should come up "TESTS
COMPLETED SUCCESSFULLY!"
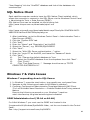
Windows 7 & Vista Issues
Windows 7 responding slow to SQL Server
1. In Windows 7, press the start button, type gpedit.msc, and press Enter.
2. Navigate to the following and make sure Enabled is checked 3. Computer Configuration\Administrative Templates\Network\DNS Client
\Turn off Multicast Name Resolution = Enabled Disable AutoTuning network
feature
Execute the following command on your Windows 7 machine:
netsh interface tcp set global autotuninglevel=disabled
ODBC Administrator tool (32-bit vs 64-bit)
For 64bit Windows 7 you must use the ODBC tool located in the
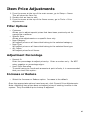
%systemdrive%\Windows\SysWoW64 folder, not the one located in the Control
Panel.
See: http://support.microsoft.com/kb/942976
41
42
Item Price Adjustments
1. From the menu at the top of the main screen, go to Setup > Items.
This will show the Item list.
2. Double-click an item to edit.
3. From the menu at the top of the Items screen, go to Tools > Price
Adjustments.
Filter Options
•
•
•
•
•
Customer
Allows you to adjust special prices that have been previously set for
a particular customer.
Specific Item
Allows price adjustments on a specific item only.
Item Category
Will adjust prices on all items that belong to the selected category.
Item Type
Will adjust prices on all items that belong to the selected item type.
ALL Items
Will adjust prices for all items.
Adjustment Percentage
•
•
Percent %
Enter the percentage to adjust prices by. Enter a number only. Do NOT
enter negative or percentage signs.
Use 5 Cent Rounding
To avoid having to round cash amounts at point of sale, it is recommended
that you check this option.
Increase or Reduce
•
Select the Increase or Reduce option. Increase is the default.
Once the appropriate options have been set, click Commit Price Adjustments.
Note: Adjusting item prices does not adjust prices of existing invoices in the
system. Only the default price lookup is adjusted.
43
User Restrictions
HirePOS allows you to limit users to specific functions within the program. At the
basic level, you can run the program in 'Restricted' mode or 'Administrator'
mode. More advanced levels allow you to set restrictions for specific users, and
also require they provide a password to access the program.
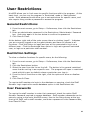
General Restrictions
1. From the main screen, go to Setup > Preferences, then click the Restrictions
tab.
2. Enter an administrator password in the Restrictions 'Administrator' Password
box. And enter again in the box below to confirm the password.
3. Click Save & Close.
At the bottom right side of the main screen there is a button Logoff . Indicates
you are currently logged on as the administrator and have full access to all
functions. Click this button to logoff and you will be prompted to log in as a
different user. Click the Restricted User option to login as a general restricted
user, or login as a particular staff member.
Restriction Settings
To allow or disallow functions for specific users, do the following:
1. From the main screen, go to Setup > Preferences, then click the Restrictions
tab.
2. Click the Restrictions button.
3. Select the user from the list on the left. The button is for general restricted
users that do not log in as a specific user. The program will open in restricted
mode with this user by default unless a particular user logs in.
4. From the list of functions on the right, click the options to allow or disallow
them.
5. Click Save & Close.
To require staff members to login to the database on opening, check the Staff
Member Login required to access database option in the Restrictions tab.
User Passwords
To require the staff member to enter their password, check the option Staff
Member Password required to access database. Staff member passwords can be
setup by going to the main HirePOS screen, then to the Setup menu at the top,
then go to Staff, edit a staff member, and enter a password in the Password box,
then Save & Close.
44
Database Optimization
See the following Microsoft article for recommendations on database optimization.
http://support.microsoft.com/kb/889588/en-au
NULL 66 Agency Module Agency Module Remittance Agency Fee Management Fee
Agency Module
Autocalculating Remittance Agency
(Management) Fee
1. Setup an 'Agency' fee item via Setup > Items.
2. Enter an item price as 'Each', then double-click the item price to show the
'Item Sell Prices' popup screen.
3. Enter the 'Charge%' as 0.
4. Select % of exclusive or inclusive.
5. You must select the '% of previous line item' option.
6. Click Save & Close.
7. Edit the property item via Setup > Items.
8. Click on the 'Cross Hire' tab.
9. Click 'Add Owner Shares'.
10.
Select the Owner/Supplier.
11.
Enter the 'Share%'.
12.
Select the 'Agency Fee Item' (which is the Agency Fee item you setup in
Step 1).
13.
Click Save & Close.
When adding a Remittance via the Invoice screen, the property is added to the
remittance automatically and also the Agency Fee item. The Agency Fee
percentage is calculated based on the Owner% setup in the Cross Hire details for
the property item.
45
Branches Module
Register the Branches module
1.
2.
3.
4.
From the main screen, go to Setup > Preferences > Modules.
Enter the registration key provided by HirePOS into the Branches Module box.
Click Register.
Click Save & Close.
Setup Branches
1. From the main screen, go to Setup > Business Details.
2. Click the Branches button at the bottom of the Business Details screen.
This will open the Branch List.
3. Click New to open the Branch screen, then enter all the details for the branch.
4. Click Save & Close.
Note: You can nominate a default branch by selecting a branch from the Default
Branch dropdown at the bottom of the Branch List screen. Any new items setup
in the system will default to the selected branch.
Link a Branch to an Item
1. From the main screen, go to Setup > Items.
2. Double-click an item in the list to edit.
This will open the item details screen.
3. Click the More Details tab.
4. Select a branch from the Branch dropdown list (on the top right side).
5. Click Save & Close.
Note: After the first item is added to a new booking/invoice, the invoice branch
will automatically default to the branch of the item. Any payments made against
the invoice default to the branch of the invoice.
Link a Branch to a Booking or Invoice.
1. From the Invoice screen, click the Branch menu at the top.
2. Select the Change Branch option.
This will open a popup list of branches.
3. Select the branch you wish to link the invoice to.
To link a branch against a payment, you follow the same procedure in the
Payments screen.
Show Item Availability by Branch
1. From the main screen, click the Availability button to open the Availability
screen.
46
2. Click the Branch menu at the top of the Availability screen, and select the
branch to filter by, or select All Branches. Please wait for the availability
screen to refresh.
Show all Items for a particular Branch
1. From the main screen, go to Setup > Items.
2. Click the Branch menu at the top of the Item List screen, and select the
branch to filter by, or select All Branches.
47
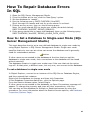
How To Repair Database Errors
In SQL
1.
2.
3.
4.
Open the SQL Server Management Studio.
From the toolbar at the top, click the 'New Query' option.
Set the database to 'master'.
Run the following query: DBCC CHECKDB ('HirePOS')
Scroll through the results and look for errors shown in red text.
5. If there are any errors, then run the following query:
Note: You must change SQL to single user mode (see article below).
DBCC CHECKDB ('HirePOS', REPAIR_REBUILD)
6. If the query above fails to repair the database, then run the following query:
DBCC CHECKDB ('HirePOS', REPAIR_ALLOW_DATA_LOSS)
How to: Set a Database to Single-user Mode (SQL
Server Management Studio)
This topic describes how to set a user-defined database to single-user mode by
using Object Explorer in SQL Server Management Studio. Single-user mode
specifies that only one user at a time can access the database and is generally
used for maintenance actions.
Caution
If other users are connected to the database at the time that you set the
database to single-user mode, their connections to the database will be closed
without warning.
The database remains in single-user mode even if the user that set the option
logs off. At that point, a different user, but only one, can connect to the database.
To set a database to single-user mode
In Object Explorer, connect to an instance of the SQL Server Database Engine,
and then expand that instance.
Right-click the database to change, and then click Properties.
In the Database Properties dialog box, click the Options page.
From the Restrict Access option, select Single.
If other users are connected to the database, an Open Connections message will
appear. To change the property and close all other connections, click Yes.
You can also set the database to Multiple or Restricted access by using this
procedure. For more information about the Restrict Access options, see Database
Properties (Options Page).
48
DBCC CHECKDB (Transact-SQL)
SQL Server 2008 R2
Other Versions
•
•
•
SQL Server "Denali"
SQL Server 2008
SQL Server 2005
Checks the logical and physical integrity of all the objects in the specified
database by performing the following operations:
Runs DBCC CHECKALLOC on the database.
Runs DBCC CHECKTABLE on every table and view in the database.
Runs DBCC CHECKCATALOG on the database.
Validates the contents of every indexed view in the database.
Validates link-level consistency between table metadata and file system
directories and files when storing varbinary(max) data in the file system using
FILESTREAM.
Validates the Service Broker data in the database.
This means that the DBCC CHECKALLOC, DBCC CHECKTABLE, or DBCC
CHECKCATALOG commands do not have to be run separately from DBCC
CHECKDB. For more detailed information about the checks that these commands
perform, see the descriptions of these commands.
Transact-SQL Syntax Conventions
Syntax
Copy
DBCC CHECKDB
[
[ ( database_name | database_id | 0
[ , NOINDEX
| , { REPAIR_ALLOW_DATA_LOSS | REPAIR_FAST |
REPAIR_REBUILD } ]
)]
[ WITH
{
[ ALL_ERRORMSGS ]
49
ePad Installation
Install the following files:
Universal Installer 9.54:
www.epadsupport.com/downloads/drivers/9.54_r11088/ui9.54_setup_r11088_sign
ed.exe
IntegriSign Desktop 9.55:
www.epadsupport.com/getlatest/IntegriSignDesktop9.55_R1318.exe
HirePOS Integration:
www.hirepos.com.au/downloads/HirePOS_ePadSetup.exe
Epad II Setup Procedure V9.54
1.
Unpack the Epad but do not connect it to the computer.
2.
Shut down all Windows programs down please.
3.
Log on as Administrator if required.
4.
Ignore the CD if supplied.
5.
Please run the following file:
www.epadsupport.com/downloads/drivers/9.54_r11088/ui9.54_setup_r11088_sign
ed.exe
6.
Select Run>Next>I accept...>Next. (Please note this may vary
depending on your Internet Search engine facility).Next enter User Name, Company
Name, and Typical if prompted.
7.
Select Next then Install (Wait until installation is complete)>Finish.
8.
Please run the following link:
50
http://www.hirepos.com.au/downloads/HirePOS_ePadSetup.exe :Please note if
Windows 7 is being used, please Save to the Downloads folder and run as
Administrator.
9.
Select Run>Run/OK>Finish>OK.
10.
Plug Epad into USB connection on your computer. The ‘New Hardware
Wizard’ may then open.
11.
Open HirePOS>Setup>Preferences>Hardware Tab and select the “Use
Epad” option.
12.
Next, go to>Setup> Preferences >Invoices tab and select ‘Show
Customers Signature section..’
13.
To test, please select New Booking or Invoice add the Customer and
then select the New Invoice button.
3. Receipt invoice as paid 06/01/11
Dr Bank
Cr Revenue
4. Cash Book - New Withdrawal Moss Green 06/01/11
Dr. Bad Debts
Cr Bank
5. Tick off the Dr and Cr when reconciling bank. This way it doesn't affect any
previous billing history and you have an audit trail.
51
Database Corruption
The following strategies, presented roughly in order of importance, should be used
to prevent corruption of Access databases:
Use decent network cards. Cheap network cards are not up to the job of moving
large chunks of data around. Stick to well-known brands of network cards. As with
all network equipment, it’s best to match the manufacturers of all your NICs and, if
possible, use the same brand as the hubs or switches.
Keep your device drivers updated. Device drivers win the prize for worst-written
software ever, so keep them as up to date as possible. PC manufacturers pay little
attention to device drivers. In fact, 80 percent of crashes in Windows NT4 are,
according to Microsoft, caused by badly written device drivers. Because so many
people report bugs and problems with drivers, they’re updated very quickly, so it’s
worth doing a periodic check to see if updates have been released.
Replace any suspect network equipment. Patch cables are not expensive. Use
the “snagless” types, which are less likely to be bent and disconnected if someone
pulls the cable too tight. If you’re using a hub to connect your network, then
consider replacing them with switches. Although this approach is drastic, it does
bring other advantages to your network, the most noticeable being speed. Switches
break the LAN into separate “collision domains,” meaning that fewer collisions occur
and so fewer packets have to be present across the wire. (A “collision” is when two
machines on the wire talk at the same time, and their data packets collide, having
to be re-sent.)
Take a close look at your virus-checking software. Any kind of TSR style “real
time” virus checking can cause corruption in all kinds of files, Access more than any
other. If you have a real-time monitor on your network, disable scanning of MDB
files. Do remember though, MDB files are a good spot for virus writers looking to
hide malicious code, so scan anything that comes into your network before letting it
loose on your users.
Use the Compact and Repair utility regularly. Access files never get smaller,
even if you delete data, until you compact them, and a larger file is a bigger target
for packet loss and other causes of corruption over a network.
Don’t leave the database open. Most backup software will back up Access
databases even if they’re open, so it’s tempting to leave them that way. This only
increases the possibilities of corruption, so get your users to close their applications
prior to backup.
Defragment your hard disk. MDB files often get quite big, and because they
change in size so often, it’s not unusual for them to be split into several hundred
fragments. This goes hand in hand with having a big-enough hard disk. Disks with
little or no free space will become fragmented more quickly, and having less than
25 percent free space available on the drive will cause any defragmenter to work
less efficiently.
52