1
LIQ - 60 User Manual
LineIQ User Manual
Trademarks
Windows and Microsoft are registered trademarks of Microsoft Corporation. Digi is a registered
trademark of Digi International Inc. All other trademarks are property of their respective owners.
Copyright
© CHK GridSense Pty. Ltd. 2011, 2012
The material presented in this manual is copyright protected by CHK GridSense Pty. Ltd. 2011. Any
reproduction in whole or part for any purpose without the prior written consent of GridSense Pty Ltd
is strictly prohibited. Information in this document is subject to change without notice.
Version 2
ii
May 2012
LineIQ User Manual
Contents
1
2
3
Safety.............................................................................................................................................. 1
1.1
Hazard Assessment ................................................................................................................ 1
1.2
Working on energised conductors and equipment.................................................................. 1
1.3
Equipment safety .................................................................................................................... 1
Introduction to the LineIQ device family .................................................................................... 2
2.1
Glossary .................................................................................................................................. 4
2.2
Implementation Scenarios ....................................................................................................... 6
2.3
System Functionality ............................................................................................................... 6
2.4
LIQ-60 Conductor Mounted Sensor overview ......................................................................... 7
2.4.1
LIQ-60 Design ................................................................................................................. 8
2.4.2
LIQ-60 Sensing ............................................................................................................... 8
2.4.3
Operation Modes ............................................................................................................. 9
2.4.4
Visual Indicators ............................................................................................................ 11
2.4.5
Power Factor Calculation .............................................................................................. 15
2.5
LIQ-Gateway Overview ......................................................................................................... 17
2.6
LIQ-LocalLink Overview ........................................................................................................ 18
Initial setup .................................................................................................................................. 19
3.1
LIQ-LocalLink installation ...................................................................................................... 19
3.1.1
For Microsoft Windows 7 ............................................................................................... 19
3.1.2
For Microsoft Windows XP ............................................................................................ 19
3.2
LIQ-60 setup.......................................................................................................................... 20
3.2.1
4
Configuration ............................................................................................................................... 21
4.1
5
LIQ-60 configuration .............................................................................................................. 21
Commissioning ........................................................................................................................... 21
5.1
Commissioning the LIQ-60.................................................................................................... 21
5.1.1
6
Pre-commissioning check of the LIQ-60s ..................................................................... 21
Installation and removal ............................................................................................................. 22
6.1
7
Switching on the LIQ-60 ................................................................................................ 20
LIQ-60 installation ................................................................................................................. 22
6.1.1
Pre-installation............................................................................................................... 22
6.1.2
Mounting ........................................................................................................................ 22
6.1.3
Post-installation checks ................................................................................................. 22
6.1.4
Removal ........................................................................................................................ 23
Power Systems ............................................................................................................................ 23
7.1
LIQ-60 Battery ....................................................................................................................... 23
7.2
Solar Panels .......................................................................................................................... 23
7.2.1
Solar Panel orientation .................................................................................................. 23
7.2.2
Adjusting the solar panel on the LIQ-60 ........................................................................ 25
Version 2
iii
May 2012
LineIQ User Manual
Appendix A – LineMan........................................................................................................................ 26
A.1 LineMan Overview ...................................................................................................................... 26
A.2 Setting up an LIQ-LocalLink ....................................................................................................... 26
A.3 Connecting to the CMS with LineMan ........................................................................................ 27
A.4 Displaying LIQ-60 Status/Summary ........................................................................................... 27
A.5 Configuring an LIQ-60 ................................................................................................................ 29
A.6 CMS Data Download .................................................................................................................. 30
Appendix B – Window XP Installation .............................................................................................. 31
Appendix C .......................................................................................................................................... 34
C.1 LIQ-60 specifications .................................................................................................................. 34
Version 2
iv
May 2012
LineIQ User Manual
1 SAFETY
If you do not understand any instructions in this manual, please ask someone to assist you.
For safety reasons, use only GridSense accessories specifically designed for use with these
products, or accessories that have been approved by GridSense. The use of any other
manufacturer's equipment is NOT recommended, will void the warranty and may cause safety
hazards.
The LIQ-60 Conductor Mounted Sensors are intended to be used on high voltage energised
conductors or equipment. Personnel using equipment on energised lines must be authorised by the
relevant regulatory bodies to carry out such work and must have appropriate training.
The information given in this document is given as a guide only. It is the user's responsibility to
ensure that correct and safe procedures are followed at the actual worksite. GridSense offers no
warranty or indemnity for accidents that may occur when following these instructions.
If the LineIQ products and accessories and associated equipment are used in a manner other
than that specified in this manual, the protection provided by the equipment may be
impaired.
1.1 Hazard Assessment
Prior to installing the equipment, the operator must carry out a worksite, pre-job hazard assessment
to identify the safety and environmental needs. This must be done prior to commencing work and
prior to recommencing work after leaving and returning to the worksite. As a minimum, this hazard
assessment should:
Identify possible hazards and risks
Identify the safety needs of the job
Identify the correct procedures, practices and equipment
Eliminate unsafe conditions and actions from the worksite
Identify the need for personal protective equipment
Inspect equipment before use.
Prior to using an LIQ-Gateway, you should check the following:
The sheaths of all cables are secured and undamaged
Plugs and connectors are properly connected and serviceable.
There should also be an ongoing risk assessment during the job.
1.2 Working on energised conductors and equipment
For the correct and safe use of this equipment, it is essential that all operating personnel follow
appropriate safety procedures. Check your employer or relevant regulatory body's rules for working
with energised equipment.
1.3 Equipment safety
The LIQ-Gateway and associated equipment should be maintained and regularly tested to make sure
the equipment is in good order.
Version 2
1 of 34
May 2012
LineIQ User Manual
2 INTRODUCTION TO THE LINEIQ DEVICE FAMILY
The LineIQ monitoring system allows electricity utilities and other operators of high and
medium voltage overhead conductor distribution and transmission lines to monitor and
respond to faults and load changes on the supply grid. The monitoring system consists of
Conductor Mounted Sensors (CMS), data collators, and remote or on-site PC-based analysis
and control software. The LineIQ system links to existing SCADA or Distribution
Management systems. The CMS communicate with the data collators (LIQ-Gateways) using
short range radio. The LIQ-Gateway and CMS can also communicate with on-site PCs (e.g.
laptop) using short range radio, when an LIQ-LocalLink is connected to the PC. The LIQGateways in turn communicate with control rooms via a cellular modem or long range radio
links, and can use a variety of different communication standards.
Figure 1 shows a typical implementation of LineIQ monitoring equipment.
The LIQ-60 CMS detect and store network events and also monitor load currents, power
factor, conductor voltage, and ambient and conductor temperatures.
Events such as faults, momentary interruptions, sustained interruptions and restorations are
radioed to the LIQ-Gateway as unsolicited events, which in turn are sent on to the SCADA
and control centre. Ongoing measurements such as load currents, conductor voltage, and
ambient and conductor temperatures are periodically downloaded to the LIQ-Gateway,
which collates the information and sends it to the control centre.
The LIQ-60s are installed on energised lines. They are battery and solar powered for long
term continuous monitoring. They can be configured and have their firmware upgraded
wirelessly using the same license-free short range radio link (RF link) which is used to
download data. Hence, there is no need to remove the LIQ-60s from the conductors after
they have been installed.
LIQ-Gateways function as Remote Terminal Units (RTUs) and are mains powered or
battery/solar powered, depending on location and supply availability. Transmission of load
log data from the LIQ-60 to the LIQ-Gateway occurs during a status check which is
periodically initiated by the LIQ-Gateway. This data is then transmitted by the LIQ-Gateway
to the remote monitoring system (e.g. SCADA) or is accessed on demand using LineMan or
SCADA via a variety of supported protocols, for example DNP3, IEC 61850 or Web services.
Version 2
2 of 34
May 2012
Figure 1: Typical Implementation of LineIQ Components
LineIQ User Manual
Version 2
3 of 34
May 2012
LineIQ User Manual
2.1 Glossary
Term
CMS
Meaning
Term
Conductor Mounted Sensor which
detects events on a conductor
and logs voltage, current and
temperature
for
periodic
downloading. The LIQ-60 is a
CMS.
Commission
Putting equipment into use for
the first time. Follows after
configuration.
Configure
The process of setting up
equipment
to
perform
a
designated task. In this manual
refers mainly to firmware. Follows
after set-up.
DPF
Displacement Power Factor. A
measure of the phase difference
between the voltage and current.
{ DPF=cos(φ) } Ideally φ should
be 0 degrees, so DPF = 1.
DTS
Date & Time Stamping
Event
Profile
Recording
Period
The time (e.g. 1 minute) after an
event has been detected and
during which the LT-60 records
current and power profiles.
Fast Filter
A 5 sec. average value filter,
applies to both current (I) and
voltage (V).
FP
Fault Path: a high current event
HV
High Voltage
IED
Intelligent Electronic Device
LED
Light Emitting Diode
LI
Long Interruption: a loss of
power on a conductor for at least
one minute.
LIQGateway
The Pole Attached Collator, which
receives and collates data from
CMS
LIQ-LAN
A local area network consisting of
a PC (Laptop) with LIQ-LocalLink
for communications, an LIQGateway & its associated LIQ-60.
LIQ-
Version 2
A USB-based radio. Used for
4 of 34
Meaning
LocalLink
communications between a PC
and the LIQ-Gateway and LIQ60s in an LIQ-LAN.
Loss of
volts
When a CMS detects no voltage
on the conductor.
LV
Low Voltage
ms
milliseconds
Permanent
Fault
Fault detection with loss of supply
detected after the end of the
event profile recording period.
PMS
Pole Mounted Sensor (as distinct
from a CMS).
P-P
Peak to Peak. A measure of a
waveform‟s amplitude (absolute,
unlike RMS) P-P ≈ 2.38VRMS
PR
Power Return: return of power
after a Long Interruption (LI).
PRT
Platinum
Resistance
Thermometer. Two are mounted
in each LIQ-60 to measure
conductor
and
ambient
temperature.
Return of
volts
When a CMS detects a return of
voltage on the conductor after a
fault condition.
RF
Radio Frequency
RMS
Root Mean Square (An amplitude
of a measurable value, e.g.
Voltage, written VRMS). The
square root of the mean over
time of the square of the
waveform.
RTC
Real Time Clock.
RTU
Remote Terminal Unit. In SCADA
terminology, the LIQ-Gateway is
an RTU. It collates information
from sensors to be sent to
centralised control units.
SCADA
Supervisory Control And Data
Acquisition. Usually a computer
system that monitors and controls
industrial
or
facility-based
May 2012
LineIQ User Manual
Term
Meaning
Term
processes.
Selfclearing
fault
Fault current detected with no
loss of supply during the event
profile recording period.
Set up
The process of setting up
equipment
to
perform
a
designated task. In this manual
refers mainly to hardware and
installation,
usually
precedes
configuration.
SI
Short Interruption: brief (less
than one minute) loss of power
on the conductor.
SLA Battery
Sealed Lead Acid Battery. The
power storage for the LIQ-60 and
LIQ-Gateway.
Version 2
5 of 34
Meaning
Slow Filter
A 10-day non-linear average
reflecting the highest value of
current and voltage over the
weekly load cycle.
TPF
True Power Factor. The ratio of
the real power flowing to the
load, to the apparent power in
the circuit.
Transient
Fault
Fault detected with a loss and
return of supply seen during the
event profile recording period.
May 2012
LineIQ User Manual
2.2 Implementation Scenarios
A possible implementation scenario is shown in Figure 2.This is a permanent configuration
used for continuous monitoring of power lines using LIQ-60s, LIQ-Gateways and LineMan
communications software.
Figure 2: An installation of GridSense devices as part of a permanent monitoring
configuration.
2.3 System Functionality
With regards to communication among the components in the LineIQ family, the LIQ-60s
and the LIQ-Gateway (and, if present, a laptop PC using an LIQ-LocalLink), form a local area
network, the LIQ-LAN. This network‟s communication is based on low power RF.
The LIQ-Gateways which communicate with remote control rooms or SCADA systems, can
be viewed as a wide area network, using any of a range of protocols, such as DNP3,
IEC 61850 or Web services.
Version 2
6 of 34
May 2012
LineIQ User Manual
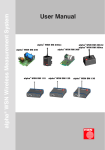
2.4 LIQ-60 Conductor Mounted Sensor overview
The LIQ-60 Conductor Mounted Sensor is a programmable Medium and High Voltage
(MV/HV) power grid logger used to detect and log fault conditions, and to record load
information, voltage and conductor and ambient temperatures on power distribution
networks.
Figure 3 shows the LIQ-60 Conductor Mounted Sensor.
Figure 3: The LIQ-60 Conductor Mounted Sensor.
The LIQ-60 is installed live on a bare overhead conductor and detects and logs disturbance
events such as fault currents or loss and return of voltage.
Each event is date and time stamped (DTS) and recorded to non-volatile memory for later
analysis. High intensity LEDs are provided to indicate line and fault status to maintenance
crews.
The LIQ-60 can be configured to calculate and store time-averaged load current, i.e. load
logging. The Log Average interval can be selected in the range from 2 to 60 minutes.
Ambient and conductor temperatures are also recorded at the same Log Average interval.
The LIQ-60 can also measure and record Displacement Power Factor (DPF) values at the
Log Average interval.
This logged information is downloaded on demand to an LIQ-Gateway unit which
periodically requests data from all the LIQ-60s that are part of its LIQ-LAN.
Version 2
7 of 34
May 2012
LineIQ User Manual
2.4.1 LIQ-60 Design
The LIQ-60 uses a sprung clamp to attach to bare conductors between 5mm (3/16 “) and
32mm (1¼ “) in diameter. It is designed to be mounted on the line by using a “hot stick” as
commonly used by electricity utilities.
The LIQ-60 is powered by a sealed lead acid battery which provides continuous long term
power for remote reporting of events and historic load data. A solar panel mounted on top
of the LIQ-60 charges the battery.
2.4.2 LIQ-60 Sensing
The LIQ-60 measures conductor current, conductor voltage, ambient and conductor
temperature and calculates Displacement Power Factor.
Current
Current is sensed with a Rogowski coil, which is automatically closed around the conductor
during the installation process. The inherent nature of a Rogowski coil (which does not have
a magnetic core) means that the coil does not saturate, allowing the LIQ-60 to measure
currents over a wide dynamic range, from 1 A up to 25 kA.
Voltage
Two options are available:
Standard option: the standard “out of the box” LIQ-60 measures voltage by sensing the
capacitive current which flows between the LIQ-60 body and ground/earth. This capacitance
varies with atmospheric conditions (temperature, humidity, air pressure, rain, snow etc.)
and also with the physical arrangement of the LIQ-60 and nearby grounded/earthed
structures and energised conductors. This means that it is not possible to make accurate
voltage measurements. The LIQ-60 therefore scales the voltage measurements so that a
reading of 100% corresponds to the normal energised conductor voltage.
High accuracy: the second option is to purchase a voltage sensor from GridSense which
connects electrically and mechanically between the LIQ-60 and an earth point. This enables
an accurate reading of the line voltage.
Temperature
Conductor and ambient temperatures are sensed using platinum resistance thermometers
(PRT). One PRT is automatically placed in contact with the overhead conductor when the
LIQ-60 is installed. Ambient temperature is measured using a shaded PRT mounted on the
upper part of the LIQ-60 housing.
Temperatures are sampled regularly, then averaged and recorded at the Log Average
Interval.
Version 2
8 of 34
May 2012
LineIQ User Manual
Power Factor
The voltage and current data are low pass filtered to eliminate harmonic information, and
then the zero crossings of the voltage and current signals are detected and processed over a
one minute period. This allows calculation of the phase angle of the current with respect to
the voltage. The sign of phase angle measurements are taken into account, so that the
measurements can be assigned to the correct quadrant.
Displacement Power Factor (DPF) is calculated from the measured phase angle, φ, where
DPF = cos (φ). For voltages and currents with low distortion, as is normally the case on high
voltage systems, this calculated DPF is a good approximation to the True Power factor
(TPF).
Power factor measurements are averaged and recorded at the Log Average Interval.
Recorded data includes phase angle, sign (leading or lagging) and DPF.
See section 2.4.5 Power Factor Calculation for a more detailed description of the power
factor calculations.
2.4.3 Operation Modes
For the majority of time that the LIQ-60 is installed it will simply be monitoring and storing
its input values. There will be minimal radio communications during this time, restricted to
periodic status requests from an LIQ-Gateway, unless initiated by an external device such as
a Laptop PC using LIQ-LocalLink. Should an event such as a power outage occur, there will
be increased radio communications when the event is detected.
Normal Operation
During normal operation the LIQ-60 continually samples voltage, current and temperatures.
The raw sample points (measured at 600Hz for voltage and current) are stored in a circular
buffer, so that once an event is detected, the LIQ-60 can “look backwards in time” and
recover pre-fault information.
RMS voltage and current readings are calculated from the raw sample points. These RMS
values, which are updated at the supply frequency (50Hz or 60Hz) are used as inputs to the
event detection algorithm.
If load logging is enabled, the current readings are averaged and stored at the end of each
Log Average period.
The voltage and current readings are processed by Fast Filters to provide input signals for
the event detection algorithm, in addition to the per-cycle values.
The outputs of the voltage and current Fast Filters are further filtered by non-linear Slow
Filters. These filters have a decay time constant of approximately 10 days, but a much faster
attack time constant. The output of the Slow Filters provides a good representation of the
normal conductor load profile. The Slow Filter outputs also provide inputs to the event
detection algorithm.
Average conductor and ambient temperatures, as well as phase angle and power factor data
are stored at the Log Average interval.
Version 2
9 of 34
May 2012
LineIQ User Manual
Event Classification
LIQ-60s incorporate a sophisticated event detection algorithm which analyses voltage and
current data and reports the following activity occurring on the conductor:
Fault Path (FP) – a high current event.
Short Interruption (SI) – a brief (less than one minute) loss of power on the
conductor.
Long Interruption (LI) – a loss of power on the conductor for at least one minute.
Power Return (PR) – return of power after a Long Interruption (LI).
Some of these activities can occur together.
For example, an LIQ-60 mounted on a conductor upstream (i.e. on the generator side) of a
fault which results in a permanent outage will report a FP-LI event, whereas an LIQ-60
mounted downstream (i.e. on the load side) of that fault will report a LI event only, because
it will not see the fault current. After power is restored, both LIQ-60s in this example will
report a PR event.
A second common example is where the system protection (recloser) operates and clears
the fault. In this case, the LIQ-60 upstream of the fault will report a FP-SI event, whereas
an LIQ-60 downstream of the fault will report a SI only. Since power has only been briefly
interrupted, a PR event will not occur.
Power Status
The LIQ-60 event detection algorithm analyses the Power Status of the conductor as
follows:
If the previous Power Status is OFF, then the Power Status changes to ON if either
voltage OR current is PRESENT.
If the previous Power Status is ON, then the Power Status changes to OFF if both
voltage AND current are ABSENT.
Event Triggers
An Event commences when one of the following trigger occurrences is detected:
1. High Current 1 – at least 2 cycles of current that are more than twice the normal
conductor load profile, accompanied by a 25% change (reduction or increase) of the
voltage.
2. High Current 2 – at least 2 cycles of current that are more than 5 times the normal
conductor load profile. The voltage reading does not influence the detection of this
type of event.
3. High Current 3 – when the current exceeds a fixed (absolute) value. Contact your
nearest GridSense support centre for further information.
4. High Current 4 – when a rapid change in current exceeds a selected delta value. (In
other words when the difference between normal and detected current exceeds a
selected value.) Contact your nearest GridSense support centre for further
information.
5. Loss of Power.
6. Power Return.
Version 2
10 of 34
May 2012
LineIQ User Manual
When an event is detected, the LIQ-60 commences a one minute “Event Profile Recording
Period”. The event detection is re-triggerable so the event profile recording period can be
extended should a higher priority event occur.
For example, if a Power Return is detected within one minute after a Loss of Power, then
the event profile recording period is started again, so that the event profile recording period
will be longer than one minute. If a high current is then detected, the event profile recording
period will again be extended.
Event Recording
Event Mode
The LIQ-60 enters Event Mode when one of the Event Triggers mentioned above occurs.
High Current trigger characteristics
If the event profile recording period commences with a high current trigger, the LIQ-60 also
records snapshots of the voltage and current waveforms.
Each of these snapshots is 200 ms long, corresponding to 10 cycles for a 50 Hz supply and
12 cycles for a 60 Hz supply. The trigger point is set at 60 ms, so the first 60 ms of each
record is the pre-event waveform, and the final 140 ms are the post event waveforms.
Characteristics for all triggers
For the full length of the event profile recording period (at least one minute), the LIQ-60
records a current profile.
An initial current value is recorded, along with its time of occurrence. The current is then
monitored on a cycle by cycle basis. If the current changes by more than 50%, a new
current (and its time of occurrence) is recorded. This process continues until the end of the
event profile recording period. This recording method allows a detailed time plot of the
conductor current to be constructed. This plot has sufficient detail to enable the sequence of
current changes caused by recloser operation to be reconstructed.
The LIQ-60 also stores time stamped changes in power status, which allows a time plot of
power status to be constructed.
Types of Faults
Self-Clearing Fault – A High Current trigger occurred but Power remained unchanged.
Transient Fault – A High Current trigger occurred and Power goes OFF briefly but is
restored before the end of the Event Profile Recording Period.
Permanent Fault – A High Current trigger occurred and Power goes OFF and remains
OFF at the end of the Event Profile Recording Period.
LIQ-60 Load Log retention in memory
If the load log memory fills up, it operates as a circular memory, overwriting the oldest data
so that the latest log data is always retained. This does not affect event storage memory.
2.4.4 Visual Indicators
Visual indications of status and event information are provided by three high intensity LEDs
mounted on the base of the LIQ-60, and therefore visible from the ground when the LIQ-60
is installed on an overhead conductor.
Version 2
11 of 34
May 2012
LineIQ User Manual
Figure 4: LIQ-60 base panel
LIQ-60 Status LED
During sensing mode, this amber LED indicates that the LIQ-60 is powered on by flashing
briefly once every 30 seconds. At other times (start-up etc.) this LED provides other
information. See Table 1 con page 14 below.
LIQ-60 Fault LEDs
During sensing mode, these red LEDs indicate that the LIQ-60 has sensed a fault in the
overhead conductor. These LEDs also have other functions. See Table 1 on page 14 below.
Both Fault LEDs will operate in parallel. Future upgrades will provide for fault direction
indication.
Commissioning Status
After an LIQ-60 is powered up, it must be configured and commissioned before it becomes
active. In order to allow easy site installation by line crews without access to LineMan
software, LIQ-60s are provided with an auto-commission feature.
An auto-commission is performed one hour after an LIQ-60 is powered up. This period is
indicated by a slow (one second) flashing of both red LEDs.
Version 2
12 of 34
May 2012
LineIQ User Manual
Line Status
The amber LED indicates line status. The number of flashes emitted every 30 seconds
indicates the line status, as detailed below:
One amber flash every 30 sec. indicates that the line is energised (voltage is present)
and is carrying current.
Two amber flashes every 30 sec. indicate that the line is energised (voltage is
present) but is not carrying current.
Three amber flashes every 30 sec. indicate that neither voltage nor current are
present on the line.
Fault Indication
Only one red LED at a time will flash during a fault condition.
The LED produces a distinctive pattern of flashes every 10 sec. as follows:
One red flash indicates that a self-clearing fault has been detected.
Two red flashes indicate that a transient fault has been detected.
Three red flashes indicate that a permanent fault has been detected.
Firmware Upgrades
LIQ-60 firmware can be upgraded using the LIQ-LocalLink and LineMan. During this process
the LEDs are used to indicate status as follows:
Amber LED – continuous fast flashing (10Hz) indicates that firmware is being
uploaded to the LIQ-60 buffer.
Red LEDs – continuous fast flashing (10Hz) indicates that there has been an error
during the firmware upload process into the buffer.
Once the firmware is successfully uploaded into the buffer, the LIQ-60 copies the new
firmware into flash memory. This process is indicated by the amber LED being permanently
on.
At the end of the firmware upgrade process, the LIQ-60 will restart.
Version 2
13 of 34
May 2012
LineIQ User Manual
The LIQ-60’s LED indicator flash patterns
The LEDs are also used to indicate other operational statuses. The various flash patterns are
summarised in Table 1.
Indication
LIQ-60 LED Flash patterns
(single)
Voltage and Current present.
(double)
Voltage but no Current.
(triple)
No Voltage and no Current.
(single)
FP self-clearing fault sensed.
(1, 2 or 3 flashes
repeated every
10 sec)
(double)
FP-SI transient fault sensed
with short interruption.
(triple)
FP-LI permanent fault sensed
with long interruption.
Both Red LEDs
flash once every
sec.
(single)
Amber LED
Line status
Fault
detected
(1 red LED
on side of
fault)
Ready for
installation /
commissioning
Firmware
upload
CPU
upgrade
Meaning
(1, 2 or 3 flashes
repeated every
30 sec)
Red LED
…
&
Amber LED
triple flash every
30 sec.
Either Amber or
both Red LEDs
(Fast flash,
10Hz)
Amber or all 3
LEDs
(triple)
Amber LED is indicating LIQ-60
is not sensing Voltage or
Current.
(very rapid)
Firmware upload into buffer in
progress.
(very rapid)
Error during firmware upload
into buffer.
(steady)
Firmware transfer from buffer
to flash ROM.
(steady)
LED Indicator
LIQ-60 awaiting commission.
Auto-commission will occur
within 1hr of start-up (or reset)
if not done manually.
LIQ-60
synchronisation
LIQ-Gateway.
awaiting
signal from
(All three LIQ-60s on a feeder
get synchronised prior to Power
Factor measurements).
Description
Amber LED
Red LED
Table 1: LIQ-60 indicator LED flashing patterns
Version 2
14 of 34
May 2012
LineIQ User Manual
2.4.5 Power Factor Calculation
2.4.5.1
Overview
This overview gives a brief introduction to Power Factor values, i.e. what is meant by
Displacement Power Factor and True Power Factor.
See Appendix A – LineMan which explains how to use LineMan to configure an LIQ-60 to
measure Displacement Power Factor.
What Information is provided
The LIQ-60 records the phase angle between the fundamental (50/60Hz) voltage and
current waveforms, from which the Displacement Power Factor (DPF) can be derived. This
information is made available in the following formats:
Instantaneous DPF and phase angle (including lead/lag) of the line is returned when
the LIQ-60 status is queried. These parameters are averaged over approximately 1
minute and updated every minute.
Average DPF and phase angle (including lead/lag) are logged for each load log
interval. This interval can be set to be between 2 and 60 minutes.
Meaning of Power Factor Values
The LIQ-60 will record power factor on power systems operating in all four quadrants of
power flow.
Positive DPF indicates net energy flow is from source to load and negative DPF indicates net
energy flow is from load back to the source.
Positive phase angles indicate current is leading voltage (capacitive load) and negative
phase angles indicate current is lagging voltage (inductive load).
Displacement vs. True Power Factor
Displacement Power Factor (DPF) is defined as cos φ where φ is the phase angle between
fundamental (50/60Hz) voltage and current waveforms, whereas True Power Factor (TPF) is
defined as the ratio of Real Power (in watts) to Apparent Power (in VA). In the case of
sinusoidal waveforms, DPF = TPF, however they are no longer equal for non-sinusoidal
waves such as those containing harmonics.
The LIQ-60 measures DPF, thus consider harmonic content before inferring the TPF from
LIQ-60 readings. With normal levels of harmonic content on typical power lines the
difference between DPF and TPF is small and usually will be negligible, however if you
suspect high harmonic content, a harmonic study should be performed if knowledge of TPF
is critical.
Version 2
15 of 34
May 2012
LineIQ User Manual
2.4.5.2
Defining Load and Source Directions
To determine how to correctly record power factor the LIQ-60 needs to know which way it is
mounted on the power line, i.e. which direction is towards the source and which is towards
the load. Under most conditions with a single generation source this will be easy to define.
In the case of power lines with multiple generation sources you must choose which direction
to call the „source‟ and which the „load‟.
LineMan provides an interface to set the load direction of the LIQ-60, as determined by the
direction of the reference arrow on the bottom of the LIQ-60.
Field Calibration – Compensating for Effects of Adjacent Conductors
The LIQ-60 does not normally have a ground reference, so it uses the electric field created
between the line and ground to establish the voltage zero crossing. This field can be skewed
by adjacent conductors, so LineMan provides a wizard to compensate for those effects. The
wizard is run once for each set of 3 LIQ-60s on a single feeder. It cannot be run on a single
LIQ-60.
Version 2
16 of 34
May 2012
LineIQ User Manual
2.5
LIQ-Gateway Overview
The LIQ-Gateway is an intelligent Remote Terminal Unit (RTU) used in conjunction with the
LIQ-60 conductor mounted sensor. The Gateway collates events and enables remote
unsolicited fault and outage event reporting for network reliability applications. It provides
detailed fault profiles for fault location analysis, modelling and scenarios, as well as system
load information for planning, line balancing and asset utilisation applications.
The Gateway is a pole attached collator mounted within radio range of the CMS and can be
integrated into remote SCADA system via DNP3, IEC 61850 or Web services protocols.
Communication with external systems is usually achieved using a GridSense supplied
communication module. If for technical reasons this does not provide coverage in a specific
area, other modems that are supported by GridSense can be used.
Event data is transferred to the LIQ-Gateway shortly after capture by the CMS devices. Load
log data (conductor current, voltage, conductor and ambient temperatures and power
factor) is requested by the LIQ-Gateway from the CMS at regular, user selected intervals. In
addition, a system “Health Check” at a user defined interval, is initiated by the Gateway
independently of events. The Gateway initiates communications with each CMS to download
all log data and health records (battery voltage, solar charge current etc) to the Gateway
memory. This information can be remotely accessed via LineMan Remote, or accessed by
SCADA.
The LIQ-Gateway can be AC or battery/solar powered, depending on power requirements
and the availability of mains power. Power consumption is minimised by powering up the
communication systems, i.e. LIQ-LAN and cellular modem or utility radio, only when
required.
The LIQ-Gateway has a combined connector / indicator panel. This comprises connectors
for AC mains and solar power input, an Ethernet connector, radio antenna and cellular
antenna, and two LEDs used as visual status indicators.
Version 2
17 of 34
May 2012
LineIQ User Manual
2.6 LIQ-LocalLink Overview
The LIQ-LocalLink is a licence-free radio modem that plugs into a USB port on a laptop or
PC. It uses the IEEE 802.15.4, 2.4 GHz communications standard, enabling it to
communicate with a similar radio inside an LIQ-60 or LIQ-Gateway.
The operating range depends on on-site conditions, the recommended operating range is
30m (100ft) using an internal omnidirectional antenna.
The kit comes with a magnetic mount, which can be attached onto any Ferromagnetic
material.
Figure 5: The LIQ-LocalLink modem
Version 2
18 of 34
May 2012
LineIQ User Manual
3 INITIAL SETUP
3.1 LIQ-LocalLink installation
3.1.1 For Microsoft Windows 7
The drivers for the LIQ-LocalLink type modem are included in Microsoft Windows 7.
1. Plug the LIQ-LocalLink into a USB port on a laptop.
2. The first time that an LIQ-LocalLink is plugged into a laptop‟s USB port, the Microsoft
Windows driver installation dialog will appear onscreen.
3. Follow the prompts to install the drivers.
4. Take note of the assigned COM Port number (in the example below COM4) as this
will be required when setting up the LineMan interface.
(This example installation was done on Windows 7 Pro 32-bit SP1.)
Figure 6: Windows 7 dialog after LIQ-LocalLink modem installation
5. To determine the COM Port connection, access the Device Manager(Control Panel
→ System → Device Manager) and expend the selection “Ports”, the selection
USB Serial Port will identify the correct COM Port number.
3.1.2 For Microsoft Windows XP
Please refer to Appendix B for Windows XP installation.
Version 2
19 of 34
May 2012
LineIQ User Manual
3.2 LIQ-60 setup
Before the LIQ-60 is configured, its battery needs to have sufficient charge. The LIQ-60 is
delivered with a fully charged battery, but it will discharge during storage.
The battery voltage can be determined with LineMan. Run the LineMan software application
and scan for all LIQ-60 CMS within range. Available devices will be displayed under the Line
Tracker Information window. Click on the device interest and click on Summary. If the
battery voltage is less than 2.0V then it should be charged before installation. It is
recommended that you use a GridSense LIQ-Charger.
Alternatively, the battery can be charged using the LIQ-60 solar panel. However, charging a
completely flat battery may require optimal sunlight for up to 50 hours.
3.2.1 Switching on the LIQ-60
The LIQ-60‟s power switch is located on the bottom panel. It is a rotating switch that turns
through 90 degrees between the OFF and ON positions, as indicated by arrows.
1. Rotate the switch clockwise to the ON position. In the ON position it will be in line
with the 2 (red) fault indicating LEDs.
When the unit is powered on the red and amber LED‟s will start a flash sequence.
The red LED will flash 8 times followed by 8 flashes from the amber LED.
After the start up sequence, the red LEDs will illuminate once every second indicating
that the unit is in a non-sensing state, awaiting commissioning. Prior to
commissioning the amber LED will flash 3 times every 30 seconds. If after one hour
the LIQ-60 has not been manually commissioned, it will commission itself
automatically.
Refer to Table 1 on page 14 for an explanation of LED status and fault indication sequences.
Version 2
20 of 34
May 2012
LineIQ User Manual
4 CONFIGURATION
Before the LIQ-Gateway and LIQ-60s are mounted and commissioned, they need to be
configured. Configuration of the LIQ-60 and the LIQ-Gateway is performed using LineMan
and an LIQ-LocalLink.
4.1 LIQ-60 configuration
The LIQ-60 is configured using LineMan software.
Please refer to Appendix A for instruction on configuring the LIQ-60 with the LineMan
software. Commissioning
LIQ-60s must be commissioned after configuration.
5 COMMISSIONING
5.1 Commissioning the LIQ-60
If the LIQ-60 is intended to operate “stand alone”, without an associated LIQ-Gateway, it
needs to be commissioned directly using a laptop PC and an LIQ-LocalLink local-RF radio,
with the LineMan software interface. If the LIQ-60 is associated with an LIQ-Gateway, the
LIQ-60 is then commissioned via the LIQ-Gateway.
5.1.1 Pre-commissioning check of the LIQ-60s
Using a laptop running LineMan, connect to each LIQ-60.
Confirm that:
The internal battery voltage exceeds 2V.
There is some solar charge current when the solar panel is illuminated.
Event recording is enabled if required.
Load logging is enabled if required.
Line currents are as expected.
Voltage sensor values are as expected.
The appropriate LIQ-Gateway (if used) has been assigned as a parent to the LIQ-60.
The correct phase and group have been assigned
Location infomation has been entered
Version 2
21 of 34
May 2012
LineIQ User Manual
6 INSTALLATION AND REMOVAL
When installing or removing the LIQ-60, if using a hot stick, use only a hot stick rated for use
at or above the voltage of the conductor on which the LIQ-60 is installed.
Similarly, if using the glove and barrier method, ensure that the safety equipment used is
rated at or above the voltage of the conductor on which the LIQ-60 is installed.
6.1 LIQ-60 installation
The LIQ-60 has been designed for live line installation on Medium and High Voltage (MV and
HV) networks (up to 138 kV) using an electric utility hot stick, or using a glove and barrier
method with a live line crew. These instructions apply to installation using a hot stick. Each
LIQ-60 takes just a few minutes to install.
6.1.1 Pre-installation
Prior to mounting, set the orientation of the LIQ-60‟s solar panel to maximise sunlight falling
onto it. See section 7.2 Solar Panels for details on determining the direction and angle at
which to mount the solar panel.
6.1.2 Mounting
1. Ensure that the LIQ-60 is switched on and configured.
2. Rotate the solar panel so that once the LIQ-60 is in position, it will receive the most
sunlight, i.e. facing north when in the southern hemisphere, and south when in the
northern hemisphere.
3. Adjust the angle (elevation) of the solar panel as discussed in section 7.2 Solar
Panels.
4. Clamp a hot stick hook onto the sprung slider and pull the hook and slider into the
head of the hot stick. This opens the LIQ-60‟s conductor clamp and the sensing coil.
5. Ensure the LIQ-60 is firmly secured to the hot stick.
6. Install the LIQ-60 by hooking the top portion of its housing over the conductor, so that
the channel in the LIQ-60’s housing encompasses the conductor.
7. Release the hot stick so that the sprung clamp and sensing coil close, thereby
clamping the LIQ-60 to the conductor.
8. Take note of the reference arrow on the bottom of the LIQ-60, and in which compass
direction this points, e.g. north, north west etc. This is required to identify the direction
of line faults when they occur.
9. Please do not mount the CMS on an insulated conductor
6.1.3 Post-installation checks
1. Check that the LIQ-60 is hanging vertically and has clamped securely onto the
conductor.
2. Check that the solar panel direction will maximise exposure to sunlight.
3. Check that the status LEDs are showing correct status: both red LEDs flashing every
second (and a status amber flash every 30 sec) if not yet commissioned, or an amber
flash every 30 sec when commissioned and reading voltages and current.
4. Check that the status LEDs are showing correct status: both red LEDs flashing every
second (and a status amber flash every 30 sec) if not yet commissioned, or an amber
flash every 30 sec when commissioned and reading voltages and current.
Version 2
22 of 34
May 2012
LineIQ User Manual
6.1.4 Removal
1. Clamp a hot stick hook onto the sprung slider and pull the slider into the head of the
hot stick. This opens the LIQ-60‟s conductor clamp and the sensing coil.
2. Remove the LIQ-60 by lifting it slightly so that the conductor slides out of the channel
in the LIQ-60‟s housing.
3. Lower the LIQ-60 carefully, then disengage the hot stick.
7
POWER SYSTEMS
7.1 LIQ-60 Battery
The LIQ-60 is powered by a sealed lead acid battery which provides continuous long term
power for remote reporting of events and historic load data. A solar panel mounted on top
of the LIQ-60 charges the battery.
The LIQ-60 is delivered with a fully charged battery, but it will slowly discharge during
storage. The battery voltage can be determined by using LineMan. (See Appendix A.) If the
battery voltage is less than 2.0V then it should be charged before installation. It is
recommended that you use a GridSense LIQ-Charger. Alternatively the battery can be
charged using the LIQ-60 solar panel. However, charging a flat battery may require optimal
sunlight for up to 50 hours.
The battery has a voltage of 2V and a capacity of 10Ah. A typical lifespan is 10 to 15 years.
7.2 Solar Panels
7.2.1 Solar Panel orientation
The LIQ-60‟s built-in solar panel provides all the energy required by the LIQ-60. The amount
of energy produced depends on the following factors:
The amount of incident solar energy. This varies with the time of day, the season,
the distance from the equator (latitude) and the amount of cloud cover.
The angle at which the sun‟s rays strike the solar panel.
The amount of shading (e.g. by trees or nearby structures) or obstruction (e.g. by
snow or dust) of the solar panel.
When mounting a solar panel it is important to ensure that it is not in shade from nearby
poles, trees etc.
Two adjustments need to be taken into account when positioning the panel, orientation and
angle:
Orientation
This is the direction in which the sun will be for most of the year, i.e. north or south. A
panel‟s performance is optimum when facing towards the equator, that is
facing north when in the southern hemisphere and
facing south when in the northern hemisphere.
See Figure 7.
Version 2
23 of 34
May 2012
LineIQ User Manual
Figure 7: Direction of solar panels in northern and southern hemispheres.
Angle
With regard to angle from the horizontal, the best angle for a solar panel that does not get
adjusted for seasonal variation, is 15° more than the latitude where the panel is installed.
For example Sacramento, California, is at approximately 40° N. So the angle from horizontal
for the face of the solar panel is 40° + 15° = 55°. See Figure 8.
Figure 8: Angle of solar panel from horizontal.
Version 2
24 of 34
May 2012
LineIQ User Manual
7.2.2 Adjusting the solar panel on the LIQ-60
The solar panel has 2 separate adjustments that need to be made:
Rotation of the solar panel and its mounting to face toward the equator, and
Setting the panel‟s angle relative to the horizontal.
1. Rotating the solar panel to face the equator:
a) Determine the direction that the solar panel must face, i.e. north in the southern
hemisphere, or south in the northern hemisphere.
b) Hold the LIQ-60 upright and oriented so that the channel that the power
conductor will fit into is lined up with the direction of the conductor overhead that
it will be installed on.
c) Rotate the solar panel so that it faces the determined direction.
The circular base of the solar panel adjusts in pre-set steps of 12°.
Note: In order to avoid twisting the panel‟s cable, the base has a stop which prevents it
from being rotated in a complete circle. If it jams against this stop before reaching the
required angle, rotate it in the opposite direction.
2. Setting the panel‟s angle relative to the horizontal:
a) Determine the angle with the horizontal that the solar panel needs to be set to,
i.e. latitude + 15° .
b) Hold the LIQ-60 upright and adjust the solar panel to this angle relative to the
horizontal.
The angle can be set between 25° to 65°, relative to the horizontal. The panel has
6 pre-set stops, in increments of 8°. The following table list the angle increments:
Stop
Angle (o)
Stop 1
25
Stop 2
33
Stop 3
41
Stop 4
49
Stop 5
57
Stop 6
54
Table 2: LIQ-60 Angle Increments
Version 2
25 of 34
May 2012
LineIQ User Manual
Appendix A – LineMan
A.1 LineMan Overview
LineMan is a software package supplied by GridSense for configuring and communicating
with the LineIQ suite of products. It is used during the commissioning phase when setting
up an LIQ-60 or LIQ-Gateway, and subsequently when downloading information from the
LIQ-60 or LIQ-Gateway to a PC.
A.2 Setting up an LIQ-LocalLink
In order for a PC to communicate with an LIQ-60 or an LIQ-Gateway, it needs to use short
range radio. This is achieved by using an LIQ-LocalLink which is a radio modem that plugs
into a USB slot on a PC.
The first time you use the LIQ-LocalLink on a PC, it needs to have the correct driver loaded.
This driver forms part of Windows 7, so the LIQ-LocalLink should have its driver
automatically loaded when it is inserted into a USB slot. Section 3.1 will detail installation
procedures for Window 7 whereas Appendix B details installation procedures for Windows
XP.
If you are using Windows XP, you can install the driver off the CD containing LineMan:
1. From Windows Explorer, run the setup.exe.
2. Follow the instructions from Windows Install to install the driver.
3. Once the driver is installed you can run LineMan.
Version 2
26 of 34
May 2012
LineIQ User Manual
A.3 Connecting to the CMS with LineMan
1. Click on the Start → All Programs → Gridsense → LineMan → LineMan to launch the
LineMan application.
2. Select the correct COM port as indicated by the LineMan Connection Window and
click on Connect to LineTracker.
Figure 9: COM port selection
3. The available LIQ-60 within the RF range is displayed under the LineTracker ID List,
differentiated by their respective serial number. Melancholy ecstatic
A.4 Displaying LIQ-60 Status/Summary
1. Check the LIQ-60 of interest and click on Summary to display information such as
firmware revision, software revision and thresholds.
Figure 10: Device List
Version 2
27 of 34
May 2012
LineIQ User Manual
Figure 11: Displaying LIQ-60 Summary
2. Similarly, click on Status to display information such as charge current, battery
voltage and etc.
Version 2
28 of 34
May 2012
LineIQ User Manual
A.5 Configuring an LIQ-60
1. Click Device Config to display and/or edit the LIQ description and measurement
configuration.
Figure 12: A.5 Configuring a CMS
The user has the following configuration selection:
a) Enter a 50 character description of the CMS Location into the Device
Description field.
b) Select the Position Number of the conductor that the LIQ-60 is on. (e.g. 1Phase A, 2-Phase B, etc.)
c) Select the number of the group that the LIQ-60 is in from the Group Number
field.
d) Select the Position Number of the conductor that the LIQ-60 is on. (e.g. 1Phase A, 2-Phase B, etc.)
e) Enable Load Logging
f)
Enable Fault Detection Event recording
g) Enable Power Factor Logging. Should the user select No, the CMS will return only
instantaneous data rather than logged readings.
h) Enable Temperature Logging.
i)
Select data polling interval (log average in minutes). Selecting a higher polling
rate will decrease the log capacity, as the available memory will reduce. However,
the most recent data is always retained.
2. Click Apply Configuration to apply any configuration changes
3. Click on Save Config Profile to Disk to save the config settings.
Version 2
29 of 34
May 2012
LineIQ User Manual
A.6 CMS Data Download
1. Click the Data Download tab button on the LineTracker Command windowpane. The
Read All Window pane will pop-up. The user can choose to download either Event
Data or both Events and Load Logging Data. Select the required option and click on
Next to proceed.
Figure 13: Data Download Option
2. Save the data file to the preferred location as prompted by the window. The user can
monitor the download progress from the task bar. The status will change to Done for
a successful download. Click on Finish to close the Read All Data window.
Figure 14: File Download
Version 2
30 of 34
May 2012
LineIQ User Manual
Appendix B – Window XP Installation
The driver for the LIQ-LocalLink is provided on the LineMan installation CD-ROM. The driver
can also be downloaded from the Digi® website on their web-page for the XStick USB
802.15.4,
at
http://www.digi.com/support/productdetl.jsp?pid=3564&osvid=0&s=444&tp=1.
To install by running the driver file:
1. From the CD-ROM or downloaded driver file, run the file CDM20600.exe
2. Install the driver as per the Windows installation wizard, select “No, not this time” on
the 1st screen:
Figure 15: Windows XP driver installation dialog screen 1
3. At the next screen, insert the CD-ROM and select “Install the software automatically”:
Version 2
31 of 34
May 2012
LineIQ User Manual
Figure 16: Windows XP driver installation dialog screen 2
The wizard will look for the driver and install it.
Follow the steps until the wizard completes:
Figure 17: Windows XP driver installation dialog screen 3
Note: Depending on setup, this may be a 2-step process, the 1st wizard installing an XStick
as a “USB serial convertor”, then the 2nd Wizard installing a “USB serial port.”
The COM port on the PC that the LIQ-LocalLink is assigned to can be determined as
follows (you will need to know the COM port number to set up communications
between LineMan and the LIQ-LocalLink):
Version 2
32 of 34
May 2012
LineIQ User Manual
4. On the Windows task bar, click the Start button, then select Control Panel >
System > Device Manager:
Figure 18: Device Manager showing USB serial COM port number
In the example above, the USB serial port is COM port 3.
An LED inside the LIQ-LocalLink‟s translucent casing flashes about once a second to indicate
it is powered up.
Version 2
33 of 34
May 2012
LineIQ User Manual
Appendix C
C.1 LIQ-60 specifications
Application
Medium V / High V overhead distribution network sensing and measurement, 4 wire, multiple
grounds, 3 wire, single phase, SWER and mixed circuit installations.
Item
Description
Interfaces
Communication
Local-RF Communication
RF range 30m (100ft) line of sight.
Status indicators
Three high intensity LEDs, 2 x red & 1 x amber
Sensing and logging
Line voltage
5kV to 138kV
Frequency
45 to 65Hz
Current sensor
Fault detection range: 5A – 25kA
Load logging range: 1A – 25kA (Accuracy +/- 5% or +/- 1A, whichever is
greater).
Trigger principle
Proprietary algorithms based on current and voltage ratios, adaptive to the
line signature i.e. load and voltage history. Inrush restraint.
Memory
Total Memory = 196 Kbytes available.
Event data = 32 Kbytes Load log = 164 Kbytes (optional)
Logged data
Time stamped, pre and post voltage status, pre and post current values,
200ms of fault current waveform (60ms pre and 140ms post fault), 2nd
harmonic calculations.
Mechanical and Power
Battery specifications
4 x 2V, 2.5Ah rechargeable SLA Battery, 10 years life typ.
Power source
Dual power circuitry – Solar panel and internal SLA Battery. Battery
specifications: 4 x 2V 2.5Ahr creating a 10Ahr battery pack.
Solar charging max 150mA gives 100% charge in approx. 17 days.
External Charging max 5A, charge time approx. 3 hours.
Current use
Normal operation (No RF Transmission) = 5mA.
Clamping mechanism
A spring loaded conductor clamp. Mounting and de-mounting by means of
hot stick.
Conductor size
Approx. 6mm (0.25 inch) – 32mm (1.25 inch) diameter.
Weight
2kg (4.4lb)
Dimensions
Height: 315mm (12.4 in), Depth: 180mm (7 in), Width: 140mm (5.5 in)
Environmental
Temperature ranges
Humidity range
Version 2
Ambient operating range
- 40ºC to +70ºC (- 40ºF to +160ºF)
Range for accuracy
- 20ºC to +65ºC (- 4ºF to +120ºF)
Conductor operating range
- 40ºC to +130ºC (- 40ºF to +265ºF)
Conductor, guaranteed accuracy
- 20ºC to +90ºC
(- 4ºF to +195ºF)
0 % to 100 %
34 of 34
May 2012