1
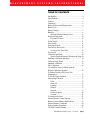
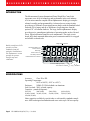
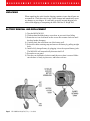
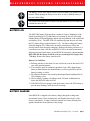
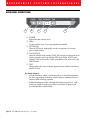
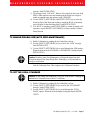
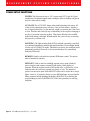
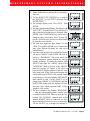
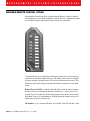
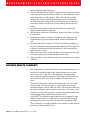
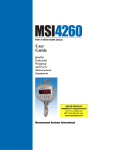
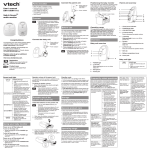
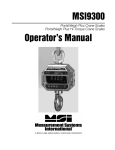
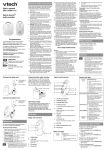
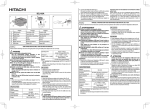
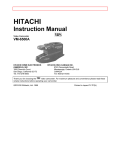
MSI4300/5
PORTA-WEIGH PLUS
CRANE SCALES
5 KEY VERSION
User
Guide
Quality Industrial
Weighing
and Force
Measurement
Equipment
Measurement
Systems
International
M E A S U R E M E N T
Page 2
MSI-4300 Porta-Weigh Plus/5 Key
•
S Y S T E M S
User Guide
I N T E R N A T I O N A L
M E A S U R E M E N T
S Y S T E M S
I N T E R N A T I O N A L
TABLE OF CONTENTS
Introduction ............................................................ 4
Specifications ......................................................... 4
Features ................................................................... 5
Unpacking ............................................................... 6
Battery Removal and Replacement ........................ 6
Battery Life ............................................................. 7
Battery Charger ....................................................... 7
Batteries .................................................................. 8
Optional Alkaline Battery Power ..................... 8
Keyboard Operations ............................................ 10
Keyboard Features ......................................... 10
Power Switch ........................................................ 11
Zero Switch .......................................................... 11
Net/Gross Switch .................................................. 12
Tare In/Tare Out Switch ....................................... 12
To remove the Tare Value ............................... 13
Test Switch ........................................................... 13
Calibration and Setup ........................................... 14
Switch Functions during Calibration & Setup 14
Enabling Calibration and Setup ............................ 14
Calibrate Setup Menu ........................................... 15
Standard Calibration ............................................. 15
Fine Calibration .................................................... 16
Cal with Rcal value (Calibrate with the
Resistor Calibration number) ............................... 16
To Enable/Disable AZM (Auto Zero
Maintenance) ........................................................ 17
To Set the Legal Standard ..................................... 17
Other Setup Functions .......................................... 17
Filter ............................................................... 17
Auto Off ......................................................... 17
Lighting .......................................................... 17
Remote ........................................................... 17
Setpoint .......................................................... 17
Disable Setpoint ............................................. 20
Contrast .......................................................... 21
To Initialize the Scale ........................................... 21
Infrared Remote Control Option .......................... 22
Remote Control Battery Replacement .................. 23
Infrared Remote Comments ................................. 24
Proper Loading Procedures .................................. 26
The MSI Limited Warranty .................................. 27
MSI-4300 Porta-Weigh Plus/5 Key
•
User Guide
Page 3
M E A S U R E M E N T
S Y S T E M S
I N T E R N A T I O N A L
INTRODUCTION
The Measurement Systems International Porta-Weigh Plus Crane Scale
represents a new level of technology and performance in the scale industry.
A16 bit microcontroller coupled with an alphanumeric display gives unprecedented versatility and programmability. Advanced power saving circuitry
provides up to 300 hours of operation between charges with the standard sealed
lead acid (SLA) battery and up to 2000 hours of operating time from the
optional “D” cell alkaline batteries. The large, backlit alphanumeric display
provides precise, unambiguous indication of operating modes such as Net and
Gross. Digital calibration simplifies scale maintenance. The single circuit
board, fully shock-mounted and marine-proof construction makes for a rugged
and reliable overhead scale.
6 Digit Weight Indication
International Motion Icon
Motion Indicator
MOTION
Minus Sign
"Infrared Remote On" Indicator
0
+
Center of Zero Icon
Low Battery Indicator
-
Backlit, transflective LCD
provides excellent
readability from full
sunlight to total darkness.
The alphanumeric section
prompts the operator
through setup and
calibration.
REMOTE
AUTO ∑
METRIC
8 Character Message Display
"Auto-Total On" Indicator
Units
lb, kg, t, METRIC t
SPECIFICATIONS
Accuracy:
Class III or IIIL
Operating Temperature:
14° F to 140° F (-10° C to +60° C)
Enclosure:
NEMA IV, IP66 alodined cast aluminum
Safe Overload: 200% of rated capacity
Capacities - pounds (kilograms):
500 (250)
2000 (1000)
20,000 (10,000) 30,000 (15,000)
100,000 (50,000)
5000 (2500)
50,000 (25,000)
10,000 (5000)
70,000 (35,000)
Other capacities available by special order or as dictated by standards compliance. MSI has designed and manufactured crane scales up to 500 ton capacity.
Page 4
MSI-4300 Porta-Weigh Plus/5 Key
•
User Guide
M E A S U R E M E N T
S Y S T E M S
I N T E R N A T I O N A L
Ultimate Overload:
500% of rated capacity except:
25,000 kg unit is 490% of rated capacity
35,000 kg unit is 430% of rated capacity
70,000 lb unit is 475% of rated capacity
50,000 kg unit is 450% of rated capacity
FEATURES
• Designed to meet or exceed all USA, Canadian, United Kingdom, and
International standards.
• Rugged construction throughout. Single printed circuit board is shock
mounted to withstand shocks in excess of 50 G’s. Switches are totally
sealed and rated for over 10 million operations.
• Precise high resolution 20 bit A/D conversion coupled with advanced 16 bit
microcontroller provides world class features and accuracy.
• Six 1.6 inch (40 mm) high digits for clear weight readings from a distance.
• Easy to read annunciation of measurement modes such as NET or GROSS
are provided on eight 0.8 inch (20 mm) alphanumeric characters. Also
used for menu prompts.
• Display illumination uses rugged, long life, light emmitting diode (LED)
backlighting coupled with a transflective liquid crystal display providing
optimum display contrast under all ambient conditions from full sunlight to
total darkness. Operation is light-sensing automatic or manually set.
• Exceptional battery life: Typically 300 hours of continuous use between
charges provided by the 12V SLA battery and 2000 hours of continuous use
is provided by the optional 8 alkaline “D” cell batteries. Maximum battery
life is reduced by use of the backlighting. The Porta-Weigh Plus will
automatically power down when not in use (this feature can be disabled). A
low battery indication appears when approximately 10% of battery life
remains.
• Easy to maintain: Full digital calibration assures reliable, repeatable measurements.
• Complete marine sealing ensures reliable operations under harsh weather
conditions.
• Anti-EMI shielding is standard. Low emissions and susceptibility.
• Easily customized for special applications.
• IR Remote control is available as an option. Adds keyboard tare and other
features.
MSI-4300 Porta-Weigh Plus/5 Key
•
User Guide
Page 5
M E A S U R E M E N T
S Y S T E M S
I N T E R N A T I O N A L
UNPACKING
When unpacking the scale from the shipping container, insure that all parts are
accounted for. Check the scale for any visible damage and immediately report
any damage to your shipper. It is advisable to use the original shipping container when shipping or transporting the MSI-4300 Port-A-Weigh Plus.
BATTERY REMOVAL AND REPLACEMENT
1) Turn the MSI-4300 Off.
2) With one hand, hold the battery access door to prevent it from falling.
3) Rotate the two cam lock knobs on the access door counter-clockwise until
the door latches disengage.
4) Carefully back the access door out of the battery well.
5) Relese the rubber retaining strap and remove the battery by pulling straight
back.
6) Install a fully charged battery by plugging it in to the exposed battery jacks.
The MSI-4300 will turn on briefly then turn itself off.
7) Reseat the access panel.
8) Turn the cam lock knobs clockwise until the access door is secured. Make
sure the door is firmly in place now, and before each use.
.
Page 6
e
s
u
MSI-4300 Porta-Weigh Plus/5 Key
•
User Guide
M E A S U R E M E N T
S Y S T E M S
I N T E R N A T I O N A L
The Battery Access Door and the Sealed Lead Acid Battery are potential falling
hazards. When opening the battery access door, be sure to hold the battery to
prevent it from falling.
The Sealed Lead Acid Battery contains lead and should be recycled when it has
reached the end of its life.
BATTERY LIFE
The MSI-4300 battery life depends on a number of factors: Brightness of the
liquid crystal display (LCD) and number of segments lit, the use of the light
emitting diode (LED) backlighting, and the age and condition of the sealed lead
acid battery (SLA) . The MSI-4300 will automatically turn the scale off when
the SLA battery drops to approximately 10.5V. You must recharge the battery
when this happens. SLA batteries do not suffer from memory effects and
actually benefit from frequent rechargings. Recharge the battery whenever it is
convenient even when it still has available life. Due to the small maintenance
discharge imposed on the battery by the MSI-4300 electronics, do not store the
MSI-4300 with the battery inside the scale for extended periods (longer than
7-10 days). Remove the battery from the scale.
Battery Use Guidelines
1) Recharge whenever convenient. Do not wait for the scale to shut itself off if
your work situation permits.
2) If you need the scale in continuous operation, keep a fully charged spare
battery at hand. Replace the drained battery as close as possible to the low
battery warning, or earlier.
3) SLA Batteries that have not been deep discharged should withstand 500 to
1500 charging cycles.
4) The low battery warning will indicate about 2-4 hours of additional use
before the MSI-4300 turns itself off.
5) If the MSI-4300 is not going to used again soon, remove the SLA battery to
prevent deep discharge while the unit is in storage.
BATTERY CHARGER
Each MSI-4300 is shipped with a battery charger designed to charge and
maintain the battery. Exact charging time will depend on the degree of discharge of the battery. A battery removed when the low battery warning first
appears should take about 4 hours to fully charge.
MSI-4300 Porta-Weigh Plus/5 Key
•
User Guide
Page 7
M E A S U R E M E N T
S Y S T E M S
I N T E R N A T I O N A L
Using the Charger
1) Remove the Battery from the MSI-4300. See previous page for removal
instructions.
2) Connect the charger assembly to the AC supply (86-260VAC). The Power
Status light should be green. If the power status light fails to illuminate,
check your AC power connection and make sure the Vin jack is fully seated.
AC power cords suitable for any world location are available from MSI.
3) Plug in the polarized connector to the jacks on the battery.
4) The Charge Status light should turn ORANGE indicating fast charge. If the
status light remains Green when the battery is first plugged in, the battery
may be defective.
5) Charge until the status light turns GREEN.
When the charge cycle is complete you can (and should) leave the battery on
the charger until it is needed. The charger keeps a maintenance float charge on
the battery to ensure the best possible operation times. For scales that are in
high usage, MSI recommends obtaining a spare battery so one can always be on
the charger.
BATTERIES
Optional Alkaline Battery Power
8 Standard “D” cells. Alkaline type is preferred, but standard Carbon-Zinc can
also be used. This reduces the available battery life in half. Also Ni-Cad “D”
cells work fine. Ni-Cad battery life varies widely, but should be about one
quarter the equivalent of Alkaline.
Installing/Changing
1) The batteries must have enough charge to ensure accurate operation. If
the batteries are too low, the scale will automatically shut off (8 batteries
in series must total more than 5.4V).
2) Turn the MSI-4300 Porta-Weigh Plus off.
3) Remove the battery tubes by turning the knobs counterclockwise. It is
not necessary to remove both tubes at once.
4) Replace the batteries with four fresh “D” cells in each tube with correct
polarity.
5) Reinstall the battery tubes by inserting the tubes back into the unit and
turning the knobs clockwise.
Note: The batteries can be checked with the Test Mode. Power displayed is in
relative percent (%) of battery life (applies to alkaline batteres only). If the
number with fresh batteries is extremely low (less than 10%), turn off the
power, remove the tubes and check that the polarity of all batteries are correct.
Page 8
MSI-4300 Porta-Weigh Plus/5 Key
•
User Guide
M E A S U R E M E N T
S Y S T E M S
I N T E R N A T I O N A L
This page intentionally left blank.
MSI-4300 Porta-Weigh Plus/5 Key
•
User Guide
Page 9
M E A S U R E M E N T
S Y S T E M S
I N T E R N A T I O N A L
KEYBOARD OPERATIONS
POWER
ZERO NET/GROSS TARE
0
TEST
T
IN / OUT
1
2
3
4
5
1) POWER
Push to turn the scale on or off.
2) ZERO
Used to zero the scale. Zero range depends on standard.
3) NET/GROSS
When in NET mode, pushing this provides a temporary (4 seconds)
gross weight reading.
4) TARE IN/OUT
When in GROSS mode, pushing TARE will zero any weight on the scale
which causes the scale to go into the NET mode. When in NET mode,
pushing TARE will clear the TARE value and the scale will revert to the
GROSS mode.
5) TEST
When pushed, this causes a display segment check, and provides battery
and RCAL tests.
Keyboard Features
• Silicon elastomeric rubber switches provide up to 10 million operations.
Far more rugged than mechanical switches that can withstand excessive
impact without affecting operation.
• Rubber membrane provides watertight and salt spray-proof seal. Additional poly shield on underlay provides second layer of integrity and
prevents humidity contamination.
Page 10
MSI-4300 Porta-Weigh Plus/5 Key
•
User Guide
M E A S U R E M E N T
S Y S T E M S
I N T E R N A T I O N A L
OPERATION GUIDE
POWER SWITCH
Function:
Turns the scale On/Off (Toggle action) and prompts user to zero the initial
deadload.
Rules for Use:
1) The batteries must have enough charge to ensure accurate operation or
the scale will not turn on.
2) Ambient temperature must be greater than 14° F (-10° C) and less than
+140° F (+60° C).
Action:
1) Display Check: All segments are illuminated for 1 second.
2) Message displays “MSI PAW+”, numerics give the software version
number for 1 second.
3) During display test and MSI message, all internal operations are checked
and any nonconformance causes an error message to be displayed.
4) UK LFT units only: ZERO - User is prompted to push the zero key (-1%
+20% zero range). If the weight is in initial zero range the scale will zero
and start standard operation. If not, the message “UNLOAD” appears on
the display and the scale will be inoperable until it is unloaded.
Final:
Unit reads the current weight in the Gross mode.
ZERO SWITCH
Function:
Sets the zero reading of the scale.
Rules for Use:
1) The scale must be stable. The scale will not zero if the motion detect
annunciator is on.
2) The scale must be in the Gross mode. The scale will not zero in the Net
mode.
3) The scale will accept a zero setting over the range of -10% to +100%
(NIST, Alaska & Industrial Standards) or -1% to +3% (UK, Australia,
OIML & Canadian Standards).
MSI-4300 Porta-Weigh Plus/5 Key
•
User Guide
Page 11
M E A S U R E M E N T
S Y S T E M S
I N T E R N A T I O N A L
4) On initial power up, the zero range is 20%.
Action:
The weight reading must be stable within ±1 division. If this condition is
met, the display reads “ZEROED” and the digits display “0” (or 0.0 or
0.00 depending on resolution). The zero setting is stored by the backup
memory, which will restore it the next time the system is turned on.
Final:
The display reads “GROSS” and the digits display “0” (or 0.0 or 0.00
depending on resolution).
NET/GROSS SWITCH
Function:
Switches the display between Net and Gross modes temporarily (4 seconds).
Rules for Use:
1) Does not operate in the GROSS mode.
2) NET/GROSS will work even when the scale is in motion.
Action:
• Not in NET mode (Tare = Ø)
No Action, display continues to read the Gross weight only
• In NET mode:
Shows Gross weight for 4 seconds. Display reads “GROSS” then returns
to “NET”.
TARE IN/TARE OUT SWITCH
Function:
Sets and removes Tare.
Rules for Use:
1) Only positive weight readings can be tared.
2) The scale will only tare when it is in the GROSS mode.
3) The motion annunciator must be off, the weight reading must be stable.
4) Setting or changing the tare has no effect on the zero setting.
5) Taring will reduce the apparent over-range of the scale. For example, if a
1000 lb container was tared and the scale capacity is 5000 lb, the scale
will overload at a net weight of 4000 lb plus any additional allowed
overload (usually ~4%) (5000-1000).
Page 12
MSI-4300 Porta-Weigh Plus/5 Key
•
User Guide
M E A S U R E M E N T
S Y S T E M S
I N T E R N A T I O N A L
Action:
• No current tare is set:
The weight reading must be stable within ±1 division (Motion annunciator off) and has to be a positive reading. The entire range of the scale can
be Tared. If the motion condition is met the display temporarily reads
“TARE SET” and then converts to a “NET” display and the digits
register Ø. All subsequent readings are deviations from the set Tare value.
Final:
• Tare is set, displaying NET weight.
To remove the Tare Value:
Push TARE. The Tare value is cleared, the scale returns to GROSS mode.
TEST SWITCH
Function:
Provides a functional system test and an on-demand display check without
disturbing the current weighment. Also provides calibration verification in the
form of a load cell calibration number.
Action:
To start the text sequence push TEST.
1) All digits (7 segment and 16 segment) count once from 0 to 9. All
annunciators are tested. 16 segment displays also go through “*”.
2) Battery condition is displayed next in the form: “%” (percent) of battery
life with a figure from 1 to 100 on the digits. Also additional warnings
will be displayed should the battery be below 5%. The % battery life will
vary depending on whether the backlight is on or off. Note: The percent
of battery life is accurate with the “D” cell battery option only. It does
not apply to the standard 12V SLA battery.
3) The “CAL” number is displayed next. To ensure that the Cal number is
accurate the scale must be near zero in the same state that it was calibrated in. The original Cal number is printed on the right battery tube
calibration label. Cal number shifts of up to 10 counts are insignificant.
4) Internal tests are performed to further ensure scale integrity.
Final:
Either the reading returns to the last condition, or an error message is displayed.
MSI-4300 Porta-Weigh Plus/5 Key
•
User Guide
Page 13
M E A S U R E M E N T
S Y S T E M S
I N T E R N A T I O N A L
CALIBRATION AND SETUP
POWER
ZERO NET/GROSS TARE
0
TEST
T
IN / OUT
1
2
3
4
5
Switch Functions during Calibration and Setup
1) POWER
Use to escape out of calibration.
2) ZERO
Used to zero the scale during calibration or CLEAR during setups.
3) NET/GROSS
Used to scroll through menu items. Used in FINE CAL as UP.
4) TARE IN/OUT
Used only in FINE CAL as DOWN.
5) TEST
Used as ENTER. When the menu item desired is on the display push
ENTER (TEST) to store the choice in the scale memory.
ENABLING CALIBRATION AND SETUP
1) Remove the Seal Port on the right side of the Porta-Weigh Plus front casting.
2) Push the small button located inside the seal port.
Page 14
MSI-4300 Porta-Weigh Plus/5 Key
•
User Guide
M E A S U R E M E N T
S Y S T E M S
I N T E R N A T I O N A L
CALIBRATE SETUP MENU
Top Menu
Selections
FILTER
UNITS
LOW, MED, HIGH
kg, lb, Ton, Metric Ton
STD CAL
FINE CAL
CAL RCAL
STANDARD
Starts Cal procedure
For minor calibration adjustments
For emergency calibration only
INDUSTRY, NIST, OIML, ALASKA, CANADA, UNITED
KINGDOM, LEGAL-FOR-TRADE, AUSTRALIA
ENABLED, DISABLED
ENABLED, DISABLE
ENABLED, DISABLED
AUTOMATIC, ON, OFF
(eight steps with numerics at “123456” and message reading
“CONTRAST”)
Push ENTER (TEST) to quit setup
HI VALUE
DISABLED, GROSS, NETGROSS
RESPONSE
NORMAL, BLANKLCD, BLINKLCD
EXIT
LO VALUE
INPUT WT
MODE
DISABLED, GROSS, NETGROSS
RESPONSE
NORMAL, BLANKLCD, BLINKLCD
EXIT
MANUAL, AUTO
AUTO OFF
AZM
REMOTE
LIGHTING
CONTRAST
EXIT
HI SET PT
LO SET PT
TOTALIZE
STANDARD CALIBRATION
Standard Calibration is to be used for normal test weight or cal fixture calibration of the Porta-Weigh Plus.
1) Enable Calibration by pushing the key behind the seal port.
2) Use the SELECT (NET/GROSS) key to scroll to the “STD CAL”
message. Push ENTER (TEST).
3) The message reads “Ø SCALE”. Remove all weight from the scale.
When motion ceases push ZERO. Assuming the detected zero weight is
MSI-4300 Porta-Weigh Plus/5 Key
•
User Guide
Page 15
M E A S U R E M E N T
S Y S T E M S
I N T E R N A T I O N A L
within acceptable limits the message reads “WEIGHT” indicating it is
time to add the test weight(s).
4) Pick up a test weight of at least 20% of capacity. (Note: A test weight of
50% or more of capacity is recommended for highest accuracy.)
5) Use the SELECT (NET/GROSS) key to cause the displayed reading to
match the value of the test weight. When a match is made push ENTER
(TEST). Repeat for the remaining digits. When the last digit is entered
the scale should be steady, as this can affect calibration accuracy.
6) Calibration is complete, push CLEAR (ZERO) to return to normal scale
operation, or push SELECT (NET/GROSS) to choose another Calibrate
Setup function.
FINE CALIBRATION
Fine calibration is for minor adjustments to the calibration and is usually not
necessary.
1) Enable Calibration by pushing the key behind the seal port.
2) Use the SELECT (NET/GROSS) key to scroll to the “FINE CAL”
message. Push ENTER (TEST).
3) Pick up a test weight of at least 50% of capacity. The weight is indicated
on the numeric digits.
WARNING: This function will not work unless the scale is loaded at 45% of
capacity or more.
4) Use the SELECT (NET/GROSS) key to cause the displayed reading to
move up slightly. Use the TARE key to cause the reading to move
down. When the displayed reading is acceptable push ENTER (TEST).
5) Fine Calibration is complete. You are now back in the Calibration Setup
Menu. Push CLEAR (ZERO) to return to normal scale operation, or push
SELECT (NET/GROSS) / ENTER (TEST) to choose another Calibrate
Setup function.
CAL WITH RCAL VALUE (CALIBRATE WITH THE RESISTOR CALIBRATION
NUMBER)
Cal Rcal is for emergency calibration when test weights or a calibration system
is not available.
1) Remove the right battery tube (facing the back). On the calibration label
is a printed RCAL value. Make a note of the value and reinsert the
battery tube. Turn the scale power on and push the Calibrate enable
switch behind the seal port.
2) Use the SELECT (NET/GROSS) key to scroll to the “CAL RCAL”
Page 16
MSI-4300 Porta-Weigh Plus/5 Key
•
User Guide
M E A S U R E M E N T
S Y S T E M S
I N T E R N A T I O N A L
message. Push ENTER (TEST).
3) The message reads “Ø SCALE”. Remove all weight from the scale. Push
ZERO. When motion ceases and assuming the detected zero weight is
within acceptable limits the message reads “ZEROED”.
4) Use the SELECT (NET/GROSS) and ENTER (TEST) key to cause the
left most digit of the displayed reading to match the RCAL value noted
earlier. Repeat for the remaining digits. Push ENTER (TEST).
5) CAL RCAL is complete, push CLEAR (ZERO) to return to normal scale
operation, or push SELECT (NET/GROSS) to choose another Calibrate
Setup function.
TO ENABLE/DISABLE AZM (AUTO ZERO MAINTENANCE)
1) Enable Calibration by pushing the key behind the seal port.
2) Use the SELECT (NET/GROSS) key to scroll to the “AZM” message.
Push ENTER (TEST).
3) Use the SELECT (NET/GROSS) key to scroll through the AZM options.
When the desired mode (ENABLED, or DISABLED) is displayed push
ENTER (TEST).
Caution: Disabling Auto Zero Maintenance will degrade temperature and
drift performance of the Porta-Weigh Plus. Disabling it is only intended for
testing at certification.
Seal the Calibration Port. This completes the Calibration Procedure.
TO SET THE LEGAL STANDARD
Caution: Do not change the standard in a Legal for Trade system. Changing the
standard will violate the terms of the LFT certificate.
1) Enable Calibration by pushing the key behind the seal port.
2) Use the SELECT (NET/GROSS) key to scroll to the “STANDARD”
message. Push ENTER (TEST).
3) Use the SELECT (NET/GROSS) key to scroll through the “STANDARD” options. When the desired standard is displayed push ENTER
(TEST).
MSI-4300 Porta-Weigh Plus/5 Key
•
User Guide
Page 17
M E A S U R E M E N T
S Y S T E M S
I N T E R N A T I O N A L
OTHER SETUP FUNCTIONS
FILTER: The filter must be set to “LO” to pass most LFT (Legal for Trade)
jurisdictions. In industrial applications, setting the filter to medium or high can
provide a more stable reading.
AUTO OFF: The AUTO OFF feature when enabled prolongs the battery life
of the scale by turning the power off after 1 hour of scale nonuse. Anytime a
key is depressed (any key), or the detected weight is in motion, the 1 hour limit
is reset. Therefore the scale will stay on indefinitely if the weight is changing or
any key is pressed at least once an hour. This feature defaults to the enabled
mode when initially calibrated. When disabled, the scale will stay on and only
the power key will turn it off.
LIGHTING: The light emitting diode (LED) backlight is normally controlled
by a photocell that detects ambient light and determines if the backlight should
be on or off (AUTOMATIC mode). Should the user desire, the backlight can be
permanently enabled (ON mode) or for increased battery life, permanently
disabled (OFF mode).
REMOTE: Enables or disables the optional IR Remote control. This option
must be installed to function.
SETPOINT: Used to enter low and high setpoint values, mode (disabled,
gross, net/gross) and response (normal, blank display, blink display) of
setpoints. When the weight exceeds a Hi Setpoint value, or falls below a Low
Setpoint value, the scale may respond in a variety of ways. The normal response is to turn on an open Drain MOSFET which can be used to drive relays,
lights, sirens etc. (Contact the factory or your MSI distributor for more details).
Other responses include blanking the display (BLANKLCD) or flashing the
weight reading on and off (BLINKLCD). Follow this procedure for entering
Setpoints:
Page 18
MSI-4300 Porta-Weigh Plus/5 Key
•
User Guide
M E A S U R E M E N T
S Y S T E M S
I N T E R N A T I O N A L
1) Enable Calibration by pushing the key behind the
seal port.
2) Use the SELECT (NET/GROSS) key to scroll to
the “HI SETPT” (or “LO SETPT”) message. Push
ENTER (TEST).
3) The message display reads “HI VALUE.” Push
ENTER.
4) The most significant digit flashes. The display reads
“INPUT WT.” Push the SELECT key until the first
digit of the desired weight value is displayed. Push
ENTER. (The CLEAR (ZERO) key can be used to
change an entry if necessary). Note: To enter 100
kgs on a 10,000 kg scale, the first two digits should
be entered as zeros (00100).
5) The next most significant digit flashes. Use the
SELECT key and the ENTER key to finish out the
entry. Note: With the IR remote, the value can be
entered directly.
6) After the entire Hi Set Point is entered the display
will step to “MODE.” Push ENTER. The first selection is “DISABLED.” This mode allows the
user to program a setpoint without the setpoint
actually operating. To enable the setpoint, push
SELECT until either the “GROSS” mode or the
“NETGROSS” mode is selected. In the “GROSS”
mode the setpoint will operate at the value set
based on Gross Weight regardless of any tare value
being subtracted. If this is the desired setpoint operation mode push ENTER. If the setpoint should
operate relative to a tared weight the “NETGROSS”
mode should be used. Use the SELECT key to
change from “GROSS” to “NETGROSS” and then
push ENTER. In this mode the setpoint will operate at the value which represents either a Gross
weight or a Net weight.
7) The next selection is the Setpoint “RESPONSE”
— what the scale should do when a setpoint value
is reached. Push ENTER. There are now three selections: The “NORMAL” response turns on the
internal MOSFET which is connected to a usersupplied alert device such as a siren or strobe light.
Use the SELECT key to change the response to
INDIVIDUAL DIGIT FLASHES EVERY
TIME SELECT KEY IS PUSHED.
MSI-4300 Porta-Weigh Plus/5 Key
•
User Guide
Page 19
M E A S U R E M E N T
S Y S T E M S
I N T E R N A T I O N A L
“BLANKLCD.” In this mode the liquid crystal
display weight reading blanks out and the message
displays “HI SETPT.” The MOSFET functions as
before. Use the SELECT key again to change to the
“BLINKLCD” response. Weight readings continue,
but the display alternates between a standard weight
reading and a “HI SET PT” indication. In all three
modes, the overload condition will override the
display mode.
8) After the desired setpoint response is selected, press
ENTER.
9) The Setpoint Menu is now back on the screen. The
SELECT key can be used to return to any of the
above operations (VALUE, MODE, RESPONSE)
if modifications need to be made. To quit and return to normal scale operation use SELECT until
the message “EXIT?” appears and push ENTER, or
push CLEAR (no shift required). This returns you
to the Setup Menu. Again, push CLEAR to get out
of the menu and back to standard scale operation.
Use the same procedure for a Low Setpoint.
Disable Setpoint:
It is often useful to be able to set up a Setpoint ahead of time and disable it for
testing purposes.
1) From the Setup function, push the SELECT (NET/
GROSS) key until the message reads “HI SETPT”
(or “LO SETPT”).
2) Push ENTER (TEST). This accepts that the HI
SETPT is to be modified.
3) Push SELECT until the “MODE” message appears.
Push ENTER.
4) Push the SELECT key until the message “DISABLE” appears. Push ENTER. This disables the
Setpoint and returns you to the Setpoint Menu.
5) Push CLEAR (ZERO) two more times to get out of
the Setpoint and Setup menus, or using the SELECT key, scroll to the next desired operation. To
re-enable the Setpoint, follow steps 1-3 above. On
step 4 select the “GROSS” mode or the
“NETGROSS” mode.
Page 20
MSI-4300 Porta-Weigh Plus/5 Key
•
User Guide
M E A S U R E M E N T
S Y S T E M S
I N T E R N A T I O N A L
CONTRAST: Used to optimize the contrast of the liquid crystal display at
various viewing angles. This is factory preset for optimal viewing from below
the scale. By going through the 8 steps, the viewing angle can be changed
slightly to improve contrast for other applications.
TO INITIALIZE THE SCALE
Caution: This procedure must be followed by a complete Setup and Calibration. Be sure to set the Calibration Units to your desired unit of measure and
the legal standard as required before starting initial calibration.
1) Remove the seal port, but do not push the Cal Switch yet. Push the front
panel TEST key followed immediately by the Cal Switch. The Scale
reads “RESET”.
2) Use the SELECT (NET/GROSS) key to scroll to “UNITS”. Push ENTER
(TEST).
3) Use the SELECT (NET/GROSS) key to scroll to the desired unit of
measure. Push ENTER (TEST).
4) Use the SELECT (NET/GROSS) key to scroll to “STANDARD”. Push
ENTER (TEST).
5) Use the SELECT (NET/GROSS) key to scroll to the desired standard.
Push ENTER (TEST).
6) Use the SELECT (NET/GROSS) key to scroll to “STD CAL”. Push
ENTER (TEST).
7) The numeric display shows the default capacity of the scale. If it is the
capacity desired push ENTER (TEST). If not, use the SELECT (NET/
GROSS) key and the ENTER (TEST) key to change the capacity.
Caution: Any capacity entered must be matched with the load cell capability
and in the case of LFT units, must be a certified capacity.
8) Next the count-by is entered. Divide the capacity by the count-by to
determine total counts.
9) Go to the Calibration Procedure section for the rest of the initial calibration.
MSI-4300 Porta-Weigh Plus/5 Key
•
User Guide
Page 21
M E A S U R E M E N T
S Y S T E M S
I N T E R N A T I O N A L
INFRARED REMOTE CONTROL OPTION
Operating the Porta-Weigh Plus with the Infrared Remote Control is identical
to operating the scale from the standard keyboard. However, additional features
are available using the remote and certain cautions are warranted.
The Infrared Remote is highly directional and requires fairly accurate aiming
to achieve the maximum operation range. The shape of the remote is designed
to help in aiming. Aiming becomes less critical as the distance decreases. The
differences between front panel operation and remote operation are described
below:
Remote Power On/Off: To turn the Porta-Weigh on with the remote requires
that the power key is held down until the scale turns on... usually about 1 to 2
seconds. Power-on is the only function that requires more than a short push of
the button. Power-off is instantaneous. Holding down the button on power-off
might cause the unit to turn back on.
ID Number: Up to 9 separate ID codes are available. Each ID code has a total
Page 22
MSI-4300 Porta-Weigh Plus/5 Key
•
User Guide
M E A S U R E M E N T
S Y S T E M S
I N T E R N A T I O N A L
register, and a tare register. Weighing setups can be prearranged by setting the
ID number and establishing a Tare Memory for that ID number. Then the next
time that particular ID number is selected the proper tare value is already
established, and any previously stored total value is enabled.
Action:
The ID number is changed by pushing “ID NUMBER” and then the desired
number (1-9). The default ID number is 1 which is the only available ID
without the remote.
Printing: Pushing the Print key on the remote will cause the current displayed
value to be printed (requires EIA-232 option).
Action:
• To print the Gross, Net or Total values, first use the NET/GROSS key
or the VIEW∑ key to place the desired mode on the display, then push
PRINT.
•
To print the Tare value: While in NET mode push TARE followed by
PRINT.
Caution: Do not accidently push the Tare key while in Gross mode as this will
clear the old tare and establish a new tare.
Numeric Entry: The Tare memory values and Set-Point values can be directly
entered from the remote. Instead of using the select key to scroll through
values, push the desired number directly. The Tare memory number can also be
accessed directly. (i.e. SHIFT - TARE - 3 will directly select Tare memory
#3).
REMOTE CONTROL BATTERY REPLACEMENT
Type: Standard 9 volt (NEDA/ANSI 1604 A, IEC 6LR61). alkaline type is
preferred due to high LED peak currents. There is storage space for a spare
battery internal to the remote.
When to Change: The internal 9 volt battery needs replacing when the
indicator LED is no longer visible when any button is pushed. The operating
range of the remote will gradually decrease. When the range is insufficient for
your normal mode of operation, replace the battery (even if the LED is still
visible).
Installing/Changing:
1) Turn the remote unit over. Remove the three phillips screws with a
MSI-4300 Porta-Weigh Plus/5 Key
•
User Guide
Page 23
M E A S U R E M E N T
S Y S T E M S
I N T E R N A T I O N A L
number 2 phillips head screwdriver.
2) Turn the unit right side up. Pop the front panel out by applying pressure
to the lower left corner of the blue urethane case thus exposing a corner
of the front panel / switch assembly. With a flat screwdriver blade;
carefully pry out the switch from the urethane case by working the
screwdriver up the left edge of the switch assembly. Be careful not to
insert the screwdriver too deep as you may damage the internal electronics.
3) Fold the switch assembly to the left side of the unit, exposing the
battery and the printed circuit board.
4) Pull the battery connector off the battery. Remove the battery by tilting
it up sideways.
5) Install the new battery by tilting it in sideways and wedging it in the
small indented region between the printed circuit board and the case
wall.
6) Reconnect the battery connector. Check for operation by pushing any
key on the front panel and ensuring that the indicator LED is lighted. If
it does not, check that the keyboard connector is still seated properly
and the battery is fresh.
7) Replace the front panel / switch assembly by centering it over the open
area and pressing evenly around the edges until it seals.
8) Replace the three screws. Make sure the screw seal gaskets are in good
condition.
INFRARED REMOTE COMMENTS
•
•
•
Page 24
MSI-4300 Porta-Weigh Plus/5 Key
Due to the sensitivity required to allow for full sunlight operation, it is
possible to overload the input to the infrared remote receiver in the
scale if the remote is too close. This situtation is characterized by
erratic remotely controlled operation. The simple remedy for this is to
not aim directly at the scale, but aim slightly off center when very
close.
The range of the remote is optimized when the scale is 8 feet or more
off the ground. The infrared sensor is aimed slightly down to help
diminish sunlight overload. When the scale is closer to the ground, aim
the remote up into the infrared window from below. If the scale is used
normally very low to the ground it is sometimes possible to bounce the
infrared signal off the ground and up into the sensor.
Using SHIFT key functions requires that the keys are entered in rapid
fashion. If more than five seconds pass between the SHIFT key and
subsequent key presses, the scale will forget that you pushed SHIFT.
This could mean, for example, that the scale will turn off rather than go
into the test function (Shift, Power).
•
User Guide
M E A S U R E M E N T
•
•
S Y S T E M S
I N T E R N A T I O N A L
The ID# function has a five second maximum window for the number
entry otherwise the ID# will remain as before.
As shipped, any Measurement Systems International infrared remote
will operate any Porta-Weigh Plus. It is possible, by special order, to
encode the infrared transmissions so that a separate remote is required
for each different Porta-Weigh Plus. Up to eight channels are possible.
Contact the factory for more details.
MSI-4300 Porta-Weigh Plus/5 Key
•
User Guide
Page 25
M E A S U R E M E N T
S Y S T E M S
I N T E R N A T I O N A L
PROPER LOADING PROCEDURES
DO NOT
POWER
ZERO NET/GROSS TARE
0
TOTAL
T
∑
TARE MEMORY
CLEAR
VIEW ∑
SHIFT
DO NOT
POWER
SETUP
PEAK HOLD
SELECT
TOTAL
T
∑
TARE MEMORY
CLEAR
VIEW ∑
SELECT
SHIFT
ENTER
DO NOT
DO
ZERO NET/GROSS TARE
0
SETUP
PEAK HOLD
TOTAL
T
∑
TARE MEMORY
CLEAR
VIEW ∑
SHIFT
PUB.PLP-01-95
User Guide
POWER
ZERO NET/GROSS TARE
0
SELECT
ENTER
1. DO NOT PUSH OR PULL ON LOADED
SCALE. 2. DO NOT PULL LATERALLY ON
HOOK WITH SCALE LOADED.
•
PEAK HOLD
DO NOT USE MULTIPLE ATTACHMENTS.
TEST
MSI-4300 Porta-Weigh Plus/5 Key
SETUP
ENTER
DO NOT INTERFACE HARDWARE
(SHACKLES, HOOKS ETC.) THAT ARE
OVERSIZED AND RESTRICT SINGLE POINT
LOADING AND SELF-ALIGNMENT WHICH
CAN RESULT IN OFF-AXIS LOADING.
POWER
Page 26
ZERO NET/GROSS TARE
0
TEST
TEST
TEST
SETUP
PEAK HOLD
TOTAL
T
∑
TARE MEMORY
CLEAR
VIEW ∑
SELECT
SHIFT
ENTER
USE HARDWARE THAT CREATES SINGLE
POINT ATTACHMENTS AND ALLOWS THE
SCALE FREEDOM OF ALIGNMENT.
M E A S U R E M E N T
S Y S T E M S
I N T E R N A T I O N A L
THE MSI LIMITED WARRANTY
MEASUREMENT SYSTEMS INTERNATIONAL, INC., WARRANTS load
sensing elements and meters against defects in workmanship and materials for
a period of one year from date of purchase and warrants electrical cables and
batteries against the same defects for a period of ninety (90) days from date of
purchase.
Any device which proves defective during the warranty period will be replaced
or repaired at no charge; provided that the defective device is returned to the
Company freight prepaid.
In no event shall the Company be liable for the cost of any repairs or alterations
made by others except those repairs or alterations made with its specific
written consent, nor shall the Company be liable for any damages or delays
whether caused by defective workmanship, materials or otherwise.
The Company shall not be liable for any personal injury or property damage
resulting from the handling, possession or use of the equipment by the customer.
The warranty set forth herein is exclusive and is expressly in lieu of all other
warranties, express or implied, including without limitation any implied
warranties of merchantability or fitness, or of any other obligations or liability
on the part of the Company.
The liability of the Company under this warranty is limited solely to repairing
or replacing its products during the warranty periods; and the final judgement
and disposition of all claims will be made by MEASUREMENT SYSTEMS
INTERNATIONAL, INC.
MSI-4300 Porta-Weigh Plus/5 Key
•
User Guide
Page 27
M E A S U R E M E N T
S Y S T E M S
NOTES
Page 28
MSI-4300 Porta-Weigh Plus/5 Key
•
User Guide
I N T E R N A T I O N A L
M E A S U R E M E N T
S Y S T E M S
I N T E R N A T I O N A L
NOTES
MSI-4300 Porta-Weigh Plus/5 Key
•
User Guide
Page 29
MADE IN THE
USA
©2004 by Measurement Systems International
Printed in U.S.A.
PUB.246-03-95D
Measurement Systems International
14240 INTERURBAN AVENUE SOUTH STE. 200
SEATTLE, WASHINGTON 98168-4661 U.S.A.
PH: 206-433-0199 • FAX: 206-244-8470
WEB: www.msiscales.com • Email: [email protected]