1
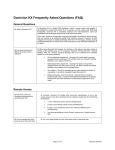
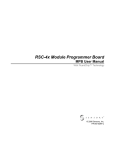
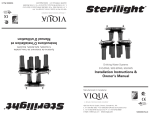
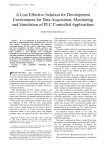
Chapter 2: Mounting
Mounting
Before you begin, note that the mounting panel cannot be more than 5 mm thick.
To maximize system performance, avoid electromagnetic interference by mounting the
controller on a metal panel and earthing the power supply according to the details in
Figure 7, page 16
1.
Make a panel cut-out that is appropriate for your model controller.
V230 cut-out dimensions are shown in Figure 3, page 12.
V260/V280 cut-out dimensions are shown in Figure 4, page 13.
2.
If you are mounting the controller on a metal panel, earth the power supply:
a. Bore a hole, as shown below, that suits the NC6-32 screw supplied with the
controller kit.
b. Scrape the panel paint away from the contact area to ensure a conductive connection.
c.
Drive the screw into the hole.
d. On the screw’s shank, place the following hardware in this order: washer, ring cable
shoe, second washer, spring, and nut; as shown in Figure 5, page 13.
3.
Slide the controller into the cut-out, ensuring that the rubber seal is in place.
4.
Push the 4 mounting brackets into their slots on the sides of the controller as shown in
Figure 2, page 9.
5.
Tighten the bracket screws against the panel.
11