1
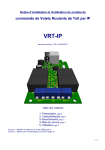
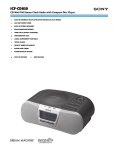
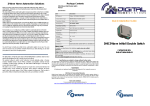
ZCS1 EN SWIIDINTER™ Z-WAVE® CORD SWITCH Installation and User's Guide FOREWORD In Europe, most of the lamps on our home tables or nightstands are equipped with a switch located on their power cord: the "good old" cord switch. In spite of this, whenever you want to control such a lamp remotely, manufacturers of home automation devices will suggest remotely controlled plugs or wall switches or inserts to fit behind them. So when you have decided to install a wireless automation system in your home (Z -Wave® or other) , and when you finally got everything to work to your satisfaction, someone comes in and turn off one of these remotely controlled lamps by pressing on the "good old switch" on the cord and "ZAP" your lamp is NO LONGER REMOTELY CONTROLLED SPECIFICATIONS INSTALLATION OF THE SWITCH Device Type : BINARY POWER SWITCH Power input : 230V ± 10% - 50Hz Max. power : 660W EU Norms : EN 61058-2-1:2011 & EN 55015 Protection index : IP20 Size : 84 x 32 x 29 mm Radio protocol : Z-Wave® (SDK 4.55) Radio frequency : 868,42 MHz (EU) Transmission dist.: Max. 30m indoors depending on construction materials Working temp : 0 – 40°C On/Off signal : Blue LEDs Power consumption : < 0,08W EU patent : Pending Your SwiidInter™ has been certified by a certification firm approved by the Z-Wave® Alliance and, as such, is fully interoperable with all the certified Z-Wave® devices produced by other manufacturers using the same authorised radio frequency (EU in our case) KEY FEATURES Top outside in the Z -Wave® ecosystem which is small enough to be compared to a regular cord switch. It can be used both manually like any ordinary cord switch and remotely by Z -Wave®. SwiidInter™ can also handle associations with other devices, both ways to and from it. Thus, your SwiidInter™ can respond directly to a signal from another Z-Wave® device in your network, such as the triggering of a presence detector. Conversely with a short press or a long press it can control two separate Z-Wave® device groups that have been associated with it : for example, all the other lights in your bedroom where your SwiidInter™ is on the cord of your bedside lamp. Tools required: - Wire cutter - Wire stripper - Electrician's flat and Phillips screwdrivers After making sure that the power cord on which you want to install your SwiidInter™ is disconnected from the power mains, carefully follow the steps described below: 1. Using the Phillips screwdriver, remove the upper shell cover of your SwiidInter™ 2. Using the wire cutter, cut the cord where you want to install your SwiidInter™ 3. With the wire cutter, Bottom outside 1. Z-Wave® pairing guide (blinking red LED during inclusion/exclusion and association) 2. Assembly screw Remember to disconnect from the power mains before opening the switch Top inside view Physically installing a SwiidInter™ is done in the same exact way as any ordinary cord switch: it is a quick and simple operation that requires no special tools. Once done, it will operate as an ordinary cord switch with a simple on/off push button. Only then can you configure your SwiidInter™ to include it into a Z-Wave® network and interoperate with other controllers and devices (even if you have only one other Z-Wave® device). 1. Front AC wire terminal towards the device (lamp) 2. On/Off switch 3. Blue LED "On" indicator 4. Back AC wire terminal towards the mains (socket) WARNING 1. Z-Wave inclusion/exclusion and association button (linked to the pairing guide) 2. Red LED: inclusion/ exclusion association and reset indicator 3. Fuse (fixed) RISK OF ELECTROCUTION : Make sure the cord switch is NOT connected to the mains (i.e. is unplugged) before opening the switch Before starting, you must determine the exact location of the switch on the cord to be able to operate the switch comfortably... 1. On/Off button (blue LEDs are lit when "On") ... SwiidInter™ is the first - and at this time still the only - cord switch The installation of your SwiidInter™ on the power cord is done in the same way as that of most cord switches, so first and foremost remember to disconnect from the power mains the device on which you install the SwiidInter™. Bottom inside view separate the two inner wires and remove 6 mm of the outer insulation sheath on both ends 6. Using the Phillips screwdriver, tighten the security clamps over the power cord, making sure they pinch the cord's outer insulation sheath firmly, so that it is held securely 7. Replace the upper shell cover of the switch and tighten with the Phillips screwdriver the assembly screw which joins the two shell covers of the switch WARNING: Make sure you do not cut or shorten the wire antenna attached to the bottom of PCB, as its length is optimized for the radio frequency used by your SwiidInter™. 8. Connect the plug of the power cord to the mains, and then check that the SwiidInter™ works normally by pressing on the On/Off button. When on the "On" position, the blue LED should illuminate the button and the lamp should switch on WARNING: The presence near your SwiidInter™ of grounded metallic objects or of high power conductors can affect the Z-Wave® radio signals and thus the remote controlling of your SwiidInter™. If your SwiidInter™ is intended to replace a pre-existing cord switch, you must first disassemble and remove the latter from the power cord (as always, only when the power has been disconnected from the mains). Then you will need to adapt the ends of the cord which will be fitted into your SwiidInter™ so as to conform to what was described in Steps 3 and 4 above. Apart from that, follow all the exact same steps as described above. 4. With the wire stripper, strip 3-4 mm of the insulation of the two inner wires on both ends 5. Using the flat screwdriver, connect the wires by screwing them into two terminals inside the SwiidInter™ respecting the directions of the wires : front towards the device (lamp - near the "L" "N" marking) and back towards the mains (socket - near the light bulb symbol marking) WARNING: If you reverse the mounting direction of the wires, your SwiidInter™ will not work at all. This will not damage your SwiidInter™, but you will need to reinstall the wires all over again always taking care to disconnect the electrical power cord. INCLUSION OF THE SWITCH INTO A Z-WAVE® NETWORK In order to control your SwiidInter™ remotely, it needs to be recognized by a Z-Wave® network. Many people are put off by the very use of the word "network", but it may in fact designate a single remote control or wireless switch coupled with a plug or a lamp. The important thing to remember is that your SwiidInter™ needs to be recognized by any device which is intended to control it (you can't call your dog, if you don't know its name). To do this, an inclusion operation needs to be performed: this is also often called an integration or a pairing operation. The inclusion of a SwiidInter™ is performed with the switch fully assembled (shell covers joined and screwed together) and with the power cord plugged into the mains. When including a SwiidInter™, make sure that it is in its final position. If this location is not in the direct range of the including controller then the Cord Switch has to be moved closer to the controller for the Inclusion ; in which case a network rediscovery process is subsequently needed in order to refresh the routing table. Tools required: - Fingernail (if thin enough) or any pointed tip 1. First put your primary ZWave® controller in inclusion mode (generally done by pressing once or several times on an inclusion button on the controller : here an Aeotech Z-Stick2) SWITCH ASSOCIATIONS In a Z-Wave® network, association procedures enable your SwiidInter™ to control directly other Z-Wave® devices (real or virtual) or vice versa to be controlled by other Z-Wave® devices without passing through a controller. A typical example would be the association of a Z-Wave® presence detector your with SwiidInter™, so that your SwiidInter™ turns "On" the lamp whenever a presence is detected. Your SwiidInter™ is capable of handling two association groups: 2. Using your fingernail or a pointed tip, press once on the Z-Wave® pairing guide on the bottom of your SwiidInter™ after which a red LED will light up through the pairing guide, indicating that your SwiidInter™ is now in the "inclusion/ exclusion" mode 3. The inclusion/exclusion process should then start automatically and the red LED will blink before staying lit permanently for 2 seconds. This indicates that the Z-Wave® inclusion/exclusion process was successful Depending on the type of controller you are using, you may be immediately able to operate your SwiidInter™ via your Z-Wave® network. For some controllers, however, you need to perform an additional pairing step in order to assign your SwiidInter™ to a specific command button on the controller (e.g. on a multi-button remote control) Once you are able to operate your SwiidInter™ remotely from your Z-Wave® network, you are able to check that the blue LEDs light up to illuminate the perimeter of the On/Off button when it is turned on remotely. Also check that your SwiidInter™ continues to respond to a manual press locally on the On/Off button. WARNING : As with any Z-Wave® "binary switch" device, the SwiidInter™ is not able - for patent reasons - to report back its status changes automatically to a Z-Wave® controller. The best way to monitor the change in status of your SwiidInter™ in real-time is to associate via the second association group (see Chapter on "Switch Association") with your primary controller. This works both when the change in status of your SwiidInter™ is the result of a manual action and when it is linked to a command communicated through the Z-Wave® network. FOR CERTAIN Z-WAVE® CONTROLLERS, THIS ASSOCIATION IS PRE-PROGRAMED TO BE IMPLEMENTED ON ITS OWN WHEN YOUR SWIID® CORD SWITCH IS FIRST INCLUDED INTO THE NETWORK. The first association group will respond to a long press (over 0.5 seconds) on the On/Off button of your SwiidInter™ The second association group works on every press (actually on release) on the On/Off button of your SwiidInter™ (this is the one which can be used to notify status changes) In each of the two association groups, your SwiidInter™ can be combined with up to 5 normal Z-Wave® devices. The process for associating your SwiidInter™ with other Z-Wave® devices can be made either via a Z-Wave® controller or, in the case where the cord switch will be the "controlling" device, by direct association with the other Z-Wave® device. In all cases, Z-Wave® devices can only be associated if they are part of the same Z-Wave® network, i.e. that they have been included using the same (primary) controller. Association via a Z-Wave® controller To associate your SwiidInter™ with another Z-Wave® device of the same Z-Wave® network via the network's controller, please revert to and follow the association instructions set out by the controller's manufacturer. Normally, this should not require your having to do anything on your SwiidInter ™ cord switch. Direct association To simplify association procedures, your SwiidInter™ can create associations with other Z-Wave® devices directly without having to go through a controller. Such "direct" associations are, however, subject to three constraints: All the devices must already be part of the same Z-Wave® network (i.e. have been included in the Z-Wave® network directly or indirectly by the same primary controller) These associations can only be made with the first association group of your SwiidInter™ These associations are unidirectional : from your SwiidInter™ to another Z-Wave® device which it will control and not the other way around To create such "direct" associations, proceed as follows: 1. Press with your fingernail or a pointed tip on the Z-Wave® pairing guide on the bottom of your SwiidInter™ (plugged into the mains) and keep pressed for 1-2 seconds until the red LED lights up permanently through the pairing guide indicating that your SWiiD® cord switch is now in "association" mode. 2. Place the Z-Wave® device to be associated in the immediate vicinity and put it in the "inclusion/exclusion" mode in the way prescribed by the device's manufacturer 3. If the association is successful, the red LED on the bottom of EXCLUSION OF THE SWITCH To exclude your SwiidInter™ from a Z-Wave® network, proceed in the same way as for the integration/inclusion described in the previous Chapter, except that in Step 1, you must press the exclusion button on the Z-Wave® controller that you will have brought into the vicinity of your SwiidInter™ (or vice versa). The red LED on the bottom of your SwiidInter™ will behave in the exact same way as during the inclusion process. your SwiidInter™ will blink twice and then turn off, indicating that your SwiidInter™ has gone back to its "normal" operating mode. If the association is not successful, the red LED will go out after 20 seconds without flashing (back to "normal") You can only associate in this way one Z-Wave® device at a time and you will need to repeat the process to add another Z-Wave® device (always only on the SwiidInter™'s first association group). WARNING: Sending relevant association information between devices may take some time, in certain cases even a full minute. WARNING: When your SwiidInter™ is sending a command to one or more associated devices and receives at the same time an instruction to issue a new command, the original broadcast is interrupted and the new command is immediately issued. RESETTING THE SWITCH To reset your SwiidInter™ to its factory settings (erasing the Home ID of the network's primary controller), press with your fingernail or a pointed tip on the Z-Wave® pairing guide on the bottom of your SwiidInter™ (plugged into the power mains) and keep pressed for a long time. The red LED will first turn on for a few seconds (association mode) and ultimately turn off. Once the red LED turns off, release the pairing guide, the red LED will then blink twice rapidly and then once longer, indicating that your SwiidInter™ has been fully reset. is estimated that, as of end 2012, more than 12 million devices using the Z-Wave® technology had been sold worldwide. Z-Wave® devices can be used either independently in a decentralized way (e.g. a wireless switch or associated with a single remote controlled plug) or in centralized manner using a central controller or integrated IP gateway. Integrated IP gateways allow access by/to your Z-Wave® network to/from the outside world: both the internet (and off course your smartphone via the internet...) and your local area network. The main integrated Z-Wave® IP gateways available in Europe today (July 2014) are: Vera's range of IP gateways : Vera2, Vera3 and Vera Lite HomeSeer's Hometroller Zee with an Aeotech Z-Stick2 Connected Object's eedomus Fibaro's Home Center 2 and Home Center Lite Zipato's Zipabox ZODIANET's Zibase ADVANCED CONFIGURATION OPTIONS Your SwiidInter™ offers a limited range of advanced configuration options, essentially turning on and off the Switch All functionality. Changing these configuration options requires the use of one or other of the more sophisticated Z-Wave® controllers (usually Z-Wave® IP gateways). For a description of these configuration options, please refer to our website www.swiid.com/en/support/documentation-swiidinter.html WHAT IS Z-WAVE®? Z-Wave® is a bidirectional communication protocol designed specifically for controlling, operating, measuring and monitoring home automation equipment via radio frequency: lighting, heating/AC, security, home entertainment, etc. The Z-Wave® protocol utilizes an optimized radio technology for narrow bandwidth radio communications (9-100 kbps). In Europe, Z-Wave® devices operate in the 868.4 MHz band, which ensures the absence of any interference with the WiFi connections or with other wireless receivers operating in 2.4 GHz such as Bluetooth or ZigBee®. Please note: For legal reasons, the Z-Wave® devices function in different frequencies - all below 1GHz - in other parts of the world, e.g. 909 MHz in the US. Therefore, the Z-Wave® devices from these other geographic zones can generally not be used in Europe. The range of the Z-Wave® signal is approximately 50m (higher outdoors and lower indoors). However, the Z-Wave® technology automatically and dynamically creates a "mesh network" between the various Z -Wave® devices that compose it and each of these devices becomes itself a repeater. This increases the reach and reliability of radio signals being transmitted in the ZWave® network and enables connections between devices that are not within direct range of each other. Each Z-Wave® network has its own identifier (Home ID), which enables multiple Z-Wave® networks in a single location to operate completely independently and without interfering with each other. The main advantage of the Z-Wave® radio protocols over mesh network competitors such as ZigBee® is the complete interoperability between the various Z-Wave® devices from different manufacturers. This interoperability is guaranteed by a "Zertification" process which is performed by companies approved by Sigma Designs, which itself is the creator and owner of the Z-Wave®, and by the Z-Wave Alliance, which was created in 2005 to bring together all the stakeholders in the Z-Wave® ecosystem. The Z-Wave Alliance has to date (September 2014) more than 250 members and nearly 1200 products have been "Zertified". It Z-Wave>Me's Z-Box Your SWiiD™ cord switch has been successfully tested with each of these integrated IP gateways, as well as with most remote controls available in Europe. WARRANTY CBCC Domotique SAS (as defined in the next section and hereinafter referred to as the "Supplier") warrants to the original purchaser for a period of twelve (12) months from the date of purchase or delivery (whichever is later) that the present device is free from material defects in materials and workmanship and undertakes, subject to continuing availability of the device, to supply at its cost a new device to replace any malfunctioning or otherwise defective device. In no event, shall the Supplier refund any monies paid for the device. Warranty claims must be filed by using the form provided on the Supplier's website (www.swiid.com/en/contact.html) and completing it in full and sending us (against refund) the defective device and a copy of the proof of purchase (with the date of purchase or delivery date!). Warranty claims made more than thirty (30) days after the occurrence of the event giving rise to the warranty claim and claims made without following the procedure set out above shall not be admissible. The present warranty shall NOT cover, whether for damages to the device itself and for consequential damages, faults not resulting from a material or manufacturing defect on the device, including but not limited to: Accidents, actions of civil or military authority, civil disturbances, war, strikes, fires, floods or other catastrophic events ; Installation or operation of the device other than in conformity with the present Installation and User's Guide ; Devices which have been repaired or modified by any person not duly authorised to do so by the Supplier ; Damages caused by (i) software utilized directly or indirectly by the device's owner or user, (ii) computer viruses or other malware attacks or (iii) failure to implement any firmware updates supplied without charge by the Supplier ; and Damages caused by power surges, by improper connection to the power grid or by using unauthorised accessories The present warranty shall be governed by the laws of France. Swiid® / CBCC DOMOTIQUE Swiid® is a registered trademark of CBCC Domotique SAS, a French limited liability company, incorporated in Paris under the Commerce Registry number 791 884 125 and having its registered address at 27 avenue de l'Opéra, 75001 Paris, France v01.11