1
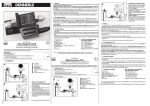
The dosing pump unit has 4 buttons to operate the pumps manually. This feature is useful to remove air for example. Several LEDs indicate the operation state: Green – device is ready; yellow – device recognizes communication with ProfiLux (only when connected to a digital powerbar output, otherwise it is off); red – activity of the pumps. Placement The pumps are self-priming and always should be located above the container with the liquid which has to be dosed. This avoids an emptying of the container in the case of a leakage. The tube on the intake side should be short. To avoid a backflow the tube must not hang in the aquarium water. The pump heads can be turned 180°. Press both lockings at the same time and pull the pump off. Turn pump around and put it again carefully onto the motor shaft - don’t use force! Check that lockings have snapped in. Important hint: The dosing pump unit must be protected against splash water and high humidity! (Salt-) Water or high humidity (e.g. occurring nearby the sump) will destroy the device – this voids all warranty claims! Upgrade/Replacement In the case your dosing pump unit has less than 4 pumps additional pumps can be built in, they are available separately. A subsequent mounting (or replacement of a defective pump) should be done like this: Disconnect device from mains Open hosing (similar to the opening of the ProfiLux, please refer to the ProfiLux manual) Push carefully the dummy cover out of the front panel and remove glue residues (respective pull the old pump off – push both lockings – and remove the motor) Insert new motor and mount it with provided screws – Caution: Don’t overwind the screws! Connect the motor cable to the appropriate plug inside the device (is labeled with Pump1 to Pump4) Close housing Press pump head carefully onto the motor shaft, the shaft should slide smoothly into the coils – don’t use force! Make sure lockings snapped in safely. Maintenance The pumps don’t need much maintenance. It is recommended to clean the inside of the pumps sometimes from dust or other contamination. The pump must never be lubricated in any way! Warranty GHL GmbH & Co. KG grants a warranty of 24 month beginning with the date of purchase for all processing or material defects. The warranty doesn’t cover wear parts like pump and motor. The original bill is your warranty certificate. Disclaimer of liability The manufacturer excludes liability for any (consequential) damages causes by the use of this device. Bedienungsanleitung für Dosierpumpeneinheit ! Bitte lesen Sie folgende Hinweise sorgfältig durch. Nichtbeachtung kann den Verlust eines etwaigen Garantieanspruches bewirken. Liebe Kundin, lieber Kunde, Sie haben ein hochwertiges Produkt erworben, welches während der Produktion mehrfach auf einwandfreie Funktion überprüft wurde. Sollte die Dosierpumpeneinheit trotz unserer Qualitäts-Endkontrolle nicht einwandfrei funktionieren, bitten wir Sie um folgendes: Im Falle einer Reklamation wenden Sie sich bitte umgehend an Ihren Fachhändler Versuchen Sie nicht selbst, den Schaden zu beheben Verwenden Sie möglichst die Originalverpackung, um Transportschäden zu vermeiden. Bitte lesen Sie diese Bedienungsanleitung sorgfältig durch, um Schäden zu vermeiden und Ihre Dosierpumpeneinheit optimal einsetzen zu können. Lieferumfang Folgende Teile müssen vorhanden sein Dosierpumpeneinheit mit 1, 2, 3 oder 4 Dosierpumpen Netzteil Steuerkabel Anschluss Stecken Sie die Buchse des Steckernetzteils (Polarität: Innen +, außen -) in den Spannungsanschluss der Dosierpumpeneinheit, das Netzkabel des Netzteils in eine Netz-Steckdose. Das Steuerkabel stecken Sie auf der einen Seite in eine der beiden Westernbuchsen der Dosierpumpeneinheit, die andere Seite wird in einen Schaltsteckdosenausgang des ProfiLux Computers (z.B. S1-S4 oder S5-S8) oder in den Steuerausgang einer autarken Dosierpumpeneinheit (mit integriertem Controller – Dosing Unit SA) gesteckt. Beim Anschluss an einem ProfiLux Computer ist es möglich die Dosierpumpeneinheit in einer Busverdrahtung (mit weiteren Dosierpumpeneinheiten oder digitalen Schaltsteckdosenleisten) zu betreiben.