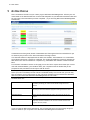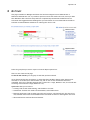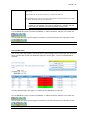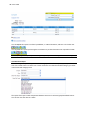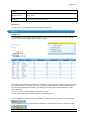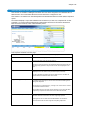
1
Wellnomics ® Risk Management 2.6
User Guide
© 2012 Wellnomics Ltd
Ref:
1088/01/042009
Note: Many of the materials referred to in this document are copyright of Wellnomics Limited. Contents
of this document and any other documents provided by Wellnomics Limited should not be divulged to,
or provided to, any other third party outside The Client or its contracted consultants.
Copyright statement
Copyright © 2000-2012 Wellnomics Ltd. All rights reserved.
No part of this Wellnomics Ltd manual may be reproduced, stored in a retrieval system or
transmitted in any form or by any means, electronic, mechanical, photocopying or otherwise
without prior permission from Wellnomics Ltd.
Trademark
Wellnomics® and Wellnomics Breaks & Exercises (WorkPace®) are registered trademarks of
Wellnomics Ltd.
Third Party Trademark Attribution
Windows®, Windows NT® Microsoft Word® and Microsoft Excel® are either registered trademarks or
trademarks of Microsoft® Corporation in the United States and/or other countries.
All other products mentioned herein are for identification purposes only and may be registered
trademarks or trademarks of their respective companies. All other brand names or trademarks are
the property of their respective owners.
Disclaimer
WELLNOMICS LTD PROVIDES THE SOFTWARE "AS IS" WITHOUT WARRANTIES OF ANY KIND INCLUDING
WARRANTIES OF MERCHANTABILITY, FITNESS FOR A PARTICULAR PURPOSE, OR NON-INFRINGEMENT
OF INTELLECTUAL PROPERTY.
Neither Wellnomics Ltd nor any of its directors, agents, consultants, contractors, employees,
distributors or dealers shall in any event be liable for any indirect, incidental or consequential
damages arising from the use of this SOFTWARE or from the use of any instructions, advice or
recommendations given by the SOFTWARE or made verbally or in writing by Wellnomics Ltd, or any
of its directors, agents, consultants, contractors, employees, distributors or dealers. Wellnomics
Ltd may make improvements and/or changes to the SOFTWARE and/or to any instructions, advice
and/or recommendations associated with the SOFTWARE at any time without notice.
Your risk of injury may be affected by workstation design, keyboard design, posture, chair design,
time worked without rest breaks, type of work, activities outside the workplace, and individual
physiology. The SOFTWARE should in no way be considered a substitute for treatment by a qualified
physician. If you have a pre-existing medical condition, please consult your physician prior to using
this product. If discomfort develops or continues, discontinue use and consult a qualified physician.
Wellnomics Ltd reserves the right to make periodic changes, enhancements, revisions and
alterations of any kind to the SOFTWARE price and/or the Online help and Manual without any prior
notice to any person, institution, or organization.
Wellnomics Breaks & Exercises (WorkPace®) and Wellnomics Risk Management have a significant
reliance upon Microsoft software, utilities and operating systems. Between significant version
releases of such products Microsoft issue a large number of Service Packs and Software Updates,
often at short notice. Experience has indicated that Service Packs and Software Updates can have
unexpected impacts on operational systems not necessarily covered by the supporting
documentation.
As a software vendor Wellnomics Ltd endeavors to check the impact of such Service Packs and
Software Updates, however we are unable to replicate all of our client’s technical environments
and configurations. This can lead to situations where our own tests reveal no problems but some
customer’s installations exhibit detrimental effects from installing the Service Pack or Software
Update.
For the above reasons you are strongly advised to investigate, in a test environment, the impact of
a Service Pack or Software Update on the operation of the Wellnomics applications, as well as any
other applications likely to be affected, prior to applying to an operational / live system.
Contents
Contents ___________________________________________________________________________ 3
1
About this Guide __________________________________________________________________ 5
2
Wellnomics Risk Management Overview _________________________________________________ 6
3
Getting Started ___________________________________________________________________ 7
4
Using System Help _________________________________________________________________ 7
5
My Risk Profile ____________________________________________________________________ 8
6
No Data or Data Out of Date __________________________________________________________ 9
RSI Risk Report ........................................................................................................................... 11
Training and Assessment Tasks ....................................................................................................... 11
7
More Information _________________________________________________________________ 12
Computer Use .............................................................................................................................
Compliance ................................................................................................................................
WorkPace Settings .......................................................................................................................
Actions Log ................................................................................................................................
Risk Category History ...................................................................................................................
Assessment Completion Individual History .........................................................................................
Assessment Reference Point (ARP) Individual History ...........................................................................
8
12
13
15
16
16
19
19
My Staff ________________________________________________________________________ 21
WorkPace Data Detail ................................................................................................................... 22
View Current Assessment Completion Detail ...................................................................................... 23
Quick Links ................................................................................................................................ 25
9
Train __________________________________________________________________________ 26
Schedule Training ........................................................................................................................
View Scheduled Training ...............................................................................................................
View Status ................................................................................................................................
Training and Assessment Completion ...............................................................................................
26
27
28
29
10 Assess _________________________________________________________________________ 32
Schedule Assessment.................................................................................................................... 32
Scheduling Assessments for Individuals ............................................................................................. 36
View Current Assessment Completion Detail ...................................................................................... 37
11 Identify ________________________________________________________________________ 40
High Risk Users ...........................................................................................................................
Top Recommendations..................................................................................................................
Top Risk Factors..........................................................................................................................
Compare ...................................................................................................................................
40
41
42
44
12 Introduction _____________________________________________________________________ 44
13 Analyze ________________________________________________________________________ 51
Overall Risk................................................................................................................................
Risk Categories ...........................................................................................................................
Risk Factors ...............................................................................................................................
Statistics ...................................................................................................................................
Application Usage ........................................................................................................................
Assessment Reference Point (ARP) Compliance ..................................................................................
51
53
56
61
62
65
14 Act67
Send Risk Messages ...................................................................................................................... 67
Change User Settings Profiles ......................................................................................................... 69
15 Tools __________________________________________________________________________ 72
Find User...................................................................................................................................
Delegated Reporting.....................................................................................................................
Manage Groups ...........................................................................................................................
Suspend Users ............................................................................................................................
72
73
75
81
4 ▪ User Guide
Change Password......................................................................................................................... 82
Preferences ............................................................................................................................... 82
Report on Behalf ......................................................................................................................... 83
16 Admin _________________________________________________________________________ 84
Local Administration .................................................................................................................... 84
Policy Configuration ..................................................................................................................... 90
17 Logging into Wellnomics Risk Management _____________________________________________ 101
Keep me logged in ...................................................................................................................... 101
Reset my password ..................................................................................................................... 101
Welcome Page ........................................................................................................................... 102
18 FAQ __________________________________________________________________________ 103
How have the risk calculation algorithms been designed? .................................................................... 103
How does the Wellnomics system calculate the Risk Levels? ................................................................. 103
How has the risk reduction advice been determined? ......................................................................... 103
How do Risk Levels relate to the actual chance of developing computer related Discomfort? ....................... 103
Why are the Risk Levels for some users shown as unknown? ................................................................. 103
Can I see the Risk Levels for a particular day? ................................................................................... 103
What security measures are in place on the Wellnomics server?............................................................ 104
19 Glossary of Terms _______________________________________________________________ 105
20 Wellnomics Ergonomics Reference Guide ______________________________________________ 108
Computer Use ............................................................................................................................ 109
Compliance ............................................................................................................................... 118
Speed and Intensity .................................................................................................................... 123
Posture & Workstation Risk Factors ................................................................................................ 126
Discomfort ................................................................................................................................ 128
Psychosocial .............................................................................................................................. 131
Individual ................................................................................................................................. 137
21 Index _________________________________________________________________________ 141
About this Guide ▪ 5
1 ABOUT THIS GUIDE
This guide is for users of the Wellnomics Risk Management Website. This Guide is presented in the
order of the menus used in Wellnomics Risk Management. Note that depending upon the modules
enabled for use, the configuration of the system and the role and privacy settings of the reader, not all
menu items may be visible or accessible to the reader.
Note: We recommend that you read this guide to maximize your knowledge and understanding of
Wellnomics Risk Management before using the software.
6 ▪ User Guide
2 WELLNOMICS RISK MANAGEMENT OVERVIEW
Wellnomics Risk Management is a health and safety management solution for analyzing, managing, and
tracking risks associated with prolonged computer use. It is designed to give organizations the ability
to:
• Assess the risk levels associated with computer use for each user and view this data at a corporate,
group or individual level.
• Identify the risk factors at individual, group and corporate level.
• Provide specific advice for each individual user on how to address and reduce their risk levels.
• Provide training and awareness to individual users on maintaining their risks within acceptable
levels over the long term.
• Provide ongoing reporting on risk levels within the organization and track trends against targets.
At a high level Wellnomics Risk Management aims to implement the following closed loop Health and
Safety process:
Wellnomics Risk Management implements the above process through the following functions:
• Gathering data through measurement of computer use by Wellnomics WorkPace. Wellnomics
WorkPace runs on each user’s computer and measures the amount of time they spend on the
computer each day. This information is fed to the Wellnomics server and used for calculating Risk
Levels.
• Gathering data through questionnaire-based assessments (if enabled). Users can be asked to
complete an online questionnaire regarding specific work environments, equipment and conditions
that have an impact on their risk levels. (This is an optional module).
• From the data that is collected Wellnomics Risk Management determines whether or not specific
Risk Factors are present for each user. These Risk Factors are classified into different Risk
Categories and a Risk Level is computed for each Risk Category. The Risk Category levels are then
used to determine a user’s Overall Risk.
• A manager, or Health and Safety Officer can report on the Risk Levels for groups or individual users
and determine the most common Risk Factors present.
• Individual users can be emailed an individual report of their own Risk Factors including suggestions
on how to address them. The user can log into Wellnomics Risk Management and see their own Risk
Report and read further advice on addressing their risk levels.
• Users who have not addressed their Risk Levels within an acceptable period of time can be
reminded with another email.
• The reporting process is repeated on a periodic basis to ensure Risk Levels are reduced over time
and maintained at acceptable levels.
Getting Started ▪ 7
3 GETTING STARTED
You will be sent a link to your Risk Profile page. By default, this link will automatically log you in to
the system.
Note: If auto login has been disabled, see Logging into Wellnomics Risk Management on page 101
Depending on the registration key that has been issued to your company, some features of Wellnomics
Risk Management that are discussed in this guide may not be available to you.
4 USING SYSTEM HELP
Wellnomics Risk Management contains a comprehensive help file system that can be accessed in two
ways:• Context Sensitive Help
Accessing Help using the ? button on the toolbar of each page will access help that relates
specifically to the page contents
• Help File Index
Accessing Help via the menu option (Help > Contents) opens up the Help file index. The structure of
the index is based on the Wellnomics Risk Management menu system and therefore a user needs to
make reference to the menu system to find appropriate help content. Note that the Help file index
contains all of the system help files and therefore may contain references to menu items not
available to all users.
8 ▪ User Guide
5 MY RISK PROFILE
This is sometimes referred to as your "Home" page in Wellnomics Risk Management. It shows your risk
levels based on the data that has been received and analyzed from your Wellnomics WorkPace data and
the responses to the Assessments you have completed - (if you are using Wellnomics Risk Management
Assessments).
If Assessments are being used, details of Assessments and Training that have been scheduled for you
are shown by the presence of the "Start Assessments/Training" buttons.
If an assessment button is displayed with the label "Not available" the assessment is in a stand down
period during which time it cannot be completed. The wording alongside the button will indicate the
date when it will next be available for completion e.g. Assessment next available on 20th December
2012.
From the More Information section on this page you can also link to reports which detail your current
risks and recommendations, your WorkPace data, your compliance with the breaks that you are
prompted to take, and historical risk reports and risk factors.
Note: If you have just started using Wellnomics WorkPace, you will have to wait until after next Sunday
before your risk is calculated, because risks are calculated weekly. Prior to this case, your risk may
show as Unknown. An accurate picture of your risks is not available until your Wellnomics WorkPace
data has synchronized with Wellnomics Risk Management for four weeks.
The Risks shown are:
Overall Risk
This is your current overall risk of developing computer use related injury. It is
calculated by combining your risks across all the Risk Categories that are
measured.
Computer Use
This is a measurement of the risks associated with your computer use patterns.
Data from your Wellnomics WorkPace program is used to generate this result.
Speed and Intensity
Measures the risks associated with how quickly and intensively you use your
computer.
Compliance
This is a measurement of how diligent you are about taking the breaks
prompted by Wellnomics WorkPace. Your risk level increases the more often
you ignore the break prompts.
If you are using the Wellnomics Assessments, you will have Risk Levels for the following categories.
These are based on your responses to the Wellnomics Risk Management Assessments.
No Data or Data Out of Date ▪ 9
Posture and WorkStation
Measures the risks associated with your workstation setup and use.
Discomfort
Measures the risks associated with your existing and past symptoms related to
computer use.
Individual
Assesses your individual physical characteristics and how they affect your risk of
developing computer use related injuries.
Psychosocial
Looks at your workload and work pressure and assesses the risks associated with
this.
If any of your Risk Levels are shown as Unknown, it will be because there is insufficient WorkPace or
Assessment data recorded for your risk to be accurately calculated.
In the case of WorkPace data (the Computer Use, Speed & Intensity and Compliance Risk Categories)
the following messages may appear against the risk levels:
6 NO DATA OR DATA OUT OF DATE
WorkPace has to send data to the Wellnomics server regularly so that it can calculate your risk for the
Computer Use, Speed & Intensity and Compliance Risk Categories. If no data is received by the
Wellnomics server the risks for these Risk Categories cannot be calculated and will display as
Unknown.
See below for suggestions on how to resolve problems with No Data or Data Out of Date.
Message
Explanation
Resolution
No Data
No WorkPace data has ever been
received by the Wellnomics
server
Check WorkPace is installed on your computer
If WorkPace is installed, make sure it is
communicating correctly with the server. To
check this:
1, Double click the WorkPace icon in the System
Tray to open the WorkPace Console.
2, From the menu select Server > Connect Now
3, From the menu select View > Communication
Log
4, Scroll to the bottom of the log text.
If there are any errors (text with the word
WARNING in the front), Contact your IT
department or Wellnomics Support for additional
assistance. You may like to copy and paste this
text into your email to help with troubleshooting.
10 ▪ User Guide
Data Out of Date
No WorkPace data has been
received by the Wellnomics
server in the last 4 weeks
Check that WorkPace hasn't been uninstalled from
your computer
If WorkPace is installed, have you been away on
leave or not using your computer for 4 weeks or
more? If so, a few days after you resume normal
computer use you should see this error disappear
and your risks being calculated again.
If the above doesn't match your situation, check
that WorkPace is still communicating with the
Wellnomics server.
To check this:
1, Double click the WorkPace icon in the System
Tray to open the WorkPace Console.
2, From the menu select Server > Connect Now
3, From the menu select View > Communication
Log
4, Scroll to the bottom of the log text.
If there are any errors (text with the word
WARNING in the front), Contact your IT
department or Wellnomics Support for additional
assistance. You may like to copy and paste this
text into your email to help with troubleshooting.
Insufficient data
WorkPace data has been
received however there is
insufficient data to calculate the
risk category values
This message is displayed during the first week
that WorkPace data has been received and
processed by the server. The WorkPace associated
risk category values are not calculated until the
end of the first week (Sunday night by default)
and will not be visible until after this calculation
has occurred. Until this has happened the risk
category values will show as Unknown.
Note: It can take a while for your data to be synchronized to the Wellnomics server. This means that if
any changes are made it may take a few days before you see any changes to your Risk Profile.
From the My Risk Profile page, you can drill down for further information about your risks and
WorkPace data:• Click on RSI Risk Report (see page 11) to go to a report that details your current overall risk and
recommendations and advice for reducing your risks in each category.
• Click on the Risk Level for any one of the Risk Categories to go to that section of the Risk Report for
recommendations and advice for reducing your risks in this area.
• See the More Information (see page 12) section for reports relating to your Wellnomics WorkPace
data records and settings along with a history of your Risk Category levels and Overall Risk Level
over time.
No Data or Data Out of Date ▪ 11
RSI Risk Report
This report shows an overall RSI risk, recommendations for reducing risk, and advice on implementing
these recommendations for each Risk Category. You may drill-down from this report into the risk
details for each risk category.
Training and Assessment Tasks
If you are using the Wellnomics Assessments, you will have information about any assessment and/or
training that has been scheduled for you to complete. This information is visible alongside each
Assessment and alongside Training on the My Risk page. Click on the "Start" button next to each
Assessment or Training to begin. If you have already started, the button label will show as "Continue".
Note that if "On Demand" Assessments are not enabled, and no Assessment has been scheduled, there
will be no button visible against the Assessments. Because Training is always accessible a button will
always be present in the Training section of the My Risk Profile page.
12 ▪ User Guide
7 MORE INFORMATION
The links in this pane give you information on your WorkPace records and settings and a history of your
risks and risk factors. These are useful to see how your computer use and risk levels have changed over
time. Report Options will allow you to select the period that you want to report on.
Note that depending upon the modules enabled and certain configuration settings you may not be able
to view all of the options visible in the example below.
Computer Use
Use this page to display your weekly or daily Computer Use, Total Computer Use (in hours), Total
Mouse Use (in hours) and the number of days in the week that you used your computer. This report
provides an easy way to view your computer use patterns over time.
More Information ▪ 13
Weekly Report Options
These reports run for whole weeks, starting on a Monday, and ending on a
Sunday.
To change the Report Period:
In the Week Beginning box, either enter the date for the first day of the
week(s) you want to report on, or select the date by clicking on the calendar.
In the calendar, click on the arrows in the month bar to move through the
year. Click on the blue area in the month bar to view and select the year that
you want to report on. The selected week is highlighted.
In the Week Ending box, either enter the date for the last day of the period
you want to report on, or select the date by clicking on the calendar icon. In
the calendar, click on the arrows in the month bar to move through the year.
Click on the blue area in the month bar to view and select the year that you
want to report on. The selected period is highlighted.
Click Apply to show the report.
Daily Report Options
To change the Report Period:
In the From box, either enter the date for the first day of the period you want
to report on, or select the date by clicking on the calendar. In the calendar,
click on the arrows in the month bar to move through the year. Click on the
blue area in the month bar to view and select the year that you want to report
on.
In the To box, either enter the date for the last day of the period you want to
report on, or select the date by clicking on the calendar icon. In the calendar,
click on the arrows in the month bar to move through the year. Click on the
blue area in the month bar to view and select the year that you want to report
on.
Click Apply to show the report.
You can export this report to an Excel spreadsheet, or a Word document, and save it for further use.
You can print this report by selecting the Print button to put the information into a printable format.
Note: Depending on how your system is configured, you may not see the Logout button on the right.
Compliance
Use this page to display your weekly or daily Micropause prompts and Rest Break prompts and your
compliance with these prompts. For more information, see Compliance. If your compliance percentage
is consistently low, you may want to rerun the WorkPace Setup Wizard if this is available to you. A link
to instructions for doing this is on your Risk Report page, (select My Risk Profile>RSI Risk Report>Run
WorkPace Setup Wizard).
14 ▪ User Guide
Weekly Report Options
These reports run for whole weeks, starting on a Monday, and ending on a
Sunday.
In the Options box select Weekly from the drop down box next to Report Type
To change the Report Period:
In the From box, either enter the date for the first day of the period you want
to report on, or select the date by clicking on the calendar. In the calendar,
click on the arrows in the month bar to move through the year. Click on the
blue area in the month bar to view and select the year that you want to report
on.
In the To box, either enter the date for the last day of the period you want to
report on, or select the date by clicking on the calendar icon. In the calendar,
click on the arrows in the month bar to move through the year. Click on the
blue area in the month bar to view and select the year that you want to report
on.
Click Apply to show the report.
More Information ▪ 15
Daily Report Options
These reports run for individual days between the dates selected in the From
and To boxes (see below).
In the Options box select Daily from the drop down box next to Report Type
To change the Report Period:
In the From box, either enter the date for the first day of the period you want
to report on, or select the date by clicking on the calendar. In the calendar,
click on the arrows in the month bar to move through the year. Click on the
blue area in the month bar to view and select the year that you want to report
on.
In the To box, either enter the date for the last day of the period you want to
report on, or select the date by clicking on the calendar icon. In the calendar,
click on the arrows in the month bar to move through the year. Click on the
blue area in the month bar to view and select the year that you want to report
on.
Click Apply to show the report.
You can export this report to an Excel spreadsheet, or a Word document, and save it for further use.
You can print this report by selecting the Print button to put the information into a printable format.
Note: Depending on how your system is configured, you may not see the Logout button on the right.
WorkPace Settings
Your Breaks and Exercises are determined by your Wellnomics WorkPace settings and the Settings
Profile (see page 69) that you are assigned to. You can use it to look back and see what changes have
been made to your settings. For example, if you think that you are currently getting more Breaks
prompts, you can go back and see if your settings have changed.
16 ▪ User Guide
Actions Log
Use this page to show a record of emails and system messages that have been sent to you through
Wellnomics Risk Management. Notes are also added if your Settings Profile is changed so that you can
see when it changed, and who changed it.
If you are a Manager, or have been assigned a role of Local Administrator, or Administrator, you can
also see a record of emails that you have sent to your staff.
For more information about roles, refer to the Wellnomics Risk Management IT Administration Guide.
Risk Category History
Use these options to select a category to view historical risk reports and risk factors. For each history
report you will have the following output options:
You can export this report to an Excel spreadsheet, or a Word document, and save it for further use.
You can print this report by selecting the Print button to put the information into a printable format.
Note: Depending on how your system is configured, you may not see the Logout button on the right.
Overall Risk History
This report shows your Overall Risk History levels calculated from your Risk Categories that have a risk
value. This allows you to view how your Overall Risk has changed over time. For more details, you can
also link to a Risk Report for each period by clicking on the risk report icon in the last column of the
report.
Options
Reports are run for whole weeks, starting on a Monday, and ending on a
Sunday.
To change the Report Period:
In the Week Beginning box, either enter the date for the first
day of the week(s) you want to report on, or select the date
by clicking on the calendar. In the calendar, click on the
arrows in the month bar to move through the year. Click on
the blue area in the month bar to view and select the year
that you want to report on. The selected week is highlighted.
In the Week Ending box, either enter the date for the last
day of the period you want to report on, or select the date
by clicking on the calendar icon. In the calendar, click on the
arrows in the month bar to move through the year. Click on
the blue area in the month bar to view and select the year
that you want to report on. The selected period is
highlighted.
Click Apply to show the report.
You can export this report to an Excel spreadsheet, or a Word document, and save it for further use.
More Information ▪ 17
You can print this report by selecting the Print button to put the information into a printable format.
Computer Use Individual History
This report shows the risk levels calculated from your WorkPace Computer Use statistics for a period
that you specify. This means that you can compare how your risk has changed over time. For more
details, you can also link to a Risk Report for each period.
Options
Reports are run for whole weeks, starting on a Monday, and ending on a
Sunday.
To change the Report Period:
In the Week Beginning box, either enter the date for the first day of the
week(s) you want to report on, or select the date by clicking on the calendar.
In the calendar, click on the arrows in the month bar to move through the
year. Click on the blue area in the month bar to view and select the year that
you want to report on. The selected week is highlighted.
In the Week Ending box, either enter the date for the last day of the period
you want to report on, or select the date by clicking on the calendar icon.
In the calendar, click on the arrows in the month bar to move through the
year. Click on the blue area in the month bar to view and select the year that
you want to report on. The selected period is highlighted.
Click Apply to show the report.
Speed and Intensity History
Use this page to view your historical Speed and Intensity risk levels. For more details, you can also link
to a Risk Report for each period. See also Speed & Intensity.
Options
Reports are run for whole weeks, starting on a Monday, and ending on a
Sunday.
To change the Report Period:
In the Week Beginning box, either enter the date for the first day of the
week(s) you want to report on, or select the date by clicking on the calendar.
In the calendar, click on the arrows in the month bar to move through the
year. Click on the blue area in the month bar to view and select the year that
you want to report on. The selected week is highlighted.
In the Week Ending box, either enter the date for the last day of the period
you want to report on, or select the date by clicking on the calendar icon.
In the calendar, click on the arrows in the month bar to move through the
year. Click on the blue area in the month bar to view and select the year that
you want to report on. The selected period is highlighted.
Click Apply to show the report.
Compliance History
Use this page to view your compliance with prompted WorkPace breaks. You can also see which Risk
Factors you had present for any given week and view a full Risk Report. See also Compliance.
18 ▪ User Guide
Options
Reports are run for whole weeks, starting on a Monday, and ending on a
Sunday.
To change the Report Period:
In the Week Beginning box, either enter the date for the first day of the
week(s) you want to report on, or select the date by clicking on the calendar.
In the calendar, click on the arrows in the month bar to move through the
year. Click on the blue area in the month bar to view and select the year that
you want to report on. The selected week is highlighted.
In the Week Ending box, either enter the date for the last day of the period
you want to report on, or select the date by clicking on the calendar icon.
In the calendar, click on the arrows in the month bar to move through the
year. Click on the blue area in the month bar to view and select the year that
you want to report on. The selected period is highlighted.
Click Apply to show the report.
Posture and Workstation History
If you are running Assessments within Wellnomics Risk Management, then you will also see this report.
Use this page to view your historical Posture and Workstation risk level and reports. You can also see
which Risk Factors you had present for any given week and view a full Risk Report.
See also Posture & Workstation on page 126.
Discomfort History
If you are running Assessments within Wellnomics Risk Management, then you will also see this report.
Use this page to view your historical Discomfort risk level and reports. You can also see which Risk
Factors you had present for any given week and view a full Risk Report.
See also Discomfort Risk Category on page 128.
Individual History
If you are running Assessments within Wellnomics Risk Management, then you will also see this report.
Use this page to view your historical Individual risk level and reports. You can also see which Risk
Factors you had present for any given week and view a full Risk Report.
See also Individual Factors Risk Category on page 60
Psychosocial History
If you are running Assessments within Wellnomics Risk Management, then you will also see this report.
Use this page to view your historical Psychosocial risk level and reports. You can also see which Risk
Factors you had present for any given week and view a full Risk Report.
See also Psychosocial Risk on page 60
More Information ▪ 19
Assessment Completion Individual History
This link takes you to a complete list of all of your completed Assessments, in date order with the most
recent at the top.
Assessment Completion Individual
History
Explanation of columns:-
Date: This is the date that the
Assessment (see Assessment Type
column) was completed
Assessment Type: The type of
Assessment completed
Category Risk Level at Completion: This
is the risk category level for the
specified Assessment after its
completion
Assessment Reference Point (ARP) Individual History
Note: This link is only visible if Assessment Reference Points (ARPs) have been configured for use in
your system by the Wellnomics Administrator.
See Admin >> Policy Configuration >> Assessments >> Assessment Policy
This page displays the Assessment Reference Points (ARP) dates and related data for a user. If there is
more than one ARP the dates will be listed in the Date column. The remainder of the page displays
data relating to the Assessment Reference Point date you have highlighted in the Date column. This
user history page is also viewable by:• The individual user from their My Risk Profile page >> More Information >> Assessment Reference
Point (ARP) Individual History link.
20 ▪ User Guide
• A Manager, Local Administrator or Wellnomics Administrator from the Tools >> Find User >> User
Summary >> More Information >> Assessment Reference Point (ARP) Individual History link (subject
to privacy settings)
The Assessment Reference Point (ARP) User History page has the following columns:-
Assessment Reference Point (ARP)
User History
Explanation of columns:Date: This holds the ARP dates, if there is more than one date listed, clicking
on the dates will display the relevant information for that date in the remaining
columns of the report.
Category: This column lists the Risk Categories (enabled in the system) and
Overall Risk.
Assessment Completion Date: The dates in this column relates to the Risk
Category dates relevant to this Assessment Reference Point.
Risk Level at ARP: This indicates the risk levels each Risk Category as at the
dates in the Assessment Completion Date column.
Current: This is the current risk profile (as at the date of viewing)
My Staff ▪ 21
8 MY STAFF
This page is available to Managers and those who have been assigned a Local Administrator or
Wellnomics Administrator role. It provides a quick overview of their staff's risk levels, how up to date
their WorkPace data is and how many staff have completed any assessments scheduled for them.
Links under the Suggested Actions heading allow you to drill down for more detail and send emails to
staff with recommendations and advice for reducing their level of risk.
Select the group that you want to report on from the Report Options box.
There are two charts on this page:
An Overall Risk Summary for the group of staff that you have selected.
(If you have staff who show as Unknown, it means that their WorkPace data is either absent (never
received) or out of date (more than 4 weeks old), and/or none of their assessments have been
completed. Once one of the Risk categories has a known risk i.e. High, Medium or Low, the Overall Risk
will change from Unknown to High, Medium or Low).
Quick Links takes you to links for:
• Training: Find out who needs training, and schedule it for them.
• Assessments: Find out who needs to do assessments, and schedule them.
• Reporting and Action: Find out what your staff's risk levels are, who has high risk, why they are at
risk, and what advice and recommendations have been made to them for reducing their risk levels.
• Advanced Features: Perform advanced features.
22 ▪ User Guide
Suggested Actions:
These options allow you to view a table showing a Risk Category breakdown for users at a particular
Risk Level. You can also view their Risk Report. The View Unknown Risk Users report is useful for
identifying which users are Unknown. View All Risk Level Users shows you a report of all users and their
risk levels.
The Send Risk Messages link allows you to send an email to staff to alert them to their risks.
WorkPace Data and Assessment Completion Summary. Shows the percentage of users whose
WorkPace data is up to date and the number of staff in this group who have completed Assessments
that have been scheduled for them. (If you are not using Assessments, then the Assessment details will
not show).
Suggested Actions:
The Suggested Actions allow you to view a chart of your staff's WorkPace data status (View WorkPace
Data Detail), with further links that identify which users data is up to date, out of date or absent (no
data).
You can also view a chart of which scheduled Assessments have been completed by staff, with a link to
charts that show when the Assessments were completed.
The Schedule Assessments link takes you to a page that allows you to select staff to complete
assessments, and send them an email to let them know they have outstanding assessments.
WorkPace Data Detail
This report is useful for identifying which users have up to date data in Wellnomics Risk Management,
and when data was last received from their WorkPace program. This report is available to Managers
and users who have been assigned a Local Administrator or Administrator role.
You can export this report to an Excel spreadsheet, or a Word document, and save it for further use.
You can print this report by selecting the Print button to put the information into a printable format.
Note: Depending on how your system is configured, you may not see the Logout button on the right.
Data Out of Date and No Data
Data out of Date
The server has received data for this user, but the last synchronization was more than 4 weeks ago.
Possible causes:
1. The user has been absent (not using their computer) for the last 4 weeks.
My Staff ▪ 23
2. WorkPace has been uninstalled from the user's computer.
3. Something has changed which means that WorkPace is no longer able to communicate with the server. Get
user to check for errors in the WorkPace Communication Log (View > Communication Log).
No Data
The server has never received a synchronization from WorkPace for this user.
Possible causes:
1. WorkPace is not installed on the user's computer. Check if this user has WorkPace installed.
2. WorkPace is installed, but is setup incorrectly and so cannot communicate with the server. Ask the user to
check for errors by opening WorkPace on their computer and selecting View > Communication Log.
Suggested Actions:
Click on these links to list users for each Data status, and to find out when data was last received by
Wellnomics Risk Management.
WorkPace Data Status User Lists
These tables show a list of users, whether their WorkPace records are up to date in Wellnomics Risk
Management and when the data was last received.
View Current Assessment Completion Detail
The function is available to Managers and those who have been assigned a Local Administrator or
Wellnomics Administrator role.
This feature is accessible from the Assess Menu and the View Current Assessment Completion option. It
is also accessible from the My Staff page using the View Current Assessment Completion link under
Suggested Actions.
The initial display is a Summary by group, using the last used group selection. The charts can be
restricted by different groups using the standard group selection option.
The feature allows a summary of available assessments to be viewed as horizontal bar charts indicating
the proportion of Complete and Incomplete Assessments by Assessment type.
24 ▪ User Guide
Note that this feature is designed to identify users that have or have not completed assessments for
the first time. Subsequent assessments cannot be identified using this feature, instead, use the
Training and Assessment Completion Report (which is accessible under both the Assess and the Training
menus) to identify the completion of assessments between specified dates.
Options available from this page:View Posture and WorkStation
Completion User List (if this
assessment is enabled)
Discomfort Completion User List (if
enabled)
Each option displays Current Assessment Completion data in tabular format.
The User List includes the following details for each of the relevant
assessment categories:
Last Completion Date
Due Date
Category Risk Level
Scheduled Status – Yes/No
Individual Completion User List (if
enabled)
Psychosocial Completion User List (if
enabled)
You can export this report to an Excel spreadsheet, or a Word document, and save it for further use.
You can print this report by selecting the Print button to put the information into a printable format.
Note: Depending on how your system is configured, you may not see the Logout button on the right.
My Staff ▪ 25
Current Assessment Completion - Tabular View
The tabular view is accessible from the initial View Current Assessment Completion option selected
from the Assess menu option or the My Staff page using the View Current Assessment Completion link
under Suggested Actions.
Once the tabular view is displayed a number of options are available to refine the displayed list of
user’s and their assessment details. The options are:Group
Use this option to restrict the list by available groups.
Category
Category Risk Level
This allows the list to be restricted by available Assessment Category.
This allows the list to be restricted by the Category Risk Level – these Risk
levels apply to the Assessments Categories selected in the previous field.
Scheduled Status
Selecting the All option result in all users (subject to other selection criteria) to
be listed.
Selecting the Scheduled option restricts the list to those users that have been
scheduled an Assessment (subject to what has been selected for Category),
whether or not that assessment has been completed.
Selecting the Not Scheduled option restricts the list to those users that have
never been scheduled an Assessment (subject to what has been selected for
Category), whether or not that assessment has been completed.
Apply
Click here to re-display the user table to take account of any of the changes
made above.
At the foot of the displayed user list there are two options for actions:Schedule Assessment for Listed Users
This link leads to the Schedule Assessment Wizard.
Quick Links
Use these links to quickly move around Wellnomics Risk Management.
26 ▪ User Guide
9 TRAIN
In This Chapter:
Schedule Training....................................................................................... 26
View Scheduled Training .............................................................................. 27
View Status .............................................................................................. 28
Training and Assessment Completion ................................................................ 29
Schedule Training
This page is available to Managers and those who have been assigned a Local Administrator or
Administrator role.
Whilst Training is available to all users on demand (users can start and complete training at any time)
it is possible for Managers and Administrators to schedule training for all users or groups of users and to
send reminders to users to complete training that has been scheduled.
Use this page to schedule training for you, or groups of staff that you have responsibility for.
Note: If a user has training currently scheduled, they cannot be scheduled again.
Training Name
Enter a name to identify the training being scheduled.
For example, 'Initial Staff Ergonomics Training'.
Group
Select the group to do the training. For example, 'Direct
Reports', or 'Everyone'.
Due to be completed by
Click the calendar icon and select the date that training
is to be completed by. This date will show on the user’s
My Risk Profile page.
Exclude Users who have
completed training
since
Check the box to enter a date that will exclude users who
have recently completed training. For example, if a user
completed training in the last week, then you may not
want them to do more training now.
Click the calendar icon to select the date which you want
to use as a cut-off point for recent training.
Next
Click to go to the Training Confirmation Page.
Schedule Training Confirmation
Use this page to confirm scheduled training for users, and send them an email with a link to the
training.
Train ▪ 27
Included
A tick in this column indicates that this user will be notified and included in the
training that has been scheduled.
Users that are found to have completed training since the date specified on the
previous page in the “Exclude Users who have completed training since” field,
will be excluded from this training session, and show a cross in this field.
User ID, First Name, Last Name
The User ID and name of the user who will do the training.
Existing Training Scheduled by
The name of the person who scheduled training for this user, if it has already
been scheduled. For example, training may have been scheduled by someone
else in the same group.
Existing Training Due by
The date that existing scheduled training should be completed by.
Confirm New Training
Click to send an email to the user asking them to complete the training.
View Scheduled Training
Use this page to view details of scheduled training for users. This training can be rescheduled or
cancelled, and you can send reminders to users.
Note: Training does not affect the Risk Levels of users.
Training Name
The name given to the training course when it was scheduled.
Due Date
The date that training should be completed by.
Training Status
The status of the training, one of: Open, Complete, or Not Started.
If the training shows as Open, the user has more sections to complete.
When the user returns to the training, they are taken to the last page that they
were working through in their last training session.
Total Users
The number of users scheduled in this training session.
28 ▪ User Guide
Users not Started
The number of users that have not started the training.
Users in Progress
The number of users who have completed part of the training.
Users Completed
The numbers of users who have finished the training.
Details
Click the Details button to display details for the training, and links to allow
you to:
Cancel training
Reschedule training
Send an email reminder
Scheduled Training Details
Use this page to view details of the training that has been scheduled.
Reschedule Training
Use this page to change the date for a training session.
Enter a new due date for a user, or group of users and click the Reschedule Training button to send an
email to tell them that there has been a change.
Cancel Training
Use this page to cancel a scheduled training session.
Note: Training can be done by users at any time from their My Risk Profile page.
View Status
Use this page to view a list of users that have been scheduled for training, the date they completed
their last training session, and when the currently scheduled training is due to be completed.
To change the Group you are reporting on:
• Click the drop-down arrow next to the Report Group field to open a list of available groups.
• Select the group you want to view the report for, and click Apply.
Train ▪ 29
You can export this report to an Excel spreadsheet, or a Word document, and save it for further use.
You can print this report by selecting the Print button to put the information into a printable format.
Note: Depending on how your system is configured, you may not see the Logout button on the right.
Training and Assessment Completion
This function is available to Managers and those who have been assigned a Local Administrator or
Administrator role.
This feature is accessible from the Analyze Menu and the Training and Assessment Completion option.
The feature displays a report that summarizes historical training and assessment completion or noncompletion (depending upon the options selected) for one or all assessment categories and/or training
Filter Options available from this page:Group
Use this option to restrict the list by available groups
From
This is the start of the reporting date range which is used to select relevant
records for the tabular report results (see below).
Note that the date range includes this specified "from" date.
To
This is the end of the reporting date range which is used to select relevant
records for the tabular report results (see below).
Note that the date range includes this specified "to" date.
Category
This allows the listing (see below) to be restricted by available Assessment
Categories or Training.
Any combination of available Assessments and Training can be selected by
checking the appropriate boxes accessed by clicking on the drop down arrow on
the right of the field.
30 ▪ User Guide
Status
This allows the list to be restricted to:Completed – will display only those results where a completion date for the
selected Assessment Types (and/or Training) falls within the selected From:
To: date range.
Not Completed - will display only those results where a completion date for the
selected Assessment Types (and/or Training) does not fall within the selected
date range.
ALL - will display all users in the group and indicate against each Assessment
type and/or Training whether or not completion has occurred within the
reported time period. Symbols (û and ü ) are used to indicate completion or non
completion
Note that report table layout changes depending upon whether Completed, Not
Completed or All is selected
Apply
This button applies the options chosen above and re-lists the relevant records in
the tabular report view which is displayed.
You can export this report to an Excel spreadsheet, or a Word document, and save it for further use.
You can print this report by selecting the Print button to put the information into a printable format.
Note: Depending on how your system is configured, you may not see the Logout button the right-hand
side.
The Tabular Report Display
Once the report options have been selected and "Applied", the report listing is in a tabular format
which displays a user list of those users that meet the report options criteria.
If the display exceeds what can be listed on a single page, options for subsequent pages are listed at
the foot of the report and are displayed as a string of available page numbers.
Each of the columns in the report can be sorted in either ascending or descending order by repeatedly
clicking on the column header.
When the Status is set to Completed or Not Completed, a summary bar above the column headers
indicates the percentage of users that meet the report Status criteria i.e. Completed or Not
Completed. This percentage is based on the proportion of all possible users (as defined by the filters
used) that have either completed or not completed the Assessments and/or Training specified, within
the date range selected
The Report Columns Where Status = Completed or Not Completed
User ID
The user's unique ID
First Name
This is the user's first name
Last Name
This is the user's second name.
Supervisor ID
This is the unique system identifier for the user's supervisor.
Train ▪ 31
The Report Columns Where Status = All
User ID
The user's unique ID
First Name
This is the user's first name
Last Name
This is the user's second name.
Supervisor ID
This is the unique system identifier for the user's supervisor.
Risk Categories
Completion of an Assessment or of Training (within the specified date range) is
indicated by the
symbol. Non completion within the specified date range is
indicated by the
symbol.
32 ▪ User Guide
10 ASSESS
In This Chapter:
Schedule Assessment ................................................................................... 32
Scheduling Assessments for Individuals .............................................................. 36
View Current Assessment Completion Detail ....................................................... 37
Schedule Assessment
Use this page to schedule an Assessment for you, or groups of staff that you have responsibility for. For
scheduling Assessments for individuals see Scheduling Assessments for Individuals
This page only displays if your Wellnomics Risk Management license includes the Assessment modules.
Only those Assessments licensed for use will be available for scheduling.
The schedule Assessment function is available to Managers and those who have been assigned a Local
Administrator or Administrator role.
Please see the Wellnomics IT Administration Guide for references to policy administration relating to
Assessments.
The operation of the Schedule Assessment facility is based on the settings for Assessments that are
configured in the Wellnomics Administration menu (see Admin >> Policy Configuration >> Assessments
>> Assessments Policy for details.)
The Schedule Assessment facility allows users that have been scheduled an Assessment to access and
complete Assessments on their Wellnomics Risk Management home page. Note that if On Demand
Assessments are enabled, users can access and complete Assessments without them first being
scheduled.
If On Demand Assessments are not enabled, scheduled Assessments are accessed using the Start button
that appears next to the relevant Assessment on the user’s My Risk page.
The schedule Assessment facility uses a wizard to go through the steps necessary for successful
scheduling, these steps are:1 Select Criteria: This allows the initial list of users, who are to receive scheduled Assessments, to
be created.
2 Confirm User Selection: This displays the list of users that have been selected in Step 1 to be
reviewed, and if required edited, prior to scheduling. By default all users identified in Step 1 are
included in the list for scheduling. Note that if the initial selection criteria in Step 1 included more
than one Assessment Category then a user will be listed more than once.
3 Set Schedule Details: This allows the selection of the Assessment Due Date and the option to send
scheduled users an email notifying them of the scheduled Assessment(s).
4 Confirmation: This confirms all selections in Steps 1 to 3 and Confirm (create) the scheduled
Assessments or to revisit previous stages and make amendments prior to confirmation.
Assess ▪ 33
Step 1: Select Criteria
The following selection criteria are available:
Group
Click the drop-down arrow next to the Report Group field to open a list of
available groups.
Select the group you want to schedule assessments for.
Category
Check the boxes for the Assessments Types you wish to schedule assessments
for.
At least one Assessment Type must be selected.
Scheduled Status
Checking only the Not Scheduled box will select users that have never
previously been scheduled an Assessment, or have never started an Assessment
on demand (but only for those Assessments selected in the Category section).
Checking only the Scheduled box will select users that have previously been
scheduled to complete an Assessment (but only for those Assessment Categories
selected in the Category section).
Checking both Not Scheduled and Scheduled will allow all users to be included
(subject to all other criteria being satisfied)
Category Risk Level
At least one box must be checked to select users. To include all users check all
boxes.
Check the boxes to include which Risk Levels are to be included for those
Assessment categories previously selected.
For user records selected, both the Assessment Category and the Category Risk
Level must be satisfied e.g. If Posture and WorkStation and Discomfort are
selected at the Category stage and High and Medium as the Category Risk Levels
then only user records that are either High or Medium Risk for both Posture and
WorkStation and Discomfort will be selected.
Overall Risk Level
At least one box must be checked to select users. To include all users check all
boxes.
Check the relevant boxes to include (checked) or exclude (unchecked) users
based on their Overall Risk (as at the previous Sunday)
34 ▪ User Guide
Last Completed
This selection relates to whether a user has or has not completed an
Assessment (of the types selected under Category) in the past, and when in the
past.
The N/A radio button (default position) means that users are not excluded
based on previous Assessments.
The Before radio button (used in connection with the enabled date field below)
will select only those users that have completed Assessments (of the types
selected under Category) before the date configured.
The After radio button (used in connection with the enabled date field below)
will select only those users that have completed Assessments (of the types
selected under Category) after the date configured.
Due Date
This selection allows users to be selected based on their Assessment Due Dates
created as a result of previously scheduled Assessments.
Note that even if a user has completed a scheduled Assessment their most
recent scheduled Assessment Due Date, for each Assessment Category, is
retained.
This Due Date parameter is applied to each of the Assessment Categories
selected under Category.
The N/A radio button (default position) means that users are not excluded
based on previous Assessment due dates.
The Before radio button (used in connection with the enabled date field below)
will select only those users that have Assessment Due Date(s) (for the types
selected under Category) before the date configured.
The After radio button (used in connection with the enabled date field below)
will select only those users that have Assessment Due Date(s) (for the types
selected under Category) after the date configured.
Next
Once the selection criteria has been completed click on the Next button to view
a table of the users that match the criteria.
Step 2: Confirm User Selection
The users selected as a result of the decisions made at Step 1 are displayed in a tabular format. All
selected users are displayed and a scroll bar is available if the list exceeds the viewable page.
If more than Assessment type was selected in Step 1 then a user may appear more than once in the
table.
Assess ▪ 35
The following options are available:
Sort Columns
All columns in the table are sort able in either ascending or descending order by
repeatedly clicking on the column header.
Include/Exclude Users
By default all identified users are selected for assessment scheduling as
indicated by the checked box in the first column of the table (entitled Include).
To exclude a user uncheck the "Include" checkbox next to their name.
Previous/Next
Once editing of the user list is complete (if applicable) Click on the Next button
to proceed to Step 3: Set Schedule Details.
If it is necessary to re-define the selection criteria click on the Previous button
to revisit Step 1: Select Criteria. Previously selected criteria will be redisplayed.
Step 3: Set Schedule Details
This allows selection of the Assessment Due date and the option to send included users with an email
notifying them of the scheduled assessment(s).
The following options are available:
Assessment Due Date
Use this date to set the Assessment Due Date for the Assessments selected in
Step 1 – Category.
Note that if the Due Date is less than the configured Assessment Creation
Warning Period (configured in the IT Administration Website Policy
Configuration) then a warning will be generated to advise of this e.g. (This
Assessment is due to be completed in less than 4 weeks).
Notwithstanding this warning, it is still possible to continue with the scheduling
of the Assessments.
Email Users
Checking this box will send an email to all selected users advising them of the
scheduling of the assessment(s) along with the Assessment Due Date(s).
Previous
Use this button to return to Step 2 of the process.
Next
Use this button to progress to Step 4 of the process.
Step 4: Confirmation
This confirms all selections in Steps 1 to 3 and the Confirm button creates the scheduled assessments.
To revisit previous stages and make amendments prior to confirmation select Previous.
36 ▪ User Guide
The Confirmation screen summarizes the selection criteria applied and indicates the number of
assessments that will be scheduled and the number of users that will be subject to the scheduling upon
final confirmation. The configured Assessment Due Date and confirmation of the email function are
also detailed.
The following Options are available:
Previous
Use this button to return to Step 3 of the process.
Confirm
Use this button to confirm the scheduling of the selected assessments for the
users identified.
Once scheduling is a complete a confirmation message - assessments
successfully scheduled will appear at the top of the page.
Scheduling Assessments for Individuals
Wellnomics Risk Management allows assessments to be scheduled for individuals. If you wish to
schedule assessments for a group of users use the Schedule Assessments page.
The Schedule Assessment for individuals function is available to Managers and those who have been
assigned a Local Administrator or Administrator role.
From the Tools menu go to Find User and enter your selection criteria. If a single record matches your
selection you will be taken to the User Summary page for the individual. If more than one user matches
your selection criteria a list of users will be displayed in tabular format. Click on the relevant user ID to
display the User Summary for the individual.
In the Training and Assessments part of the User Summary, a Schedule Assessment shortcut leads to a
short Schedule Assessment wizard. Note that the user is automatically added to the wizard. This
Schedule Assessment wizard has 2 steps:Step 1: Select Criteria
This has the following options:Category
Check the boxes for the Assessment Categories you wish to schedule
Assessments for.
At least one Assessment Category must be selected.
Assess ▪ 37
Assessment Due Date
Use this date to set the Assessment Due Date for the Assessments selected in
Step 1 – Category.
Note that if the Due Date is less than the configured Assessment Creation
Warning Period (configured in the IT Administration Website Policy
Configuration) then a warning will be generated to advise of this e.g. (This
Assessment is due to be completed in less than 4 weeks).
Notwithstanding this warning, it is still possible to continue with the scheduling
of the Assessments.
Email User
Checking this box will send an email to the selected user advising them of the
scheduling of the Assessment(s) along with the Assessment Due Date(s).
Next
Use this to progress to Step 2
Step 2: Confirmation
This step confirms the selections made in the previous step and has the following options:Previous
Use this button to return to Step 1 of the process
Confirm
Use this button to confirm the scheduling of the selected Assessments for the
users identified.
Once scheduling is complete a confirmation message - "Assessments successfully
scheduled" will appear at the top of the page.
View Current Assessment Completion Detail
The function is available to Managers and those who have been assigned a Local Administrator or
Wellnomics Administrator role.
This feature is accessible from the Assess Menu and the View Current Assessment Completion option. It
is also accessible from the My Staff page using the View Current Assessment Completion link under
Suggested Actions.
The initial display is a Summary by group, using the last used group selection. The charts can be
restricted by different groups using the standard group selection option.
The feature allows a summary of available assessments to be viewed as horizontal bar charts indicating
the proportion of Complete and Incomplete Assessments by Assessment type.
Note that this feature is designed to identify users that have or have not completed assessments for
the first time. Subsequent assessments cannot be identified using this feature, instead, use the
Training and Assessment Completion Report (which is accessible under both the Assess and the Training
menus) to identify the completion of assessments between specified dates.
38 ▪ User Guide
Options available from this page:View Posture and WorkStation
Completion User List (if this
assessment is enabled)
Discomfort Completion User List (if
enabled)
Each option displays Current Assessment Completion data in tabular format.
The User List includes the following details for each of the relevant
assessment categories:
Last Completion Date
Due Date
Category Risk Level
Scheduled Status – Yes/No
Individual Completion User List (if
enabled)
Psychosocial Completion User List (if
enabled)
You can export this report to an Excel spreadsheet, or a Word document, and save it for further use.
You can print this report by selecting the Print button to put the information into a printable format.
Note: Depending on how your system is configured, you may not see the Logout button on the right.
Current Assessment Completion - Tabular View
The tabular view is accessible from the initial View Current Assessment Completion option selected
from the Assess menu option or the My Staff page using the View Current Assessment Completion link
under Suggested Actions.
Assess ▪ 39
Once the tabular view is displayed a number of options are available to refine the displayed list of
user’s and their assessment details. The options are:Group
Use this option to restrict the list by available groups.
Category
Category Risk Level
This allows the list to be restricted by available Assessment Category.
This allows the list to be restricted by the Category Risk Level – these Risk
levels apply to the Assessments Categories selected in the previous field.
Scheduled Status
Selecting the All option result in all users (subject to other selection criteria) to
be listed.
Selecting the Scheduled option restricts the list to those users that have been
scheduled an Assessment (subject to what has been selected for Category),
whether or not that assessment has been completed.
Selecting the Not Scheduled option restricts the list to those users that have
never been scheduled an Assessment (subject to what has been selected for
Category), whether or not that assessment has been completed.
Apply
Click here to re-display the user table to take account of any of the changes
made above.
At the foot of the displayed user list there are two options for actions:Schedule Assessment for Listed Users
This link leads to the Schedule Assessment Wizard.
40 ▪ User Guide
11 IDENTIFY
In This Chapter:
High Risk Users .......................................................................................... 40
Top Recommendations ................................................................................. 41
Top Risk Factors ........................................................................................ 42
Compare ................................................................................................. 44
High Risk Users
This report shows who your high risk users are on a date that you specify. You can also click on the icon
in the Risk Report column to view a full Risk Report (see page 11) for a user.
This report is available to Managers and users who have been assigned a Local Administrator or
Administrator role.
Group
Select the group that you want to view the report for by clicking the drop-down
arrow next to the Report Group.
Week Ending
In the Week Ending field, either enter the date for the last day of the week
that you want to report on, or select the date by clicking on the calendar icon.
Note: These reports display data in weekly periods, from
a Monday to a Sunday. So, for example, if you select a
date that is a Tuesday, then the report date will default
to the following Sunday of that week.
Once you have identified your high risk users, you can use Act to Send Risk Messages to staff. You may
also want to move selected users to another Settings Profile (see page 69).
You can export this report to an Excel spreadsheet, or a Word document, and save it for further use.
You can print this report by selecting the Print button to put the information into a printable format.
Note: Depending on how your system is configured, you may not see the Logout button on the right.
Identify ▪ 41
Top Recommendations
This report provides a quick way to analyze the most common recommendations given to your staff for
reducing their risk levels. You can then identify who the users are, and view a full Risk Report (see
page 11) for each user.
This report is available to Managers and users who have been assigned a Local Administrator or
Administrator role.
The results are sorted in descending order by the number of users that have each recommendation.
Options
Select the group that you want to view the report for by clicking the drop-down arrow next to
the Report Group.
Select the Risk Level that you want to report on, or report on Any Risk Level.
In the Week Ending field, either enter the date for the last day of the week that you want to
report on, or select the date by clicking on the calendar icon.
Note: These reports display data in weekly periods, from a Monday
to a Sunday. So, for example, if you select a date that is a Tuesday,
then the report date will default to the following Sunday of that
week.
You can export this report to an Excel spreadsheet, or a Word document, and save it for further use.
You can print this report by selecting the Print button to put the information into a printable format.
Note: Depending on how your system is configured, you may not see the Logout button on the right.
Users with Recommendation
Click on any of the "user number" links in the Users column to display a list of users with the
recommendation shown, and the date of their last assessment (subject to access rights - access to
individual data is required).
42 ▪ User Guide
You may click Risk Report (see page 11) to display the RSI Risk Report for this user.
You can export this report to an Excel spreadsheet, or a Word document, and save it for further use.
You can print this report by selecting the Print button to put the information into a printable format.
Note: Depending on how your system is configured, you may not see the Logout button on the right.
Top Risk Factors
This report shows which risk factors are most prevalent for a group of staff that you select, for a given
date. It is a good way of finding out why your staff are at risk.
Identify ▪ 43
Options
Select the group that you want to view the report for by clicking the drop-down arrow next to the
Report Group.
Select the Risk Level that you want to report on, or report on Any Risk Level.
In the Week Ending field, either enter the date for the last day of the week that you want to report
on, or select the date by clicking on the calendar icon.
Note: These reports display data in weekly periods, from a Monday to a
Sunday. So, for example, if you select a date that is a Tuesday, then the
report date will default to the following Sunday of that week.
You can export this report to an Excel spreadsheet, or a Word document, and save it for further use.
You can print this report by selecting the Print button to put the information into a printable format.
Note: Depending on how your system is configured, you may not see the Logout button on the right.
Users with Risk Factor
Click on any of the "user number" links in the Users column to display a list of users with the risk factor
shown, and the date of their last assessment (subject to access rights - access to individual data is
required).
You may click Risk Report (see page 11) to display the RSI Risk Report for this user.
You can export this report to an Excel spreadsheet, or a Word document, and save it for further use.
You can print this report by selecting the Print button to put the information into a printable format.
Note: Depending on how your system is configured, you may not see the Logout button on the right.
44 ▪ User Guide
Compare
12 INTRODUCTION
This utility provides the user with the ability to compare a variety of risk criteria against HR field
criteria e.g. Department, Country etc. Note that in order to use HR field data in this way, the fields
first have to be configured as "Enumerable" (see Admin > Policy Configuration > HR Data Field
Management)
The criteria that can be selected to determine the "Compare" view are:• Group
• The week ending date of the data of interest
• Enumerable HR fields e.g. Country, Department, (entered into the Compare field)
• Various Risk criteria e.g. Overall Risk, Risk Categories, Risk Factors (entered into the Show field)
Once the criteria has been selected and the "View Report" link clicked, the information is presented as
a series of horizontal bar charts (representing the risk criteria) subdivided by the values associated
with the HR field selected in the Compare field.
See instructions for use below
• In the Report Options box, select the Group that you want to report on, for example 'My Staff'.
Choose a date in the week that you want to report on.
• In the Comparison Options window, select the filter that you want to use. These filters match the
fields that are made available from the HR import file. For further information, see the Wellnomics
Risk Management IT Administration Guide.
• In the Show field, select the level of risk detail that you want to report on, one of Overall Risk, Risk
Category, or Risk Factor. If Risk Category or Risk Factor is chosen, you can then select the category
and/or factor that you want to report on.
• Click to view the report.
View Overall Risk Report
This report allows you to make comparisons between sections of a selected group. You can also view
the chart as a table.
Introduction ▪ 45
You can export this report to an Excel spreadsheet, or a Word document, and save it for further use.
You can print this report by selecting the Print button to put the information into a printable format.
Note: Depending on how your system is configured, you may not see the Logout button on the right.
View Overall Risk Table
The report allows you to make comparisons between sections of a selected group based on Overall
Risk. You can also go back to view the data as a chart.
46 ▪ User Guide
You can export this report to an Excel spreadsheet, or a Word document, and save it for further use.
You can print this report by selecting the Print button to put the information into a printable format.
Note: Depending on how your system is configured, you may not see the Logout button on the right.
View Risk Category Report
When selecting to Compare using the show Risk Category option, you are presented with a selection of
Risk Categories to select from:
Note: Depending upon the modules enabled for use in your system you may not see all of the Risk
Categories shown above.
The report allows you to make comparisons between sections of a selected group based on Risk
Categories. You can also view the chart as a table.
Introduction ▪ 47
You can export this report to an Excel spreadsheet, or a Word document, and save it for further use.
You can print this report by selecting the Print button to put the information into a printable format.
Note: Depending on how your system is configured, you may not see the Logout button on the right.
View Risk Category Table
The report allows you to make comparisons between sections of a selected group based on Risk
Categories. You can also go back to view the data as a chart.
48 ▪ User Guide
You can export this report to an Excel spreadsheet, or a Word document, and save it for further use.
You can print this report by selecting the Print button to put the information into a printable format.
Note: Depending on how your system is configured, you may not see the Logout button on the right.
View Risk Factor Report
When selecting to Compare using the show Risk Category and Risk Factor options, you are presented
with a list of Risk Factors to select from. These risk factors are related to the Risk Category you select
in the Select Risk Category field:
The report allows you to make comparisons between sections of a selected group based Risk Factors.
You can also view the chart as a table.
Introduction ▪ 49
You can export this report to an Excel spreadsheet, or a Word document, and save it for further use.
You can print this report by selecting the Print button to put the information into a printable format.
Note: Depending on how your system is configured, you may not see the Logout button on the right.
View Risk Factor Table
The report allows you to make comparisons between sections of a selected group based on Risk
Factors. You can also go back to view the data as a chart.
50 ▪ User Guide
You can export this report to an Excel spreadsheet, or a Word document, and save it for further use.
You can print this report by selecting the Print button to put the information into a printable format.
Note: Depending on how your system is configured, you may not see the Logout button on the right.
Analyze ▪ 51
13 ANALYZE
In This Chapter:
Overall Risk .............................................................................................. 51
Risk Categories .......................................................................................... 53
Risk Factors .............................................................................................. 56
Statistics ................................................................................................. 61
Application Usage ...................................................................................... 62
Assessment Reference Point (ARP) Compliance .................................................... 65
Overall Risk
This report shows the Overall Risk Levels for users in a group for a week that you specify. You can click
on the User List link to list the users in this group, and their individual overall Risk Levels.
This report is available to Managers and users who have been assigned a Local Administrator or
Administrator role.
Group
Select the group that you want to view the report for by clicking the drop-down arrow next to the Report Group.
Week Ending
In the Week Ending field, either enter the date for the last day of the week that you want to report on, or select th
by clicking on the calendar icon.
Note: These reports display data in weekly periods, from a Monday to a Sunday. So, fo
example, if you select a date that is a Tuesday, then the report date will default to th
following Sunday of that week.
You can export this report to an Excel spreadsheet, or a Word document, and save it for further use.
You can print this report by selecting the Print button to put the information into a printable format.
Note: Depending on how your system is configured, you may not see the Logout button on the right.
52 ▪ User Guide
Overall Risk User List
Use this page to display a list of Users and their Overall Risk. You can click on Risk Report to see the
risk factors and recommendations given to this user.
You can export this report to an Excel spreadsheet, or a Word document, and save it for further use.
You can print this report by selecting the Print button to put the information into a printable format.
Note: Depending on how your system is configured, you may not see the Logout button on the right.
Overall Risk Individual History
Clicking on the user's ID will display their Overall Risk History. This report is useful for seeing how a
user's Overall Risk has changed over time.
Analyze ▪ 53
You can export this report to an Excel spreadsheet, or a Word document, and save it for further use.
You can print this report by selecting the Print button to put the information into a printable format.
Note: Depending on how your system is configured, you may not see the Logout button on the right.
Risk Categories
This report lets you quickly see what risk levels are present in each Risk Category for users in a group
for a week that you specify. You can click on the User List link to list the users in this group, and their
individual Risk Levels.
This report is available to Managers and users who have been assigned a Local Administrator or
Administrator role.
54 ▪ User Guide
Group
Select the group that you want to view the report for by clicking the drop-down arrow next to
the Report Group.
Week Ending
In the Week Ending field, either enter the date for the last day of the week that you want to
report on, or select the date by clicking on the calendar icon.
Note: These reports display data in weekly periods, from a Monday to
a Sunday. So, for example, if you select a date that is a Tuesday, then
the report date will default to the following Sunday of that week.
You can export this report to an Excel spreadsheet, or a Word document, and save it for further use.
You can print this report by selecting the Print button to put the information into a printable format.
Note: Depending on how your system is configured, you may not see the Logout button on the right.
Risk Categories User List
This list shows the users with a particular Overall Risk Level and identifies their Risk Level for each of
the Categories. You can open their Risk Report by clicking on the link in that column.
Analyze ▪ 55
You can export this report to an Excel spreadsheet, or a Word document, and save it for further use.
You can print this report by selecting the Print button to put the information into a printable format.
Note: Depending on how your system is configured, you may not see the Logout button on the right.
Risk Categories User History
You can click on the User ID column to see how a user's risk history has changed over time.
56 ▪ User Guide
You can export this report to an Excel spreadsheet, or a Word document, and save it for further use.
You can print this report by selecting the Print button to put the information into a printable format.
Note: Depending on how your system is configured, you may not see the Logout button on the right.
Risk Factors
These reports show the Risk Factors for each Risk Category for the nearest whole week to the date
selected in the Report Options panel.
Group
Select the group that you want to view the report for by clicking the drop-down arrow next to the
Report Group.
Week Ending
In the Week Ending field, either enter the date for the last day of the week that you want to
report on, or select the date by clicking on the calendar icon.
Note: These reports display data in weekly periods, from a Monday to a
Sunday. So, for example, if you select a date that is a Tuesday, then the
report date will default to the following Sunday of that week.
User List
Click to view the levels of risk for each reported category, for each user in the selected group.
These reports allow you to quickly identify prevalent areas of risk.
You can export this report to an Excel spreadsheet, or a Word document, and save it for further use.
You can print this report by selecting the Print button to put the information into a printable format.
Note: Depending on how your system is configured, you may not see the Logout button on the right.
Analyze ▪ 57
Computer Use
This page shows a chart of the risk factors present for the users in the selected group. This report
allows you to quickly identify prevalent areas of risk.
User List
Use this page to view a list of Users with risk factors for this Risk Category.
Group
Select the group that you want to view the report for by clicking the drop-down arrow next to the
Report Group.
In the Week Ending field, either enter the date for the last day of the week that you want to
report on, or select the date by clicking on the calendar icon.
Week Ending
Note: These reports display data in weekly periods, from a Monday to a
Sunday. So, for example, if you select a date that is a Tuesday, then the
report date will default to the following Sunday of that week.
Click Apply to show the report.
User Name
First Name
Last Name
Click to show the Risk Factor history of this user, and link to a Risk Report.
The first name of the user.
The last name of the user.
Risk Factors Present
The number of Risk Factors present for this user out of the total number of Risk Factors that apply
to this category.
Risk Report
Click to display a Risk Report for this user.
Risk Factors
Use this page to see which Risk Factors are present for this user.
Speed & Intensity
This page shows the risks associated with how quickly and intensely the selected group uses the
computer.
User List
Use this page to view a list of Users with risk factors for this Risk Category.
Group
Select the group that you want to view the report for by clicking the drop-down arrow next to
the Report Group.
In the Week Ending field, either enter the date for the last day of the week that you want to
report on, or select the date by clicking on the calendar icon.
Week Ending
Note: These reports display data in weekly periods, from a Monday to a
Sunday. So, for example, if you select a date that is a Tuesday, then
the report date will default to the following Sunday of that week.
Click Apply to show the report.
User Name
First Name
Click to show the Risk Factor history of this user, and link to a Risk Report.
The first name of the user.
58 ▪ User Guide
Last Name
The last name of the user.
Risk Factors Present
The number of Risk Factors present for this user out of the total number of Risk Factors that
apply to this category.
Risk Report
Click to display a Risk Report for this user.
Risk Factors
Use this page to see which Risk Factors are present for this user.
Compliance
This page shows a chart of the risk distributions for each of the Risk Factors for the Compliance
category for the selected group of users.
User List
Use this page to view a list of Users with risk factors for this Risk Category.
Group
Select the group that you want to view the report for by clicking the drop-down arrow next to the
Report Group.
In the Week Ending field, either enter the date for the last day of the week that you want to
report on, or select the date by clicking on the calendar icon.
Week Ending
Note: These reports display data in weekly periods, from a Monday to a
Sunday. So, for example, if you select a date that is a Tuesday, then the
report date will default to the following Sunday of that week.
Click Apply to show the report.
User Name
First Name
Last Name
Click to show the Risk Factor history of this user, and link to a Risk Report.
The first name of the user.
The last name of the user.
Risk Factors Present
The number of Risk Factors present for this user out of the total number of Risk Factors that apply
to this category.
Risk Report
Click to display a Risk Report for this user.
Risk Factors
Use this page to see which Risk Factors are present for this user.
Posture & Workstation
This page shows the risks associated with the Posture and Workstation practices of the selected group.
User List
Use this page to view a list of Users with risk factors for this Risk Category.
Group
Select the group that you want to view the report for by clicking the drop-down arrow next to the
Report Group.
Analyze ▪ 59
In the Week Ending field, either enter the date for the last day of the week that you want to
report on, or select the date by clicking on the calendar icon.
Week Ending
Note: These reports display data in weekly periods, from a Monday to a
Sunday. So, for example, if you select a date that is a Tuesday, then the
report date will default to the following Sunday of that week.
Click Apply to show the report.
User Name
First Name
Last Name
Click to show the Risk Factor history of this user, and link to a Risk Report.
The first name of the user.
The last name of the user.
Risk Factors Present
The number of Risk Factors present for this user out of the total number of Risk Factors that apply
to this category.
Risk Report
Click to display a Risk Report for this user.
Risk Factors
Use this page to see which Risk Factors are present for this user.
Discomfort
This page shows the risk distributions for each of the Risk Factors for the Discomfort category for the
users in the selected group. The Risk Factors are a breakdown of the Discomfort category into its
constituent parts.
User List
Use this page to view a list of Users with risk factors for this Risk Category.
Group
Select the group that you want to view the report for by clicking the drop-down arrow next to the
Report Group.
In the Week Ending field, either enter the date for the last day of the week that you want to
report on, or select the date by clicking on the calendar icon.
Week Ending
Note: These reports display data in weekly periods, from a Monday to a
Sunday. So, for example, if you select a date that is a Tuesday, then the
report date will default to the following Sunday of that week.
Click Apply to show the report.
User Name
First Name
Last Name
Click to show the Risk Factor history of this user, and link to a Risk Report.
The first name of the user.
The last name of the user.
Risk Factors Present
The number of Risk Factors present for this user out of the total number of Risk Factors that apply
to this category.
Risk Report
Click to display a Risk Report for this user.
Risk Factors
Use this page to see which Risk Factors are present for this user.
60 ▪ User Guide
Individual
This page shows the risk distributions for each of the Risk Factors for the Individual category for the
users in the currently selected group.
User List
Use this page to view a list of Users with risk factors for this Risk Category.
Group
Select the group that you want to view the report for by clicking the drop-down arrow next to
the Report Group.
In the Week Ending field, either enter the date for the last day of the week that you want to
report on, or select the date by clicking on the calendar icon.
Week Ending
Note: These reports display data in weekly periods, from a Monday to a
Sunday. So, for example, if you select a date that is a Tuesday, then
the report date will default to the following Sunday of that week.
Click Apply to show the report.
User Name
First Name
Last Name
Click to show the Risk Factor history of this user, and link to a Risk Report.
The first name of the user.
The last name of the user.
Risk Factors Present
The number of Risk Factors present for this user out of the total number of Risk Factors that
apply to this category.
Risk Report
Click to display a Risk Report for this user.
Risk Factors
Use this page to see which Risk Factors are present for this user.
Psychosocial
This page shows the risk distributions for each of the Risk Factors for the Psychosocial category for the
users in the currently selected group. The Risk Factors are a breakdown of the Psychosocial category
into its constituent parts.
User List
Use this page to view a list of Users with risk factors for this Risk Category.
Group
Select the group that you want to view the report for by clicking the drop-down arrow next to the
Report Group.
In the Week Ending field, either enter the date for the last day of the week that you want to
report on, or select the date by clicking on the calendar icon.
Week Ending
Note: These reports display data in weekly periods, from a Monday to a
Sunday. So, for example, if you select a date that is a Tuesday, then the
report date will default to the following Sunday of that week.
Click Apply to show the report.
User Name
First Name
Click to show the Risk Factor history of this user, and link to a Risk Report.
The first name of the user.
Analyze ▪ 61
Last Name
The last name of the user.
Risk Factors Present
The number of Risk Factors present for this user out of the total number of Risk Factors that apply
to this category.
Risk Report
Click to display a Risk Report for this user.
Risk Factors
Use this page to see which Risk Factors are present for this user.
Statistics
Computer Use
Use this report to see Computer Use statistics for a group that you specify. There are two types of
report available from this page: daily or weekly reports.
Daily reports show data that is calculated on a daily basis. These reports are useful if you want a report
on a specific period, for example 1st to 31st July. Weekly reports show the results for data collected
for whole weeks beginning on a Monday, and ending on a Sunday with averages displayed in weeks
rather than days.
Click on any of the column headings to sort on that column.
You can click on the User ID to show statistics for individual users.
You can export this report to an Excel spreadsheet, or a Word document, and save it for further use.
You can print this report by selecting the Print button to put the information into a printable format.
Note: Depending on how your system is configured, you may not see the Logout button on the right.
62 ▪ User Guide
Compliance
Use this page to list statistics showing how compliant users are with taking their prompted breaks and
exercises. There are two types of report available from this page: daily or weekly reports.
Daily reports show data that is calculated on a daily basis. These reports are useful if you want a report
for a specific period, for example 1st to 31st July. Weekly reports show the results for data collected
for whole weeks beginning on a Monday, and ending on a Sunday with averages displayed in weeks
rather than days.
Click on a column heading to sort on that column.
You can click on the User ID to show statistics for individual users.
You can export this report to an Excel spreadsheet, or a Word document, and save it for further use.
You can print this report by selecting the Print button to put the information into a printable format.
Note: Depending on how your system is configured, you may not see the Logout button on the right.
Application Usage
Application Usage
This feature is available to those who that been assigned a Wellnomics Administrator role. It allows
data relating to application usage recorded in WorkPace to be exported from Wellnomics Risk
Management to Microsoft Excel. From here it may be subjected to analysis or moved to another 3rd
party product for analysis e.g. SPSS etc. Some points to note about the Application Usage feature:The feature can only be used if application related data is being recorded in Wellnomics WorkPace.
The recording of Application Usage Statistics can be enabled/disabled in WorkPace in the Recording
Options configuration panel (accessed in WorkPace via Statistics >> Recording Options.
Application Usage Statistics recording is limited to the top 20 (in terms of time) applications used by
each user each day. The application list may therefore differ day to day for the same user.
Analyze ▪ 63
The data output will be by user, per day and data relating to up to 20 applications will be identified
per user per day of use. This can result in very large data files being created e.g. for a single user for
one year this could result in 4800 rows of data (48 weeks x 5 days x 20 applications). For this reason it
may take some time to create and export data files using this feature. Users should be aware of this
when setting their filter options.
Using the Application Usage Feature
The Application Usage feature is accessed through Analyze >> Application Usage menu option. The
feature allows the user to define a limited number of parameters – Filter Options, prior to creating an
export file. These Filter Options are:Group
Use this option to restrict the list by available groups
From
The start of the date range for data you wish to export
To
The end of the date range for data you wish to export
Exclude applications
used less than
This allows minor applications (in terms of time used) to be excluded from the
compiled data for each user. The default time is 5 minutes. If this is increased
it will exclude more applications. If this is increased it will allow more
applications to be increased but only up to 20 applications per user per day. In
order to control the amount of data that has to be identified and exported
users are advised not to reduce this value to below 5 minutes per day.
Checking this box allows HR related data (as contained in the imported HR file)
to be appended to each line of data in the export. This allows such data to be
used to analyze the data in external applications. If there is no intention of
using this data for analysis this box should NOT be checked because it has the
potential to add a significant amount of data (and hence time to compile and
export) to the export file
Include additional HR
data
Export
Clicking the Export link will begin the data compilation – depending upon the
filter options this may take some time.
64 ▪ User Guide
The Export Data Window
Prior to committing to the export stage the number of records (rows of data) identified during the first
stage will be displayed. To export the identified data click on the Export Data button. If no records are
identified or if the export is not to proceed click on the "Close this window" link which will return the
user to the Application Usage Filter Options page. Depending upon the number of records identified,
the compilation of the export file might take some time. Once the export has completed Microsoft
Excel will open with exported data displayed.
Exporting to Microsoft Excel
Please note the following Microsoft Excel row limits when exporting:Pre Excel 97 limit is 16,384 rows
Excel 97 - 2003 limit is 65,536 rows
Excel 2007 – present is 1,048,576 rows
Analyze ▪ 65
Assessment Reference Point (ARP) Compliance
This function is available to Managers and those who have been assigned a Local Administrator or
Administrator role if Assessment Reference Points have been configured for use.
This feature is accessible from the Identify Menu and Assessment Reference Point (ARP) Compliance
option.
The feature displays a report that identifies users that have (or have not) completed all of their
available (i.e. system enabled) Assessment questionnaires and hence have had an Assessment
Reference Point created, within a defined date period.
Filter Options available from this page:Group
Use this option to restrict the list by available groups
From
The start of the date range you wish to report on
To
The end of the date range you wish to report on.
Note that if a user has more than one Assessment Reference Point within the
date range being reported on only the most recent will be displayed in the
report.
Overall Risk as of
This allows the user to report on the Overall Risk as at a defined date and this
is displayed in the last column of the processed report (see below).
The report automatically displays the Overall Risk value as at the date the
reported Assessment Reference Point was created.
Display Training (checkbox)
Checking this box will add an additional column "Training Completion Date" to
the standard report showing the last date that Wellnomics Risk Management
training was completed.
Note that this is for information only, Training is not relevant to the creation
of an Assessment Reference Point.
This field does not have a filtering function therefore If no Training has been
completed by a reported user this column will be blank for that user.
Show Not Completed (checkbox)
If this box is not checked then the report will list those users that have an
Assessment Reference Point within the date range being reported.
Checking the box will list those users that do not have an Assessment
Reference Point within the date range and Group being reported on
66 ▪ User Guide
ARP Event
Where more than one Assessment Reference Point (ARP) exists for a user
within the reporting period there is the option to report on either the earliest
or the latest event in the period.
First in Period selects the earliest ARP (where more than one exists per user).
Last in Period selects the latest ARP (where more than one exists per user)
ARP Event
Choose between First in Period and Last in period
Within the selected range it is possible for more than one Assessment
Reference Points to be created for an individual. If such a case should arise,
the reporter can select whether the first or last ARP created during the period
is listed in the report
Apply
The Report
This button applies the options chosen above and re-lists
the relevant records in the tabular report view which is
displayed.
The report displays the following columns :User ID, First Name, Last Name: Identifies the user. Clicking on the User ID
field will take you to an Assessment Reference Point History for that user (see
below).
Note that if a user has more than one Assessment Reference Point within the
date range being reported on only the most recent will be displayed in the
report. Additional ARPs can be viewed via the Assessment Reference Point
History for that user via the User ID link.
Supervisor: The supervisor or manager as defined within the HR import file
(staff list).
Overall Risk at ARP: The Overall Risk for the user as at the date the
Assessment Reference Point was created (see next column). Note that if the
"Show Not Completed" checkbox is checked this column does not appear in the
report.
ARP Date: The date the Assessment Reference Point was created. Note that if
the "Show Not Completed" checkbox is checked this column does not appear in
the report.
Overall Risk as on XXXX: This is the Overall Risk of the user as at the date
specified in the "Overall Risk as of" parameter in the options panel.
Training Completion Date: NB This column is only displayed if the Display
Training checkbox is checked in the options panel.
This is the last date that the user completed Ergonomics Training in
Wellnomics Risk Management
Act ▪ 67
14 ACT
In This Chapter:
Send Risk Messages ..................................................................................... 67
Change User Settings Profiles ......................................................................... 69
Send Risk Messages
Use this feature to identify staff members that you wish to notify of their Risk Levels and
Recommendations.
The Risk Factors that are present combine into the Risk Category and ultimately the Overall Risk. The
Risk Management process operates as follows:
1 For each of the users in the selected Group, Wellnomics Risk Management determines whether or not
there are Recommendations currently present for each Risk Category.
2 The manager identifies these users and uses Wellnomics Risk Management to send them an email. This
email gives the user a list of recommendations that will help them address their Risk Factors.
Once the email is sent Wellnomics Risk Management records those users that have been sent an email
for the Risk Categories selected through the users Action Log.
The users are once again eligible to be reminded via email about their risks once the Risk Reminder
Period of time has elapsed. The system administrator configures the Risk Reminder Period on a systemwide level. Typically this period is 2 weeks.
Options
The Send Risk Messages function is accessed via Risk > Act > Send Risk reports.
The Send Risk Messages function operates as a 3 or 4 step Wizard depending
upon the privacy access level assigned. Your progress thorough the stages of
the Wizard is summarized in the progress trail at the top of the screen.
Wizard Step 1: Select Criteria
The first step of the wizard allows you to select the users who will receive the
Risk Message and the Risk Categories that will be included in the email. The
page contains the following:To: Displays today's date, the date at which the Assessments data (if used) is
current. Note that the Computer Use, Speed and Intensity and Compliance
data used in the email message is dated as at the previous Sunday (when such
data is subject to weekly updating)
Group: Allows selection of the group to which the email will be sent.
Overall Risk Level: Select which Overall Risk Level users are to receive the
Risk Message
Risk Category (column): The individual risk categories that contribute to the
Overall Risk Level.
68 ▪ User Guide
Users with recommendations present: The number of users that have
recommendations present for this Risk Category.
Users already emailed: The Users that you have already reminded about their
recommendations.
Users Due to be Emailed: The number of users that will be emailed with
details of recommendations to reduce their Risk Levels for this Risk Category.
Include Category in Email?: Check the box, or boxes for the Risk Category that
you want to send recommendation reminder emails for. For Example, you may
only want to remind users about the recommendations for reducing Posture
and Workstation risks.
Review (button): Click to show a summary of the number of users that will
receive an email and the risk categories to be included in the email.
Next: The Next Button takes you to the next stage of the Wizard. If you do not
have access to individual users, the next stage will be Confirmation (Step 3). If
you do have access to individual user details, the next step will be the User
List.
Wizard Step 2: User List
This page provides a tabular view of the users to be emailed (one to each row)
along with the details of the number recommendations per Risk Category
(displayed as columns) that will be included in the email.
Note that if your group contains a large number of users this page may take a
number of seconds to load.
Within this page you have the following options :Select /Unselect Users: This is done using the first column. Repeatedly
clicking on the column header selects or unselects all users on the page.
Unselected users will be removed from the email list. Individual users can be
selected/unselected by clicking on the checkbox next to their UserID in the
first column.
Preview Email: Clicking on the email icon on the User row (end column)
allows you to preview the actual email content to be sent to that user. Note
that email content is personal to each user depending upon their individual
risks.
The page view can be sorted in the order of the contents of the columns listed
below, by clicking on the column header:UserID, First Name, Last Name
Back (button) : Takes you back to the Select Criteria (Step 1) page
Next (button) : Takes you to step 3 of the Wizard - Confirmation
Wizard Step 3: Confirmation
This page provides a summary of the number of users to be emailed and the
Risk Categories to be included in the email. This page has the following
options:Back (button): Returns the user to the previous stage of the Wizard. For users
with access to individual user details this will be to the User List. If you have a
large user list you may wish to avoid re-listing users, if so use the Select
Criteria (button).
Select Criteria (button): Returns the user to Step 1 of the Wizard.
Send (button): Clicking on the Send button sends the emails detailed in the
on-screen summary to your email system for posting. This takes the user to
Step 4 of the Wizard.
Act ▪ 69
Wizard Step 4: Send Complete
This page provides confirmation of the number of emails sent along with
details of the Risk Categories covered.
It also provides confirmation of the creation of an entry into the action log of
each of the users emailed.
Within this page you have the following options:Send More (button): Returns the user to the first page of the Wizard where
new criteria can be selected.
Finish (button): Returns the user to their Home page (as defined by
preference)
User List
Use this page to display a list of users and the number of recommendations they have for each
category.
User Name
The name of the User to be Emailed. Click on the name
to display a summary for this user.
Preview Email
Click to preview the Email that will be sent.
Change User Settings Profiles
WorkRhythm ships with eight Settings Profiles:
• 1. Monitor Only
• 2. Standard Breaks
• 3. Effective Settings Enforced
• 4. Micropause Compliance Enforced
• 5. Micropause and Break Compliance Enforced
• 6. Recovery Settings Low
• 7. Recovery Settings Medium
• 8. Recovery Settings High
The Wellnomics IT Administrator can create more if needed. For more information about this, see
Settings Profiles.
70 ▪ User Guide
Managers can run a report to find High Risk Users who need to be moved to a more effective Settings
Profile.
To do this:
• Select Act>Change User Settings Profiles from the menu
• Select the Group and Risk Levels that you want to report on. For example, you may want to identify
all Users with a High Overall Risk, who are currently using either of the default Settings Profiles.
• Select the Settings Profile that you want to move the users to from the drop-down list. For
example, you may want to move High Risk Users to the next level Settings Profile "WRM Effective
Settings Enforced".
• Click "Move Selected Users to Settings Profile". A confirmation page is displayed. Check that the
information is correct and click "Yes" to change the Settings Profile for these users.
A message is displayed when the user's profiles are successfully updated.
Note: Once the settings profiles of a list of users has been changed it is not possible to "undo" the
changes made
• Continue to monitor users and change their Settings Profiles accordingly.
A note is created in the User's Actions log to tell them when their Settings Profile was change, and by
whom.
You can export this report to an Excel spreadsheet, or a Word document, and save it for further use.
You can print this report by selecting the Print button to put the information into a printable format.
Note: Depending on how your system is configured, you may not see the Logout button on the right.
Settings Profiles
The table below lists the Settings Profiles in the order that they should be used. Each Settings Profile is
based on the previous settings with additional enforcements.
1. Monitor Only
Data is collected and synchronized with Wellnomics Risk Management, but Breaks and Exercises are
not activated. When sufficient data is collected to determine the user's risk levels the user can be
changed to an appropriate profile.
The operation of the software on the desktop is silent and transparent to the user.
2. Standard Breaks
Micropauses and Rest Breaks are turned on, and can't be turned off by users through the WorkPace
console.
Users can set whether they can ignore prompts for breaks, and how many times they can ignore them.
Act ▪ 71
3. Effective Settings
Enforced
Micropauses and Rest Breaks are turned on, and can't be turned off by users through the WorkPace
console. Exercises are prompted during Rest Breaks.
The interval between micropauses can be set by the user to between 2 and 8 minutes and must last for
between 5 and 30 seconds.
The interval between Rest Breaks can be set by the user to between 10 and 60 minutes and must last
for between 5 and 30 minutes.
A Daily Limit is set for each user. The user can set the time that they can spend using the computer
each day to between 1 and 6 hours.
A Weekly limit is set for each user. The user can set the time that they can spend using the computer
each week to between 5 and 35 hours.
Users can set whether they can ignore prompts for breaks, and how many times they can ignore them.
4. Micropause
Compliance Enforced
Micropauses and Rest Breaks are turned on, and can't be turned off by users through the WorkPace
console. Exercises are prompted during Rest Breaks.
The interval between micropauses can be set by the user to between 2 and 8 minutes and must last for
between 5 and 30 seconds.
The interval between Rest Breaks can be set by the user to between 10 and 60 minutes and must last
for between 5 and 30 minutes.
A Daily Limit is set for each user. The user can set the time that they can spend using the computer
each day to between 1 and 6 hours.
A Weekly limit is set for each user. The user can set the time that they can spend using the computer
each week to between 5 and 35 hours.
Users cannot ignore micropause prompts.
5. Micropause and
Break Compliance
Enforced
Micropauses and Rest Breaks are turned on, and can't be turned off by users through the WorkPace
console. Exercises are prompted during Rest Breaks.
The interval between micropauses can be set by the user to between 2 and 8 minutes and must last for
between 5 and 30 seconds.
The interval between Rest Breaks can be set by the user to between 10 and 60 minutes and must last
for between 5 and 30 minutes.
A Daily Limit is set for each user. The user can set the time that they can spend using the computer
each day to between 1 and 6 hours.
A Weekly limit is set for each user. The user can set the time that they can spend using the computer
each week to between 5 and 35 hours.
Users cannot ignore micropause prompts, and can only ignore 1 rest break prompt.
6. Recovery Settings
Low
Micropauses and Rest Breaks are turned on, and can't be turned off by users through the WorkPace
console. Exercises are prompted during Rest Breaks.
The interval between micropauses can be set by the user to between 2 and 4.5 minutes and must last
for between 10 and 60 seconds.
The interval between Rest Breaks can be set by the user to between 10 and 45 minutes and must last
for between 6 and 30 minutes.
A Daily Limit is set for each user. The user can set the time that they can spend using the computer
each day to between 1 and 6 hours.
A Weekly limit is set for each user. The user can set the time that they can spend using the computer
each week to between 10 and 30 hours.
Users can ignore 1 micropause prompt, and up to 2 rest break prompts.
72 ▪ User Guide
7. Recovery Settings
Medium
Micropauses and Rest Breaks are turned on, and can't be turned off by users through the WorkPace
console. Exercises are prompted during Rest Breaks.
The interval between micropauses can be set by the user to between 2 and 3.5 minutes and must last
for between 12 and 60 seconds.
The interval between Rest Breaks can be set by the user to between 10 and 45 minutes and must last
for between 6 and 30 minutes.
A Daily Limit is set for each user. The user can set the time that they can spend using the computer
each day to between 1 and 4 hours.
A Weekly limit is set for each user. The user can set the time that they can spend using the computer
each week to between 10 and 20 hours.
Users cannot ignore micropause prompts. They can ignore up to 2 rest break prompts.
8. Recovery Settings
High
Micropauses and Rest Breaks are turned on, and can't be turned off by users through the WorkPace
console. Exercises are prompted during Rest Breaks.
The interval between micropauses can be set by the user to between 2 and 3 minutes and must last for
between 30 and 60 seconds.
The interval between Rest Breaks can be set by the user to between 10 and 15 minutes and must last
for between 20 and 30 minutes.
A Daily Limit is set for each user. The user can set the time that they can spend using the computer
each day to between 1 and 2.5 hours.
A Weekly limit is set for each user. The user can set the time that they can spend using the computer
each week to between 5 and 12.5 hours.
Users cannot ignore micropause prompts. They can ignore up to 1 rest break prompts.
15 TOOLS
In This Chapter:
Find User ................................................................................................. 72
Delegated Reporting ................................................................................... 73
Manage Groups .......................................................................................... 75
Suspend Users ........................................................................................... 81
Change Password ....................................................................................... 82
Preferences .............................................................................................. 82
Report on Behalf ........................................................................................ 83
Find User
Use this page to find a user and view their Risk Profile.
Tools ▪ 73
Note: You can enter the first part of a User ID, or name and press Enter and Wellnomics will search for
users who match the search criteria. If there is only one match, you will be taken to the user's Risk
Profile page. If there is more than one match, a list of users is displayed and you can select from the
list.
To find a User:
• Type in either their User ID, or the First Name, or Last Name of the user you wish to find. The User
ID is a user's unique identification in Wellnomics Risk Management. It comes from the Human
Resources file that is imported into the IT Administration website.
• Click Find.
• If there is more than one match for your search criteria, a list of users will be displayed. Click on
the user you wish to view.
• The User Summary page is displayed
• To exit, choose a different option from the menu.
User Summary
This page is the manager or administrators view of the users My Risk profile page. It shows the user's
current risk overview, and the status of their scheduled assessments and training (if these are in use).
Click the RSI Risk Report link to show the user's overall RSI risk, recommendations for improvement and
a profile of each Risk Category.
Note: This page contains a link (Schedule Assessment) that allows Assessments to be scheduled for just
this user.
Delegated Reporting
This feature allows Managers and Local Administrators to assign other users to run reports on their
behalf by allowing that user to "impersonate them" for the purposes of reporting. Before Delegated
Reporting can be configured and used it must first be enabled at system level by the Wellnomics
Administrator (see Admin > Policy Administration > Delegated Reporting).
Assigning Reporting Delegates
Before a user can report on behalf of a Manager/Local Administrator, they must first assign that user
the delegated reporting function. This is done in the Add or Remove Delegates page (Tools > Delegated
Reporting > Assign Reporting Delegates). This page can also be used to view and amend previously
delegated users. A Manager/Local Administrator can delegate reporting to more than one user; the
users can be either - end users or Managers.
74 ▪ User Guide
Adding a Delegate
Find User
Available Users
Use the User ID, First Name and last Name fields to identify the user or users you wish to delegate the
reporting function to.
Users that the match the search criteria will be listed in the Available Users pane. Note that if a wildcard (*
character) is used in any of the search fields all possible users will be listed. Use the Add>> button to move
on or more users to the Delegates.
Save
Use this to button Save any changes you have made since accessing the page.
Cancel
Use this button to Cancel any changes you have made since accessing the page.
Removing Existing Delegates
Removing Existing
Delegates
If you wish to remove users from the list of Delegates, highlight the user(s) in the Delegates pane and Click
on the <<Remove button. Click on the Save button to save your changes.
Reporting on Behalf of a Manager/Local Administrator
In order to act on behalf of a Manager/Local Administrator an end user first needs to select the menu
option "Report on Behalf". If the user wishing to Report on Behalf is themselves a Manager they will
find the menu option under Tools > Delegated Reporting > Report on Behalf. If the user wishing to
Report on Behalf is not a Manager the menu option will appear as a tab on the main menu bar.
The Report on Behalf menu takes the user to the Delegated Reporting – Report on Behalf page where
the user selects the Manager/Local Administrator they wish to report on behalf of. Highlight the
relevant Manager/Local Administrator and click on the Go button. The user is prompted by a dialogue
"Are you sure you want to start delegated reporting". If the user selects OK they are given access to the
reporting functions of the user they are reporting on behalf of. A yellow banner, visible at the top of
all pages viewed during the "reporting on behalf of" session, indicates the nature of the session e.g.
Mickey Mouse reporting on behalf of Donald Duck. An End button is available at the end of this status
bar which is used to end the session, at which time the user will be returned to their own access and
permissions (see below).
Points to Note When Reporting on Behalf
All reports, whether exported or printed will display, in the heading, the nature of the user e.g. Mickey
Mouse (mmouse) on behalf of Donald Duck (dduck)
Access to the My Risk page of the user being reported on behalf of is not visible to the delegated
reporter.
Tools ▪ 75
Ending a "Report on Behalf" Session
In order to end a "report on behalf" session click on the End button located on the right of the session
status banner. A dialogue "Are you sure you want to end delegated reporting?" is displayed. Click on the
OK button to return to normal access and permissions or Cancel to resume reporting on behalf.
Manage Groups
Use this page to view your current Wellnomics groups and to rename, edit or create your personal
groups.
76 ▪ User Guide
Current Groups
The name of the group:
Me
The currently logged in user (you).
Direct Reports
All users for who you are the direct Supervisor. This is defined in the organizational structure
information which is updated into the database regularly (through the HR Import). If the group is not
correct it may be because the organizational structure information is incorrect or out of date.
All Staff Under Me
All users under you in the organizational hierarchy. This includes your direct reports. If none of your
direct reports are themselves Supervisors, you will not see this group.
Everyone
All users in the Wellnomics database. Only available to a Wellnomics Administrator.
Groups Other Than Those Named Above
The groups named above (Me, Direct reports, All Staff Under Me and Everyone (if applicable) are
created automatically by the system and updated on each HR file import (staffing) update. These
groups have the Type description of System Groups.
Any groups that you have created for your own use will be listed after these automatically created
System Groups. Note that you cannot edit or delete system created groups. Groups you create yourself
will be allocated a type of either Select HR Fields or Select User
Local Administrator Type Groups
If you have been assigned a Local Administrator role by a Wellnomics Administrator the Local
Administrator groups that you can report on will be listed below those you have created for your own
use and will have the Type description of Local Administrator
Users in Group
The number of users in this group.
Type
The type of group:
System
These groups are automatically created for you according to the organizational structure information.
Select HR Field
Custom groups that you have created based on HR Fields. Note that these groups will only contain users
that you have access to. These groups are automatically updated with changes in the HR file (staff file)
Select User
Custom groups that you have created based on individually Selected Users, HR field based groups where
users have been removed, or HR Fields plus individually selected users. Note that you can only create
groups containing users that you have access to.
Edit/Delete
Allows Groups which you have created to be edited or deleted. Editing includes the ability to rename a
group.
Note: You can only Edit (including renaming) or Delete groups that you have
created. You cannot therefore Edit or Delete System or Local Administrator
type groups
Add New Group
Click to add a new group.
Tools ▪ 77
Editing and Deleting Groups
As a user, you have the option to Edit the groups you have created. In this context edit means either
re-naming the group or changing the users in the group:• Renaming a Group
• Amending the contents of a Group
Editing a Select HR Fields Type Group
Edit
Click on the Edit button next to the Group you wish to edit
Highlight the Filter by HR Fields tab
Group Name
You can amend the Group name in this field. If there are no other changes. Select the SAVE or SAVE
AND CLOSE button to confirm changes
Edit
New values are added by moving the required value from the Available pane to the Selected pane and
clicking on the OK button. The Selected Users list on the right of the page will be refreshed to reflect
the users that match the new selection.
Existing values can be removed by moving the required value from the Selected pane to the Available
pane and clicking on the OK button. The Selected Users list on the right of the page will be refreshed
to reflect the users that match the new selection.
If there are no other changes. Select the SAVE or SAVE AND CLOSE button to confirm changes
Delete
Use this button to Delete a field type altogether.
If there are no other changes. Select the SAVE or SAVE AND CLOSE button to confirm changes
Add field
Use this button to add additional fields to those already selected.
Note that provided no users have been manually added or removed from the Select Users list the group
will continue to be called a Select HR Fields Group and behave in a dynamic manner i.e. it will be
automatically updated with changes in the HR data.
If there are no other changes.
Select the SAVE or SAVE AND CLOSE button to confirm changes.
Note that adding more values for an HR field can only ADD users to the Group Members table i.e. a
user becomes available to add to Selected Users list if they match any of the field values and not all of
the values.
Remove
This button is available against every Selected User.
Use this button to remove individual users from the Group.
Note that if one or more users are removed from a previously dynamic HR Field Type Group will
become a Select Users Group (see below) and will no longer be automatically updated with changes to
the HR data file. A warning is displayed when an existing HR Fields group is about to be changed to a
Select Users group.
If there are no other changes.
Select the SAVE or SAVE AND CLOSE button to confirm changes.
Editing a Select Users Type Group
Note that these instructions cover editing Select Users groups created either solely through selecting
individual users or through a combination of Individual User selection and HR Field criteria.
78 ▪ User Guide
Edit
Click on the Edit button next to the Group you wish to edit
Highlight the Select Individual Users tab
Group Name
You can amend the Group name in this field.
If there are no other changes.
Select the SAVE or SAVE AND CLOSE button to confirm changes
Find
Use the User ID, First Name or Last Name fields to search for and Add additional users.
See How To Use Searching below.
Remove
This button is available against every Group Member.
Use this button to remove individual users from the Group.
Note that if one or more users are removed from a previously dynamic HR Field Type Group will become
a static Group.
If there are no other changes.
Select the SAVE or SAVE AND CLOSE button to confirm changes.
Adding or
Removing Users
based on HR
Fields
If you wish to add multiple users based on HR field criteria you can do so by clicking on the Filter by HR
Fields tab and selecting appropriate fields and field values thereby adding users that match the HR field
criteria to Selected Users list. See "Creating a New Select HR Fields Type Group" for further details on
how to add HR fields and field values
Alternatively you can remove users by removing previously chosen field criteria and values.
Select the SAVE or SAVE AND CLOSE button to confirm changes.
Add New Group
Types of Groups
It is possible to create the following type of Groups:• One based solely on the HR field data.
Note: This type of group is Dynamic in that the contents will change as the HR file (staff list) changes.
These Groups are described as "Select HR Field" in the Type column of the Manage Groups page.
• One based solely on selected individual users (to which you have access).
Note: This type of group is static in nature in that the contents are fixed and are independent of
changes to the HR file (staff list) other than where a user is removed from the HR file e.g. they have
left the organization. These Groups are described as "Select Users" in the Type column of the Manage
Groups page.
• One based on a combination of HR data selected users and individually selected users.
Tools ▪ 79
Note: This type of group is static in nature in that the contents are fixed and are independent of
changes to the HR file (staff list) other than where a user is removed from the HR file e.g. they have
left the organization. These Groups are described as "Select Users" in the Type column of the Manage
Groups page.
Creating Groups
Creating Filter by HR Fields
• Click on the Add New Local Administration Group button
• Enter a Group name (this can be done later at the point of saving, if necessary)
• Click on the Filter by HR Fields Tab to highlight it.
• Click on the down arrow next to the field next to the field in the HR field column to expand the HR
field choices
• Click on the first field on which you wish to select users e.g. Department
The "Available" pane will indicate the field values available. The field adjacent to the SEARCH button
will allow you to search for values where values are too numerous (see How to Use Searching below)
• Use your mouse to highlight one or more field values. You can use the standard Shift and/or Ctrl
keys to do multiple selections.
• Once your field values are highlighted, click on the DOWN arrow below the "Available" pane to move
the selected values to the "Selected" pane below. Note that it is possible to de-select field values by
highlighting them in the "Selected" pane and clicking on the UP arrow. This will move the values
back into the "Available" pane.
• Click on the OK button next to the "Selected" pane to confirm your selections
• Users that meet your field and values selections will be displayed in the Selected Users table on the
right of the screen. If desired, members can be removed from the Selected Users table using the
"Remove" button next to their name. If you do this the Group will cease to behave as a dynamic
Group and become a static Group
• If you wish to add additional field selections to your group click on the "Add HR Field" button and
repeat the field selection process. Note that adding more fields only has the potential to reduce the
number of users already selected. For a user to be selected where more than one field is specified
they must match the field values for all of the fields
Selection Using Supervisor ID Field
• When this field is chosen the Select By HR Fields page re-draws to optimize searching by Supervisor
Name. Once one or more Supervisors are selected and added to the "Selected" pane it is necessary
to confirm:• Whether the group is to be created from the selected Supervisor's Direct Reports or All Staff Under.
The default selection is Direct reports. To change this to All Staff Under, click on the adjacent radio
button.
• Whether the group should also contain the Supervisor (or Supervisors) upon whom the group is
based. Check the "Include Supervisor" checkbox to include Supervisors.
Note: It is not possible to create groups based on a combination of Supervisor ID Direct Reports AND All
Staff Under
80 ▪ User Guide
Note that Groups based solely on HR fields act as dynamic groups unless they have been edited by
adding or removing individual members from the Group.
Once you have finished your field selections you must name your group if you haven't already done so
before selecting either Save or Save and Close
Options to:-
• SAVE - Saves your created group and leaves the Create New Groups page onscreen.
• SAVE AND CLOSE - Saves your created group and exits to the Manage Groups page.
• CANCEL - Cancels your selections and returns to the Manage Groups page.
Select Individual Users
• Enter a Group name (this can be done later at the point of saving if necessary)
• Click on the Select Individual Users Tab to highlight it
Search for users using the following options:• User ID which will allow you to create a group by hand-picking users and adding them to the group
one by one. (The User ID is a user's unique identification in Wellnomics Risk Management. It comes
from the Human Resources file that is imported into the IT Administration website.)
• First Name which will allow you to create a group by hand-picking users and adding them to the
group one by one.
• Last Name which will allow you to create a group by hand-picking users and adding them to the
group one by one.
As users are identified, either individually or using the multiple selection options (use of Shift and/or
Ctrl), click on the Add>> button to add them to the Group Members list on the right of the screen
Note: Groups created using the Select Individual Users tab will act as a static Group.
A Combination of HR field and Select Individual Users
This type of Group, created through a combination of both HR Field criteria AND Select Individual Users
will act as a static Group. To create such a combination group:• Create a group based on HR fields as described above but do not SAVE or SAVE and CLOSE.
• Click on the Select Individual Users Tab
• Search for and Add individually Selected Users as described above. Note that if a User has already
been added to the Group Members table through the HR File option they will not appear in the
Available Users list in the Select Users tab, even if they match the User search criteria you have
used.
Once you have finished adding Users Click on either the SAVE or SAVE and CLOSE buttons to confirm
your selections.
Tools ▪ 81
Suspend Users
This feature allows Wellnomics Administrators and Local Administrators to remove selected users from
groups and reports.
There are occasions when users are legitimately in the HR file but are known to be inactive for a
temporary or even permanent period. e.g. a user on long term sick leave, secondment, sabbatical,
maternity leave etc. The Overall Risk for such users can become Unknown if their WorkPace related
data goes out of date i.e. after a period of 4 or more weeks of no data. Such users can adversely affect
the distribution of Overall Risk if they make up a significant proportion of the group in which they are
contained. The Suspend User feature allows such users to remain in the HR import file but to be
excluded from reports in which they would otherwise be included.
Suspending a User
In order to suspend a user it is first necessary to find the user using the search criteria of User ID
and/or First Name and/or Last Name. A search for users that are not currently suspended is carried out
using the fields on the left side of the Suspend user page. Users that match the search criteria are
listed in the Available Users pane. In order to exclude the user, highlight the entry in the Available
Users pane and move them to the Suspended Users pane by clicking on the Add >> button. Note that
users are suspended (and an entry added to the user’s Action Log) immediately after they are added to
the Suspended Users list. Repeat searches are possible to continue to add users to the Suspended Users
list. It is possible to return to the list at any time to add more users to the Suspended Users list.
Unsuspending a User
When you wish a user to be made "active" again i.e. "unsuspending them" you can do so by finding them
in the Suspended Users list, highlighting them and clicking on the << Remove button.
To find users in the Suspended users list use the search fields on the right side of the Suspend Users
page. Once a user is identified (using the User ID and/or the First Name and/or the Last Name search
criteria), highlight them and click on the << Remove button to move them out of the Suspended user
list. Note that immediately you move a suspended user out of the suspended user list they will
immediately become "active" and an entry will be added to their Action Log.
Notes on Suspending/Unsuspending Users
Once Suspended, a user cannot access Wellnomics Risk Management until they have been removed
from the Suspended Users list. When a suspended user attempts to access the system the following
warning will be displayed:"Your ability to log in to your account is currently suspended. Please contact your manager"
An entry will be added to the user’s Action Log each time they are suspended or unsuspended.
Someone delegated to report on behalf of a user that is subsequently suspended will be able to
continue to run reports on behalf of that user during the period of suspension.
82 ▪ User Guide
The following options are available in the Suspend User Page:
Note that this page has a left and right side pane with associated search fields. These fields operate
independently with the left side allowing searching for existing users that need to be suspended and
the right side allowing searching for suspended users so that they can be "unsuspended"
User ID
First Name
Last Name
Search
Clear
Add >>
<< Remove
Enter a unique value here to find a single user that
matches the entered User ID. Click on the Search button
to display any user that matches the User ID. Any
matching user will be displayed in the Available Users
pane
Enter a first name for a user here. Click on the Search
button to display any users that match the first name
criteria. Any matching users will be displayed in the
Available Users pane
Enter a first name for a user here. Click on the Search
button to display any users that match the first name
criteria. Any matching users will be displayed in the
Available Users pane
Use this button to execute the search based on the
criteria entered into the User ID, First Name or Last Name
fields
Use this button to clear entries in the search criteria
fields and any users from the available users list
Use this button to add highlighted users in the Available
Users list to the Suspended Users list
Use this button to remove highlighted from the Suspended
Users list, effectively "unsuspending them"
Change Password
To change your password:
• Enter your current password into the 'Old Password' field.
• Enter your new password in the 'New Password' field.
• Retype your new password in the 'Confirm New Password' field.
• Click Save.
The password is checked to ensure it is a valid password.
If the password is invalid, you will be asked to choose another password.
Once the password is saved, you must use it next time you login to the Wellnomics System.
Preferences
Use this page to select which page you want to show as your first Wellnomics Page, and how many rows
you want displayed on page lists and reports. If a list or report has too many rows to fit on a page, it
will split into several pages. You can then use the Next and Previous links to navigate through the
pages.
Tools ▪ 83
Report on Behalf
This menu item will be visible if a Manager or Local Administrator has delegated you to report on their
behalf. Note that more than one manager/Local Administrator can delegate their reporting ability to
you.
In order to report on behalf of a manager:• Click on the Report on Behalf menu item
• In the Delegated Reporting page use the drop down arrow to find and select the Manager you wish
to report on behalf of.
• Click on the Go button
You will now see a dialogue that asks "Are you sure you want to start delegated reporting?" If you wish
to proceed click on the OK button, if not click Cancel.
Your reporting on behalf of session will now begin. This is signified by the presence of the status bar
above the Wellnomics logo which is visible throughout the reporting session.
During the reporting on behalf session you will have access to the Manager's reporting pages and groups
however you will not be able to create new groups or edit existing groups.
All reports created will be titled with:
Created by: "your name" on behalf of "the name of the manager on whose behalf you are reporting"
When you wish to end your reporting on behalf of session, click on the END button on the status bar at
the top of the page. A dialogue asks "Are you sure you want to end delegated reporting?" If you wish to
end the session, click on OK at which point you will be returned to your My Risk Profile page. If you
click on Cancel, you will be returned to your reporting on behalf of session.
84 ▪ User Guide
16 ADMIN
In This Chapter:
Local Administration ................................................................................... 84
Policy Configuration .................................................................................... 90
Local Administration
Manage Roles
The Manage Roles screen allows the Wellnomics Administrator to view and edit any of the active users
in order to make them Local Administrators.
Users may be sorted in order of Unique ID, First Name, Last Name, their assigned Roles/Rights or their
Access Levels.
Note that only users that have been assigned a Local Administration Role will have entries in the
Roles/Rights and Access Levels Columns. Sorting on these columns therefore is the same as sorting
(searching for) Local Administrators
To re-sort the user list, simply click on any of the column headings. Each subsequent click on the same
column header will alternate the order between ascending and descending order.
Selecting the Edit button for a user will allow the Wellnomics Administrator to specify if user has Local
Administrator permissions.
Once the permission has been granted (using the Local Administrator Checkbox) It is then possible to
determine which Roles / Rights and Access Levels are applicable to each user. Note that unless
otherwise amended, the following defaults are applied to a user given Local Administrator status:Roles / Rights
Send Risk Messages = YES
View Everyone Group = NO
Change Global User Settings Profile = YES
Admin ▪ 85
Change Individual Settings Profile = YES
Access Levels - Those configured in the Data and Privacy Access Levels (See Admin > Policy
Configuration > Data and Privacy Access Levels).
More Refined Role for Local Administrators: Points to Note
The upgrade to Wellnomics Risk Management 2.6 will not change the existing Local Administrators
configuration or behavior.
If a local Administrator has had their data access and privacy levels amended from the default (as
configured in Data and Privacy Access Levels) and that default is subsequently changed, the new
defaults will be globally applied to all existing Local Administrators.
Manage Local Administration Groups
This function, which is available to Administrators through the Admin >> Local Administration >>
Manage Local Administration Groups menu option, allows Wellnomics Administrators to create groups
for use by Local Administrators.
Manage Local Administration Groups page - Use this page to view your current Local Administration
Groups and to rename, edit or create groups.
Creating a New Local Administration Group
Click on the Add New Local Administration Group
Types of Groups
It is possible to create the following type of Groups:• One based solely on the HR field data.
Note: This type of group is Dynamic in that the contents will change as the HR file (staff list) changes.
These Groups are described as "Select HR Field" in the Type column of the Manage Groups page.
• One based solely on selected individual users (to which you have access).
Note: This type of group is static in nature in that the contents are fixed and are independent of
changes to the HR file (staff list) other than where a user is removed from the HR file e.g. they have
left the organization. These Groups are described as "Select Users" in the Type column of the Manage
Groups page.
• One based on a combination of HR data selected users and individually selected users.
Note: This type of group is static in nature in that the contents are fixed and are independent of
changes to the HR file (staff list) other than where a user is removed from the HR file e.g. they have
left the organization. These Groups are described as "Select Users" in the Type column of the Manage
Groups page.
Creating Groups
Creating Filter by HR Fields
• Click on the Add New Local Administration Group button
• Enter a Group name (this can be done later at the point of saving, if necessary)
86 ▪ User Guide
• Click on the Filter by HR Fields Tab to highlight it.
• Click on the down arrow next to the field next to the field in the HR field column to expand the HR
field choices
• Click on the first field on which you wish to select users e.g. Department
The "Available" pane will indicate the field values available. The field adjacent to the SEARCH button
will allow you to search for values where values are too numerous (see How to Use Searching below)
• Use your mouse to highlight one or more field values. You can use the standard Shift and/or Ctrl
keys to do multiple selections.
• Once your field values are highlighted, click on the DOWN arrow below the "Available" pane to move
the selected values to the "Selected" pane below. Note that it is possible to de-select field values by
highlighting them in the "Selected" pane and clicking on the UP arrow. This will move the values
back into the "Available" pane.
• Click on the OK button next to the "Selected" pane to confirm your selections
• Users that meet your field and values selections will be displayed in the Selected Users table on the
right of the screen. If desired, members can be removed from the Selected Users table using the
"Remove" button next to their name. If you do this the Group will cease to behave as a dynamic
Group and become a static Group
• If you wish to add additional field selections to your group click on the "Add HR Field" button and
repeat the field selection process. Note that adding more fields only has the potential to reduce the
number of users already selected. For a user to be selected where more than one field is specified
they must match the field values for all of the fields
Selection Using Supervisor ID Field
• When this field is chosen the Select By HR Fields page re-draws to optimize searching by Supervisor
Name. Once one or more Supervisors are selected and added to the "Selected" pane it is necessary
to confirm:• Whether the group is to be created from the selected Supervisor's Direct Reports or All Staff Under.
The default selection is Direct reports. To change this to All Staff Under, click on the adjacent radio
button.
• Whether the group should also contain the Supervisor (or Supervisors) upon whom the group is
based. Check the "Include Supervisor" checkbox to include Supervisors.
Note: It is not possible to create groups based on a combination of Supervisor ID Direct Reports AND All
Staff Under
Note that Groups based solely on HR fields act as dynamic groups unless they have been edited by
adding or removing individual members from the Group.
Once you have finished your field selections you must name your group if you haven't already done so
before selecting either Save or Save and Close
Options to:-
• SAVE - Saves your created group and leaves the Create New Groups page onscreen.
• SAVE AND CLOSE - Saves your created group and exits to the Manage Groups page.
• CANCEL - Cancels your selections and returns to the Manage Groups page.
Select Individual Users
• Enter a Group name (this can be done later at the point of saving if necessary)
Admin ▪ 87
• Click on the Select Individual Users Tab to highlight it
Search for users using the following options:• User ID which will allow you to create a group by hand-picking users and adding them to the group
one by one. (The User ID is a user's unique identification in Wellnomics Risk Management. It comes
from the Human Resources file that is imported into the IT Administration website.)
• First Name which will allow you to create a group by hand-picking users and adding them to the
group one by one.
• Last Name which will allow you to create a group by hand-picking users and adding them to the
group one by one.
As users are identified, either individually or using the multiple selection options (use of Shift and/or
Ctrl), click on the Add>> button to add them to the Group Members list on the right of the screen
Note: Groups created using the Select Individual Users tab will act as a static Group.
A Combination of HR field and Select Individual Users
This type of Group, created through a combination of both HR Field criteria AND Select Individual Users
will act as a static Group. To create such a combination group:• Create a group based on HR fields as described above but do not SAVE or SAVE and CLOSE.
• Click on the Select Individual Users Tab
• Search for and Add individually Selected Users as described above. Note that if a User has already
been added to the Group Members table through the HR File option they will not appear in the
Available Users list in the Select Users tab, even if they match the User search criteria you have
used.
Once you have finished adding Users Click on either the SAVE or SAVE and CLOSE buttons to confirm
your selections.
Editing and Deleting Groups
As a Wellnomics Administrator you have the option to Edit Local Administration Groups. In this context
edit means either re-naming the group or changing the users in the group. In the Manage Local
Administration Groups page existing groups are displayed in a tabular format containing the following:-
• Group - The name of the group assigned at the time the group was created
88 ▪ User Guide
• Users in Group - The number of users in the group. Note that for dynamic groups (see below) this
number may change from time to time
• Type - The Type of group which is a result of the way in which the group was originally created or
subsequently amended (see "Creating New Groups")
Editing a Select HR Fields Type Group
• Click on the Edit button next to the Group that you wish to edit
• Highlight the Filter by HR Fields tab
Group Name
You can amend the Group name in this field. If there are no other changes. Select the
SAVE or SAVE AND CLOSE button to confirm changes
Edit
Click on the Edit button. New values are added by moving the required value from the
Available pane to the Selected pane and clicking on the OK button. The Selected Users
list on the right of the page will be refreshed to reflect the users that match the new
selection.
Existing values can be removed by moving the required value from the Selected pane to
the Available pane and clicking on the OK button. The Selected Users list on the right of
the page will be refreshed to reflect the users that match the new selection.
If there are no other changes. Select the SAVE or SAVE AND CLOSE button to confirm
changes
Delete
Use this button to Delete a field type altogether.
If there are no other changes. Select the SAVE or SAVE AND CLOSE button to confirm
changes
Add field
Use this button to add additional fields to those already selected.
Note that provided no users have been manually added or removed from the Selected
Users list the group will continue to be called a Select HR Fields Group and behave in a
dynamic manner i.e. it will be automatically updated with changes in the HR data.
If there are no other changes.
Select the SAVE or SAVE AND CLOSE button to confirm changes.
Note that adding more values for an HR field can only ADD users to the Group Members
table i.e. a user becomes available to add to Selected Users list if they match any of the
field values and not all of the values.
Remove
This button is available against every Selected User.
Use this button to remove individual users from the Group.
Note that if one or more users are removed from a previously dynamic HR Field Type
Group will become a Select Users Group (see below) and will no longer be automatically
updated with changes to the HR data file. A warning is displayed when an existing HR
Fields group is about to be changed to a Select Users group.
If there are no other changes.
Select the SAVE or SAVE AND CLOSE button to confirm changes.
Editing a Select User Type Group
Note: These instructions cover editing Select Users Groups created either solely through selecting
individual users or through a combination of Individual User selection and HR Field criteria.
Admin ▪ 89
Edit
Click on the Edit button next to the Group you wish to edit
Highlight the Select Individual Users tab
Group Name
You can amend the Group name in this field.
If there are no other changes.
Select the SAVE or SAVE AND CLOSE button to confirm changes
Find
Use the User ID, First Name or Last Name fields to search for and Add additional users.
See How To Use Searching below.
Remove
This button is available against every Group Member.
Use this button to remove individual users from the Group.
Note that if one or more users are removed from a previously dynamic HR Field Type
Group will become a static Group.
If there are no other changes.
Select the SAVE or SAVE AND CLOSE button to confirm changes.
Adding or Removing
Users based on HR
Fields
If you wish to add multiple users based on HR field criteria you can do so by clicking on
the Filter by HR Fields tab and selecting appropriate fields and field values thereby
adding users that match the HR field criteria to Selected Users list. See "Creating a New
Select HR Fields Type Group" for further details on how to add HR fields and field values
Alternatively you can remove users by removing previously chosen field criteria and
values.
Select the SAVE or SAVE AND CLOSE button to confirm changes.
Assign Groups to Local Administrators
Once Local Administration Groups have been defined you may assign any of the Local Administrators to
these groups.
Presently, Karen Larkin (example user) is the only user designated with the Local Administrator role.
Click on the Assign Groups button to view a list of the available Local Administrator Groups.
90 ▪ User Guide
Select the appropriate group from the list at the left and click on the Add >> button to add the group
to the column at the right.
If you wish to remove previously assigned groups, highlight the group in the Assigned Local
Administration Groups pane and click on the << Remove button to move it to the Available Local
Administration Groups pane.
Click on the Save button to proceed.
Policy Configuration
Risk Warnings
This setting allows the Wellnomics Administrator to set the minimum period of time (The Risk Reminder
Period) before reminder emails are able to be resent to users to address their Risk Factors.
Risk Reminder Period:
The minimum frequency (in weeks) that users may be reminded to address
their Risk Factors.
Assessments
If your company has been issued with a registration key that includes assessment questionnaires, then
this screen controls the policy on how these assessments are to be delivered and managed.
Admin ▪ 91
Allow On Demand
Assessments:
Allow users to initiate their own assessments without being scheduled to do
so.
Assessment Creation Warning
Period:
The minimum number of weeks that the users will be given to complete an
assessment once scheduled.
If an assessment is scheduled which has a period less than this value then a
warning will be given. The warning can be ignored.
Assessment Due Soon Period:
No longer relevant
Sends an email to the user's supervisor upon the completion of an assessment.
Send an email to a user's
supervisor upon completion of
an assessment:
Enable Assessment Reference
Points (ARPs):
Checkbox to enable the use of Assessment Reference Points (ARPs)
Assessment Period Start
Month
This is a 12month period which starts on the 1st day of the configured month.
Only assessments competed in the same 12 month period are considered for
the creation of an Assessment Reference Point.
Assessment Qualifying Period
This is the period during which completed assessments are considered for the
creation of an ARP. If the number of days between assessment dates
(completed in the same 12 month period, as defined above) is greater than
the configured number for Assessment Qualifying Period, then an Assessment
Reference Point is NOT created.
92 ▪ User Guide
Check this box to automatically send an email to a supervisor when the
Send an email to a user's
system creates an Assessment Reference Point for a user
supervisor upon completion of
an ARP
Send an email to end user
upon completion of an ARP
Check this box to automatically send an email to the user when the system
creates an Assessment Reference Point for the user. An entry is also added to
the user's Action Log
Data & Privacy Access Levels
Role
There are three roles that may be used to establish distinct data viewing rights for reporting users
within Wellnomics Risk Management.
Wellnomics Administrator:
This refers to a user who has been identified as a Wellnomics Administrator in
the User Roles section of the IT Administration Website.
Manager:
A Manager refers to anyone who has users reporting to them in the reporting
structure, as defined in the HR Import process.
Local Administrator:
A Local Administrator is assigned by the Wellnomics Administrator to be
responsibility for a selected group(s) of users within the organization.
Data Access Level
This level determines how much detail is visible for each user group or individual.
Overall Risk:
Only the overall risk level for a group or individual will be shown.
Risk Categories:
Only the overall risk and risk categories for a group or individual will be
shown.
Risk Factors:
The overall risk, risk categories and risk factors for a group or individual will
be shown. However, detailed statistics are not visible.
Statistics:
All information, from overall risk level right down to detailed statistics for a
group or individual will be shown.
Privacy Access Level
This level determines whether reporting is available down to the individual, or restricted to group level
only.
Group:
Reports are restricted to a group level only (No data shown on individuals).
Admin ▪ 93
Individual:
Reports are shown down to the individual user level.
Minimum Group Size
Restricting the Privacy Access Level to group level only is designed to prevent users in this role from
obtaining information on individual users. This access restriction may be compromised if the group in
question contains just a single user, or a very small number of users.
Minimum Group Size:
Set to 3 by default, this may be increased so that information about groups of
users smaller than a set size is not visible.
Delegated Reporting
This Delegated Reporting feature allows a user that is a manager or Local Administrator to delegate
their reporting functions to another user and for that user to run reports as if they were the
Manager/Local Administrator. In order for this feature to be used the Wellnomics Administrator must
enable it at system level through the menu option Admin > Policy Configuration > Delegated Reporting.
HR Data Field Management
The HR Data Field Management screen is used to manage three separate functions:
• Display Name
• Is Exportable
• Is Enumerable
Display Name
Using the Edit button, the Wellnomics Administrator is able to modify the text that will be displayed as
the title for most of the fields listed in the HR Import file.
Is Exportable
If a field is marked as Is Exportable, then data from this HR field is included in any report exported to
Microsoft Word or Excel.
Note: In order to make use of the ability to export to email, the email field must be configured as
exportable.
Is Enumerable
The Wellnomics Portal website provides a Compare Groups function for Managers and Administrators.
This allows risk comparison reporting using sub-groups which are automatically generated based on sets
of common data contained within a selected HR field.
For example, in the HR Import file below the Department field can be enumerated into 4 separate sets
for comparison reports:
• (blank / empty)
• Support
• Sales
• Admin
94 ▪ User Guide
UID
First
Name
Last
Name
SupUI
D
LoginID
Email
[email protected]
Departmen Location
t
Dallas
CL412 Chris
Lake
BG884 Bruce
Gomez
CL412
ZAMBOZO\chris22
REMOTE\chris
ZAMBOZO\bruce99
[email protected]
Support
Dallas
AK441 Alex
JD123 Janice
HY663 Harry
King
Dixon
Yates
BG884
BG884
CL412
ZAMBOZO\aking1
OFFICE\jdixon
ZAMBOZO\hy663
[email protected]
[email protected]
[email protected]
Support
Support
Sales
Dallas
Houston
Dallas
KB45
Kelly
MK226 Matt
JS93
Jim
Brown
Knox
Sutton
HY663
HY663
HY663
OFFICE\kelly45
REMOTE\mattk
REMOTE\js93
[email protected]
[email protected]
[email protected]
Sales
Sales
Sales
Houston
Denver
Calgary
JT237 Jay
KH08
Karen
SO943 Steve
Tan
Larkin
Owens
CL412
JT237
JT237
ZAMBOZO\jaytan1
ZAMBOZO\klarkin
ZAMBOZO\sowens
[email protected]
[email protected]
[email protected]
Admin
Admin
Admin
Dallas
Dallas
Dallas
However, due to the processing required to enumerate through every value of each field and compare
it against every other value, it is recommended that not all fields be made available in the Wellnomics
Portal website for comparison reporting. In fact, no fields are enumerable for group comparison unless
specifically identified in the Enumerable HR Fields screen.
Use the Enumerable HR Fields screen to set the Is Enumerable property for only the fields you wish to
allow for sub-group comparison reporting. Only fields that have a limited number of available values
are suitable for configuring as Enumerable. HR fields that contain Unique or many possible values e.g.
Date of Birth, are not suitable for configuration as Enumerable.
Please Note:
The Domain name is extracted from the users LoginID field. To allow support for
multiple domain membership it is possible that users may belong to more than a single domain, and as
such may be included across multiple sub-groups where Domain is used for group comparison reports.
The Email field must be configured to be exportable before the export to email feature can be used
i.e. the export to email icon is not visible until Email is configured as Exportable
Settings Profiles
During the synchronization process the Wellnomics Server may update Wellnomics WorkPace with
selected settings. These settings control many things such as the ability of the user to exit Wellnomics
WorkPace, minimum Micropause durations, etc. The settings are divided into two separate categories;
Group and User Settings, and the parameters for these settings are inherited from the settings
specified in two separate XML files.
• Group Settings
-
BaseGroupSettings.xml
Admin ▪ 95
• User Settings
-
BaseUserSettings.xml
Please see Settings Control for more details on settings control files.
Wellnomics Risk Management now ships with eight built in Settings Profiles:
• 1. WRM Monitor Only
• 2. WRM Standard Breaks
• 3. WRM Effective Settings Enforced
• 4. WRM Micropause and Compliance Enforced
• 5. WRM Micropause and Break Compliance Enforced
• 6. WRM Recovery Settings Low
• 7. WRM Recovery Settings Medium
• 8. WRM Recovery Settings High
There are two default Settings Profiles used for users of Wellnomics WorkPace in a Wellnomics Risk
Management environment. Wellnomics Risk Management determines which of the two Settings Profiles
should be applied the first time the user synchronizes with the server.
New WorkPace Users
The specified Settings Profile shown here will be applied to new WorkPace users, when WorkPace
connects to the Wellnomics Risk Management server for the first time from a PC that has no existing
user history or settings files (.usr and .raw) on that PC.
As there will be no pre-existing WorkPace settings on the user’s PC, the initial synchronization process
will apply the full range of WorkPace settings that are specified on the server including any Locked,
RangeLocked, and RangeLocked defaults that may be defined in that Settings Profile.
Existing WorkPace Users
The specified Setting Profile shown here will be applied to existing WorkPace users (Standalone, or
Central Network installation types), when WorkPace connects to the Wellnomics Risk Management
server for the first time from a PC that has existing history or settings files (.usr and .raw) on that PC.
As there will already be pre-existing WorkPace settings on the PC, the initial synchronization process
will only apply those WorkPace settings that are specified on the server as being "locked". That is,
Locked and RangeLocked. Any RangeLocked default settings specified in the settings profile will be
ignored.
You can see which Group and User Settings file has been associated with each profile and the number
of users who currently belong to each profile.
96 ▪ User Guide
The table below lists the Settings Profiles in the order that they should be used. Each Settings Profile is
based on the previous settings with additional enforcements.
1. Monitor Only
Data is collected and synchronized with Wellnomics Risk Management, but Breaks and
Exercises are not activated until enough data is collected to determine the user's risk levels.
The operation of the software on the desktop is silent and transparent to the user.
2. Standard Breaks
Micropauses and Rest Breaks are turned on, and can't be turned off by users through the
WorkPace console.
Users can set whether they can ignore prompts for breaks, and how many times they can
ignore them.
3. Effective Settings Enforced
Micropauses and Rest Breaks are turned on, and can't be turned off by users through the
WorkPace console. Exercises are prompted during Rest Breaks.
The interval between micropauses can be set by the user to between 2 and 8 minutes and
must last for between 5 and 30 seconds.
The interval between Rest Breaks can be set by the user to between 10 and 60 minutes and
must last for between 5 and 30 minutes.
A Daily Limit is set for each user. The user can set the time that they can spend using the
computer each day to between 1 and 6 hours.
A Weekly limit is set for each user. The user can set the time that they can spend using the
computer each week to between 5 and 35 hours.
Users can set whether they can ignore prompts for breaks, and how many times they can
ignore them.
4. Micropause and Compliance Micropauses and Rest Breaks are turned on, and can't be turned off by users through the
Enforced
WorkPace console. Exercises are prompted during Rest Breaks.
The interval between micropauses can be set by the user to between 2 and 8 minutes and
must last for between 5 and 30 seconds.
The interval between Rest Breaks can be set by the user to between 10 and 60 minutes and
must last for between 5 and 30 minutes.
A Daily Limit is set for each user. The user can set the time that they can spend using the
computer each day to between 1 and 6 hours.
A Weekly limit is set for each user. The user can set the time that they can spend using the
computer each week to between 5 and 35 hours.
Users cannot ignore micropause prompts.
5. Micropause and Break
Compliance Enforced
Micropauses and Rest Breaks are turned on, and can't be turned off by users through the
WorkPace console. Exercises are prompted during Rest Breaks.
The interval between micropauses can be set by the user to between 2 and 8 minutes and
must last for between 5 and 30 seconds.
The interval between Rest Breaks can be set by the user to between 10 and 60 minutes and
must last for between 5 and 30 minutes.
A Daily Limit is set for each user. The user can set the time that they can spend using the
computer each day to between 1 and 6 hours.
A Weekly limit is set for each user. The user can set the time that they can spend using the
computer each week to between 5 and 35 hours.
Users cannot ignore micropause prompts, and can only ignore 1 rest break prompt.
Admin ▪ 97
6. Recovery Settings Low
Micropauses and Rest Breaks are turned on, and can't be turned off by users through the
WorkPace console. Exercises are prompted during Rest Breaks.
The interval between micropauses can be set by the user to between 2 and 4.5 minutes and
must last for between 10 and 60 seconds.
The interval between Rest Breaks can be set by the user to between 10 and 45 minutes and
must last for between 6 and 30 minutes.
A Daily Limit is set for each user. The user can set the time that they can spend using the
computer each day to between 1 and 6 hours.
A Weekly limit is set for each user. The user can set the time that they can spend using the
computer each week to between 10 and 30 hours.
Users can ignore 1 micropause prompt, and up to 2 rest break prompts.
7. Recovery Settings Medium
Micropauses and Rest Breaks are turned on, and can't be turned off by users through the
WorkPace console. Exercises are prompted during Rest Breaks.
The interval between micropauses can be set by the user to between 2 and 3.5 minutes and
must last for between 12 and 60 seconds.
The interval between Rest Breaks can be set by the user to between 10 and 45 minutes and
must last for between 6 and 30 minutes.
A Daily Limit is set for each user. The user can set the time that they can spend using the
computer each day to between 1 and 4 hours.
A Weekly limit is set for each user. The user can set the time that they can spend using the
computer each week to between 10 and 20 hours.
Users cannot ignore micropause prompts. They can ignore up to 2 rest break prompts.
8. Recovery Settings High
Micropauses and Rest Breaks are turned on, and can't be turned off by users through the
WorkPace console. Exercises are prompted during Rest Breaks.
The interval between micropauses can be set by the user to between 2 and 3 minutes and
must last for between 30 and 60 seconds.
The interval between Rest Breaks can be set by the user to between 10 and 15 minutes and
must last for between 20 and 30 minutes.
A Daily Limit is set for each user. The user can set the time that they can spend using the
computer each day to between 1 and 2.5 hours.
A Weekly limit is set for each user. The user can set the time that they can spend using the
computer each week to between 5 and 12.5 hours.
Users cannot ignore micropause prompts. They can ignore up to 1 rest break prompts.
You may create your own Custom Group and User Settings Control files, each containing a different
configuration of settings for different groups of users. Please see Settings Control for more details on
settings control files.
Once a new set of Settings Control files have been created, a Settings Control Profile must be created.
To manage existing and new control profiles please select Settings Profiles from the Policy
Configuration menu.
Edit
Selecting the Edit button for a profile will allow the Wellnomics Administrator to modify the profile
name and the file names used as the Group and User Settings files.
98 ▪ User Guide
Delete
Selecting the Delete button for a profile will allow the Wellnomics Administrator to Delete that profile
- as long as there are no current users shown for that profile.
Please Note: Assigning users or groups of users to these Settings Control Profiles is a function
performed by Wellnomics Administrators and Managers through Act >> Change User Settings Profiles
menu.
To add a new profile, click on the Add New Profile link.
When adding a Profile give your new profile a descriptive name and indicate which Group and User
Settings XML files should be used (Group and User Settings XML files may be used by more than one
Settings Profile).
Click on the Add button to save your new Settings Control Profile.
Modules
[Enable Modules
This configuration allows a Wellnomics Administrator to determine which modules are in use (available
to users). Only those modules purchased and permitted by the Registration Key can be enabled or
disabled. Modules that are not permitted by the registration key are visible but grayed out. If you wish
to enable modules that are inaccessible please contact [email protected],
Admin ▪ 99
The Enable Module configuration allows Wellnomics Administrators to deploy modules as and when
required. It is envisaged that this configuration will be used to enable previously disabled modules
rather than to disable (turn off) modules that have previously been used - see below.
The Effect of Enabling (Turning On) New Modules
When a new module is enabled it will become visible to the end users. If it is an Assessment then the
risk value for that Assessment will be displayed as Unknown until data has been collected for the risk
value to be calculated. Depending upon the method of calculating Overall Risk, the Overall Risk value
can change to Unknown when a module is enabled until such time that the risk value for the module
has been calculated. If you do not wish the Overall Risk value to change to Unknown when enabling a
new module ensure that Overall Risk is set to calculate on ANY Risk Category (see Appendix II of the
Wellnomics Risk Management IT Administration Guide 2.6)
The Effect of Disabling Modules
If a module has been enabled and data has been collected and a risk value calculated, the Overall Risk
will also be re-calculated. If the module is then disabled, the data for the disabled data is removed
however THE OVERALL RISK IS NOT AUTOMATICALLY RECALCULATED. Please contact
[email protected] for advice BEFORE disabling a previously enabled module
Show Active Users
By Default, all users are shown in the reports based on the system or custom group selected at the
time. However, not all users included in the HR Import (required to establish lines of reporting
structure) are actively using Wellnomics Risk Management and so will not have risk or statistical
calculations associated to them. This may lead to large sets of 'Unknown' data, which could affect the
clarity of the reports.
The Show Active Users function will filter out all WorkPace inactive users so that only active users are
displayed.
Please Note: An active user is someone who has synchronized their Wellnomics WorkPace data with
Wellnomics Risk Management at any point in time.
Welcome Page
This release of Wellnomics Risk Management introduces the new Welcome Page feature.
The Welcome Page feature allows the Wellnomics Administrator to create and maintain a page
designed to welcome both new and existing users as they enter the Wellnomics Risk Management portal
site.
The Welcome Page editor is accessible from the Admin menu in the Portal site (Admin > Policy
Configuration > Welcome Page) and allows the Wellnomics Administrator to add both formatted text
and images to either a welcome message or disclaimer area on the Welcome Page.
100 ▪ User Guide
Please note: Save your work often! Working within the Welcome Page editor window is not detected
as web browser activity as far as the system timeout is concerned, so (depending on your system
timeout settings) spending extended periods of time designing your welcome page before clicking on
the "Save" button may cause a timeout error.
Logging into Wellnomics Risk Management ▪ 101
17 LOGGING INTO WELLNOMICS RISK MANAGEMENT
By default a user is automatically logged into Wellnomics Risk Management and taken to their Risk
Profile page. If auto login has been disabled each user must log in manually.
Please consult with your IT Administrator, or the person who is responsible for administering
Wellnomics Risk Management within your organization, for the correct URL link to your Wellnomics
Portal website.
For example, the link may be similar to http://OurServer/Wellnomics
Enter your Windows Log-on ID as your Username and your unique Wellnomics password (not your
Windows password) in the spaces provided, ensuring that your correct Windows Domain is indicated,
before clicking on the Login button to proceed.
Note: Your Windows Login ID and Domain details, along with your email address have all been
imported into Wellnomics Risk Management to ensure that only validated users are granted access to
the system. If this is your first time logging into Wellnomics Risk Management you must first establish a
password. Please see Reset my password on page 101 for further information.
Keep me logged in
Selecting this option will allow you to navigate away from the Wellnomics Risk Management website
and return without needing to re-enter through the Log in page.
Note: If you choose to log out of Wellnomics Risk Management by clicking on the icon in the menu, you
will have to log back in through the Log in page.
Reset my password
If you have forgotten your Wellnomics Risk Management password, please enter your Windows Login ID
and click on the OK button. An email will be sent to you with further instructions.
102 ▪ User Guide
Welcome Page
This release of Wellnomics Risk Management introduces the new Welcome Page feature.
The Welcome Page feature allows the Wellnomics Administrator to create and maintain a page
designed to welcome both new and existing users as they enter the Wellnomics Risk Management portal
site.
The Welcome Page editor is accessible from the Admin menu in the Portal site (Admin > Policy
Configuration > Welcome Page) and allows the Wellnomics Administrator to add both formatted text
and images to either a welcome message or disclaimer area on the Welcome Page.
Please note: Save your work often! Working within the Welcome Page editor window is not detected
as web browser activity as far as the system timeout is concerned, so (depending on your system
timeout settings) spending extended periods of time designing your welcome page before clicking on
the "Save" button may cause a timeout error.
FAQ ▪ 103
18 FAQ
In This Chapter:
How have the risk calculation algorithms been designed? ....................................... 103
How does the Wellnomics system calculate the Risk Levels? ................................... 103
How has the risk reduction advice been determined? ............................................ 103
How do Risk Levels relate to the actual chance of developing computer related Discomfort?103
Why are the Risk Levels for some users shown as unknown? .................................... 103
Can I see the Risk Levels for a particular day? .................................................... 103
What security measures are in place on the Wellnomics server? ............................... 104
How have the risk calculation algorithms been designed?
The risk calculation algorithms have been developed in conjunction with a team of international
experts at the TNO Scientific Research Institute in the Netherlands. They are the result of a three year
study analyzing data and results from over 50 scientific research papers on office ergonomics and
computer use related risks. This has resulted in the only scientifically validated computer use risk
assessment tool on the market.
How does the Wellnomics system calculate the Risk Levels?
The Risk Levels are calculated using algorithms that combine the Risk Factors present for that user.
These algorithms take into account the relative importance of the different Risk Factors and their
interrelationship in terms of whether multiple factors have a multiplying effect or an additive one.
How has the risk reduction advice been determined?
The advice given by the Wellnomics Risk Management system has been compiled by the TNO Scientific
Research Institute in the Netherlands and is based on a three year study of over 50 scientific research
papers and the current state-of-the-art advice from leading experts within the field.
How do Risk Levels relate to the actual chance of developing computer related Discomfort?
The Wellnomics Risk Management system uses a three level scale for describing risk, namely High,
Medium and Low. These are relative ratings and do not map directly onto an actual probability of
developing computer related discomfort or injuries. This is because this relationship cannot be
determined due to the lack of sufficient scientific data and that some factors that can contribute to
the risk are outside of the scope of the system (e.g. individual physiology). This means that although a
user may have a Low risk rating it does not mean there is no chance of them developing discomfort.
Similarly High risk users are not guaranteed to developed discomfort, however it is known that their
chances are higher. For this reason it is important to address all Risk Factors present where possible
even in Low risk users.
Why are the Risk Levels for some users shown as unknown?
The Wellnomics Risk Management system needs data to compute the Risk Levels. If the data is not
available, the Risk Level is shown as unknown. For the Computer Use Category and Compliance
Category this will be because either the user is not running Wellnomics WorkPace on their computer or
WorkPace is not communicating correctly with the Wellnomics Risk Management server. Please ensure
these users are running Wellnomics WorkPace to enable data collection. For a Risk Category based on
questionnaires it will be because the user has not completed the relevant assessment questionnaire.
Can I see the Risk Levels for a particular day?
No. The Wellnomics Risk Management system is based on computing Risk Levels on a weekly basis
(Monday through to Sunday). This is because data for a single day is not sufficient to draw significant
conclusions. Whenever a date is selected for a report, the report is shown for the nearest complete
week prior to the date.
104 ▪ User Guide
What security measures are in place on the Wellnomics server?
The Wellnomics Risk Management server has been designed from the ground up with security in mind.
It uses the following security measures:
• Communication between the server and the browser uses 128-bit SSL.
• Communication between the server and the Wellnomics WorkPace clients uses 128-bit SSL (if
configured to do so).
• The system enforces the password policy set by the administrator (e.g. password length, requiring a
mix of alphanumeric characters).
19 GLOSSARY OF TERMS
G
Group
A
A Group is a subset of users within the
Wellnomics system, as defined through the
Group Builder or automatically created, as
System Groups, through the HR import
process.
Assessment
A questionnaire used to collect information
from a user to assess the risk in a particular
area. For example the Assessment for the
Posture & WorkStation Category collects
data on the user’s workstation equipment,
setup and use.
Group Builder
The Group Builder allows a Wellnomics
Administrator to define a subset of users as
a Group.
Assessment Reference Point (ARP)
A point in time where the Wellnomics Risk
Management system records the risk profile
for the user based on the completion of all
available Assessments.
H
High Risk
Assessment Status
A high Risk Level means that
recommendations should be implemented as
soon as possible.
The state of progress a user has made
towards completing an Assessment. This can
be one of Not Started, Started or Complete.
Home Page
Assessments
The end user’s home page showing a
summary of their Risk Levels, User Notes,
Statistics and Assessments.
A collection of individual Assessment
questionnaires.
HR Import
Compliance Risk Category
Human Resource (HR) Import refers to the
process of importing HR data into the
Wellnomics Risk Management system. Every
user of the system must be imported via the
HR Import process.
C
This Risk Category assesses the risks
associated with not taking enough breaks
from the computer and adherence to the
break regime settings for Wellnomics
WorkPace.
The HR Import process requires a Comma
Separated (CSV) file which contains a set of
fields describing each user of the system.
For example the CSV file would contain the
user's first name, last name and department
amongst other details.
Computer Use Risk Category
This Risk Category assesses the risks
associated with the amount of time spent
using a computer as measured directly by
the Wellnomics WorkPace component.
I
Individual Risk Category
D
This Risk Category assesses the risks
associated with the individual’s physical
characteristics, for example age and fitness
levels. It is measured by an Assessment.
Data out of Date
A status message shown next to the
Computer user, Speed and Intensity and
Compliance risk categories that indicates
that the data is more than 4 weeks old. This
may be because the user has not been
active or because there is a problem with
the communication between WorkPace and
the server.
Discomfort Risk Category
This Risk Category assesses the risks
associated with the user’s existing
discomfort, for example discomfort in the
arms or neck and eye strain.
L
Low Risk
A low Risk Level means that no immediate
action is required; however any identified
risk factors should be addressed if possible.
M
Management Report
The report available to the manager
showing the distribution of Risk Levels and
Risk Factors within their Group, as well as
advice for addressing these risks.
106 ▪ User Guide
Medium Risk
Risk Category
A medium Risk Level means that the
recommendations need to be implemented
in the next couple of months.
A Risk Category measures risk within a
specific area or activity, for example
computer use or compliance. A Risk
Category contains a combination of
underlying Risk Factors. All Risk Categories
are combined to produce the Overall Risk
for an individual.
N
Not Synchronized
A risk summary that shows as Not
Synchronized indicates that the WorkPace
data for a user is not being picked up by the
Wellnomics server. This may be because of a
new user has been added to the system, or
because of a server error.
Risk Factor
A Risk Factor is a condition that, if present,
contributes towards the risk within a Risk
Category and ultimately contributes towards
the Overall Risk. A Risk Factor is defined as
either Present or Not Present (or Unknown).
For example not having an adjustable chair
is considered a Risk Factor.
To check details of a user's synchronization,
open their WorkPace program and select
View>Communications Log.
O
Risk Factors
Overall Risk
A collection of individual Risk Factor
conditions.
The Overall Risk is a top-level risk
measurement for an individual user
measuring the relative risk of that user
developing computer use related injuries. It
is composed as a weighted combination of
each underlying Risk Category. Overall Risk
is classified as three levels - High Risk,
Medium Risk, and Low Risk.
Risk Level
The level of risk determined by the
Wellnomics Risk Management system for a
particular Risk Category or Overall Risk. The
possible levels are High Risk, Medium Risk,
and Low Risk.
P
Risk Levels
A collection of individual Risk Level
determinations.
Personal Risk Report
The report available to each user
customized to present their personal Risk
Factors and recommendations for addressing
these.
Risk Management
Refers to the process of managing computer
use related risks.
Posture & Workstation Risk Category
This Risk Category assesses the risks
associated with the user’s posture and
workstation setup, for example the height
of their desk and their chair setup. It is
measured by an Assessment.
Risk Reminder Period
The period (in weeks) before which a user
can be reminded again to address any
currently present Risk Factors.
S
Psychosocial Risk Category
Settings Profile
This Risk Category assesses the risks
associated with the user’s workload and
work environment, for example the level of
pressure and stress at work. It is measured
by an Assessment.
A Settings Profile is a group of options that
determine the behavior of the Wellnomics
WorkPace component. For example whether
or not breaks are enforced and the duration
of breaks. Each user is assigned to one of
these profiles.
R
Report Options Panel
The panel shown in the top-right area of the
page. This panel allows the adjustment of
the Report Options such as the Group and
Date selected for the currently viewed
report.
Speed & Intensity Risk Category
This Risk Category assesses the risks
associated with the speed and intensity of
computer use as measured by the
Wellnomics WorkPace component.
Glossary of Terms ▪ 107
Statistics
Wellnomics Risk Management
These are the raw computer use data
measurements made by the Wellnomics
WorkPace component. Example statistics
include the time spent using the computer,
the number of keystrokes typed and mouse
usage information.
The system developed by Wellnomics
Limited for the purpose of identifying and
managing the risks associated with
developing computer use related injuries. It
consists of the Wellnomics Server and
Wellnomics WorkPace clients.
Synchronized
Wellnomics Server
Synchronized indicates that WorkPace data
for users is being received and analyzed by
the Wellnomics server. See also Not
Synchronized.
The Wellnomics Server is the central
component of the Wellnomics Risk
Management system. It consists of a
database and the Wellnomics Portal. The
database stores the Risk Level information
for each user of the system and the Portal
makes access to the data and underlying
functionality available via a Web browser. It
has been developed using the Microsoft .Net
framework.
T
Top Recommendations
The list of the most common
recommendations given to the currently
selected Group of users.
Wellnomics WorkPace
Top Risk Factors
The list of the most common Risk Factors
present in the currently selected Group of
users.
U
Unknown
The Wellnomics Risk Management system
relies on collecting data to determine
whether or not Risk Factors are present. If
the data is not available the Risk Factors,
the Risk category and possibly the Overall
Risk is classified as Unknown.
User History
A week by week summary of the user’s Risk
Levels for the selected Risk Category.
User Notes
User notes are notes maintained by the
system on each user. These are added to
whenever a manager actions an item.
W
Wellnomics Portal
This describes the web based component of
the Wellnomics Server that provides the
framework within which the user
communicates and interfaces with the
Wellnomics data held on the database
server.
Wellnomics WorkPace is the client side
component of the Wellnomics Risk
Management system. It is installed on each
user’s computer and advises the user on the
appropriate time to take micropauses and
breaks. It also communicates with the
Wellnomics Risk Management system and
updates the computer use statistics for each
user.
108 ▪ User Guide
20 WELLNOMICS ERGONOMICS REFERENCE GUIDE
The causes of computer related injuries are complex and involve many factors, such as the level of
computer use, workstation ergonomics, work load and stress levels, and physical fitness.
Wellnomics Risk Assessment needs information on all these factors to correctly assess risks and provide
recommendations best suited to each individual.
Wellnomics Risk Assessment operates in three steps.
Automated assessment of computer use (WorkRhythm module): Data is gathers over a 4 week period
and analyzed to capture typical computer activity. This allows Wellnomics Risk Management to
calculate indicative statistics on computer usage. For example, the average time spent at the
computer each day, how often breaks are taken and how many mouse-clicks or keystrokes are done.
To create this profile the software compiles daily summary statistics on computer activity. These
statistics can be viewed as they are being compiled by looking under the Analyze > Statistics menu in
the web portal for the product.
Online Assessments: Once an accurate profile of normal computer use has been compiled, each office
worker is asked to complete several online assessment questionnaires. These assess many other factors
that can't be measured from your computer activity, such as posture, workstation ergonomics, stress
levels, physical fitness, and also any existing symptoms of discomfort. Each assessment section takes
between 5 and 10 minutes to complete.
Personal Risk Report and Recommendations: Once Wellnomics Risk Management has all the
information it needs this information is passed through a special 'expert system' which calculates each
person's unique risk profile. The result is a personalized report showing their risks for developing RSI,
and recommendations for addressing any risks found.
The report, and the risk factors that Wellnomics Risk Management assesses, is divided into six
categories:
Risk Category
Computer Use
Description
Measures how much time you spend at the computer, your level of
mouse and keyboard use, and whether you take sufficient breaks.
High levels of computer use, with few breaks leads to a higher risk.
Speed & Intensity
Evaluates the speed and intensity of your computer work. For
example, does your work require high keystroke rates, intensive or
high precision mouse work (e.g. CAD), or continuous repetition of
the same tasks.
The more intensely you are using the computer the more stress is
placed on your body, and the quicker fatigue occurs.
Compliance
Analyses how well you are complying with the break and work load
guidelines WorkPace provides.
Looks at your micropause and break compliance, and whether
WorkPace settings are set correctly.
Posture & Workstation
Assesses the ergonomics of your workstation (covering your chair,
desk, screen, mouse and keyboard), and assesses your posture
when using the computer.
Poor workstation ergonomics and poor posture can result in an
increased risk.
Discomfort
Assesses any existing symptoms of discomfort you may have as a
result of your computer use. Looks at the severity of any
discomfort present, which body regions are affected, and what
impact any symptoms may have had on your work.
People with existing discomfort and symptoms have an increased
risk of injury.
Wellnomics Ergonomics Reference Guide ▪ 109
Individual
Looks at individual factors such as your physical fitness level, how
easily you're able to relax, and how hard you push yourself when
tired.
These factors help determine your level of muscle fatigue and how
quickly you recover from fatigue.
Psychosocial
Evaluates some of the more non-physical aspects of your work
environment, such as work pressure, stress and levels of
management and co-worker support available to you in your job.
These factors greatly affect how the body responds to physical risk
factors.
The report provides a rating for each risk category (of High, Medium, or Low risk), together with an
overall High/Medium/Low risk rating.
If someone is found to have a Medium or High level of risk in any category, they will be given
recommendations on how to reduce these risks.
Reports can be run to analyze risk and the incidence of specific risk factors across your department or
organization.
Computer Use
This Risk Category looks at how much time the user spends on the computer, their time spent using the
mouse and keyboard, their peaks in usage, and whether they are taking sufficient natural breaks. All
Risk Factors are based upon usage averaged over the last four weeks of computer use. This means that
a user has to have a sustained pattern of high use before being flagged as at risk. Occasional periods of
higher than normal use (e.g. 1 week) will not be sufficient to flagged the use at risk.
Long periods spent using the computer, high mouse use and a lack of sufficient breaks are known to be
important risk factors for musculoskeletal symptoms.
Note: The Risk Factors that look at breaks (Insufficient Micropauses, Insufficient Rest Breaks) only
operate if a user has Wellnomics WorkPace Breaks & Exercises in Monitor Only mode. This allows you
to monitor whether sufficient breaks are being taken even if Wellnomics Breaks & Exercises (WorkPace)
is being used.
However, if a user has any of these three Risk Factors present and does not have WorkPace Breaks &
Exercises enabled, then this is a sign that these need to be enabled for them.
If a user these three Risk Factors present and does have WorkPace Breaks & Exercises enabled, then it
may be that their Breaks & Exercises settings are incorrect, or they are ignoring too many break
warnings. See later Compliance section for Risk Factors covering these issues.
Very High Computer Use
Users with this risk factor have computer use of more than 30 hours per week (6 hours per day on
average). This puts them in the top 1.5% of computer users, well above the normal population average
for computer use of 10-15 hours per week. This level of computer use significantly increases the risk
for developing RSI symptoms. Continuing with such high levels of computer use should be avoided.
Due to their high level of exposure these computer users should be your first priority for implementing
RSI prevention measures.
Recommendations
• Ensure management is aware of these users' very high computer use. Talk with management to
identify the reasons behind these users' very high use and investigate ways of reducing their
workload at the computer, or mitigating its effects. Computer use over 30 hours per week (6 hours
per day) normally indicates overtime is being worked (more than 40 hours per week). You may need
to consider limiting ongoing overtime which involves extended computer use
• Try to limit users computer use to less than 25 hours a week (5 hours a day) by spreading workload
over more working days or workers and/or by job or task redesign. Try to improve the organization
of tasks and jobs so that these long hours won't be necessary. You could also consider hiring more
(part-time) employees or cutting out tasks all together.
110 ▪ User Guide
• Encourage management and users to avoid very long days on the computer. Often users with high
use will have one or two days each week of particularly high use, perhaps 6-8 hours in one day
(possibly working late to get something finished). Such high peaks in computer use cause a raised
risk of RSI symptoms and should be avoided if possible. If peaks in work load are difficult to avoid,
other ways to reduce the risk should be considered. For example, allowing a late start following an
extended computer work day which was required to meet deadlines.
• Ensure that other risk factors present for these users are addressed. It may be difficult to reduce
these users' computer use significantly, but you can still minimize their overall risks by ensuring that
all other aspects of their work environment are as good as possible. For example, you should ensure
that:
these users are well trained about good workstation ergonomics and RSI prevention
their posture and workstation ergonomics are excellent
stress is well managed
• Regularly survey these users for symptoms of discomfort related to their computer use. If any raised
levels of discomfort are found, take immediate remedial action to reduce their workload, and
provide support.
• If you find raised symptom levels ask the users to run the WorkPace Setup Wizard. This will provide
them with a specially designed recovery / rehabilitation breaks and exercise regime to help reduce
their symptoms. Explain to the users with symptoms why taking more frequent breaks is important,
and that it will not reduce their productivity in the long term, even if it takes a while to get used
to.
Criteria
Using the computer for more than 30 hours per week over the last 4 weeks.
High Computer Use
Users with this risk factor have computer use of 25 hours to 30 hours a week (between 5 hours and 6
hours a day on average). This puts them in the top 6% of computer users, well above the normal
population average for computer use of 10-15 hours per week. This level of computer use increases the
risk of developing RSI symptoms. Computer use above this level for long periods should be avoided.
Due to their higher exposure levels these computer users should be a high priority for implementing RSI
prevention measures.
Recommendations
• Ensure management are aware of these users' high computer use. It is possible some of these users
are working overtime regularly (more than 40 hours per week at work). You may need to consider
limiting ongoing overtime which involves extended computer use.
• Try to limit users' computer use to less than 25 hours a week (5 hours a day) by spreading workload
over more working days or workers and/or by job or task redesign. Try to improve the organization
of tasks and jobs so that these long hours won't be necessary. You could also consider hiring more
(part-time) employees or cutting out tasks all together.
• Encourage management and users to avoid very long days on the computer. Often users with high
use will have one or two days each week of particularly high use, perhaps 6-8 hours in one day
(possibly working late to get something finished). Such high peaks in computer use cause a raised
risk of RSI symptoms and should be avoided if possible. If peaks in work load are difficult to avoid,
other ways to reduce the risk should be considered. For example, allowing a late start following an
extended computer work day which was required to meet deadlines.
• Ensure that other risk factors present for these users are addressed. It may be difficult to reduce
these users' computer use significantly, but you can still minimize their overall risks by ensuring that
all other aspects of their work environment are as good as possible. For example, you should ensure
that:
these users are well trained about good workstation ergonomics and RSI prevention
Wellnomics Ergonomics Reference Guide ▪ 111
their posture and workstation ergonomics are excellent
stress is well managed
• Regularly survey these users for symptoms of discomfort related to their computer use. If any raised
levels of discomfort are found, take remedial action to reduce their workload, and provide support.
• If raised symptom levels are found also ask the user to run the WorkPace Setup Wizard. This will
provide them with a specially designed recovery / rehabilitation breaks and exercise regime
designed to reduce their symptoms. Explain to the users with symptoms why taking more breaks
more often is important, and it will not reduce their productivity long term, even if it takes a while
to get used to.
Criteria
Using the computer for 25 hours - 30 hours per week over the last 4 weeks.
Medium-High Computer Use
Users with this risk factor have computer use of 20 hours to 25 hours a week (between 4 hours and 5
hours a day on average). This puts them in the top 20% of computer users and above the normal
population average for computer users of 10-15 hours per week. This level of computer use may
increase the risk of users developing RSI symptoms.
These computer users should be a higher than average priority for RSI prevention measures.
Recommendations
• You may wish to make management aware that these users have higher than average computer use.
• Encourage management and users to spread computer work evenly over the week and to avoid
peaks in computer use.
• Ensure that other risk factors present for these users are addressed. For example, you should ensure
that:
these users are well trained about good workstation ergonomics and RSI prevention
their posture and workstation ergonomics are excellent
stress is well managed
• You may wish to survey these users for symptoms of discomfort related to their computer use. If any
raised levels of discomfort are found, take remedial action to address these symptoms.
• If raised symptom levels are found you may wish to ask the users to run the WorkPace Setup Wizard.
This will provide them with a specially designed recovery / rehabilitation breaks and exercise
regime to help reduce their symptoms. Explain to the users with symptoms why taking more
frequent breaks is important, and that it will not reduce their productivity in the long term, even if
it takes a while to get used to.
• These users should have a higher than average priority for other RSI prevention initiatives. For
example (i) training about good ergonomics and RSI prevention, (ii) workstation assessments, and
(iii) monitoring of stress levels.
Criteria
Using the computer for 20 hours - 25 hours per week over the last 4 weeks.
Very High Mouse Use
Users with this risk factor have very high mouse use of more than 25 hours per week (more than 5 hours
per day on average). This puts them in the top 0.1% of computer users, with mouse use more than
double the normal population average of 6-10 hours per week.
Such a very high level of mouse use significantly increases the risk for developing RSI symptoms.
Continuing with such high levels of mouse use should be avoided if at all possible.
112 ▪ User Guide
Users with this high level of mouse use should be your first priority for implementing RSI prevention
measures.
Recommendations
• Ensure management is aware of these users' very high mouse use. Talk with management to identify
the reasons for these users' very high mouse use and investigate ways of reducing it, or mitigating
its effects. Mouse use over 25 hours per week (5 hours per day) normally indicates overtime is being
worked (more than 40 hours per week). You may need to consider limiting ongoing overtime which
involves extended computer use.
• Try to limit users mouse use to less than 15 hours a week (3 hours a day). Some ways you can do this
are by:
Spreading workload over more workers.
Job or task redesign to replace mouse intensive tasks with tasks requiring less mouse use.
Hiring more (part-time) employees or cutting out some mouse-intensive tasks all together.
Discussing with managers whether there are alternative software applications that can be used for
tasks, applications which require less intensive mouse use, and possibly support keyboard shortcuts
better.
• Encourage users to learn keyboard shortcuts for their common tasks. See online help for a good list
of Windows keyboard shortcuts. If a lot of the mouse use is due to one particular application (e.g.
CAD or graphic design software) see if you can find a list of specific keyboard shortcuts for this
application in its online help or manual (search for 'keyboard shortcuts' or 'shortcut keys').
• Encourage users to learn good techniques for using the mouse. For example, by:
Not to leave their hand holding the mouse when they're not using it.
Alternating between the left and right hands. For example, using the mouse in the left hand in the
morning, and right hand in the afternoon. This can spread the load. Remember though - it can take a
while for people to get used to using their other hand on the mouse. Users should buildup gradually
over time, and adjust the mouse speed settings if they need to, to make it easier to use the mouse in
their other hand.
• See Tips on using the mouse for more tips on good technique when using the mouse.
• Ensure that other risk factors present for these users are addressed. If it is difficult to reduce these
users' mouse use significantly you can still minimize their overall risks by ensuring that all other
aspects of their work environment are as good as possible. For example, you should ensure that:
these users are well trained about good workstation ergonomics and RSI prevention
their posture and workstation ergonomics are excellent
stress is well managed
• Regularly survey these users for symptoms of discomfort related to their high mouse use. If any
raised levels of discomfort are found, take immediate remedial action to reduce their workload,
and provide support.
• If you find raised symptom levels ask the users to run the WorkPace Setup Wizard. This will provide
them with a specially designed recovery / rehabilitation breaks and exercise regime to help reduce
their discomfort. Explain to the users with discomfort why taking more frequent breaks is
important, and that it will not reduce their productivity in the long term, even if it takes a while to
get used to.
Criteria
Using the mouse for more than 25 hours per week over the last 4 weeks.
Wellnomics Ergonomics Reference Guide ▪ 113
High Mouse Use
Users with this risk factor have mouse use of 20 hours to 25 hours a week (between 4 hours and 5 hours
a day on average). This puts them in the top 0.5% of computer users, with mouse use double the
normal population average of 6-10 hours per week.
Such a high level of mouse use significantly increases the risk for developing RSI symptoms. Continuing
with such high levels of mouse use should be avoided if at all possible.
Users with this high level of mouse use should be your first priority for implementing RSI prevention
measures.
Recommendations
Ensure management is aware of these users' high mouse use. Talk with management to identify the
reasons for these users' high mouse use and investigate ways of reducing it, or mitigating its effects.
Mouse use over 20 hours per week (4 per day) can indicate overtime is being worked (more than 40
hours per week). You may need to consider limiting ongoing overtime which involves extended
computer use.
• Try to limit users mouse use to less than 15 hours per week (3 hours per day). Some ways you can do
this are by:
Spreading workload over more workers.
Job or task redesign to replace mouse intensive tasks with tasks requiring less mouse use.
Hiring more (part-time) employees or cutting out some mouse-intensive tasks all together.
• Discussing with managers whether there are alternative software applications that can be used for
tasks, applications which require less intensive mouse use, and possibly support keyboard shortcuts
better.
• Encourage users to learn keyboard shortcuts for their common tasks. See online help for a good list
of Windows keyboard shortcuts. If a lot of the mouse use is due to one particular application (e.g.
CAD or graphic design software) see if you can find a list of specific keyboard shortcuts for this
application in its online help or manual (search for 'keyboard shortcuts' or 'shortcut keys').
• Encourage users to learn good techniques for using the mouse. For example, by:
Not to leave their hand holding the mouse when they're not using it.
Alternating between the left and right hands. For example, using the mouse in the left hand in the
morning, and right hand in the afternoon. This can spread the load. Remember though - it can take a
while for people to get used to using their other hand on the mouse. Users should buildup gradually
over time, and adjust the mouse speed settings if they need to, to make it easier to use the mouse in
their other hand.
See Tips on using the mouse for more tips on good technique when using the mouse.
• Ensure that other risk factors present for these users are addressed. If it is difficult to reduce these
users' mouse use significantly you can still minimize their overall risks by ensuring that all other
aspects of their work environment are as good as possible. For example, you should ensure that:
these users are well trained about good workstation ergonomics and RSI prevention
their posture and workstation ergonomics are excellent
stress is well managed
• Regularly survey these users for symptoms of discomfort related to their high mouse use. If any
raised levels of discomfort are found, take immediate remedial action to reduce their workload,
and provide support.
114 ▪ User Guide
• If you find raised symptom levels ask the users to run the WorkPace Setup Wizard. This will provide
them with a specially designed recovery / rehabilitation breaks and exercise regime to help reduce
their discomfort. Explain to the users with discomfort why taking more frequent breaks is
important, and that it will not reduce their productivity in the long term, even if it takes a while to
get used to.
Criteria
Using the mouse for 20 hours - 25 hours per week over the last 4 weeks.
Medium-High Mouse Use
Users with this risk factor have mouse use of 15 hours to 20 hours a week (between 3 hours and 4 hours
a day on average). This puts them in the top 6% of computer users, with mouse use significantly higher
than the normal population average of 6-10 hours per week.
Such a high level of mouse use puts these users at an increased risk for developing RSI symptoms.
Continuing with such high levels of mouse use for long periods should be avoided.
Users with this high level of mouse use should be a high priority for implementing RSI prevention
measures.
Note The advice and recommendations that appear in the users risk report refer to this risk factor as
High Mouse Use (the same as for the High Mouse Use risk factor described above; the term MediumHigh Mouse Use does not appear in Risk Reports)
Recommendations
• Ensure management is aware that these users are high mouse users. Talk with management to
identify the reasons for these users' high mouse use and investigate ways of reducing it where
possible, or mitigating its effects.
• Try to limit users mouse use to less than 15 hours a week (3 hours a day). Some ways you can do this
are by:
Spreading workload over more workers.
Job or task redesign to replace mouse intensive tasks with tasks requiring less mouse use.
Hiring more (part-time) employees or cutting out some mouse-intensive tasks all together.
Discussing with managers whether there are alternative software applications that can be used for
tasks, applications which require less intensive mouse use, and possibly support keyboard shortcuts
better.
• Encourage users to learn keyboard shortcuts for their common tasks. See online help for a good list
of Windows keyboard shortcuts. If a lot of the mouse use is due to one particular application (e.g.
CAD or graphic design software) see if you can find a list of specific keyboard shortcuts for this
application in its online help or manual (search for 'keyboard shortcuts' or 'shortcut keys').
• Encourage users to learn good techniques for using the mouse. For example, by:
Not to leave their hand holding the mouse when they're not using it.
Alternating between the left and right hands. For example, using the mouse in the left hand in the
morning, and right hand in the afternoon. This can spread the load. Remember though - it can take a
while for people to get used to using their other hand on the mouse. Users should buildup gradually
over time, and adjust the mouse speed settings if they need to, to make it easier to use the mouse in
their other hand.
See Tips on using the mouse for more tips on good technique when using the mouse.
• Ensure that other risk factors present for these users are addressed. If it is difficult to reduce these
users' mouse use significantly you can still minimize their overall risks by ensuring that all other
aspects of their work environment are as good as possible. For example, you should ensure that:
these users are well trained about good workstation ergonomics and RSI prevention
their posture and workstation ergonomics are excellent
Wellnomics Ergonomics Reference Guide ▪ 115
stress is well managed
• Regularly survey these users for symptoms of discomfort related to their high mouse use. If any
raised levels of discomfort are found, take immediate remedial action to reduce their workload,
and provide support.
• If you find raised symptom levels ask the users to run the WorkPace Setup Wizard. This will provide
them with a specially designed recovery / rehabilitation breaks and exercise regime to help reduce
their symptoms. Explain to the users with symptoms why taking more frequent breaks is important,
and that it will not reduce their productivity in the long term, even if it takes a while to get used
to.
Criteria
Using the mouse for 15 hours - 20 hours per week over the last 4 weeks.
Very High Keyboard Use
Users with this risk factor have very high keyboard use of more than 30 hours per week (more than 6
hours per day on average). This puts them in the top 0.1% of computer users, with keyboard use more
than far higher than the normal population average of 3-6 hours per week.
Such a very high level of keyboard use significantly increases the risk for developing RSI symptoms.
Continuing with such high levels of keyboard use should be avoided if at all possible.
Users with this high level of keyboard use should be your first priority for implementing RSI prevention
measures.
Recommendations
See recommendations for Very High Computer Use.
Criteria
Using the keyboard for more than 30 hours per week over the last 4 weeks.
High Keyboard Use
Users with this risk factor have keyboard use of 25 hours to 30 hours a week (between 5 hours and 6
hours a day on average). This puts them in the top 0.1% of computer users, with keyboard use far
higher than the normal population average of 3-6 hours per week.
Such a high level of keyboard use significantly increases the risk for developing RSI symptoms.
Continuing with such high levels of keyboard use should be avoided if at all possible.
Users with this high level of keyboard use should be your first priority for implementing RSI prevention
measures.
Recommendations
See recommendations for Risk Factor Very High Computer Use.
Criteria
Using the keyboard for 25 hours - 30 hours per week over the last 4 weeks.
Medium-High Keyboard Use
Users with this risk factor have keyboard use of 20 hours to 25 hours a week (between 4 hours and 5
hours a day on average). This puts them in the top 0.1% of computer users, with keyboard use far
higher than the normal population average of 3-6 hours per week.
Such a high level of keyboard use significantly increases the risk for developing RSI symptoms.
Continuing with such high levels of keyboard use should be avoided if at all possible.
Users with this high level of keyboard use should be your first priority for implementing RSI prevention
measures.
116 ▪ User Guide
Recommendations
See recommendations for Risk Factor High Computer Use.
Criteria
Using the keyboard for 20 hours - 25 hours per week over the last 4 weeks.
High Peak Computer Use
Users with this risk factor have been regularly exceeding 6 hours computer use in a day. Normally this
level of computer use is only achieved when working long hours (much longer than 8 hours).
High peaks in computer use can increase a user's risk of developing RSI symptoms.
Recommendations
• Ensure management is aware of these users' high peaks in computer use. Talk with management to
identify the reasons behind these users' long hours at the computer (such as working late to get
something finished).
• Encourage management and users to spread their computer work evenly over the week. If the peaks
in work load are difficult to avoid other ways to reduce the risk should be considered. For example,
allowing a late start following an extended computer work day which was required to meet
deadlines.
• Ensure that the Daily Limit warning in WorkPace is enabled and set to 6 hours or less. Consider
increasing the Enforcement Level for the WorkPace Daily Limit, perhaps to Medium or Medium-High.
You could also consider using a WorkPace Settings Profile to set minimum Daily Limit settings for
these users.
• Ensure that other risk factors present for these users are addressed. For example, you should ensure
that:
these users are well trained about good workstation ergonomics and RSI prevention
their posture and workstation ergonomics are excellent
stress is well managed
• Regularly survey these users for symptoms of discomfort related to their computer use. If any raised
levels of discomfort are found, take immediate remedial action to reduce their workload, and
provide support.
• If you find raised symptom levels ask the users to run the WorkPace Setup Wizard. This will provide
them with a specially designed recovery / rehabilitation breaks and exercise regime to help reduce
their symptoms. Explain to the users with symptoms why taking more frequent breaks is important,
and that it will not reduce their productivity in the long term, even if it takes a while to get used
to.
Criteria
Computer use of more than 6 hours on an average of 2 or more days per week over the last 4 weeks.
Insufficient rest breaks
Users with this risk factor have been taking insufficient rest breaks on an average of 5 or more
occasions per week. At these times they worked longer than 1 hour at the computer without at least a
5 minute break. This exceeds the recommended break limits set by guidelines in many countries.
Regular long work periods without sufficient breaks can increase the risk of users developing RSI
symptoms.
Note: This risk factor is only activated when WorkPace is in Monitor Only mode.
Recommendations
Wellnomics Ergonomics Reference Guide ▪ 117
• These users are waiting too long before taking breaks or switching to non-computer tasks. Educate
these users on taking regular breaks and encourage them to spread their workload at the computer
evenly across the day and week. For example,
Instead of spending the first few hours each day replying to emails, spread this work out into 3-4
sessions across the day.
Some users can organize their schedule by dedicating certain days of the week to 'computer work'
(e.g. writing reports). It is much better to spread this computer work out evenly across the week.
• Ensure that these users are using WorkPace. Using WorkPace correctly should eliminate this risk
factor by ensuring users are reminded to take enough breaks.
• If these users are already using WorkPace then it is likely they either have ineffective WorkPace
settings, or that they're ignoring too many WorkPace Break reminders (i.e. they have poor WorkPace
Break Compliance). Check these users WorkPace Break Settings and Break Compliance and take
action if need be.
• For advice on changing WorkPace Settings and improving Break Compliance see the separate
Management Recommendations for these risk factors.
Note: When taking a break users should try to change their posture and relax or stretch their muscles.
Preferably they should stand up and walk away from their desk, then perhaps do some non-computer
activities (such as reading, writing or filing)
Criteria
Working longer than 1 hour without at least a 5 minute break on an average of 5 or more occasions a
week over the last 4 weeks.
Insufficient micropauses
Users with this risk factor have been taking insufficient micropauses (micro-breaks) on an average of 20
or more occasions per week. At these times they worked intensively without pausing at least 5 seconds
in every 10 minutes. This is recommended as the minimum pause time for effective micropauses
(micro-breaks)
Rest breaks every hour are not sufficient by themselves to fully recover from muscle fatigue. Taking
plenty of Micropauses as well is therefore important to help prevent buildup of fatigue over the day,
and to aid continuous muscle recovery.
Note: This risk factor is only activated when WorkPace is in Monitor Only mode.
Recommendations
• Educate these users on the importance of taking micropauses (micro-breaks).
• Note that for Micropauses to be beneficial the users must actually relax their muscles, either resting
their arms and hands on the desk, or dropping them at their sides. See online help for more on
taking Micropauses correctly
• Investigate if these users are working under high work pressure, which may cause them to work
intensely with few pauses.
• Ensure that these users are using WorkPace. Using WorkPace correctly should eliminate this risk
factor by ensuring users are reminded to take enough Micropauses.
• If these users are already using WorkPace then it is likely they either have ineffective WorkPace
settings, or that they're ignoring too many WorkPace Micropause reminders (i.e. they have poor
WorkPace Micropause Compliance). Check these users WorkPace Break Settings and Micropause
Compliance and take action if need be.
• For advice on changing WorkPace Settings and improving Micropause Compliance see the separate
Management Recommendations for these risk factors.
Criteria
Not taking enough micropauses (micro-breaks) of at least 5 seconds every 10 minutes on an average of
20 or more occasions a week over the last 4 weeks.
118 ▪ User Guide
Compliance
This Risk Category is designed specifically for those with Wellnomics WorkPace Breaks & Exercises
enabled. It assesses whether the Breaks and Exercises settings are set correctly and whether the user
is complying with break prompts. The aim is to ensure that users are taking sufficient breaks, and in a
way which meets the recommended break levels set by regulations and guidelines for VDU users.
Note that many of the risk factors in this Risk Category only occur if the user's computer use is above
minimum levels. For example, if someone only users the computer for 30 minutes a day, then whether
they take all their WorkPace prompted micropauses isn't so much of an issue, as their computer use
isn't high enough to create a significant risk.
Break compliance becomes most important for high computer users.
Marginal Micropause Compliance
Users with this risk factor have been ignoring more than 25% of their Micropauses.
Recommendations
For advice on helping users to reduce Micropause warnings by adapting their work habits, see risk
factor Poor Micropause Compliance.
Criteria
WorkPace Micropause Compliance less than 75% over the last 4 weeks (where at least 4 Micropauses
prompted per week)
Marginal WorkPace Break Compliance
Users with this risk factor have been ignoring more than 25% of their WorkPace Breaks. This means the
user is occasionally working long periods without sufficient breaks.
Recommendations
For advice on helping users to reduce WorkPace Break warnings by changing their work habits, see risk
factor Poor WorkPace Break Compliance.
Criteria
WorkPace Break Compliance less than 75% over the last 4 weeks (where at least 3 breaks prompted per
week)
Poor Micropause Compliance
Users with this risk factor have been taking less than 50% of their Micropauses.
Note that the average user sees just 3-4 Micropause reminders a day. Users will be interrupted more
often if they're working long hours and intensively at the computer, or if they're not taking enough
natural breaks.
Recommendations
• Investigate if there are reasons for this poor Micropause Compliance, such as high work pressure and
feeling unable to take breaks, or unhappiness with using WorkPace.
• If there are high work pressures talk to management about improving employee awareness of the
importance of taking Micropauses when prompted. Employees and management must be aware of
the benefits of Micropauses, and understand that they do not reduce productivity (and can actually
improve productivity). You may wish to provide the information under What are Micropauses, and
why are they needed? to staff as a refresher. This explains why Micropauses are important.
• Explain to users how to take advantage of natural pauses in their work. For example, taking their
hand off the mouse when not using it, relaxing their hands on the desk when reading text on screen,
waiting for a software program to finish a task, or when thinking. Note that WorkPace only provides
reminders if not enough natural Micropauses are being taken. If a user is seeing lots of Micropause
reminders this is telling them they're not taking enough natural pauses.
Wellnomics Ergonomics Reference Guide ▪ 119
•
Note: Remember that the key to Micropauses being effective is relaxing the muscles to restore
blood flow and promote recovery. If the user does not relax their shoulder, arm and hand muscles
when taking Micropauses, then they won't be effective. See What are Micropauses, and why are they
needed? for more information.
• If necessary, explain to users and management your organization's policies on RSI prevention and
taking breaks. Ensure management understand they have a responsibility to ensure their staff can
take enough Micropauses. Ensure users also understand they have a personal responsibility to
comply with RSI prevention initiatives such as the Micropause warnings given by WorkPace.
• As a last resort, you can use Settings Control to lock Micropauses so they cannot be ignored (by
setting the Micropause Enforcement Level to high). See Wellnomics Administrator's Guide for
instructions on doing this.
Note: To avoid user annoyance at having the Micropause Enforcement Level increased it's very
important you inform users before taking this step, and explain why. The users' managers should also
be involved in making this decision and support it. Having Micropauses enforced can be quite effective
if introduced correctly and well supported by management and work design (e.g. performance bonuses
not linked to keystroke output, users doing non-time-critical tasks that can tolerate a 5-8 second
pause). Many organizations using WorkPace do successfully use the highest Micropause Enforcement
Level as the default for all users, guaranteeing good Micropause compliance.
Criteria
WorkPace Micropause Compliance less than 50% (with at least 4 Micropauses prompted per week).
Poor WorkPace Break Compliance
Users with this risk factor have been ignoring more than 50% of their WorkPace Breaks. This means the
user is regularly working long periods without sufficient breaks, which increases their risk of RSI
symptoms.
Recommendations
• Investigate if there are reasons for these users' poor WorkPace Break Compliance, such as high work
pressure and feeling unable to take breaks, or unhappiness with using WorkPace.
• If there are high work pressures talk to management about improving employee awareness of the
importance of taking WorkPace Breaks when prompted. Employees and management must be aware
of the benefits of breaks, and understand that they do not reduce productivity (and can actually
improve productivity). You may wish to ask staff to review the WorkPace Multimedia Training again,
as this explains the benefits of breaks.
• If possible, try to get management and users to break up their work into alternating periods of
computer work, and non-computer work (i.e. away from the computer).
• Encourage users to take advantage of natural breaks in their work. Note that WorkPace only
provides reminders if not enough natural breaks are being taken. If a user seeing lots of break
reminders this is telling them they're not taking enough natural breaks.
• Encourage users to keep the WorkPace Compliance Indicator (the 'smiley face' icon in the Windows
System Tray, or WorkPace Status Panel) smiling.
• If necessary, explain to users and management your organization's policies on RSI prevention and
taking breaks. Ensure management understand they have a responsibility to ensure their staff can
take enough breaks. Ensure users also understand they have a personal responsibility to comply with
RSI prevention initiatives such as the break warnings given by WorkPace.
• As a last resort, you can use Settings Control to increase the WorkPace Break Enforcement Level
(for example, to Medium - (only 1 ignore allowed) or to Medium-High (postpone only)). This will
limit the number of times users can ignore breaks.
120 ▪ User Guide
Note: To avoid user annoyance at having the WorkPace Break Enforcement Level increased it's very
important you inform users before taking this step, and explain why. The users' managers should also
be involved in making this decision and support it. Having WorkPace Breaks enforced can be effective if
introduced correctly and well supported by management and work design (e.g. performance bonuses
not linked to keystroke output, users doing non-time-critical tasks that can tolerate a 5 minute break
at unpredictable times).
Criteria
WorkPace Break Compliance less than 50% (with at least 4 breaks prompted per week).
Ineffective Settings: Micropauses turned off
Users with this risk factor have disabled their Micropauses. This means they won't be reminded to take
Micropauses (micro-breaks). As Micropauses are very important to preventing fatigue they should
always be enabled.
Recommendations
By default Micropauses are always enabled. Users have likely disabled their Micropauses to avoid being
interrupted by warnings.
For advice on helping users to reduce Micropause warnings by changing their work habits, see risk
factor Poor Micropause Compliance.
Note: With Settings Control you can lock Micropauses on so they cannot be disabled. See Wellnomics
Administrator's Guide for instructions on doing this.
Criteria
WorkPace Micropauses turned off.
Ineffective Settings: Micropause Duration too long
Users with this risk factor have increased their Micropause Interval to greater than 8 minutes. The
optimum value for the Micropause Interval is about 5-7 minutes. Taking lots of Micropauses (microbreaks) is a key method to avoid the buildup of fatigue during the day. Increasing the Micropause
Interval means less Micropauses will be taken.
Recommendations
For advice on helping users to reduce Micropause warnings by changing their work habits, see risk
factor Poor Micropause Compliance.
Note that with Settings Control you can restrict the Micropause Interval to a maximum allowable value
(for example, 8 minutes). See Wellnomics Administrator's Guide for instructions on doing this.
Criteria
WorkPace Micropause Interval Setting > 8 minutes (with Micropause Duration Setting < 8 seconds)
Ineffective Settings: WorkPace Breaks turned off
Users with this risk factor have disabled their WorkPace Break warnings. This means they will never be
reminded to take breaks.
Recommendations
By default WorkPace Breaks are always enabled. Users have likely disabled their Breaks to avoid being
interrupted by warnings.
For advice on helping users to reduce WorkPace Break warnings by changing their work habits, see risk
factor Poor WorkPace Break Compliance.
Note that you can use Settings Profiles to lock the WorkPace Break warnings on so they cannot be
disabled. See Wellnomics Administrator's Guide for instructions on doing this.
Criteria
Wellnomics Ergonomics Reference Guide ▪ 121
WorkPace Breaks turned off.
Ineffective Settings: WorkPace Break Interval too long
Users with this risk factor have increased their WorkPace Break Interval to more than 1 hour. Most
regulatory guidelines for computer use specify that breaks should be taken at least once an hour.
Consequently these users' settings do not comply with guidelines.
Recommendations
By default WorkPace Break Interval is longer than 1 hour. Users have likely increased the Interval to
reduce the number of break warnings they get.
For advice on helping users to reduce WorkPace Break warnings by changing their work habits, see risk
factor Poor WorkPace Break Compliance.
Note that you can use Settings Profiles to restrict the WorkPace Break Interval to a maximum allowable
value (for example, 1 hour). See Wellnomics Administrator's Guide for instructions on doing this.
Criteria
WorkPace Break Interval Setting is more than 1 hour.
Ineffective Settings: WorkPace Break Duration too short
Users with this risk factor have reduced their WorkPace Break Duration to less than 5 minutes. Most
regulatory guidelines for computer use specify that breaks of at least 5 minutes every hour should be
taken. Consequently these users' settings do not comply with guidelines.
Recommendations
For advice on helping users to reduce WorkPace Break warnings by changing their work habits, see risk
factor Poor WorkPace Break Compliance.
Note that you can use Settings Profiles to restrict the WorkPace Break Duration to a minimum
allowable value (for example, 5 minutes). See Wellnomics Administrator's Guide for instructions on
doing this.
Criteria
WorkPace Break Duration Setting is < 5 minutes (and WorkPace Break Interval Setting is > 30 minutes)
OR
WorkPace Break Duration Setting is < 3 minutes (and WorkPace Break Interval Setting is ≤ 30 minutes)
Ignoring too many Daily Limit warnings
Users with this risk factor have been ignoring Daily Limit warnings on more than 4 days over the
previous 4 weeks. This means they are regularly working long days at the computer with their usage
exceeding their preset safe working limits. High peak usage like this can increase the risk of RSI
symptoms.
Recommendations
• Investigate the reasons for these users poor Daily Limit compliance. For example, high workloads or
regular deadlines that require working late.
• It's possible that some users have recovery settings with a lowered Daily Limit (e.g. to 3 hours). If
so, then either this limit needs to be raised, or, if the user still has RSI symptoms, you may need to
work with management on lowering their workload at the computer, or giving them reduced
working hours to allow them to recover from their RSI symptoms. Note that for users with significant
RSI symptoms strictly controlling the level of computer use is key to preventing symptoms worsening
and avoiding future lost work time injuries.
• If there are high workloads or deadline pressures, talk to management about this.
122 ▪ User Guide
• Encourage users (and management) to smooth out peaks in computer work. If a task requires
intensive computer use, spread it out over several days. For example, aim for two days of 3 hours at
the computer instead of one day of 6 hours.
• If a user works part-time, consider getting them to work more days and less hours per day. For
example, aim for 4 half-days instead of 2 full days.
• If necessary, explain to users and management the organization's policies on RSI prevention and safe
working limits. Ensure management understand they have a responsibility to ensure their staff don't
exceed safe limits. Ensure users understand they have a personal responsibility to comply with RSI
prevention initiatives and the WorkPace warnings enforcing these.
Criteria
WorkPace Daily Limit warnings were ignored on more than 4 days over the last 4 weeks.
Too much time with WorkPace on standby
Users with this risk factor have been putting WorkPace on Standby too much. During Standby WorkPace
continues monitoring computer use, but doesn't prompt for any breaks.
Standby can be useful if the user needs to avoid being interrupted for a short while. For example,
when:
• Giving a presentation.
• Demonstrating something on your computer to another person.
• Doing some critical work that must not be interrupted.
WorkPace can only be put on Standby for a limited period of 15 minutes, 30 minutes or 1 hour, after
which WorkPace automatically resumes giving reminders.
If a user does not like being prompted for breaks they may use Standby more often than necessary, in
order to avoid being interrupted WorkPace. This will reduce the effectiveness of WorkPace by allowing
the user to continue working for long periods without taking breaks.
Recommendations
• Find out why these users are using Standby so much. For example:
• Are they doing a lot of work in which interruptions are detrimental (e.g. giving presentations)
• Are they getting too many interruptions because their WorkPace Settings are too strict.
• Do they not understand the importance of breaks and using WorkPace
• If it is because users are finding it irritating to be interrupted by WorkPace, then educate the users
on the importance of breaks and their benefits, and encourage them to use the WorkPace Status
Panel to track when breaks are next due and then take voluntary breaks before WorkPace prompts
them. If they take lots of voluntary breaks they will seldom be interrupted by WorkPace
• If you still have problems with Standby being used too much, you can disable the Standby option
using WorkPace Settings Profiles. See the WorkPace Administrator's Guide for instructions on doing
this.
Criteria
WorkPace being put on standby for an average of more than 1 hour a week, and more than 20% of the
user's time at the computer, over the last 4 weeks.
Ignoring too many Dutch regulation break warnings
Users with this risk factor have been ignoring more than 4 Dutch Regulation breaks a week. This means
they're regularly working long periods with insufficient breaks and not complying to regulatory
requirements for breaks.
Wellnomics Ergonomics Reference Guide ▪ 123
Recommendations
For advice on helping users to reduce break warnings by changing their work habits, see risk factor
Poor WorkPace Break Compliance.
Criteria
More than 4 Dutch Regulation breaks (for computer use more than 1 hour without a 5 min break, or
more than 2 hours without a 10 min break) per week were ignored over the last 4 weeks.
Speed and Intensity
Whereas the Computer Use risk category evaluates the duration of keyboard and mouse use, Speed &
Intensity evaluates the intensity of the work done during these periods. A higher intensity of activity,
such as high typing speeds and fast or precise mouse work, has been shown to increase muscle strain
and be associated with increased musculoskeletal symptoms.
There is not currently enough scientific evidence to set exact safe limits for intensity factors.
However, the evidence does indicate a likely dose-response relationship for these factors - meaning the
higher the intensity, the higher the increased risk. Exactly what threshold should be used to determine
'safe' or 'unsafe' is yet to be determined.
Because of this, Wellnomics Risk Management uses a population comparison approach to identify those
users whose Speed & Intensity at the computer is much higher than average, and therefore likely to
represent an increased risk. The thresholds at which risks are flagged are based at the 90th percentile
compared against the normal population of computer users. This means that a Speed & Intensity Risk
Factor is only present if the user is in the top 10% of computer users for this statistic as compared
against the average computer user (not just against computer users in your organization).
Your organization may, of course, have a higher or lower proportion of users than normal with a high
intensity of work. For example, if your organization has a lot of data entry workers or copy typists
then your level of computer users with the High typing speed Risk Factor may be greater than average
(i.e. more than 10%).
High Typing Speed
Users with this risk factor have a high typing speed, with more than 14,000 keystrokes per hour. This
places them in the top 10%† of computer users for typing speed.
High typing speeds have been found to be associated with increased loading of shoulder muscles, and
an increased risk of complaints. For this reason very high typing speeds should be avoided, or at least
compensated for by paying special attention to mitigating any other risk factors present for these
users.
Note that there is not enough scientific evidence to set exact safe typing speed limits. Instead,
Wellnomics identifies users with much higher typing speeds than the average, as these users are more
likely to be in a higher risk population.
Recommendations
• You may wish to suggest to these users that they limit their typing speed to less than 14,000
keystrokes an hour. Note that WorkPace provides a feature (called the Typing Speed Limit) that can
warn users when they are exceeding a high typing speed for long periods.
It may be difficult to get these users to reduce their typing speed. High typing speed may be a key
requirement of their job (for example, as a data entry operator or copy typist). If it is not practical
to reduce typing speeds, at least make sure that these users are a higher priority for other
ergonomics interventions.
• If these users are also high computer users (with computer use of 15 hours a week or more) it is
recommended you encourage these users to learn touch typing (i.e. typing with all 10 fingers and
without looking at the keyboard).
Touch typing spreads the load across your fingers and allows a more relaxed hand and forearm
position. It is also more efficient and accurate when learned well. Touch typing can have other
benefits with regard to posture and head position (the user no longer needs to look down at the
keyboard regularly to see where the keys are).
124 ▪ User Guide
Criteria
Greater than 14,000 keystrokes per hour over the last 4 weeks, placing the user in the top 10%†
compared to a normal population for this statistic. Must also have average computer use of at least 5
hours per week before this risk factor is flagged.
High level of mouse clicks
Users with this risk factor have a very high level of mouse clicking - in the top 10%† of computer users.
These users are doing more than 1,250 clicks per hour on average, which means their work must
require a much higher amount of mouse clicking than normal. This high level of mouse clicking can
cause increased muscle and tendon loads.
Recommendations
Try to find out why these users have such a high mouse click rate. Is it something about the type of
work they are doing? Can this work be adjusted to reduce the amount of mouse clicking required?
Some tips that may help users to reduce the amount of mouse clicking required are:
• Using keyboard shortcuts instead of the mouse for common tasks. (See Further Information section
for a list of common Windows keyboard shortcuts)
• Changing the Windows mouse and application settings so users can use single clicks instead of
double clicks. (See Further Information section for instructions on how to do this).
Criteria
Number of mouse clicks greater than 1,250 clicks per hour over the last 4 weeks, placing the user in
the top 10%† compared to a normal population for this statistic. Must also have average computer use
of at least 5 hours per week before this risk factor is flagged.
High level of mouse movements (direction changes/min)
Users with this risk factor have a much higher intensity of mouse usage than normal users. They are
doing more than 1,850 mouse movement direction changes per hour, placing them in the highest 10%†
of users for this activity.
This means these users are either using highly mouse intensive applications, or they are trying to work
very quickly - speeding up their normal mouse activity. Intensive mouse use like this can caused
increased muscle and tendon loading in the arm and hand.
Recommendations
Try to find out why these users have such a high number of mouse movements. Is it related to the type
of work they are doing? Can this work be adjusted to reduce the level of mouse movements required?
If special applications are being used (such as CAD or graphic design), check the manuals to see if there
are keyboard alternatives for common actions in the application that require lots of mouse movements.
Get users to think about whether there are common activities they're doing that require a lot of mouse
movement. If there is, try one of the following:
• Look in the application's online help for an alternate, more efficient way of doing that activity. For
example, if moving many objects one at a time, perhaps there is a way to select them all, then
move them together.
• Use the keyboard to select and move objects. Many applications let you use the Arrow keys (or
Shift-Arrow or Ctrl-Arrow) to move selected objects around.
• Use keyboard shortcuts instead of the mouse. (See Further Information section for a list of common
Windows keyboard shortcuts.)
It may be just that the user is working very quickly - doing normal activities but trying to do them as
quickly as possible. If so, encourage the user to slow down a bit.
Wellnomics Ergonomics Reference Guide ▪ 125
Criteria
Number of mouse movements of greater than 1,850 movements per hour over the last 4 weeks, placing
the user in the top 10%† compared to a normal population for this statistic. Must also have average
computer use of at least 5 hours per week before this risk factor is flagged.
High use of mouse drag
Users with this risk factor use mouse drag (moving the mouse while holding down a mouse button) far
more than normal users. For these users more than 12% of their mouse use is mouse-drag actions,
which puts them in the highest 10% of computer users for this activity.
Mouse drag actions can require significantly greater muscle tension in the hand and forearm than
normal mouse movements.
Recommendations
Try to find out why these people use mouse drag so much. Is it related to the type of work they are
doing? Can this work be adjusted to reduce the amount of mouse drag required?
If special applications are being used (such as CAD or graphic design), check the manuals to see if there
are keyboard alternatives for the common activities in the application that require mouse dragging.
Encourage users to find alternate ways of moving or selecting items. For example, some alternatives
that can be used in many applications are:
• Using the PageUp and PageDn keys to move through a document instead of dragging the slider bar.
• Using Ctrl-C and Ctrl-V to Copy and Paste text or objects instead of 'dragging and dropping' using the
mouse.
• Using the keyboard to select and move objects instead of the mouse. Many applications let you use
the Arrow keys (or Shift-Arrow or Ctrl-Arrow) to move objects around. (First select or highlight the
object, then use these keys to move).
• If using Windows XP, try using the ClickLock feature. This allows you to drag without holding down
the mouse button. See Further Information section for more on this feature and how to use it.
Tip: To make navigation and moving objects with the keyboard easier, see Further Information
section for advice on optimizing the keyboard's auto-repeat settings.
Criteria
More than 12% of mouse use involved doing a mouse drag action (holding down mouse button while
moving the mouse) over the last 4 weeks, placing the user in the top 10%† compared to a normal
population for this statistic. Must also have average computer use of at least 5 hours per week before
this risk factor is flagged.
High level of precise mouse work
Users with this risk factor are doing a lot of precise mouse movements. They are in the highest 10%† of
computer users for this risk factor. This means these users are likely doing a lot of very precise mouse
work requiring small movements and high positioning accuracy. This may be related to doing specialist
mouse work such as CAD or graphic design.
Precise mouse work can place a higher strain on the hand and forearm muscles. This is because of the
high level of muscle tension needed to position the mouse accurately, and make controlled small
movements.
Recommendations
Try to find out why these users' work requires such high mouse precision. Is it related to the type of
work they are doing? Can this work be adjusted to reduce the level of mouse precision required?
If special applications are being used (such as CAD or graphic design), check the manuals to see if there
are keyboard alternatives for the common actions in the application that require high mouse precision.
Some options for reducing the need for precise mouse work, or reducing the strain caused by precise
work are listed below.
126 ▪ User Guide
• Reduce the mouse speed (and turn off acceleration) to make it easier for the hand to make precise
movements. See Further Information section for instructions on how to adjust mouse speed and turn
off mouse acceleration.
• Use the keyboard to select and move items. Many applications let you use the Arrow keys (or ShiftArrow or Ctrl-Arrow) to move selected items around.
• Use keyboard shortcuts instead of the mouse. (See Further Information section for a list of common
Windows keyboard shortcuts.)
• Try out a different type of input device, such as a touchpad or tablet, which may be better suited
to precise mouse work.
Criteria
High level of small/precise mouse movements, with mouse precision index of 14.5 or higher over last 4
weeks, placing the user in the top 10% compared to a normal population for this statistic. Must also
have average computer use of at least 5 hours per week before this risk factor is flagged.
Posture & Workstation Risk Factors
This risk category covers risk factors that are normally covered in a traditional workstation assessment.
This focuses on postural factors involving the neck, shoulders, and arms. The online assessment asks
additional questions to identify potential causes of postural risk factors, such as an incorrectly setup
workstation.
All of these risk factors have been shown to be correlated with an increased risk of upper body
discomfort and musculoskeletal injuries.
Head bent forward (Neck flexion)
This is when a position is adopted where the head is rotated downwards on the neck more than 45
degrees.
This may be because:
• the position of documents is too low (For example, no document holder being used)
• the user is looking at the keyboard while typing
• the screen position is too low
• a laptop or notebook computer is being used (which can cause the screen to be too low)
This can result in strain on upper neck muscles, ligaments and joints and consequently discomfort.
Head bent backwards (Neck extension)
This is when a position is adopted where the head is tipped backwards on the neck. This may be
because:
• bifocal glasses are being used
• the screen position is too high
This can result in strain on upper neck muscles, ligaments and joints and consequently discomfort.
Head turned sideways (Neck rotation)
This is when a position is adopted where the head is turned to one side more than a quarter turn.
This may be because:
• A document or screen is positioned to one side
• A doorway with frequent visitors is located to the side or behind the workstation resulting in
frequent turning of the head and neck to see who is there
This can result in strain on upper neck muscles, ligaments and joints and consequently discomfort.
Wellnomics Ergonomics Reference Guide ▪ 127
Forward head posture (Anterior position of the head i.e. leaning forward, head sticking out)
This is when a position is adopted where the head is pushed forward on the neck, sometimes called
‘protraction’ or a ‘poking chin’.
This may be due to leaning forward or sticking the chin forward, in an effort to see something better
This can result in strain on upper neck muscles, ligaments and joints and consequently discomfort.
Shoulder Elevation
This is when a position is adopted where the shoulders are shrugged towards the ears.
This may be due to:
• desk being too high
• mouse being placed too far away
• keyboard being too high
• telephone being held between the shoulder and the ear
• chair armrests being too high
• stress / tension
This can result in strain on upper neck and shoulder muscles, tendons, ligaments and joints and
consequently discomfort.
Upper arm raised (Upper arm elevation)
This is when a position is adopted where the upper arms are lifted or positioned forward of the main
body.
This may be due to:
• desk being too high
• mouse being placed too far away
• keyboard being too high
• telephone being held between the shoulder and the ear
• chair armrests being too high
• stress / tension
This can result in strain on upper neck and shoulder muscles, tendons, ligaments and joints and
consequently discomfort.
Reaching with arm (Upper Arm Rotation)
This is when a position is adopted where the lower arm, when bent at the elbow, is positioned away
from the trunk.
This may be due to:
• the mouse being placed too far to one side
• the way the mouse is used
• the position of the chair armrests
This can result in strain on upper neck and shoulder muscles, tendons, ligaments and joints and
consequently discomfort.
Insufficient Forearm Support
This is when a position is adopted where there is little or no support for the forearms while working.
This may be due to:
• the configuration of the desk
128 ▪ User Guide
• the height of the chair
• the placement of equipment e.g. the keyboard or mouse are too close to the desk edge to allow
space for forearm support on the desk or too far away from desk to allow forearm support on chair
arm rests.
Lack of forearm support can increase musculoskeletal loading of the trunk, shoulders and arms and
consequently discomfort.
For more information on the latest advice on forearm support see the Wellnomics white paper Forearm
support during keyboard and mouse use.
Wrist bent to side (Wrist ulnar abduction)
This is when a position is adopted where the wrist, when the palm is facing down, is bent towards the
little finger side too much.
This may be due to:
• laptop being used with no external keyboard
• position of the mouse
• the way the mouse is used
• typing technique
• arm rest position
This can result in strain on elbow, forearm, wrist and hand muscles, tendons, ligaments and joints and
consequently discomfort.
Wrist bent up (Wrist extension)
This is when a position is adopted where the wrist, when the palm is facing down, is raised up too
much.
This may be because:
• the body of the mouse is too high
• of the way the mouse is used
• the keyboard is tilted forward, i.e. the keyboard has high legs at the back
• the keyboard is too thick
This can result in strain on elbow, forearm, wrist and hand muscles, tendons, ligaments and joints and
consequently discomfort.
Wrist bent down (Wrist flexion)
This is when a position is adopted where the wrist, when the palm is facing down, is bent down too
much.
This may be because:
• the keyboard is tilted backwards, i.e. the keyboard has high legs at the front
• the keyboard is positioned too low
This can result in strain on elbow, forearm, wrist and hand muscles, tendons, ligaments and joints and
consequently discomfort.
Discomfort
Upper body discomfort can hamper work activities and reduce productivity. It is also an early warning
sign of potential musculoskeletal injury.
A prior history of discomfort related to computer use is also a strong predictor of future problems. In
other words, if an employee has had problems before they are at greater risk of future problems.
This risk category uses the scientifically validated Visual Analogue Scale to identify any existing
symptoms of discomfort, their severity, and which body areas are affected.
Priority should be placed on any employees who have significant discomfort in one or more body areas.
Immediate steps should be taken to reduce this discomfort, and address the causes.
Wellnomics Ergonomics Reference Guide ▪ 129
To help pinpoint the causes of discomfort read the recommendations below for each body area. You
should also review the risk factors in other risk categories. A high risk in the Discomfort risk category
will often be the result of risk factors being present in other risk categories. For example, neck
discomfort may be caused by Posture & Workstation risk factors such as neck flexion or neck rotation.
Neck Discomfort
Neck discomfort is commonly reported by computer users.
They may be related to:
• posture and workstation factors, e.g. screen placement, workstation height
• psychosocial work factors e.g. work demands, stress
• individual factors e.g. past history of discomfort, levels of physical activity
Neck discomfort may affect work performance and absenteeism.
Shoulder Discomfort
Shoulder Discomfort is commonly reported by computer users.
They may be related to:
• posture and workstation factors, e.g. workstation height, mouse position
• psychosocial work factors e.g. limited influence over rest breaks
• individual factors e.g. past history of Discomfort, level of physical activity
Shoulder discomfort may affect work performance and absenteeism.
Upper Back Discomfort
Upper back discomfort is reported by computer users.
They may be related to:
• posture and workstation factors, e.g. workstation height, the chair
• computer use behavior e.g. working too long without a break
• individual factors e.g. past history, level of physical activity
Upper back discomfort may affect work performance and absenteeism.
Lower Back Discomfort
Lower back discomfort is commonly reported by people in general but can be associated with computer
use.
They may be related to:
• posture and workstation factors, e.g. the chair
• computer use behavior e.g. working too long without a break
• psychosocial work factors e.g. stress
• individual factors e.g. past history of discomfort, levels of physical activity
Lower back discomfort may affect work performance and absenteeism.
Forearm Discomfort
Forearm discomfort is commonly reported by computer users.
They may be related to:
• posture and workstation factors, e.g. forearm support, mouse and keyboard position
• psychosocial work factors e.g. high work demands, work load surges
• individual factors e.g. past history of discomfort, levels of physical activity
Forearm discomfort may affect work performance and absenteeism.
130 ▪ User Guide
Wrist / Hand Discomfort
Wrist/hand discomfort is reported by computer users.
They may be related to:
• posture and workstation factors, e.g. forearm support, mouse and keyboard position
• psychosocial work factors e.g. overtime, low job control
• individual factors e.g. past history of discomfort, levels of physical activity
Wrist/hand discomfort may affect work performance and absenteeism.
Head Discomfort (headaches)
Headaches are commonly reported by people in general but can be associated with computer use.
They may be related to:
• visual discomfort. See risk factor Eye strain
• neck discomfort. See risk factor: Neck discomfort
• environmental conditions, e.g. lighting, glare
• posture and workstation factors, e.g. screen placement
• computer use behavior e.g. working too long without break
• psychosocial work factors e.g. work demands
• individual factors e.g. visual deficiencies, stress
Headaches may affect work performance and absenteeism.
Eye Strain
Visual discomfort is commonly reported by computer users and may include symptoms of sore eyes,
blurry vision, red eyes, tired eyes, dry eyes and headaches. It may be related to:
• environmental conditions, e.g. lighting, humidity
• posture and workstation factors, e.g. screen placement, screen quality
• computer use behavior e.g. working too long without a break
• individual factors e.g. undetected visual deficiencies
Visual discomfort may affect work performance and absenteeism.
High Risk Rating for Discomfort Assessment
Action should be taken as soon as possible to address the discomfort reported by these users.
Recommendations
• Ensure that the individual(s) concerned implement the recommendations given under each category
in their risk assessment report. Particularly those categories that are given a High or Medium risk
rating.
• Follow up on any requests from employees regarding the implementation of these recommendations
e.g. alternative equipment, discussion of work demands or work feedback requirements,
information regarding an employee assistance program.
• Take particular note of any High or Medium ratings in other risk categories. These may give you
pointers to the causes of this discomfort. For advice on addressing likely causes of discomfort,
identify the top risk factors in the High or Medium risk categories, and then see the
recommendations under each of these specific risk factors.
Wellnomics Ergonomics Reference Guide ▪ 131
Criteria
Frequent or continuous (“All the time”) discomfort rated at 4 or more (out of 10 on the Visual Analog
Scale) in one or more body areas.
Medium Risk Rating for Discomfort Assessment
Action should be taken where possible to help alleviate the discomfort reported by these users.
Recommendations
• Encourage the individual(s) concerned to implement the recommendations given under each
category in their risk assessment report. Particularly those categories that are given a High or
Medium risk rating.
• Follow up on any requests from employees regarding the implementation of these recommendations
e.g. alternative equipment, discussion of work demands or work feedback requirements,
information regarding an employee assistance program.
• Take particular note of any High or Medium ratings in other risk categories. These may give you
pointers to the causes of this discomfort. For advice on addressing likely causes of discomfort,
identify the top risk factors in the High or Medium risk categories, and then see the
recommendations under each of these specific risk factors.
Criteria
Occasional (“Sometimes”) discomfort rated at 4 or more (out of 10 on the Visual Analog Scale) in one
or more body areas
OR
Frequent or continuous (“All the time”) discomfort rated at 1 or more (out of 10 on the Visual Analog
Scale) in one or more body areas.
Psychosocial
Psychosocial factors can be sources of stress for the employee. Stress has been shown to have an
important influence on the development and persistence of musculoskeletal discomfort and disorders.
Including a focus on psychosocial factors is increasingly seen as best practice in any office ergonomics
program.
Psychosocial risk factors have also been shown to influence many other aspects of individual
productivity and organizational success, such as absenteeism, staff turnover and employee job
satisfaction.
The benefits of addressing psychosocial factors are therefore often far wider than just reducing the
risks of musculoskeletal disorders.
Recommendations from experts are provided below to guide you in taking appropriate action for any
psychosocial risk factors identified in your department or organization.
For more background on psychosocial factors see Wellnomics white paper Psychosocial risk factors,
What are they and why are they important.
High Mental Load
Workers perceive the mental requirements of the job to be high.
For example,
• Working intensely
• High information processing demands
High mental load is associated with a greater risk of developing musculoskeletal discomfort and
disorders.
Studies have shown that mental performance drops off after one hour of sustained concentration on a
task. Just like physical exercise, best performance is achieved when effort is alternated with rest.
132 ▪ User Guide
It is important that tasks which require a high degree of mental effort are varied with other less
mentally demanding tasks. If this is not possible frequent, short breaks are important to maintain
optimal performance.
The demands of work with a high mental load can also be mitigated by a healthy work life balance and
physical activity.
Recommendations
• Design mentally demanding jobs to include tasks which have variable mental loads.
For example, consider
Requesting that staff do their own photocopying, filing or other simple administrative tasks.
Scheduling meetings in the middle part of the day rather than at the beginning or end of the day so that
intensive periods of work are broken up.
Requesting that each staff member participates in a role outside of their key role e.g. be a member of
the H&S, social or product evaluation committee or be a First Aid or Fire warden.
• Ensure that staff have opportunities for regular breaks and encourage them to take these breaks.
Make sure you use Wellnomics WorkPace Breaks & Exercises to help you with encouraging this.
• Encourage a healthy work life balance amongst staff. For some recommendations on achieving this
see advice under risk factor High tendency to continue in the Individual Factors risk category.
• Encourage physical activity. For some recommendations on achieving this see advice under risk
factors Low physical activity and Low physical fitness or low muscle strength in the Individual
Factors risk category.
Criteria
User answers Often or higher to questions assessing mental load.
Based upon Copenhagen Psychosocial Questionnaire (COPSOQ).
High Work Demands
Workers perceive the physical and mental requirements of the job to be high.
For example,
• Working very fast
• High work load
• Constant time pressures
• Pressure to work overtime
High work demands are associated with a greater risk of developing musculoskeletal discomfort and
disorders. Ensuring that employees are managing the demands of their work satisfactorily is therefore
very important to preventing these problems, as well as optimizing performance.
Coping with the demands of work is helped by a healthy work life balance and physical activity.
Recommendations
• Try as much as possible to spread work load and responsibilities amongst team members.
• Ensure that targets can be realistically met. In setting targets consider quantity of work, quality of
work, and the situations under which the work is being done. Set targets in consultation with team
members and review them regularly
• If an individual is reporting high work demands and is having difficulties meeting realistic targets
consider if they need:
further or more specific training
assistance in managing personal matters e.g. a referral to an employee assistance
program
• Encourage a healthy work life balance amongst staff. For some recommendations on achieving this
see advice under risk factor High tendency to continue in the Individual Factors risk category.
Wellnomics Ergonomics Reference Guide ▪ 133
• Encourage physical activity. For some recommendations on achieving this see advice under risk
factors Low physical activity and Low physical fitness or low muscle strength in the Individual
Factors risk category.
• Criteria
User answers Often or higher to questions assessing work demands.
Based upon Copenhagen Psychosocial Questionnaire (COPSOQ).
Low Job Control
Workers perceive they have a low amount of input into the way they do their work.
For example,
• Little or no control over work speed
• Little or no opportunity to schedule own work
• Limited break opportunity
• Poor task variation
• Little or no opportunity to make own decisions
Low job control is associated with a greater risk of developing musculoskeletal discomfort and
disorders.
Having some control over work speed, work schedule, some task variation, opportunities to take
regular breaks and some input in decision making is important for people to enjoy their jobs, perform
well and avoid musculoskeletal discomfort and disorders.
Recommendations
• Consider if any work routines can be altered to provide more control for staff
e.g. consider
The way the work is allocated; can workers select a proportion of their work from a
than have it just given to them?
‘menu’ rather
More flexible working hours e.g. slightly later start or earlier finish to allow children
or from school or to allow peak hour traffic to be avoided.
to be taken to
Allowing allocated breaks within a range of time to accommodate workflow and
personal preference
e.g. 10 minute morning break to be taken sometime between 9
am and 10:30 am
Flexibility over how the work is done with performance measures based on successful outcomes.
Be creative! And ask your staff how the role might work better for them.
• Ensure there are realistic standards for work load and achievement.
• Consider if more variety can be added to the role e.g. reduce the amount of division of work; for
example, in a call center allow the call taker to perform some of the follow ups required rather
than allocating this part to another person.
• Consider clear pathways for achievement based advancement.
• Ensure that regular breaks are built into the work process and the time that these take are
considered in the performance targets. Make sure you use Wellnomics WorkPace Breaks & Exercises
to help you with this.
• Provide an employee ‘suggestion box’ or web-based equivalent so that staff can have input into
their roles and the organization in an anonymous way if preferred. Ideas from the suggestion box
should be presented, discussed with staff and implemented where appropriate.
• Whenever possible staff should be well informed and consulted about any issues pertaining directly
to their roles.
Criteria
User answers Sometimes or lower to questions assessing level of job control.
Based upon Copenhagen Psychosocial Questionnaire (COPSOQ).
134 ▪ User Guide
Low Social Support from Colleagues
Workers perceive that they receive a low level of support from co-workers.
Poor social support is associated with an increased risk of musculoskeletal discomfort and disorders. A
supportive working environment is important to optimize performance and to reduce the risk of
musculoskeletal problems.
It is important to try and establish why staff may be feeling unsupported.
• Are others too busy to help or listen to problems?
• Is the work considered too specialized for others to help?
• Is there a shared understanding not to 'bother' colleagues or managers with questions?
Recommendations
• If the lack of support available is a workload or time pressure issue try as much as possible to spread
work load and responsibilities amongst team members.
• If the lack of support is due to a lack of specialist skill consider
if support can be provided from another area of the organization
if support can be provided external to the organization e.g. a mentoring program
if support can be provided to an individual e.g. an employee assistance program
• If the lack of support may be due to a historic culture that colleagues should not be ‘bothered’
consider
Discussing with staff how better support can be provided for them to do their work.
How could
this be done? What procedure should be followed, e.g. informal, a web
based post system or regular
meetings?
• Consider organizing a team building event.
• Consider entering a corporate sports event or competition.
Criteria
User answers Sometimes or lower to questions assessing level of social support from colleagues.
Based upon Copenhagen Psychosocial Questionnaire (COPSOQ).
Low Sense of Community
Workers feel that they are not really part of a community at work.
For example,
• Poor general atmosphere at work
• Poor co-operation and relationships between colleagues
Poor social support is associated with an increased risk of musculoskeletal discomfort or disorders.
A friendly, considerate atmosphere within your work group is important to working successfully
together.
It is important to try and establish why staff may feel that the working environment is not optimal.
• Is it due mainly to a clash of personalities between several people? Or clashes between groups with
different views?
• Is it due to people not really knowing each other that well due to conflicting work schedules or new
employees entering into established work groups?
• Is it due to organizational change which has resulted in uncertainty?
Recommendations
• Try to resolve issues of personality clashes by considering:
Careful arrangement of work groups and project groups to have compatible people working together
where possible.
Wellnomics Ergonomics Reference Guide ▪ 135
Full consultation with affected parties to see if conflicts can be resolved and ‘ground
rules’
established. In serious cases, specialized assistance may be required e.g. from the Human Resources
department or an Organizational Psychologist.
• Try to resolve issues of unfamiliarity between team members by considering:
Regular group meetings at a time all can attend.
Team building and social events.
An induction program for new employees that includes specific introductions to team members and a
group social event e.g. morning team or lunch together.
• Try to resolve issues of organizational change and uncertainty by considering
Full consultation with affected parties to ensure all staff are well informed.
Utilizing experts to assist staff in the change process e.g. from the Human Resources department,
Organizational Psychologist or employee assistance program.
• Consider organizing a team building event.
• Consider entering a corporate sports event or competition.
• Try to make the workplace fun e.g. celebrate people’s birthdays, have a regular shared morning tea
or lunch, arrange a sweepstake for an upcoming event. Be creative!
• Show an interest in employees’ out of work lives e.g. their family, hobbies and congratulate
employees who excel in their out of work pursuits.
• Lead by example and be friendly and considerate to all.
Criteria
User answers Sometimes or lower to questions assessing sense of community at work.
Based upon Copenhagen Psychosocial Questionnaire (COPSOQ).
Lack of Feedback at Work
Workers perceive that they receive a low level of feedback from colleagues and immediate superiors.
For example,
• Little or no opportunity to talk about work performance with colleagues or managers
A perception of poor co-worker support is associated with an increased risk of musculoskeletal
discomfort or disorders.
To perform well and be satisfied by their work people need good information on what is expected of
them, including feedback on their work performance.
Feedback provides opportunities for staff to improve their performance, if necessary. It can also be
reassuring for people to know that they are doing well and that they are on the right track.
Recommendations
• Ensure that all staff are provided with constructive feedback about their work performance.
• The format of feedback should be decided, in part, through discussions with staff.
Consider:
The style e.g. formal, informal
The frequency of each style e.g. informally weekly and formally annually
The process e.g. email, meeting
The ‘ground rules’.
These may include, for example, that feedback will:
• not be personal but objective
• be constructive and always include something positive
• include realistic and achievable improvement requests
• include opportunity for discussion
136 ▪ User Guide
• include ways to achieve improvements e.g. training
• include a review process
• If you are unsure about how to provide feedback or are experiencing difficulties with the process
seek help e.g. from the HR department or through further training
Criteria
User answers Sometimes or lower to questions assessing feedback at work.
Based upon Copenhagen Psychosocial Questionnaire (COPSOQ).
Lack of Sufficient Leadership
Workers perceive that their immediate superiors show a poor level of leadership.
For example,
• Perceived poor ability of managers to plan work well and to solve problems
A perceived lack of good leadership is associated with an increased risk of musculoskeletal discomfort
or disorders. Good management support and leadership is important for having healthy and productive
work groups.
Recommendations
• Meet with your staff and ask for feedback regarding work planning and problem solving
management.
Consider:
Discussing what style of management would be beneficial to all
Focusing on specific work examples to ensure that the discussions are objective and
personally critical
are not
Utilizing experts to assist facilitation of the discussions e.g. from the Human Resources department or an
Organizational Psychologist
• If you are unsure about how to provide appropriate leadership or are experiencing difficulties with
this role seek help e.g. from senior colleagues, the HR department or through further training.
Criteria
User answers Sometimes or lower to questions assessing leadership.
Based upon Copenhagen Psychosocial Questionnaire (COPSOQ).
High Work Stress
Workers perceive their work to be stressful and they are experiencing signs of work stress.
For example,
• High levels of fatigue
• High levels of emotional tiredness
• High levels of frustration
• Poor work-life balance
High perceived work stress is associated with an increased risk of upper limb problems and symptoms
of stress can be associated with musculoskeletal problems.
People may experience stress for a variety of reasons, both work and personal. Some of these reasons
may be highlighted in the Individual Factors assessment, e.g.
• having a high commitment to work
• a tendency to continue to work regardless of the circumstances
• difficulties in achieving a good work life balance
and in other sections of the Psychosocial Factors assessment e.g.
• High work demands
Wellnomics Ergonomics Reference Guide ▪ 137
• Low job control
• Low social support from colleagues
Personal, out of work issues are also likely to impact on the experience of stress.
Having high perceived work stress makes employees more likely to develop musculoskeletal discomfort
and disorders. It is important that signs of stress are recognized and addressed as well as possible.
Recommendations
• Be open to discuss the individual’s feelings of work stress.
• Try to address any specific psychosocial factors identified e.g. work demands, control over work,
social support. See advice provided for the specific psychosocial risk factors that have been
identified in the assessments.
• Try to address any specific individual factors identified e.g. a tendency to continue, poor work life
balance. See advice provided for the specific Individual risk factors that have been identified the
assessments.
• Recommend that the individual seeks help from experts e.g. their doctor, the employee assistance
program.
Criteria
User answers Sometimes or higher to questions assessing work stress.
Based upon Copenhagen Psychosocial Questionnaire (COPSOQ).
Individual
Musculoskeletal discomfort and disorders that are related to work have a multi-factorial origin. As well
as environmental factors such as workstation setup and workload there are individual factors unique to
each person which can also affect that person's risk level.
These factors can reinforce each other or be mediated by cultural or societal factors (such as those
assessed by the psychosocial factors risk category). Individual factors include things about a person
that they can't change, e.g. gender; things that they can change, e.g. fitness and muscle strength, and
some factors that may be difficult to change, e.g. coping strategies and personality traits.
Of the many attributes that can vary between individuals six have been shown to have a significant
correlation with an increased risk of discomfort and injury.
Each of these risk factors is explained below, together with recommendations for addressing or
mitigating the effects of this risk factor.
In practice it may be difficult to address some of these risk factors. In this case it is simply a matter of
placing a higher priority on these people for other preventative measures, ensuring that their overall
risk does not exceed safe levels.
For more background on the Individual Factors risk category see Wellnomics white paper Individual
factors: What are they and why are they important?
Increased Risk Due to Female Gender
Females are more at risk of developing musculoskeletal discomfort or disorders.
Although this increased risk has been proven extensively in many studies the exact reasons for the
increased risk remain unclear.
Recommendations
None.
Criteria
Gender = Female
138 ▪ User Guide
High Sensitivity to Stress or Commitment
Individuals who have a tendency to feel very stressed and those who are very committed to their work
have an increased risk of developing musculoskeletal discomfort and disorders.
A sustained stress response may result in increased muscle tension, reduce the ability of the
musculoskeletal system to recover during or after work and increase the central nervous system’s
response to discomfort. Over commitment to work may result in less leisure time and consequently
less time to rest and recuperate both mentally and physically.
Recommendations
Being highly committed to their work is an admirable quality and makes for valuable employees. One
potential drawback of such focus and dedication is that it can have a negative impact on health in the
long term. A good balance between work and relaxation is important to maintain a good working and
private life.
It is important that work load and responsibilities are distributed evenly amongst team members so
that an increased work load does not fall to one or two individuals.
Another thing that can help is to make sure that staff take full advantage of their leisure time.
Encourage relaxing activities that provide a change from work and which really helps employees to
recharge their batteries. Adequate recovery from mental fatigue is just as important for maintaining
'mental fitness' as adequate recovery from physical fatigue is. The same principles apply.
• Try as much as possible to spread work load and responsibilities amongst team members
• Encourage a work-life balance amongst staff.
You can do this by:
Not expecting regular overtime
Allowing for flexible hours where possible
Encouraging leisure activities by joining corporate events or having work teams entered into local sports
competitions
Supporting and congratulating employees who excel in their out of work pursuits
Showing an interest in employees out of work lives e.g. their family, hobbies
Setting a positive example of a good work-life balance as a manager
Criteria
Agree or Strongly Agree with 4-5 of the 6 questions on sensitivity to stress and high commitment
High Tendency to Continue Working
Employees with this risk factor indicate a tendency to work overtime, and keep working outside normal
working hours. Individuals who have a tendency to continue to work regardless of the circumstances
have an increased risk of developing musculoskeletal discomfort and disorders, especially if it means
they are spending extra long hours at a computer.
An individual’s tendency to continue may result in risky biomechanical and cognitive processes, for
example adopting poor postures, continuing to work without breaks and working through symptoms of
discomfort. A tendency to continue working may also result in less leisure time and consequently less
time to rest and recuperate both mentally and physically.
Recommendations
It is important to work out why these employees feel they need to continue working so hard.
Is it because:
• High work demands?
• A company culture that expects people to work lots of overtime?
• High standards they have for themselves?
• They enjoy their work so much that they find it hard to put it down.
Wellnomics Ergonomics Reference Guide ▪ 139
If the main reason is 1 or 2, then your organization should consider the implications of this and identify
ways to reduce the causes of overwork. Continuous overwork can increase the risk of musculoskeletal
discomfort and disorders.
If the main reason is 3 or 4 then it is a matter of making sure that staff aim for balance. High standards
and/or a strong interest in work are very healthy and often indicators of highly valued employees. But
if taken too far, can affect health in the long term.
Some suggestions for addressing this risk factor are listed below:
• Try as much as possible to spread work load and responsibilities amongst team members to reduce
work demands.
• Try as much as possible to spread the workload over a period of time and avoid large surges and
peaks in workload.
• Ensure that workload and performance expectations are reasonable and matched to the individual’s
skill levels.
• If improved performance is required from an individual formulate a consultative professional
development plan to develop staff competencies.
• Monitor overtime hours and encourage reasonable working hours.
• If overtime is required in the short term, then once the period is over reward the extra effort with
time-in-lieu or another appropriate recognition of extra effort.
• Encourage a work-life balance amongst staff.
You can do this by:
Not expecting regular overtime
Allowing for flexible hours where possible
Encouraging leisure activities by joining corporate events or having work teams entered into local sports
competitions
Supporting and congratulating employees who excel in their out of work pursuits
Showing an interest in employees out of work lives e.g. their family, hobbies
Setting a positive example of a good work-life balance as a manager
Criteria
Answers highest level on questions designed to assess tendency to continue working.
Low physical activity
Individuals who have low levels of physical activity are at greater risk of developing musculoskeletal
disorders.
Exercise can prevent and reduce musculoskeletal discomfort so the absence of exercise increases an
individual’s risk of discomfort.
Recommendations
• Encourage physical activity amongst your staff. Some simple ideas to help with this are listed
below:
• Getting off the bus early and walking
• Parking the car further away from the office and walk
• Where possible, travel to work and appointments by bicycle or by foot (in combination with public
transport), instead of driving
• Taking the stairs instead of the lift
• Walking briskly
• Walking at lunchtimes and during breaks
• Initiation of group exercise at breaks e.g. stretching or walking
• Considering using 'sit-stand' desks to reduce prolonged sitting
140 ▪ User Guide
• Walking as much as possible during work, e.g. to the coffee machine, to the copier, printer or fax
and to your mailbox
• Walking outside when two or three people are meeting and few notes need to be made
• Regular breaks from computer work to walk away from desks or perform exercises to stretch or
relax your muscles. (Make sure you use WorkPace® to help you with this. WorkPace® has many good
exercises that you can do in working time at your computer)
• Provide an exercise facility or subsidized gym membership
• Provide shower and change facilities
• Display posters to encourage physical activity.
• Enter corporate events or enter a work group in a local sports competition
• Arrange exercise based team building events e.g. orienteering, rock climbing, kayaking
• Acknowledge the physical activity achievements of staff
• As a manager, lead by example!
Criteria
Does physically demanding activity less than 5 times a week and participates in exercise less than 3
times a week.
Low Physical Fitness or Low Muscle Strength
Individuals who have low levels of physical fitness or muscle strength are more susceptible to
developing discomfort because bodies and muscles are less resistant to fatigue and less able to recover
quickly.
Strength training and all-round physical exercise (e.g. walking, cycling, and swimming) can prevent and
reduce musculoskeletal discomfort so the absence of fitness and muscle strength increases an
individual’s risk of discomfort.
Recommendations
Maintaining a good level of fitness and muscle strength will help staff stay healthy.
This can be achieved by either:
1 Performing at least 20 minutes of exercise three times a week. this exercise should be strenuous
enough that you sweat, or
2 Doing 30 minutes of moderate physical activity, such as walking or gardening, at least 5 days a week.
"Just 30 minutes of physical activity taken regularly will benefit the health of everyone."
US Surgeon General 1996
See risk factor Low Physical Activity for some ideas on how to encourage greater fitness and muscle
strength amongst your staff.
Criteria
User rates their fitness or muscle strength as poor.
Low Overall Physical Capacity to Cope with Workload
Individuals who have a tendency to continue to work regardless of the circumstances have an increased
risk of developing musculoskeletal discomfort and disorders.
An individual’s tendency to continue may result in risky biomechanical and cognitive processes, for
example adopting poor postures, continuing to work without breaks and working through Symptoms of
discomfort. A tendency to continue working may also result in less leisure time and consequently less
time to rest and recuperate both mentally and physically.
Recommendations
See risk factors Low Physical Activity and Low Fitness or Low Muscle Strength for some ideas on
addressing this risk factor.
Criteria
Either low physical activity, Low physical fitness or low muscle strength
21 INDEX
A
A Combination of HR field and Select Individual Users • 83, 90
About this Guide • 5
Act • 69
Actions Log • 16
Add New Group • 81
Adding a Delegate • 77
Admin • 87
Analyze • 53
Application Usage • 64
Assess • 34
Assessment • 109
Assessment Completion Individual History • 20
Assessment Reference Point (ARP) • 109
Assessment Reference Point (ARP) Compliance • 66
Assessment Reference Point (ARP) Individual History • 20
Assessment Status • 109
Assessments • 93, 109
Assign Groups to Local Administrators • 92
High Sensitivity to Stress or Commitment • 142
High Tendency to Continue Working • 142
High Typing Speed • 127
High use of mouse drag • 129
High Work Demands • 136
High Work Stress • 140
Home Page • 109
How do Risk Levels relate to the actual chance of developing
computer related Discomfort? • 107
How does the Wellnomics system calculate the Risk Levels? • 107
How has the risk reduction advice been determined? • 107
How have the risk calculation algorithms been designed? • 107
HR Data Field Management • 96
HR Import • 109
I
Identify • 42
Ignoring too many Daily Limit warnings • 125
Ignoring too many Dutch regulation break warnings • 126
Increased Risk Due to Female Gender • 141
Individual • 61, 141
Individual History • 19
Individual Risk Category • 109
Ineffective Settings
Micropause Duration too long • 124
Micropauses turned off • 124
WorkPace Break Duration too short • 125
WorkPace Break Interval too long • 125
WorkPace Breaks turned off • 124
C
Can I see the Risk Levels for a particular day? • 107
Cancel Training • 29
Change Password • 85
Change User Settings Profiles • 72
Compare • 46
Compliance • 14, 60, 63, 122
Compliance History • 18
Compliance Risk Category • 109
Computer Use • 13, 59, 63, 113
Computer Use Individual History • 17
Computer Use Risk Category • 109
Creating a New Local Administration Group • 88
Creating Filter by HR Fields • 82, 88
Creating Groups • 82, 88
Current Assessment Completion - Tabular View • 26, 40
D
Data & Privacy Access Levels • 95
Data out of Date • 109
Delegated Reporting • 76, 96
Discomfort • 61, 132
Discomfort History • 19
Discomfort Risk Category • 109
E
Editing a Select HR Fields Type Group • 91
Editing a Select User Type Group • 92
Editing and Deleting Groups • 90
Eye Strain • 134
F
FAQ • 107
Find User • 76
Forearm Discomfort • 133
Forward head posture (Anterior position of the head i.e. leaning
forward, head sticking out) • 131
G
Getting Started • 7
Group • 109
Group Builder • 109
H
Head bent backwards (Neck extension) • 130
Head bent forward (Neck flexion) • 130
Head Discomfort (headaches) • 134
Head turned sideways (Neck rotation) • 130
High Computer Use • 114
High Keyboard Use • 119
High level of mouse clicks • 128
High level of mouse movements (direction changes/min) • 128
High level of precise mouse work • 129
High Mental Load • 135
High Mouse Use • 117
High Peak Computer Use • 120
High Risk • 109
High Risk Rating for Discomfort Assessment • 134
High Risk Users • 42
Insufficient Forearm Support • 131
Insufficient micropauses • 121
Insufficient rest breaks • 120
K
Keep me logged in • 105
L
Lack of Feedback at Work • 139
Lack of Sufficient Leadership • 140
Local Administration • 87
Logging into Wellnomics Risk Management • 105
Low Job Control • 137
Low Overall Physical Capacity to Cope with Workload • 144
Low physical activity • 143
Low Physical Fitness or Low Muscle Strength • 144
Low Risk • 109
Low Sense of Community • 138
Low Social Support from Colleagues • 138
Lower Back Discomfort • 133
M
Manage Groups • 78
Manage Local Administration Groups • 88
Manage Roles • 87
Management Report • 109
Marginal Micropause Compliance • 122
Marginal WorkPace Break Compliance • 122
Medium Risk • 110
Medium Risk Rating for Discomfort Assessment • 135
Medium-High Computer Use • 115
Medium-High Keyboard Use • 119
Medium-High Mouse Use • 118
Modules • 101
More Information • 12
My Risk Profile • 8
My Staff • 22
N
Neck Discomfort • 133
Not Synchronized • 110
O
Overall
Overall
Overall
Overall
Risk
Risk
Risk
Risk
• 53, 110
History • 17
Individual History • 54
User List • 54
P
Personal Risk Report • 110
Policy Configuration • 93
Poor Micropause Compliance • 122
142 ▪ User Guide
Poor WorkPace Break Compliance • 123
Posture & Workstation • 60
Posture & Workstation Risk Category • 110
Posture & Workstation Risk Factors • 130
Posture and Workstation History • 19
Preferences • 85
Psychosocial • 62, 135
Psychosocial History • 19
Psychosocial Risk Category • 110
Q
Quick Links • 26
R
Reaching with arm (Upper Arm Rotation) • 131
Removing Existing Delegates • 77
Report on Behalf • 86
Report Options Panel • 110
Reporting on Behalf of a Manager/Local Administrator • 77
Reschedule Training • 29
Reset my password • 105
Risk Categories • 55
Risk Categories User History • 57
Risk Categories User List • 57
Risk Category • 110
Risk Category History • 16
Risk Factor • 110
Risk Factors • 58, 59, 60, 61, 62, 110
Risk Level • 110
Risk Levels • 110
Risk Management • 110
Risk Reminder Period • 110
Risk Warnings • 93
RSI Risk Report • 10
S
Schedule Assessment • 34
Schedule Training • 27
Schedule Training Confirmation • 27
Scheduled Training Details • 29
Scheduling Assessments for Individuals • 38
Select Individual Users • 83, 90
Send Risk Messages • 69
Settings Profile • 110
Settings Profiles • 73, 97
Shoulder Discomfort • 133
Shoulder Elevation • 131
Show Active Users • 102
Speed & Intensity • 59
Speed & Intensity Risk Category • 110
Speed and Intensity • 127
Speed and Intensity History • 18
Statistics • 63, 111
Step 1
Select Criteria • 35
Step 2
Confirm User Selection • 36
Step 3
Set Schedule Details • 37
Step 4
Confirmation • 37
Suspend Users • 83
Synchronized • 111
T
The Tabular Report Display • 31
Too much time with WorkPace on standby • 126
Tools • 76
Top Recommendations • 43, 111
Top Risk Factors • 44, 111
Train • 27
Training and Assessment Completion • 30
Training and Assessment Tasks • 11
Types of Groups • 81, 88
U
Unknown • 111
Upper arm raised (Upper arm elevation) • 131
Upper Back Discomfort • 133
User History • 111
User List • 59, 60, 61, 62, 71
User Notes • 111
User Summary • 76
Users with Recommendation • 43
Users with Risk Factor • 45
Using System Help • 7
Using the Application Usage Feature • 65
V
Very High Computer Use • 113
Very High Keyboard Use • 119
Very High Mouse Use • 115
View Current Assessment Completion Detail • 24, 39
View Overall Risk Report • 46
View Overall Risk Table • 47
View Risk Category Report • 48
View Risk Category Table • 49
View Risk Factor Report • 50
View Risk Factor Table • 51
View Scheduled Training • 28
View Status • 29
W
Welcome Page • 103, 106
Wellnomics Ergonomics Reference Guide • 112
Wellnomics Portal • 111
Wellnomics Risk Management • 111
Wellnomics Risk Management Overview • 6
Wellnomics Server • 111
Wellnomics WorkPace • 111
What security measures are in place on the Wellnomics server? • 108
Why are the Risk Levels for some users shown as unknown? • 107
WorkPace Data Detail • 23
WorkPace Data Status User Lists • 24
WorkPace Settings • 16
Wrist / Hand Discomfort • 134
Wrist bent down (Wrist flexion) • 132
Wrist bent to side (Wrist ulnar abduction) • 132
Wrist bent up (Wrist extension) • 132