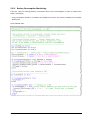
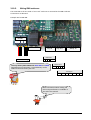
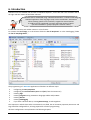
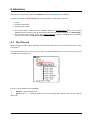
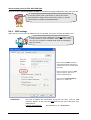
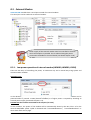
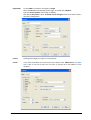
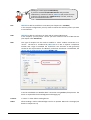
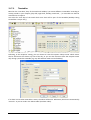
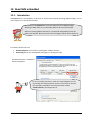
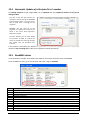
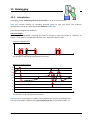
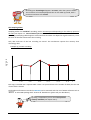
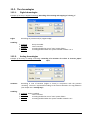
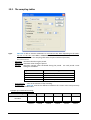
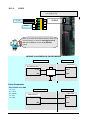
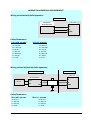
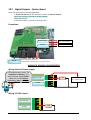
1
A -WM -LP User's Guide Wiring & Technical Specifications Version 2.08 Disclaimer Every effort has been made to ensure the accuracy of the information in this guide. However, SEMAPHORE. assumes no responsibility for the accuracy of the information. Product information is subject to change without notice. Windows 2000, 2003, XP, VISTA are trademark of Microsoft Corp. EXCEL and Internet Explorer aretrademark of Microsoft Corp. Copyright 2004-2010 by Drêve Richelle, 161. Bâtiment M B-1410 Waterloo Edition: December 07, 2010 TWinSoft: 10.07 Author: Jean Burton Version: 2.08 TBox - ULP 2 Important Safety Instructions Read and understand all instructions. Save these instructions. Safety Instruction when used in Hazardous Location • • • • • • • • • • • • • • • • • • • • • WARNING: USE ONLY BATTERY PACK, reference ATEX-BAT-PACK WARNING: DO NOT OPEN THE BOX IN EXPLOSIVE ATHMOSPHERE WARNING: DANGER OF POTENTIAL ELECTROSTATIC CHARGE. CHECK THERE IS NO GAZ BEFORE TOUCHING THE CABINET Read the instruction manual carefully before using the equipment and comply with the instructions that it contains to avoid mistakes and to prevent any personal injury or damage to property. Warning ! It is mandatory that this equipment is earthed by the rack or IP68 enclosure. Connect the crimp terminal ring to the earth with a stranded wire between 1.5 and 2.5 mm² inclusively. The cable must be crimped consistent with rules of good practice. Installation must be carried out by suitable, competent personnel, according to the steps and stated specifications described in this manual. Use only the approved color-coded wires for connecting to mains. The green/yellow colored wire can be only used as earth wire. This equipment has been designed for use only by qualified and instructed personnel in an industrial environment. This equipment must be operated in a restricted access location according to IEC60950. It is a Safety Class III equipment, according to IEC classification; This equipment must be powered by a Safety Extra Low Voltage (SELV). This equipment has been designed to meet IEC60950-1 requirements (safety of information technology equipment) This equipment has been designed for indoor or for outdoor use when mounted in the IP68 enclosure. It can be used in a Pollution Degree 2 environment (dry non-conductive pollution). The DIN rail mounting module must be fastened to the rack using a screw driver, with a recommended minimum torque of 0.5 N.m. Caution – To reduce the risk of fire, use only No. 26 AWG or larger telecommunication line cord. Your TBox-WM and TBox-LP can be used in a wet environment if mounted in IP68 enclosure. Using this instrument in a way not specified by these instructions can impair the equipment safety. Do not operate the instrument outside its rated supply voltage and environmental ranges. Do not open power supply unit. There are no user serviceable parts inside. Do not connect or disconnect any connector when powered. Protect your TBox-WM and TBox-LP from environmental hazards such as dirt, dust, food, liquids, excessive temperature, and sunlight overexposure. Keep your TBox-WM and TBox-LP away from direct or excessive moisture or rain and extremely hot or cold temperatures to ensure that the TBox is used within the specified operating range. Caution – Risk of explosion if battery is replaced by an incorrect type. Dispose of used batteries according to the local regulations. Caution – When used in hot environment, the aluminum housing may reach a temperature higher than 70°C. Take precautions when touching the housing. Version: 2.08 TBox - ULP 3 Environmental Considerations Battery Disposal ! CAUTION: There is a danger of a new battery exploding if it is incorrectly installed. Replace the battery only with the same or equivalent type recommended by the manufacturer. Do not dispose of the battery along with household waste. Contact your local waste disposal agency for the address of the nearest battery deposit site. Your TBox-WM uses lithium battery. The lithium battery is a long-life battery, and it is very possible that you will never need to replace it. However, should you need to replace it, see chapter 3.1 and 3.2 for instructions. General Precautions in Wiring • • • To avoid electrostatic discharge, drain off electrostatic charges by touching a known earth immediately before handling TBox, touching front plate button, connectors or cables. Wiring of Inputs/Outputs, RS232 connections, GSM antennas cannot exceed 30 m., neither leave the building without surge protection. Wiring to DC power, PSTN modem and RS485 can exceed 30 m. In case of DC power to a distribution network, it is mandatory to use a surge protection. Certifications ATEX ll 2 G for TBOX WM Ex ib IIB T4-T3 (CEI/EN 60079-0 and CEI/EN 60079-11) ISSeP10ATEX 036 X ATEX ll 3 G for TBOX LP Ex ic IIB T4-T3 (CEI/EN 60079-0 and CEI/EN 60079-11) ISSeP10ATEX 037 X SAFETY Metlabs In progress nd CEBEC IEC 60950-1:2005 (2 Edition) and EN 60950-1:2006 EMC EN 61000-4-2:1995 + A1:1998 + A2:2001 EN 61000-4-8:1993 + A1:2001 EN 61000-4-3:2002 + A1:2002 + A2:2005 EN 61000-4-11:2004 EN 61000-4-4:1995 + A1:2000 + A2:2001 EN 55011:1998 + A1:1999 + A2:2002 EN61000-4-5:2006 EN 61326-1:2006 EN 61000-4-6:1996 + A1:2000 + A2:2005 FCC CFR47: 2008 (Part15 Sub Part B) CE Low Voltage directive: 2006/95/EC Electromagnetic Compatibility Directive: 2004/108/EC C-TICK ACMA N3413 Version: 2.08 TBox - ULP 4 TABLE OF CONTENTS Presentation..................................................................................................... 11 1. How to use this manual? .........................................................................................14 1.1. 1.2. What is in the manual? .......................................................................................................... 14 What is not in the manual? .................................................................................................... 14 2. The Ultra Low Power Concept .................................................................................15 2.1. 2.2. Features .................................................................................................................................. 15 Models .................................................................................................................................... 16 2.2.1. I/O Options ................................................................................................................................... 16 2.2.2. Communication Options ............................................................................................................... 16 2.2.3. Housing Options ........................................................................................................................... 16 2.2.4. LCD Display Options ...................................................................................................................... 16 2.2.5. Gas Location Options .................................................................................................................... 16 2.3. Low Power operation of CPU .................................................................................................. 17 2.3.1. Sleep mode ................................................................................................................................... 17 2.3.2. Awake mode ................................................................................................................................. 17 2.3.3. Wake-up Intervals ......................................................................................................................... 17 2.3.4. Permanent mode .......................................................................................................................... 17 2.4. 2.5. 2.6. Low Power operation of GSM/GPRS ....................................................................................... 18 Low Power operation with Analog Input ................................................................................ 18 Current Consumption Estimation ........................................................................................... 19 2.6.1. Battery Life Time Estimation in EXCEL .......................................................................................... 19 2.6.2. Application Generation ................................................................................................................. 20 2.6.3. Battery Consumption Monitoring................................................................................................. 21 Hardware ......................................................................................................... 23 3. Installation of theTBox ULP ......................................................................................24 3.1. 3.2. Installation of batteries in ATEX environment ........................................................................ 24 Installation of batteries in normal and Class1 Div1 environment........................................... 24 3.2.1. Replacement of the Battery in ATEX environment ....................................................................... 25 3.2.2. Replacement of the Battery in Class1 Div1 and normal environment .......................................... 25 3.3. 3.4. 3.5. 3.6. 3.7. 3.8. 3.9. External Power Supply ............................................................................................................ 25 Mounting TBox-WM in Mini Rack enclosure .......................................................................... 26 Mounting IP68 enclosure ........................................................................................................ 26 Cable Glands ........................................................................................................................... 26 Cover ....................................................................................................................................... 26 Push-buttons (Optional) ......................................................................................................... 26 “Safety Earth Ground” Connection ......................................................................................... 27 3.9.1. With Mini Rack Enclosure ............................................................................................................. 27 3.9.2. With IP68 enclosure ..................................................................................................................... 27 3.10. Wiring ..................................................................................................................................... 28 3.10.1. Wiring Mini Rack enclosure .......................................................................................................... 28 3.10.2. Wiring IP68 enclosure................................................................................................................... 29 3.11. Version: 2.08 SIM card.............................................................................................................................. 30 TBox - ULP 5 TWinSoft - Getting Started ................................................................................31 4. Installation of TWinSoft........................................................................................... 32 4.1. 4.2. 4.3. System requirements .............................................................................................................. 32 Installation of the CD-ROM ..................................................................................................... 33 Programs of ‘TWinSoft Suite’ ................................................................................................. 35 5. Starting TWinSoft .................................................................................................... 36 5.1. 5.2. 5.3. Wizard ..................................................................................................................................... 37 Communicating with TBox ULP ............................................................................................... 38 PC Communication Set up....................................................................................................... 38 5.3.1. Communication possibilities of TWinSoft .................................................................................... 39 5.3.2. IP address settings in TWinSoft PC Setup ..................................................................................... 40 5.4. 5.5. 5.6. 5.7. 5.8. 5.9. Testing communication ........................................................................................................... 41 Reset of Tbox ULP ................................................................................................................... 42 Global reset of TBox ULP......................................................................................................... 42 Upload ‘Operating System’ ..................................................................................................... 43 LED « Status » ......................................................................................................................... 44 Saving and Sending a Program ............................................................................................... 44 5.9.1. Saving a document – Backup document ...................................................................................... 44 5.9.2. Compiling an application .............................................................................................................. 45 5.9.3. Sending an application ................................................................................................................. 45 TWinSoft - Programming ...................................................................................47 6. Introduction............................................................................................................. 48 7. RTU properties ........................................................................................................ 49 7.1. 7.2. 7.3. 7.4. 7.5. General properties .................................................................................................................. 50 Drivers ..................................................................................................................................... 51 Security ................................................................................................................................... 51 Info properties ........................................................................................................................ 52 Advanced ................................................................................................................................ 52 7.5.1. Start/Stop ..................................................................................................................................... 52 7.5.2. Alarms .......................................................................................................................................... 54 7.5.3. Flow Meters ................................................................................................................................. 56 7.5.4. Sampling Tables ............................................................................................................................ 58 7.5.5. Temperature ..................................................................................................................................... 58 7.5.6. Remote Tags ................................................................................................................................. 59 7.5.7. TCP/IP ............................................................................................................................................... 59 7.5.8. Environment variables.................................................................................................................. 61 7.5.9. Web and Report ........................................................................................................................... 61 8. Resources ................................................................................................................ 63 8.1. 8.2. The CPU card........................................................................................................................... 63 Communication ports ............................................................................................................. 64 8.2.1. 8.3. 8.4. Communication ports tabs ........................................................................................................... 64 Serial ports .............................................................................................................................. 64 GSM/GPRS modem ................................................................................................................. 65 Version: 2.08 TBox - ULP 6 8.4.1. GSM in mode Low Power ............................................................................................................. 65 8.4.2. GSM-data settings ........................................................................................................................ 67 8.4.3. GPRS settings ................................................................................................................................ 68 8.5. External Modem ..................................................................................................................... 73 8.5.1. Low power operation of external modem (WM100, WM200, LP400) ......................................... 73 8.5.2. Low power operation of external modem (LP450) ....................................................................... 74 8.6. Communication Variables....................................................................................................... 75 8.6.1. Digital Communication Variable ................................................................................................... 75 8.6.2. Analog Communication Variable .................................................................................................. 76 8.7. Groups of I/O .......................................................................................................................... 78 8.7.1. Group1 – System Analog Inputs ................................................................................................... 79 8.7.2. Group 2 - Digital Inputs................................................................................................................. 79 8.7.3. Group 3 - Digital Outputs.............................................................................................................. 81 8.7.4. Group 4 - Analog Inputs................................................................................................................ 81 8.7.5. Group6 – Analog Variables Associated to Digital Inputs............................................................... 82 8.7.6. Summary on the use of I/O .......................................................................................................... 85 8.8. System variables ..................................................................................................................... 86 8.8.1. Digital System Variables ................................................................................................................ 86 8.8.2. Analog System Variables ............................................................................................................... 89 8.9. Timers & Counters .................................................................................................................. 91 9. Tags ..........................................................................................................................92 9.1. 9.2. Physical I/O ............................................................................................................................. 93 Internal Variables (Registers) .................................................................................................. 94 9.2.1. Digital Internal Variable ................................................................................................................ 94 9.2.2. Analog Internal Variable ............................................................................................................... 96 9.2.3. Text Internal Variable ........................................................................................................................ 97 9.3. ModBus address ..................................................................................................................... 99 9.3.1. 9.4. 9.5. ModBus address of System Variables ........................................................................................... 99 Tags - Presentation / Write ................................................................................................... 100 Run Time Parameters ........................................................................................................... 100 9.5.1. Alarm Parameters ....................................................................................................................... 102 9.5.2. Datalogging Parameters ............................................................................................................. 103 9.5.3. IP Parameters.............................................................................................................................. 103 9.5.4. GSM/GPRS Parameters ............................................................................................................... 104 10. IP Parameters ........................................................................................................ 105 10.1. 10.2. 10.3. 10.3.1. 10.4. 10.4.1. 10.5. 10.5.1. 10.6. 10.6.1. Version: 2.08 ISP configuration .............................................................................................................. 106 FTP Host ............................................................................................................................ 108 SMTP Server...................................................................................................................... 109 About Redundancy ..................................................................................................................... 110 POP3 Server ...................................................................................................................... 111 Alarm Acknowledge Through POP3 ............................................................................................ 112 NTP Server ........................................................................................................................ 113 Time accuracy ............................................................................................................................. 113 DynDNS ............................................................................................................................. 114 How to configure DynDNS in TBox ............................................................................................. 115 TBox - ULP 7 10.7. TCP/IP Debugging ................................................................................................................. 116 11. Alarms.................................................................................................................... 119 11.1. 11.2. 11.3. 11.4. 11.5. 11.6. Introduction ...................................................................................................................... 119 Digital Alarm Condition .................................................................................................... 120 Analog Alarm Condition.................................................................................................... 122 Recipients .......................................................................................................................... 124 Group of Recipients........................................................................................................... 127 Messages .......................................................................................................................... 127 11.6.1. Value of Tag in a message........................................................................................................... 128 11.6.2. “String” in a message ................................................................................................................. 128 11.7. Alarm Timetables .............................................................................................................. 129 11.7.1. Time Slices .................................................................................................................................. 129 11.7.2. Holidays ...................................................................................................................................... 129 11.7.3. Timetables .................................................................................................................................. 130 11.8. 11.8.1. Alarms table...................................................................................................................... 131 Columns description .................................................................................................................. 131 12. Read SMS embedded ............................................................................................ 133 12.1. 12.2. Introduction ...................................................................................................................... 133 Acknowledgment of an alarm by sending SMS to the RTU .............................................. 134 12.2.1. Structure of the message ........................................................................................................... 135 12.2.2. Acknowledgment of the message .............................................................................................. 135 12.3. 12.4. 12.5. Controlling the RTU using SMS message or reading e-mail using POP3 .......................... 136 Automatic Update of a Recipient’s tel. number ................................................................ 140 ReadSMS status ................................................................................................................ 140 13. Datalogging............................................................................................................ 141 13.1. Introduction ...................................................................................................................... 141 13.2. The chronologies ................................................................................................................... 143 13.2.1. Digital chronologies .................................................................................................................... 143 13.2.2. Analog chronologies ................................................................................................................... 143 13.3. The sampling tables .............................................................................................................. 144 14. Remote Tags .......................................................................................................... 147 14.1. 14.2. 14.2.1. Introduction ...................................................................................................................... 147 Creating a Remote Device................................................................................................. 147 Remote Device – Advanced Properties ...................................................................................... 148 14.3. Creating a Remote Tag ..................................................................................................... 149 14.4. Timing configuration of Remote Tags ................................................................................... 151 15. Periodic Events ...................................................................................................... 152 16. Access security ...................................................................................................... 154 16.1. RTU configuration ............................................................................................................. 155 16.1.1. RTU Properties ........................................................................................................................... 155 16.1.2. Port Properties ........................................................................................................................... 155 16.2. TWinSoft document protected .............................................................................................. 156 16.3. Password utility................................................................................................................. 157 Version: 2.08 TBox - ULP 8 16.4. Login/Logout .................................................................................................................... 158 16.4.1. With TWinSoft ............................................................................................................................ 158 16.4.2. With Internet Explorer ................................................................................................................ 158 16.5. 16.6. Deactivating protection .................................................................................................... 159 Deactivating protection of TWinSoft document ............................................................... 159 Technical Specifications - Wiring ................................................................... 161 17. Technical specifications......................................................................................... 162 17.1. 17.2. 17.3. 17.4. 17.5. 17.5.1. 17.6. 17.7. 17.8. 17.9. Hazardous Environment ................................................................................................... 162 Entity Concept................................................................................................................... 162 Entity Parameters ............................................................................................................. 163 Barriers ............................................................................................................................. 163 General ............................................................................................................................. 164 Button (Working modes) ............................................................................................................ 165 5 VDC + LCD display (option) ............................................................................................ 165 GSM (option) .................................................................................................................... 166 RS232 & Switching (option) .............................................................................................. 166 I/O ..................................................................................................................................... 167 18. Wiring .................................................................................................................... 169 18.1. Power Supply .................................................................................................................... 169 18.1.1. -WM100, -WM200, -LP400 ......................................................................................................... 169 18.1.2. -LP450 ......................................................................................................................................... 170 18.2. 18.3. 18.3.1. 18.4. RS232 – Main Board ......................................................................................................... 171 RS232 – Option Board....................................................................................................... 173 Jumper Settings .......................................................................................................................... 175 RS485 - Main Board .......................................................................................................... 176 18.4.1. WM100, -WM200, -LP400 .......................................................................................................... 176 18.4.2. -LP450 ......................................................................................................................................... 176 18.5. Digital Inputs - Counter inputs .......................................................................................... 178 18.5.1. -WM100, -WM200...................................................................................................................... 178 18.5.2. -LP400, -LP450 ............................................................................................................................ 178 18.6. Digital Outputs - Main Board ........................................................................................... 180 18.6.1. -WM100, -WM200...................................................................................................................... 180 18.6.2. -LP400, -LP450 ............................................................................................................................ 180 18.7. 18.8. Digital Outputs - Option Board ......................................................................................... 182 Analog Inputs – Current.................................................................................................... 184 18.8.1. -WM100, -WM200...................................................................................................................... 184 18.8.2. -LP400, -LP450 ............................................................................................................................ 184 18.9. Analog Inputs – Voltage ................................................................................................... 187 18.9.1. -WM100, -WM200...................................................................................................................... 187 18.9.2. -LP400, -LP450 ............................................................................................................................ 187 Appendixes .................................................................................................... 191 Appendix A. Licenses .................................................................................................. 192 A.1. The Evaluation mode ................................................................................................................. 192 A.2. The Dongle ................................................................................................................................ 192 Version: 2.08 TBox - ULP 9 A.3. The Code (License) ..................................................................................................................... 192 A.4. The TWinSoft LITE...................................................................................................................... 192 Appendix B. Time in RTU ............................................................................................. 193 B.1. Time in TBox ULP ....................................................................................................................... 193 B.2. Data logging .............................................................................................................................. 194 B.3. System variables associated ...................................................................................................... 195 B.4. Summary.................................................................................................................................... 195 Appendix C. Pack & Go ................................................................................................ 196 C.1. Presentation............................................................................................................................... 196 C.2. Pack ........................................................................................................................................... 196 C.3. Unpack ....................................................................................................................................... 197 Appendix D. ModBus Rerouting .................................................................................. 199 Appendix E. Terminal mode ........................................................................................ 201 Appendix F. Synchronization of Counters ................................................................... 203 Index ...............................................................................................................204 Version: 2.08 TBox - ULP 10 P R E S E N TAT I O N Version: 2.08 TBox - ULP 11 The unique TBOX ULTRA LOW POWER, ‘All-In-One’ includes the best of 3 Worlds: Telemetry + Internet + Automation Version: 2.08 TBox - ULP 12 Overview of TBOX ULTRA LOW POWER possibilities Consulting process through HTML pages Programming: locally or remotely IMPORTANT NOTE about Ultra Low Power concept Even if the features available with TBOX ULTRA LOW POWER are identical to other models of TBox, the fact it runs in ultra low power mode (µA consumption), imposes another way of considering telemetry. To achieve ultra low power consumption and to guarantee battery lifetime of several years, the wireless communication port will be switched off most of the time. Therefore, connection time must be reduced as much as possible, with in consequence a preference for using PUSH technology (sending SMS, e-mail or files) instead of classical PULL technology. As far as Analog Input is concerned, try to use “Voltage” sensors and schedule long period between sampling (several minutes). Process is also time consuming, then make it simple ! Version: 2.08 TBox - ULP 13 1. How to use this manual? 1.1. What is in the manual? This manual contains the essential of TBOX ULTRA LOW POWER documentation. It concerns two families of TBox: the TBOX WM and TBOX LP. To make reading easier, we will speak of TBOX ULP all along the manual. It first introduces to the hardware concept The Ultra Low Power concept: Quick overview on installing and powering: chapter 2 chapter 3 Then it brings you to the programming of TBOX ULP using TWinSoft. All features are explained using plenty of snapshots for an easy understanding The main topics are: Starting TWinSoft: chapter 5 Properties of TBOX ULP: chapter 7 Resources (CPU, com. Ports, I/O): chapter 8 Tags: chapter 9 IP configuration: chapter 10 Alarms: chapter 11 Datalogging: chapter 13 Periodic events: chapter 15 All technical specifications and wiring are presented at the end of this manual. Information related to Licenses is available in Appendix A. All along this manual, I inform you with Notes and Remarks: “What a nice manual!” All along this manual, I insist on battery and ultra low power issues: “Save energy!” All along this manual, I warn you: “Read the manual!” Text highlighted in blue concerns the use of TBOX ULP in hazardous environment. 1.2. What is not in the manual? One major topic you will not find in this manual concerns the programming of the process. TBOX ULP supports BASIC and Ladder languages for developing any advanced process. Those languages are detailed in another manual: BASIC and LADDER for TBOX Another important feature, which is not presented into this manual, concerns the development of HTML pages, to use TBOX ULP as web server. This matter is explained in details in another manual: WEBFORM STUDIO – Getting Started Another software part of the TWinSoft Suite is Report Studio, for creating e-mail report or files to send. It is explained in the ‘On line’ help of Report Studio. Version: 2.08 TBox - ULP 14 2. The Ultra Low Power Concept 2.1. Features TBox WM is a ultra low power RTU, powered with Lithium battery (one or two batteries). TBox LP is also ultra low power RTU, which can be powered with Lithium battery or external 12 V battery, typically connected to a solar panel. With limited number of communications, the average consumption turns around 100 µA. The typical applications are: 1. Controlled locations that are not equipped with mains (pipeline monitoring, tank monitoring, river level monitoring, avalanche monitoring, asset monitoring, ...) 2. Mobile applications. TBox ULP is a All-In-One RTU, including a fix number of I/O and of communication ports. It is not possible to add local I/O or communication ports. TBox ULP is also a powerful RTU with all the features available on all models of TBox RTU: Automation program (using Ladder and/or BASIC languages) Data logger Alarm generator (sending of SMS, e-mail, files,...) Serial protocol (Modbus-RTU, ModBus-ASCII, NMEA, ASCII) TCP/IP protocols: ModBus-TCP, SMTP, POP3, FTP, HTTP (through GPRS) WebServer embedded TBOX ULP is programmed using TWinSoft Suite. Version: 2.08 TBox - ULP 15 2.2. Models The TBOX ULP is available in different hardware versions. Product numbering syntax: WM- <I/O>-<Com><Housing><LCD><Gas Location> LP- <I/O>-<Com><Housing><LCD><Gas Location> Examples: WM-100-GD00: (with GSM, DIN rail mounting, without LCD, normal location) WM-200-GM01 (with GSM, IP68 enclosure, without LCD, ATEX zone 1) 2.2.1. I/O Options Reference Power Supply DI DO AI (12 bits) WM-100 3.6 V Lithium battery 4 4 - WM-200 3.6 V Lithium battery 4 4 2 (4..20mA – 0..5V) LP-400 3.6 V Lithium battery 8 8 4 (4..20mA – 0..5V) LP450 12 VDC Lead battery 8 8 4 (4..20mA – 0..5V) 2.2.2. Communication Options Reference Communication -G GSM/GPRS -S Serial 2.2.3. Housing Options Reference DIN rail IP68 - Aluminum D √ - M optional √ 2.2.4. LCD Display Options Only available with the IP68 enclosure. Reference Display – 2 lines 2 buttons 5 VDC (max. 220mA) 0 - - - 1 √ √ √ 5 - - √ 2.2.5. Gas Location Options With TBOX WM Reference Norm Zone 0 Class1, Div1 Explosive Atmosphere can exist all the time. Normal location 1 ATEX1 Explosive Atmospheres are likely to occur Norm Zone 0 Class1, Div2 Explosive Atmosphere are not likely to exist. Normal location 1 ATEX2 Explosive Atmospheres are unlikely to occur With TBOX LP Reference Version: 2.08 TBox - ULP 16 2.3. Low Power operation of CPU To operate in ultra low power mode, TBOX ULP needs specific components (hardware) but also a dedicated Operating System (firmware) to reduce consumption by monitoring 2 working modes: • ‘Sleep’ mode. • ‘Awake’ mode. 2.3.1. Sleep mode Most of the time, TBOX ULP runs in sleep mode. The microprocessor runs with a 32 kHz Quartz and executes few operations: • counting and storing pulses coming on the digital inputs while in sleep mode. • storing transitions on digital inputs • two inputs can also act on interrupt of the microprocessor to wake up the system on demand. 2.3.2. Awake mode At fix intervals, TBOX ULP wakes up to carry on several tasks and check various items since the last wake-up: - reading the amount of pulses at the digital inputs. - checking the transitions on inputs. - checking the period for powering the analog inputs. - checking alarm conditions. - checking data logging conditions. - checking communication with remote device conditions. - execution of one cycle of Ladder/BASIC. 2.3.3. Wake-up Intervals The period between wake-up can be selected among the followings: 1sec., 5 sec., 10sec., 15 sec., 20 sec., 30 sec., 1 minute. The bigger the period is, the smaller the consumption will be ! 2.3.4. Permanent mode In this mode, the processor never returns to sleep mode, Ladder/BASIC is executed without interruption, handling of I/O, Alarms and data logging are still executed only every second. In this mode, the RTU does not work in low power ! We consider real ultra low power operation when working at a wake-up rate of 1 minute. Any local or remote ModBus communication awakes TBox ULP. Concerning I/O changing and effect on datalogging: - direct writing to outputs is immediately processed as well as chronologies. - inputs and sampling tables are processed at wake-up of the CPU. Version: 2.08 TBox - ULP 17 2.4. Low Power operation of GSM/GPRS In addition to RS232 and RS485 ports, a GSM/GPRS communication module is available with TBox ULP. The GSM/GPRS has been selected to fit low power application. In order to save as much energy as possible, this modem supports its own low power mechanism, independent from the CPU, allowing to turn off GSM power for any amount of time. There are 2 possible modes that you can select from the ‘Parameters’ menu (see chapter 8.4.1: GSM/GPRS modem). Permanent: the modem is always ready to communicate, independently from the wake-up rate of the TBox ULP Low Power: the modem is by default unpowered. During wake-up of the CPU, the modem can be powered according to alarm with severity ‘High’ or with the help of communication variables [COM2.ModemPower & COM2.ModemPoT] or [COM2.ModemAlarm]. The modem can be powered independently from CPU wake-up, using “interrupt” inputs. When an “interrupt” is detected, one cycle of Ladder/BASIC is launched which can cycle the power of the GSM/GPRS using communication variables (see chapter 8.4.1). • GSM data / GPRS: when powered, the GSM module can be either in idle mode or in communication. The GSM selected for TBox ULP has a limited consumption during idle mode, still being able to detect incoming communication. Example of consumption with a GSM data availability of 60 minutes per week: o with 55 minutes in idle: 5 mA during 55 min. o with 5 minutes in communication: 132 mA during 5 min. o TOTAL=15.58 mA/h o Battery lifetime of 1 battery= 5 years and 44 days We consider real ultra low power operation when GSM is working at Low Power mode, with small periods of GSM wake-up and little communication. 2.5. Low Power operation with Analog Input A key feature of ultra low power is the control on power of analog inputs. It is clear for everyone that with a 4..20mA sensor, the consumption may be of 20mA just for one analog input ! Therefore, TBox ULP is able to control the power and the acquisition of the analog inputs. Each channel has 4 connections: o V out = to power the sensor (12 VDC or 24 VDC) o V in = input for 0..5 V sensor o I in = input for 4..20 mA sensor o GND = 0V. At regular, predefined periods, TBox ULP powers the sensor, waits and reads the signal. Version: 2.08 TBox - ULP 18 2.6. Current Consumption Estimation From the above description of low power operations, we can conclude that one of the major issue of an Ultra Low Power application is the current consumption of the TBox ULP. To estimate the current used and the resulting life time of the batteries, you will find in the directory of TWinSoft an EXCEL sheet: Consumption_ULP_x.xx.xls TO RUN PROPERLY THE EXCEL SHEET, MAKE SURE MACRO ARE ACTIVATED IN EXCEL. 2.6.1. Battery Life Time Estimation in EXCEL Fill in the sheet and check at the bottom the resulting life time: Version: 2.08 TBox - ULP 19 2.6.2. Application Generation The EXCEL sheet provides also the generation of a TBox ULP application, including battery life time calculation. Click the button and it automatically generates an application with calculation of current consumption corresponding to the data filled in the EXCEL sheet. To monitor battery consumption, it is highly recommended to start your own application from this document. Example of a list of Tags of an application: Version: 2.08 TBox - ULP 20 2.6.3. Battery Consumption Monitoring There are 2 ways of checking battery consumption. Both can be used together in order to improve the battery monitoring. - Using a estimation, based on an addition of the different currents. The result is available in the variable “BatteryUse” Piece of BASIC code: Version: 2.08 TBox - ULP 21 - Using the voltage difference between the battery in charge and the battery without charge. When the delta is regularly of 0.3 V and higher, you should consider replacing the battery. Batteries are OK: Batteries reach end of life: Version: 2.08 TBox - ULP 22 H A R D WA R E Version: 2.08 TBox - ULP 23 3. Installation of theTBox ULP 3.1. Installation of batteries in ATEX environment TBox ULP runs with 3.6 V lithium batteries. In ATEX environment, use the battery pack ATEX-BAT-PACK. It contains 2 batteries with one power connection. Don't use any other power means 3.2. Installation of batteries in normal and Class1 Div1 environment TBox ULP runs with 3.6 V lithium batteries. TBox ULP requires “High Power” battery, to support high current during short period of time when the GSM/GPRS switches on. It also requires batteries having the best performance in a large range of temperatures. The choice has been made for a model of battery providing the best efficiency: SAFT LSH20. Don't use any other model of battery ! Working with IP68 enclosure, unscrew the top cover to access the battery slots. Two slots are available. Both are in parallel. Insert the battery with the + sign to the red side. Version: 2.08 TBox - ULP 24 3.2.1. Replacement of the Battery in ATEX environment Only qualified people are authorized to replace battery pack. Use only the reference ATEX-BAT-PACK First, connect the new battery pack to the power connection available. Then remove the old battery pack. 3.2.2. Replacement of the Battery in Class1 Div1 and normal environment There is no other power supply than the lithium battery. Without battery, the TBox ULP loses its datalogging and its time will restart at 01/01/70 00:00:00 GMT. Working with one battery, place first the new battery in the empty slot then remove the old one Working with two batteries, replace the battery one by one. When using TBox ULP in a the Mini Rack enclosure, a separate DIN Rail enclosure contains the batteries. Two options are available, with 1 or 2 batteries: • Closed enclosure, see photo on the right (ref. ACC-BAT-ENC) 3.3. External Power Supply During development and testing period DON’T USE battery. You risk to empty the battery during this period. Use the external power supply instead of battery (ref. ACC-PS-ULP-3.3V) Version: 2.08 TBox - ULP 25 3.4. Mounting TBox-WM in Mini Rack enclosure TBOX ULP is mounted on a mini rack equipped with one spring for DIN rail fixing. To fix it on a DIN rail: 1. 2. Place the spring of the Rack under the bottom side of the DIN rail and pull-up the TBOX ULP. Push the TBOX ULP against the DIN rail 3.5. Mounting IP68 enclosure The back of IP68 enclosure can fixed on different ways, using different models of bracket options: Wall mounting (reference: ACC-BKT-WALL) Pipe 2”-3” fixing (reference: ACC-BKT-PIPE3) Pipe 4” fixing (reference: ACC-BKT-PIPE4) • • Mounting on a wall, make sure the wall is flat Place the enclosure with glands to the bottom (see below). Check the glands are properly tightened and that no hole is left open. 3.6. Cable Glands Cable glands are used to pass cable inside the enclosure. • • • • Cable must be round, with a diameter between 5.5 and 10 mm. Pass one cable per gland. Rear fixing nut torque: 3.5 N.m. Dome nut torque: 3.5 N.m 3.7. Cover The cover is fixed with eight screws. • Tighten properly the eight screws. • Use a flat blade screwdriver and tighten with a torque between 2 and 3N.m. 3.8. Push-buttons (Optional) The two optional push-buttons are fixed in the cover. Tightening the lock nut with a torque of 1.5 N.m. Version: 2.08 TBox - ULP 26 3.9. “Safety Earth Ground” Connection 3.9.1. With Mini Rack Enclosure Each Rack is equipped with a “Safety Earth Ground” blue ring tongue PIDG. It is marked with the famous upside-down Christmas tree in a circle. 3.9.2. With IP68 enclosure The blue ring tongue is available at one of the corners of the PCB. You have to fasten this ring tongue to a cable and screw this ring to the rack as indicated. On the other side, you must connect the cable to the ground. The cable must be a 2.5mm², colored green/yellow (ratio ±70% / 30%). Be sure all connections and joints are reliably made and that Safety Earth Ground connections have no other function that connection to ground. 1. Be aware that RS485 of TBox is not isolated. If connecting several devices together, be sure they use the same ground connection; otherwise, you have to use ACC-RS485 (contact your local TBox distributor) 2. If the environment is very noisy, like for instance with the presence of a frequency variator, be sure : - the connection to earth stake is as short as possible - to separate the connection of TBox to ground from other devices - not to mix AC cabling with low voltage DC cabling Version: 2.08 TBox - ULP 27 3.10. Wiring TBOX ULP is equipped with compact spring-cage terminal blocks. This connector allows a high density of connections. Press the orange plastic with a screwdriver to insert or remove the cable. Connection capacity Without cable shoe Solid cable: 0.2 .. 1.5 mm² (24..16 AWG) With cable shoe without plastic sleeve Solid or Stranded cable: 0.2 .. 1.5 mm² With cable shoe with plastic sleeve Solid or Stranded cable: 0.2 .. 0.75 mm² Ferrule specification for 0.75mm² cable B: minimum 10 mm C: 1.5 mm D: 3.5 mm 3.10.1. Reference: Weidmüller 9021050000 Wiring Mini Rack enclosure Use only battery SALT LSH20 with TBox WM and LP400 Depending on consumption, a second battery can be added to increase battery life time GSM: connection to the antenna 3.6 VDC battery + - 3.6 VDC battery + - RS 485: for communicating to remote device(s) RS232: for programming Digital Inputs Digital Outputs More information about cabling and technical specifications is available at the end of this manual Analog Inputs Version: 2.08 TBox - ULP 28 3.10.2. Wiring IP68 enclosure The same PCB as the one used in “mini rack” enclosure is mounted in the IP68 enclosure. Connections are identical. Example with a WM-200 RS 485 Gnd A+ Gnd B- RS 232 + - + - 3.6 VDC battery Dig. OUT Dig. IN Analog IN Digital IN 0 1 2 3 GND Use only battery SALT LSH20 with TBox WM and LP400 Depending on consumption, a second battery can be added to increase battery life time Digital OUT GND 0 1 2 3 Analog IN GND PS 0 U0 I0 PS 1 U 1 I 1 More information about cabling and technical specifications is available at the end of this manual Version: 2.08 TBox - ULP 29 3.11. SIM card TBOX WMXXX-G and TBOX LPXXX-G requires a SIM card. It must either support GSM-DATA (including a specific DATA number to be reached) or GPRS. The choice between GSM-DATA and GPRS will depend on the availability of your local GSM operator, the volume of TBOX ULP concerned, the frequency of communications, the volume of data, … With the “Mini rack” enclosure, the SIM card must be inserted at the back of the TBox. Press the eject button of the SIM card tray and place the SIM card. With the IP68 enclosure, the slot for the SIM card appears on top of the PCB. Press the eject button of the SIM card tray and place the SIM card. SIM card is mandatory in TBox WMxxx-G and TBox LPxxx-G . Without SIM card, the system tries to initialize the SIM card, without success. Without SIM card, the modem state machine will stop after several tries, but this still represents a useless consumption of the battery. Check if you have an operational SIM card ! Version: 2.08 TBox - ULP 30 T W I N S O F T - G E T T I N G S TA RT E D Version: 2.08 TBox - ULP 31 4. Installation of TWinSoft 4.1. System requirements • Hardware: Pentium or higher. • Memory: 32 MB minimum. • Hard Disk: 150 MB required plus the application files. • Display: VGA, SVGA with a minimum resolution of 800 x 600. • Mouse: any Windows compatible mouse. • USB port: required • Serial port: required for a local connection to TBOX ULP and/or for an external modem. If no serial port available, USB to serial adapter should be used. • Ethernet port: 10/100 Mbps. Required for a connection to TBOX ULP through a LAN if the TBOX ULP uses GPRS. • Modem: • Operating system: Windows 2000, 2003, XP, VISTA, 7. in case of license with dongle for ‘USB’ port. any modem properly configured in Windows. To Browse the RTU: • Internet Browser: as ActiveX is used, Internet Explorer only can be used. Version 5.00 or higher is recommended to take benefit of the dialer. The CD-ROM of TWinSoft Suite includes MSIE version 5.00. Version: 2.08 TBox - ULP 32 4.2. Installation of the CD-ROM When running the Setup of CD-ROM of TWinSoft Suite, the following software’s are available • TWinSoft 10.xx TWinSoft is the software required for developing an application for the RTU. The basis for configuring a TBOX ULP application is described in this manual. Installation of TWinSoft includes: WebForm Studio: HTML editor dedicated to RTU Report studio: Report editor dedicated to RTU WebForm Viewer: ActiveX and TBox Dial it! dialer from Internet Explorer (see next). (Administrator rights is required during installation) • WebForm Viewer This software contains the tool TBox Dial It ! uses to dial TBOX ULP with Internet Explorer. It also contains the ‘ActiveX’ used to display objects dedicated to the RTU. It must be installed on the operator's PC to dial TBOX ULP with Internet Explorer, when TWinSoft is not required. (Administrator rights is required during installation) Version: 2.08 TBox - ULP 33 • RM-xxx Configurator RM are Remote Modules, based on TBOX LITE architecture. They are programmed though an interface running TWinSoft in background. This entry installs this interface. (Administrator rights are required during installation) • TBox Mail This software is used to display a Chart view from data logging attached to e-mail. To store data in a global database, you should use T (call your local distributor). (Administrator rights is required during installation) • Hardware Dongle Driver In case you use a hardware dongle as TWinSoft license, you need to install this driver. • Manuals All technical documentation about hardware and software related TBox and accessories. • Acrobat Reader Software needed to read our documentation. • TBox Drivers Some features like DNP.3, IEC-60870 protocols, … are available as external drivers. The list of available drivers is available here. Version: 2.08 TBox - ULP 34 4.3. Programs of ‘TWinSoft Suite’ During installation of TWinSoft, a group of programs is created where TWinSoft can be started. Other programs and menus: • Accessories: • Documentation: group containing various documents associated to TWinSoft and RTU. • Samples: group with TWinSoft documents installed as example. • TBox drivers: when 'C' custom drivers have been installed. The ‘on line’ help of the driver configuration is available in this folder. • Report Studio: to create reports dedicated to TBOX ULP. • TWinSoft: to start TWinSoft. • WebForm Studio: to start the HTML editor, dedicated to TBOX ULP when it is used as a Web Server. Version: 2.08 group containing the utility ‘Password generator’ and ‘Reset User preferences’: reset of registry information to restore the default configuration of TWinSoft. TBox - ULP 35 5. Starting TWinSoft I am the Wizard of TWinSoft! When you start TWinSoft the first time, or when you create a new document, I help you with some basic configurations. The use of TWinSoft is free, but sending of a program to TBOX ULP is protected. For more info about Licenses go to Appendix A. at the end of this manual. Version: 2.08 TBox - ULP 36 5.1. Wizard The ‘New Document Wizard’ helps you getting started with a new application by gathering information about your hardware and some basic settings. Except for the ‘Type of RTU’, settings can be modified later from the ‘RTU properties’. According to the hardware you have, select the corresponding family and type of RTU. !! You cannot change it later!! Free name of the RTU Sub address (0..255) Station address (1..255) Version: 2.08 TBox - ULP 37 5.2. Communicating with TBox ULP Once you have opened a document, either a new one created with the Wizard or an existing one, you can establish the connection with your TBOX ULP. The possible communications are serial, TCP/IP or modem, according to the media used to connect to TBOX ULP. Serial: check the Baudrate you have given to the serial port in your application (by default 9600,N). See chapter 8.3. TCP/IP: to communicate to your TBOX ULP through GPRS (see chapter 8.4.3). Modem: check the tel. Number of TBOX ULP. 5.3. PC Communication Set up To communicate with the TBOX ULP, you need to select a communication media on the PC. From the main menu of TWinSoft: Communication PC Setup: Example with a RS232 connection: RJ45 cable to RJ45-DB9 converter (MS-CONV-232) DB9 programming cable (MS-CABL-PROG) default Baudrate of TBox ULP : 9600,N Version: 2.08 TBox - ULP 38 5.3.1. Communication possibilities of TWinSoft • Offline: this option avoid sampling TBOX ULP • Local: you select a serial port of the PC (typically RS232). The Baudrate must fit with the port of TBOX ULP you are connected to. If your PC is equipped with USB port, you have to use a USB-RS232 converter • TCP/IP: to establish a communication in TCP/IP, typically to your TBOX ULP configured in GPRS. By default, TWinSoft uses the IP address of the Ethernet (not available with TBOX ULP. Therefore you will have to specify another IP address, when communicating to the TBOX ULP through GPRS. (See details chapter 5.3.2 below) • Modem: to establish a remote connection to the TBOX ULP when the GSM is configured in DATA mode. TWinSoft takes full advantage of Windows' built-in modem support: simply install your modem in the control panel's modems applet of Windows and you are ready to call your TBOX ULP. You can develop your TWinSoft document without connection to the TBOX ULP, but it will be mandatory to send it to have the RTU running! The program can be sent through RS232, RS485, or GSM modem. When sending an application through the GSM (DATA or GPRS), the GSM will be kept powered independently from its low power seting (see chapter 8.4. GSM/GPRS modem). Communication will be interrupted when TWinSoft stops communication. Version: 2.08 TBox - ULP 39 5.3.2. IP address settings in TWinSoft PC Setup By default, TWinSoft displays the IP address of the Ethernet port of the RTU, which is not available with TBOX ULP. TWinSoft also automatically adapts itself to the Ethernet IP address of the RTU. To get around the problem, as you don’t program your TBOX ULP through a direct Ethernet connection and you don’t want to change its IP address use the following configuration: Example: you access you TBOX ULP through ADSL or through a direct GPRS modem. You type the current IP address of the TBOX ULP. (see chapter 8.6.2. Analog Communication Variables) When TWinSoft has finished uploading the program, it will not adapt itself to Ethernet IP address of the RTU (which does not exist!) Version: 2.08 TBox - ULP 40 5.4. Testing communication Once you have selected the media on the PC, you can test the communication. From the main menu of TWinSoft: Communication RTU identification: Available information: Name of the RTU Type of Hardware Version of Operating System Status of the process ModBus address of the Station Subaddress of the Station Access level of the current user Date/Time in the RTU General information about the program Process cycle time Unique ID of the RTU MMC / SD card not available The Status bar of TWinSoft displays the status of the connection: The communication media used by the PC is indicated as well as the access level of your connection (see chapter 16: ‘Security’). If a connection cannot be established with the TBOX ULP, it might be because the configuration of its port does not fit with the PC setup you use (different Baudrate, different IP address, protocol other than ModBus, …). To set the TBOX ULP to a default configuration, you have to do a global reset (see next). Version: 2.08 TBox - ULP 41 5.5. Reset of Tbox ULP Pressing the button ‘Reset’, restarts the program: stack of alarms and event are erased datalogging is maintained Tags with initial value are set to the value; others are maintained Timers are reset (status and value) Counters are maintained 5.6. Global reset of TBox ULP The Global Reset is used to set TBOX ULP to a default, well-known configuration, in case it does not communicate anymore. The program running in the CPU is stopped and TBOX WM runs on the Operating System. This is very useful when you take a CPU from the stock and you have no idea how the port you want to communicate with is configured. The global reset is achieved using the button on the front side of TBOX ULP Procedure: • • • Push and maintain the button to the ‘Reset’ side Let the “Status LED” flash 3 times Release the button IP68 enclosure “Mini Rack” enclosure Push up and maintain during 3 flash LED “status” under the PCB Version: 2.08 TBox - ULP 42 Global reset configuration: The global reset mode is indicated by the LED flashing at 0.5 Hz (instead of 2 Hz in RUN mode). In this mode, the TBOX ULP is configured like following: Port Baudrate Protocol COM1 (RS232) COM2 (GSM-DATA) COM2 (GPRS) COM3 (RS485) 9600,N,8,1 ModBus-RTU ModBus-RTU ModBus/TCP ModBus-RTU 9600,N,8,1 Station address IP address 1 maintained maintained 1 refreshed - The Global Reset does not erase the current program. Doing an ordinary Reset will restart the program. 5.7. Upload ‘Operating System’ Operating System is the heart of your TBOX ULP. It contains all features of TBOX ULP. In some cases you might have to change this operating system, when new features are available or a bug fix released. From the main menu, select ‘Upload OS’ Select the highest version to use the latest features and corrections. Version: 2.08 TBox - ULP 43 5.8. LED « Status » By default, the LED “Status” is switched off in order to save battery power Program runs Program stopped Operating System stopped 2 Hz 0.5 Hz 8 Hz To display the working mode of the TBOX ULP, you have to press the button to “test” side. IP68 enclosure “Mini Rack” enclosure Press down the button LED “Status” under the PCB 5.9. Saving and Sending a Program Like any Windows program, TWinSoft creates ‘Documents’. One document corresponds to one TBOX ULP application. Each of them must be saved using the Windows standard. 5.9.1. Saving a document – Backup document Possibilities for saving a document: • • • Use the icon of the main tool bar From the main menu use: ‘File’ ‘Save’ Use the accelerator keys <CTRL + S> Saving a document creates a file with the extension ‘.tws’ which is your TWinSoft application. But each time a TWinSoft project ‘.tws’ is opened successfully, it is saved in a back up file ‘.tbk’. If you encounter some problem retrieving your ‘.tws’ file, you can just replace the ‘.tbk’ extension by ‘.tws’ and use the back up. During the development of the application, it can be sent at any time to TBOX ULP, for testing purpose. When sending an application to TBOX ULP, it is first compiled and then sent, in the same sequence. Version: 2.08 TBox - ULP 44 5.9.2. Compiling an application Compilation converts the document into microprocessor code. You can execute it: • • Use the icon of the main tool bar Use the accelerator key <F9> The result of the compilation is available in the Results window. This windows automatically pops up when there is a problem but it can be opened manually: • from the main menu: ‘View’ ‘Results’ • using the accelerator keys <ALT + 2> The Results window provides useful data: Information: indicated in black Warning: indicated in bold dark green Error: indicated in bold red Test of memory still available The result window also displays memory still available: TBOX ULP ROM: 32 kbytes ROM: 512 kbytes RAM: 48 kbytes RAM: 72 kbytes Features Application Ladder / BASIC (64k) Sources, Web&Report Application Chronologies & Sampling Tables, backup of Tag values 5.9.3. Sending an application In order to have the TBOX ULP running with the program developed with TWinSoft, you have to transfer it. You can use any media to achieve it (RS232, modem, TCP/IP, …). Possibilities for sending a program: • • • Use the icon of the main tool bar From the main menu use: ‘Communication’ ‘Send program’ Use the accelerator keys <CTRL + F9> The sequence when sending is: Compiling + Transferring. If a problem occurs during compilation, the sequence is stopped and the ‘Results’ window pops-up (see above) If you interrupt the sending of the program or an error happens before the end of sending, TBOX ULP will not restart, even after a reset. The reason is that the program is composed of several modules; when TBOX ULP starts, it checks the integrity of these modules. When they do not correspond to the same data transfer, the program does not start, even after a reset. You have then to re-send the program. The good news is that TBOX ULP keeps its original settings before it was stopped. Version: 2.08 TBox - ULP 45 Version: 2.08 TBox - ULP 46 TWINSOFT - PROGRAMMING Version: 2.08 TBox - ULP 47 6. Introduction TWinSoft uses the standard look and feel of ‘Windows Explorer’; on the left side a list of folders and on the right side the content of the folder selected. TWinSoft can be automated using “TWinSoft Automation”. It allows automating TWinSoft application from languages script such as Visual Basic. Automation allows creating specific users interfaces, targeted to vertical market. It could be also be considered in project with large number of RTU's. (see documentation in group of programs “Techno Trade”) In TWinSoft interface, each Folder consists in a list of items. For instance the list of Tags, or in the ‘Alarms’ folder the list of ‘Recipients’ or in the ‘Datalogging’ folder the list of ‘Sampling tables’, … The programming of a TBOX ULP application will be done in different steps: Configuring the RTU properties Configuring the communication ports and I/O's (from the ‘Resources’) Creating Tags Creating Programs using automation language Ladder and/or BASIC Creating Alarms Creating Datalogging If you have a Remote device, creating Remote Tags, to exchange data The sequence in which those tasks are executed is not fixed, but at least RTU properties, Resources and Tags should be configured first, as being required for all other programming. All those configurations are explained in the following chapters. Version: 2.08 TBox - ULP 48 7. RTU properties Setting the properties of the TBOX ULP has never been so easy thanks to a set of comprehensive dialog boxes, available from the main tool bar. RTU properties can be accessed easily by clicking this icon. The RTU properties are divided into: • General the type of the RTU, telephone number, size of the chronologies, … • Drivers configuration of external software modules written in ‘C’, used to execute specific task or to communicate with other protocol than standard ones. • Info to type any info about your program, its different versions, … • Advanced for some features, some advanced parameters are available:during start-up, when sending alarms, concerning sampling tables, … Communication ports are configured from the ‘Resources’. General TCP/IP configuration is done from the ‘Workspace’ and folder IP parameters. Version: 2.08 TBox - ULP 49 7.1. General properties RTU Type: The type of RTU you have selected with the Wizard. It cannot be changed ! Name: type a free name for the TBOX ULP. It will be displayed when doing a ‘RTU identification’ and used by the supervisory T. Maximum 8 characters. ModBus address: with ModBus protocol, each device must have a Station number. It is its ModBus address. Enter a number between 1 and 254 (default=1). Sub address: if more than 254 TBOX ULP must be installed in one project, you need to define a Sub address. As this is not ModBus standard, it is only supported by ‘TComm.dll’ based software (TWinSoft, T, … please call your distributor for further information). Enter a number between 0 and 255 (default=0). Version: 2.08 TBox - ULP 50 OS version: when working Offline, it is the OS used to simulate the compilation. By default it is the OS version associated to version of TWinSoft. Telephone number: Configuration used by TWinSoft when it needs to dial TBOX ULP. Sizes: Number of records of Digital and Analog chronologies. The chronologies are the ‘on event’ method of recording data in TBOX ULP (see chapter 13: Data logging). Digital Chronology: max. 12 000 (Default=100). Analog Chronology: max. 7 000 (Default=100). Time zone: The Time Zone where the TBOX ULP is installed. This information is used to create the time stamps when retrieving data from TBOX ULP according to its location. TBOX ULP uses Universal Coordinated Time (UTC) as internal time stamp. The conversion is carried out when retrieving the data. Summer/Winter: Allows automatic management of winter/summer time. This selection has to be made according to the location where the TBOX ULP is installed. See Appendix B : Time in the RTU Wake-up: Determine the period between wake-ups of the CPU. See also chapter 2.3. 7.2. Drivers A driver is a module written in ‘C’ that executes a specific task, non-standard. Typically, it is communication to equipment not supporting standard protocol of TBOX ULP. Standard SCADA protocols are also supported: IEC-60870-5-101 -104, DNP3.0, TG800, Access Control devices, .... Check with your distributors. This kind of communication is not really applicable to ultra low power applications 7.3. Security Access security is discussed at chapter 16. Version: 2.08 TBox - ULP 51 7.4. Info properties You can enter a version number, the name of the programmer and a description of your program. This information is not sent to TBOX ULP. 7.5. Advanced 7.5.1. Start/Stop By Start-up we mean: Reset of RTU (hardware or software). Sending of Program See also chapter 5.6 above Under those conditions two mechanisms of the RTU can be customized: START Reset all physical outputs: when active, at start-up the RTU reinitializes the outputs to ‘0’. After that the outputs are monitored according to the process. When not active, at start-up the outputs are maintained to their last status. After that, outputs are monitored according to the process. Version: 2.08 TBox - ULP 52 Wait start of condition: this feature relates to alarm condition. The mechanism of generating alarm is based on transition: the changing of a digital Tags or the overstepping of an analog threshold. This option allows changing this rule at start-up: With ‘Wait start of condition’ active: Alarm Alarm time startup With ‘Wait start of condition’ not active: if the alarm condition is true at start-up, an internal ‘start of alarm - auto-ack’ is generated. When the alarm condition disappears, the alarm is generated. Internal Alarm Alarm Alarm Alarm time startup STOP Reset All physical outputs at program stop: when this option is active, the RTU reinitializes the outputs to '0' at stop. This is particularly useful if you want to reset the outputs when sending a new program, and you want to be sure they stay at '0' during the sending and restarting sequence. After that, outputs are monitored according to the process. Disconnect ModBus address at program stop: all variables will have their ModBus address disconnected, which means that an external equipment accessing the RTU will receive communication error. This feature has been implemented to allow a SCADA detecting immediately a TBox is stopped: as the ModBus addresses are not available, the RTU stays in communication but returns an 'Exception' error. Version: 2.08 TBox - ULP 53 7.5.2. Alarms The advanced parameters of alarms concern the size of the stacks and customizing of e-mail and GSM message. Event stack: is a public stack, accessible by users, where alarms are available with date, time, recipient, message, status, …. The Event stack can be displayed from the main menu: ‘Communication’ ‘Download’ ‘Alarms’. The object ‘Alarms’ used in a WebForm displays the Event stack. It corresponds also to the list of Alarms sent to T. Alarm stack: is an internal stack used to buffer alarms when there are several to handle. SMTP From: when receiving an e-mail from TBOX ULP, the field ‘From’ indicates the origin of the email. It accepts any text and the following parameters: %station% : replaced by the name of the station (see General properties) %email% : replaced by the e-mail address of the RTU Example: TBox_%station% <%email%> Version: 2.08 TBox - ULP 54 SMTP subject: when receiving an e-mail from TBOX ULP, the field 'Subject' can be dynamized like following: When sending a message, the field ‘Subject’ contains the message or the title of the report (see Report Studio). It accepts any text and the following parameters: %station% : replaced by the name of the station (see General properties) %email% : replaced by the e-mail address of the RTU %time% : the time of the RTU when the e-mail was generated Example: Report TBox %station% - %time% : When sending a report, the subject field contains the Title of the report (see Report Studio); title that can contain the parameter %station% GSM & Printer message: when TBOX ULP sends a SMS, you can add information to the message. This information is sent in front of the message. You can type any text and the following parameters: %station% : replaced by the name of the station (see General properties) %time% : the time of the RTU when the SMS (or printing) was generated %condition% : It will result in an exclamation mark (!) in the message if the condition of the alarm is still active when the alarm is sent. End of Alarm prefix : allows specifying a text that will be sent in front of the message, when the alarm condition ends, to indicate it corresponds to the End of the alarm. Example: END: Message sent when the condition ends: END: Level too HIGH Check that the total length of SMS message does not exceed 160 characters Do not use accent Process alarm even when com. port not available: An alarm corresponds always to a communication (at the exception of "Internal" alarms). When a alarm condition is activated, by default, it waits the availability of the com. port to be handled (GSM present, ...) This can lead to problems in handling escalation: if a media is not present, the alarm process will be stopped. This option allows to carry on alarms, even when the port is not available. Alarm filter on both transitions : this option allows computing the filter of alarm condition during both transitions: when the Tag value goes to alarm condition AND when it leaves alarm condition. This option will be applied to all alarm conditions. This is particularly useful to filter interferences on inputs. Version: 2.08 TBox - ULP 55 Delay alarm processing when recipient's time table not available This feature is associated to the "Scheduling" attached to the recipient. If the recipient is not in an active time table when the alarm is initiated, this feature provides 2 options: - the alarm is auto-acknowledged (by default) - the alarm is maintained in the alarms table until the time table becomes active. The "Start" timestamp is the one at the moment the alarm condition was generated. Example: the alarm condition happens at 2:35 AM, but it is not an urgent alarm. It is an SMS meant to inform the technician. The "recipient" is configured with a time table starting at 8:00 AM (corresponding to the technician work shift). Therefore, the technician will receive the message at 8:00 AM, but with a timestamp of 2:35, informing him when the event happened Display alarm calls in alarm table This feature is associated to the alarm condition sent to a group of recipients. When this feature is active, the alarms table displays the event having initiated the alarm and all the calls generated (see below). Event stack displaying also alarm calls: Working with group of recipients, it is also possible to display each call with its acknowledgment status: Message: message preceded by (*) means that it corresponds to a call Start: always ack Recipient: name of each recipient of the group End timestamp: timestamp corresponding to the end of the call End: acknowledgment status of the call: Not Ack; Ack'ed or Auto ack. 7.5.3. Flow Meters Flowmeters with ‘Pulse output’ (potential-free contact) can be connected to TBOX ULP. Even when TBOX ULP runs in sleep mode, it reads the input at a maximum frequency showed in the table bellow. The flow, index, alarms, … are computed at wake-up. The handling of the pulses depends on the duty cycle OPEN - CLOSE of the contact. Two main categories of pulses are available: • • Duty cycle of 50 % : the contact is OPEN 50% of the period and 50% CLOSE. Duty cycle of 10 % : the contact is OPEN 90% of the period and 10% CLOSE. Version: 2.08 TBox - ULP 56 With a wake up interval of max. 1 minute, according to the selection, the supported timings are: Setting: 50% pulse at 50 % pulse at 10 % Min. pulse duration > 125 msec. > 125 msec. Max. pulse frequency < 4 Hz < 0.8 Hz Setting: 10% pulse at 50 % pulse at 10 % Min. pulse duration > 32 msec. > 32 msec. Max. pulse frequency < 2.28 Hz < 3.2 Hz 1. As you can see from the table, when working selecting a duty cycle of 10%, the max. frequency is smaller than when working at 50 % of duty cycle. 2. When working with 10% ratio, the time between 2 pulses must be of at least 125 msec. Version: 2.08 TBox - ULP 57 7.5.4. Sampling Tables This menu gives access to the parameters for long period recording in Sampling tables. (See chapter 13.3: ‘Sampling tables’) Those configurations concern all sampling tables. Daily: When ‘daily’ is selected in sampling table, it is the time of the day the recording is executed. Weekly: When ‘weekly’ is selected in sampling table, it is the day of the week and the time the recording is executed. Monthly: When ‘monthly’ is selected in sampling table, it is the day of the month and the time the recording is executed. 7.5.5. Temperature For internal temperature (Group 1 of I/O), you can define a unit: Celsius, Fahrenheit or Kelvin. Version: 2.08 TBox - ULP 58 7.5.6. Remote Tags Reset the device Trigger only if success When communicating as ‘Master’ using ‘Remote Tags’, a Trigger is associated to the device the RTU communicates with (see chapter 14. Remote Tags). This Trigger activates the communication according to a ‘State’ or ‘Edge’. Working with Trigger ‘Edge’, the RTU restores automatically the Tag after the transaction(s). - With this option active: the Trigger is restored only when communication has been done successfully. - Without this option: the Trigger is restored when all Remote Tags associated to the device have been executed, with or without error. 7.5.7. TCP/IP TCP Ports Numbers. Each TCP/IP service has its own unique TCP port. It provides a logical location for the delivery of TCP data. TCP Port number complies to a standard defined by the IANA to be sure everyone using a TCP service uses the same TCP ports according to protocols used. When working with TBOX ULP, in some cases, you might want to change this port number. Version: 2.08 TBox - ULP 59 HTTP: port used to access TBOX ULP as WebServer. ModBus/TCP-Slave: port used by a ‘Master’ to access TBOX ULP as ‘Slave’. ModBus/TCP-Master: port used when TBOX ULP is ‘Master’ to access a remote device. 1. Changing the TCP port does not affect access from TWinSoft using TCP/IP. This is always possible. 2. The changing of TCP port is automatically applied to 'WebForms' when building the HTML pages using WebForm Studio. FTP: port used by TBOX ULP to send Files (by default=21). SMTP: port used by TBOX ULP to send e-mails (by default=25). TCP/IP addresses for incoming calls Range of addresses used during incoming calls. TBOX ULP uses the first address of the range and applies the following to the remote equipment. Typically, this information is needed when TBOX ULP is used as a Web Server, dialled from Internet Explorer and TBox Dial It !. The utility TBox Dial It ! , used to dial TBOX ULP automatically, detects the IP address and uses it as URL. Avoid using addresses in the same range than IP address defined for the LAN card of the PC used as Browser. TCP/IP miscellaneous Extended Log: TBOX ULP provides a debugging mode to test TCP/IP connection (see chapter 10.7.) The extended log adds any IP information sent/received by the CPU. It allows extended spying of the line. Debugging uses Analog Chronology table. Check its size is sufficient (see chapter 7.1. General RTU properties). Version: 2.08 TBox - ULP 60 7.5.8. Environment variables The environment variables are used when particular configuration might be needed in external software. Available only when sending historical data through .tma file. Variable Value Description TViewPath \path The path in which the station will be created when importing data in T. The path is the relative path from the Project workspace of T. Example: with the Value: \Lines\10 Result in T : Longname Type any long name The name typed here will be used in T, instead of the one declared in the ‘General’ properties, which is limited to 8 characters 7.5.9. Web and Report Check user's WebFormViewer version: You activate the verification done by the WebForm Viewer. When creating a WebForm, an indication of minimum version of the Viewer is declared in HTML pages sent in TBOX ULP. When going in connection with IE, WebForm Viewer will check the version of WebForm, and in case it is newer, display a message (see next). Message: Version: 2.08 In case you have activated the option, you can specify a text that will be displayed in a message box. This message box appears when connecting with IE to a WebForm that needs an update of WebForm Viewer to be displayed. This information mainly depends on the type of connection used to access TBox: TBox - ULP 61 - - The TBox is accessed through a modem point to point connection: as it is impossible to access Internet from this connection, you type a message to inform on the procedure to access Internet and download the WebForm Viewer It can be from TBox manufacturer site (see below). The TBox is on Internet or part of a LAN: the message informs on the situation. By clicking 'OK', you jump to the URL (see next). Download new version: This option can be checked to automatically download the last version of WebForm Viewer. It will be used in 2 cases: - The TBox is connected to Internet:. then you have also direct access to Internet to download WebForm Viewer. You can leave the URL of the manufacturer: http://www.tboxsupport.biz/free_downloads/DownloadWebFormViewer.html - The TBox is connected on a LAN: and one of the PC of the LAN contains the WebForm Viewer. You type the URL of the PC. Example: \\PCServer\C\TBox\Download\DownloadWebFormView.htm Unique Report file name format: When sending a report by FTP, you have the choice of sending the report with ‘Unique file name’ (see Report Studio report properties Advanced). In this case, the RTU includes supplementary parameters in head of the name of the report. Accepted parameters are: %station%: name of the RTU %email%: e-mail of the RTU %time%: complete date & time %condition%: ! (if alarm active) %YY%: %YYYY%: %M%: %MM%: %MONTH%: %D%: %DD%: %h%: %hh%: %H%: %HH%: %mm%: %ss%: %file%: %ampm%: ~mytag~: year in 2 digits year in 4 digits month in 1 digit (if possible) month in 2 digits month in letters day in 1 digit (if possible) day in 2 digits Eur. hour in 1 digit (if possib.) Eur. hour in 2 digits US hour in 1 digit (if possible) US hour in 2 digits minute in 2 digits second in 2 digits name of the report US time am/pm value of Tag Any supplementary text can be added. Version: 2.08 TBox - ULP 62 8. Resources The resources represent the list of the hardware that your TBOX ULP has to its disposal. The TBOX ULP, being an all-in-one RTU, has a fixed hardware all built within one card: • A CPU • Communication ports • Several groups of I/O • If the CPU needs to communicate in ‘ModBus Master’ to another device (CPU, or an external ModBus device), the latter must be declared as a Remote I/O card (see chapter 14: ‘Remote Tags’) • The Resources also contain 2 lists with System variables. Systems variables have pre-defined function (see chapter 8.8 ‘System variables’) 8.1. The CPU card When starting a new document, TWinSoft creates automatically the CPU card; the minimum for a TBOX ULP project ! The communication ports of the CPU with their associated configuration and the I/O of the CPU are available from the ‘Resources’: The CPU card is divided in several groups: Group 0 : communication ports Group 1, 2, 3, … : different groups of I/O corresponding (See chapter 17.9. for more details about I/O). Version: 2.08 TBox - ULP 63 8.2. Communication ports By selecting the Group 0 (CPU-COM) in the workspace, you can access each port separately. 8.2.1. Communication ports tabs Depending on the type of communication port (RS232, modem or RS485), different tabs are available: Parameters: general parameters (Baudrate, Protocol). DCV: Digital Communication Variables. Special variables with a pre-defined function (communication error, modem online, …). (see chapter 8.6) ACV: Analog Communication Variables. Special variables with a pre-defined function (time-out, user ID, …). (see chapter 8.6) Advanced: mainly ‘timing’ parameters required when CPU is ‘Master’ or ‘Slave’ in a ModBus communication. TCP/IP: TCP IP configuration dedicated to the communication port, when available. To enter the configuration of the communication port, double click the port in ‘Group 0’. 8.3. Serial ports Baudrate: 200…115200 bps Data bits: 7 or 8 Parity: None, Odd, Even, Space, Mark Stop bits: 0, 1 or 2 Protocol: ModBus (RTU/ASCII), Printer, NMEA Example with COM1 – RS232 Version: 2.08 TBox - ULP 64 8.4. GSM/GPRS modem When present, GSM modem is available as COM2. 8.4.1. GSM in mode Low Power Before entering GSM configuration, let's take a look at the consumption aspect of GSM. It is important with TBOX ULP to use the power the more efficiently. The hardware and software of TBOX ULP is designed with this highest target. On the same way, the GSM must be used to consume as less energy as possible. It is therefore possible to configure the GSM in a ‘Low Power mode’. When the ‘Low power’ option is not checked: the GSM is powered permanently; ready to be dialed-up and to dial out. We consider real ultra low power operation when GSM is working at Low Power mode, with small periods of GSM wake-up and little communication. When the ‘Low power’ option is checked: the GSM is powered according to 3 conditions: At wake-up, when there is an alarm defined with severity ‘high’ When the DCV ‘COM2.ModemPower’ = 1 (see example below) When the DCV ‘COM2.ModemAlarm’ = 1 (see example below) Version: 2.08 TBox - ULP 65 Wake-up of GSM in case of Alarm of ‘High’ severity In case an alarm of severity ‘High’ happens, at CPU wake-up, the GSM is powered, alarm is sent and the GSM returns to sleep mode. This is valid for GSM-DATA and GPRS communication. Wake-up of GSM using Communication Variables Three variables allow handling wake-up of the GSM, in order to save as much energy as possible. Those variables are used when the option ‘Low Power’ has been checked (see above) Type DCV Name COM2.ModemPower ACV COM2.ModemPoT DCV COM2.ModemAlarm Description When ON, activate powering the GSM during the period defined in the Analog Communication Variable ‘COM2.ModemPoT’ (see next) Time in minutes while GSM is maintained powered when ‘COM2.ModemPower’ is ON. After this period, even if still in communication, the GSM is switched off. Start powering the GSM to send alarm of severity ‘Low’ and ‘Normal’. After sending alarms, the GSM switches off. Examples of waking-up GSM using BASIC: 1. Wake-up of the GSM every Monday at 8:00 during 1/2 hour: Com2_ModemPoT=30 ' Wake-up period of 30 minutes If (weekday=1) and (hours=8) and (minute=0) and (Com2_ModemPwr=0) then Com2_ModemPwr=1 endif Note: ‘Com2_ModemPwr’ is automatically reset by the OS after the number of minutes declared in ‘Com2_ModemPoT’ 2. Wake-up at 8:00 to send alarm of severity ‘Low’ and ‘Normal’: if (hours=8) and (Com2_ModemAla=0) then Com2_ModemAla=1 endif Notes: 1. The two modes can be used at the same time. In those 2 examples when ‘Com2_MademAla’ is active at 8:00, at the same time as ‘Com2_ModemPwr’, TBOX ULP will send alarms of severity ‘Low’ and ‘Normal’ and will stay awake during the time defined in ‘Com2_PowerOn’. 2. ‘Com2_ModemPwr’ can be reset to stop power before the end of the period. If this happens during a communication, the power will be stopped at the end of the communication. Version: 2.08 TBox - ULP 66 The GSM modem can be used in 2 modes: as a GSM-data modem in GPRS mode In addition to standard modem configuration (initialization), some parameters are specific to GSM. The main option ‘GPRS’ determine the working mode of the modem: GSM-data OR GPRS 8.4.2. GSM-data settings Initialization: should not be changed PIN Code: If the SIM card you have inserted uses a PIN code, type it at the place of the letter n. Example: with the PIN code 4896, you should have in the field: AT+CPIN=“4896” including the quotes If the SIM card you have does not require a PIN code, you can leave the field as it is or erase it completely. If you type the wrong PIN code, or you type a PIN code when the SIM card does not require one, you risk blocking the SIM card. It must then be restored with the PUK code using a mobile. Auto Answer: number of RINGS before the modem picks-up the line. Dialing to a GSM-data The SIM card of a GSM has three telephone numbers: VOICE (the one you dial to speak), DATA and FAX. To dial to TBOX ULP, you have to be sure that data service is activated and that you dial the DATA number (please call your GSM operator). In some countries, like in US for instance, GSM operators do not provide DATA service. DATA communication is then only available in GPRS mode (see below) Version: 2.08 TBox - ULP 67 About sending e-mail or Files with GSM-data Some ISP requires specific telephone number for connecting through GSM (please check with your ISP). In ultra low power mode, as all alarms, e-mail or FTP can be generated either using a alarm with severity “high” or with the communication variable Com2.ModemAlarm. 8.4.3. GPRS settings When you run a TBOX ULP with GSM and want to use GPRS, you have to activate the GPRS mode. You have to choose either ‘GSM-Data’ mode OR ‘GPRS’ mode. It is not possible to use the modem in both modes at the same time, but it is possible to combine GPRS mode and sending of SMS (see below). When selecting GPRS, TWinSoft automatically adapts Initialization and Operator Phone number fields (see next). If the connection requires a login, select the option ‘The server requires authentication’. If you receive a fixed IP address, declare it in ‘TCP/IP’ tab. Initialization: Version: 2.08 You have to update the initialization string with the APN (ask you GSM operator). Replace in the string the apn with the URL you receive from your GSM operator. Example with Mobistar: AT+CGDCONT=1,“IP”,“WEB.PRO.BE”. TBox - ULP 68 PIN Code: If the SIM card you have inserted uses a PIN code, type it at the place of the letter n. Example: with the PIN code 4896, you should have in the field: AT+CPIN=“4896”, including the double apostrophes If the SIM card you have does not require a PIN code, you can leave the field as it is or erase it completely. Operator Phone number: special number to establish the GPRS connection. Typically, the number is *99***1#. Check with your operator and type it following the command ATD. Example with Mobistar, Proximus, SFR, AllIP, …: ATD*99***1# Connection at start up: by default, this option is not selected (this is the proper way of working for an ultra low power RTU). TBOX ULP has to handle: first the modem wake-up, using COM2.ModemPower and COM2.ModemPoT, second the connection using the Communication Variables COM2.GPRSCon (see below). When this option is selected, TBOX ULP powers the modem to keep the connection permanently... which is not compatible with ultra low power. Don't do it ! Examples of Activating GPRS connection using BASIC: Wake-up of the GSM every Monday at 8:00 during 1/2 hour: Com2_PowerPoT=30 ' Wake-up period of 30 minutes If (weekday=1) and (hours=8) and (minute=0) and (Com2_ModemPwr=0) then Com2_ModemPwr=1 Com2_GPRSCon=1 endif Communication Variables dedicated to GPRS Some communication variables allow monitoring GPRS and give information on the status. Version: 2.08 TBox - ULP 69 Digital Communication Variable COMx.GPRSCon GPRS: Handles the GPRS connection. Working in manual connection, writing ‘1’ forces a connection; writing ‘0’ forces a disconnection. * When working with automatic connection at start up, if you reset this variable the connection will stop, but after maximum 5 minutes, it will be automatically restarted. Don't use this feature in ultra low power mode! Analog Communication Variable COMx.GPRSState - COMx.IPAddress - GPRS: indicates the status of the GPRS connection. Value=0 : disconnected Value=1 : currently connecting Value=2 : connected Value=3 : currently disconnecting GPRS: this register gives the IP address used by TBOX ULP during its GPRS connection. The information is available in a DWORD, but in the list of Tags, you can display it as an IP address: from the list of Tags, right click the Tag Display as IP address. This information is very important when working with dynamic IP address. It can be sent for instance by e-mail (see Report Studio), or displayed in a webform, to inform on IP address changing. Accessing TBOX ULP with dynamic IP can be done using DynDNS. About sending alarms with GPRS With GPRS, you are able to send e-mail or files using FTP. You create recipient(s) associated to the SMTP or FTP server you have associated to the GSM/GPRS. In ultra low power mode, as all alarms, e-mail or FTP can be generated either using a alarm with severity “high” or with the communication variable Com2.ModemAlarm. For sending e-mail, you may need to use a SMTP server specific to the GPRS connection. Ask your GSM operator. Example with Mobistar: gprsmail.mobistar.be Version: 2.08 TBox - ULP 70 Sending of SMS with GSM configured in GPRS It is possible, but only when handling GPRS connection from the Ladder/BASIC. To use this feature, you have to monitor the GPRS connection manually: ¯ Be sure the option ‘Connection at startup’ is not activated. ¯ Make a Tag of the DCV ‘GPRSconnect’ ¯ Change it to 1 to activate GPRS ¯ Change it to 0 before sending SMS When GPRS is de-activated, it is also possible to receive SMS (See chapter 12: Read SMS Embedded). GPRS IP settings GPRS represents a TCP/IP connection using GSM network. It then requires a TCP/IP configuration. Obtain IP address automatically: You work with dynamic IP address which is provided by the Operator at the connection. Use IP address: You work with fix IP address; it corresponds to the SIM card you use. Obtain DNS server addresses auto.: The Operator provides you with DNS. Use DNS Server addresses: You want to use specific DNS addresses. Version: 2.08 TBox - ULP 71 Using TWinSoft to communicate to an RTU in GPRS To access TBOX ULP through GPRS, GSM must be powered. Keep in mind the ultra low power concept and the monitoring of the GSM as explained 2.4. Typically, TWinsoft will access TBOX ULP from a LAN, using an Ethernet connection (if your LAN has a Gateway connection to Internet). In order to have a reliable communication, you have to increase some timing parameters in TWinSoft: menu ‘Communication’ ‘PC Setup’; select ‘Ethernet’ and click ‘Advanced’. Change ‘Comm. Timeout’ to 5000 millisec. minimum Change ‘Inter-Frame Gap’ to 100 millisec. Before sending a program through GPRS, check the PC setup settings of TCP/IP, like explains chapter 5.3.2. IP address settings, point 3. Version: 2.08 TBox - ULP 72 8.5. External Modem TBOX ULP-XXX-S models have a serial port instead of a internal modem. This serial port can be used with an external modem. Power supply of this external modem must be controlled to avoid as much consumption as possible. This is achieved using the power connections available on the serial board (see details chapter 17.8) 8.5.1. Low power operation of external modem (WM100, WM200, LP400) There are two ways of controlling the power, an automatic way and a manual way using system and communication variables. Automatic way: In the advanced parameters of the RS232 port, you select “Low Power Mode”. The modem can be powered either by internal 12 VDC (limited to 350mA) or if higher power is required by switching an external power supply (see details chapter 17.9). DO NOT TAG the variables associated to the outputs (see next) In this condition, the power of the modem will be automatically driven by the RTU, like it is for the internal GSM/GPRS: power cycled on demand with “Com2.ModemPower”, “Com2.ModemAlarm” or when alarm with severity high. Version: 2.08 TBox - ULP 73 Manual way: The Modem is powered manually using dedicated Outputs: One output drives the internal 12 VDC. One output drives the switch to external power supply. Tag ONLY THE ONE you need. Each time you want to communicate, you will have to switch on/off the variable used to power the modem, in addition to “Com2.ModemPower” or “Com2.ModemAlarm”. 8.5.2. Low power operation of external modem (LP450) The major difference between LP450 and the others is that LP450 runs directly from 12 VDC battery. Therefore, the optional serial board does not provide a 12 VDC. To drive the external modem, use the same as described above, but exclusively using the output “Enable switch power”. Version: 2.08 TBox - ULP 74 8.6. Communication Variables Communication variables are dedicated registers to status of the communication. It is very useful for controlling the connection and the access level authority. Those variables are divided into 2 tabs, the Digital Communication Variables (DCV) and the Analog Communication Variable (ACV). When you need one, you double click it from the list and declare it as a Tag. It becomes then available in any feature of TBOX ULP. 8.6.1. Digital Communication Variable According to its function a communication variable is Read/Write or Read only. In the following table, the column R/W indicates: - : Read only. 0 : Write ‘0’ only. 1 : Write ‘1’ only. * : Write ‘0’ or ‘1’. Name R/W COMx.NoReply 0 COMx.HookLink * COMx.Call - COMx.Answer - COMx.NoDial 0 COMx.GPRSCon * Version: 2.08 Description Communication: SET by TBOX ULP in case of communication error. The possible errors are: - Timeout. - ModBus: Unknown address, wrong quantity, CRC error. - TCP/IP: wrong closing of socket. Must be RESET by the user. Modem: When at ‘1’, indicates the modem has picked-up the line and it connecting to another modem. The success of the connection can be checked from the next ‘Connect’ variables. Writing ‘0’ or ‘1’ forces the modem to hang-up. It is mandatory to use a positive or negative edge Trigger contact to a SET or RESET relay Modem: Reading ‘1’ indicates the modems are synchronized with TBOX ULP ‘Calling’ Modem: Reading ‘1’ indicates the modems are synchronized with TBOX ULP ‘Answering’ Modem: Reading ‘1’ indicates that no dial tone has been detected when the modem has picked-up the line. Must be RESET by the user. GSM: Indicates the status of the GPRS. Writing ‘1’ forces a connection; writing ‘0’ forces a disconnection. TBox - ULP 75 Name R/W COMx.ModBusResp 0 COMx.ModemError 0 COMx.ModemPower * COMx.ModemAlarm * Description Communication: indicates the port is transmitting. At each transmission, TBOX ULP SET this register. To check TBOX ULP is transmitting, you RESET this register and test whether it is SET again (using Ladder or BASIC logic). Communication: modem initialization failed. Modem has answered with an ERROR to one of the parameters of the init. String (see modem properties). A reason could be, working with GSM, because it is not registered yet. When you RESET this register, OS executes a warm start of the modem (sending init. string) LowPower: When ON, start powering the GSM during the period defined in the Analog Communication Variable ‘COM2.ModemPoT’ (see Com2.ModemPoT in ACV). See example chapter 8.4.1. LowPower: Start powering the GSM to send alarm of severity ‘Low’ and ‘Normal’. After sending alarms, the GSM switches off 8.6.2. Analog Communication Variable According to its function a Communication variable is Read/Write or Read only. In the following table, the column R/W indicates: - : Read only. 0 : Write ‘0’ only. 1 : Write ‘1’ only. * : Write ‘0’ or ‘1’. Name R/W Description COMx.Level * Access Control: access level of the user currently logged (see chapter 16). COMx.UserId * Access Control: user Id of the user currently logged (see chapter 16). The user Id and the authority level correspond to those you have defined with the utility ' PASSWORD '. The values returns to 0 when the user has disconnected. Values can be written to those registers. Example: when a user is connected you can modify its level access by writing a value in the register COMx.level (level available: 0, 1, 2 or 3). COMx.Timeout Version: 2.08 * Those values can be stored in analog chronology for keeping a history on the access. When a user disconnects (Logout), the register returns to 0 Modem: global time-out for hanging-up the modem when there is no communication. Correspond to the ‘Inactivity time-out’ in the ‘Advanced properties’ of the modem. TBox - ULP 76 Name R/W COMx.GPRSState - COMx.IPAddress - COMx.SigLevel - COMx.SmsState - COMx.AutoAnswer * COMx.ModemState - COMx.CallerID * COMx.ModemPoT * Version: 2.08 Description GPRS: indicates the status of the GPRS connection. Value=0 : disconnected Value=1 : currently connecting Value=2 : connected Value=3 : currently disconnecting GPRS: this register gives the IP address used by TBOX ULP during its GPRS connection. The information is available in a DWORD. To be interpreted, you should compute this Tag with mask to read the 4 bytes composing the IP address. GSM: The quality of the GSM signal. The range of the value is 1 to 31. The value should be minimum 20 to be considered as an acceptable signal level. PSTN: Voltage on the line (+/- 20%) GSM: associated to the GSM, can be used to check the status of ReadSMS. Modem: Read: indicates the number of RING before the off hook Write “0”: no off hook Write “1”: force off hook at the next RING MODEM: gives current status of the modem. Some possible values: 1: PIN code sent (GSM only when PIN code activated) 2: Wait after PIN code is sent 4: Init string accepted 7: Idle mode 9: Calling. Waiting CONNECT 10: RING arriving 11: Answering. Wait CONNECT ... The last value is maintained, until the next status changing. MODEM: variable which indicates the caller ID of the current incoming modem connection, 32 bits format, giving the 9 last digits of the calling number. It can be used in the program to trace and control who is calling Init string of GSM modem: Caller ID identification must be activated. Add at the end of the init string of GSM: ^AT+CLIP=1 LowPower: Time in minutes while GSM is maintained powered when ‘COM2.ModemPower’ is ON. See example chapter 8.4.1. After this period, even if still in communication, the GSM is switched off. Except when sending a program or OS, the GSM will be maintained powered until the end of sending and the restart of the GSM. TBox - ULP 77 8.7. Groups of I/O The Hardware is represented in TWinSoft with a hierarchy of 3 levels: CARD: with TBOX ULP, it is all-in-one CPU card GROUP: the communication ports form a group (Group 0) as well as each type of I/O: group of DI, group of DO, group of AI, … CHANNEL: each physical connection, within a Group, corresponds to a channel. CHANNEL CARD GROUP When connected to a TBOX ULP the column ‘Value’ displays the current value, when the channel has been declared as a Tag and the program sent to the RTU. (see chapter 9 : ‘Tags’) See technical specifications of all I/O at the end of the manual. Version: 2.08 TBox - ULP 78 8.7.1. Group1 – System Analog Inputs From the ‘Resources’ and the list of I/O, open the ‘Group 1 (3 AI)’ to list internal I/Os. The main board is equipped with internal analog inputs giving system data: Variable Format Min Max Resolution Battery 1 voltage Float 0 3.6 0.1 Battery 2 voltage Float 0 3.6 0.1 Internal temperature Float -50°C +90°C 0.1 8.7.2. Group 2 - Digital Inputs From the ‘Resources’ and the list of I/O, open the ‘Group 2 (4DI)’ to list variables associated to the digital input channels. TBOX ULP has 4 Digital Input Channels, scheduled to receive pulses. Associated to each channel, there are several variables. Tag: The easiest way to declare the variable as a Tag: double click it, edit it and save it. The icon changes according to its type (digital or analog). Value: The value is available only after the Tag has been declared and program sent to TBOX ULP. WARNING: the value is refreshed at the rate defined in the ‘Wake up’ properties (see chapter 7.1: General Properties) Version: 2.08 TBox - ULP 79 Digital Input - State It is the direct digital input. It is the image of the input contact at the moment of wake-up. Independently of wake-up interval, the input is sampled 8 times per second. In order to detect changing between ‘0’ and ‘1’ states, the later must have a minimum period of 125 msec. each (maximum frequency of 4 Hz with a maximum wake-up interval of 1 minute). Digital Input - positive edge In case a positive edge on the Digital Input has occurred between 2 intervals of wake-up, it is memorized. When TBOX ULP wakes up, it changes the variable to ‘1’ and treats it according to its use in the program (alarm, datalogging, remote Tags). The variable is automatically reset after treatment (see example and here below). Digital Input - negative edge In case a negative edge on the Digital Input has occurred between 2 intervals of wake-up, it is memorized. When TBOX ULP wakes up, it changes the variable to ‘0’ and treats it according to its use in the program (alarm, datalogging, remote Tags). The variable is automatically Set after treatment (see example here below). wake-up DI pulse DI positive edge DI pulse DI positive edge DI pulse DI negative edge Version: 2.08 TBox - ULP 80 Digital Input - Interrupt Digital Input 0 and 1 can act as interrupt on the microprocessor. This allows executing tasks without waiting for the next wake-up. When an interrupt is detected, a cycle of Ladder/BASIC is executed. Alarm conditions and chronology conditions will be tested after Ladder/BASIC has been carried on. You will not see the value=1 of “Interrupt” before the wake-up. But the variable counter associated will be incremented. It can then be used in the Ladder/BASIC to indicate the interrupt has been detected. Using Interrupt variable has an impact on consumption, because the digital input stage must be powered permanently. 8.7.3. Group 3 - Digital Outputs From the ‘Resources’ and the list of I/O, open the ‘Group 3 (4DO)’ to list digital outputs. 8.7.4. Group 4 - Analog Inputs From the ‘Resources’ and the list of I/O, open the ‘Group 4 (2AI)’ to list analog inputs. Tag: Value: The easiest way to declare the variable as Tag: double click it, edit it and save it. The icon changes according to its type (digital or analog). The value is available only after the Tag has been declared and program sent to TBOX ULP. WARNING: the value is refreshed at the rate defined in the ‘Wake up’ properties (see chapter 7.1: General Properties) Version: 2.08 TBox - ULP 81 Voltage / Current Input Each channel can be cabled to receive either ‘Voltage’ or ‘Current’ (see chapter 17: Technical specifications & wiring). Tag definition parameters: By double clicking the inputs, you enter into the ‘Tag definition’ menu: For each analog inputs, you have the choice: - voltage signal (0..5V) - current signal (4..20mA) As the sensor is powered by the input channel, 2 voltages are available: - 12 V sensors - 24 V sensors Format: You select the format you want 16bits - Signed or Unsigned or float. to display the pressure, between, Scaling: A scaling can be configured to work with real values. The range depends on the format selected (see previous). (default: minimum=0 and maximum=1000). Type: You select in the list the sensor you use (see above). Resolution: The resolution allows reducing the handling of the variable for small variation and therefore to consume less energy. Example: with a resolution of ‘5’, TBOX ULP will only treat the variable when the value has changed from 5 units. Acquisition rate configuration In order to save energy, this menu allows controlling the power and acquisition of Analog Input: Frequency of Acquisition: you select a number of wake-up cycles between acquisition. Example: with a wake-up rate of 1 minute, 15 cycles corresponds to an acquisition each 15 minutes. “Setup time” period: the time needed for the sensor to stabilize. After this time, the value is read, and the process cycle is launched (Ladder/BASIC, datalogging, Alarms, ...) 8.7.5. Group6 – Analog Variables Associated to Digital Inputs Version: 2.08 TBox - ULP 82 Some internal variables are associated to Digital Inputs, computing pulses to return calculated “Counter” and “Flow”. Counter (Totalizer) Each Digital Input is associated to a ‘Counter’ variable. It accumulates the pulses of the digital input. It requires a wake-up interval of max. 1 minute. Counters are saved when loading a new program or after a reset. Counter can be synchronized to a mechanical counter (see Appendix F: Synchronization of counters). Tag definition parameters: By double clicking the inputs, you enter into the ‘Tag definition’ menu: Totalizer: - you can define the number of digits you want to use. Above the maximum values, the counter turns over: 32 bits = max. 4294967295 (default). 4 digits = max. 9999 5 digits = max. 99999 …. 9 digits = max. 999999999 Counter (HS) Digital inputs 0 and 1 can be used for high speed counting (up to 10 kHz). To use one of these counters, create the Tag “Counter HS” associated to the digital input. Using HS counters increase the consumption, because the input stage needs to be powered permanently. Version: 2.08 TBox - ULP 83 Flow TBOX ULP executes a calculation to interpret pulses of the Digital Input as a Flow. It requires a wake-up interval of max. 1 minute. A configuration is available to adjust the measurement according to the duty cycle of pulses (see chapter 7.5.3: Flowmeters) After starting, TBOX ULP needs at least 3 pulses to start calculating the Flow. There are 2 mechanisms used in flow calculation, depending on the time between pulses: With at least 1 pulse every 12.5 sec.: the calculation is based on the quantity of pulses per period of time. With less than 1 pulse every 12.5 sec.: the calculation is based on the time between the last pulse and the previous one. The precision is ± 1% of the reading value. Tag definition parameters: By double clicking the inputs, you enter into the ‘Tag definition’ menu: Time unit: The unit in which you wish the calculation to be displayed. Example: ‘hour’ for m3/h. 1 Pulse: The weight given to 1 pulse, according to the unit chosen above. Example: ‘0.01’ for 1 pulse=10 liters on a calculation based on m3. Zero Threshold: Calculation is based on time between pulses. When TBOX ULP does not receive pulses for a certain amount of time, it decreases the flow slowly. When the value reaches the ‘zero threshold’, the flow is forced to ‘ 0 ’ DI pulse FLOW Zero Threshold The precision of the Floating point register is applied to a range of 7 digits, starting with the highest number. (Precision = max 0.0001 %). It corresponds to the norm IEEE-754 Examples: 12035652,56 the value handled by TBOX ULP is 1203565xx,xx (x = any value). 120356,52656 the value handled by TBOX ULP is 120356,5xxxx (x = any value). 120,35652656 the value handled by TBOX ULP is 120,3565xxxx (x = any value). Version: 2.08 TBox - ULP 84 8.7.6. Summary on the use of I/O As we have seen above, each DI channel can be associated to several variables. As we have seen above, it is possible to wake up TBOX ULP using an “Interrupt” input. Using the digital system variable [49] “PgmCnt” (see below), it is possible to execute several ,successive process cycles. The table below illustrate how I/O and associated variables are handled: Variable Description Handled at wake-up Handled at each cycle DI “State” Current state at wake-up √ - DI “Edge” State during sleep maintain √ - DI “Interrupt” Launch one cycle √ (*) - DI “Counter” Number of Puls on DI (-> 4 Hz) √ √ DI “Counter HS” Number of Puls on DI (-> 10 kHz) √ - DI “Flow” Flow based on puls/period on DI √ - DO Digital Output √ √ AI Analog Input (0..5 V or 4..20mA) √ - (*) Even if the DI “Interrupt” wakes up the TBOX ULP , its digital value is only updated at the next wakeup Version: 2.08 TBox - ULP 85 8.8. System variables The system variables have pre-defined functions. They are very useful to check or to act on features of TBOX ULP. They are divided into ‘Digital’ and ‘Analog’. 8.8.1. Digital System Variables According to its function a register indicates: 0 1 * is Read/Write or Read only. In the following table, the column R/W : Read only. : Write ‘0’ only. : Write ‘1’ only. : Write ‘0’ or ‘1’. When the action (SET) is specified, it means that the TBOX ULP maintains the variable at 1 to be sure it is detected. With such a variable, you need then to reset it using BASIC or Ladder logic. Index Name R/W 0 TikSec 0 Tik Second: Changes of state every second. Useful for counting time. 1 PrgRun - 2 NewPro - 3 Reboot 1 Program run: At each starting of TBOX ULP , this register changes to 1 and stays at 1 as long as the BASIC/Ladder program runs. This register is used in BASIC/Ladder to execute operations only at the start of the program, with the help of a positive edge trigger function. New program: Start of a program flag. Changes to 1 if TBOX ULP has started after having received a new program. Changes to 0 after a reset of the TBOX ULP. Reboot: complete restart of TBOX ULP. It is equivalent to hardware reset. 4 RstWat 1 5 Ala_On 0 6 Alaerr 0 7 RstAla - Reset Watchdog: the watchdog checks the cycle time of BASIC/Ladder program. In case it is longer than 1 second, it resets TBOX ULP. This Watchdog can be reset to reinitialize the 1 second timer in case of cycle time longer. Alarm on: this register indicates that alarm is active (not acknowledged). Writing 0 in this register causes a global acknowledgment of all alarms. It corresponds to a reset of the alarm stack. Alarm in error: TBOX ULP SET this register 1 when an alarm failed to be sent. This means that after the number of tries, the alarm has been auto-acknowledged. Must be Reset by User. Reset Alarm: Not used. See ‘Ala_On’ here above. 8 EnaDCr * Digital Chronology: General enable of recording in digital chronology. 9 EnaACr * Analog Chronology: General enable of recording in analog chronology. 10 EnaSam * Sampling Tables: General enable of recording in sampling tables (not available). 11 EnaAla * Enable Alarm: General enable of generating alarms. 12 DisCrd * 13 DisCra * 14 DisSam - Flag digital chronology: can be associated to any digital chronology configuration to inhibit recording. When at value ‘1’, inhibits recording in Database. Flag analog chronology: can be associated to any analog chronology configuration to inhibit recording. When at value ‘1’, inhibits recording in Database. Not used 15 DisAla - Version: 2.08 Description Flag sending alarm: can be associated to any Alarm condition. When at value ‘1’, inhibits the sending of alarm. TBox - ULP 86 Index Name R/W Description 16 DaySav - 17 PrgEnb * 18 PrgOnc 1 19 TcpIpLog * 20 ALAovf * 21 ComErr 0 22 SmtpEr 0 Communication error: general communication error flag. It means that one of the communication ports (of the CPU or of a communication card) used as ‘Master’ has encountered a communication error. (SET) Smtp Error: an error occurred while sending an e-mail. (SET) 23 FtpErr 0 Ftp Error: an error occurred while sending files. (SET) 24 NTPErr 0 NTP Error: an error occurred while setting time of TBOX ULP. (SET) 25 GpsVF - 26 GPRSErr 0 27 ModemLog * 28 SystemEr 0 29 MmcToRTU - 30 DigChrOv - 30 DigChrOv - 31 AnaChrOv - 32 RsDigChr - 33 RsAnaChr - GPS: GPS validity (connected on COM1). GPS returns a valid signal. Validity of the signal. When changes to ‘1’, it indicates the GPS receives sufficient signals to calculate its position (from minimum 3 satellites). When changing from 0 to 1, the time of TBOX ULP is set to the time of GPS, with correction in regards to GMT according to the location of TBox. If you want to update the time manually, you reset the variable GPRS Error: an error occurred during GPRS connection. TBOX ULP does not succeed to connect (not supported yet) (SET) ModemLog: authorizes the modem connection to be logged into chronology. The communication port is declared in the ASV.24 [PortIdLog]. The ASV.25 [EventLog] must be tagged also. The information is available in from the communication Download TraceLog (not supported yet) SystemErr: the RTU detected an error during starting. Typically a problem with a card (not supported yet) or a discordance between cards detected in program and cards installed (SET) MMC: indicates whether the program has been loaded from the MMC 1 = the program of the MMC is different from the one of the RTU and has been loaded from the MMC 0 = there is no MMC; the MMC is empty; the program of the MMC is identical to the one of the RTU (see also appendix C. Plug&Go) Chronologies: Indicates that the amount of records in the digital chronology has reached the maximum selected Chronologies: Indicates that the amount of records in the digital chronology has reached the maximum selected Chronologies: Indicates that the amount of records in the analog chronology has reached the maximum selected Chronologies: Allows emptying the digital chronology using a SET. Automatically reset by OS Chronologies: Allows emptying the analog chronology using a SET. Automatically reset by OS Version: 2.08 Time: 1 = summer time (the ASPE ZoneBias = + 3600 seconds). 0 = wintertime. Program Enable: when reset to ‘0’, allows stopping the execution of BASIC/Ladder program. It can be useful to execute the program manually (see next). Program Once: when set to ‘1’, executes the cycle of BASIC/Ladder program once. Useful for debugging the program. TBOX ULP resets the variable automatically. TCP Logging: Setting this register activates the Debugging of TCP/IP connection. Very useful to trace problems when sending e-mail or FTP (see chapter 10.7). When this option has been activated, the information is available from TWinSoft main menu: ‘Communication’ ‘Download’ ‘TCP/IP debugging’. Alarm Overflow: overflow in the stack of alarms. The size of the stack of alarms can be adjusted from the ‘Advanced’ properties of the RTU TBox - ULP 87 Index Name R/W Description 34 BusError - System: indicates an error on the BUS. For TBOX MS only 35 MasterAnsw * 36 DynDnsEr 0 Remote Tag: when set to 1, allows handling of remote Tags on incoming call. It concerns then only Remote Tags through modem TCPIP: error during a connection to DynDNS server. (SET) 37... 44 Tsl_Xa - 45 DisAla2 * 46 DisAla3 * 47 DisAla4 * 48 Pop3Err * 49 PgmCnt 1 50 CntErr 0 Version: 2.08 Alarm: There are 8 time slices that can be used to build Time Tables. Those 8 variables indicate the activity of each of them Alarm: inhibition flag #2 of the alarms. Used as inhibition flag in the 'Conditions' menu of the alarms. Let’s you temporarily prevent from executing an alarm when at 1. Alarm: inhibition flag #3 of the alarms. Used as inhibition flag in the 'Conditions' menu of the alarms. Let’s you temporarily prevent from executing an alarm when at 1. Alarm: inhibition flag #4 of the alarms. Used as inhibition flag in the 'Conditions' menu of the alarms. Let’s you temporarily prevent from executing an alarm when at 1. Alarm: an error occurred while accessing POP3 server. (SET) Low Power: to carry on one more Ladder/BASIC cycle. The variable is reset by the OS. You set it anywhere in the program and a new cycle will be carried on (by default, TBox ULP runs the BASIC/Lader cycle once at each wakeup) See how I/O are controlled in chapter 8.7.6 above. Low Power: Counter synchronization (see Appendix F.) 1 = sync of a counter with a ID that does not exist. (SET) TBox - ULP 88 8.8.2. Analog System Variables According to its function a variable is Read/Write or Read only. In the following table, the column R/W indicates: - : Read only. : Writable. Index Name R/W Description 0 Second * Time: Second in TBOX ULP. 1 Minute * Time: Minute in TBOX ULP. 2 Hours * Time: Hour in TBOX ULP. 3 Date * Time: Day of the month in TBOX ULP. 4 Month * Time: Month in TBOX ULP. 5 Year * Time: Year in four digit in TBOX ULP. 6 DayOfw * Time: Day of the week in TBOX ULP. (Mo=1; Tu=2; We=3; …) 7 AlaCnt * 8 AlaID * 9 ALACur * 10 ALARec * 11 SamQty * Alarm quantity: Amount of alarms in the alarms stack. It means the quantity of alarms that have not been generated already. The size of the Alarm stack can be adjusted in the ‘Advanced RTU properties’). Alarm last index: Absolute index of the last alarms generated (number between 0 and 65535). Can be used to acknowledge an alarm by writing its index. Alarm current index: Absolute index of the alarm being currently handled (number between 0 and 65535). Alarm recipient: gives the index of the recipient of the current alarm. Can be used to acknowledge all alarms of a Recipient by writing its index (see index in the list of Recipients). Sampling Table: Quantity of sampling tables defined. 12 UtcTim - 13 ZonBia * 14 ZonID * 15 WeYear * 16 CycTim * 17 AAcond - Time: time for one cycle of the program (BASIC and Ladder). This register is refreshed after each cycle. Within the program, you could compute this register to memorize the highest value. Alarms: Quantity of alarm conditions, which are still active. 18 LevId - Events: absolute number of the last event (0…65535). 19 AppVer - 20 OsVer - Application version: according to the ‘version’ indicated in the ‘Info’ of the RTU properties. This register returns a version in a WORD format: 0…65535 Operating System version: running in TBOX ULP 21 OsBuil - Operating System build: build number of the OS running in TBOX ULP 22 LoaVer - Loader version: Loader version running in TBOX ULP 23 LoaBui - Loader build: build number of the loader running in TBOX ULP 24 PortIdLog * Selection of the port for TCP debugging (see chapter 10.7) 25 EventLog - Contains internal codes used for TCP debugging (see chapter 10.7) 26 MilliS - TIME: With CPU-16: 10 milliseconds tik With CPU-32: 1 millisecond tik (not available yet) Version: 2.08 Time: Universal Coordinated Time (UTC). It is the number of seconds since 01/01/1970, GMT time. It is used as time-stamp reference for datalogging. Time: Time difference in seconds with GMT. Time: ID of the zone where TBOX ULP has been installed. It uses Regional Settings of PC, therefore it is important that you configure the PC according to the location where TBOX ULP is installed. Time: week of the year (*) TBox - ULP 89 Index Name R/W Description 27 GpsLat - 28 GpsLong * 29 GpsAlt - 30 GpsSats - 31 Rerout * 32 MasterErr * 33 CardErr * 34 CPUusage - 35 SerialNb - 36 CPUmode - Low Power: gives the number of seconds the CPU has run in high frequency (=with high consumption). It includes wake-up procedure, I/O scanning, process, alarm and datalogging handling, remote Tags communication, ... and the return to sleep mode procedure. Hardware: indicates the serial number of the CPU (see sticker on the side of the card). Redundancy: for TBOX MS32 only 37 OpenSoc 38 GpsSpeed - TCP/IP: number of sockets opened. The socket availability is: - 1 socket reserved for Remote Tags 'Client' - 2 sockets reserved for 'Alarms (FTP needs 2 sockets) - 5 sockets available for 'Server' connection GPS: with a GPS on TBox, current speed of TBox, expressed in km/h 39 GpsRoute - 40 AlaPop3 - 41 EvenCur * GPS: with a GPS on TBox, current direction of TBox, expressed in degree (0 .. 359.9 degree) Alarm: it indicates the number of alarm needing to be acknowledged by POP3 connection Alarm: it indicates the current Event ID 42 HardRev - HW: it indicates the hardware revision of the CPU 43 Pop3State * Alarm: indicates the state of POP3 connection. Particularly useful when monitoring the RTU with POP3 connections. The last value is maintained: 1 Accepted message received 2 Acknowledgment received 10 Invalid message 11 Unknown command 20 Incorrect password 21 Incorrect password or not supplied for a com. Port protected 30 Message received does not match a pre-defined message Version: 2.08 GPS: current latitude given by the external GPS (ACC-GPS). Latitude in degrees multiplied by 1000000 (example: 50123456 means 50 degrees + 0.123456 degree). Resolution : 11 cm. Precision 15 meters GPS: current longitude given by the external GPS (ACC-GPS). Longitude in degrees multiplied by 1000000 (example: 7123456 means 7 degrees + 0.123456 degree). Resolution : 11 cm. Precision 15 meters GPS: current altitude given by the external GPS (ACC-GPS). Altitude in meters. Resolution, 1 meter. Precision: depends on the quantity of satellites. Poor precision GPS: quantity of satellites detected by the external GPS (ACC-GPS). Must be of minimum 3, or even 4 to expect a good precision. Modbus: variable 16 bits, each representing a COM Port from 1 to 16. The bits corresponding to the Ports in ReRouting are at 1, the other at 0. Can be use to set the mask. Communication: indicates the last station ID (modbus address) in communication error. Once an error has been detected, the value is maintained until next error. Usually, communication errors can be solved by modifying the time-out available in the ‘Advanced’ tab of the communication used (End of Fame Detection, IFG, Rx Time-out). To trace an error, we advise you to reset the variable and check it when it is different from 0. When this happens, you can handle it in your process and reset the variable, that it is ready for the next error System: this variable indicates card(s) in error. For TBOX MS only TBox - ULP 90 Index Name R/W 44 CntID * 45 CntValue * 46 CntTime * 47 CrdIndex 48 CrdSize 49 CraIndex 50 CraSize 51 CreIndex 52 CreSize Description Low Power: Variable containing the ID of the Counter. It is used when doing a counter synchronization (see Appendix F.) Low Power: Value of the counter when it was pressed on TEST button. It is used when doing a counter synchronization (see Appendix F.) Low Power: UTC time when it was pressed on TEST button. It is used when doing a counter synchronization (see Appendix F.) Datalogging: current position in the table of digital chronologies (circular counter) Datalogging: size of the table of digital chronologies (see RTU properties → General) Datalogging: current position in the table of analog chronologies (circular counter) Datalogging: size of the table of analog chronologies (see RTU properties → General) Datalogging: current position in the table of events (circular counter) Datalogging: size of the table of events (see RTU properties → Advanced Alarms properties) (*) System variable 15. ‘Week of the year’ : This system variable indicates the week of the year according to the date in the RTU. The rules are the following: the changing of week happens on Monday, 00:00 AM the changing of week happens at January 1, whatever day it is if January 1, is a Friday, Saturday or Sunday, there will be two ‘Week 1’ Examples: Month dec dec dec / jan jan jan Mon Tue Wed Thu Fri Sat Sun .. 21 28 4 11 .. 22 29 5 12 .. 23 30 6 .. 17 24 31 7 .. 18 25 1 8 .. 19 26 2 9 20 27 3 10 Month dec dec dec / jan jan jan Mon Tue Wed Thu Fri Sat Sun .. 22 29 5 12 .. 23 30 6 13 .. 24 31 7 .. 18 25 1 8 .. 19 26 2 9 .. 20 27 3 10 21 28 4 11 Week 50 51 52 / 1 1 2 Week 50 51 52 / 1 2 3 8.9. Timers & Counters Timers and Counters are described in the manual BASIC & Ladder for TBox Version: 2.08 TBox - ULP 91 9. Tags A Tag is essential for any programming • • • • An alarm is conditioned from a Tag. The Datalogging mechanism records values of Tags. BASIC/Ladder logic executes a process by handling Tags. … Any variable of the TBOX ULP that you want to use in any configuration, you have to declare it as a Tag. There are 4 types of variables: • The Physical I/O (DI, DO, AI, AO) • The System Variables (predefined analog and digital functions) • The Internal Variables, digital, analog and text (aka Registers) • The Communication Variables, digital and analog The Tags are gathered in the folder Tags of the Project Workspace: The Tags can be sorted into Groups of Tags. - From the list of Tags, right click. - From the Context menu, select ‘New → Group’. - You can then move/create Tags into the Group. Version: 2.08 TBox - ULP 92 9.1. Physical I/O The physical I/O’s are the signals available on I/O cards. They can be easily accessed from the ‘Resources’ (see also chapter 8: ‘The Resources’). Details about the different I/O are available in chapters 8.7 and 17.9. To create a Tag of a variable from the Resources: select it into the list and double click it change its name and description click <OK> If you are connected to a TBOX ULP when the Tag is created, you will see ***** appearing in the column ‘Value’. This is because the ModBus address of the Tag needs to be sent to TBOX ULP (see chapter 9.3: ‘ModBus addresses’) Once the program has been sent, the value appears. You can use this icon to send the program. Version: 2.08 TBox - ULP 93 9.2. Internal Variables (Registers) An internal variable (also know as Register) is an addressable location of the memory. It is used as flag, as temporary value, to make a calculation, … There are 3 types of internal variables: Digital (DIV) Boolean register with possible values: 0 or 1. Analog (AIV) with several formats: • 8 bits, Signed or Unsigned • 16 bits, Signed or Unsigned • 32 bits, Signed or Unsigned • 32 bits Float, IEEE 754 TEXT (AIV) analog register associated to a string of characters The internal variables can be only created from the list of Tags. 9.2.1. Digital Internal Variable To create a Digital Internal Variable, from the list of Tags, click ‘Add a Tag’ . Select ‘Digital’ Version: 2.08 TBox - ULP 94 The Definition menu pops up: You type a Tag Name, a Comment and select as Type: ‘Internal Variable’ The initial value is the value the Tag will have at the start-up of TBOX ULP. If you select ‘None’ the value is maintained at start-up. ModBus Address is discussed in chapter 9.3 Version: 2.08 TBox - ULP 95 9.2.2. Analog Internal Variable To create an Analog Internal Variable (also known as Register), from the list of Tags, click ‘Add a Tag’ . Select ‘Analog’ The Definition menu pops up: Example with a ’16 bits – Unsigned’ internal variable Version: 2.08 TBox - ULP 96 You type a Tag Name, a Comment and select as Type: ‘Internal Register’ For each Analog Register, the formats available are: o 8 bits (Signed or Unsigned) o 16 bits (Signed or Unsigned) o 32 bits (Signed or Unsigned) o Float (32 bits, IEEE 754) By default, TWinSoft creates Analog Internal Variable in format ‘Float’. Check whether it fits with the use you intend to have of the variable. The initial value is the value the Tag will have at the start-up of TBOX ULP. If you leave the field empty, the value is maintained at start-up. ModBus Address is discussed in chapter 9.3 9.2.3. Text Internal Variable The Tag TEXT uses ASCII character encoding ISO/CEI 8859-1 of the Latin alphabet. To create a Tag TEXT (string of characters), from the list of Tags, click ‘Add a Tag’ . Select ‘Text’ Version: 2.08 TBox - ULP 97 The Definition menu pops up: Version: 2.08 TBox - ULP 98 9.3. ModBus address The ModBus address is the link to the outside world. When equipment must sample Tags in TBOX ULP, it uses its ModBus addresses; like T, SCADA or TWinSoft. Each Tag has a unique ModBus address. By default TWinSoft proposes a ModBus address. You can change it if you want. While being On-line, the value of the Tag can be displayed only when TWinSoft has sent the program to TBOX ULP. The Tag is then available for the outside world at the ModBus address you have declared. 9.3.1. ModBus address of System Variables With System Variables it is a little bit different; they have two ModBus addresses: One internal and fixed ModBus address. It explains why when you are connected to TBOX ULP, even without sending a program, you still can see values from the Resources. The address of these variables is 65280 + ID of the variable. Example: [AlaRec] = 65280+10=65290 One user ModBus address that you are allowed to modify if you want. When you create a Tag of system variable, you can change its default ModBus address. In case you wish to access the Tag, you declare this user ModBus address. Other Tabs of the Tag configuration refer to menu where the Tag can be declared: For Alarms, see chapter 11 For Datalogging, see chapter 13 For Remote Tags, see chapter 14 About Presentation-write, see next chapter Version: 2.08 TBox - ULP 99 9.4. Tags - Presentation / Write This tab contains configuration used when the Tag is declared in a Report or in a WebForm. The Description is also used in T Presentation settings can also be used when the Tag value is included in a SMS. Report: file edited with ‘Report Studio’ and used for instance as text body when sending email. (Start ‘Report Studio’ from ‘Windows’ and the group of Programs of Techno Trade or from the ‘Project Workspace’ and the list of ‘Web and Report files’) WebForm: file edited with ‘WebForm studio’. Used to display values of Tags in a HTML page. (Start ‘WebForm Studio’ from ‘Windows’ and the group of Programs of Techno Trade or from the ‘Project Workspace’ and the list of ‘Web and Report files’) SMS: with Digital Tags, the ‘states’ defined here will be used and with Float Tags, the number of decimals. (See also chapter 11.6.1. Value of Tag in message) Presentation: makes the following information available to T, ‘Report’ and ‘WebForm’. Description: in a Report, text displayed as ‘Header’ in sampling table or as Tag information in chronologies when the data is retrieved. Units: text displayed as ‘Unit’ in datalogging when the data is retrieved. It can also be displayed when selecting as format ‘Value + unit’ in the report or WebForm. # decimal: the quantity of decimals displayed Write allowed: if the Tag is declared in a WebForm, allows defining a writing access to the Tag, within a specific range. 9.5. Run Time Parameters Version: 2.08 TBox - ULP 100 Run time parameters feature allows accessing some TBOX ULP configurations through Tags, in order to modify them "on line". For instance, to change a tel. number of a SMS recipient, the e-mail address of a recipient, the address of SMTP server, the handling of a alarm condition. When a configuration provides access to run time parameters, a tab is attached to the configuration. Example with Alarm Recipient: You will associate a Tag to the run time parameter you want to add. The Tag, and therefore its associated parameter, can then be modified from TWinSoft, a WebForm, a SCADA, ... The format of the Tag depends on the parameter (Bool, Byte, Word, Float, Text) Changing of parameters is maintained in case of power cycle, reset, reboot and watchdog. Original configuration is restored in case of sending new program or OS and doing stop/start from TWinSoft. Version: 2.08 TBox - ULP 101 9.5.1. Alarm Parameters Alarm Condition Parameter Choice Tag Format Inhibition 0 = enabled 1 = disabled 2 = power fail 3 = DisAla 4 = DisAla2 5 = DisAla3 6 = DisAla4 Byte Threshold (analog) Byte or Word or DWord or Float Hysteresis (analog) Byte or Word or DWord or Float Alarm Recipient Parameter Recipient Type Tag Format Phone Number E-mail To E-mail Cc ModBus, SMS, Printer, RAS, Custom Email Email Text Text Text Alarm Time Slices Parameter Tag Format From Hour From Min To Hour To Min Byte Byte Byte Byte Alarm Holidays Parameter Tag Format Day Month Year Byte Byte Word Version: 2.08 TBox - ULP 102 9.5.2. Datalogging Parameters Chronologies Condition Parameter Choice Tag Format Inhibition 0 = enabled 1 = disabled 2 = power fail 3 = DisCra/DisCrd Byte Variation (analog) Byte or Word or DWord or Float 9.5.3. IP Parameters ISP Parameter Tag Format Phone Number User Name Password Text Text Text FTP Parameter Tag Format Host TCP Port User Name Password Text Word Text Text SMTP Parameter Tag Format Server TCP Port E-mail From Authentication Login Password Text Word Text Bool Text Text POP3 Parameter Tag Format Server TCP Port Authentication Login Password Text Word Bool Text Text Version: 2.08 TBox - ULP 103 NTP Parameter Tag Format Server Text 9.5.4. GSM/GPRS Parameters GPRS Authentication Parameter Tag Format Authentication Login Password Bool Text Text Version: 2.08 TBox - ULP 104 10. IP Parameters IP parameters consist in the global configuration for: connecting to an ISP (dial-up connection) sending files (FTP) sending e-mail (SMTP) reading e-mail subject (POP3) Time synchronization (NTP) DynDNS (handling of public, dynamic IP addresses) Concerning IP configuration for incoming calls (WebServer), see advanced RTU properties → TCP/IP All IP parameters are defined in this Folder, available from the ‘Resources’. The FTP Host, SMTP Server, POP3 Server and NTP configurations correspond to connections to the appropriate servers. It is done for once, and called when creating a recipient of alarms. This makes creating alarm recipients very easy ! Example with alarm for sending e-mail: The Recipient is of type ‘e-mail’ with the e-mail address and it refers to a SMTP server. This SMTP server refers to an ISP In other way round, when TBOX ULP generates an e-mail, it sequences the tasks like following: connection to an ISP connection to a SMTP Server sending to a recipient (e-mail address) Version: 2.08 TBox - ULP 105 10.1. ISP configuration ISP stands for Internet Service Provider. An ISP represents the entrance to Internet. It is required to access Internet with a dial-up connection (GSM-DATA). It represents the company you call to access an internet service, like sending e-mail or files (FTP). Some among the most well-known: At&T, Scarlet, Tiscali, … When you want TBOX ULP to send e-mail or to send files to a FTP site, through GSM-DATA connection, you have to subscribe an account to an ISP. Using the button ‘Import…’, it gives you access to an existing ISP configuration you have tested successfully on the PC. A good piece of advice Name: It is the name of the provider. Modem: a connection to an ISP is always carried out through modem. Select the modem. Phone number: It is the phone number of the provider the TBOX ULP must dial to send an e-mail or files. Dial Prefix: The default dial prefix to connect to the ISP (ATDT). It should not be changed unless the modem needs a particular configuration. User name: It is the name of your account needed to access Internet (usually it is given by the ISP). Version: 2.08 TBox - ULP 106 Password: It is the password of your account needed to access Internet (usually it is given by the ISP). DNS: A DNS converts names in IP address. It is needed in case the the Server (SMTP, FTP, NTP, POP3) is indicated in 'text' and not with an IP address. More and more ISPs support dynamic DNS, they provide the DNS addresses when connecting. If this is not the case, they provide you with a ‘Preferred’ and ‘Alternate’ DNS address. You can declare several ISP entries! Then they can be used in redundancy through the sending of e-mails. You are allowed to define several SMTP Servers (see next), associated to different ISPs. Creating the alarm recipient, you can select the ‘Redundancy’ option. Version: 2.08 TBox - ULP 107 10.2. FTP Host FTP stands for File Transfer Protocol. When subscribing an account to an ISP, usually you have some Mbytes to your disposal for sending files. The FTP host represents the target when sending files. The directory where the files are sent is defined in the Recipient (see chapter 11.4). First, TBOX ULP connects to Internet through an ISP or through GPRS and then sends the files. Host Name: It is a free name, to recall when you create the alarm recipient Host address: text and IP address are accepted. Connection: You select the way to connect to the Server (ISP or GPRS). TCP port: Each TCP/IP service has its own unique TCP port. It provides a logical location for the delivery of TCP data. TCP port used by TBOX ULP to establish FTP connection (default=21). Login: Depending on the account you have subscribed, you have a login or work with ‘Anonymous login’. This is the basic configuration to connect to the ‘FTP site’. You do not declare a directory in this configuration, but when declaring the ‘Recipient’ (see chapter 11.4. The Recipients). This allows creating any combination: - several ‘FTP recipients’ to one FTP site - several ‘FTP recipients’ to different FTP sites. -… Version: 2.08 TBox - ULP 108 10.3. SMTP Server SMTP stands for Simple Mail Transfer Protocol. It is usually the main reason for subscribing an account to an ISP, for sending e-mail. Concerning e-mail, TBOX ULP is able to send e-mail (through SMTP server) and to read e-mail (through POP3 server) The SMTP Server represents the mail server used for sending e-mail (typically the one of the ISP where we have subscribed and account). First, TBOX ULP connects t to Internet through an ISP or through GPRS and then to the SMTP Server. Name: It is a free name, to recall when you create the alarm recipient. Mail Server (SMTP): It is the IP address (or the name) of the outgoing e-mail Server. It is the unique mail Server needed to send e-mails. E-mail address: . Connection: Version: 2.08 It is the e-mail address of the TBOX ULP. You can usually choose it when you subscribe an account. This address will appear in the 'From:' when receiving the email. In order to protect the mail sever (and you) against spamming, the ISP risks to refuse sending e-mail if the address of the originator is not known. Therefore, be careful to indicate here the e-mail address you have received from your ISP. You select the way to connect to the Server (ISP or GPRS). TBox - ULP 109 TCP port: Each TCP/IP service has its own unique TCP port. It provides a logical location for the delivery of TCP data. TCP port used by TBOX ULP to establish SMTP connection (default=25). The Server requires Authentication: Depending on your ISP and on the way you send e-mail, authentication might be needed to send e-mail. Usually, when you have subscribed the e-mail account at your ISP it is not required. To be sure, if you have created this account to a PC, check its configuration otherwise contact your ISP. TBOX ULP supports one SMTP authentication protocol: PLAIN authentication. Check with your ISP. 10.3.1. About Redundancy If you create more than one SMTP Server, they can be used in redundancy according to their order in the list. You decide to work with redundancy when creating the e-mail recipient (see chapter 11.4). Version: 2.08 TBox - ULP 110 10.4. POP3 Server POP3 stands for Post Office Protocol 3. It is used to check and collect e-mails in a mail box. The POP3 Server represents the mail server used to read mails previously sent to the attention of TBOX ULP. The use of POP3 is not to retrieve e-mail, but to read the field "Subject" and to take some actions. Two actions can be taken by sending e-mail to TBox: 1. Alarm acknowledgment sent through e-mail (see next page) 2. RTU monitoring with predefine message (see chapter 12. ReadSMS) First, TBOX ULP connects to Internet through an ISP or through GPRS and then to the POP3 Server. Name: It is a free name, to recall when you create the alarm recipient. POP3 Server: It is the IP address (or the name) of the POP3 Server to which TBOX ULP connects to read e-mails. Connection: You select the way to connect to the Server (ISP or GPRS). TCP port: Each TCP/IP service has its own unique TCP port. It provides a logical location for the delivery of TCP data. TCP port used by TBOX ULP to establish POP3 connection (default=110). The Server requires Authentication: If authentication required to collect e-mail: Login and Password. TBOX ULP does not support SSH. Version: 2.08 TBox - ULP 111 10.4.1. Alarm Acknowledge Through POP3 Introduction With the TBOX ULP sending a SMS through a GSM, it is possible to acknowledge the alarm by sending back a SMS to TBOX ULP In some cases, mostly working in GPRS, SMS can be sent through e-mail services. In return, it is then possible to acknowledge the alarm using POP3 connection. Sequence of connections 1. TBOX ULP sends an e-mail. The alarm condition has been configured with the option "POP3 Ack". It is important you have a dedicated e-mail account for your RTU. The data sent by e-mail can be a report or a message. 2. The recipient retrieves its e-mail. The field "Subject" of the e-mail is preceded with internal data: RTU Id (I) and Alarm index (A) Example of message: #I460000020107,A00004# MyTBox: PUMP stopped 3. The user sends back the e-mail. Typically, he will make a "Reply" and sends back the e-mail to the address as specified in point 1. above, in the SMTP server. 4. TBOX ULP generates a POP3 connection (through alarm condition) and checks the presence of email with specific data in field "Subject". With this data, TBOX ULP knows which alarm for which RTU it can acknowledge. The POP3 connections have to be handled into your process and can be checked from System Variables (see below) Illustration with a TBox MS Version: 2.08 TBox - ULP 112 Supplementary information 1. The time between phases 1 and 4 can be determined in RTU properties --> Advanced Alarms properties 2. System Analog Variable: #40 [AlaPop3] indicates the number of alarm needing to be acknowledged by POP3 connection and #43 [Pop3State] indicates the state of connection. 3. If escalation is required, Group of recipients can be associated to the alarm condition 4. Like other alarms, failure in sending SMTP alarms can be checked using System Digital Variable: #06 [AlaErr] and System Analog Variable: #10 [AlaRec] 5. Error in POP3 connection can be detected also using System Digital Variable: #48 [POP3Err] 10.5. NTP Server NTP stands for Network Time Protocol, an Internet standard protocol (built on top of TCP/IP) that assures accurate synchronization of the clock of TBOX ULP. The NTP Server represents a server dedicated to time synchronization. First, TBOX ULP connects to Internet through an ISP or through GPRS and then to the NTP Server. Example with a connection to Windows server through Ethernet Examples of Servers: time.windows.com europe.pool.ntp.org You will find valuable information, like lists of Servers with open access at: www.ntp.org public time server list The organization pool.ntp.org proposes servers using DNS round robin, which make a random selection from a pool of open access time servers. This is good enough when working with TBOX ULP. Round Robin DNS technique is used when the number of access to a server is unpredictable, to balance the use of IP addresses (load balancing technique). 10.5.1. Time accuracy When setting time, TBOX ULP takes into account the propagation delay. This is particularly important when connecting to the server via modem. The precision is of 1 second. Version: 2.08 TBox - ULP 113 10.6. DynDNS DynDNS stands for Dynamic Data Name Server. It is a service, provided by the company DynDNS.org, offering the handling of dynamic IP addresses. When working with GPRS connection, using public dynamic IP addresses, it is not possible to access the RTU directly, as you don't know its IP address. The DynDNS service solves this problem: each time the RTU detects a changing of its IP address, it informs the DynDNS server. You then connect to the DynDNS Server that will redirect you to the RTU. Example of topology : connecting with Internet Explorer to a RTU having a GPRS dynamic IP address. Sequence: 1. Detecting a changing in its IP address, the RTU informs the DynDNS Server. 2. Internet Explorer connects to the DynDNS Server (example: http://waterloo.dyndns.org). The DynDNS Server resolves the name and sends back the corresponding IP address. 3. Internet Explorer connects to the IP address it has received. Version: 2.08 TBox - ULP 114 10.6.1. How to configure DynDNS in TBox 1. Subscribe a DynDNS account: o Go to www.dydns.org o Create an Account o Create a Host 2. Create in TWinSoft IP Parameters the connection to DynDNS: Name Type any name Server DynDNS Server to which TBox ULP will connect when it detects a changing in its IP address. It should not be changed. Path Location in the server of the table of correspondences between IP address --> name. It should not be changed. Url You type the host address you have creating when subscribing the DynDNS account. Example: waterloo.dyndns.org Server requires authentication Select the option to type the login corresponding to the account you have created at DynDNS organization. User name Type the login name of your account. Password Type the login password of your account. 3. Associate the DynDNS connection to the modem (see communication port: TCP/IP Advanced...) Version: 2.08 TBox - ULP 115 10.7. TCP/IP Debugging This feature is very convenient to trace problems when sending e-mails and/or files (with FTP). It informs on the different steps of the connection: Login to the ISP, obtain of DNS, SMTP communication, … It is based on 3 ‘System variables’: TcpIpLog, PortIdLog and EventLog Procedure 1. One System variable must be Tagged: Analog # 25: EventLog Keep the ModBus address as it is (22080). Do not change it. It is not necessary to Tag the 2 other variables. 2. Make the following lines of Ladder: This line activates Debugging process This means that we make debugging on COM2 Example on debugging through LT-xxx with PSTN modem (COM2) As you can see, we use the system variables without having Tagged them (brown color). You can also Tag them if you want. 3. Once the connection is finished, look at the trace from the ‘Communication menu’ 4. Once the connection is finished, look at the trace from the ‘Communication menu’ Version: 2.08 TBox - ULP 116 Closing connection SMTP (e-mail) dialog Obtain DNS from ISP Agreement on options supported Authentication (PAP or CHAP) Agreement on options supported Modem connected TBOX ULP uses the ‘Analog Chronologies’ to store debugging data: - Check whether the size is sufficient (from the RTU properties General) - If you retrieve data, for instance with T, you might receive strange data! Version: 2.08 TBox - ULP 117 5. Once the connection is finished, look at the trace from the ‘Communication menu’ Closing connection FTP (sending files) dialog Obtain DNS from ISP Agreement on options supported Authentication (PAP or CHAP) Agreement on options supported Modem connected Values The column 'Value' returns messages from/to the Server. When there is a code, it is always information received from the Server: 2xx: OK 3xx: OK, but something still missing 4xx: temporary error 5xx: permanent error. When TBOX ULP receives such a code, it stops communication and closes the socket. Version: 2.08 TBox - ULP 118 11. Alarms 11.1. Introduction Alarm module of TBOX ULP is the gate to the outside world. An alarm consists in a communication event, not only for sending warning messages but also to establish a connection, like we will see. Via alarms, you are able to call a SCADA, send SMS or message to Pagers, send e-mail, send files to a FTP site, dial another TBOX or send a report to a printer. Alarms can be used also to send historical data (datalogging) on regular base using e-mail or FTP. The historical data is sent as the attached file of a report, developed using Report Studio (see from ‘Windows’ the group of programs of ‘Techno Trade’). TView, the supervisory software can then be used to collect data from a mail box or a FTP site. The initiation of alarms in the TBOX ULP relies on the variation of digital or analog Tags. For example, an intrusion contact or a flow level generates a call. When the modem is in low power mode, it will be automatically powered if an alarm with severity “high” is detected at the wake-up of the CPU. There are three basic configurations for an alarm: The condition: a changing in a Tag. The recipient: to whom the alarm is sent. The message (or report): information to sent to the recipient. Each new alarm is immediately entered into a 32-alarms queue (adjustable) and processed, according to the availability of communication ports required and its severity level. Alarms are generated one by one. The alarm queue represents an internal buffer of alarms: if several alarms happen at the same time or if a communication port is not available when the alarm happens. The Events stack, gives information about alarms status (Started – Stopped – Acknowledged). ). The Events stack is discussed in chapter 11.8 Version: 2.08 TBox - ULP 119 To access the definition of Conditions, click the folder ‘Alarms’ in the Project workspace and select ‘Conditions’. According to the Tag you select, you define a digital alarm condition or an analog alarm condition. 11.2. Digital Alarm Condition Tagname: The Tag selected to generate the alarm. Type: The edge on which the alarm is going to be started (rising, falling or both). Message or Report: text or file associated to the alarm. Depending on the type of recipient associated, you can send a message or a report. It can be a message sent to a GSM, a message or report sent as e-mail, to a printer or the file sent by FTP … It always appears in the table of alarms, to distinguish them (see chapter 11.8.). If the alarm condition sends an e-mail, it can be of 2 kinds: Message: a text message is sent and it appears in the ‘object’ field of the e-mail Report: sending of a report created with Report Studio. The report can be created from the Project Workspace and the list of ‘Web & Report files’. Recipient: Version: 2.08 Select a Recipient or a group of recipients. The ‘person’ you wish to contact in case of alarm (see ‘Recipients’ below). In case you select a ‘group of Recipients’ see next. TBox - ULP 120 Call all Recipients: can be used when selecting a Group of Recipients. When the option is cleared: TBOX ULP calls the first one in the group. In case the alarm cannot be acknowledged after the number of tries, TBOX ULP automatically calls the next recipient in the group and so on until it succeeds. Then it stops. (Also known as ‘Chain’) When the option is checked: TBOX ULP sends the alarm to all recipients of the group. (Also known as ‘Link’) Filter: The time in hour:minute:second during which the condition must stay TRUE, before the call is generated. The availability of filter periods depends on the wake-up rate of the CPU. One cannot define a filter in “seconds” with a wakeup “each minute”. Filter can be tested either during both transitions or only during the transition selected (see chapter 7.5.2) Handling: The handling option allows blocking each alarm condition, manually or automatically. Enabled: alarm condition always active. Disabled: alarm condition always de-activated. PowerF: alarm condition disabled when there is a main power failure. DisAla: alarm condition de-activated when the system variable ‘DisAla’ is at 1. Severity: Each alarm can be assigned a level of severity: Low, Normal or High. When several alarms are still present in the queue and then not processed yet, TBOX ULP generates the calls according to the highest severity. Alarm with a severity “high” will force power-up of the GSM at wake-up of TBOX ULP and be proceeded immediately. Other alarms will be proceeded at either: - next power-up of GSM - if variable Com2.ModemAlarm has been activated, it will force Power-up of GSM at wake-up of TBOX ULP End of Alarm: When the alarm condition is finished, the alarm is automatically re-sent to the same recipient with the same message preceded with a prefix (see chapter 7.5.2). Example: for a ‘positive edge’ alarm, it is when the Tag returns to ‘0’. It is also useful when the alarm condition is active when TBOX ULP starts up. When ‘end of alarm’ is checked, an alarm is automatically generated when the alarm condition disappears (see illustration chapter 11.8.: Alarms table) SMS acknowledge: See chapter 12.2. POP3 acknowledge: See chapter 10.4.1 Version: 2.08 TBox - ULP 121 11.3. Analog Alarm Condition Tagname: The Tag selected to generate the alarm. Type: Maximum or Minimum. The threshold for which the alarm will be started. If the value of the analog Tag passes under (minimum) or over (maximum) this threshold, the alarm is started. If an alarm must be generated for both a maximum and a minimum threshold, 2 conditions must be declared with the same Tag. Value: The threshold value, according to the scaling defined when creating the Tag (see chapter 9. The Tags). Hysteresis: The amount that the level must fall or rise below or above the Max. or Min. value before an alarm can be re-started Relation between Value and Hysteresis With “MAXIMUM” threshold Value > threshold = Alarm TRUE Value < (threshold – hysteresis) = Alarm FALSE With “MINIMUM” threshold Value < threshold = Alarm TRUE Value < (threshold + hysteresis) = Alarm FALSE Recipient: Version: 2.08 Select a Recipient or a group of recipients. The ‘person’ you wish to contact in case of alarm (see ‘Recipients’ below). In case you select a ‘group of Recipients’ see next. TBox - ULP 122 Call all Recipients: To be used when selecting a Group of Recipients. When the option is cleared: TBOX ULP calls the first one in the group. In case the alarm cannot be acknowledged after the number of tries, TBOX ULP automatically calls the next recipient in the group and so on until it succeeds. Then it stops. (Also known as ‘Chain’) When the option is checked: TBOX ULP sends the alarm to all recipients of the group. (Also known as ‘Link’) Message or Report: text or file associated to the alarm. Depending on the recipient associated, it is the SMS sent to a GSM, or the message/report sent as e-mail or the text printed, or the file sent by FTP … It also appears in the table of alarms, to distinguish them (see chapter 11.8.). If the alarm condition sends an e-mail, it can be of 2 kinds: Message: a text message is sent and it appears in the ‘object’ field of the e-mail Report: sending of a report created with ‘Report Studio’. The report can be created from the Project Workspace and the list of ‘Web & Report files’. Filter: The time in hour:minute:second during which the condition must stay TRUE, before the call is generated. The availability of filter periods depends on the wake-up rate of the CPU. One cannot define a filter in “seconds” with a wakeup “each minute”. Filter can be tested either during both transitions or only during the transition selected (see chapter 7.5.2) Handling: The handling option allows blocking each alarm condition, manually or automatically. Enabled: alarm condition always active. Disabled: alarm condition always de-activated. PowerF: alarm condition disabled when there is a main power failure. DisAla: alarm condition de-activated when the system variable ‘DisAla’ is at 1. Severity: Each alarm can be assigned a level of severity: Low, Normal or High. When several alarms are still present in the queue and not processed yet, TBOX ULP generates the calls according to the highest severity. Alarm with a severity “high” will force power-up of the GSM at wake-up of TBOX ULP and be proceeded immediately. Other alarms will be proceeded at either: - next power-up of GSM - if variable Com2.ModemAlarm has been activated, it will force Power-up of GSM at wake-up of TBOX ULP End of Alarm: When the alarm condition is finished, an alarm is automatically sent to the same recipient with the same message preceded with a prefix (see chapter 7.5.2). Example: for a ‘maximum’ alarm, it is when the value returns below maximum - hysteresis. It is also useful when the alarm condition is active when TBOX ULP starts up. When ‘end of alarm’ is checked, an alarm is automatically generated when the condition of alarm disappears (see illustration chapter 11.8.: Alarms table) Version: 2.08 TBox - ULP 123 SMS acknowledge: See chapter 12.2. POP3 acknowledge: See chapter 10.4.1 11.4. Recipients To access the definition of Recipients, click the folder ‘Alarms’ in the Project workspace and select ‘Recipients’. The types of recipients supported are: Internal: the alarm is saved in the stack of events and no call is generated. It can be used to memorize a particular event without generating an alarm or to test an alarm condition. ModBus: it can be Master or Slave. It is used to establish a ModBus connection to another ModBus device or a SCADA (for instance T). The difference between Master and Slave concerns the handling of the modem connection and acknowledgement. A ‘Slave’ connection means that TBOX ULP dials an equipment and doesn’t do anything else. The dialed equipment will sample, acknowledge and hang-up. Typically used for instance when dialing T. A ‘Master’ connection means that TBOX ULP dials a ModBus equipment and will also sample this equipment (with Remote Tags). TBOX ULP will then be also responsible of acknowledgment (see chapter 8.8.2 System Variables [8] AlaID or [10] AlaRec) and hanging-up (see ‘Advanced’ properties of the communication port used to send the alarm). A modem parameter: “Hang up timeout” is used by ‘ModBusMaster’ alarm to define the maximum connection time. The maximum value is 600 seconds. Version: 2.08 TBox - ULP 124 Pager/SMS: to send SMS to a mobile or message to a Pager. Select the Service corresponding to the pager or mobile and a Modem. Type the Phone Number of the Pager or Mobile. The default Dial prefix is ATDT. It should not be changed unless the modem needs a particular configuration. Printer: sending of message(s) or report to a local printer. E-mail: If you have subscribed an e-mail account (see chapter 10.3. SMTP Server), the TBOX ULP is able to send an e-mail. You only have to specify the e-mail address of the recipient. Version: 2.08 TBox - ULP 125 Sending of e-mail supports Redundancy. If you have created several SMTP Servers and you select ‘Redundancy’ instead of a Server, TBOX ULP will use the first one in the list (see chapter 10.3. SMTP Servers). If it fails, it will try with the second one and so on… FTP: TBOX ULP is able to send files to a FTP Host (see chapter 10.2. FTP Host). In the recipient configuration you only need to indicate the directory where you want to send the files. NTP: TBOX ULP is able to synchronize its clock with an external NTP server. In the recipient, you only select a server you have created in the list of NTP Servers (see chapter 10.5. NTP Server). RAS: This type of recipient can be used to establish a ‘Client’ modem connection to a ‘Server’. The Server is considered by TBOX ULP as an ISP: it requires a telephone number and a login to establish the connection. You associate an ISP (previously created in the IP parameters of TWinSoft), and when connection is established, the ‘Server’ has to communicate in protocol ModBus-TCP It can be assimilated to a ‘Modbus-Slave’ connection using ModBus/TCP protocol. The Server is responsible of acknowledgment and hanging-up. Custom: in case a 'C' driver allows sending alarms POP3: allows reading e-mail to acknowledge e-mail or to operate TBox with a message (see details in chapter 10.4.1) Version: 2.08 TBox - ULP 126 11.5. Group of Recipients A group of recipients is composed of several recipients, which can be of different types (SMS, e-mail, …). You can declare several groups. Then previous to creating groups of recipients, you have to create first the recipients (see above). You can then associate an Alarm condition to a ‘recipient’ or a ‘group of recipients’. Working with groups of recipients offers 2 possibilities: 1. You select the option ‘Call all recipients’: the alarm is sent to all recipients, one after each other ( equivalent to the ‘Link’ with previous generation of RTU, the TBox CPU-3). 2. You don’t select the option ‘Call all recipients’: the alarm is sent to the first one in the list; if it fails, to the second one; if it fails to the third one ; … When it succeeds the sending process stops. ( equivalent to the ‘Chain’ with previous generation of RTU, the TBox CPU-3). 11.6. Messages To access the definition of Alarm messages, click the folder 'Alarms' in the Project workspace and select 'Messages'. Message number : it indicates the index of the message, corresponding to its position in the list of messages. Type a message of maximum 120 characters. This message is user specific: - If it is for a Digital Pager, it will consist only of numbers. - If it is for a Text Pager or for a GSM, it will not contain accent (ü, é, à, ...) Version: 2.08 TBox - ULP 127 11.6.1. Value of Tag in a message Two kinds of value are available: The value at the moment the alarm is sent The value will be the value of the Tag at the moment the alarm is accessed: the SMS is sent, the alarm list is displayed in a WebForm, the alarms retrieved from TView, ... The syntax is: ~TAG~ (with TAG=the name of the Tag). The value at the moment the alarm appeared The value will be frozen to the one at the moment the alarm is stored in the stack of events. The syntax is: $TAG$ (with TAG=the name of the Tag). Remarks: 1. Tag TEXT cannot be used in a message with $Tag$. No problem with ~Tag~. 2. With -WM, -MS16 and -LITE: ONE $Tag$ can be inserted in a message. No limit with ~Tag~ 3. With -MS32: TWO $Tag$ can be inserted in a message. No limit with ~Tag~ With a Digital Tag for which you have defined ‘States’ in the ‘Presentation’ menu, those states will be used; otherwise, 0 and 1. With a Float Tag for which you have defined a number of decimals in the ‘Presentation’ menu, this number will be used; otherwise, fixed to 3 decimals. 11.6.2. “String” in a message Possibility to include a series of ASCII characters in one alarm message. Put the character hyphen " - " in front of the TAG. Syntax like follows: I say ~-TAG~ to everybody ~-TAG~ will be replaced by characters corresponding to ASCII code, starting at Tag "TAG". It ends when code 0x00 is encountered or after 32 characters. Example with the following value at TAG and following: TAG : TAG+1: TAG+2: TAG+3: TAG+4: TAG+5: 0x48 0x45 0x4C 0x4C 0x4F 0x00 (H) (E) (L) (L) (O) The following message will be generated: I say HELLO to everybody Version: 2.08 TBox - ULP 128 11.7. Alarm Timetables Alarm timetables allows specifying an activity period associated to a recipient, in other words, periods of time during the day, the week, the year, when a recipient can receive an alarm. The time tables are based on the specification of ‘Time Slices’ (time periods of the day) and on ‘Days’ (days of the week and holidays). 11.7.1. Time Slices The time slices are used to trunk the day in different slices. Further, you select those time slices when creating timetables. To declare the time slice, just select the start time and the end time of the slice. A time slice can’t be part of 2 different days: no time slice can include midnight! (e.g. 18h30 to 08h30) 11.7.2. Holidays The holidays offer to flag specific days of the year; these days constitute a group that can be checked in the timetables (all at once, not days separately) like if it was a specific day of the week (see Time Tables next). You can choose to keep each selected day as holiday for ‘every year’ (by default). Version: 2.08 TBox - ULP 129 11.7.3. Timetables Based on the ‘Time Slice’, days of the week and ‘Holidays’ you create different ‘Timetables’ according to activity periods in your company (day shift, night shift, holidays, week-end, …). A time table can then be associated to a recipient. You select for each days of the week which time slice will be part of the timetable (Holidays being treated like a unique ‘day’). Following, in the recipients’ setting, you can choose to have the recipient ‘always active’ which means that he will receive his alarms any time of the day, or you can also choose to have the recipient active only during a particular timetable (e.g. Day shift without week-end and holidays). If an alarm occurs when time table is active, the alarm will be sent. Otherwise, the alarm is automatically ‘auto ack.’ as you can read in the ‘Alarm Table’ (See here under). Version: 2.08 TBox - ULP 130 11.8. Alarms table The Alarms table displays the Events stack of TBOX ULP. The Events stack is the visible part of the handling of some system events and alarms in TBOX ULP. The internal queue of alarms is not accessible. You access the Alarms table from the main menu: Communication Download Alarms Date/Time of the start of the condition Message Acknowledg. Status of the Start Recipient Date/Time of the start of the condition Acknowledg. Status of the End The Alarms table does not only display alarms generated in TBOX ULP, but also system events like startup of the program, Reset of the TBOX ULP, … 11.8.1. Columns description Start Timestamp: Date and time when the alarm condition appears (‘Start’ condition) Message: Message (or name of the file) associated with the alarm. System events appear between brackets. Start: acknowledgment status of the ‘Start’ condition. The possibilities are: - Not ack.: the alarm is still in process. - Ack’ed: the alarm has been processed successfully. - Auto ack.: the alarm has not been processed successfully. In case of ‘system events’, it is always the case as it is not an alarm but an event. Recipient: Version: 2.08 The name of the Recipient (from the list of Recipients). The name is listed only if the alarm was sent successfully. With chained alarms, this allows to show the one that was used. In case of ‘system events’, there is no name. TBox - ULP 131 End Timestamp: Date and Time when the alarm condition disappears (‘End’ condition). End: acknowledgment status of the ‘End’ condition. When creating an alarm condition, there is an option ‘Notify end of alarm’. This option will automatically generate an alarm when the condition generating the alarm disappears. The possibilities are: - Not ack.: there is a ‘Notify end of alarm’ condition and the alarm is still in process. - Ack’ed: the ‘end of alarm’ has been processed successfully. - Auto ack.: the ‘end of alarm’ has not been processed successfully. When there is no ‘end of alarm’, it is immediately indicated as ‘Auto ack.’ Version: 2.08 TBox - ULP 132 12. Read SMS embedded 12.1. Introduction ReadSMS/POP3 is the capability of the RTU to receive and interpret incoming SMS messages, and to read “subject' of e-mail to execute tasks. The GSM must be powered to access the SIM card and its SMS messages. Working in GPRS, when it is in idle mode, SMS can be sent and received. When an incoming SMS is detected, it is monitored independently from the wake-up of the CPU. But the control of the message(s) will be done at wake-up. This feature allows two uses: 1. 2. Acknowledgment of an alarm by sending back a SMS to the RTU Controlling the RTU by sending SMS message(s) or sending e-mail(s) An advanced menu is available in the RTU properties: For any incoming connection, either for acknowledgement or for monitoring, the caller ID (phone number of the caller for the last call received) is available in the communication variable “Com2.Caller ID” (see chapter 8.6.2) Version: 2.08 TBox - ULP 133 12.2. Acknowledgment of an alarm by sending SMS to the RTU Two types of recipient may require an acknowledgment by SMS: Pager/SMS: sending a message through a SMS-C (standard way) E-mail: sending a message, which can be forwarded as SMS through a dedicated service Alarm conditions associated to one of these recipients provide the option: SMS acknowledge acknowledgment will be executed in 2 steps: 1. The sending of the message by the TBOX ULP (to the SMS-C or to the e-mail provider) will be first performed. Retries and time-out defined in the recipient will be used to determine the success or failure of this first step. 2. Then a second time-out, defined in the advanced ‘Alarms’ properties, will check if the incoming SMS required to acknowledge the alarm, arrives on time. The incoming SMS must arrive within this time-out for the alarm to be acknowledged. If not, a retry will be executed according to the definition in the Recipient. After the end of retries, the alarm will be considered as in error: “auto-ack” and the system variable ‘AlaErr=1’. Working with ‘Group of Recipients’: Version: 2.08 TBox - ULP 134 - with option ‘Call all recipients’: all recipients have to acknowledge the alarm. - without option ‘Call all recipients’: any recipient can acknowledge the alarm. Don’t set a time-out too short, to give time to the SMS Center to send the SMS back to the CPU, in case the service is busy. Also, if the CPU sends an SMS while acknowledgment SMS is coming in, it will miss the warning from the GSM, the SMS will be stored in the SIM card and will have to wait until the next auto-check from the CPU (max. 5 minutes). 12.2.1. Structure of the message If the option ‘SMS acknowledge’ has been selected, the RTU will send a header with the message including an identification number. Example: #A00056# Level too HIGH # A 00056 # message 12.2.2. prefix (fixed). precedes the absolute identification number of the alarm. absolute identification number of the alarm. suffix (fixed). message associated to the alarm. Acknowledgment of the message By sending to the same header syntax to the RTU, you will acknowledge this specific alarm. Typically, this can be done using the option ‘Reply’ of the mobile. Verify that your mobile also sends the original message. Example: #A00056# Level too HIGH Reply: YES The text sent to the RTU does not matter, as long as the syntax #Axxxxx# is sent. Some variables are very useful to monitor the acknowledgment of the alarms by SMS: AlaErr, SmsState, CallerID (see chapters 8.6. and 8.8.) Version: 2.08 TBox - ULP 135 12.3. Controlling the RTU using SMS message or reading e-mail using POP3 ReadSMS/POP3 provides the possibility to control the RTU by sending predefined SMS or by reading email, meant to TBOX ULP, using POP3 service. Details of the different possibilities: 1. Using pre-defined messages ( - ) - From the ReadSMS properties menu, you select a ‘Message index Tag’ (analog Tag 16 bits format), that will contain a value associated to the message sent to the RTU - You add the message(s) you intend to send to the RTU When the RTU receives the message, it will put the corresponding value to the ‘Message index Tag’ Notes: - SMS/POP3 message are not case sensitive - This method of monitoring, using message, is the only method supported by POP3. Message sent by SMS A message can combine one or several data: Password, acknowledgment ID, writing values directly to ModBus addresses,... It must always start and end with the character # Examples: #-START PUMP# #P1568,A00056,-START PUMP,W20480=123# The maximum number of messages supported is 20. In case you need to monitor more process, you can use the direct/indirect addressing (see next). Message sent by e-mail A message must include the RTU Id of the TBOX ULP , preceded by the letter I and a pre-defined message. It may also include an acknowledgment ID. It must always start and end with the character # Examples: #I460000020107,-START PUMP# #I460000020107,A00002,-START PUMP# Version: 2.08 TBox - ULP 136 2. Writing Tag with Direct addressing ( W ) You write a value directly to a ModBus address. Syntax: #Wmodbus address=value# Example: #W20480=123# This message sent to the RTU will write value 123 to the analog Tag with ModBus address 20480 Notes: 1. You can combine several texts, separated by a comma. For instance: #W20480=123,W20481=456# 2. ReadSMS checks access protection level of the port before writing (see point 5. below) 3. Writing Tag with Indirect addressing – analog ( N ) You write a value directly to a ModBus address representing a pointer. Syntax: #Nmodbus address=value# The value at ‘modbus address’ corresponds to the ModBus address to write in. Example: #N20480=123# If ModBus address 20480 contains the value 1000, the value 123 will be written to the ModBus address 1000. We make a distinction between Target address corresponding to an analog Tag and a digital Tag (see next). With indirect addressing, ReadSMS does no check the access protection level of the GSM port 4. Writing Tag with Indirect addressing - digital ( D ) You write a value directly to a ModBus address representing a pointer. Syntax: #Dmodbus address=value# The value at ‘modbus address’ corresponds to the ModBus address to write in. Example: #D20481=1# If ModBus address 20481 contains the value 512, the value 1 will be written to the ModBus address 512. Version: 2.08 TBox - ULP 137 5. Access protection ( P ) ReadSMS access protection is independent from the GSM port it is associated to. In other words, even if the communication port is protected, ReadSMS will not specially be protected. ReadSMS has its own independent access protection configuration, that can be activated from: RTU properties Security. If ReadSMS protection is activated, a login is required in the incoming the SMS message. The login is composed of the last 8 digits of telephone number of the mobile used to send the SMS and a password. To obtain the Password, the utility 'Password Generator' is needed (Start Programs Techno Trade Accessories Password generator). From the Password utility, you define: - the global code used in the RTU - as NAME: the last 8 numbers of the telephone number of the mobile which will be used to send the SMS. - as Access Level: Engineer (Level 3). The resulting 'PASSWORD' must be used to login. Syntax: #Ppassword# Example: #P1568# If needed, the Password must be declared first. Acknowledgment (with code A) does not require password 6. acknowledgment ( A ) See chapter 12.2 above Version: 2.08 TBox - ULP 138 7. SET a digital Tag ( S ) You write 1 to a digital Tag using its ModBus address. Syntax: #Smodbus address# Example: #S32# The digital Tag at ModBus address 32 will be set to 1. Note: ReadSMS checks access protection level of the port before writing (see point 5. above) 8. RESET a digital Tag ( R ) You write 0 to a digital Tag using its ModBus address. Syntax: #Rmodbus address# Example: #R32# The digital Tag at ModBus address 32 will be reset to 0. Note: ReadSMS checks access protection level of the port before writing (see point 5. above) 9. Changing a telephone number ( T ) You change the telephone number of a recipient using its index number (see list of recipients in TWinSoft). Syntax: #Tindex=telephone number# Example: #T05=0123456789# You replace the telephone number of recipient 5 with 0123456789. Notes: 1. Maximum length: 21 characters. 2. ReadSMS checks the access protection level of the port before writing (see point 5. above) 10. Writing minutes since midnight into a register ( h ) To write in an analog register, the current number of minutes since midnight at the moment the message is received. Syntax: #Wmodbus address=h# Example: #W20482=h# If the message is received at 15:23, the value 923 will be written at ModBus address 20482 Note: ReadSMS checks the access protection level of the port before writing (see point 5. above) Version: 2.08 TBox - ULP 139 12.4. Automatic Update of a Recipient’s tel. number An existing recipient of type ‘Pager/SMS’ can be updated with the telephone number of the person calling the RTU. The idea is that the RTU verifies the message it receives (using the ReadSMS special register status - see next) and is able to send back a message to the originator. ReadSMS uses the caller ID of the originator to update the recipient you select in this menu, with originator’s telephone number. From the Process, you can then decide to send back an SMS, to confirm the order, to indicate the incoming message was invalid, that the password was incorrect, … If this option is activated, the selected recipient will be automatically updated with the telephone number of any incoming call (if caller ID of originator has been activated!). 12.5. ReadSMS status A communication variable, associated to the GSM can be used to check the status of ReadSMS. From the GSM Com port, go to the tab ‘ACV’ and make a Tag of ‘SmsState’ Value Description 1 2 10 11 12 20 21 30 31 32 33 Accepted message received Acknowledgment received Invalid message Unknown command Equality character (=) not found or incorrect Incorrect password Incorrect password or not supplied for a com. Port protected Message received does not match a predefined message Writing to an unknown address Writing to an unknown address, using indirect addr. (address contained in the Tag not known) Changing the telephone number of an unknown recipient Version: 2.08 TBox - ULP 140 13. Datalogging 13.1. Introduction Datalogging allows memorizing values of your process, in order to trace its history. TBOX ULP contains memory for recording historical values of Tags and events (see technical specifications); the latter is what we call the database of TBOX ULP. There are two categories of databases: The Chronologies Chronologies are 'On event' recordings, by means of changes in Tags (also known as “Sequence of Events”). Each event is recorded with the time, date, Tag and its status or value. Example of ‘digital event’: 1 0 t The changes of status of the Tag represent the events. Example of ‘analog events’: 180 160 140 120 100 80 60 40 20 t The variations of the Tag represent the events. TBOX ULP stores chronologies in 2 tables: one for digital events and one for analog events. The size of the tables is defined in the General RTU properties, as described chapter 7.1. Version: 2.08 TBox - ULP 141 Recording into chronologies happens ‘on event’, when the system is awake. The resolution of timestamp depends then on the wake-up period, with a minimum resolution of 1 second. The Sampling Tables. Sampling tables use ‘Periodical’ recording, with a minimum period depending on the wake-up period of the CPU (see chapter 7.1. General RTU Properties). Recording in Sampling tables happens at fixed intervals and does not depend on signal variations; it uses the clock of the CPU to determine the recording. Only date and time of the last recording are stored. This mechanism requires less memory than chronology does. Example of ‘periodic recording’: te m pe rat ur 9 :30 9 :45 10 :00 10 :15 10 :30 10 :45 t Each Tag is recorded into a separate table. There is no practical limit in the number of tables, but the size of each table is limited. The database information recorded in TBOX ULP can be retrieved with the use of SCADA software such as T or other HMI package with ‘TComm.dll’ based driver (please call your distributor). By doing a compilation you can check the space of memory available (see chapter 5.9.2). Version: 2.08 TBox - ULP 142 13.2. The chronologies 13.2.1. Digital chronologies Example of an entry in Digital chronology: Recording of the starting and stopping of a ‘Pump_1’. Edges: Recording on positive and (or) negative edge. Handling: 13.2.2. Enabled: Disabled: PowerF: DisCRD: always recorded. never recorded. recording disabled in case of ‘main’ power failure. recording disabled when the system variable ‘DisCRD’ is at 1. Analog chronologies Example of an entry in Analog chronology: Recording of a variation of 2.5 bars in ‘Pressure_Pipe1’ input. Variation: Recording in case of variation (higher or lower) in comparison with the previous recording. The unit is expressed according to the format selected in the Tag definition (see chapter 9.2.2: Analog Tags). Handling: Version: 2.08 Enabled: always recorded. Disabled: never recorded. PowerF: recording disabled in case of ‘main’ power failure. DisCRA: recording disabled when the system variable ‘DisCRA’ is at 1. TBox - ULP 143 13.3. The sampling tables Type: TBOX ULP is able to execute calculations on a minimum time base depending on the wakeup rate of the CPU and with a minimum resolution of 1 second. The result of the calculation is written in the sampling table after the period selected (see next). This value can be: - Minimum : minimum value during the period. - Maximum : maximum value during the period. - Average : arithmetic average value calculated during the period. For each period a new average is calculated. Tag format Limitation in recording 8 bits 16 bits 32 bits Float All periods accepted Period limited to 12 hours Not available All periods accepted - Instantaneous : value at the moment of the recording. - Incremental : TBOX ULP records the difference between the current value and previously recorded value. Example of incremental recording: Value of the Tag 865 878 902 905 965 985 Incremental value recorded … 13 24 3 60 20 Period Period Period Period Period Period Version: 2.08 TBox - ULP 144 Period: Period between 2 recordings, depending on the wake-up rate of the CPU (see chapter 7.1. General RTU properties). You may choose between: 1sec; 2sec; 4sec; 5sec; 10sec; 15sec; 30sec; 1min; 2min; 4min; 5min; 10min; 15min; 30min; 1h; 2h; 4h; 6h; 12h; 24h; 48h; daily; weekly; monthly. The recording happens at ‘birthday’ time of the period selected. Example: if you select as period 5 minutes, the recording will be done at: 9:25:00; 9:30:00; 9:35:00; 9:40:00 ... In case you wish to make recording every day, or even with a longer period, the options are: • daily: recording once a day • weekly: recording once a week • monthly: recording once per month. The hour of the day, the day of the week and/or the month are defined once for all sampling tables in the RTU Advanced properties (see chapter 7.5.4.) Size: The size can be expressed on two ways: Size: the number of records of the table. The recording works on the FIFO principle. According to the size, the duration is updated automatically (see next). The size can be of maximum 65 535 records, with a total of 72 kbytes for datalogging. Duration : you may prefer to enter a number of days and hours, in this case the size is automatically updated. To adjust the sizes check the available memory with the compile option. See chapter 5.9.2: Compiling a program. Trigger: Synchronize each sample on external clock: the recording of the value is executed on the positive edge of the Tag selected, and not with the clock of the CPU. Version: 2.08 The period between 2 pulses of the Trigger must correspond to a period between 2 recordings (see above). The latter is used when retrieving the data to compute time stamps using the last time stamp and the period. TBox - ULP 145 Example of use of external Trigger: quarter - hour management. In some industries, every 15 minutes (may vary slightly), your electric company sends a pulse which is used to calculate the consumption, based on average consumption during 15 minutes. You will be charged based on the highest consumption. In order to analyse your consumption and prevent from peaks, you can use this pulse as Trigger. Recording will be done each time the pulse arrives, but when retrieving data, the calculation of timestamp will be computed from the time stamp of the last recording and the period. This means it can only be used if the period between pulses corresponds to a period between 2 recordings (see above). No sampling if trigger = 0: the CPU clock is used to record data (see period above), but the recording is only possible when the Tag Trigger is in “high state”. When it is negative, the recording stops. On the positive edge of the Tag, the table is erased and a new recording starts. Reset Tag after sampling: if this option is checked, the RTU automatically resets the register that has been recorded. This option works only with registers, NOT I/O ! Version: 2.08 TBox - ULP 146 14. Remote Tags 14.1. Introduction Remote Tags allow exchanging information between two or more ModBus stations via any communication ports. Typically, it is a TBOX ULP connected to a local ModBus device through RS485. One often speaks of 'Master Network' because it is a Master/Slave communication: the Master executes reading and writing in slave(s). TBOX ULP, being ‘Master’, reads and writes the variables with all other devices using the ModBus protocol Each Remote Tag corresponds to one transaction (reading or writing) with 1 slave. When there are several stations, TBOX ULP executes the different transactions of one station at a time, then transactions of the following station, and so on … Before creating a Remote Tag you have to create the equipment you are going to communicate with. Communication consumes energy; 1.5 mA at 9600 bps ! Try to reduce communication as much as possible. Communication is monitored by a “Trigger”. The frequency this trigger can be activated will depend on the wake-up rate of the CPU 14.2. Creating a Remote Device From the Project Workspace, select ‘Resources’ ‘I/O’. Click ‘I/O’ and in the list of I/O, click ‘Add an I/O card’. ModBus device: any supporting ModBus-RTU Version: 2.08 device TBox - ULP 147 Name: You type any name. It will be available in a list of available equipment when creating ‘Remote Tags’ (see next). Address: It is the ModBus address of Remote equipment. It must different from the TBOX ULP possible other equipment on same network. the be and the RTU Port: The communication port used by TBOX ULP to communicate with the remote equipment. Trigger: Select a digital Tag that will trigger the communication, according to a ‘Condition’ (see next). Working with several equipment, you can declare different Tags and then monitor differently the communication to each equipment. The Trigger must be a digital variable (DIV). Condition: Condition of Tag ‘Trigger’ to start communication. With ultra low power RTU, communication works on edge conditions, to carry on communication as little as possible and therefore reduce consumption. 14.2.1. Remote Device – Advanced Properties Click on “Advanced” button in above configuration to access advanced properties An interesting feature related to low consumption device is “Wake-up frame”. TBOX ULP can send a wake-up frame to the remote device before starting communication. Version: 2.08 TBox - ULP 148 14.3. Creating a Remote Tag Example: reading of 2 “Flow” variables in TBox#2 at address 5000 Tag: Select an existing Tag by clicking the button. Be sure you select a Tag of the same type of the address you want to access in the ‘Slave’ (Byte, Word or Float). If the Tag does not exist, you can create it after having clicked the button. It is the Tag of the Master; it contains the value you want to write in a Slave or it is a register that contains the value that Master reads in a Slave. In case of block communication (with a quantity > 1), this Tag is the one of first ModBus address. Operation : Operations MASTER (Tag) SLAVE (Address) READ WRITE Read : Write : the Master executes a reading in the Slave. the Master executes writing in the Slave. Quantity : Quantity of variables of successive addresses that are read (or written) in the Slave. It depends on the external source, the types of variable and the ModBus function used (see tables below). ModBus protocol handles only words (16 bits). When working with 32 bits, TWinSoft adapts the quantity to double the number of words. 32 bits are handled with: <Hi word1><Lo word1><Hi word2><Lo word2>… Version: 2.08 TBox - ULP 149 External Source. All the following parameters concern the Slave station: Device: select an existing external device from the ‘Resources’. You can create one clicking the button Type: select the type of the external variable. According to the external source, the choices are: With external source ‘ModBus device’ (another TBOX ULP, any ModBus device) Types Connection in remote device ModBus Function Digital input Coil Analog input Holding register Only digital input(s) Digital output(s) or register(s) Only analog input(s) Analog output(s) or register(s) 2 1, 5 or 15 4 3, 6 or 16 Operations Types ModBus Functions Max. Quantity (*) Read Digital Read Digital Read Analog Read Analog Write Single Digital Write Single Analog Write Multiple Digital Write Multiple Analog Digital Input Coil Analog Input Holding Register Coil Holding Register Coil Holding Register 2 1 4 3 5 6 15 16 1600 (see Warning below) 1600 (see Warning below) 125 (16 bits) - 62 (32 bits) 125 (16 bits) - 62 (32 bits) 1 1 (word) 800 (see Warning below) 100 (16 bits) - 50 (32 bits) (*): Maximum quantities for TBOX ULP. You also have to check the maximum quantities of the ‘Remote device’they could be less. Address : The ModBus address must be typed according to the indication of the user’s guide of the Remote device. Communicating to TBOX ULP, you have to refer to the TWinSoft application and its configuration of Tags. Version: 2.08 TBox - ULP 150 14.4. Timing configuration of Remote Tags Several timings can be adjusted when communication through Remote Tags. Their value mostly depends on the media and the baudrate (see on line help for more info). They are available from the tab ‘Advanced’ of the properties of the communication port used to communicate with the remote device. Packet reception delay: maximum time for receiving a valid answer Master timeout: maximum time to receive an answer before sending the next query Number of Tries: in case of error, number of times a query is sent Interframe gap: after having received a valid answer, time before sending the next query. Version: 2.08 TBox - ULP 151 15. Periodic Events The idea is to enable events to be executed periodically, for example Remote Tags, alarm calls, datalogging, process, etc., independently of any other condition. A periodic event could be compared to an automatic timer. A digital Tag is Triggered periodically: it is automatically SET when the period has elapsed. All tasks associated to a positive edge on this Tag will be launched, then the Tag will be automatically RESET, ready for the next period. Several tasks can be associated to the Tag triggered. This implies for the OS to RESET the Tag when all tasks have been launched. In the project workspace of TWinSoft, a folder is available to declare the Periodic Events: Version: 2.08 TBox - ULP 152 Example of a ‘daily event’: The Tag ‘Event1’ (a DIV) will be automatically SET every 30 minutes, at each xx:15:00 and xx:45:00. The task(s) associated to ‘Event1’ will be execute every 30 minutes. Example of a ‘weekly event’: The Tag ‘Event2’ (a DIV) will be automatically SET every day at 6:00:00 AM. The task(s) associated to ‘Event2’ will be execute at that moment. Version: 2.08 TBox - ULP 153 16. Access security This (optional) access security of the TBOX ULP prevents non-authorized persons from accessing the RTU and from opening the TWinSoft document. If the Access security option is activated, each port of the TBOX ULP can be independently protected. Once you activate the “Access security” option, the TWinSoft document will also be protected, even if no port has been selected! The protection concerns ‘ModBus’ protocol, on serial and modem ports. The protection is based on a four-digit hexadecimal global code that is saved in the TBOX ULP. This code allows different logins related to different users with different access levels to the TBOX ULP. Three access levels are available to access protected port(s): • Level 1: Surveillance mode or VISUALIZATION MODE. The operator can view all TBOX ULP values (local or remote), but cannot execute any command. • Level 2: COMMAND MODE, the operator can view all the values and execute commands (locally or remotely). Also known as READ/WRITE MODE. • Level 3: ENGINEER MODE, the operator can view all the values, execute commands and send new application (locally or remotely). Version: 2.08 TBox - ULP 154 16.1. RTU configuration The configuration of security of TBOX ULP is available from the ‘RTU properties’: - there is a general activation of the protection. - for each port you activate the protection. 16.1.1. RTU Properties From the RTU properties tab ‘Security’, you activate the general access security feature. Global code type in the code you used to generate the Access Codes with the utility PASSWORD.EXE (see chapter 16.3 below). Type it a second time, to confirm. TWinSoft presents you ports according to the TBOX ULP you are configuring. Next, you check the port you want to be protected. 16.1.2. Port Properties Access level on each port can be checked using the Analog Communication Variables (see chapter 8.6.2.). Version: 2.08 TBox - ULP 155 16.2. TWinSoft document protected Opening a protected document 1. Once a document has been protected (see above), when opening it with TWinSoft, you are prompted to type a login. 2. Type the NAME and PASSWORD you have created with the Password generator (see below) 3. Click OK - The different access levels are not supported when opening a document. Any acceptable login will be supported. - If you click ‘Cancel’, TWinSoft will indicate the document is protected and will open a new document Version: 2.08 TBox - ULP 156 The utility program Password generates access codes. 16.3. Password utility When installing TWinSoft Suite a password-creation program named PASSWORD is installed in the same directory as TWinSoft. It can be started from the 'Start' button of Windows and is located in the group of programs “Techno Trade” “Accessories” created while installing TWinSoft. This program generates a password that will be necessary to Login to the TBOX ULP (see next). This password is composed of 4 hexadecimal characters in response to information related to the user. It is based on a complex algorithm using the global code, the user’s name and the access level. A 5-digit number that identifies persons who have accessed the TBOX ULP accompanies the password. This information can be used to trace users for example by inserting this number into a database, with the help of Analog Communication Variables (see chapter 8.6.2.). Global code This hexadecimal code of 4 characters is the basis for password generation. It is typed in the ‘RTU Properties’ (see above) of TWinSoft and sent to the TBOX ULP. When a user logs in, TBOX ULP checks whether NAME and PASSWORD fit with the global code. This means that if different users with different access levels must communicate with TBOX ULP, the global code used to generate passwords must be the same. User name The NAME you use as login. Access level Three access levels are available: Level 1: Surveillance mode or VISUALIZATION MODE. The operator can view all TBOX ULP values (local or remote), but can not execute any command. Level 2: COMMAND MODE, the operator can view all the values and execute commands (locally or remotely). Level 3: ENGINEER MODE, the operator can view all the values and execute commands and alter or send new TWinSoft documents (locally or remotely). When this information has been entered, click on the button "Get password". Version: 2.08 TBox - ULP 157 Two codes have been created: The PASSWORD: this PASSWORD must be used together with the NAME when logging in. The USER ID: this number is available in an Analog Communication Variable when a user is connected to a port of TBOX ULP that is protected. 16.4. Login/Logout 16.4.1. With TWinSoft The Login feature of TWinSoft allows connecting to a protected port of the TBOX ULP according to an access level. If a port is not protected, access level is automatically 3: Engineer. The Login/Logout is executed from the main menu bar 'Tools'. Login If connected to a port of TBOX ULP that is protected, you need to Login to get an access level. You type the Name you used in the ‘Password’ utility and the Password that was created (see previous). According to those, you are in: Read only mode Read/write mode Engineer The access level is displayed in the Status bar. If 'Save password' is checked and TWinSoft is connected to a protected port: when TWinSoft starts, it uses the access level corresponding to the password saved (see the status line). If it is not checked and TWinSoft is connected to a protected port: TWinSoft starts in 'Read only' mode. You need to do a Login to get your access level. Logout If the TWinSoft is connected to a protected port, the Logout sets TWinSoft in 'Read only' mode. 16.4.2. With Internet Explorer Through a modem connection, you can access TBOX ULP as Web Server. From Internet Explorer, you use the tool TBox Dial It! to dial TBOX ULP directly. TBOX ULP is then considered first as an ISP and then as a Web Server. To connect to an ISP you need to login You type the NAME and PASSWORD you have used with password utility (see above) Version: 2.08 TBox - ULP 158 Even if TBOX ULP is not protected, type a NAME and PASSWORD. Depending on Windows and IE versions, they may not allow a connection without login. 16.5. Deactivating protection There are two methods of deactivating TBOX ULP access protection: Global reset (see chapter 5.6.) The first method is by performing a global reset, which must be done on site. When the program has stopped, the local port is no longer protected. If the ‘modem’ has been declared protected, it will still be protected even after a global reset. To deactivate the protection, an unprotected TWinSoft document must be sent to TBOX ULP (see below). Sending an unprotected TWinSoft document The second method involves modifying the TWinSoft document and deactivating the Access Security option. The document is sent to the TBOX ULP after having done a Login as 'Engineer'. 16.6. Deactivating protection of TWinSoft document You have to open the document and de-activate ‘Access security’ in tab ‘Security’ (RTU properties). If you have forgotten your login, but still remember the Global Code, you can generate a new login (see chapter 16.3. above). If you have forgotten your login and the Global Code, you have to contact your local distributor and send him the application, the <application>.tws file. Version: 2.08 TBox - ULP 159 Version: 2.08 TBox - ULP 160 T E C H N I C A L S P E C I F I C AT I O N S WIRING Version: 2.08 TBox - ULP 161 17. Technical specifications 17.1. Hazardous Environment Depending on the model, TBOX ULP can be used in hazardous environment. TBOX ULP is then considered as an intrinsically-safe equipment and can then be installed in Class1 Div1, and Class 1 Div2 or ATEX locations. Intrinsically-safe equipment is defined as "equipment and wiring which is incapable of releasing sufficient electrical or thermal energy under normal or abnormal conditions to cause ignition of a specific hazardous atmospheric mixture in its most easily ignited concentration." (ISA-RP12.6) This is achieved by limiting the amount of power available to the electrical equipment in the hazardous area to a level below that which will ignite the gases. When an Intrinsically-safe equipment needs to be connected to a device which is not intrinsically-safe, a barrier must be used to electrically isolate the hazardous area from the outside. The basic design of an intrinsic safety barrier uses Zener Diodes to limit voltage, resistors to limit current and a fuse. Most applications require a signal to be sent out of or into the hazardous area. The equipment mounted in the hazardous area must first be approved for use in an intrinsically safe system. The barriers designed to protect the system from non intrinsically-safe device must be mounted outside of the hazardous area in an area designated as Non-hazardous or Safe in which the hazard is not and will not be present. 17.2. Entity Concept The Entity concept specifies parameters which any approved intrinsically safe device and barrier must meet. The concept of Entity Approval allows inter-connections between different intrinsically safe apparatus, or barriers that have not been specifically approved as a complete system. The parameters used for the Entity Approval are available as pair of parameters, as it concerns connecting two intrinsically safe apparatus: Uo (or Uoc) Ui (or Umax) Maximum Output Voltage (or Open Circuit Voltage) that can appear at the connection. Maximum Input Voltage that can be applied to the connection. (With Uo of associated apparatus ≤ Ui) Io (or Isc) Maximum Output current (or Short Circuit Current) that can be taken from the connection. Maximum Input Current that can be applied to the connection. (With Io of associated apparatus ≤ Ii) Ii (or Imax) Po Pi Version: 2.08 Maximum Output Power that can be taken from the connection. Maximum Input Power that can be applied to the connection. (With Po of associated apparatus ≤ i) TBox - ULP 162 Co Ci Maximum External Capacitance that can be connected to the connection. Maximum equivalent Internal Capacitance that is considered as appearing at the connection. (With Co ≥ Ci + cable) Lo Ci Maximum External Inductance that can be connected to the connection. Maximum equivalent Internal Inductance that is considered as appearing at the connection. (With Lo ≥ Li + cable) Capacitance and inductance of the wiring and cables must be included in the loop evaluation. 17.3. Entity Parameters For each type of connection (Power Supply, RS232, RS485, DI, DO, AI), a series of entity parameters are provided in their respective chapter. Some Entity Parameters are global for all connections of TBOX ULP : TBOX WM: Co= 500 nF Lo= 250 µH Lo/Ro= 73.3 µH/Ohm TBOX LP: Co= 1.3 µF Lo= 350 µH Lo/Ro= 191.6 µH/Ohm 17.4. Barriers In case TBOX ULP is installed in hazardous environment and needs to be connected to a device not intrinsically-safe approved for used in hazardous area, an intrinsically-safe barrier must be wired between TBOX ULP and the device. The barrier must be installed in the non hazardous area. Version: 2.08 TBox - ULP 163 17.5. General CPU Processor Clock Button 16 bits, 7.37 Mips Realtime Clock, backed-up (see schema following) Push button : TEST - RESET Power Supply Power Source Quantity Energy Typical Voltage Minimum Voltage Maximum Voltage Max. Continuous Current Max. Peak Current Operating Temperature Current Sleep mode Run mode RS 232 com. RS 485 com. GSM/GPRS com. 4 x DI slow sampling 1 x DI fast sampling AI stage 4..20mA (24 V) AI stage 0..5V (12 V) LED “Test” WM-100, WM-200, LP-400 LP-450 Lithium Battery: SAFT LSH20 1 or 2 batteries 13 AH 3.6 VDC @ 25 °C 2 VDC 1800 mA 4000 mA/0.1 sec. -20°C ..+70°C On 3.6VDC: 15 µA 15 mA 1.5 mA @ 9600 bps 1.5 mA @ 9600 bps 242 mA 20 µA 32 µA 30 ms powering: 163 µA 30 ms powering: 40 µA 10 second flashing: 400 µA External LEAD Battery 12 VDC 1 battery 12 VDC @ 25 °C 8 VDC 16 VDC -20°C ..+70°C On 12VDC: 50 µA 5.6 mA 0.6 mA @ 9600 bps 0.6 mA @ 9600 bps 91 mA 8 µA 12 µA 30 ms powering: 62 µA 30 ms powering: 15 µA 10 second flashing: 150 µA Check the battery life time, according to the frequency of sampling analog inputs and to the periods of communication. Do a simulation using the EXCEL sheet Consumption_ULP.xls available in TWinSoft directory. Protection Power Supply FUSE battery Reverse polarity protection Soldered Fuse of 2 A. Not replaceable by user. Memory Flash Flash Version: 2.08 Internal: 256 kbytes - loader: 16 kbytes - OS: 192 kbytes - application: 32 kbytes External: 512 kbytes: Web Files, Report, Sources, BASIC/Ladder (max. 64 kbytes) Internal: 20 kbytes External (backed up with lithium battery): 128 kbytes (-LP4xx: + 256 kbytes) - Datalogging, Alarm Stacks, Tag Values: 72 kbytes - Datalogging Sampling Tables: 256 kbytes (-LP4xx) - application: 48 kbytes - buffer TCP: 24 kbytes TBox - ULP 164 RS 232 Connector Wiring (see schema next) Protocol RJ45 TxD, RxD, GND, RTS, CTS ModBus-RTU ‘Slave’ (for programming) RS 485 Connector Wiring (see schema next) Number of slaves Protocol Isolation Termination Spring-cage terminal block 2 Wires: A, B 256 (if RS485 technology of slaves allows it too) ModBus-RTU ‘Master’ and ‘Slave’ No isolation between signals A - B and Power Supply Termination not required. Failsafe bias resistors included: pullup and pulldown resistors which assures a logical level TRUE when A and B are opened or in short-circuit. Temperature Storage Working Hydrometry Altitude -40…+70 °C -20...+70 °C 5 to 95 % without condensation Maximum 4000 m. Dimensions DIN Rail model - Rack1 On Rack1, w/o connectors Weight Height x Depth x Width: 150 x 115 x 40mm (5.9 x 4.53 x 1.58 inches) 300 gr Dimensions IP68 model With glands Weight (without battery) Height x Depth x Width: 140 x 76.2 x 177.8 mm (5.51 x 3 x 7 inches) 1328 g Certifications See page 4 17.5.1. Button (Working modes) On the front side of TBOX ULP, a button allows checking the working mode and resetting the CPU. See chapters 5.6. and 5.8. 17.6. 5 VDC + LCD display (option) 5 VDC Power Supply Current Max. 220 mA LCD Lines Consumption Operating temperature Protocol Transistor Output Version: 2.08 2x16 alphanumeric characters With backlight: 160 mA Without backlight: 30 mA 0 .. + 50 °C ModBus-RTU: Feature: Address: Row1 0000 Row2 0008 Backlight 0000 Transitor Out 0001 Jumper J5. Max. current on 5 VDC: 250 mA TBox - ULP Operation: write analog write analog write digital write digital Quantity: 8 8 1 1 165 17.7. GSM (option) Modem GSM/GPRS Model Frequencies SAGEM HiLo Quad-BAND: GSM 850 / EGSM 900 / DCS 1800 / PCS 1900 MHz GPRS Class 10 (4+1/3+2) with support PBCCH , SMS and DATA Emitting power CLASS 4 (2W) for EGSM900 CLASS 1 (1W) for DCS1800 and PCS1900 Screw connector, type FME Plug Antenna connector On field, use ACC-GSM-ANT (+3 dB external antenna), ACC-GSM-ANT-FLAT (+2 dB external flat mount antenna) or ACC-GSM-CARANT (magnetic car antenna). In Hazardous environment, a +0 dB antenna should be used: ACC-GSM-ANTATEX 17.8. RS232 & Switching (option) IN ATEX MODEL (models with options -SM01), THIS BOARD DOES NOT INCLUDE THE 12 VDC OUTPUT RS232 Connector Wiring (see schema next) Communication RJ50 Full RS232 port, with 2 supplementary connections Local or Modem 12 VDC Power Supply Output - NOT AVAILABLE IN ATEX MODEL Availability on models Voltage (typical) Current (max.) Protection Connector Variable WM100-S, WM200-S, LP400-S 12 VDC 350 mA SMD fuse between battery and primary of power supply Available on separate connector and RJ50 (see wiring) Internal DO (D0.0.1.3) to switch the output Switch of Power Supply Output Availability on models Type Voltage (max.) Current - continuous (max.) Current - peak (max.) Protection Connector Variable WM100-S, WM200-S, LP400-S, LP450-S Current Sourcing (PNP transistor) 30 VDC 1.6 A 7 A during 5 ms. each 100 ms. No protection Available on separate connector (see wiring) Internal DO (D0.0.1.4) to switch the output Digital Output Type Voltage Current Output Impedance Protection Connector Variable Version: 2.08 Current Sinking (NPN transistor) Maximum: 30 VDC Maximum: 45 mA 60 Ω No protection Available on RJ50 connector (see wiring) Internal DO (D0.0.1.4) to switch the output (same DO as above) TBox - ULP 166 17.9. I/O Group 1 – Internal I/O AI_0: AI_1: AI_2: D0_3: D0_4: AI_5: Battery 0 Battery 1 Internal Temp Enable 12 V Enable Swith Power DC Power voltage with -WM and LP-400, voltage of Lithium battery 1 (both battery in //) with -WM and LP-400, voltage of Lithium battery 2 (both battery in //) Temperature inside the module (°C) with -S model, enable 12 V output with -S model, enable transistor switch with LP-450 only, Input DC voltage Group 2 - Digital Inputs Group 6 - Counter / Flow Principle of measurement - “Slow Sampling” Concerns the 4 DI of TBOX WM and the 8 DI of TBOX LP To avoid unnecessary consumption, TBox ULP acquires the digital inputs during a very short time on a regular base. ‘Ultra Low Power’ application supposes no external power, which means TBox ULP must power Digital Inputs. TBOX ULP applies a voltage of 3.3V to a pull-up resistor during 739 µsec. After 500 µsec. TBOX ULP reads the input. This mechanism is carried out 8 times per second Principle of measurement - “Fast Sampling” Concerns DI-0 and DI-1 when their associated variable “Counter HS” is Tagged. The 2 first DI act as interrupts on the microprocessor. The corresponding input stage in then powered permanently, to support high frequency (< 10 kHz) Digital Input Dry Contact, NPN transistor Voltage at input Switch closed = logical '1' Switch open = logical '0' Voltage = 0 V = logical '1' (Switching '0' to '1' max. 2 V) Voltage > 2 V = logical '0' (Switching '1' to '0' min. 0.5 V) Current at input Typical Source Current 33 µA (with dry contact or NPN cabling) Sink Current @ 12 VDC 6.8 mA (with incoming voltage cabling) Resistance at input Impedance Typical 101 kΩ Minimum Typical 90 kΩ Protection Inverted polarity Protection EMC protected RC Isolation Between inputs To the power supply No isolation No isolation “Counter” & “Flow” inputs The 4 inputs Wake up rate 4 Hz with a cycle ratio of 50 % Max. 1 minute “Counter -HS” input DI-0 and DI-1 Number of pulses Version: 2.08 10 kHz Max. 65535 pulses between 2 wake up periods TBox - ULP 167 Group 3 - Digital Outputs Output Type Voltage per output Current per output Output Impedance Current Sinking (NPN transistor) Maximum: 30 VDC Maximum: 45 mA 60 Ω Protection No protection Isolation Between outputs To the power supply No isolation No isolation Group 4 - Analog Inputs Group 7 - Validity Principle of measurement Concerns the 2 AI of TBOX WM and the 4 AI of TBOX LP To avoid unnecessary consumption, TBOX ULP reads Analog Inputs during a very short time on a regular base. ‘Ultra Low Power’ application supposes no external power, which means TBOX ULP must power Analog Inputs (through V out). At a rate and during a period determined in the Tag configuration, TBOX ULP applies a voltage of 12V. or 24V. to power the sensor. See configuration in chapter 8.7.4: Analog Inputs – Acquisition rate V out + 12 VDC + 24 VDC max. 45 mA max. 22 mA 4..20mA Resolution Mode Precision Input Impedance Protection DI: Validity input associated to each analog input 4..20mA 12 bits Unipolar 0.1 % Max. 25.3 Ω Reverse current, over-current (up to 100mA), short circuit between AI power supply and current input (sensor short circuit). Returns ‘0’ when signal < 2.4mA or > 21.6mA Returns ‘1’ when the signal is valid. 0..5 V Resolution Mode Precision Input Impedance Protection 12 bits Unipolar 0.1% Typical: 104 kΩ No protection Isolation Between inputs To the power supply Version: 2.08 No isolation No isolation TBox - ULP 168 18. Wiring 18.1. Power Supply 18.1.1. -WM100, -WM200, -LP400 Connector: Spring Cage Terminal block (see chapter 3.9) +3.6 VDC +3.6 VDC + + Battery - There is no internal cell lithium battery. When the external battery is removed, datalogging will be lost and the RTC will restart at 01/01/1970 (GMT) POWER SUPPLY IN ATEX ENVIRONMENT In ATEX environment, you have to use the battery pack ATEX-BAT-PACK. Version: 2.08 TBox - ULP 169 18.1.2. -LP450 Connector: Spring Cage Terminal block (see chapter 3.9) + +12 VDC 12 VDC RS485 A+ A+ B- B- There is no internal cell lithium battery. When the external battery is removed, datalogging will be lost and the RTC will restart at 01/01/1970 (GMT) WIRING IN HAZARDOUS ENVIRONMENT NON-HAZARDOUS Area HAZARDOUS Area TBox-LP450 Non ATEX classified Power Supply V OUT BARRIER DC in GND GND Entity Parameters TBOX LP450: DC in-GND NON-HAZARDOUS Area Ui= 17 V Ii= 1.34 A Pi= 5.69 W ATEX classified Ci= 2 µF Li= 0 µH Power Supply V OUT TBox-LP450 DC in GND GND Version: 2.08 HAZARDOUS Area TBox - ULP 170 18.2. RS232 – Main Board Description: RS232 communication Connector: RJ 45 Pin out: 1. 2. 3. 4. 5. 6. 7. 8. RS232 RI DCD DTR Gnd RxD (input) TxD (output) CTS (input) RTS (output) WIRING IN NORMAL ENVIRONMENT Use RJ45 to DB9 adapter: ref. MS-CONV-232 Use DB9 serial cable: ref. MS-CABL-PROG Version: 2.08 TBox - ULP 171 WIRING IN HAZARDOUS ENVIRONMENT Wiring to Intrinsically-Safe Apparatus HAZARDOUS Area TBox-ULP IS Apparatus Simple Apparatus Tx RxD Rx TxD GND GND Entity Parameters TBOX WM: Rx/Tx-GND Uo=8.51 V Io= 37.5 mA Po= 80 mW Ui= 15 V Ii= 150 mA Pi= 560 mW Ci= 440 pF Li= 0 µH TBOX LP: Rx/Tx-GND Uo= 8.51 V Io= 37.5 mA Po= 80 mW Ui= 15 V Ii= 150 mA Pi= 560 mW Ci= 440 pF Li= 0 µH Wiring to Non Intrinsically-Safe Apparatus NON-HAZARDOUS Area HAZARDOUS Area TBox-ULP Non IS Apparatus Power Source + Power - GND Tx BARRIER RxD TxD Rx GND GND Entity Parameters TBOX WM: Rx/Tx-GND Ui= 15 V Ii= 150 mA Ci= 440 pF Li= 0 µH Version: 2.08 TBOX LP: Rx/Tx-GND Ui= 15 V Ii= 150 mA Ci= 440 pF Li= 0 µH TBox - ULP 172 18.3. RS232 – Option Board IN ATEX MODEL (with options -SM01), THIS BOARD DOES NOT INCLUDE THE 12 VDC OUTPUT Description: RS232 communication Connector: RJ 50 Pin out: RJ 50 1. 2. 3. 4. 5. 6. 7. 8. 9. 10. RJ45 vs. RJ50 A RJ45 connector enters a RJ50 socket. It uses pins 2 to 9 of RJ50 sockets and is then compatible with RJ45 socket. see jumper below RI (input) DCD (input) DTR (output) Gnd RxD (input) TxD (output) CTS (input) RTS (output) see jumper below RS 232 Adapter between RJ45 and SUB-D 9 + Wiring to a PC Adapter RJ 45 2 5 6 3 4 8 7 1 DB-9 1 2 3 4 5 6 7 8 9 PC DB-9 1 2 3 4 5 6 7 8 9 Description DCD RxD TxD DTR GND DSR RTS CTS RI (Data Carrier Detect) (Receive Data) (Transmit Data) (Data Terminal Ready) (Ground) (Data Set Ready) (Request To Send) (Clear To Send) (Ring indicator) Reference adapter= MS-CONV-232 Reference RS232 cable= MS-CABL-PROG WIRING IN NORMAL ENVIRONMENT Use RJ45 to DB9 adapter: ref. MS-CONV-232 Use DB9 serial cable: ref. MS-CABL-PROG Version: 2.08 TBox - ULP 173 WIRING IN HAZARDOUS ENVIRONMENT Wiring to Intrinsically-Safe Apparatus HAZARDOUS Area Serial board IS Apparatus Simple Apparatus Tx RxD Rx TxD GND GND Entity Parameters TBOX WM: Rx/Tx-GND Uo=8.51 V Io= 67.2 mA Po= 143 mW Ui= 15 V Ii= 150 mA Pi= 560 mW Ci= 970 pF Li= 0 µH TBOX LP: Rx/Tx-GND Uo= 8.51 V Io= 67.2 mA Po= 143 mW Ui= 15 V Ii= 150 mA Pi= 560 mW Ci= 970 pF Li= 0 µH Wiring to Non Intrinsically-Safe Apparatus NON-HAZARDOUS Area HAZARDOUS Area Serial board Non IS Apparatus Power Source + Power - GND Tx BARRIER RxD TxD Rx GND GND Entity Parameters TBOX WM: Rx/Tx-GND Ui= 15 V Ii= 150 mA Ci= 970 pF Li= 0 µH Version: 2.08 TBOX LP: Rx/Tx-GND Ui= 15 V Ii= 150 mA Ci= 970 pF Li= 0 µH TBox - ULP 174 18.3.1. Jumper Settings Jumper allows assigning different signals to pin 1 and pin 10 of RJ50 connector. You have to unscrew the serial board to access the jumper. RS 232 5-3-1 Jumper 1 Power Supply Jumper 2 Protection Zener Example: Serial model for Class1, Div1 or normal environment JUMPER SETTINGS for C1D1 and NORMAL ENVIRONMENT models: Jumper connections Jumper 1 - Pin1 Jumper 2 - Pin 10 : 1-2. 12 VDC (tot: 350mA) + 12 VDC. max. 175mA + 12 VDC. max. 175mA : 3-4. “switch power” output “in” from connector “Switch Power”. max. 175mA (tot: 350mA) “out” from connector “Switch Power” max. 175mA : 5-6 GND Digital Output (NPN). See wiring JUMPER SETTINGS for ATEX models: Jumper connections Jumper 1 - Pin1 Jumper 2 - Pin 10 : 1-2. NO CONNECTION NO CONNECTION NO CONNECTION : 3-4. “switch power” output “in” from connector “Switch Power”. max. 175mA (tot: 350mA) “out” from connector “Switch Power” max. 175mA : 5-6 GND Digital Output (NPN). See wiring See wiring the Digital Outputs at chapter 18.7. Version: 2.08 TBox - ULP 175 18.4. RS485 - Main Board Description: RS485 communication 18.4.1. Connector: Spring Cage Terminal block (see chapter 3.9) WM100, -WM200, -LP400 Gnd RS485 A+ Gnd RS485 B- 1 2 3 18.4.2. A+ Gnd B- -LP450 RS485 A+ RS485 BGnd About RS485 cabling: Use a twisted pair for signal A and B. RS 485 is not isolated. If cabling equipment in different buildings (different Earth), you have to use ACC-RS485 (ask your local distributor) Maximum length depends on quality of cable, speed and quantity of stations (max. 32 stations). In good condition, guaranteed to 1.2 km (max. 32 stations @ 9600 Bps) In practice, longer distance can be reached with lower Baudrate and fewer stations. Cable: - Twisted pair (2 pairs) - cross-section: minimum 0.5mm² - screening : pair and global screening - reference: Li2YCY-PiMF Version: 2.08 TBox - ULP 176 WIRING IN HAZARDOUS ENVIRONMENT Wiring to Intrinsically-Safe Apparatus HAZARDOUS Area TBox-ULP IS Apparatus Simple Apparatus A A B B GND GND Entity Parameters TBOX WM: A/B-GND Uo=8.51 V Io= 156 mA Po= 332 mW Ui= 8.51 V Ii= 310 mA Pi= 660 mW Ci= 220 pF Li= 0 µH TBOX LP: A/B-GND Uo= 8.51 V Io= 156 mA Po= 332 mW Ui= 8.51 V Ii= 310 mA Pi= 660 mW Ci= 220 pF Li= 0 µH Wiring to Non Intrinsically-Safe Apparatus NON-HAZARDOUS Area HAZARDOUS Area TBox-ULP Non IS Apparatus Power Source + Power - GND BARRIER A A B B GND GND Entity Parameters TBOX WM: A/B-GND Ui= 8.51 V Ii= 310 mA Ci= 220 pF Li= 0 µH Version: 2.08 TBOX LP: A/B-GND Ui= 8.51 V Ii= 310 mA Ci= 220 pF Li= 0 µH TBox - ULP 177 18.5. Digital Inputs - Counter inputs 18.5.1. -WM100, -WM200 Connector: Spring Cage Terminal block (see chapter 3.9) I/O Connector Di 0 Di 1 Di 2 Di 3 Gnd 18.5.2. -LP400, -LP450 I/O Connector Di 4 Di 5 Di 6 Di 7 Gnd Di 0 Di 1 Di 2 Di 3 Gnd WIRING IN NORMAL ENVIRONMENT Dry contact NPN transistor Voltage DI x DI x Sensor GND GND Version: 2.08 TBox - ULP DI x GND 178 WIRING IN HAZARDOUS ENVIRONMENT Wiring to Intrinsically-Safe Apparatus / Simple Apparatus HAZARDOUS Area TBox-ULP IS Apparatus Simple Apparatus SIGNAL Di x GND GND Entity Parameters TBOX WM: Di x-GND Uo= 7.51 V Io= 33.1 mA Po= 62 mW Ui= 10 V Ii= 100 mA Pi= 250 mW Ci= 440 pF Li= 0 µH TBOX LP: Di x-GND Uo= 7.51 V Io= 66.1 mA Po= 124 mW Ui= 10 V Ii= 100 mA Pi= 250 mW Ci= 880 pF Li= 0 µH Wiring to Non Intrinsically-Safe Apparatus NON-HAZARDOUS Area HAZARDOUS Area TBox-ULP Non IS Apparatus Power Source + POWER - GND SIGNAL BARRIER Di x GND GND Entity Parameters TBOX WM: Di x-GND Ui= 10 V Ii= 100 mA Pi= 250 mW Ci= 440 pF Li= 0 µH Version: 2.08 TBOX LP: Di x-GND Ui= 10 V Ii= 100 mA Pi= 250 mW Ci= 880 pF Li= 0 µH TBox - ULP 179 18.6. Digital Outputs - Main Board 18.6.1. -WM100, -WM200 Connector: Spring Cage Terminal block (see chapter 3.9) I/O Connector Gnd DO 0 DO 1 DO 2 DO 3 Load 18.6.2. Load 0V Load Load Gnd is common to all I/O's and to the power supply +5..30 VDC -LP400, -LP450 Gnd DO 4 DO 5 DO 6 DO 7 I/O Connector Gnd DO 0 DO 1 DO 2 DO 3 WIRING IN NORMAL ENVIRONMENT See wiring above. Version: 2.08 TBox - ULP 180 WIRING IN HAZARDOUS ENVIRONMENT Wiring to Intrinsically-Safe Apparatus / Simple Apparatus HAZARDOUS Area TBox-ULP IS Apparatus Simple Apparatus Entity Parameters TBOX WM: DO x-GND Uo= 7.51 V Io= 3.31 mA Po= 6.2 mW Ui= 10 V Ii= 100 mA Pi= 250 mW Ci= 880 pF Li= 0 µH INPUT DO GND GND TBOX LP: DO x-GND Uo= 7.51 V Io= 6.61 mA Po= 12.4 mW Ui= 10 V Ii= 100 mA Pi= 250 mW Ci= 1.32 nF Li= 0 µH Wiring to Non Intrinsically-Safe Apparatus NON-HAZARDOUS Area HAZARDOUS Area TBox-ULP Non IS Apparatus Power Source + POWER - GND INPUT BARRIER DO GND GND Entity Parameters TBOX WM: DO x-GND Ui= 10 V Ii= 100 mA Pi= 250 mW Ci= 880 pF Li= 0 µH Version: 2.08 TBOX LP: DO x-GND Ui= 10 V Ii= 100 mA Pi= 250 mW Ci= 1.32 nF Li= 0 µH TBox - ULP 181 18.7. Digital Outputs - Option Board The Serial Option board is also equipped with: ¯ an internal 12 VDC output (for instance to power an external modem) THIS OUTPUT IN NOT AVAILABLE ON ATEX MODEL ¯ a NPN digital output ¯ an electronic switch, to switch an external power Connectors RS232 Switch Power External power: max. 1.6A at 30 VDC 12 VDC max. 0.35 A at 12 VDC RJ50 is compatible with RJ45. To cable RS232 to RJ50 connector, see point 3 above. WIRING IN NORMAL ENVIRONMENT Wiring External Power Supply For equipotentiality reason, it is mandatory to cable 0V ( - ) of external power supply to GND. Make sure it is done before connecting + VDC or serial port + Switch Power Load External power: max. 1.6A at 30 VDC - 12 VDC Wiring 12 VDC output Switch Power + 12 VDC Version: 2.08 Load TBox - ULP - 182 Pins 1 and 10 of RJ50 can be connected to different signals (See jumper settings at chapter 18.3.1). When the digital output NPN is cabled, use the following wiring: Wiring Digital Output (NPN) External Power: Max. 45mA/30VDC 1. 2. 3. 4. 5. 6. 7. 8. 9. Load 0V 10. OUT RI (input) DCD (input) DTR (output) Gnd RxD (input) TxD (output) CTS (input) RTS (output) GND WIRING IN HAZARDOUS ENVIRONMENT Wiring Digital Output (NPN) NON-HAZARDOUS Area HAZARDOUS Area TBox-ULP RJ50 Non IS Apparatus V out BARRIER Power Source GND Load 1 10 DO GND Wiring Switch Power NON-HAZARDOUS Area HAZARDOUS Area TBox-ULP CITO-2 Non IS Apparatus V out Power Source GND BARRIER Load 1 2 Entity Parameters TBOX WM: Output-GND Ui= 15 V Ii= 150 mA Pi= 560 mW Ci= 970 pF Li= 0 µH Version: 2.08 TBOX LP: Output-GND Ui= 15 V Ii= 150 mA Pi= 560 mW Ci= 970 pF Li= 0 µH TBox - ULP 183 18.8. Analog Inputs – Current 18.8.1. -WM100, -WM200 Connector: Spring Cage Terminal block (see chapter 3.9) I/O Connector Gnd PS U in I in 0 0 0 18.8.2. PS U in I in 1 1 1 -LP400, -LP450 Gnd PS U in I in 2 2 2 PS U in I in 3 3 3 I/O Connector Gnd PS U in I in 0 0 0 PS U in I in 1 1 1 In order to save energy, TBox ULP controls the power of the sensor. It activates power on pin PS x at a frequency and a period defined in the Tag configuration (see chapter 8.7.4. Analog Inputs – Acquisition rate). WIRING IN NORMAL ENVIRONMENT Wiring to 2-wires sensor PS x + +12 (45mA) or +24 (22mA) SENSOR - I in x Measure R in GND Version: 2.08 TBox - ULP 184 WIRING IN HAZARDOUS ENVIRONMENT Wiring to Intrinsically-Safe Apparatus / Simple Apparatus HAZARDOUS Area TBox-ULP IS Apparatus Simple Apparatus PS SIGNAL GND PS x I in x GND Entity Parameters TBOX WM: I in x-GND Uo= 8.51 V Io= 113.3 mA Po= 241 mW Ui= 29.35 V Ii= 120 mA Pi= 881 mW Ci= 660 pF Li= 0 µH PS-GND Uo= 29.35 V Io= 181.74 mA Po= 1.33 W Ui= 29.35 V Ii= 100 mA Pi= 734 mW Ci= 44 nF Li= 0 µH TBOX LP: I in x-GND Uo= 8.51 V Io= 8.7 mA Po= 18.44 mW Ui= 29.35 V Ii= 100 mA Pi= 734 mW Ci= 1.32 nF Li= 0 µH PS-GND Uo= 29.35 V Io= 92.65 mA Po= 680 mW Ui= 29.35 V Ii= 100 mA Pi= 734 mW Ci= 88 nF Li= 0 µH Analog Input: Current Sensor with 2 wires TBOX WM: I in x - PS Uo= 29.35 V Io= 86.05 mA Po= 658 mW Ci= 44.66 nF Li= 0 µH TBOX LP: I in x - PS Uo= 29.35 V Io= 91.35 mA Po= 91.2 mW Ci= 89.32 nF Li= 0 µH Analog Input: Current Sensor with 3 wires TBOX WM: TBOX LP: I in x + PS - GND Uo= 29.35 V Io= 204.2 mA Po= 1.50 W Ci= 44.66 nF Li= 0 µH I in x + PS - GND Uo= 29.35 V Io= 98.90 mA Po= 726 mW Ci= 89.32 nF Li= 0 µH Version: 2.08 TBox - ULP 185 Wiring to Non Intrinsically-Safe Apparatus NON-HAZARDOUS Area HAZARDOUS Area TBox-ULP Non IS Apparatus POWER BARRIER PS x I in x SIGNAL GND GND Entity Parameters TBOX WM: I in x-GND Ui= 29.35 V Ii= 120 mA Pi= 881 mW Ci= 660 pF Li= 0 µH Version: 2.08 PS-GND Ui= 29.35 V Ii= 100 mA Pi= 734 mW Ci= 44 nF Li= 0 µH TBOX LP: I in x-GND Ui= 29.35 V Ii= 100 mA Pi= 734 mW Ci= 1.32 nF Li= 0 µH TBox - ULP PS-GND Ui= 29.35 V Ii= 100 mA Pi= 734 mW Ci= 88 nF Li= 0 µH 186 18.9. Analog Inputs – Voltage 18.9.1. -WM100, -WM200 Connector: Spring Cage Terminal block (see chapter 3.9) I/O Connector Gnd PS U in I in 0 0 0 18.9.2. PS U in I in 1 1 1 -LP400, -LP450 Gnd PS U in I in 2 2 2 PS U in I in 3 3 3 I/O Connector Gnd PS U in I in 0 0 0 PS U in I in 1 1 1 In order to save energy, TBox ULP controls the power of the sensor. It activates power on pin PS x at a frequency and a period defined in the Tag configuration (see chapter 8.7.4. Analog Inputs – Acquisition rate). WIRING IN NORMAL ENVIRONMENT Wiring to 2-wires sensor PS x + - U in x +12 (45mA) or +24 (22mA) Measure SENSOR GND Version: 2.08 TBox - ULP 187 WIRING IN HAZARDOUS ENVIRONMENT Wiring to Intrinsically-Safe Apparatus / Simple Apparatus HAZARDOUS Area TBox-ULP IS Apparatus Simple Apparatus PS SIGNAL GND Entity Parameters TBOX WM: I in x-GND Uo= 8.51 V Io= 113.3 mA Po= 241 mW Ui= 29.35 V Ii= 120 mA Pi= 881 mW Ci= 660 pF Li= 0 µH PS-GND Uo= 29.35 V Io= 181.74 mA Po= 1.33 W Ui= 29.35 V Ii= 100 mA Pi= 734 mW Ci= 44 nF Li= 0 µH TBOX LP: I in x-GND Uo= 8.51 V Io= 8.7 mA Po= 18.44 mW Ui= 29.35 V Ii= 100 mA Pi= 734 mW Ci= 1.32 nF Li= 0 µH PS x U in x GND PS-GND Uo= 29.35 V Io= 92.65 mA Po= 680 mW Ui= 29.35 V Ii= 100 mA Pi= 734 mW Ci= 88 nF Li= 0 µH Analog Input: Voltage Sensor TBOX WM: TBOX LP: U in x + PS - GND Uo= 29.35 V Io= 204.3 mA Po= 1.5 W Ci= 44.66 nF Li= 0 µH U in x + PS - GND Uo= 29.35 V Io= 101.66 mA Po= 746 mW Ci= 89.32 nF Li= 0 µH Version: 2.08 TBox - ULP 188 Wiring to Non Intrinsically-Safe Apparatus NON-HAZARDOUS Area HAZARDOUS Area TBox-ULP Non IS Apparatus POWER BARRIER U in SIGNAL GND GND Entity Parameters TBOX WM: U in x-GND Ui= 29.35 V Ii= 120 mA Pi= 881 mW Ci= 660 pF Li= 0 µH Version: 2.08 PS-GND Ui= 29.35 V Ii= 100 mA Pi= 734 mW Ci= 44 nF Li= 0 µH PS x TBOX LP: U in x-GND Ui= 29.35 V Ii= 100 mA Pi= 734 mW Ci= 1.32 nF Li= 0 µH TBox - ULP PS-GND Ui= 29.35 V Ii= 100 mA Pi= 734 mW Ci= 88 nF Li= 0 µH 189 Version: 2.08 TBox - ULP 190 APPENDIXES Version: 2.08 TBox - ULP 191 Appendix A. Licenses The software itself is not protected; it can be installed on any PC and used to develop TWinSoft document (online or offline) and to monitor TBOX ULP. The only operation protected is the sending of an application to TBOX ULP. In order to find the best way for you we offer different possibilities: A.1. The Evaluation mode You don't need any software or hardware dongle. You are able to develop a complete TBOX ULP project without any restriction, but when you send the application to TBOX ULP, it will stop after 2 hours. This is a good solution for testing programs or creating a demo. A.2. The Dongle It is a hardware device placed on your PC. The dongle consists in a USB key. TWinSoft regularly checks the presence of it. It allows you sending applications to as many TBOX ULP as you want, with any PC. A.3. The Code (License) Available from the menu ‘Help’ ‘License Register.’ Using information of the PC (the Company name, the User name, a Serial Number), you receive a code that you enter in the 'License' field. Once entered, you can send any application as if you had a dongle (see previous). The only restriction is that it must always be on the same PC. If you wish to use another PC, you have the possibility to remove registration on the first PC and register back on the second. A.4. The TWinSoft LITE Available from the menu ‘Help’ ‘TWinSoft Lite configuration.’ This protection mode is ideal for users having one or two TBOX ULP units. The dongle or a license might be too expensive. TWinSoft LITE code is linked to one TBOX ULP; it allows you sending an application to the TBOX ULP for which you have the code. Version: 2.08 TBox - ULP 192 Appendix B. Time in RTU One of the biggest issues in Telemetry and data logging equipment is the handling of time. In order to have a universal solution, wherever the TBOX ULP is used, TWinSoft, OS of the RTU and ‘Windows’ collecting data, shares the mechanism of time management. Time in the RTU is based on UTC time. B.1. Time in TBox ULP The RTC (Real Time Clock) The TBOX ULP is equipped with a RTC chip (Real Time Clock). The RTC is used to manage all internal time. Functions of the RTC: • it is a calendar Y2000 compatible. • it updates the UTC time (see next). • it communicates with OS to handle the UTC time, used for data logging. The RTC time is used at start-up of TBOX ULP to update the UTC. UTC Time UTC time is based on the number of seconds since 1/1/1970 at Greenwich latitude. It is used as internal timestamp to each event (alarm, chronology, …) The UTC time is converted into Analog System Variables to give access to time information: second, minute, hour, day, month, year, week. Changing UTC time automatically updates the RTC. When time information needs to be sent (in a report, as header of an e-mail, in the Analog System Variable), it is always computed using the UTC time and according to the zone and daylight saving specified in the ‘General’ RTU properties. TBox ULP Time setting In order to set TBOX ULP to PC time, an option is available in the 'Communication' menu of the main menu bar; option available when connected (locally or remotely) to the RTU When sending an application to TBOX ULP, TWinSoft updates automatically the RTU time to the PC time. This feature can be deactivated from the ‘Send application’ menu. RTU time can be checked anytime doing a RTU Identification, from the main 'Communication' menu. Version: 2.08 TBox - ULP 193 Winter/Summer time When installed in regions using daylight saving, the TBOX ULP handles the changes automatically. It means that the RTC and Analog System Variable [hour] are automatically updated when the time changes. Standard changing time in Europe: - last Sunday of October: - last Sunday of March: 3:00 2:00 2:00 3:00 B.2. Data logging Chronologies In chronologies, the time is recorded for each log of data. The time recorded is the UTC time. When retrieving the data, the PC reads the UTC time and converts it according to the local time of the PC, depending on the time settings of the PC. When a winter/summer time change occurs, the TBOX ULP is informed and automatically adapts all coming timestamps to the new time. Sampling tables In sampling tables, the TBOX ULP records the timestamp of the last record only. The other timestamps are built up when retrieving the data (from TWinSoft, TView, in report, ...). A choice had to be made between with period > 1 hour: either having always the same period of recording or having always the same 'hour' of recording. The latter case has been chosen. When a winter/summer time change occurs, the target time is automatically updated for sampling tables having a period > 1 hour. Example: If recording a value once a day at 6.00 in the morning, the recording will always happen at 6.00, but when changing from winter to summer, the sampling period will be 23 hours and when changing from summer to winter the period will be 25 hours. Periodic events When a periodic event is defined with a period > 1 hour, its target time is automatically adjusted when a changing winter/summer happens. Version: 2.08 TBox - ULP 194 B.3. System variables associated Some System Variables of TBOX ULP are associated to the Time. They can be used in Ladder/BASIC logic to execute specific operations: Type Variable Comment Analog Analog Second, Minutes, … UtcTim Analog Analog ZonBia ZonID 6 Registers giving the time in hour, minute, second, day, month and year. Time in UTC format (number of seconds since 1/1/1970 at Greenwich latitude) Time difference in seconds between the local time and time UTC ID of the zone where RTU is installed. It uses regional settings of the PC B.4. Summary Summary of time handling in the different cases: 1. System variables in the RTU They display the local time where the RTU is installed, according to the Regional settings declared in the ‘General’ RTU properties 2. Identification from TWinSoft The UTC time is computed according to Regional settings of the PC 3. List of alarms in a report The time is calculated according to RTU local time (see 1. above) 4. List of alarms in TWinSoft See point 2. above 5. Object ‘Time’ in WebForm See point 2. above 6. System variables in WebForm Displays the value of the variables, as explained point 1. above Version: 2.08 TBox - ULP 195 Appendix C. Pack & Go C.1. Presentation Pack & Go is a tool that builds up one file with your complete project, including TWinSoft document, WebForms, Reports, OS,... The goal is to backup or to transfer a complete project without missing files or to update an RTU with the complete project without requiring advanced knowledge of TWinSoft. All files are compressed and packed into one file with the extension .tpg (TWinSoft Pack & Go). Once a project is packed, it can be unpacked and/or updated to the RTU from a double click on the .tpg file. TWinSoft needs to be installed on the machine used to update the RTU with .tpg file, but the TWinSoft license is not required. The license is required to pack. C.2. Pack To access Pack & Go menu, select from the main menu ‘File’ ‘Pack & Go…’ Select the button ‘Pack …’ IF YOU ARE OFF LINE while compiling, TWinSoft uses the OS indicated as ‘Off line OS’ in the ‘General RTU properties’. This OS, and only this OS, will be sent to the RTU. Version: 2.08 TBox - ULP 196 All Files of the project, TWinSoft document, WebForm, html pages, OS, … are packed in one file, with the extension .tpg Be sure the user running the .tpg file runs a version of TWinSoft at least equivalent to the one used to pack the files. C.3. Unpack To open the Unpack window, double click a file with the extension .tpg. Unpack menu offers 2 features: 1. Restore a project Extract a project into a directory of your PC. This option is very convenient for backing up a project being sure you don't miss any file. Option available from the main menu: ‘Tools’ Unpack. Version: 2.08 TBox - ULP 197 2. Update an RTU Update an RTU with a complete project, including the application, OS, WebForms, report, ...from a unique file. The button ‘PC Setup…’ gives you access to the configuration of the PC, to communicate with the RTU. The button ‘Update RTU’ sends the project and OS to the RTU. If packed OS is different from OS in the RTU, Pack & Go updates the RTU with the OS. Languages supported are English, French and German. It cannot be selected from 'Unpack' menu but changed from TWinSoft main menu: 'Tools' 'Language' Version: 2.08 TBox - ULP 198 Appendix D. ModBus Rerouting ModBus rerouting allows associating two ‘ModBus-RTU’ communication ports, in order to access a remote RTU with TWinSoft from your computer by rerouting through a ‘Master’ RTU. The typical application, is dialling an RTU to access a remote RTU connected to the RS485 network. You access routing from the main menu of TWinSoft: Communication Routing Address: Address of the RTU you are physically connected (the ‘Master’) Timeout: Rx timeout used to communicate with the Remote device Route from: incoming communication port (the port of the ‘Master’ TWinSoft is connected to) to: outgoing communication port (the port of the ‘Master’ connected to the remote device) Sequence to access a Remote RTU in rerouting: 1. Open in TWinSoft the document corresponding to the ‘Master’ RTU 2. Fill in the Routing request menu as explained above. 3. Open in TWinSoft the document corresponding to the ‘Remote’ RTU (if you were using modem communication, you will have to redial the “Master”). You are in communication with the Remote Device. This sequence is only possible when Master and Remote are the same model of RTU. If not, you have to pre-configure the Analog system variable (see next) Version: 2.08 TBox - ULP 199 Analog System variable ‘Rerout’ An analog system variable ‘Rerout’ can also be used in your Process to force a rerouting. This 16 bits variable represents 16 communication ports, with the LSB corresponding to COM1. Example: A rerouting between COM2(…000010) and COM3 (…000100) corresponds to the decimal value = 6 (…000110) Rerouting is only possible with local communication ports configured in ModBus-RTU (not in ModBus-ASCII) Sending a program using Rerouting For instance, you can send a program by dialing a “Master”, and accessing “Slaves” on RS485 network. Doing a ‘local’ rerouting, for instance from a RS232 port to a RS485, we recommend using the same Baudrate on all ports. If you have ‘Remote Tags’ running between ‘Master’ and ‘Slave’, we recommend stopping them during rerouting, to avoid communication errors. Version: 2.08 TBox - ULP 200 Appendix E. Terminal mode The ‘Terminal’ mode allows accessing a modem in ‘AT command’. Before starting: The TWinSoft connection to the RTU MUST be through COM1 (RS232) at 115200 Bps (corresponding to the internal Baudrate of the modem). It is available from the menu ‘Communication’ ‘Terminal’: Example with WM-200-G Version: 2.08 TBox - ULP 201 Examples of commands to check the availability of a GSM: To activate the echo in the window, type ATE1 <ENTER> (you don’t see what you type, it is normal) The modem answers with OK From now on you will see what you type To check if the SIM card is ready, type AT+CPIN? <ENTER> The modem answers CPIN: READY To check the GSM operator has been found, type AT+COPS? <ENTER> The modem answers with a code or the name of the operator To check the quality of the signal, type AT+CSQ <ENTER> The modem answers +CSQ:xx,99 xx: must be between 20 and 31 To quit the Terminal mode, click the button “Stop” Version: 2.08 TBox - ULP 202 Appendix F. Synchronization of Counters If you use the Digital Inputs for counting pulses, and that a mechanical counter exits on site, you wish to have the equivalence in TBOX ULP. On this way, on a simple remote connection you can be informed on the value of the counter. To each digital input, a ‘Totalizer’ variable is associated. This variable is supposed to represent the mechanical counter. After installing the TBOX ULP on site, you will need to synchronize the counter of TBOX ULP to the mechanical counter. Procedure. 1. Install and cable the TBOX ULP on site. 2. Note the value of the mechanical counter on a paper. 3. Press ‘PGM’ button. This action memorizes the current value of the counter of TBOX ULP. 4. At the office, start TWinSoft and connect to TBOX ULP. 5. When connected, open the menu: ‘Communication’ → ‘Synchronize counters’ 6. In the list of counters, enter the value of mechanical counter(s) you noted(see point 2 above). 7. The registers of TBOX ULP are now updated to the value of the mechanical counter + the number of pulses since the moment you pressed ‘PGM’. Version: 2.08 TBox - ULP 203 INDEX CPU A Access level ........................................................... 157 Access security deactivating ............................................................... 159 TWinSoft document ................................................... 159 Alarm end of alarm ................................................................ 55 events stack ............................................................... 131 Alarm stack ..................................................... 54, 119 Alarms ................................................................... 119 advanced parameters .................................................. 54 analog condition ........................................................ 122 chain .................................................................. 121, 123 digital condition ......................................................... 120 display list of .............................................................. 131 e-mail ......................................................................... 125 FTP ............................................................................. 126 group of recipients ..................................................... 127 holidays ...................................................................... 129 link ..................................................................... 121, 123 Message ..................................................................... 127 ModBus...................................................................... 124 NTP ............................................................................ 126 printer ........................................................................ 125 recipients ................................................................... 124 SMS ............................................................................ 125 time slices .................................................................. 129 timetables .................................................................. 130 Analog inputs configuration ............................................................... 81 Awake mode ........................................................... 17 communication ports .................................................. 64 D Datalogging ........................................................... 141 chronologies .............................................................. 143 sampling tables ......................................................... 144 Debugging ............................................................. 116 Digital inputs duty cycle .................................................................... 57 wiring ........................................................................ 178 Document backup ......................................................................... 44 Dongle ................................................................... 192 Drivers ..................................................................... 51 DynDNS ................................................................. 114 E Earth Grounding...................................................... 27 e-mail .............................................100, 120, 123, 125 SMTP from................................................................... 54 SMTP subject ............................................................... 55 Event stack ...................................................... 54, 131 F Flow input ............................................................... 84 Flowmeters ............................................................. 56 FTP ........................................................................ 126 G B Battery installation ................................................................... 24 life time ........................................................................ 19 Button ........................................................42, 44, 165 C Caller ID................................................................... 77 Certifications ............................................................. 4 Chronologies ......................................................... 141 Communication PC Setup....................................................................... 38 status ........................................................................... 41 testing with TWinSoft .................................................. 41 to other RTU .............................................................. 147 variables....................................................................... 75 Compiling an application ........................................ 45 Consumption .......................................................... 19 Counters Global code ........................................................... 157 Global Reset ............................................................ 42 GPRS ........................................................................ 68 communicating with TWinSoft .............................. 40, 72 communication variables ............................................ 69 IP settings .................................................................... 71 with SMS ..................................................................... 71 GPS .......................................................................... 90 Ground .................................................................... 27 Group of Tags .......................................................... 92 GSM Signal level................................................................... 77 GSM - data .............................................................. 67 GSM message header ......................................................................... 55 GSM/GPRS configuration ............................................................... 65 technical specifications ..................................... 165, 166 synchronization .......................................................... 203 Version: 2.08 TBox - ULP 204 H N Hardware concept ........................................................................ 15 installation ................................................................... 26 NTP ........................................................................ 113 Hazardous Environment ................................ 162, 163 Historical data ....................................................... 119 I O Operating System .................................................... 43 Overview ................................................................. 13 I/O analog inputs ............................................................... 82 battery voltage ............................................................ 79 counter - High Speed ................................................... 83 counter - Totalizer ........................................................ 83 digital inputs ................................................................ 79 digital outputs ............................................................. 81 flow.............................................................................. 84 system inputs............................................................... 79 technical specifications.............................................. 167 temperature ................................................................ 79 Intrinsically-safe .................................................... 162 IP Parameters ........................................................ 105 ISP.................................................................. 106, 108 L LED Status................................................................ 44 License................................................................... 192 code ........................................................................... 192 dongle ........................................................................ 192 evaluation .................................................................. 192 TWinSoft LITE ............................................................ 192 Login/Logout ......................................................... 158 Low power operation external modem .......................................................... 73 of Analog Input ...................................................... 18, 82 of GSM/GPRS ......................................................... 18, 65 of the CPU ................................................................... 17 M Memory........................................................... 45, 164 Message dynamic value............................................................ 128 ModBus rerouting .................................................................... 199 ModBus address of station ..................................... 50 default address ............................................................ 43 Modbus device ...................................................... 147 ModBus device trigger ........................................................................ 148 Models .................................................................... 16 Modem caller ID........................................................................ 77 external modem .......................................................... 73 on PC ........................................................................... 39 states ........................................................................... 77 Version: 2.08 P Pack & Go .............................................................. 196 Password utility ..................................................... 157 PC system requirement .................................................... 32 PC Setup IP address settings ...................................................... 40 Periodic events ...................................................... 152 Permanent mode .................................................... 17 POP3 ...................................................................... 111 controlling RTU.......................................................... 136 Power Supply battery......................................................................... 24 external ....................................................................... 25 Precautions................................................................ 4 Protection TWinSoft document .................................................. 154 PSTN signal level ................................................................... 77 R RAS ........................................................................ 126 ReadSMS ............................................................... 133 Remote Tags .......................................................... 147 creating ..................................................................... 149 timing parameters ..................................................... 151 Report............................................ 100, 119, 120, 123 Reset........................................................................ 42 Resources ................................................................ 63 CPU ............................................................................. 63 I/O ............................................................................... 78 RS232 (optional) technical specifications ............................................. 166 RTC ........................................................................ 193 RTU Properties ........................................................ 49 advanced ..................................................................... 52 general ........................................................................ 50 name of the station ..................................................... 50 Remote Tags ................................................................ 59 report name ................................................................ 62 summer/winter ........................................................... 51 TCP/IP .......................................................................... 59 Tel. number ................................................................. 51 time zone .................................................................... 51 wake-up....................................................................... 51 RTU startup ............................................................. 52 RTU Type ........................................................... 37, 50 Run Time Parameters ............................................ 100 TBox - ULP 205 S Safety Earth XE "Ground"Ground ........................... 27 Sampling tables ..................................................... 142 advanced properties .................................................... 58 Saving a document.................................................. 44 Security ................................................................. 154 Sending an application............................................ 45 Serial port ............................................................... 64 SIM card .................................................................. 30 Sleep mode ............................................................. 17 SMS acknowledgment with incoming SMS ........................ 134 controlling RTU .......................................................... 136 header ......................................................................... 55 SMTP ..................................................................... 109 System Variables analog .......................................................................... 89 digital ........................................................................... 86 GPS .............................................................................. 90 Technical Specifications all models .......................................................... 162, 164 Temperature units................................................... 58 Terminal ................................................................ 201 Time ...................................................................... 193 system variables ........................................................ 195 week of the year.......................................................... 91 winter/summer ......................................................... 194 Timers ..................................................................... 91 TView .................................................................... 119 TWinSoft starting ........................................................................ 36 TWinSoft Suite installation ................................................................... 33 programs ..................................................................... 35 system requirement .................................................... 32 U UTC Time ............................................................... 193 V T Tags ......................................................................... 92 analog variable............................................................. 96 digital variable ............................................................. 94 group ........................................................................... 92 I/O ................................................................................ 93 initial value .................................................................. 97 internal variables ......................................................... 94 ModBus address .......................................................... 99 presentation .............................................................. 100 text variable ................................................................. 97 write .......................................................................... 100 TBox Mail ................................................................ 33 TCP ports ................................................................. 59 TCP/IP debugging .................................................................. 116 extended log ................................................................ 60 GPRS settings ............................................................... 71 PC setup settings ......................................................... 40 TCP/IP address incoming call ................................................................ 60 Variables system ......................................................................... 86 W Wake-up of CPU.................................................................... 17, 51 of GSM in case of alarm .............................................. 66 of GSM with communication variables ....................... 66 WebForm .............................................................. 100 WebForm Viewer .................................................... 33 Week of the year..................................................... 91 Wiring analog input ...................................................... 184, 187 connectors ................................................................... 28 digital input ............................................................... 178 digital output - main board ....................................... 180 digital output - option board ..................................... 182 power supply ............................................................. 169 RS232 - Main Board .................................................. 171 RS232 (optional) ........................................................ 173 RS485 ........................................................................ 176 Wizard ..................................................................... 37 Version: 2.08 TBox - ULP 206