1
Installation / Troubleshooting Manual
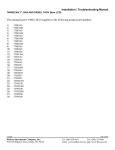
TWINSCAN 3”, GAS AND DIESEL TACH (New LCD)
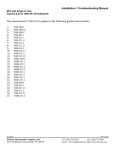
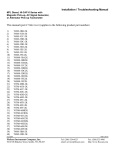
This manual (part # 1000-158-01) applies to the following product part numbers:
1)
2)
3)
4)
5)
6)
7)
8)
9)
10)
11)
12)
13)
14)
15)
16)
17)
18)
19)
20)
21)
22)
23)
24)
25)
26)
27)
28)
29)
30)
31)
32)
33)
34)
35)
36)
37)
38)
39)
40)
41)
3TB013
3TB013U
3TB014
3TB014M
3TB014U
3TB016
3TB016M
3TB016U
3TB016U-WC
3TB018
3TB018U
3TB023
3TB023M
3TB024
3TB026U
3TB028
3TB028U
3TS013
3TS013M
3TS013U
3TS014
3TS014U
3TS016
3TS016U
3TS023
3TS023U
3TS024
3TS024M
3TS024U
3TS026
3TS026U
3TS026U-WC
3TS028
3TS028U
3TW023
3TW023U
3TW024
3TW024M
3TW024U
3TW026
3TW026M
03/21/2005
FloScan Instrument Company, Inc.
3016 NE Blakeley Street, Seattle, WA 98105
1000-190-04
Tel: (206) 524-6625
Email: [email protected]
Fax: (206) 523-4961
Http://www.floscan.com
42)
43)
44)
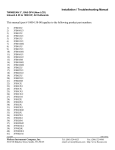
3TW026U
3TW028
3TW028U
03/21/2005
FloScan Instrument Company, Inc.
3016 NE Blakeley Street, Seattle, WA 98105
1000-190-04
Tel: (206) 524-6625
Email: [email protected]
Fax: (206) 523-4961
Http://www.floscan.com
OPERATION
TwinScan 3” Tachometer (LCD)
To ensure years of trouble free operation of your new TwinScan instrument,
please read all of these instructions carefully before beginning your installation.
1. Mounting Location
TwinScan instruments allow you to quickly monitor and compare port and starboard engine performance. The front faces of
all TwinScan® instruments are water-resistant and include a gasket to seal the instrument to the panel. Please note that TwinScan
instruments contain magnets that may affect your compass. Use care in choosing a mounting location.
2.
Start-up Sequence and Normal Operation
The TwinScan tachometer performs a quick self-test each time it is powered up. The self-test verifies adequate power, good ground
connections, that the pointers are free, and the LCD display is working properly. During this test, the pointers will sweep smoothly
from zero to full scale and then back to zero. The LCD shows a series of numbers as detailed below (example values are used, so
actual numbers may differ). Switches and configurations are shown on the LCD as: “0123456789AbCdEF”
“8.8.8.8”
“ 1.2 0”
“F
3”
“- - 3 4”
“
”
“
4.0”
“
”
Checks LCD segments and backlighting.
Software version number.
The red (left) and black (right) knob settings (on back of instrument).
Internal configuration (scale range, units, etc.)
Blank
Cycles per revolution as set by the red and black knobs (refer to calibration sheet—Table 1).
Blank
After the self-test, the instrument goes into its normal operating mode. The needles indicate engine rpm and the LCD displays a
synch indicator or nautical miles per gallon/liters per nautical mile depending on the “synch / MPG” (“synch / L/NM”) select switch.
3.
LCD Synchronizer Indicator
In engine-synch mode, the LCD is programmed to display a bar-graph indicator. A series of vertical bars will appear on the side of
the faster running engine. The number of bars displayed depends on how far the engines are out of synch and the synch resolution
setting on the back of the instrument (see calibration sheet for details). When the engines are synchronized an “IN SYNCH BAR”
appears in the center of the display. When one of the engines is not running, two small rectangles will appear in the corner of the
LCD display. For example, if the starboard engine is at idle and the port engine is not running the two small rectangles will appear in
the bottom left side of the display. Please refer to the diagram below for examples of sync displays.
Port engine running
In Synch
Starboard engine running
faster
faster
FIG. 1 SYNCH DISPLAY
5/20/1999
FloScan Instrument Company, Inc.
3016 NE Blakeley Street, Seattle, WA 98105
1000-206-00
Tel: (206) 524-6625
Fax: (206) 523-4961
Email: [email protected] Http://www.floscan.com
The number of bars visible in the display indicates how far the engines are out of synch. Referring to the gas engine settings in the
chart below, the display shows one vertical line if the engines are within 200 rpm (coarse) or 100 rpm (fine); it will only indicate
“IN SYNCH” if the engines are within 100 and 50 for the coarse and fine resolution respectively.
Number of bars displayed
≡ ≡
|
||
|||
||||
Coarse (gas)
Fine (gas)
Coarse (diesel)
Fine (diesel)
100
200
300
400
over 400
50
100
250
400
Over 400
50
100
200
300
over 300
20
50
150
300
over 300
Table 1 Synch resolution
4.
Nautical Miles per Gallon/Liters per Nautical Mile
The TwinScan tachometer displays nautical miles per gallon or liters per nautical mile (depending on the internal configuration of the
instrument) when it is used in conjunction with the TwinScan GPH and a device that outputs a NMEA 0183 data stream (GPS, Loran
C, etc.).
During normal vessel operation, adjusting engine RPM to your maximum MPG (L/NM) reading maximizes your fuel mileage. When
switching from the synch mode to MPG (L/NM), you will notice the display temporarily indicate MPG—“nnPG” or
L/NM—“LPnn” before it starts reading efficiency. The speed and flow data are smoothed for about 30 seconds, so wait for 30-60
seconds after making a throttle or trim change for the MPG/LPM reading to respond. Vessel trim, load, adjustment of trim tabs, water
currents and weather conditions also affect your fuel consumption. For similar operating conditions, dramatic changes in MPG
(L/NM) readings indicate possible mechanical malfunction, propeller damage or excessive bottom fouling and should be investigated.
Your current MPG (L/NM) reading on the TwinScan Tachometer instrument and GALLONS (LITERS) reading on the TwinScan
GPH (LPH) instrument allow you to quickly and easily estimate your current maximum cruising radius. For safety, allow a margin of
error when calculating your next fuel stop.
5.
Illumination
TwinScan instruments use a dual method of illumination to create a high contrast display making it easy to read at night without
affecting your night vision. The pointers are individually lighted so all the port pointers light when the port key switch is energized
and all the starboard pointers light when the starboard key switch is energized. “Light piping” directs the light from an incandescent
lamp across the dial face instead of bouncing it off the dial face and into your eyes.
6.
Caring for your instrument
The front lens of your TwinScan instrument is made of hardened Lexan and is resistant to mild abrasion. Use mild soap and water to
clean. Never wipe with a dry cloth. This can scratch the lens and builds up static electricity attracting dust and dirt. Avoid solvents
such as acetone, benzene, and lacquer thinner as they attack the surface of the lens. Most window and kitchen cleaners contain at
least one of these solvents plus mild abrasives and should be avoided. Applying automobile or furniture wax covers minor scratches
on the lens and helps prevent further scratching.
5/20/1999
FloScan Instrument Company, Inc.
3016 NE Blakeley Street, Seattle, WA 98105
1000-206-00
Tel: (206) 524-6625
Fax: (206) 523-4961
Email: [email protected] Http://www.floscan.com
INSTALLATION / WIRING
TwinScan 3” Instrument – Tachometer & GPH
Gas – NMEA 0183 Input (LCD)
******************************
*COMBINATION ONLY*
******************************
This unit conforms to NMEA 183, Version 1.5 and 2.0 interface standards, and requires a message that includes “VTG”, “RMC” or
“RMA”. Check your owner’s manual to verify your GPS / LORAN-C includes this information. To insure an easy trouble free
installation, read all instructions before starting.
WIRING
1. Refer to the electrical wiring section of the GPS / LORAN-C Owner’s Manual for the proper procedure to connect your GPS /
LORAN-C to NMEA 183 devices. Use shielded wire between instruments and ground the shield ONLY at the GPS / LORAN-C
(sender end), not at the FloScan instrument end (receiver end). The shield is not to be used as a ground path.
2. Connect the WHITE/ORANGE wire to the NMEA (+) (BNC center terminal) terminal coming from your GPS / LORAN-C
instrument.
3. Connect the GREEN/BLACK wire to the NMEA (-) (BNC shield) terminal coming from your GPS / LORAN-C instrument.
4. Connect the BLUE wire to the WHITE/RED wire from the TwinScan GPH meter and to one terminal of a single pole, single
throw switch. Connect the other terminal to the BLACK wire (system ground).
CALIBRATION
1.
2.
See your GPS / LORAN-C owner’s manual and set output for NMEA 0183 version 1.5 or 2.0 at 4800 bits/sec. (standard).
Speed is always sent on the NMEA string as speed over ground in knots no matter what units your GPS / LORAN-C displays.
Fuel flow rate calibration is automatically done when the totalizer is calibrated. To calibrate, see the Totalizer calibration
instruction page.
FUEL ECONOMY/SYNCH OPERATION
The blue wire must be connected to an operating TwinScan fuel flow meter to show fuel economy, otherwise the instrument shows
the synchronizer regardless of this switch position.
1. With the MPG/SYNCH switch in the ON position (BLUE wire closed, grounded), your instrument displays the engine
synchronizer. In the OFF (open) position, the instrument shows fuel economy in nautical miles per gallon or liters per nautical mile
and is automatically selected by the TwinScan GPH/LPH instrument. You must have valid NMEA 0183 version 1.5 or 2.0 speed
data to display fuel economy; otherwise you receive an error code:
ERROR CODES
Display
Reason
No signal activity present on NMEA 0183 terminals
“ OFF”
for four seconds.
“- - - -”
“- Lo -”
“- hi -”
“Err1”
“Err2”
Receiving NMEA 0183 Version 1.5 or 2.0 message,
but speed message is invalid.
(MPG mode) Speed valid but flow rate less than
0.25 GPH.
(LPM mode) Speed valid but less than 0.2 KM.
Some pulsing signal present but no NMEA 0183
message received in last four seconds.
NMEA 0183 message detected, but no “VTG”,
“RMC” or “RMA” sentence found.
Cause
GPS / LORAN-C OFF
NMEA OUTPUT not selected
Leads not connected
(+) & (-) leads reversed
GPS satellite reception is poor
GPS / LORAN-C in startup mode
Flow rate too low—engine stopped
Speed too low—boat stopped
Leads connected to wrong source
GPS / LORAN-C set to NMEA 0180 or 0182
(+) & (-) leads reversed.
GPS / LORAN-C incompatible with NMEA 0183,
version 1.5 or newer
5/15/2002
FloScan Instrument Company, Inc.
3016 NE Blakeley Street, Seattle, WA 98105
1000-205-00B
Tel: (206) 524-6625
Email: [email protected]
Fax: (206) 523-4961
Http://www.floscan.com
Note: THIS SHEET IS TO BE USED ONLY WHEN INSTALLING A TWINSCAN GPH METER
AND TACHOMETER COMBINED.
Back of GPH Instrument
0
Back of Tachometer
0
0
Red Switch
Black Switch
WHITE/RED
MPG
0
Red Switch
WHITE/ORANGE
BLUE
CABLE
Black Switch
SYNC
GREEN/BLACK
* Do not use Back-lit, or Illuminated switches
CABLE
RED/WHITE
1/2 amp fuse
To Port
key switch
RED/WHITE
Data (-)
To STARBOARD
tachometer input
VIOLET
BLACK
Data (+)
YELLOW
To PORT
tachometer input
RED
1/2 amp fuse
To Starboard
key switch
RED
BLACK
WHITE
PORT
R
CABLE
B
RED
Flow
Sensor
W
WHITE
RED
BLACK
BLACK
BROWN
WHITE
Battery (-) buss
BLACK
GREEN
Totalizer Reset Switch
* Do not use Back-lit, or Illuminated switches
3016 NE Blakeley Street, Seattle, WA 98105
B
W
Flow
Sensor
* If installing TwinScan tachometer and
TwinScan GPH Instrument, parallel
power and ground wires as shown.
Otherwise, wire as single instrument
as shown.
5/15/2002
FloScan Instrument Company, Inc.
STARBOARD
R
CABLE
1000-205-00B
Tel: (206) 524-6625
Email: [email protected]
Fax: (206) 523-4961
Http://www.floscan.com
ELECTRICAL
Series 5400(0)/5500(0)/56100/5800(0)/6500(0)/6600(0) AccuTroll & CruiseMaster,
All Multi Function Instruments, & TwinScan®
SET UP
Wire & Switches: Use 18 AWG stranded wire on runs under 50’. For runs over 50’ use 16 AWG. Shielded wire is recommended
for all Diesel systems and suggested for Inboard & I/O gasoline systems. Always, “Ground” the wire shield or shield drain wires in
the engine room by connecting them to the bonding system or engine block. The double wiring harness for twin engine
Pulse/NMEA Diesel installations is included in all, (97/9800(0)) kits. FloScan suggests using J-Boxes, Terminal Blocks, and three
conductor cables between diesel sensors and instrument to make wiring easier.
Install Single Pole Single Throw (SPST) switches for Totalizer Reset, Port–Starboard Select, Engine Hours / Synchronizer, and
GPH / MPG, (switches are not included with kit). To determine which switch types are required for your system, refer to the table
below. All instruments except TwinScan Tachometers require a totalizer reset switch.
SYSTEM
5400(0)
5500(0)/56100
5800(0)
6500(0)/6600(0)
65/6600(0) Cummins PT
7000/8000(0) Gasoline MFI
71/8A00(0) MFI - Gasoline
EFI
75/7600(0) Diesel MFI
9000 Gasoline MFI
9A00(0) MFI - Gasoline EFI
95/96/97/9800(0)
TwinScan GPH Meter
TwinScan Tachometer
TwinScan GPH & Tachometer
NA = Not Applicable
SPST or Momentary OFF
SPST or Momentary OFF
SPST or Momentary OFF
SPST or Momentary OFF
SPST or Momentary OFF
SPST or Momentary ON
PORT/STBD
Twin Engine Systems
SPST
SPST
NA
NA
SPST
SPST
HOURS/
SYNCH
NA
NA
NA
NA
NA
SPST
SPST or Momentary ON
NA
NA
NA
NA
SPST or Momentary ON
SPST or Momentary ON
SPST or Momentary ON
SPST or Momentary ON
SPST or Momentary ON
NA
SPST or Momentary ON
NA
SPST
NA
NA
NA
NA
NA
NA
SPST
NA
NA
NA
NA
NA
NA
SPST
SPST
SPST
NA
NA
NA
NA
NA
NA
NA
NA
NA
SPST
TOTALIZER RESET
GPH/
MPG
NA
NA
NA
NA
NA
NA
MPG/
SYNCH
NA
NA
NA
NA
NA
NA
Grounding: Each Black sensor wire must be connected directly to the Black, “Instrument Ground” wire. Use a single wire to
connect the Black wire junction to the battery’s negative terminal, or a ground buss.
Power: FloScan Instruments & sensors operate on 9 to 12 VDC. Voltages exceeding 16 VDC will damage equipment. 24 & 32
VDC systems must be reduced to 12 VDC. Two different types of voltage reducers are available through FloScan.
WIRE CONNECTIONS
Installation: Connect wires one at a time and install heat shrink tubing
before proceeding to the next wire, (refer to diagram). Connect ground
wires first, (BLACK instrument ground wire to the BLACK sensor
wires). Connect this junction to the battery’s negative terminal or the
ground buss. Connect all other wires leaving the Red power wires for
last to prevent short circuits during installation.
Splicing: Splice or join individual wires per the diagram. Slide heat
shrink tubing over the splices to prevent shorts. Do not seal splices until
the installation is finished and has been tested.
5/25/2006
FloScan Instrument Company, Inc.
3016 NE Blakeley Street, Seattle, WA 98105
1. Slide heat shrink tubing
over one wire.
2. Insert wire ends into butt splice.
3. Crimp butt splice.
4. Slide heat shrink tubing
over butt splice.
5. Apply heat.
HEAT
4001-100-00J
Tel: (206) 524-6625
Fax: (206) 523-4961
Email: [email protected] Http://www.floscan.com
An adequate number of crimp-on connectors and heat-shrink tubing are included with system. The heat-shrink is a special type that
will bond to wire insulation and make a watertight connection. See diagram for proper tubing application. Crimp-on connectors are
sized for 18 or 20 gauge stranded wire.
Tachometer Wiring Information applies only to MFI & TwinScan Instrument Tachometers
Tachometer signal wires on MFI & TwinScan Tachometers should be shielded.
For proper tachometer operation on gasoline EFI engines, (especially outboards) the engine Ground wire must be physically
connected to the MFI or TwinScan instrument ground wire.
Note: FloScan recommends using dedicated 18 AWG shielded cable for tachometer signal wire connections. Always, “Ground”
wire shields or the shield drain wire in the engine room by connecting to the bonding system or engine block.
MULTI FUNCTION & TWINSCAN INSTRUMENT TACHOMETERS for CARBURETOR & CLOSED LOOP EFI
GASOLINE ENGINES POINTS or STANDARD ELECTRONIC IGNITIONS
Inboard, & I/O Engines: Connect the YELLOW wire from pin # 8 to the distributor coil’s negative terminal. On twin engine
systems the Yellow wire from pin # 8 connects to the port engine, the VIOLET wire from pin # 16 to starboard.
Outboard Engines: Outboard tachometers are connected to either the engine alternator or tachometer signal wire. Connect the
YELLOW wire from pin # 8 to the engine alternator or tachometer signal wire. On twin engine systems the Yellow wire from pin #
8 connects to the port engine, the VIOLET wire from pin # 16 to starboard.
MULTI FUNCTION & TWINSCAN INSTRUMENT TACHOMETERS for
CLOSED LOOP EFI GASOLINE ENGINES with CPU IGNITION SYSTEMS
Inboard, I/O, & Outboard Engines: Connect the YELLOW wire from pin # 8 to the engines’ tachometer signal wire. On twin
engine systems the Yellow wire from pin # 8 connects to the port engine, the VIOLET wire from pin # 16 to starboard.
Outboard Engines: Connect the YELLOW wire from pin # 8 to the engines’ tachometer signal wire. On twin engine systems the
Yellow wire from pin # 8 connects to the port engine, the VIOLET wire from pin # 16 to starboard.
MULTI FUNCTION INSTRUMENT TACHOMETERS for
OPEN RETURN EFI GASOLINE ENGINES with CPU IGNITION SYSTEMS
Inboard & I/O Engines: Connect the YELLOW wire, pin # 8 to the engines’ tachometer signal wire.
MULTI FUNCITON INSTRUMENT TACHOMETERS - DIESEL ENGINES
• Keep existing tachometer: Connect the YELLOW and VIOLET wires to the existing tachometer signal wires. If one lead is
grounded at the pickup or alternator, connect the YELLOW wire to the tachometer signal wire. Connect the VIOLET wire to a
ground buss.
• Replace existing tachometer: Connect the YELLOW and VIOLET wires to the existing magnetic pickup or signal generator. If
one lead is grounded at the pickup or alternator, connect the YELLOW wire to the existing signal wire terminal at the tachometer
and connect the VIOLET wire to a ground buss.
• Install as a new tachometer. On engine alternator installations, connect the YELLOW wire to the tachometer output terminal
(usually marked “tach” or “sig”) and connect the VIOLET wire to a ground buss. For mechanically driven A-C signal generators
and magnetic pickups, connect the YELLOW wire to one terminal and the VIOLET wire to the other.
TWINSCAN INSTRUMENT TACHOMETERS – DIESEL ENGINES
• Connect the YELLOW wire to one terminal the Port tachometer sender, (AC signal generator, Magnetic pickup, or the engines’
alternators tach or sig terminal). Connect the VIOLET wire to the Starboard sender. The tachometer senders’ second terminal must
be grounded.
FINAL ACTIONS
Check Electrical Installation: Test all connections. Support and secure all dangling wires. Start engine and calibrate system.
5/25/2006
FloScan Instrument Company, Inc.
3016 NE Blakeley Street, Seattle, WA 98105
4001-100-00J
Tel: (206) 524-6625
Fax: (206) 523-4961
Email: [email protected] Http://www.floscan.com
ELECTRICAL
TwinScan Gas & Diesel Tachometer
Tachometer Wiring: For proper tachometer operation on Gasoline EFI engines, (especially outboards) the engine Ground wire must
be directly connected to the TwinScan Tachometer ground wire. FloScan recommends using dedicated 18 AWG shielded cable for
tachometer signal wire connections. Always, “Ground” wire shield or shield drain wire in the engine room by connecting it to the
bonding system, or engine block.
CARBURETOR & CLOSED LOOP EFI GASOLINE ENGINES with POINTS or STANDARD ELECTRONIC IGNITIONS
Inboard, & I/O Engines: Connect the Yellow tachometer signal wire to the negative terminal of the port engines’ distributor coil.
Connect the Violet tachometer signal wire to the negative terminal of the starboard engines’ distributor coil.
Outboard Engines: Outboard motor tachometers are connected to either the engine alternator or tachometer signal output wire.
Connect the Yellow tachometer signal wire the port engines’ alternator or tachometer signal output wire. Connect the Violet
tachometer signal wire to the starboard engines’ alternator or tachometer signal output wire.
CLOSED LOOP EFI GASOLINE ENGINES with CPU IGNITION SYSTEMS
Inboard, I/O, & Outboard Engines: Connect the Yellow tachometer signal wire to the port engines’ tachometer signal output wire.
Connect the Violet tachometer signal wire to the starboard engines’ tachometer signal output wire.
CHRYSLER (Except Magnapower I) - Connect tachometer signal wire(s) to the engine terminal strip marked, “ALT”.
JOHNSON/EVINRUDE/SEADRIVE - Connect tachometer signal wire(s) to the gray wire at key switch harness or Gray/Yellow
alternator wire on engine terminal strip. For 1984 and later model years with standard voltage regulators, connect the tachometer
signal wire(s) to either the Gray voltage regulator wire, or the Yellow/Gray alternator wire on the engine terminal strip.
MERCURY/MARINER - Attach tachometer signal wire(s) to the Yellow/Red, or Yellow wire terminal on engine rectifier.
SUZUKI - Remove three screws from rear of the throttle control box and remove cover plate. Attach tachometer signal wire(s) to the
Yellow wire, and shield ground wire to Black wire. Keep wires away from the moving parts in control box and reinstall back cover.
YAMAHA - Attach tachometer signal wire(s) to the Green wire, and shield ground wire to the Black wire at underside of shift control
box. If the Green wire is not accessible at control box, either Green wire on engine terminal strip can be used.
DIESEL ENGINES
New Installations: TwinScan Diesel Tachometers can use an Engine Alternator, Mechanically Driven AC Signal Generator, or a
Magnetic Pick-Up as the tachometer signal source.
•
Engine Alternator: Connect the Yellow tachometer signal wire to the port alternators’ tachometer output terminal (usually
marked “Tach” or “Sig”). Connect the Violet tachometer signal wire to the starboard alternators’ tachometer output terminal.
•
Mechanically Driven A-C Signal Generator, Magnetic Pickup: Signal Generators and Magnetic Pick-Ups have two terminals.
One terminal must be connected to battery minus or a ground buss. Connect the Yellow tachometer signal wire to the open
terminal on the port signal generator or magnetic pickup. Connect the VIOLET tachometer signal wire to the open terminal on the
starboard signal generator or magnetic pickup.
Keep or Replace Existing Tachometer: Connect the Yellow tachometer signal wire to the port tachometers signal output wire.
Connect the Violet tachometer signal wire to the starboard tachometers signal output wire. If using an AC Signal Generator or
Magnetic Pick-Up as the tachometer signal source, verify that one terminal is grounded.
FINAL ACTIONS
Check Electrical Installation: Test all connections. Support and secure all dangling wires to prevent accidental breakage. Proceed to
operate system and calibrate.
9/19/2003
FloScan Instrument Company, Inc.
3016 NE Blakeley Street, Seattle, WA 98105
7000-039-01
Tel: (206) 524-6625
Email: [email protected]
Fax: (206) 523-4961
Http://www.floscan.com
9/19/2003
FloScan Instrument Company, Inc.
3016 NE Blakeley Street, Seattle, WA 98105
7000-039-01
Tel: (206) 524-6625
Email: [email protected]
Fax: (206) 523-4961
Http://www.floscan.com
WIRING
Installation Instructions
TwinScan® 3” Instrument – Tachometer Only
Gas and Diesel Engines
To ensure years of trouble free operation of your new TwinScan® Instrument
please read all of these instructions carefully before beginning your installation.
CAUTION: To avoid electrical shorts and possible fire, turn OFF the power to the instrument panel until installation is complete.
WIRING
Use No. 18 AWG multi-strand wire, the included butt splices, and self-sealing heat shrink to make all connections. Alternate
installation: Use insulated ring tongue connectors and a terminal strip. DO NOT solder connections. Vibration can cause wire to
break where solder stops and cause intermittent connections.
Installation: Make a 3 3/8” diameter cutout in the instrument panel for the instrument.
Important: Protect wires from damage caused by sharp edges, moving and hot engine parts. Cable tie and support all wire runs for
safety.
MAIN WIRING
Wire Color
RED/WHITE
RED
BLACK
YELLOW
VIOLET
BLUE
WHITE/ORANGE
GREEN/BLACK
Back of Instrument
Function
PORT + 12 VDC Power
STARBOARD + 12 VDC Power
Battery Ground
PORT tachometer input
STARBOARD tachometer input
Flow Input
GPS Input, NEMA + (A)
GPS Input, NEMA - (B)
Dial Lamp
0
Black Switch
Calibration Knobs
0
Red Switch
Wires
1.
Connect the RED/WHITE stripe wire to the “power on” side of the
PORT engine key switch.
2.
Connect the RED wire to the “power on” side of the STARBOARD engine key switch.
3.
Connect the BLACK wire to the negative (-) side of the battery buss.
4.
Connect the YELLOW wire to the PORT engine tachometer pickup.
5.
Connect the VIOLET wire to the STARBOARD engine tachometer pickup.
Note: If not installing a TwinScan GPH instrument, leave the following wires disconnected (tape them off).
6.
Connect the BLUE wire to the WHITE/RED wire from the TwinScan GPH instrument.
7.
Connect the WHITE/ORANGE wire to the GPS (+) terminal (A).
8.
Connect the GREEN/BLACK wire to the GPS (-) terminal (B).
NOTE: The industry standard for tachometer pickup wire(s) color coding is as follows:
PORT side = GREY/RED
STARBOARD side = GREY/GREEN
This completes the Tachometer wiring. See TACHOMETER CALIBRATION sheet for calibration information.
WIRING SCHEMATIC FOR GAS AND DIESEL TWINSCAN TACHOMETER
10/21/1999
FloScan Instrument Company, Inc.
3016 NE Blakeley Street, Seattle, WA 98105
1000-109-00E
Tel: (206) 524-6625
Email: [email protected]
Fax: (206) 523-4961
Http://www.floscan.com
Wiring Schematic For Gas
Twinscan Tachometer
Back of Tachometer
+ 12VDC
VIOLET
YELLOW
+ 12VDC
Distributor
Coil
Distributor
Coil
0
0
Black Switch
Red Switch
Starboard Keyswitch
RED
+ 12V
CABLE
+ 12V
BLACK
1/2 amp fuses
RED/WHITE
Port Keyswitch
(Used with TwinScan
GPH instrument )
WHITE/ORANGE Tape End
GREEN/BLACK
Battery
Post
Negative
Tape End
BLUE
Tape End
Wiring Schematic For Diesel
Twinscan Tachometer
Back of Tachometer
PORT
STARBOARD
Tach Sender
Tach Sender
Battery
Post
Negative
0
0
Black Switch
Red Switch
YELLOW
VIOLET
Starboard Keyswitch
RED
+ 12V
CABLE
1/2 amp fuses
Port Keyswitch
RED/WHITE
BLACK
+ 12V
10-21-99
(Used with TwinScan
GPH instrument )
Battery
Post
Negative
WHITE/ORANGE Tape End
GREEN/BLACK
Tape End
BLUE
10/21/1999
FloScan Instrument Company, Inc.
3016 NE Blakeley Street, Seattle, WA 98105
Tape End
1000-109-00E
Tel: (206) 524-6625
Email: [email protected]
Fax: (206) 523-4961
Http://www.floscan.com
CALIBRATION
TwinScan 3” Instrument – Tachometer (LCD)
Diesel Engines
Back of Instrument
Dial Lamp
The TwinScan 3” Tachometer is unique in that it can be calibrated for both gasoline and
diesel systems. On the back of the TwinScan 3” Tachometer Instrument, the RED
switch is used for fine calibration. The BLACK switch is used for coarse calibration.
You will use a combination of both switches for proper calibration.
0
Black Switch
0
Calibration Knobs
Red Switch
Wires
DIESEL SYSTEM CALIBRATION
Diesel systems have three options for tachometer pick-up styles, Mechanical AC Generator, Magnetic Pick-up, and Alternator.
Table 1 will be used to calibrate any style of tachometer pickup you may have. Please read the section pertaining to your specific
tachometer pick-up style for instructions on calibrating the tachometer.
I.
MECHANICAL AC GENERATOR
1.
Determine the number of pole pairs of your generator. Some examples are:
Century Brass 8
Stewart Warner 8
Hewitt 8
Synchrostart 30
VDO 4
Motorola 8
2.
Determine the ratio of the number of revolutions of the crankshaft drive to the number of revolutions of the tachometer. For
most engines, the ratio is 0.5. If you are not sure of your tachometer drive ratio, you can either check with your local engine
dealer or you can adjust the RED and BLACK switches until you get a reading of 500-800 RPM at a normal idle with the
engine at or near normal operating temperature.
Calculate the proper switch setting:
Tachometer drive ratio x number of generator pole pairs = number used to determine RED and BLACK switch settings
from Table 1.
Example: Installation - Caterpillar 3208 with an 8 pole pair generator.
Crankshaft revolution to tachometer drive = 0.5 ratio.
Generator = 8 pole pair.
0.5 (ratio) x 8 (pole pair) = 4 (generator produces 4 pulses per revolution).
3.
The switch setting selection would be as follows:
50 RPM synchronized resolution - RED switch = 3
20 RPM synchronized resolution - RED switch = 3
II.
BLACK switch = 1
BLACK switch = 9
MAGNETIC PICK-UP
This instrument must be calibrated at the time of installation to your specific engine in the following manner:
1. Determine the number of pulses of the magnetic pick-up per crankshaft revolution. If you are not sure what this is, contact
you local engine dealer and they can provide this information.
Pulses = (number of teeth on gear) x (number of revolutions of gear per crank shaft revolution).
The table steps allow setting to be within +/- 1% to 2% of the actual pulse count. As this applies to both engines, the
synchronizing accuracy is not affected.
2.
III.
Locate the number of pulses per crankshaft revolution in Table 1. Select the number closest to your actual pulses per
crankshaft revolution.
Example: Pulses per crank shaft revolution = 160. From Table 1:
BLACK switch = 6
50 RPM synchronized resolution - RED switch = B
BLACK switch = E
20 RPM synchronized resolution - RED switch = B
ALTERNATOR
6/16/2006
FloScan Instrument Company, Inc.
3016 NE Blakeley Street, Seattle, WA 98105
1000-207-00
Tel: (206) 524-6625
Fax: (206) 523-4961
Email: [email protected] Http://www.floscan.com
The alternator input usually comes off one of the windings of the alternator before it is rectified. This tachometer signal is
inconsistently inaccurate because of a varying amount of belt slippage depending on the load on the alternator, the dimension of the
belt and the belt tension.
Calibration
You can calibrate the tachometer by two methods:
1. Calibrate to the existing tachometer. Simply rotate the RED and BLACK knobs on the back of the instrument until the two
tachometers agree with each other. The accuracy of this method depends on the accuracy of the existing tachometer at the
RPM to which you calibrate. It is best to compare to the existing tachometer at cruising RPM or higher, not at idle.
2. You need the number of poles the alternator has to determine the number of pulses per revolution. Multiply this times the
ratio of the diameter of the crankshaft pulley. Divide this number by the diameter of the alternator pulley.
3. Locate the number of pulses per crankshaft revolution in Table 1. Select the number closest to your actual pulses per
crankshaft revolution.
Example: Motorola alternator has 12 pole pairs (12 pulses per revolution)
Crank shaft pulley = 10” diameter
Alternator pulley = 4” diameter
12 x (10 ÷ 4) = number of pulses per revolution 12 x 2.5 = 30 pulses per revolution.
BLACK switch = 3
From Table 1 - 50 RPM synchronized resolution - RED switch = 8
20 RPM synchronized resolution - RED switch = 8 BLACK switch = B
Adjust the RED and BLACK switches for the pulses per revolution according to Table 1:
Table 1 Tachometer Calibration
Synchronized
Resolution
0
9
1
1
A
2
13.9
BLACK Switch Setting
B
C
D
3
4
5
23.8
39.5
63.5
1
2
14.3
24.5
41
66
114
196
2
3
14.6
25.3
42.5
69
117
202
3
4
15
26
44
72
120
208
4
5
15.4
26.8
45.5
75
123
214
5
6
15.8
27.5
47
78
126
220
20 RPM
0 RPM
E
6
111
F
7
190
RED
6
7
16.3
28.3
48.5
81
130
226
Switch
7
8
17
29
50
84
136
232
Setting
8
9
17.8
29.8
51.5
87
142
238
9
10
18.5
30.5
53
90
148
244
A
11
19.3
31.3
54.5
93
154
250
B
12
20
32
56
96
160
256
C
12.4
20.8
33.5
57.5
99
166
268
D
12.8
21.5
35
59
102
172
280
E
13.1
22.3
36.5
60.5
105
178
292
F
13.5
23
38
62
108
184
304
6/16/2006
FloScan Instrument Company, Inc.
3016 NE Blakeley Street, Seattle, WA 98105
1000-207-00
Tel: (206) 524-6625
Fax: (206) 523-4961
Email: [email protected] Http://www.floscan.com
CALIBRATION
TwinScan 3” Instrument – Tachometer (LCD)
Gasoline Engines
Back of Instrument
Dial Lamp
TwinScan 3” Tachometers are unique in that they can be used on gasoline and diesel
engines. For gasoline engine calibration refer to the appropriate engine section, Inboard or
Outboard.
0
Black Switch
0
Calibration Knobs
Red Switch
Wires
There are two calibration switches on the back of the instrument, Black and Red. Both are
required for calibration. If there’s an existing tachometer, or you know the engines’ idle
RPM, you can calibrate the tachometer without referring to Tables I, II, or III.
Decide on either Coarse or Fine Synch resolution. Coarse resolution shows that the engines are synched when they are running within
100 RPM, fine resolution shows synch within 50 RPM. Begin calibrating by putting the Black switch on 0 or 8, 0 is recommended.
Starting at 0, rotate the Red switch one, “click” at a time until you dial in the correct idle RPM.
•
If the correct RPM cannot be dialed in, refer to Table I, II, or III below.
Inboard Engines:
Tachometer calibration for standard point and electronic ignition inboard engines is usually based upon the number of engine
cylinders. EFI engines sometimes use a CPU to generate its tachometer signal. For these engines calibration is not always based on
engine cylinders.
Standard Point & Electronic Ignition Inboard Engines
Coarse Synch Display, (Recommended)
BLACK
RED
Cylinders
4
0
1
6
0
2
8
0
3
Fine Synch Display
Cylinders
BLACK
4
8
6
8
8
8
RED
1
2
3
EFI Inboard Engines
Coarse Synch Display, (Recommended)
BLACK
RED
Cylinders
4, 6, or 8
0
1
4
0
1
6
0
2
8
0
3
Cylinders
4,6, or 8
4
6
8
Fine Synch Display
BLACK
RED
8
1
8
1
8
2
8
3
Table 1: 4-Cycle Gasoline Inboard Engines
7/8/2003
FloScan Instrument Company, Inc.
3016 NE Blakeley Street, Seattle, WA 98105
1000-208-00A
Tel: (206) 524-6625
Email: [email protected]
Fax: (206) 523-4961
Http://www.floscan.com
Outboard Engines:
Tachometer calibration for standard point and electronic ignition outboard engines is usually based upon the number of alternator pole
pairs. EFI outboards sometimes use a CPU to generate its tachometer signal. Calibration for EFI engines is not always based
alternator pole pairs. Refer to your engine manual or check with a local dealer to determine the number of alternator pole pairs your
engine has.
Standard Points, Electronic Ignition, & EFI Outboard Engines
Coarse Synch Display, (Recommended)
Pole Pairs Black Switch
Red Switch
2
0
1
4
0
3
6
0
5
8
0
7
10
0
9
12
0
B
14
0
D
16
0
F
Pole Pairs
2
4
6
8
10
12
14
16
Fine Synch Display
Black Switch
Red Switch
8
1
8
3
8
5
8
7
8
9
8
B
8
D
8
F
EFI Outboard Engines
Coarse Synch Display, (Recommended)
Pole Pairs Black Switch
Red Switch
CPU
0
1
Pole Pairs
CPU
Fine Synch Display
Black Switch
Red Switch
8
1
Table II, 2&4-Cycle Gasoline Inboard Engines
Red Switch
0
1
2
3
4
5
6
7
8
9
A
B
C
D
E
F
0
1
8
9
1
1
2
2
3
3
4
4
5
5
6
6
7
7
8
8
9
9
10
10
11
11
12
12
13
12.4
14
12.8
15
13.1
16
13.5
2
A
13.9
14.3
14.6
15
15.4
15.8
16.3
17
17.8
18.5
19.3
20
20.8
21.5
22.3
23
3
B
23.8
24.5
25.3
26
26.8
27.5
28.3
29
29.8
30.5
31.3
32
33.5
35
36.5
38
4
C
39.5
41
42.5
44
45.5
47
48.5
50
51.5
53
54.5
56
57.5
59
60.5
62
5
D
63.5
66
69
72
75
78
81
84
87
90
93
96
99
102
105
108
6
E
111
114
117
120
123
126
130
136
142
148
154
160
166
172
178
184
7
F
190
196
202
208
214
220
226
232
238
244
250
256
268
280
292
304
100 RPM 50 RPM
Black
Switch
Table III: Pulses/Engine Revolution
7/8/2003
FloScan Instrument Company, Inc.
3016 NE Blakeley Street, Seattle, WA 98105
1000-208-00A
Tel: (206) 524-6625
Email: [email protected]
Fax: (206) 523-4961
Http://www.floscan.com
TROUBLESHOOTING
®
TwinScan 3” Instrument - Tachometer (LCD)
BEFORE CALLING FOR ASSISTANCE, COMPLETE THESE TROUBLESHOOTING CHECKS AND RECORD YOUR
FINDINGS. TECHNICAL SUPPORT REQUIRES THIS INFORMATION BEFORE A RETURN AUTHORIZATION WILL BE
ISSUED. IT TAKES ABOUT 20 MINUTES AND IS VERY IMPORTANT IN ANALYZING SYSTEM PROBLEMS.
Before starting, record instrument model number and switch settings.
MODEL # _____________________
SERIAL # ____________
RED SWITCH POSITION __________
BLACK SWITCH POSITION _________
Perform the Instrument Diagnostic Test First. Record your findings.
I. INSTRUMENT DIAGNOSTIC SELF-TEST
•
•
•
•
Secure power to the Red, and Red/White wires, (Turn both key switches OFF).
Turn power on, (Either to one or both switches). At start-up, the instrument automatically performs a, “Self-test”.
Verify that the pointer’s back-lighting glows Red, and that the LCD back-light is glowing Green.
Observe that the pointers smoothly sweep to near full scale, (Slightly above or below) then smoothly drop back to zero.
The LCD display shows the following numbers and letters in sequence. These are examples actual readings may vary. Switch settings
and configurations are shown on the LCD as, “0123456789AbCdEF”.
8.8.8.8
1.21
F 3
- - 34
≡ ≡
LCD segment and back-lighting check.
Software version number.
Red, (Port) and Black (Starboard) switch settings.
Internal configuration (scale range, units, etc.)
Blank
Synch display, (Indicates normal operation).
NOTE: If Tachometer is powered from on switch, a lower case oo will appear in one corner of the LCD.
•
Record the software version __________ and switch settings _____ _____. FloScan Technical Support will ask for these.
The self-test verifies adequate power, a good ground, that the pointers move, and the LCD display is working.
FAULT
PROBABLE CAUSE
SEE SECTION:
Blank LCD Display
No back-lighting
High, Low or No Tachometer Reading
Wiring
Wiring/bulb failure
Wiring
Calibration
Section II
Section II
Installation sheet
Calibration sheet
Fluctuating Tachometer
Wiring/continuity
In synch w/engine
Sections II, III
Wire Harness Continuity Test
Section III
II. SUPPLY VOLTAGE and GROUND TEST
•
Measure voltage between the Starboard RED power wire, and the BLACK Instrument ground wire.
•
Measure voltage between the Port RED/WHITE power wire, and the BLACK Instrument ground wire.
This reading should be approximately 12 VDC, but not lower than 10 VDC.
3/13/2002
FloScan Instrument Company, Inc.
3016 NE Blakeley Street, Seattle, WA 98105
__________VDC
1000-223-00
Tel: (206) 524-6625
Fax: (206) 523-4961
Email: [email protected] Http://www.floscan.com
•
•
If 12 VDC is not present, measure between the RED, or RED/WHITE power wire and a known good
ground in the instrument panel. If you measure 12 to 14 VDC there may be an instrument ground problem.
__________VDC
If 12 to 14 VDC is not present check wiring, switches, fuse, and the 12 VDC power source.
III. CONTINUITY TEST
•
Continuity testing requires access to the back of the Instrument and an Ohmmeter. It verifies that wires are not
broken, shorted to ground, another wire, or to power. Before starting, secure all power. You will be testing the
VIOLET, and YELLOW wires.
•
Disconnect the Yellow wire harness conductor from the Port Tachometer Sender & Instrument wire.
Connect a jumper from the YELLOW wiring harness conductor to a known good ground. At the
Instrument, connect an Ohmmeter lead to its’ YELLOW wiring harness conductor. Connect the other
Ohmmeter Lead to a known, good ground. The Ohmmeter should read approximately 0.1 to 3 Ω.
(Ohm Reading)
Disconnect the VIOLET wire harness conductor from the Port Tachometer Sender & Instrument wire.
Connect a jumper from the VIOLET wiring harness conductor to a known good ground. At the
Instrument, connect an Ohmmeter lead to its’ VIOLET wiring harness conductor. Connect the other
Ohmmeter Lead to a known, good ground. The Ohmmeter should read approximately 0.1 to 3 Ω.
(Ohm Reading)
•
____________
____________
IV. TACHOMETER PROBLEMS
Note: Refer to the engine owners’ manual, wiring diagram, installation, and calibration instructions for parts A, B, & C below.
A. NO READING.
•
Check continuity of the YELLOW and VIOLET Tachometer signal wires, (Section III). Verify that the tachometer signal wires
are connected at the correct signal output point.
B. HIGH OR LOW READINGS.
•
Verify that Tachometer is calibrated correctly.
C. FLUCTUATING READINGS.
•
Listen to your engine(s). If engine speed cycles up and down, (when idling or underway) the tachometer reading will follow. This
does not indicate a problem with the Tachometer, but may indicate engine problems.
•
Verify that wiring connections are tight, clean and dry. Check continuity while shaking the wires. Ohm readings should be near
zero and remain steady.
•
Verify that the tachometer signal wires are connected at the correct signal output point.
This concludes system testing. If problems with your system persist,
contact FloScan Technical Support with testing results.
3/13/2002
FloScan Instrument Company, Inc.
3016 NE Blakeley Street, Seattle, WA 98105
1000-223-00
Tel: (206) 524-6625
Fax: (206) 523-4961
Email: [email protected] Http://www.floscan.com
Installation / Troubleshooting Manual
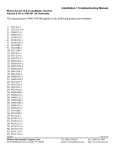
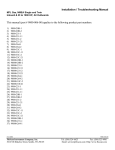
TWINSCAN 3”, GAS GPH (New LCD)
Inboard & IO to 1000 HP, All Outboards
This manual (part # 1000-158-00) applies to the following product part numbers:
1)
2)
3)
4)
5)
6)
7)
8)
9)
10)
11)
12)
13)
14)
15)
16)
17)
18)
19)
20)
21)
22)
23)
24)
25)
26)
27)
28)
29)
30)
31)
32)
33)
34)
35)
36)
37)
38)
39)
40)
41)
3FB010U
3FB010U3
3FB011M1
3FB011M2
3FB012U
3FB012U1
3FB012U2
3FB013U
3FB013U1
3FB013U2
3FB014M2
3FB015U
3FB015U1
3FB016M1
3FB016U
3FB016U1
3FB016U2
3FB018M
3FB018M1
3FB018M2
3FB022U
3FB022U1
3FB022U2
3FB023U
3FB023U1
3FB028M
3FS012U
3FS012U1
3FS012U2
3FS013U
3FS013U1
3FS013U2
3FS015U1
3FS021M
3FS021M1
3FS022U
3FS022U1
3FS022U2
3FS023U
3FS023U2
3FS023U1
04/21/2008
FloScan Instrument Company, Inc.
3016 NE Blakeley Street, Seattle, WA 98105
1000-190-02
Tel: (206) 524-6625
Fax: (206) 523-4961
Email: [email protected] Http://www.floscan.com
42)
43)
44)
45)
46)
47)
48)
49)
50)
51)
52)
53)
54)
55)
56)
57)
58)
59)
60)
61)
62)
63)
64)
65)
66)
67)
68)
69)
70)
71)
72)
73)
74)
75)
76)
77)
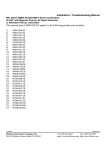
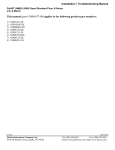
3FS024M2
3FS025U
3FS025U1
3FS026
3FS026U
3FS026U1
3FS026U2
3FS028M
3FS028M1
3FS028M2
3FW012U1
3FW013U2
3FW016U1
3FW020U
3FW020U3
3FW021M
3FW021M1
3FW021M2
3FW022U
3FW022U1
3FW022U2
3FW023U
3FW023U1
3FW023U2
3FW024M
3FW024M2
3FW025U
3FW025U1
3FW025U3
3FW026U
3FW026U1
3FW026U2
3FW028M1
3FW028M2
3FW028M4
3FS018M2
04/21/2008
FloScan Instrument Company, Inc.
3016 NE Blakeley Street, Seattle, WA 98105
1000-190-02
Tel: (206) 524-6625
Fax: (206) 523-4961
Email: [email protected] Http://www.floscan.com
!
INSTALLATION PLANNING
!
READ ME FIRST - Mechanical & Electrical Installation Planning Saves Time!
FloScan systems are not difficult to install. Installing one requires only basic electrical & mechanical skills. With forethought and
planning, your system will be installed with few problems.
I. Installation Preparation:
Review the mechanical installation instructions, then survey your vessel. Determine where the Sensor(s), Pulsation Damper(s), (if
used) Switches and Instruments are to be mounted. Place them at their approximate locations. Measure fuel line lengths between
system components, (Primary Filter, Sensor(s), Damper(s), Engine, and Fuel Tank). Determine fitting sizes and type of fittings needed
for each plumbing connection, (JIC, SAE, NPT, NPTF, or Hose Barb).
FloScan Gasoline, “Hi-Flo” system components have ½” Female NPT ports.
FloScan Gasoline, “Lo-Flo” system components have ¼” Female NPT ports.
Review the electrical installation instructions. Open and survey your vessels wire ways and run 3-conductor cables from each sensor
to the instrument. Tachometers require 1 or 2 additional conductors. If there’s an existing tachometer, its signal wires can be used.
II. Mechanical Installation:
Install or mount the Sensor(s), Pulsation Damper(s), (If required) Instruments and Switches, (Reset, MPG, Port/Starboard, Synch).
III. Plumbing:
Mount sensor(s) where they’re to be installed. On installations using Fabric Braid A-1 Fuel Hose install the correct HB X MNPT
fitting into each sensor. Always assemble fittings using a fuel proof pipe thread sealant. Never use Teflon Tape. Use a hose cutter or
knife to cut the fuel hose. Next install the hose onto the barb fittings. Hose should not be twisted, have adequate slack, an ample radius
at all bends and be supported at reasonable distances, approximately 2-4 feet. When clamping hose onto the barbs, use 2 narrow or 1
wide stainless hose clamp on each hose end.
Wire Braid A-1 Aeroquip Type Fuel Hose or Hydraulic Hose: Mount the sensor(s) or sensor assemblies where they’re to be
installed. Mark the hose where it is to be cut. Remove hose and bring it to a hydraulic shop. Have them cut the hose and install hose
ends. Reinstall the hoses and install the correct fitting into each sensor or sensor assembly. Always assemble fittings using a fuel proof
pipe thread sealant. Never use Teflon Tape. Hoses should not be twisted, have adequate slack, an ample radius at all bends and be
adequately supported at reasonable distances, approximately 2-4 feet. AP-50 copper sealing washers, (Connie Seals) or Flaretite seals
may be required to seal JIC & SAE fittings.
IV. Electrical Installation:
Run cables between Sensor(s) and Instrument(s). Cables must be adequately supported at reasonable distances, approximately 2-4
feet. Wire Terminations—Referring to the wiring diagram. Connect Sensor, Instrument and Switches to their respective wires with
crimp type butt or ring connectors. Always cover connectors and wire ends with heat shrink tubing.
V. System Start-Up:
Prime the fuel system and check for leaks. Start and run your engines. Look for leaks and other installation problems. If system is not
operating properly refer to the Troubleshooting Instructions and correct any deficiencies.
VI. Calibration:
When system is running properly, refer to the calibration instructions and calibrate your system.
5/25/2004
FloScan Instrument Company, Inc.
3016 NE Blakeley Street, Seattle, WA 98105
4001-386-01D
Tel: (206) 524-6625
Fax: (206) 523-4961
Email: [email protected] Http://www.floscan.com
USCG approved fuel hose with either fabric or wire reinforcing braid meet the following standards:
Hose Marking
USCG Type A-1
USCG Type A-2
USCG Type B-1
USCG Type B-2
Permeation Rating
100g/m²/24hrs.
300g/m²/24hrs.
100g/m²/24hrs.
300g/m²/24hrs.
2½ Minute Fire Test
Required
Required
Not Required
Not Required
Table I
Installation Do’s & Don’ts
Do
Don’t
Use a Fuel Proof Pipe Thread Sealant when
assembling fittings into fuel system components,
(Locktite PST, Leak-Lock, or equivalent).
Never use Teflon Tape!
Use thin wall, low pressure, full flow type NPT or
NPTF hose barb fittings.
Don’t use Push-Lok, or Barb-Tite fittings.
Avoid using JIC or SAE swivel fittings. If used
always install copper conical sealing washers,
(Connie seals) or fitting seals on fittings.
Double clamp all hose barb fittings.
Avoid using 90º elbow fittings.
Install Sensor(s) at a low point in the fuel system, as
far from the engine as practical. Fuel must travel, If possible, avoid bolting or mounting sensor(s)
“Up-hill” slightly after leaving the sensor. Verify directly onto the engine.
correct orientation and fuel flow direction.
Connect all, “Ground” wires to a Ground Buss, or
directly to the Battery’s Negative Terminal. Connect Never connect Instrument or Sensor “Ground”
wires to the hull, engine block, or other
or, “Ground” wire shields to the engine block.
machinery.
On Instruments with a GPS interface, connect
Do not connect FloScan’s Data (–) to the GPS
FloScan’s Data (+) to the GPS signal output.
Data (–).
Connect Data (–) to the GPS signal ground.
Always use non-illuminated switches for Totalizer
Reset, Port/Starboard Select, Hours/Synch, and
GPH/MPG.
5/25/2004
FloScan Instrument Company, Inc.
3016 NE Blakeley Street, Seattle, WA 98105
Never use illuminated, or back-lit switches.
4001-386-01D
Tel: (206) 524-6625
Fax: (206) 523-4961
Email: [email protected] Http://www.floscan.com
OPERATION
TwinScan® 3” GPH Instrument – Gallons Per Hour (LCD)
To ensure years of trouble free operation of your new TwinScan® instrument,
please read all of these instructions carefully before beginning your installation.
1. Mounting Location
The TwinScan® GPH instrument allows you to quickly monitor and compare port and starboard engine performance. The front faces
of all TwinScan® instruments are water-resistant and include a gasket to seal the instrument to the panel in which it is installed.
Caution: TwinScan® instruments contain magnets that may affect your compass. Use care in choosing your mounting location.
2.
Start-up Sequence and Normal Operation
The TwinScan® GPH instrument performs a quick self-test each time it is powered up. The self-test verifies adequate power, good
ground connections, that the pointers are free, and the LCD display is working. During this test, the pointers will sweep smoothly
from zero to full scale and then back to zero. The LCD shows a series of numbers as detailed below (example values are used so
actual numbers may be different). Switches and configurations are shown on the LCD as: “0123456789AbCdEF”
“8.8.8.8”
“ 1.21”
“F 3”
“- - 34”
“
”
“123.4”
Checks LCD segments and backlighting.
Software version number.
The red (left) and black (right) switch settings.
Internal configuration (scale range, units, etc.)
Blank
Current total gallons or total liters (normal operation).
After the self-test, the instrument goes into its normal operating mode. The needles indicate fuel flow in gallons (or liters) per hour
and the LCD shows the total gallons (or liters) consumed since the last reset.
3.
Testing the Totalizer
The TwinScan GPH instrument has a non-volatile memory to track the total fuel consumed and therefore can only be reset by holding
the reset switch in the “RESET” position for approximately 15 seconds. You will notice the LCD totalizer blinking during the reset
mode—warning you that it is about to reset. After 10-15 seconds, the LCD will blink “E 0.0”. Release the switch to return to
normal operation.
4. Illumination
TwinScan® instruments use a dual method of illumination to create a high contrast display making it easy to read at night without
affecting your night vision. The pointers are individually lighted so all the port pointers light when the port key switch is energized
and all the starboard pointers light when the starboard key switch is energized. “Light piping” directs the light from an incandescent
lamp across the dial face instead of bouncing it off the dial face and into your eyes.
5. Caring For Your Instrument
The front lens of your TwinScan® instrument is made of hardened Lexan and is resistant to mild abrasion. Use mild soap and water to
clean. Never wipe with a dry cloth. This can scratch the lens and builds up static electricity attracting dust and dirt. Avoid solvents
such as acetone, benzene, and lacquer thinner as they attack the surface of the lens. Most window and kitchen cleaners contain at
least one of these solvents plus mild abrasives and should be avoided. Applying automobile or furniture wax covers minor scratches
on the lens and helps prevent further scratching.
6/14/2006
FloScan Instrument Company, Inc.
3016 NE Blakeley Street, Seattle, WA 98105
1000-203-00
Tel: (206) 524-6625
Email: [email protected]
Fax: (206) 523-4961
Http://www.floscan.com
INSTALLATION / WIRING
TwinScan 3” Instrument – Tachometer & GPH
Gas – NMEA 0183 Input (LCD)
******************************
*COMBINATION ONLY*
******************************
This unit conforms to NMEA 183, Version 1.5 and 2.0 interface standards, and requires a message that includes “VTG”, “RMC” or
“RMA”. Check your owner’s manual to verify your GPS / LORAN-C includes this information. To insure an easy trouble free
installation, read all instructions before starting.
WIRING
1. Refer to the electrical wiring section of the GPS / LORAN-C Owner’s Manual for the proper procedure to connect your GPS /
LORAN-C to NMEA 183 devices. Use shielded wire between instruments and ground the shield ONLY at the GPS / LORAN-C
(sender end), not at the FloScan instrument end (receiver end). The shield is not to be used as a ground path.
2. Connect the WHITE/ORANGE wire to the NMEA (+) (BNC center terminal) terminal coming from your GPS / LORAN-C
instrument.
3. Connect the GREEN/BLACK wire to the NMEA (-) (BNC shield) terminal coming from your GPS / LORAN-C instrument.
4. Connect the BLUE wire to the WHITE/RED wire from the TwinScan GPH meter and to one terminal of a single pole, single
throw switch. Connect the other terminal to the BLACK wire (system ground).
CALIBRATION
1.
2.
See your GPS / LORAN-C owner’s manual and set output for NMEA 0183 version 1.5 or 2.0 at 4800 bits/sec. (standard).
Speed is always sent on the NMEA string as speed over ground in knots no matter what units your GPS / LORAN-C displays.
Fuel flow rate calibration is automatically done when the totalizer is calibrated. To calibrate, see the Totalizer calibration
instruction page.
FUEL ECONOMY/SYNCH OPERATION
The blue wire must be connected to an operating TwinScan fuel flow meter to show fuel economy, otherwise the instrument shows
the synchronizer regardless of this switch position.
1. With the MPG/SYNCH switch in the ON position (BLUE wire closed, grounded), your instrument displays the engine
synchronizer. In the OFF (open) position, the instrument shows fuel economy in nautical miles per gallon or liters per nautical mile
and is automatically selected by the TwinScan GPH/LPH instrument. You must have valid NMEA 0183 version 1.5 or 2.0 speed
data to display fuel economy; otherwise you receive an error code:
ERROR CODES
Display
Reason
No signal activity present on NMEA 0183 terminals
“ OFF”
for four seconds.
“- - - -”
“- Lo -”
“- hi -”
“Err1”
“Err2”
Receiving NMEA 0183 Version 1.5 or 2.0 message,
but speed message is invalid.
(MPG mode) Speed valid but flow rate less than
0.25 GPH.
(LPM mode) Speed valid but less than 0.2 KM.
Some pulsing signal present but no NMEA 0183
message received in last four seconds.
NMEA 0183 message detected, but no “VTG”,
“RMC” or “RMA” sentence found.
Cause
GPS / LORAN-C OFF
NMEA OUTPUT not selected
Leads not connected
(+) & (-) leads reversed
GPS satellite reception is poor
GPS / LORAN-C in startup mode
Flow rate too low—engine stopped
Speed too low—boat stopped
Leads connected to wrong source
GPS / LORAN-C set to NMEA 0180 or 0182
(+) & (-) leads reversed.
GPS / LORAN-C incompatible with NMEA 0183,
version 1.5 or newer
5/15/2002
FloScan Instrument Company, Inc.
3016 NE Blakeley Street, Seattle, WA 98105
1000-205-00B
Tel: (206) 524-6625
Email: [email protected]
Fax: (206) 523-4961
Http://www.floscan.com
Note: THIS SHEET IS TO BE USED ONLY WHEN INSTALLING A TWINSCAN GPH METER
AND TACHOMETER COMBINED.
Back of GPH Instrument
0
Back of Tachometer
0
0
Red Switch
Black Switch
WHITE/RED
MPG
0
Red Switch
WHITE/ORANGE
BLUE
CABLE
Black Switch
SYNC
GREEN/BLACK
* Do not use Back-lit, or Illuminated switches
CABLE
RED/WHITE
1/2 amp fuse
To Port
key switch
RED/WHITE
Data (-)
To STARBOARD
tachometer input
VIOLET
BLACK
Data (+)
YELLOW
To PORT
tachometer input
RED
1/2 amp fuse
To Starboard
key switch
RED
BLACK
WHITE
PORT
R
CABLE
B
RED
Flow
Sensor
W
WHITE
RED
BLACK
BLACK
BROWN
WHITE
Battery (-) buss
BLACK
GREEN
Totalizer Reset Switch
* Do not use Back-lit, or Illuminated switches
3016 NE Blakeley Street, Seattle, WA 98105
B
W
Flow
Sensor
* If installing TwinScan tachometer and
TwinScan GPH Instrument, parallel
power and ground wires as shown.
Otherwise, wire as single instrument
as shown.
5/15/2002
FloScan Instrument Company, Inc.
STARBOARD
R
CABLE
1000-205-00B
Tel: (206) 524-6625
Email: [email protected]
Fax: (206) 523-4961
Http://www.floscan.com
ELECTRICAL
Series 5400(0)/5500(0)/56100/5800(0)/6500(0)/6600(0) AccuTroll & CruiseMaster,
All Multi Function Instruments, & TwinScan®
SET UP
Wire & Switches: Use 18 AWG stranded wire on runs under 50’. For runs over 50’ use 16 AWG. Shielded wire is recommended
for all Diesel systems and suggested for Inboard & I/O gasoline systems. Always, “Ground” the wire shield or shield drain wires in
the engine room by connecting them to the bonding system or engine block. The double wiring harness for twin engine
Pulse/NMEA Diesel installations is included in all, (97/9800(0)) kits. FloScan suggests using J-Boxes, Terminal Blocks, and three
conductor cables between diesel sensors and instrument to make wiring easier.
Install Single Pole Single Throw (SPST) switches for Totalizer Reset, Port–Starboard Select, Engine Hours / Synchronizer, and
GPH / MPG, (switches are not included with kit). To determine which switch types are required for your system, refer to the table
below. All instruments except TwinScan Tachometers require a totalizer reset switch.
SYSTEM
5400(0)
5500(0)/56100
5800(0)
6500(0)/6600(0)
65/6600(0) Cummins PT
7000/8000(0) Gasoline MFI
71/8A00(0) MFI - Gasoline
EFI
75/7600(0) Diesel MFI
9000 Gasoline MFI
9A00(0) MFI - Gasoline EFI
95/96/97/9800(0)
TwinScan GPH Meter
TwinScan Tachometer
TwinScan GPH & Tachometer
NA = Not Applicable
SPST or Momentary OFF
SPST or Momentary OFF
SPST or Momentary OFF
SPST or Momentary OFF
SPST or Momentary OFF
SPST or Momentary ON
PORT/STBD
Twin Engine Systems
SPST
SPST
NA
NA
SPST
SPST
HOURS/
SYNCH
NA
NA
NA
NA
NA
SPST
SPST or Momentary ON
NA
NA
NA
NA
SPST or Momentary ON
SPST or Momentary ON
SPST or Momentary ON
SPST or Momentary ON
SPST or Momentary ON
NA
SPST or Momentary ON
NA
SPST
NA
NA
NA
NA
NA
NA
SPST
NA
NA
NA
NA
NA
NA
SPST
SPST
SPST
NA
NA
NA
NA
NA
NA
NA
NA
NA
SPST
TOTALIZER RESET
GPH/
MPG
NA
NA
NA
NA
NA
NA
MPG/
SYNCH
NA
NA
NA
NA
NA
NA
Grounding: Each Black sensor wire must be connected directly to the Black, “Instrument Ground” wire. Use a single wire to
connect the Black wire junction to the battery’s negative terminal, or a ground buss.
Power: FloScan Instruments & sensors operate on 9 to 12 VDC. Voltages exceeding 16 VDC will damage equipment. 24 & 32
VDC systems must be reduced to 12 VDC. Two different types of voltage reducers are available through FloScan.
WIRE CONNECTIONS
Installation: Connect wires one at a time and install heat shrink tubing
before proceeding to the next wire, (refer to diagram). Connect ground
wires first, (BLACK instrument ground wire to the BLACK sensor
wires). Connect this junction to the battery’s negative terminal or the
ground buss. Connect all other wires leaving the Red power wires for
last to prevent short circuits during installation.
Splicing: Splice or join individual wires per the diagram. Slide heat
shrink tubing over the splices to prevent shorts. Do not seal splices until
the installation is finished and has been tested.
5/25/2006
FloScan Instrument Company, Inc.
3016 NE Blakeley Street, Seattle, WA 98105
1. Slide heat shrink tubing
over one wire.
2. Insert wire ends into butt splice.
3. Crimp butt splice.
4. Slide heat shrink tubing
over butt splice.
5. Apply heat.
HEAT
4001-100-00J
Tel: (206) 524-6625
Fax: (206) 523-4961
Email: [email protected] Http://www.floscan.com
An adequate number of crimp-on connectors and heat-shrink tubing are included with system. The heat-shrink is a special type that
will bond to wire insulation and make a watertight connection. See diagram for proper tubing application. Crimp-on connectors are
sized for 18 or 20 gauge stranded wire.
Tachometer Wiring Information applies only to MFI & TwinScan Instrument Tachometers
Tachometer signal wires on MFI & TwinScan Tachometers should be shielded.
For proper tachometer operation on gasoline EFI engines, (especially outboards) the engine Ground wire must be physically
connected to the MFI or TwinScan instrument ground wire.
Note: FloScan recommends using dedicated 18 AWG shielded cable for tachometer signal wire connections. Always, “Ground”
wire shields or the shield drain wire in the engine room by connecting to the bonding system or engine block.
MULTI FUNCTION & TWINSCAN INSTRUMENT TACHOMETERS for CARBURETOR & CLOSED LOOP EFI
GASOLINE ENGINES POINTS or STANDARD ELECTRONIC IGNITIONS
Inboard, & I/O Engines: Connect the YELLOW wire from pin # 8 to the distributor coil’s negative terminal. On twin engine
systems the Yellow wire from pin # 8 connects to the port engine, the VIOLET wire from pin # 16 to starboard.
Outboard Engines: Outboard tachometers are connected to either the engine alternator or tachometer signal wire. Connect the
YELLOW wire from pin # 8 to the engine alternator or tachometer signal wire. On twin engine systems the Yellow wire from pin #
8 connects to the port engine, the VIOLET wire from pin # 16 to starboard.
MULTI FUNCTION & TWINSCAN INSTRUMENT TACHOMETERS for
CLOSED LOOP EFI GASOLINE ENGINES with CPU IGNITION SYSTEMS
Inboard, I/O, & Outboard Engines: Connect the YELLOW wire from pin # 8 to the engines’ tachometer signal wire. On twin
engine systems the Yellow wire from pin # 8 connects to the port engine, the VIOLET wire from pin # 16 to starboard.
Outboard Engines: Connect the YELLOW wire from pin # 8 to the engines’ tachometer signal wire. On twin engine systems the
Yellow wire from pin # 8 connects to the port engine, the VIOLET wire from pin # 16 to starboard.
MULTI FUNCTION INSTRUMENT TACHOMETERS for
OPEN RETURN EFI GASOLINE ENGINES with CPU IGNITION SYSTEMS
Inboard & I/O Engines: Connect the YELLOW wire, pin # 8 to the engines’ tachometer signal wire.
MULTI FUNCITON INSTRUMENT TACHOMETERS - DIESEL ENGINES
• Keep existing tachometer: Connect the YELLOW and VIOLET wires to the existing tachometer signal wires. If one lead is
grounded at the pickup or alternator, connect the YELLOW wire to the tachometer signal wire. Connect the VIOLET wire to a
ground buss.
• Replace existing tachometer: Connect the YELLOW and VIOLET wires to the existing magnetic pickup or signal generator. If
one lead is grounded at the pickup or alternator, connect the YELLOW wire to the existing signal wire terminal at the tachometer
and connect the VIOLET wire to a ground buss.
• Install as a new tachometer. On engine alternator installations, connect the YELLOW wire to the tachometer output terminal
(usually marked “tach” or “sig”) and connect the VIOLET wire to a ground buss. For mechanically driven A-C signal generators
and magnetic pickups, connect the YELLOW wire to one terminal and the VIOLET wire to the other.
TWINSCAN INSTRUMENT TACHOMETERS – DIESEL ENGINES
• Connect the YELLOW wire to one terminal the Port tachometer sender, (AC signal generator, Magnetic pickup, or the engines’
alternators tach or sig terminal). Connect the VIOLET wire to the Starboard sender. The tachometer senders’ second terminal must
be grounded.
FINAL ACTIONS
Check Electrical Installation: Test all connections. Support and secure all dangling wires. Start engine and calibrate system.
5/25/2006
FloScan Instrument Company, Inc.
3016 NE Blakeley Street, Seattle, WA 98105
4001-100-00J
Tel: (206) 524-6625
Fax: (206) 523-4961
Email: [email protected] Http://www.floscan.com
Mechanical Installation
Series 5400(0)/ 5500(0)/ 56100/ 7000(0)/8000(0)/ 9000(0), Single Sensor EFI 8A00(0)/9A00(0) and TwinScan®
GPH Instruments for Gasoline Inboard/ I/O/ and Outboard Engines
FLOW SENSOR INSTALLATION
Flow Sensors must be placed in a horizontal section of fuel line at a low point in the fuel system. Fuel should travel, “Up-hill” when
exiting the sensor. Its outlet should be at least 1 or 2 inches lower than the fuel pump inlet, priming bulb or pulsation damper, (if
used). Pulsation Dampers and Priming Bulbs must also be mounted horizontally. Installing sensor(s) 12” upstream of the fuel pump,
priming bulb or pulsation damper improves system accuracy. Install sensors in a protected location, away from water spray.
Model 20A, 20B, 231, & 233C gasoline sensors must be installed downstream of a fuel filter or water separator. On vessels not
equipped with off engine filters, we suggest installing a Flow Ezy model ILA-02 filter with 238 micron screen directly to the 20A,
20B or 231 Low-Flow Sensors’ inlet. Use model 4ILA-04 with 595 micron screens with High Flow 233C Sensors’.
Flow Ezy can be reached at (800) 237-1165.
Caution: NEVER install sensor(s) downstream of an engine mounted fuel filter. NEVER use Teflon Tape when installing
sensors. Teflon Tape can jam a sensor’s rotor. Instead, always use a fuel proof pipe thread sealant.
For proper system operation, Carburetor Inboard & I/O Engines having diaphragm fuel pumps require Gasoline Pulsation
Dampers. FloScan Systems are not shipped with Pulsation Dampers’ as carburetor Inboard and I/O engines are no longer in
production. If you have a Carburetor Inboard or I/O engine, Pulsation Dampers can be purchased factory direct. Standard
Flow Dampers’ are $30.00 each. The standard Flow Damper can be ordered under Part Number 150-004-00 online at
www.floscan.com in the Accessories section.
E-mail: [email protected], or [email protected].
The following engine types DO NOT require Pulsation Dampers:
•
•
Outboard Gasoline Engines Including Ficht, Optimax, 2 & 4-Cycle.
Most Closed Loop EFI Gasoline Inboard, and I/O Engines.
•
Sensors are marked with orientation and fuel flow arrows. They must be installed with these arrows pointing in the right direction.
Standard-Flow Pulsation Damper
20A/ 20B/ 231 SENSOR
Outlet
Inlet
ARROW UP
Fuel Flow Direction
2/15/2007
FloScan Instrument Company, Inc.
3016 NE Blakeley Street, Seattle, WA 98105
ARROW UP
7000-036-00M
Tel: (206) 524-6625
Fax: (206) 523-4961
Email: [email protected] Http://www.floscan.com
High-Flow Pulsation Damper
233C SENSOR
Outlet
Inlet
ARROW UP
•
Install sensor(s) with orientation arrows pointing UP Ï. Fuel must enter through the port marked IN or with an inward pointing
Î fuel flow arrow, and exit through the port marked OUT or with an outward pointing Î arrow.
•
The sensor must be installed horizontally at a low point in the fuel system. When fuel exits the sensor it must travel up-hill
slightly. One or two inches of vertical rise is adequate, more is ok.
•
The sensor must be installed downstream of, and protected by a screen, filter, or water separator. Sensors are tolerant of fine
debris. A coarse screen, (up to 800 microns) or water separator is all that is required.
•
It is recommended that the sensor be installed between the fuel filter and fuel pump inlet. There should be at least twelve inches
of fuel hose, (more is ok) between the sensor and fuel pump inlet.
•
If required, the pulsation damper must be installed horizontally, with its orientation arrow pointing up, (refer to fuel flow
schematics below).
•
Minimize the number of 90º elbows and pipe fittings. Excessive use may create a high vacuum, fuel restricting pressure drop
across the fuel system. Whenever possible, use a large radius hose bend instead of elbows. Refer to the engine owner’s manual for
maximum fuel pump vacuum. A vacuum gauge can be used to confirm that the system is within limits.
•
If swivel fittings are used, (JIC or SAE) their mating surfaces should be sealed with AP 50 Copper Conical Sealing Washers or
Flaretite Fitting Seals. Seals and sealing washers can be purchased through Fittings Inc. in Seattle, WA (206) 767-4670, 1-800552-0632, or a local hydraulic supply house.
CAUTION, DO NOT OVER TIGHTEN FLOW SENSOR FITTINGS. Over-tightening may crack the sensor’s body. Cracks
cause leaks and fuel leaks sometimes cause catastrophic explosions and fire. Assemble fittings with a Lubricating, Fuel Proof,
Non or Semi Hardening pipe thread sealant, designed for aluminum and stainless steel threads, (Loctite 567 or equivalent).
DO NOT USE TEFLON TAPE.
INSTRUMENT INSTALLATION
•
Before cutting holes in your Instrument Panel, verify that the instrument will be installed approximately 12” away from the
compass, and in a shaded location out of direct sunlight. Mounting it within 12” of a compass may interfere with compass
operation. Direct sunlight may cause the LCD display to temporarily turn black due to heat.
Instrument Series
5400(0), 5500(0)
7000(0), 8000(0), 9000(0), TwinScan®
2/15/2007
FloScan Instrument Company, Inc.
3016 NE Blakeley Street, Seattle, WA 98105
Cutout Size
3 1/16”
3 3/8”
Table 1
Instrument Depth
3” – Console Panel Thickness
2 ½” – Console Panel Thickness
7000-036-00M
Tel: (206) 524-6625
Fax: (206) 523-4961
Email: [email protected] Http://www.floscan.com
Standard-Flow Gasoline System Schematics
Vane, Gear, Gear-Rotor
Electric
Fuel Pump
(EFI & Carburetor Engines)
FUEL TANK
FUEL
FILTER
20A/ 20B/ 231
Flow Sensor
1" to 2" Minimum
Vertical Rise
ENGINE
ARROW UP
12" Minimum Distance:
A-1 Fabric Braid
Flexible Fuel Line Preferred
Outboard Motor
Diaphragm
Fuel Pump
FUEL TANK
FUEL
FILTER
Priming
Bulb
1" to 2" Minimum
Vertical Rise
20A/ 20B/ 231
Flow Sensor
ENGINE
ARROW UP
12" Minimum Distance:
A-1 Fabric Braid
Flexible Fuel Line Preferred
Engine Driven
Diaphragm Fuel Pump
(Carbureted Inboards and I/O's)
Pulsation
Damper
1" to 2" Minimum
Vertical Rise
FUEL TANK
FUEL
FILTER
20A/ 20B/ 231
Flow Sensor
ENGINE
ARROW UP
12" Minimum Distance:
A-1 Fabric Braid
Flexible Fuel Line Preferred
2/15/2007
FloScan Instrument Company, Inc.
3016 NE Blakeley Street, Seattle, WA 98105
7000-036-00M
Tel: (206) 524-6625
Fax: (206) 523-4961
Email: [email protected] Http://www.floscan.com
High-Flow Gasoline Fuel Flow Schematics
Vane, Gear, Gear-Rotor
Electric
Fuel Pump
(EFI & Carburetor Engines)
FUEL TANK
FUEL
FILTER
233
Flow Sensor
1" to 2" Minimum
Vertical Rise
ENGINE
12" Minimum Distance:
A-1 Fabric Braid
Flexible Fuel Line Preferred
Pulsation
Damper
FUEL TANK
FUEL
FILTER
233
Flow Sensor
Engine Driven
Diaphragm Fuel Pump
(Carbureted Inboards and I/O's)
1" to 2" Minimum
Vertical Rise
ENGINE
12" Minimum Distance:
A-1 Fabric Braid
Flexible Fuel Line Preferred
High-Flow Sensor Bracket Assembly
2/15/2007
FloScan Instrument Company, Inc.
3016 NE Blakeley Street, Seattle, WA 98105
7000-036-00M
Tel: (206) 524-6625
Fax: (206) 523-4961
Email: [email protected] Http://www.floscan.com
WIRING
TwinScan
®
Gas 3” GPH Instrument Only
To ensure years of trouble free operation of your new TwinScan® Instrument
please read all of these instructions carefully before beginning your installation.
CAUTION: To avoid electrical shorts and possible fire, turn OFF the power to the instrument panel until installation is complete.
Please Note: The pointer is accurate only when gauge is energized. The pointer may stop at any position when power is OFF and is
not indicative of a faulty gauge.
This instrument fits in a standard 3 3/8” tachometer hole. The analog needles show the PORT and STARBOARD fuel flow rates of
each engine and the totalizer shows the total consumption of both engines. Fuel consumption is stored in non-volatile RAM and does
not require power to retain its memory. Resetting the totalizer is done with an external switch (not supplied). An excellent choice is a
momentary on (normally open) switch. You can also use a single throw, single pole (SPST) switch.
Wiring
Use No. 18 AWG mufti-strand wire, the included butt splices and self-sealing heat shrink to make all connections. Alternate
installation: Use insulated ring tongue connectors and a terminal strip.
Important: Protect wires from damage caused by sharp edges, moving and hot engine parts. Cable tie and support all wire runs for
safety.
Back of Instrument
Wire Color
RED/WHITE
RED
BLACK
WHITE
BROWN
GREEN
WHITE/RED
Function
PORT Instrument & flow sensor +12 VDC Power
STARBOARD Instrument & flow sensor+12 VDC Power
Battery Ground (Instrument & flow sensor ground)
PORT Flow Sensor Input
STARBOARD Flow Sensor Input
Totalizer Reset Switch
Pulse Output to Tachometer/MPG Switch if Installed
Dial Lamp
0
Black Switch
0
Calibration Knobs
Red Switch
Wires
1.
Connect the RED/WHITE wire to the “power on” side of the PORT ignition switch.
2.
Connect the RED wire to the “power on” side of the STARBOARD ignition switch. In multiple gauge installations, join all the
RED/WHITE wires together and run a single wire to the keyed terminal of the PORT ignition switch. Do the same for the RED
wires on the STARBOARD side.
3.
Connect the BLACK wire of the gauge to the BLACK wire(s) at the flow sensor(s). Run a BLACK wire to the negative battery bus
from this point. This instrument requires a single point ground system. Connecting the gauge to a ground at the instrument panel
and the flow sensor(s) to a different ground can introduce noise and affect the accuracy of the instrument.
4.
Connect the WHITE wire of the instrument to the WHITE wire of the PORT flow sensor.
5.
Connect the BROWN wire of the instrument to the WHITE wire of the STARBOARD flow sensor.
6.
Connect the GREEN wire to one of the terminals of a single pole, single throw (SPST) or momentary on (normally open) switch.
Run a BLACK wire from the other terminal of the switch to the Instrument BLACK wire (ground.) Totalizer reset switch OPEN Normal operation , Totalizer reset switch CLOSED - Reset mode.
5/15/2002
FloScan Instrument Company, Inc.
3016 NE Blakeley Street, Seattle, WA 98105
1000-108-00E
Tel: (206) 524-6625
Email: [email protected]
Fax: (206) 523-4961
Http://www.floscan.com
Back of GPH Instrument
0
0
Black Switch
Red Switch
WHITE/RED
(This wire is used when a tach is installed)
Port Engine
key switch
1/2 amp fuse
CABLE
+ 12 VDC
Starboard Engine
key switch
1/2 amp fuse
+ 12 VDC
RED/WHITE
RED
BLACK
WHITE
R
CABLE
B
W
WHITE
PORT
Flow
Sensor
RED
RED
BLACK
BLACK
BROWN
WHITE
STARBOARD
R
CABLE
B
W
Flow
Sensor
Battery (-) buss
BLACK
GREEN
Totalizer Reset Switch
* Do not use Back-lit, or Illuminated switches
5/15/2002
FloScan Instrument Company, Inc.
3016 NE Blakeley Street, Seattle, WA 98105
1000-108-00E
Tel: (206) 524-6625
Email: [email protected]
Fax: (206) 523-4961
Http://www.floscan.com
CALIBRATION
®
TwinScan 3” GPH Instrument
Gasoline and Diesel Engines
To ensure years of trouble free operation of your new GPH Meter,
please read all of these instructions carefully before beginning your installation.
Calibration and flow sensor selection of your TwinScan® 3” GPH Instrument is done with the sixteen position rotary switches on the
back of the instrument. The RED switch is used for sensor type and pointer damping selection; the BLACK switch is used to calibrate
your instrument. It is critical that you set the sensor selection switch correctly. Before re-calibrating your instrument, note the current
position of the switch and check the calibration table for the correct flow sensor selection. Changing the totalizer calibration also
changes the analog needle calibration.
Re-calibration is required only if you find your totalizer reading to be more than 2% different from the actual fuel put into the tank.
Various things such as the attitude of the boat in the water, the amount of the fill up, and how full the tank is filled affect accuracy.
The larger the amount of fuel you base calibration on, the more accurate your system will be.
To check the calibration:
1.
Fill the tank(s) and reset the totalizer to zero.
2.
Operate the boat in a normal manner until you would ordinarily refuel.
3.
Fill the tank(s) as close to the same level as possible. Check the amount of fuel the tank actually took as well as the amount the
totalizer shows you used. In most cases, these two amounts are within 2% of each other and no additional calibration is
required.
4.
To change the calibration, rotate the BLACK switch on the back of the instrument until the totalizer reads as close to your
actual fill up as possible. If your reading is off by more than you can calibrate, go to the troubleshooting guide.
BLACK Switch
0
1
2
3
Effect to Totalizer
No Change
+2%
+4%
+6%
RED Switch
0
1
2
3
Sensor
20B
20B
20B
20B
Results
Light meter damping
Heavy meter damping
Light meter damping
Light meter damping
4
5
6
7
8
9
A
B
C
D
E
F
+8%
+10%
-20%
-18%
-16%
-14%
-12%
-10%
-8%
-6%
-4%
-2%
4
5
6
7
8
9
A
B
C
D
E
F
231
231
231
231
233C
233C
233C
233C
w/diesel*
w/diesel*
w/diesel*
w/diesel*
Light meter damping
Heavy meter damping
Light meter damping
Light meter damping
Light meter damping
Heavy meter damping
Light meter damping
Light meter damping
Light meter damping
Heavy meter damping
Light meter damping
Light meter damping
*TwinScan + MFI combination
9/19/2003
FloScan Instrument Company, Inc.
3016 NE Blakeley Street, Seattle, WA 98105
1000-148-00E
Tel: (206) 524-6625
Email: [email protected]
Fax: (206) 523-4961
Http://www.floscan.com
9/19/2003
FloScan Instrument Company, Inc.
3016 NE Blakeley Street, Seattle, WA 98105
1000-148-00E
Tel: (206) 524-6625
Email: [email protected]
Fax: (206) 523-4961
Http://www.floscan.com
TROUBLESHOOTING
®
TwinScan 3” Instrument - Gallons Per Hour (LCD)
BEFORE CALLING FOR ASSISTANCE, COMPLETE THESE TROUBLESHOOTING CHECKS AND RECORD YOUR
FINDINGS. TECHNICAL SUPPORT REQUIRES THIS INFORMATION BEFORE A RETURN AUTHORIZATION WILL BE
ISSUED. IT TAKES ABOUT 20 MINUTES AND IS VERY IMPORTANT IN ANALYZING SYSTEM PROBLEMS.
Before starting, record instrument model number and switch settings.
MODEL # _____________________
SERIAL # ____________
RED SWITCH POSITION __________
BLACK SWITCH POSITION _________
Perform the Instrument Diagnostic & Duty Cycle Tests outlined in Sections I & II First. Record your findings.
I. INSTRUMENT DIAGNOSTIC SELF-TEST
•
•
•
•
Secure power to the Red, and Red/White wires, (Turn both key switches OFF).
Turn power on, (Either to one or both switches). At start-up, the instrument automatically performs a, “Self-test”.
Verify that the pointer’s back-lighting glows Red, and that the LCD back-light is glowing Green.
Observe that the pointers smoothly sweep to near full scale, (Slightly above or below) then smoothly drop back to zero.
The LCD display shows the following numbers and letters in sequence. These are examples, actual readings may vary. Switch settings
and configurations are shown on the LCD as, “0123456789AbCdEF”.
8.8.8.8
1.21
F 3
- - 34
123.4
•
LCD segment and back-lighting check.
Software version number.
Red, (Port) and Black (Starboard) switch settings.
Internal configuration (scale range, units, etc.)
Blank
Current total gallons or total liters, (Indicates normal operation).
Record the software version __________ and switch settings _____ _____. FloScan Technical Support will ask for these.
The self-test verifies adequate power, a good ground, that the pointers move, and the LCD display is working.
If the self-test fails, the LCD shows, “PO” plus a two-digit number code. The pointers also show the error number as a, “Blink Code”.
Sitting near center scale the pointers will twitch upwards, showing a numeric value. For Po23 the pointers twitch twice, pause for a
moment, and then twitch three times. After a long wait the twitching resumes. This continues until power is secured. If the self-test
fails, verify that supply voltage is at least 10 VDC. If voltage drops below 10V, the self-test may fail.
II. DUTY CYCLE TEST
•
•
•
•
•
•
•
•
Start both engines and run at idle.
Close and open the RESET switch twice within 0.6 seconds—like double-clicking a computer mouse.
The LCD will show dcy when it’s in duty cycle check mode.
With the display showing dcy the pointers should remain steady and in the middle third of their scales.
At very low flow rates, the pointers track the on/off signal from each sensor and will wiggle.
Increase engine rpm until the pointers are steady.
Steady readings with occasional, “Hick-ups” may indicate air or vapor bubbles passing through the sender.
“Double-click” the RESET switch to return to the normal fuel flow display mode.
8/30/2004
FloScan Instrument Company, Inc.
3016 NE Blakeley Street, Seattle, WA 98105
1000-204-00C
Tel: (206) 524-6625
Email: [email protected]
Fax: (206) 523-4961
Http://www.floscan.com
FAULT
Blank LCD Display
No back-lighting
Low Totalizer Reading, over 10%
High Totalizer Reading, over 10%
Fluctuating GPH Readings
No GPH or Totalizer Reading
PROBABLE CAUSE
Wiring
Wiring/bulb failure
Calibration
Sensor orientation/failure
Incorrect/defective sensor
Incorrect switch settings
Suction leak
Suction leak
Low RPM operation
Wiring/Instrument failure
Sensor orientation/failure
Wire Harness Continuity Test
SEE SECTION:
Section III
Section
Calibration sheet
Section IV, Install. sheets
Section IV
Calibration sheet
Section VII
Section VII
Section X
Section I, II, III, and V
Section IV, Install. sheet
Section V
III. SUPPLY VOLTAGE and GROUND TEST
•
Measure voltage between the Starboard RED power wire, and the BLACK Instrument ground wire.
__________VDC
•
Measure voltage between the Port RED/WHITE power wire, and the BLACK Instrument ground wire.
__________VDC
These readings should be approximately 12 - 14 VDC, but not lower than 10 VDC.
•
If 12 VDC is not present, measure between the RED, or RED/WHITE power wire and a known good ground
in the instrument panel. If you measure 12 to 14 VDC, there may be an instrument ground problem.
__________VDC
•
If 12 to 14 VDC is not present check wiring, switches, fuse, and the 12 VDC power source.
IV. SENSOR(S) TEST
1.
With your voltmeter set to a DC scale greater than 14 volts, measure between the RED (+12VDC) and
BLACK (Instrument ground) wires. With engine idling, measure and record the voltage reading.
___________VDC
2.
Move the voltmeters’ negative lead to the WHITE (Signal) wire. With engine idling, measure and record
the voltage reading. Readings between 4 and 10 VDC usually indicate a good sensor.
___________VDC
3.
Stop the engine while observing the voltmeter. Readings should fluctuate between a high of 9 to 12 VDC,
and a low of 0 to 4 VDC as the sensors’ turbine slows to a stop.
___________VDC
NOTE: This may not be seen on a digital voltmeter.
4.
Move the voltmeters’ negative lead to the BROWN (Signal) wire. With engine idling, measure and record
the voltage reading. Readings between 4 and 10 VDC usually indicate a good sensor.
___________VDC
5.
Stop the engine and observe the voltmeter. Voltage readings should fluctuate between a high of 9 to 12
VDC, and a low of 0 to 4 VDC as the Sensors’ turbine slows to a stop.
NOTE: This may not be seen with a digital voltmeter.
6.
The Sensor may be defective if voltage readings in steps 3 & 5 remain constant while the engine is
stopping.
7.
On twin engine systems, try swapping the Brown & White signal wires. Observe the Instrument and see if the
problem shifts sides, or remains on the same side.
8/30/2004
FloScan Instrument Company, Inc.
3016 NE Blakeley Street, Seattle, WA 98105
1000-204-00C
Tel: (206) 524-6625
Email: [email protected]
Fax: (206) 523-4961
Http://www.floscan.com
•
The Sensor(s) may be defective if voltage readings in steps 3 & 5 remain constant.
•
If signal voltages in steps 3 & 5 are ok, go to the backside of the Instrument. With engine(s) running, measure and record voltage
readings across the Red/White & White, (Port Sensor) and Red & Brown, (Starboard Sensor) signal wires. These voltage readings
should match the Sensor’ readings. This verifies that the Sensors’ signal output is reaching the Instrument. If not there is a wiring
problem.
V. CONTINUITY TEST
1.
Continuity testing requires access to the back of the Instrument and an Ohmmeter. It verifies that wires are not broken, shorted
to ground, another wire, or to power. Before starting, secure all power. You will be testing the WHITE, BROWN, and BLACK
wires.
2.
Disconnect the WHITE and BLACK wire harness conductors from the WHITE and BLACK Port Sensor
& Instrument wires. Connect a jumper from the WHITE wiring harness conductor to a known good ground.
At the Instrument, connect an Ohmmeter lead to its’ WHITE wiring harness conductor. Connect the other
Ohmmeter Lead to a known, good ground. The Ohmmeter should read approximately 0.1 to 3 Ω.
____________
(Ohm Reading)
Connect a jumper from the Black wiring harness conductor to a known good ground. At the Instrument
connect an Ohmmeter lead to its’ Black wiring harness conductor. Connect the other Ohmmeter Lead to
a known, good ground. The Ohmmeter should read approximately 0.1 to 3 Ω.
____________
(Ohm Reading)
Disconnect the Brown and BLACK wire harness conductors from the WHITE and BLACK Starboard Sensor
& Instrument wires. Connect a jumper from the BROWN wiring harness conductor to a known good ground.
At the Instrument, connect an Ohmmeter lead to its’ BROWN wiring harness conductor. Connect the other
Ohmmeter Lead to a known, good ground. The Ohmmeter should read approximately 0.1 to 3 Ω.
____________
(Ohm Reading)
Connect a jumper from the Black wiring harness conductor to a known good ground. At the Instrument
connect an Ohmmeter lead to its’ Black wiring harness conductor. Connect the other Ohmmeter Lead to
a known, good ground. The Ohmmeter should read approximately 0.1 to 3 Ω.
____________
(Ohm Reading)
3.
VI. PULSATION PROBLEMS
A stiff anti-siphon valve, sticking carburetor float or miss-plumbed Pulsation Damper(s) can cause fluctuating GPH readings. These are
most pronounced at low Rpm’s and tend to disappear around mid throttle. They are annoying, but won’t affect totalizer accuracy. To
eliminate, repair or replace any defective parts, or re-plumb dampers according to the Fuel Flow Schematic Instructions.
VII. FINDING FUEL SYSTEM VACUUM LEAKS
Fluctuating GPH and High Totalizer Readings are usually caused by a small vacuum leak between the fuel tank and fuel pump inlet.
Fluctuations tend to be between 2 and 4 GPH. These vacuum leaks also affect totalizer accuracy, causing it to read 15 to 100% high.
Larger leaks produce greater fluctuations and higher readings. They generally do not affect engine performance.
Finding suction leaks can be time-consuming. When approached properly, they can usually be found and repaired quickly. Two
common places for suction leaks to occur are at the primary fuel filter - water separator, and/or a loose valve stem packing nut.
Remove the filter housing and coat all o-rings, gaskets and sealing surfaces with a medium to heavy grease, (Do not use oil) and
reassemble. Grease all valve stem packings and gently tighten gland nuts. Don’t over tighten, valve handles should turn freely.
Tighten all hose clamps and compression fittings. Don’t over tighten. Run the engine for 5 to 10 minutes observing GPH readings. If
you’ve found the problem, fluctuations should be reduced to less than ½ GPH.
8/30/2004
FloScan Instrument Company, Inc.
3016 NE Blakeley Street, Seattle, WA 98105
1000-204-00C
Tel: (206) 524-6625
Email: [email protected]
Fax: (206) 523-4961
Http://www.floscan.com
If the problem persists, temporarily install a clear piece of fuel resistant hose downstream of the forward flow sensor. Run the engine
and watch for a stream of small bubbles in the clear hose, or an occasional larger bubble. Sometimes shining a light through the hose
makes bubbles easier to see.
Observe the clear hose while shaking the fuel lines. If the bubble stream continually increases or decreases you’ve found the leak area.
Repair or replace as needed. If this occurs one-time, you probably dislodged some trapped air.
If the leak hasn’t been found, the last step is to inspect each pipe joint. Thread sealant should be visible around each joint. If not, that
joint is suspect and must be resealed. After resealing run the engine for a few minutes to purge any remaining air. There should now
be bubble free fuel running through the clear hose. If bubbles are still present a leak was missed. Recheck your work. After all the
leaks are stopped, remove the clear hose.
VIII. FUEL FILTERS
A dirty fuel filter, or one that is too fine (1-25 micron) will draw vapor bubbles out of the fuel, causing fluctuations and high readings.
Replace it with a new 30-micron or coarser filter.
IX. FLOW SENSOR ORIENTATION
Sensor orientation is critical for proper operation. All Sensors have their inlet and outlet ports clearly marked (IN / OUT or Î Î).
This identifies fuel flow direction. The Sensor must be, “Plumbed” correctly for it to operate properly. There is an additional single
arrow on the Sensor body. It is crucial that this single arrow points up Ï.
X. LOW RPM OPERATION
At idle, under a no load condition, it is common for GPH readings to fluctuate slightly.
This concludes system testing. If problems with your system persist,
contact FloScan Technical Support with testing results.
8/30/2004
FloScan Instrument Company, Inc.
3016 NE Blakeley Street, Seattle, WA 98105
1000-204-00C
Tel: (206) 524-6625
Email: [email protected]
Fax: (206) 523-4961
Http://www.floscan.com