1
Maintain the Prism Printer
Rimage supports only the use of Rimage brand ribbons in our printers. Printer issues that occur as a result of using ribbons by
manufacturers other than Rimage are not included under your Rimage warranty or maintenance agreement.
Tip: If ribbons are stored in an environment much different from that of the printer, allow time for them to become
acclimated to the new environment. Allow more time for greater temperature and/or humidity differences.
Note: If you are replacing the ribbon, now is a good time to clean the print head. Refer to the Clean the Print Head
section.
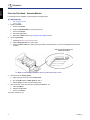
1. Access the ribbon area.
a. Power on the Prism.
b. Remove the top cover from the printer.
c. Lift up the take-up roller so that the end with the gear comes up
first, then lift the take-up roller out of the printer.
d. Lift up the supply roller to remove it.
Take-up Roller
Supply Roller
2. Load the print ribbon.
Print Ribbon
a. Slide the print ribbon onto the supply roller.
b. Align the two notches of the cardboard core to the metal pins on
the supply roller.
c. Peel the ribbon leader from the supply ribbon.
d. Slide the ribbon leader under the ribbon guide.
Cardboard Core
Notches
Metal Pins
Supply Roller
Tape
Ribbon Guide
3. Tape the ribbon leader to the back of the printer tray as shown.
Printer Tray
4110635_J
Ribbon Leader
4
English
Change the Print Ribbon