1
®
HAL S1030 Quick Start /User Guide
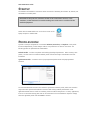
Dynamic Airway and Lung Compliance
HAL is an interactive educational system developed to assist
a certified instructor. It is not a substitute for a
comprehensive understanding of the subject matter and not
intended for clinical decision making.
HAL S1030 12.3.1
©2011 Gaumard Scientific Company, Inc.
All Rights Reserved
www.Gaumard.com
Quick Start Guide HAL S1030
CONTENTS
CONTENTS ....................................................................................................................................................................... 3
END USER LICENSE AGREEMENT .............................................................................................................................. 5
QUICK START .................................................................................................................................................................. 7
W ELCOME TO THE FAMILY ....................................................................................................................................................... 8
SETUP ...................................................................................................................................................................................... 8
STARTING GIGA MODULE ....................................................................................................................................................... 9
LOAD A PROFILE ....................................................................................................................................................................... 9
GIGA MODULE INTERFACE.................................................................................................................................................... 10
CONNECTING THE VENTILATOR.............................................................................................................................................. 11
VENTILATOR SETTINGS .......................................................................................................................................................... 11
SIMULATION EXERCISE ........................................................................................................................................................... 11
Lung compliance loops ................................................................................................................................................... 11
Preloaded palette items .................................................................................................................................................. 14
USER GUIDE .................................................................................................................................................................. 18
OVERVIEW .............................................................................................................................................................................. 19
TERMINOLOGY........................................................................................................................................................................ 19
WORKING WITH GIGA MODULE ................................................................................................................................ 20
STARTUP ................................................................................................................................................................................ 21
PROFILES MENU ..................................................................................................................................................................... 21
ENVIRONMENT........................................................................................................................................................................ 23
Status panel ...................................................................................................................................................................... 23
Trend time ......................................................................................................................................................................................... 23
Feature indicators ............................................................................................................................................................................ 23
Current parameters .......................................................................................................................................................................... 23
Sound and volume ........................................................................................................................................................................... 23
Control bar ........................................................................................................................................................................ 24
Connection ........................................................................................................................................................................................ 24
Battery indicator ............................................................................................................................................................................... 24
Session time ..................................................................................................................................................................................... 24
Ventilator operating mode ............................................................................................................................................................... 25
Stand-by ............................................................................................................................................................................................ 25
Details tab ......................................................................................................................................................................... 26
Physiological parameter controls ................................................................................................................................................... 27
Palette items ..................................................................................................................................................................................... 32
Palette tab ......................................................................................................................................................................... 33
Scenario tab ...................................................................................................................................................................... 34
Loading preprogrammed scenarios ............................................................................................................................................... 34
Creating a new scenario ................................................................................................................................................................. 37
Respiratory monitor ......................................................................................................................................................... 43
Log panel........................................................................................................................................................................... 43
Log actions tab ................................................................................................................................................................. 45
Quick Start HAL S1030
MENU BAR .............................................................................................................................................................................. 48
File...................................................................................................................................................................................... 48
Profile ................................................................................................................................................................................................. 48
New Session ..................................................................................................................................................................................... 48
Save report........................................................................................................................................................................................ 48
Print report ........................................................................................................................................................................................ 48
Exit ..................................................................................................................................................................................................... 48
Setup.................................................................................................................................................................................. 49
Calibration ......................................................................................................................................................................................... 49
Options .............................................................................................................................................................................................. 52
Help .................................................................................................................................................................................... 52
Diagnostics........................................................................................................................................................................................ 52
Help .................................................................................................................................................................................................... 52
About .................................................................................................................................................................................................. 52
WORKING WITH HAL .................................................................................................................................................... 53
Connecting the ventilator ................................................................................................................................................ 54
CO2 exhalation ................................................................................................................................................................. 56
Oxygen saturation ............................................................................................................................................................ 58
CARE AND CAUTIONS ................................................................................................................................................. 59
OVERALL WARNINGS .............................................................................................................................................................. 60
APPENDIX ....................................................................................................................................................................... 61
TIPS ON CREATING SCENARIOS ............................................................................................................................................. 62
FILE STRUCTURE ................................................................................................................................................................... 63
TROUBLESHOOTING ............................................................................................................................................................... 64
W ARRANTY............................................................................................................................................................................. 67
CONTACT US .......................................................................................................................................................................... 69
4
END USER LICENSE AGREEMENT
This is a legal agreement between you, the end user, and Gaumard ® Scientific Company, Inc. (“Gaumard”). This software is
protected by copyright laws and remains the sole property of Gaumard. By installing the GaumardUI (the "Software") media,
you agree to be bound by the terms of this agreement. If you do not agree to the terms of this agreement, promptly return
the
uninstalled
media
and
accompanying
items
to
Gaumard
at
the
address
indicated
below.
1. Grant of License. Gaumard hereby grants to you (an individual or institution) the right to install and activate the Software
on one computer for use with one Interactive patient simulator system. The software may also be installed on any number of
other computers at the same institution so that students may access the learning resources. One copy of the software may
be made for backup purposes. You may not network this Software, or allow multiple users unless you purchased a multi-user
workstation license. Sharing this Software with other individuals or allowing other individuals to view the contents of this
Software is in violation of this license.
2. Copyright. The Software is owned by Gaumard and protected by United States copyright laws and international treaty
provisions. Therefore, you must treat this Software like any other copyrighted material. You may not make this Software or
copies thereof available in any manner or form or use, copy or transfer the Software, in whole or in part, except as provided
herein.
3. Other Restrictions. You may not rent or lease this Software to any other party. You may not alter, merge, modify, adapt,
reverse engineer, decompile or disassemble the software, or disclose the contents of this Software to any other party.
4. Electronic Transmission of Software. If you received the Software by electronic transmission or by Internet delivery, by
installation of the Software, you acknowledge that you have read and understand this license agreement and agree to be
bound by its terms and conditions.
5. Term of Agreement. The term of this Agreement and the license granted to you pursuant hereto shall commence upon
installation of this Software. This Agreement and the license granted herein may otherwise be terminated by Gaumard in the
event that you are in breach of any provision of this Agreement. In the event of termination, you agree to immediately return
this Software, accompanying items, and any copies thereof to Gaumard.
6. LIMITED WARRANTY
(A) THE CD-ROM MEDIA (THE "MEDIA") WHICH CONTAINS THIS SOFTWARE IS WARRANTED, FOR A PERIOD OF 30 DAYS
FROM THE DATE OF PURCHASE, TO BE FREE FROM DEFECTS IN MATERIAL AND WORKMANSHIP. ELECTRONIC
TRANSMISSION IS WARRANTED TO BE FREE FROM DEFECTS AT THE MOMENT OF TRANSMISSION. YOUR SOLE AND
EXCLUSIVE REMEDY, AND GAUMARD'S SOLE LIABILITY, IS TO REPLACE THE DEFECTIVE MEDIA OR TO REPEAT THE
ELECTRONIC TRANSMISSION PROVIDED THAT YOU NOTIFY GAUMARD IN WRITING OF SUCH DEFECT OR DEFECTIVE
TRANSMISSION AND RETURN THE DEFECTIVE MEDIA, IF ANY, DURING THE 30-DAY WARRANTY PERIOD.
(B) EXCEPT AND TO THE EXTENT EXPRESSLY PROVIDED IN PARAGRAPH (A), THE SOFTWARE AND ACCOMPANYING
WRITTEN MATERIALS ARE PROVIDED ON AN "AS IS" BASIS, WITHOUT ANY WARRANTIES OF ANY KIND, INCLUDING, BUT
NOT LIMITED TO, ANY IMPLIED WARRANTIES OF MERCHANTABILITY OR FITNESS FOR ANY PARTICULAR PURPOSE. NO
ORAL OR WRITTEN INFORMATION OR ADVICE GIVEN BY GAUMARD, ITS DEALERS, DISTRIBUTORS, AGENTS OR
EMPLOYEES SHALL CREATE A WARRANTY OR IN ANY WAY INCREASE THE SCOPE OF THIS WARRANTY, AND YOU MAY NOT
RELY ON ANY SUCH INFORMATION OR ADVICE. GAUMARD DOES NOT WARRANT, GUARANTEE, OR MAKE ANY
REPRESENTATIONS REGARDING THE USE OR THE RESULTS OF USE, OF THE SOFTWARE OR WRITTEN MATERIALS IN
TERMS OF CORRECTNESS, ACCURACY, RELIABILITY, CURRENTNESS, OR OTHERWISE, AND THE ENTIRE RISK AS TO THE
RESULTS AND PERFORMANCE OF THE SOFTWARE IS ASSUMED BY YOU. IF THE SOFTWARE OR WRITTEN MATERIALS ARE
DEFECTIVE, YOU AND NOT GAUMARD OR ITS DEALERS, DISTRIBUTORS, AGENTS, OR EMPLOYEES, ASSUME THE ENTIRE
COST OF ALL NECESSARY SERVICING, REPAIR OR CORRECTION OTHER THAN EXPRESSLY DESCRIBED ABOVE.
(C) NEITHER GAUMARD NOR ANYONE ELSE WHO HAS BEEN INVOLVED IN THE CREATION, PRODUCTION OR DELIVERY OF
THIS PRODUCT SHALL BE LIABLE FOR ANY DIRECT, INDIRECT, CONSEQUENTIAL OR INCIDENTAL DAMAGES (INCLUDING
5
Quick Start HAL S1030
DAMAGES FOR LOSS OF BUSINESS PROFITS, BUSINESS INTERRUPTION, LOSS OF BUSINESS INFORMATION, AND THE LIKE)
ARISING OUT OF THE USE OR INABILITY TO USE SUCH PRODUCT OR RELATED TO THIS AGREEMENT EVEN IF GAUMARD
HAS BEEN ADVISED OF THE POSSIBILITY OF SUCH DAMAGES.
GAUMARD SHALL NOT BE LIABLE TO YOU FOR ANY
INDIRECT, SPECIAL, INCIDENTAL, OR CONSEQUENTIAL DAMAGES OR LOST PROFITS ARISING OUT OF OR RELATED TO
THIS AGREEMENT OR YOUR USE OF THE SOFTWARE AND/OR THE RELATED DOCUMENTATION, EVEN IF GAUMARD HAS
BEEN ADVISED OF THE POSSIBILITY OF SUCH DAMAGES. IN NO EVENT SHALL GAUMARD'S LIABILITY HERE UNDER, IF ANY,
EXCEED THE PURCHASE PRICE PAID BY YOU FOR THE SOFTWARE.
ALL RIGHTS NOT EXPRESSLY GRANTED IN THIS LICENSE AGREEMENT ARE RESERVED BY GAUMARD.
ACKNOWLEDGMENT
BY INSTALLATION OF THIS SOFTWARE, YOU ACKNOWLEDGE THAT YOU HAVE READ AND UNDERSTAND THE
FORE GOING AND THAT YOU AGREE TO BE BOUND BY ITS TERMS AND CONDITIONS. YOU ALSO AGREE THAT
THIS AGREEMENT IS THE COMPLETE AND EXCLUSIVE STATEMENT OF AGREEMENT BETWEEN THE PARTIES
AND SUPERSEDES ALL PROPOSED OR PRIOR AGREEMENTS, ORAL OR WRITTEN, AND ANY OTHER
COMMUNICATIONS BETWEEN THE PARTIES RELATING TO THE LICENSE DESCRIBED HEREIN.
6
QUICK START
Quick Start HAL S1030
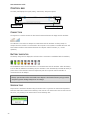
WELCOME TO THE FAMILY
Connect the CO2 tubing to the right lower leg and
position both lower legs on the knee joint.
Meet HAL S1030 dynamic airway and lung compliance
simulator.
This Quick Start Guide is intended to provide
a basic understanding of HAL’s functionality
and interaction with a mechanical ventilator.
Please review the HAL S1030 User Guide and
equipment manuals for all the items included
with the S1030 system for important safety
warnings, operation, and features
information.
Use the two hexagonal wrenches provided to secure the
knee bolts without over tightening.
SETUP
Quick start items check list:
Included with HAL
HAL S1030
HAL AC Adapter
Equipment not included
INTERNAL BATTERY
Locate the battery connectors on HAL’s right hand side.
Ventilator (e.g. Puritan
Bennett® 840™)
USB Communication
Module
Patient breathing
circuit
Ethernet cable
Lubricant
Control Laptop
Laptop AC Adapter
Please see the shipping manifest for a
complete list of the items included with the
HAL S1030 system.
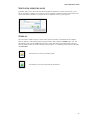
HAL SETUP
Place HAL on a flat surface and remove the fixed bolts
from the leg joint.
8
Gently lift the right corner on the chest skin as shown and
connect the battery clips.
Quick Start HAL S1030
WARNING: Do not remove the chest skin.
Internal components are serviced by Gaumard
certified technicians only.
Slide battery plugs into the cavity and secure the skin.
LAPTOP CONNECTION
Connect the Ethernet cable to the USB communication
module.
Connect the laptop’s AC Adapter, and then the
communication module to an available USB port.
Lastly, power on the laptop and continue onto the
Windows® home screen.
STARTING GIGA MODULE
To start the simulator, double click on the GIGA Module
icon on the laptop’s home screen.
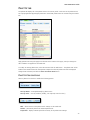
LOAD A PROFILE
Select the Quick Start Profile and click Load. Hal will
establish a connection and power on within 30 seconds of
activating the GIGA Module software.
On HAL’s right side, connect the Ethernet cable to the
communications port and the AC adapter.
9
Quick Start HAL S1030
GIGA MODULE INTERFACE
Click the V button to adjust HAL’s lung compliance by
volume.
By default, HAL will initialize to a healthy state. At this
point the ventilator should not be connected to the
ETT; as the simulator’s normal breathing rate could create
a conflict with the medical equipment. On the main
screen, HAL’s current parameters are seen on the left
status panel.
Finally, click NOW on the apply controls located at the
bottom of the screen to submit the settings.
First, set the respiration rate to 0 on the details tab of
the GIGA Module interface.
The status panel shows the updated settings. HAL is now
ready to be mechanically ventilated.
10
Quick Start HAL S1030
CONNECTING THE
LUNG COMPLIANCE LOOPS
VENTILATOR
First, change the Lung Compliance values in the GIGA
software to view the volume-pressure graphs on the
ventilator screen.
First, lubricate and insert the ETT into HAL’s airway.
Then, connect the ventilator circuit and power on the
ventilator. For additional information, go to page 54.
Start by entering a value of 9 for the compliance level and
click Now at the bottom of the window to immediately
apply the changes.
WARNING: Do not change the mechanical
ventilator settings while the simulator is
adjusting lung compliance parameters.
WARNING: Do not introduce liquids,
humidified gases or administer aerosol
medications into the airway. Moisture in the
airway will damage the simulator’s internal
sensors and mechanics.
WARNING: HAL’s operating limitations are
consistent with that of a real human.
Treating HAL in a manner that would
seriously harm a real person is likely to
result in damage to the internal mechanics.
Always treat HAL as a real patient.
VENTILATOR SETTINGS
For this simulation exercise, configure the ventilator with
the following parameters. HAL’s theoretical weight is
75 Kg (165 lbs.)
The lung compliance values range from 0 to 9. A lung
compliance setting of 0 will provide the lowest (tight)
compliance characteristics while a setting of 9 will provide
the highest (loose) compliance characteristics. For more
information on the lung compliance control, go to page
30.
Ventilation Type = Volume controlled
Respiratory Rate = 12 breaths/min
VT = 550 mL
Flow = 40 ltr / min
SIMULATION EXERCISE
Now that HAL is connected to the ventilator, use the
manual physiological parameters controls on the details
tab to change HAL’s condition.
11
Quick Start HAL S1030
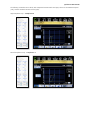
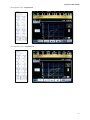
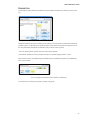
The following screenshots are a side by side comparison between HAL’s vital signs, shown on the GIGA status panel
(Left), and the ventilator’s monitor screen (right).
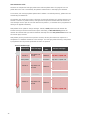
High Compliance Loop – Compliance 9
Normal Compliance Loop – Compliance 7
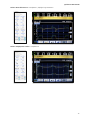
Quick Start HAL S1030
Mid Compliance Loop - Compliance 4
Low Compliance Loop – Compliance 0
13
Quick Start HAL S1030
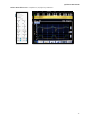
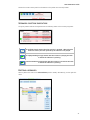
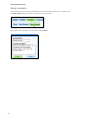
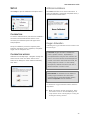
PRELOADED PALETTE ITEMS
A palette item stores a set of preprogrammed physiological parameters in a single loadable item. Click on the
palette tab and select the Normal on Vent 1 palette item from the list. Click Now to apply the palette item and
change HAL’s condition.
Normal on vent 1 will set HAL’s respiratory rate to 0, patient trigger rate to 0 and compliance to 7. The new vitals
are updated on the status panel located on the left of the screen. For information on creating new palette items, go
to page 32.
Palette: Normal on Vent 1 - Compliance 7
14
Quick Start HAL S1030
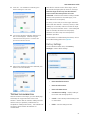
Palette: Bronchitis Severe – Compliance 5, left/right lung resistance 4
Palette: Emphysema Lobular – Compliance 9
15
Quick Start HAL S1030
Palette: Fibrosis Severe – Compliance 0
Palette: Asthma Moderate - Compliance 6, left/right lung resistance 5
16
Quick Start HAL S1030
Palette: Bronchitis severe – Compliance 5, left/right lung resistance 4
17
USER GUIDE
User Guide HAL S1030
OVERVIEW
TERMINOLOGY
The HAL S1030 Dynamic Airway and Lung Compliance
Simulator is a training simulator equipped with the
following features.
It is wise to spend a moment familiarizing yourself with
some of the terminology that will be used to discuss
simulation with the HAL system.
SIMULATOR FEATURES
BVM, intubate or mechanically ventilate
Practice intubation and management of anatomic and
pathologic conditions
Treat HAL with mechanical ventilators set to operate
by volume or pressure control
Ten levels of static compliance, from 15 to 90 mL/cm
H2O
Ten levels of independently controlled airway
resistances
Capable being treated with A/C, and PCV modes of
ventilation
Capable of assisting the ventilator at variable
respiratory rates
Capable of holding PEEP
Set inspiratory effort rate to trigger the ventilator for
assistance
Four anterior and four posterior lung sounds
Tongue edema, pharyngeal swelling and
laryngospasm
Real CO2 exhalation
O2Sat readings using a real monitor on the left index
finger
Articulating adult HAL full size body
USER INTERFACE
Monitor and control HAL‘s physiologic state from the
user interface.
Program tongue edema, pharyngeal swelling and
laryngospasm
Built in software respiratory monitor
Pre-programmed clinical scenarios
Create new scenarios using our proven, easy to use,
GIGA Module software
Evaluation feature for assessing and logging care
provider performance
Profile based log-in to support different users or
areas of study
Pre-programmed airway and lung pathologies
including
-
Asthma
-
Chronic Bronchitis
-
CHF
-
Emphysema
Facilitator - the person conducting the simulation;
an instructor or lab staff member.
GUI - the Gaumard User Interface - is the software
application, used to control the simulator and
evaluate care providers.
Palette Item - A palette item stores a set of
preprogrammed physiological parameters in a single
loadable item.
Profile - a unique HAL software configuration,
including custom Palette, Scenarios, and options.
Each Profile acts as a separate program, in that
changes made to one profile have no effect on the
others.
Provider - a person participating in the simulation as
a healthcare provider.
Scenario - a saved sequence of physiological states,
like a "playlist." Scenarios provide a level of
automation that unburdens the facilitator and allows
standardized presentation of symptoms.
Scenario Item - a Palette Item that is part of a
scenario. Scenario Items may also represent a fixed
delay period ("Wait") or a pause ("Wait Indefinitely").
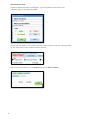
WORKING WITH GIGA Module
HAL S1030 User Guide
STARTUP
The simulator will establish a connection within 30 seconds of activating the software. By default, HAL
will initialize in a healthy state.
CAUTION: At this point the ventilator should not be connected to the ETT or the
ventilator; as the simulator’s normal breathing rate could create a conflict with the
medical equipment.
Double click the GIGA Module icon on the home screen of the
laptop computer to initialize HAL.
PROFILES MENU
A profile is a unique configuration of customized Palettes, Scenarios, and Options. Each profile
functions independently, in that changes made to one profile have no effect on the others. The
following profiles are preloaded into GIGA Module.
Default Profile – includes one palette with healthy physiological parameters. When creating a new
profile, it is often useful to include the Default profile contents and begin customization from that
foundation.
Quick Start Profile – contains a series of preprogrammed palette items and preprogrammed
scenarios.
It is recommended that first time users select the Quick Start Scenarios profile, which was created in
conjunction with experienced healthcare instructors and working medical professionals. It has
applicable Palettes that are useful for simulating common medical emergencies. For many applications,
it serves a convenient starting point that can be customized to fit most simulation objectives. Simply
select the applicable profile and click Load to continue.
HAL S1030 User Guide
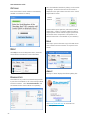
CREATING A NEW PROFILE
Create a new profile for each user of the HAL system or a specific academic course. For the most
detailed exercises, it is sometimes useful to devote an entire profile to one particular subject area, or
even one particular scenario.
On the left panel and enter a name for the new profile followed by a description.
Include items from other profiles by making the appropriate selection below and click Create Profile
to finish.
The profile name is displayed on the GIGA Module title bar. To change profiles without restarting the
software click File > Profiles.
22
HAL S1030 User Guide
ENVIRONMENT
STATUS PANEL
The Status panel is visible along the left edge of the GUI window at all times. It displays the simulators
current vital signs, volumes, and active features.
TREND TIME
The status countdown displays the time
left for vitals to reach the state
programmed on the details page.
Depending on the trend time, the
countdown timer will display 10 seconds,
30 seconds, 1 minute, 2 minutes or 5
minutes.
FEATURE INDICATORS
Each of these icons corresponds to a
complication. Active features are marked
with light blue icons. In this example,
pharyngeal swelling is enabled while
tongue edema and laryngospasm are
disabled.
CURRENT PARAMETERS
Vital signs undergoing change are
highlighted in blue.
SOUND AND VOLUME
Monitor the sound type and volume level
for each lung.
23
HAL S1030 User Guide
CONTROL BAR
The lower panel displays the signal, battery, session time, and power options.
Battery
Connection icon
Standby
Ventilator Operating Mode
CONNECTION
The signal icon is used to monitor the hard wired connection between the laptop and the simulator.
The indicator is clear when no attempts to communicate with the simulator are being made; for
example when the module is not connected to the computer or the system is in STAND-BY mode. Full
bars indicate excellent communication between the computer and the simulator (i.e., normal
operation).
BATTERY INDICATOR
The battery charge level is displayed in real time when a connection is established with the simulator,
The exclamation mark is shown when there is no communication with the simulator. When the battery
is so low that the indicator turns blinking red, the simulator is sent automatically to STAND-BY mode (to
protect some of the simulator's internal components) and will not operate until the simulator is
reconnected to the AC adapter.
Always operate HAL while connected to AC adapter. The internal battery only provides
temporary power during transport or an outage.
SESSION TIME
Keep track of a simulation’s duration using the session timer. Log entries are session time dependent.
Reset the session time counter before starting a new exercise. The session timer can be reset from the
file menu, or by clicking on the session time icon and selecting reset.
24
HAL S1030 User Guide
VENTILATOR OPERATING MODE
By default, HAL is set to work with mechanical ventilators operating in volume control mode. To set
HAL to work with a ventilator set to pressure control, toggle the ventilator operating mode button to P
on the GIGA module software. To prepare HAL for a ventilation exercise, go to page 54.
STAND-BY
HAL uses what is called soft power, which means that the simulator is activated from the software.
After the battery is connected during the setup procedure, HAL is always in SLEEP mode. HAL will
automatically wake up in the ON mode less than 1 minute after starting the GIGA Module software.
Click the stand-by mode to conserve battery during transport. To completely power down the simulator,
click File>Exit.
The Simulator is currently in Stand-by mode.
The simulator is currently connected and operational.
25
HAL S1030 User Guide
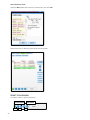
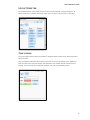
DETAILS TAB
It is best to think of controlling the simulator in terms of three levels of complexity: Firstly Details, then
the Palette, and finally Scenarios. The Details page is the first of the tab-pages found in the main area
of the user interface window. This is the simplest form of control available to the facilitator. Note that,
for each item in the Details tab, there is a corresponding entry on the Status panel.
Apply menu
APPLY MENU
After the physiological parameters are selected, click one of the apply buttons to update HAL’s
condition. Click NOW to change the vital signs immediately. Alternatively, click a timed apply option
automate the gradual increase or decrease of numeric physiological parameters (e.g. blood pressure)
over the span of several minutes. It is very important to note that those settings that you do
not specify will remain unchanged.
WARNING: Do not change the mechanical ventilator settings while the simulator is
adjusting lung compliance parameters.
26
HAL S1030 User Guide
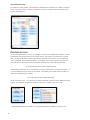
PHYSIOLOGICAL PARAMETER CONTROLS
Airway
Airway complications have three states, on/off and no change. To set the complication to active click
the circle icon light blue. To disable the complication, click again to darken the control. If no change is
to be made from the previous state, the control will display clear. Recall that to change HAL’s condition,
all changes must be submitted using the apply menu.
Respiratory Pattern
Select from the following options: normal, Kussmaul’s, Cheyne-Stokes, Biot’s, Apneustic and Apnea.
Heart rate
The heart is a virtual value can be expressed either as beats-per-minute, or a percentage of change.
Maximum heart rate is 220.
Respiratory Rate
The respiratory rate can be expressed either as breaths-per-minute, or a percentage of change.
Maximum respiratory rate is 120.
27
HAL S1030 User Guide
Inspiration Percentage
Control the inspiration percentage by using the numerical input of slider. The maximum value is 75.
Oxygen saturation
The oxygen saturation is a virtual value can be expressed either as percentage overall, or a percentage
of change. Place a real oximeter on the left index finger to obtain a reading. For more information on
calibrating the oximeter equipment, navigate to page 49.
Carbon dioxide
Adjust the exhalation of carbon dioxide when a CO2 cartridge is installed. If no cartridge is found, the
software will accept the input as a virtual value. The maximum output rate is 10. To install a CO2
cartridge, go to page 56 for instructions.
28
HAL S1030 User Guide
CO2 LEVELS
The chart below is an estimate of the duration of CO2 output for each of the programmable CO2 levels
with the following parameters: RR=13, Compliance= 8, Airway Resistance=0, VT = 550. For
information on installing the CO2 cartridge, go to page 56.
Approximate duration (in
minutes) of CO2 cartridge
CO2 Level
Approximate kPa
0
0
1
1.7
125
2
2.8
110
3
3.9
75
4
4.7
55
5
5.5
45
6
6
35
7
6.7
30
8
7.3
25
9
7.7
25
10
8.5
20
29
HAL S1030 User Guide
Lung compliance
The lung compliance values range from 0 to 9. A lung compliance setting of 0 will provide the lowest
(tight) compliance characteristics while a setting of 9 will provide the highest (loose) compliance
characteristics.
WARNING: Do not change the mechanical ventilator settings while the simulator is
adjusting its lung compliance parameters.
The graph below shows an estimate of the peak inspiratory pressure across HAL’s compliance levels
while the ventilator’s volume is set to 550mL and a flow of 40 ltr/min. It is assumed that HAL’s weight
is 75 Kg (165 lbs.). To accommodate for fluctuations in the results as seen on ventilators, values on the
graph may differ by +/- 2.
Cst vs PIP
60
50
40
30
20
10
0
C9
30
C8
C7
C6
C5
C4
C3
C2
C1
C0
HAL S1030 User Guide
Patient trigger rate
Set the rate of shallow inhalations per minute that will trigger the ventilator for breathing assistance.
The simulator is able to trigger the ventilator either when: Flow ≤ 1 Lts/min, or Pressure ≤ 1 cmH2O.
Facilitator’s may need to adjust the flow/pressure triggers sensors on the ventilator
so the equipment can easily recognize HAL’s shallow inhalations (gasps).
Lung controls
The lung fields include several settings that work independently on each lung. Recall that to change
HAL’s condition, all changes must be submitted using the apply menu. (e.g Now, 10 sec, 30 sec).
Chest Rise – The chest rise mechanism on each lung can be enabled or disabled
independently. Click on the circular icon to cycle through the states (disabled, enabled and no
change). A dark circle disables the lung and a light blue circle enables it. A clear circle specifies
no change from the previous state of the lung. Recall that to change HAL’s condition, all
changes must be submitted using the apply menu.
Disable the lung mechanism to simulate a collapsed lung. However, to simulate an apneic
patient, change the respiratory rate to 0 and keep the lung enabled.
Resistance – Adjust the resistance of each lung bronchi.
Sounds – Select an independent sound for the upper and lower lungs. Choose between
normal, none, wheezing, inspiratory squeaks, crackles and rales. In addition, anterior and
posterior volumes can be adjusted and programmed into palettes.
31
HAL S1030 User Guide
PALETTE ITEMS
The Details tab is also used to create palette items. A palette item stores a set of preprogrammed
physiological parameters in a single loadable item. Use a palette item to quickly load several
physiological parameters at once. Palette items are also used in scenarios as covered in the next
section.
To create a palette item, set several physiological parameters on the Details tab and click the Save as
Palette Item button near the top of the page.
On the Save as Palette Item window, enter the name and palette description. Assign one of four colorcoding labels for easier identification and click Save.
Once a palette is created, it is listed in the Palette tab library. Different palette items are then used to
create scenarios. For more information on scenarios see page 34
32
HAL S1030 User Guide
PALETTE TAB
The palette tab displays all of the palette items in the current profile. Each item on the palette stores
set of preprogrammed physiological parameters. Recall that palette items are created using the Details
tab.
Apply palette items using the apply menu buttons at the bottom of the page, exactly as changes to
HAL's condition are applied on the Details tab.
To modify an existing palette item, select the item and click the Edit button. The palette item will be
loaded in the Details tab and the settings that comprise the selected palette item will be displayed.
Change them as desired, and click the Save as Palette Item button.
PALETTE ITEM CONTROLS
Select a palette from the list to enable the following options.
Sort by Name – sorts alphabetically by palette name
Sort by Color – sorts by condition (healthy, care required, critical or other.)
Edit – allows revision of the palette item’s settings on the Details tab.
Delete – permanently deletes the selected palette item.
Properties – displays a Status panel-like summary of the palette item settings.
33
HAL S1030 User Guide
SCENARIO TAB
The most advanced method of controlling the HAL system is to use a scenario. Scenarios automate
most of the changes to HAL's condition, so that facilitators can keep their attention on the providers'
actions. The scenario system can also provide standardization of the patient's presentation of
symptoms. For fair assessment of providers and any research application, such standardization is key.
LOADING PREPROGRAMMED SCENARIOS
GIGA Module includes several preprogrammed scenarios to simulate a variety of airway and lung
pathologies. All preprogrammed scenarios are included in the Quick Start Profile.
First, click FILE> Profile and load the Quick Start Profile. Then, go to the Scenario tab and click
Load Scenario.
The Load Scenario dialog box appears. Select a scenario and click on Load.
34
HAL S1030 User Guide
Scenarios are a playlist of palette items played in a linear sequence. At any point, the facilitator can
pause, resume, rewind, fast forward, or restart the scenario using the scenario player controls.
Scenario progress
indicator
Vital sign
Palette items
Scenario player
controls
35
HAL S1030 User Guide
Scenarios are composed of vital signs palette items and wait palette items. The progress from one
palette item to the next is controlled by the palette’s transition time or manually by the facilitator.
In a scenario, each vital signs palette updates HAL’s condition. As outlined previously, palette items are
created using the Details tab.
The transition time trends the increase or decrease of numerical vital signs such as blood pressure over
seconds or minutes. On palette 2 below, vital signs from the previous inherited state will trend to the
new vital signs over the span of 5 seconds. Note that on palette 1, no transition time is programmed so
vital signs are applied immediately.
Wait palettes do not update or change vital signs. Instead, a Wait palette item will maintain the
inherited vital signs until the transition time expires. Alternately, a Wait Indefinitely palette will
maintain the inherited vital signs until the facilitator manually clicks the next palette item button from
the scenario player controls.
Wait palettes give the provider time to perform an action; this may be treatment in response to a
complication or a standard assessment of the vital signs. The vital signs palette following a wait palette
is programmed as if the provider performed the action as expected.
Scenario walkthrough
Palette Name
Palette Vital Signs
Transition
Time
Resp. Rate = 10
HR =90
00:00 sec
Resp. Rate = 10, HR =90
01:30 min
Resp. Rate = 10, HR =90
Simulator Vital Signs
Start
Palette 1
Wait palette
__________
Resp. Rate = 11, HR =92
Resp. Rate = 12, HR =94
Palette 2
Resp. Rate = 15
HR =100
00:05 sec
Resp. Rate = 13, HR =96
Resp. Rate = 14, HR =98
Resp. Rate = 15, HR =100
Wait palette
__________
02:00 min
Resp. Rate = 15, HR =100
Resp. Rate = 14, HR =96
Resp. Rate = 13, HR =92
Palette 3
Resp. Rate = 10
HR =80
00:05 sec
Resp. Rate = 12, HR =88
Resp. Rate = 11, HR =84
Resp. Rate = 10, HR =80
End
36
Total scenario time
03:40 min
HAL S1030 User Guide
CREATING A NEW SCENARIO
Build new scenarios to expand the number of exercises available in a training program. Below is a brief
overview of the steps necessary to create and save a new scenario. For detailed information on
scenario planning and theory, go to page 62.
Create scenario vital sign palette items
Add vital signs palettes and wait times to the scenario
Play the scenario
Modify and edit palettes
Save the scenario
The first step is to create the vital sign palette items that will be used in the scenario using the Details
tab. Each palette item will represent a physiological state in HAL’s condition. It is recommended that all
the physiological parameters, sound types, and volumes are programmed in the scenario’s first palette.
Physiological parameters not specified are inherited from one palette to the next.
Enter the vital signs for the first physiological state in the scenario, and then click the Save as Palette
Item button.
37
HAL S1030 User Guide
The Save as Palette Item dialog box is displayed. Type in the palette item name and a brief
description; assign a color tag and click Save.
The first vital signs palette is now created. Repeat the previous process to create new vital sign palettes
for each of the states in HAL’s conditions during the scenario.
After creating all the palettes, go to the Scenario tab and click Add to Scenario.
38
HAL S1030 User Guide
Select the vital sign palette previously programmed to be first on the scenario. Enter a transition time
and click Add.
The first palette is now added. Click Add Palette to Scenario… to add a wait palette item.
39
HAL S1030 User Guide
Select the Wait palette item and enter a transition time, then click Add.
Repeat the process to add more palette items and wait periods.
START THE SCENARIO
To start the scenario, click the play button.
Previous Palette
Reset
40
Stop
Next Palette
Play
HAL S1030 User Guide
Monitor the scenario status panel for information on the palette item currently loaded.
SCENARIO POSITION INDICATORS
The green position indicator changes between the following states as the scenario progresses.
An unfilled triangle means that the scenario is stopped. When the Play
button is clicked, the item pointed by the indicator is be played.
A rapidly blinking triangle means that the scenario is playing the item
to which the indicator is pointing.
A slowly blinking triangle means that the scenario is paused at the item
to which the indicator is pointing.
EDITING A SCENARIO
Select a palette item and use the Selected Item panel to modify. Alternatively, use the right click
menu.
41
HAL S1030 User Guide
Saving a scenario
Use the scenario menu to clear any palettes listed on the scenario page, load or save a scenario. Click
the Save scenario button to store the scenario in the current profile.
Enter a name and a description for the scenario and click Save.
42
HAL S1030 User Guide
RESPIRATORY MONITOR
On the right of the screen, the lung graphic is synchronized with HAL’s breathing rate. A red half circle
will appear beneath the lung graphic every time HAL attempts to trigger the ventilator. If HAL is
intubated, the graphic will also display the approximate location of the ET tube in the airway.
The respiratory monitor displays real time information as detected by the simulator. All the readings
displayed are approximate values.
Ventilations per minute
Peek inspiratory pressure
Inspiratory time (sec)
Inspiration: Expiration
Positive end-expiratory pressure
LOG PANEL
The Log records entries for every simulation event and parameter change. In addition, facilitators can
log observed provider actions using the evaluation feature. To save and print a log report, go to page
48.
COMPACT LOG VIEW
43
HAL S1030 User Guide
EXPANDED LOG VIEW
EVENT TYPES
The different types of entries are: Actions, Applied Changes, Detected Events, Evaluations, and Notes.
Actions
Actions refers to those performed by one of the providers in the session. The facilitator can quickly log
actions from the Provider Actions section and make the entry more specific using the Team Logging
feature. The following is an example of an Action entry:
"00:07:24 Action (Assess responsiveness)"
Applied Changes
An 'Applied' log entry occurs automatically every time there is a change to the physiological condition of
the simulator. In other words, every time changes are made from the Details page, Palette page, or
from a Scenario a log entry like the following is created:
"00:04:01 Applied (00:30): Details: Rhythm Sinus; Cardiac event 0; HR 80;"
Detected Events
Every time one of the various sensors in the simulator detects a provider action, it is automatically
logged as a 'Detected' entry. These actions include electrical therapy (pacing, defibrillation,
cardioversion, inappropriate shock). The following example shows an entry after a provider attempts to
perform a chest compression.
"00:03:26 Detected (chest compression): integral=140, peak=70, duration=0.4 seconds."
44
HAL S1030 User Guide
LOG ACTIONS TAB
The evaluation field is used to track provider actions and rate individual or team performance. All
entries made on the evaluation field will be visible in the log panel near the bottom of the page.
TEAM LOGGING
The Team Logging feature allows the facilitator to designate which member of the team performed a
particular action.
First, the facilitator should add all providers in the team, one by one, by clicking on the Add button.
Enter the name of the first team member and designate a color. Finally click OK to create the new
provider. There can be up to four different providers, each with a corresponding button.
45
HAL S1030 User Guide
To indicate the active provider, the evaluation bar will display the providers name. While a provider is
active, every time an action is clicked or Evaluation log entry is created it will have the name of the
provider prepended to it.
PROVIDER ACTIONS
The Provider Actions section refers to the collection of buttons in the middle of the window. It allows
the facilitator to accurately keep track of provider actions. The buttons are grouped into 3 groups:
Basic, , Airway and Breathing. Anytime the facilitator clicks one of the buttons, a time-stamped log
entry is generated with that particular action. For example, if the 'Assess responsiveness' button is
clicked when the session clock reads 00:07:24, the following entry is automatically generated:
"00:07:24 [Patricia] Action (Assess Responsiveness)"
Some provider-action buttons are accompanied by a special option button.The first special button, “ +
“, lets the facilitator be a log actions in more detail. For example, if the button “Assess breathing” is
clicked, the following entry is created:
"00:01:28 [Patricia] Action (Assess breathing)"
On the other hand, if the “ + “ button next to “Assess breathing” is clicked, a list of additional options
appears. The facilitator can be more specific and choose, for example, “look, listen, feel”:
...and the following log entry is added: "00:01:28 [Patricia] Action (Ventilate): look, listen, feel"
46
HAL S1030 User Guide
EVALUATION
The Evaluation feature allows the facilitator to insert standard evaluations or arbitrary notes into the
log.
Standard evaluations are given context by their position in the log relative to detected and observed
provider actions. To add entries for specific providers, select the active provider and type the note in
the entry field. After clicking OK, the following entry is shown in the log panel.
"00:07:41 [Patricia] Note: provider took too long to assess patient "
To deactivate, deselect the active provider and return to general logging, click the “Team”.
Each provider can also be graded using the satisfactory and unsatisfactory buttons. The satisfactory
entry is show below:
"00:07:41 [Patricia] Evaluation (Care Provided) : Satisfactory”
For information on saving the log report, navigate to page 48.
47
HAL S1030 User Guide
MENU BAR
The session time can also be reset by clicking on the
timer and selecting reset.
The following sections will explain each of the menu bar
options.
FILE
Click File to change between profiles, start a new
session and save or print the log report.
SAVE REPORT
Click Save Report to save all the information recorded
in the log as a plain text file.
PROFILE
Click Profile to open the profiles menu window and
manage profile options without restarting the software.
Enter a name for the log file, and click Save.
PRINT REPORT
Print a text file containing all the information in the
current log session. Click Print Report to open the
Print dialog box. The shortcut key for this option is Ctrl
+ P.
EXIT
Exit the software and power down HAL.
NEW SESSION
Click File > New Session to:
Clear any loaded/playing scenario
Clear any loaded/playing palette
Reset physiological parameters to normal values
Clear out log page
Restart the session clock.
HAL S1030 User Guide
SETUP
Artificial Ventilations
Click Setup to open the Calibration and Options menu.
Click Start and follow the on-screen instructions. A
green oval indicates a successfully-completed action; a
red oval indicates a failed action.
CALIBRATION
To view the calibration menu, HAL must first establish a
connection with the GIGA Module software. Once
connected, the Calibration option will appear in the
Setup dropdown.
During the calibration process the respiratory Rate,
inspiration percentage, O Sat, compliance, and patient
trigger rate are changed to zero.
CALIBRATION WIZARD
Calibration uses multiple steps. Navigation through the
wizard uses the “Next” and “Back” buttons at the
bottom of the dialog box. Select “Artificial Ventilation”,
then “Next”.
Oxygen Saturation
Calibrating the oxygen saturation sensor located on the
left index finger.
CAUTION: Oxygen saturation is calibrated to
match a specific oximeter. Repeatability is
accomplished when using the same oximeter and
sensor. Even if the oximeter is interchanged with
another one from the same brand and model, the
reading might not coincide. To avoid reading
discrepancies, calibrate this feature each time a
different oximeter or sensor is used.
DISCLAIMER: Co-Oximeters that in addition to
reading oxygen saturation also read carbon
monoxide (SpCO) and methemoglobin (SpMet)
are not compatible with this simulator.
To calibrate the oxygen saturation feature, follow the
steps below:
1.
Make sure that the oximeter is turned off. Place
the oximeter sensor on the left index finger and
verify that the center of the fingertip is covering the
emitting and sensing element.
49
HAL S1030 User Guide
2.
3.
Go to Setup>Calibration and select “Oxygen
Saturation”. Click “Next”.
5.
The oxygen saturation calibration dialog box is
displayed (for 98%).
A message box is displayed to remind you to have
the oximeter turned off. “Click OK”.
6.
Using the arrows on the left column of the
calibration dialog box, adjust the reading on the
oximeter monitor screen, to match the 98
displayed on the calibration window.
Select the left index finger. Then click “Next”.
For large increases or decreases, use the triple
arrows. For moderate changes, use the double
arrows. Use single arrows for small changes of
one or two percent reading (only for 98%
calibration).
4.
50
Turn on the oximeter and click “OK” on the dialog
box.
To ensure proper calibration, always
allow the oximeter to stabilize
readings by waiting 3-5 seconds after
the onscreen value is displayed. After
the value on the oximeter screen
stabilizes, click “Next” to continue
calibration.
HAL S1030 User Guide
7.
8.
Click “OK”. The calibration oval blinks green
before showing the next value.
The oxygen saturation calibration dialog box for
80% is now displayed. Calibrate using the
instructions from step 6 and 7. Continue the
process until the final screen.
Now take the oximeter sensor off the finger, wait for
five seconds and again place the sensor on the finger.
Slide the finger all the way into the oximeter
sensor and in the same position as it was
calibrated. Check that the oximeter reading coincides
with the value specified on the Details page (±3 %
value differences are accepted).
If it does, you are ready to use the oxygen saturation
feature with this oximeter. If the first, second, or both
readings do not coincide, make sure to slide the finger
all the way into the oximeter sensor. If the reading still
does not coincide, the feature was not properly
calibrated. Go back to step one and repeat the
calibration procedure.
For information on troubleshooting this feature, refer to
the troubleshooting guide in the Appendix.
Factory Settings
On the calibration wizard menu, click Factory
Settings to restore default settings.
9.
After all the checkpoint values are calibrated, click
Finish to save the calibration.
TESTING THE CALIBRATION
With the oximeter on the finger, go to the details page
and change the oxygen saturation value on the
software. Observe that the oximeter reading coincides
with the value you specified (±3 differences are
acceptable on readings above 80%). Test calibration at
two points; values between 80 and 95% are
recommended.
Reset Ventilations Sensor
Reset ET Tube Sensor
Reset Left OSat Sensor
CO2 Pressure reading – Display reading of
the current CO2 cartridge pressure.
Cancel – Closes Factory Default Settings with
no action taken
Finish - save the settings and exit.
51
HAL S1030 User Guide
OPTIONS
Enter the simulator’s serial number to automatically
establish a connection on startup.
Also check individual modules by clicking on the module
to highlight. Notice that the name of the module is
displayed on the right column. Now click on the "Check
Single Module" button:
Module
selected
Active modules report light blue, and inactive modules
report black. If there is a specific module that fails to
respond please contact customer support (ensure that
the module that is unresponsive is not specific to an
Add-On feature that is not installed on your simulator).
HELP
HELP
Click help to open an electronic copy of the HAL S1030
User Guide No internet connection is required to view
the file.
Click Help to access the diagnostics menu, electronic
documentation and software version information.
ABOUT
Clicking on “About” displays the following dialog box:
DIAGNOSTICS
This window is very useful for troubleshooting because
it gives the user feedback on all of the working modules
inside the simulator. Click "Check All Modules" and
the software checks which modules are responding.
Visit www.Gaumard.com for information on
software updates.
52
WORKING WITH HAL
HAL S1030 User Guide
CONNECTING THE VENTILATOR
HAL is designed to work with most microprocessor-based mechanical ventilators and respond like real
patient. Review the information below before starting a ventilation exercise.
FEATURE HIGHLIGHTS
The list below outlines some of HAL’s patient capabilities.
Treat HAL with mechanical ventilators set to operate by volume or pressure control
Ten levels of static compliance, from 15 to 90 mL/cm H2O
Ten levels of independently controlled airway resistances
Capable being treated with A/C, and PCV modes of ventilation
Capable of assisting the ventilator at variable respiratory rates
Capable of holding PEEP
Set inspiratory effort rate to trigger the ventilator for assistance
DISCLAIMER: HAL is not designed to test the performance, functionality, and accuracy
of a mechanical ventilator.
WARNING
Always follow the mechanical ventilator’s guidelines and precautions.
Do not introduce liquids, humidified gases or administer aerosol medications into the
airway. Moisture in the airway will damage the simulator’s internal mechanics.
HAL’s operating limitations are consistent with that of a real human. Treating HAL in a
manner that would seriously harm a real person is likely to result in damage to the internal
mechanics.
Always treat HAL as a real patient.
54
HAL S1030 User Guide
Follow the steps below to connect HAL to a mechanical ventilator.
CAUTION: Do not intubate the airway when the simulator is powered off. Doing so will
result in inaccurate intubation readings when the GIGA software is activated. To
reset, remove the tubing the airway and restart the software.
1.
By default, HAL will initialize to a healthy respiratory rate of 13 breaths per minute. If the ventilator
is connected at this point, the healthy breathing rate may trigger the ventilator alarms and put
unnecessary stress on the simulator’s breathing mechanism. Set HAL’s respiratory rate to 0 for
at least 8 seconds before continuing to the next step.
2.
Configure the ventilator settings to treat an apneic patient weighting 75Kg (165 lbs.)
3.
Set the ventilation control mode on the GIGA module software. By default, HAL is set to work with
mechanical ventilators operating in volume control mode. To set HAL to work with a ventilator set
to pressure control, toggle the ventilator operating mode button to P on the GIGA module
software.
4.
Lubricate the endotracheal tube prior to intubating the airway. Placement procedures and tube
sizes follow the specifications of an adult patient.
5.
Start mechanically ventilating HAL.
After HAL is successfully intubated, simulate numerous respiratory conditions by changing the
physiological parameters.
WARNING: Do not change the mechanical ventilator settings while the simulator is
adjusting lung compliance parameters.
For detailed information on all the lung compliance, airway resistance, patient trigger rate, and other
respiratory physiological controls, go to page 27.
55
HAL S1030 User Guide
CO2 EXHALATION
When a CO2 cartridge is installed, HAL can exhale real CO2 through the airway. The CO2 output rate is
adjusted using the CO2 physiological parameter control on the Details tab. For more information about
the CO2 output rate, physiological parameter control, and approximate duration of CO2 release, go to
page 28.
Due to shipping regulations, CO2 cartridges are NOT included with the system. The
required 16g threaded CO2 3/8”-24UNF-2A cartridges can be purchased at most
bicycle or hardware stores. 12g threaded cartridges are also compatible.
CO2 SAFETY AND WARNING CHECKLIST
Read all the safety and warning information included with the CO2 cartridge package before installing.
Never point the CO2 cartridge at yourself or others.
Remove the CO2 cartridge only when the LOW CO2 warning is displayed on the
main screen.
Do not use damaged CO2 cartridges.
Do not over tighten the cartridge into the adapter harness. Do not puncture the
cartridge CO2 seal manually.
Do not expose the CO2 cartridges to high temperatures.
CO2 CARTRIDGE INSTALLATION
For maximum duration, the CO2 cartridge should be installed just before the simulation begins. If left
overnight, the cartridge will empty within 24 hours whether it is used or not.
1.
56
Remove the right leg skin cover.
HAL S1030 User Guide
2.
Remove the tibia bone insert.
3.
Remove the adapter harness located inside the right lower leg chamber.
4.
Screw in a new CO2 cartridge into the harness adapter. As the cartridge is tightened, the harness
adapter will puncture the CO2 seal. The cartridge will feel cool to the touch when the seal is
broken. Continue to tighten the CO2 cartridge until it is fully secured in the harness adapter.
5.
Finally, insert the adapter into the chamber and replace the tibia insert and skin.
57
HAL S1030 User Guide
OXYGEN SATURATION
Use commercially available monitors on the left index finger to read HAL’s oxygen saturation. Control
the oxygen saturation directly from the Details Tab. To calibrate HAL to work with an OSAT monitor, go
to page 49.
Co-oximeters that in addition to reading oxygen saturation also read carbon monoxide
(SpCO) and methemoglobin (SpMet) are not supported and may provide inaccurate
readings.
58
CARE AND CAUTIONS
HAL S1030 User Guide
OVERALL WARNINGS
Remember that damage caused by misuse is not covered by your warranty. It is critical to understand and comply with
the following guidelines:
WARNING: There are inherent dangers in the use of some medical devices. For simulations that
incorporate mechanical ventilation, always know your equipment and follow the device manufacturers'
safety guidelines.
HAL should be cleaned with a cloth dampened with diluted liquid dishwashing soap. If medical adhesives remain on the
skin, clean with alcohol wipes. DO NOT USE “GOO GONE” as the citric acid in the formula will cause pitting of the
various materials comprising your simulator.
WARNING: When connecting the simulator’s internal battery leads, be sure to match the two color-coded
connectors to the corresponding color-coded battery terminals.
WARNING: Do not attempt to intubate without lubricating the airway adjunct with silicone oil lubricant
(provided). Failure to do so will make intubation very difficult and is likely to result in damage.
WARNING: NEVER disconnect the communications module while the GIGA Module software is running.
The software will halt, and the module may be damaged.
WARNING: When simulating drug administration via endotracheal tube, providers must use an empty syringe.
Passing liquids into the trachea or esophagus will cause internal damage.
Store HAL in a cool, dry place. Extended storage above 85 degrees Fahrenheit (29 Celsius) will cause the simulator to
soften and slowly warp. It is acceptable to operate HAL at an ambient temperature of 95 degrees Fahrenheit (35
Celsius).
WARNING: HAL is "splash-proof" but not water-proof. Do not submerge or allow a large volume of fluid to
enter the interior of the simulator. Do not expose the tablet computer to water or excessive dust unless it
is protected by a rugged case (available separately).
Mouth to mouth resuscitation without a barrier device is not recommended, as it will contaminate the airway. Treat HAL
with the same precautions that would be used with a real patient.
WARNING: HAL is not equipped with hemothorax sites puncturing his chest skin will damage the simulator
and void the warranty.
WARNING: Do not introduce liquids, humidified gases or administer aerosol medications into the airway.
Moisture in the airway will damage the simulator’s internal mechanics.
WARNING: HAL’s operating limitations are consistent with that of a real human. Treating HAL in a manner
that would seriously harm a real person is likely to result in damage to the internal mechanics. Always
treat HAL as a real patient.
DISCLAIMER: HAL should never be used to test the performance, functionality, and accuracy of a
mechanical ventilator.
WARNING: Do not change the mechanical ventilator settings while the simulator is adjusting lung
compliance parameters.
WARNING: Do not remove the chest skin. Internal components are to be serviced only by Gaumard
certified technicians.
60
APPENDIX
HAL S1030 User Guide
TIPS ON CREATING SCENARIOS
Thinking in Terms of Palette Items
As described previously, Palette items represent complete or partial groups of settings that have been
stored as a single item. We learned how applying partial states will hold constant all settings that are
left unspecified.
Not only does it take time to customize the palette, but a very large palette becomes difficult to
navigate. So, it is desirable to minimize the number of Palette Items in each Profile. To accomplish
this, an experienced facilitator tries to create items that are as generally applicable as possible and can,
thus, be applied to a wide range of scenarios. The key is to only include in your Palette Items the
settings that are directly related to the physiological event represented by that Palette Item.
Smart Scenarios
After reading the Details, Palette, and Scenarios sections of this guide, it should be clear how to build a
scenario. You may have already tried building your own or modifying some of the factory presets. The
following four guidelines will refine your ability to build the best possible scenarios.
1. How will the scenario begin?
The first thing to consider is the initial condition of the patient. Create a Palette Item to describe this
condition. Make sure that this first step in the scenario is a complete state. That is, indicate some
selection for each and every available setting on the Details page. Remember that only the settings
you specify will cause a change in HAL, and all other settings will remain constant. So, by starting with
a complete state, HAL's condition will always be the same when the scenario starts, regardless of what
he was doing previously.
Likewise, the "transition duration" of the first step in the scenario should be zero, indicating that
changes are applied immediately.
There is one point that can cause confusion and warrants further explanation. It is an extension of the
above discussion of partial states. The issue is best illustrated through the following example:
Suppose that you are creating a Palette Item to start your scenario. In this case, you
have decided that the patient will be apneic. The question is, "How should the lung
sounds be set?"
Most people's first inclination is to set the lung sounds to "none." This is incorrect,
despite apnea. Obviously, no lung sounds should be heard during apnea, but since
you have already set respiratory rate to zero, none will be. (Sounds are synchronized
to the breathing cycle.)
What you are really setting here when you choose a lung sound is the condition of
the lungs, given respiratory drive. That is, if the patient's respiratory rate were
changed from zero, what sound would be heard? Assuming that the lungs
themselves are normal in this scenario, you would choose "normal" for the lung
sound setting.
Then, as the scenario progresses, if the patient starts breathing, there will be no
need to set the lung sound again. It will already be set. The same principle applies
to the heart sound and other settings.
62
HAL S1030 User Guide
2. Include notes to guide the facilitator during the simulation.
It is common for scenario designers, especially those who act as facilitators, to neglect the importance
of notes in the scenario. They think that they will remember the learning objectives, patient history,
and other details at the time they are ready to conduct the simulation. hey usually don't, especially
when revisiting a scenario months after creating it.
When you add "Wait" and "Wait Indefinitely" steps to a scenario, you have an opportunity to edit the
item description. Use this description field to hold notes to the facilitator. Typically, scenario designers
write notes in that space to indicate what the provider(s) or facilitator should be doing at that point.
Further, when saving the scenario, you may edit the scenario description. This is the best place to put
patient history and any other longer notes and instructions.
3. Assume that providers will do the right thing.
Usually, you should create a scenario with the assumption that the providers will perform correctly. As
long as they do, the scenario can simply be allowed to continue.
Naturally, you must be prepared for what might happen to HAL® when providers deviate from expectations. The consequences of such deviations can sometimes be included in the scenario, punctuated by
"Wait Indefinitely" items. In other cases, the simulation will require more direct control by the
facilitator via either the Palette or Details page.
FILE STRUCTURE
Advanced users may find it helpful to understand the GIGA Module directory structure. With direct file
manipulation, one can easily move palette items and scenarios between profiles, as well as move entire
profiles from one computer to another.
PROFILES
In the GUI program folder is the “profiles” sub-folder (e.g. “C:\Program Files\Gaumard Scientific\GIGA
Module\profiles”). All user information is saved there, and it is the only folder that should be modified
manually. In the example shown, notice that there are two profiles in this installation, “Default Profile”,
and “Quick Start Scenarios”.
PALETTE ITEMS
Saved as “*.plt” files, palette items in each profile are located at the top-level of each profile folder. To
copy palette items from one profile to another, simply copy the .plt file found in the source profile
folder.
SCENARIOS
Scenarios are stored as sub-folders within profile directories. Scenarios can also be transferred
between profiles by copying the scenario folder and its contents.
Never…
modify files in the “resources” directory or those at the top-level of the “Gaumard User Interface”
directory.
manipulate files or folders while the GaumardUI software is running.
modify or delete “*.dll”, “*.scn”, or “*.sys” files.
63
HAL S1030 User Guide
TROUBLESHOOTING
GENERAL TROUBLESHOOTING GUIDE
Use the following table to find causes and solutions to a number of possible problems.
Symptom
Possible Cause
Solution
Communication
never gets
established or is
lost
(No signal bars or
battery reading.)
Data cable is not connected.
Verify connection of the Ethernet cable and
USB module to the computers USB port.
Serial number on the
environment does not match
the simulator.
Navigate to setup>options>Environment.
Enter the simulator’s serial number and
save.
Incorrect intubation
reading.
Simulator indicates that no
ETT is present.
Remove ETT and restart the software.
Chest compressions
are not properly
detected or not
detected at all
Is the respiratory rate set to
'0 / min'? Chest
compressions are only
detected when the
respiratory rate is set to 0
per minute (0 / min).
Otherwise they are ignored
Set respiration rate to zero
All others
See “Calibration” section
Simulator is not running
In some simulators, the trachea is
disconnected from the lungs when they are
not on
Disabled lung/s
Enable the lungs from “Detail” page on the
User Interface software
Simulator’s chest does
not rise with artificial
ventilation (e.g. BVM)
64
USB Module is not
connected.
HAL S1030 User Guide
Symptom
Possible Cause
Solution
Low chest rise (or no
chest rise at all) while
breathing
Wrong settings or disable
lungs
Make sure lungs are enabled and both
respiration rate and inspiration percent are
different than ‘0’. Try changing the
respiration rate to a different value or turn
the simulator off and then on again.
Oximeter reading
does not coincide
with value set
Using a different
Oximeter/Sensor for which
the simulator was calibrated
The simulator must be calibrated with the
Oximeter instrument that it is going to be
used (including the Pulse Oximeter Sensor).
Oximeter Sensors cannot be swapped even
with same kind of oximeter’s brand and
model.
CO2 not being
exhaled
Mechanical Ventilator
is not triggered when
assisting the
simulator
An oximeter which includes carbon monoxide
and/or methemoglobin sensing cannot be
used.
Oximeter has been placed on the arm that
doesn’t have the O2Sat feature. Check in the
Diagnostic if that arm has the feature
installed
Pulse Oximeter Sensor not
properly placed
Make sure to slide the Pulse Oximeter Probe
all the way into the simulator’s finger. Make
sure the emitter part (the red light) of the
probe is on the nail side of the finger. If user
is sure that the probe is properly placed, it
means that it was not when calibration was
performed, then re-calibration is necessary.
See O2Sat calibration section for more info.
Offset value within +/- 2
User should expect a +/- 2 discrepancy
between value set and Oximeter reading for
O2Sat values above 80%, and +/-3 below
80%.
Empty CO2 canister
Make sure the CO2 canister is in place. For
S1030, the User Interface displays the “Low
CO2” message when CO2 pressure is low.
Notice that CO2 canister must be plug just
before the training section starts to get
maximum duration. If left overnight, the
canister will slowly empty. (See “CO2
exhalation” section). The CO2 canister once
it is plugged, will empty within 24 hours
whether it is used or not.
65
HAL S1030 User Guide
Symptom
Mechanical Ventilator
is not triggered when
assisting the
simulator
66
Possible Cause
Solution
CO2 pressure regulator is
“OFF”
Go to “Calibration/Factory Settings” and then
press the “CO2 Pressure” button. In the
window to the right a value between 3-6 psi
(ideal 4.5 psi) indicates good level. Should
not be the case, call tech support for
advanced troubleshooting.
Settings exceeding the
simulator’s capabilities
The simulator is able to trigger the ventilator
either when:
-
Flow ≤ 1 Lts/min, or Pressure ≤ 1 cmH2O
HAL S1030 User Guide
WARRANTY
EXCLUSIVE ONE-YEAR LIMITED WARRANTY
Gaumard warrants that if the accompanying Gaumard product proves to be defective in material or workmanship within
one year from the date on which the product is shipped from Gaumard to the customer, Gaumard will, at Gaumard’s
option, repair or replace the Gaumard product.
This limited warranty covers all defects in material and workmanship in the Gaumard product, except:
1.
Damage resulting from accident, misuse, abuse, neglect, or unintended use of the Gaumard product;
2.
Damage resulting from failure to properly maintain the Gaumard product in accordance with Gaumard product
instructions, including failure to property clean the Gaumard product; and
3.
Damage resulting from a repair or attempted repair of the Gaumard product by anyone other than Gaumard or a
Gaumard representative.
This one-year limited warranty is the sole and exclusive warranty provided by Gaumard for the
accompanying Gaumard product, and Gaumard hereby explicitly disclaims the implied warranties of
merchantability, satisfactory quality, and fitness for a particular purpose. Except for the limited obligations
specifically set forth in this one-year limited warranty, Gaumard will not be liable for any direct, indirect, special,
incidental, or consequential damages, whether based on contract, tort, or any other legal theory regardless of whether
Gaumard has been advised of the possibilities of such damages. Some jurisdictions do not allow disclaimers of implied
warranties or the exclusion or limitation of consequential damages, so the above disclaimers and exclusions may not
apply and the first purchaser may have other legal rights.
This limited warranty applies only to the first purchaser of the product and is not transferable. Any
subsequent purchasers or users of the product acquire the product “as is” and this limited warranty does not apply.
This limited warranty applies only to the products manufactured and produced by Gaumard. This limited
warranty does not apply to any products provided along with the Gaumard product that are manufactured by thirdparties. For example, third-party products such as computers (desktop, laptop, tablet, or handheld) and monitors
(standard or touch-screen) are not covered by this limited warranty. Gaumard does not provide any warranty, express or
implied, with respect to any third-party products. Defects in third-party products are covered exclusively by the warranty,
if any, provided by the third-party.
67
HAL S1030 User Guide
Any waiver or amendment of this warranty must be in writing and signed by an officer of Gaumard.
In the event of a perceived defect in material or workmanship of the Gaumard product, the first purchaser must:
1.
Contact Gaumard and request authorization to return the Gaumard product. Do NOT return the Gaumard
product to Gaumard without prior authorization.
2.
Upon receiving authorization from Gaumard, send the Gaumard product along with copies of (1) the original bill
of sale or receipt and (2) this limited warranty document to Gaumard at 14700 SW 136 Street, Miami, FL, 331965691 USA.
3.
If the necessary repairs to the Gaumard product are covered by this limited warranty, then the first purchaser
will pay only the incidental expenses associated with the repair, including any shipping, handling, and related
costs for sending the product to Gaumard and for sending the product back to the first purchaser. However, if
the repairs are not covered by this limited warranty, then the first purchaser will be liable for all repair costs in
addition to costs of shipping and handling.
Extended Warranty
In addition to the standard one year of coverage, the following support plans are available:
68
Two-Year Extension (covers second and third years)
Call for pricing (USA only)
HAL S1030 User Guide
CONTACT US
Technical Support:
E-mail Sales and
Customer Service:
Office hours:
Phone:
[email protected]
[email protected]
Monday-Friday
8:30am - 4:30pm EST
(GMT-5, -4 Summer Time)
Toll-free in the USA:
(800) 882-6655
Fax:
(305) 667-6085
Post:
Gaumard Scientific
14700 SW 136 Street
Miami, FL 33196-5691
USA
Worldwide:
01 (305) 971-3790
Before contacting Tech Support, please have the simulator’s serial
number ready. It is located in the left leg under the IM site. In
addition, maintain close proximity to the simulator if troubleshooting
is needed.
© Gaumard Scientific Company, 2012.
All rights reserved.
Gaumard®, HAL® and GIGA™ are trademarks of Gaumard Scientific Company, Inc.
Patented; other patents pending
Always dispose of this product and its components in compliance with local law and regulations.
69