1
Chapter 6 Maintenance and inspections
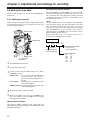
6-1-3 Inspecting the VTR unit
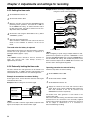
2. Automatic audio level adjustment function
inspection
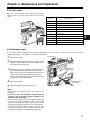
Perform all the steps outlined in section “1. Tape travel
inspection” through section “4. Earphone and speaker
inspection” one after the other.
1
Set the AUDIO SELECT CH1 and CH2 switch to AUTO.
2
Set the AUDIO IN CH1 and CH2 switches to FRONT.
3
Point the microphone connected to the MIC IN jack at a
suitable sound source, and check that the changes in the
level displays for both CH1 and CH2 reflect the changes
in the strength of the sound.
1. Tape travel inspection
1
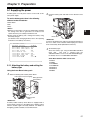
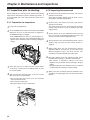
Set the VTR SAVE/STBY switch to SAVE, and check that
the VTR SAVE lamp inside the viewfinder lights.
2
Set the VTR SAVE/STBY switch to STBY, and check that
the VTR SAVE lamp goes off.
3
Set the TCG switch to R-RUN.
3. Manual audio level adjustment function
inspection
4
Set the DISPLAY switch to CTL.
1
Set the AUDIO IN CH1 and CH2 switches to FRONT.
5
Press the unit’s VTR START button, and check that:
2
Set the AUDIO SELECT CH1 and CH2 switch to MAN.
3
Turn the AUDIO LEVEL CH1 and CH2 controls.
Check that when they are turned clockwise, the level
displays increase.
≥ The tape reels rotate.
≥ The figure shown on the counter display changes.
≥ The REC lamp inside the viewfinder lights.
≥ The RF and SERVO displays do not appear in the
display window.
6
4. Earphone and speaker inspection
6
Press the unit’s VTR START button again. Check that
the tape stops and the REC lamp inside the viewfinder
goes off.
7
Use the lens VTR button to check the same operations as
in steps 5 and 6.
8
Press the RESET button, and check that “00:00:00:00”
appears on the counter display.
9
Set the LIGHT switch to ON, and check that the display
window illuminates.
1
Set the VTR SAVE/STBY switch to STBY.
2
Turn the MONITOR control, and check that the speaker
volume changes.
3
Connect the earphones to the PHONES jack.
Check that the sound from the speaker is muted, and that
the microphone’s sound is heard in the earphones.
4
Turn the MONITOR control, and check that the earphone
volume changes.
the REW button, and after the tape has been
10 Press
rewound for a few seconds, press the PLAY/PAUSE
button.
Check that the tape is recorded, played back and
rewound properly.
the FF button, and check that the tape is fast
11 Press
forwarded properly.
69