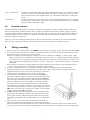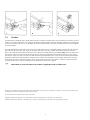
1
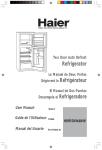
operating instructions 18.40 nitrachek reflectometer Contents 1.Introduction....................................................................................................................................................1 2.Operating controls and battery.......................................................................................................................2 2.1The read-head and test-strip carrier......................................................................................................2 2.2The hatch.............................................................................................................................................2 2.3The push-buttons.................................................................................................................................2 2.4The alarm switch..................................................................................................................................2 2.5The battery...........................................................................................................................................2 3. Memory function............................................................................................................................................3 4.Clock and calendar functions .........................................................................................................................3 4.1Adjusting the date................................................................................................................................3 4.2Adjusting the time................................................................................................................................4 5. Maximising performance.................................................................................................................................4 5.1General................................................................................................................................................4 5.2 Multiple readings . ...............................................................................................................................4 5.3Sample application ..............................................................................................................................4 5.4Test strip variation Nitrachek 404..........................................................................................................4 5.5 Nitracheck “old” model without Lot-number selection or test strips without calibration certificate........5 5.6 Lot number selection ...........................................................................................................................5 5.7 Dilutions . ............................................................................................................................................5 5.8Standard solutions................................................................................................................................6 6.Taking a reading ............................................................................................................................................6 7.Care and maintenance....................................................................................................................................7 7.1General................................................................................................................................................7 7.2Checker . .............................................................................................................................................8 1.Introduction Nitrachek offers a simple, speedy means for the quantitative assessment of nitrate content of water, soil or plant samples, in conjuction with nitrate test strips art. no. 18.40.01 (Other test strip types should not be used). Nitrachek incorporates a 20-reading memory, stored readings automatically being ‘tagged’ with day/date information from the meters’ integral clock/calendar. Optionally, a range of calibrations can also be selected by means of a ‘lot number’ feature, providing some degree of compensation for test strip batch variation. Nitrachek has a measurement range of 5 - 500 ppm (mg/l) nitrate: for measuring higher nitrate concentration (e.g. in plant sap), the sample must first be dilluted (see section 5.7). As with any measurement process, accuracy and repeatability depend not only on the adequacy of the equipment and materials used, but also on care and precision both in the preparation of any sample to be tested and in the operational technique itself. Please therefore read these operating instructions carefully before use, and carry out some practice measurements to gain familiarity with the system before attempting any “real” assessments. P.O. Box 4, 6987 ZG Giesbeek, NL T +31 313 880200 F +31 313 880299 E [email protected] © oktoiber 2004 www.eijkelkamp.com M1.18.40.E Nitrachek is supplied complete with: A padded, protective carrying wallet A plastic "checker" strip for testing the meter's calibration - see Section 7.2. A small brush for cleaning the meter's optical system - see Section 7.1. A diary/notebook for recording readings 2.Operating controls and battery 2.1The read-head and test-strip carrier The black section at one end of the meter is the read-head, incorporrating the hatch (see below) and into which fits the test-strip carrier, which is removable so that both it and the read-head can be cleaned occasionally, see section 7.1. 2.2The hatch The hinged door fitted to the read-head is the main operating control: as well as allowing insertion and removal of test-strips, opening the hatch switches the meter on at the start of a test, and subsequent opening and closing continues the measurement process. 2.3The push-buttons These function controls are only used for setting and adjusting lot numbers (see section 5.6), setting and adjusting the meters’ integral clock/calendar (see section 4), and reviewing the meters’ memory content (see section 3). In this manual, the circular push-button is shown as , the square push-button as , and the 'up'- and/or 'down - triangular push-buttons as . These latter two are used a. to increase or reduce a displayed number (holding either down for a second or two will cause the number concerned to 'roll' until the button is released. b.To 'search' through the meters' memory. 2.4The alarm switch The meters’ beeper can be switched off by sliding this switch (on the side of the meter, near the printed name) towards the battery compartment end of the meter (though, since the beepers’ warning is often useful, it should normally be left switched on). 2.5The battery Nitrachek operates from a single 9V (PP3) battery with a twin press-stud connector. Battery life depends very much on the type of battery being used and on the pattern of use. However, up to 500 or more readings can be expected when using a ‘standard’ battery, and substantially more when using a ‘high power’(MnAl) type. In the top right-hand corner of the display will indicate when the battery is near the end of its useful life. B The meter will still function properly (and will retain its memory content), but early replacement is advisable. EEE Shown in the main display area when the meter is switched on indicates that the battery is too flat to run the meter properly, and must be replaced. Testing cannot proceed. To fit a battery: Provided the meter is switched off, it will retain its memory content, including day/date and lot number information, for up to about 30 seconds when the battery is disconnected. A longer disconnection period, or any disconnection at all while the meter is switched on, will cause all such data to be lost. Remove the battery cover by pulling it away from the end of the meter, disconnect and remove the old battery if applicable, insert the new battery, and attach the connector, ensuring it is connected firmly and the right way round. Replace the battery cover, taking care not to 'trap' the battery leads in the process. The battery should be removed altogether during any prolonged periods of non-use (of several months or more) to minimise the risk of damage from possible battery leakage. First ensure that any memory readings have been noted. 3.Memory function The most recent 20 readings are automatically stored in memory, complete with date/time data from the meters’ clock/calendar, for later review as required. Each new reading after the first 20 automatically overwrites the oldes previously stored reading. To review the memory contents: Open the hatch and wait for CAL Press : the display will show Clr if the memory is empty, otherwise it will show: the most recently stored result e.g. 47 ppm, and the day and time when it was stored e.g. TH 9:37 PM, and M to indicate a memory reading. To review other stored readings press . Repeated pressing of the "up" button accesses the next newest reading: repeated pressing of the "down" button the next oldest reading. The meter beeps to indicate when a search in either direction can go no further. To review the date of any displayed, stored reading, press and the date (YY-MM-DD) will be shown together with the reading number from #0 for the most recently stored reading to #19 for the oldest stored reading. With the date and “reading number” displayed, each stored reading can be reviewed in succession by pressing . To display the day and time of any given stored reading, press , and press again to revert to date and “reading number”. Close the hatch to switch the meter off. 4.Clock and calendar functions The internal clock/calendar enables stored readings to be automatically ‘tagged’ with the time and date when they were taken. 4.1Adjusting the date Open the hatch and wait for CAL Press twice: Cloc is displayed Press then press : the year display will start to flash. Press until the correct year is displayed. Press ● again: the date display will start to flash. Press until the correct date is displayed (the meter automatically calculates the day of the week). Press to complete the procedure, or press again to adjust the time - the time display will flash - see below. Close the hatch to switch the meter off. 4.2Adjusting the time Open the hatch and wait for CAL Press twice: CLOC is displayed Press : the time display will start to flash. Press to set the time no more than one minute ahead of the correct time. Press as soon as the correct time has 'caught up' with the displayed time. Close the hatch to switch the meter off. It is best to adjust the time after adjusting the date, because the meter's clock 'stops' during such adjustments, and may therefore be 'slow' after any prolonged date adjustment. The meter's internal calendar runs to 31 st December 2010. For use afther this date, an earlier year, with matching leap - year and day - of week/date characteristics, should be selected, and the year 'translated' during memory review. 5.Maximising performance The accuracy of the Nitrachek system depends not only on the performance of the meter itself, but also on the consistent characteristics, correct handling, and storage of the test strips, and the correct and careful preparation and application of the samples to be measured. The following sections highlight some ways to minimise potential errors from these various sources. 5.1 General Ensure that all materials required are in place before starting any measurement process. Consistent timing and technique are both necessary for best results, and neither are easily achievable unless item comes readily to hand, where and when required. 5.2Multiple readings For maximum confidence in the result from a single sample, especially when significant action may be taken based on that result, it is recommended that three separate readings (using three separate strips) are taken of each sample, with the average of the three results (assuming no one result is substantially different from the other two) being taken as the definitive value. 5.3 Sample application Instead of dipping the test strip into the sample solution to be measured, and then vigorously shaking the test strip as described in Section 6, an alternative technique for improved accurary is to apply a measured volume of liquid to the test strip pad, by means of a micro - pipetter or syringe. A sample volume of approximately 7.8 microliter is recommended for exactly covering the test strip pad, and obviating the need to shake surplus liquid off the test strip before measurement. 5.4Test strip variation Nitrachek 404 By the nature of the manufacturing process, there can be slight variation in all test strips’ performance, both from one to another within a single batch (usually small), and from one batch to another (sometimes more significant). Effects of the former variation can be minimised by the multiple-sampling approach outlined above. To minimise the effect of any batch to batch variation, the test strips are calibrated very accurately by the manufacturer. With the enclosed calibration certificate it is possible to compensate for variations between batches of strips and to compensate for influence of temperature. The calibration certificate is supplied with the test strips. With the table on the certificate the Lot-number is selected. 5.5Nitracheck “old” model without Lot-number selection or test strips without calibration certificate To minimise the effect of any batch to batch variation, it is recommended (at least for critical applications) that each new batch of test strips is characterised before ‘live’ use by means of a standard nitrate solution (see below). Following the normal measurement process outlined in Section 6, take five readings of a standard (100 ppm) nitrate solution with the first five test strips from a newly opened container. Assume. for example, that the five test results were 91, 89, 96, 94 and 93 ppm: an average value of 92.6 ppm. From this average, derive a correction factor (‘CF’) being 100/92.6 = 1.080. All future readings obtained with Nitracheck using this particular batch of test strip should then be multiplied by this CF (1.80) - but see Section 5.6 below. Similary, for a subsequent, different batch of test strips, the five initial test readings might, for example, (and still using a standard 100 ppm solution) give results of 104, 109, 112, 101, 111 ppm: an average value of 107.4 ppm. From this average, derive a CF of 100/107.4 = 0.931. All future readings obtained with Nitrachek using this particular batch of test strips should the be multiplied by 0.93 - but see Section 5.6 below. When using a standard solution in this way, do not dip the test strips into the main solution container. If dipping the test strips at all, first dispence a small amount of standard solution into a smaller container and then dip the test strips in this (or use a small clean glass pin to dispence a drop to the test strip: better, use a micropipetter or syringe as described in Section 5.3 above. 5.6Lot number selection To avoid the need manually to apply a correction factor to each new reading, the meter’s Lot Number selection can be altered to achieve the same effect automatically (with the Nitrachek 404), to a close approximation, as follows (see Section 6.2 for procedure): Correction factor: Set the meter to lot-number: < 0.831 0.83 - 0.87 2 0.88 - 0.92 3 0.93 - 0.97 4 0.98 - 1.02 5 1.03 - 1.07 6 1.08 - 1.12 7 1.13 - 1.17 8 > 1.18 9 Once an appropriate lot number is set, displayed/stored readings must of course be used directly and not further adjusted by CF. The lot number remains as selected until manually changed (or ‘lost’ because of battery exhaustion or removal). When a particular batch of test strips has been exhausted, therefore, and before starting to use another batch, it is important that a new lot number is selected. Note: With the Nitrachek without lot number selection every reading must be multiplied “by hand” with the correction factor as calculated in 5.5. 5.7 Dilutions If it is known that a nitrate sample is likely to yield a concentration in excess of the meter’s maximum level of 500 ppm (mg/l), or if a reading of an unknown sample has resulted in a HI display, dilution of the sample is necessary to provide a quantified reading. Although any dilution ratio is possible, standardising on one or two fixed ratios to minimise the possibility of error or confusion. Thus: 1:100 dilution: 1:10 dilution: 5.8 mix 99 ml of nitrate-free water (e.g. double distilled water) with 1 ml of sample. Readings obtained with the resultant diluted mixture must then be multiplied by 100 to give the nitrate concentration in the original sample: e.g. a displayed reading of 63 = 6300 ppm nitrate. mix 9 ml of nitrate-free water with 1 ml of sample. Readings obtained with the resultant diluted mixture must then be multiplied by 10 to give the orginal sample: e.g. a displayed reading of 245 = 2450 ppm nitrate. Standard solutions Standard solutions should always be stored in a refrigerator (4 degrees or lower), in tightly closed containers to prevent evaporation or possible contamination. To make a standard nitrate solution, carefully weigh 1.63 gram of analysis quality Potassium Nitrate into a 100 ml volumetric flask (or 16.3 gram into a 1000 ml flask). Make up exactly to volume (100 ml or 1000 ml as applicable) with distilled (nitrate-free) water. Shake well: the resultant solution represents 10,000 ppm. Extract 10 ml of the 10,000 ppm solution into a 100 ml volumetric flask, and make up to volume with distilled water (giving a 1,000 ppm solution), and finally repeat the process to generate a 100 ppm solution. 6.Taking a reading 1. Open the hatch, the display briefly shows 8888 (if any segments are missing, do not proceed), then shows CAL. 2. If a lot number has already been accepted on a previous occasion, this will now flash to indicate that it can be changed if required - see Sections 5.4, 5.5 and 5.6. If no lot number has previously been selected, this will be indicated by a flashing - in the top right - hand corner of the display. A Lot Number must be selected, by use of the buttons, before further operation can continue. If no lot number has been previously selected, and the batch of test strips to be used have not been 'characterised' as described in Section 5.4 and 5.5 , select LOT 5 - this will set the meter to its 'median' calibration. If a different lot number is already displayed, and this matches the lot number to which the batch of test strips to be used has been 'characterised', proceed to stage 3 below. 3.Remove a nitrate test strip from its container (close the container immediately, and check expirydate). 4.Carefully and fully insert the unused test strip into the meter's read - head, between the hinged retaining tongue and the face of the carrier, with the test strip's pad downwards and facing towards the meter's body - see drawing. 5.Close the hatch: the display will show ---, followed by GO and two beeps, indicating that the meter has accepted the unused test strip and ‘zeroed’ on it. Err may be displayed instead of GO after this initial auto-calibration procedure, indicating that the test strip used for calibration seems unacceptable to the meter. Possibly the unused strip is too dark (perhaps because of unsuitable storage conditions, or because it is past its ‘use-by’ date), or has been incorrectly inserted. Reopen the hatch, and the display will revert to CAL. Remove the test strip, and check for reasons. This procedure must be repeated until GO is obtained. 6.At GO, open the hatch and remove the test strip. Approximately five seconds after opening the hatch, the meter will beep at the start of a 60 seconds count-down period (shown on the display), immediately preceded by two warning beeps at one second intervals. 7.Upon removal, the test strip must immediately but carefully be dipped in the solution to be analysed, for two seconds, and therefore removed from the solution before the start of the 60 seconds countdown. Upon removal, hold the test strip in air for further two seconds to allow absorbtion, and then shake it if necessary to remove any remaining excess solution. However, do not touch, wipe or dab the test strip: this will cause colour loss and avoidable measurement inaccurary. Make sure the reagent pad is evenly coloured. 8.As the countdown approaches zero (afther 60 seconds), the meter beeps a ‘3,2,1’ warning. At the start of this warning, carefully re-insert the test strip (again, pad downwards and facing towards the meter’s body), and close the hatch. With the hatch closed, measurement takes place automatically at the end of the countdown (if the hatch is still open, Shut is displayed.) Do not delay inserting the test strip: consistent timing of the reaction is important for consistent measurement. 9.The symbol “---” will be displayed, followed by the measurement value in ppm (mg/l) of nitrate e.g. 47 ppm. If the display shows HI, the level of nitrate detected exceeds the meter’s maximum range. This probably means that a dilution is required: see Section 5.7. If the display shows LO, the level of nitrate detected is below the meter’s minimum range. Both sample and operating procedure should be checked, and the test repeated if appropriate. If the sample has been diluted, then probably a reduced dilution factor is required. Afther noting the result, open the hatch and remove the test strip. The display will show 8888, followed by CAL, and the reading just taken will be stored in memory. If no more readings are to be taken, close the hatch again, and the meter will switch itself off. Alternatively, further readings can now be taken, or the memory reviewed as described in Section 3, above. If the meter is accidentally left switched on, it will automatically turn off after about two minutes. Memory storage is not lost. 7.Care and maintenance 7.1 General Nitrachek should be handled with care. Although it is robustly made, it must be treated as a precision instrument, and not subjected to severe mechanical shocks which might cause malfunction. It is advisable to avoid subjecting Nitrachek to extremes of heat, cold or humidity. In particular, water or steam should never be allowed to enter the meter, as permanent damage is likely. The surface of the display can be cleaned by wiping it gently with a soft tissue from time to time, but care should be taken not to damage the glass surface, and only very light pressure should be used. The meter can be cleaned with a damp cloth - any solvent which might damage the surface should not be used. The meter’s read-head and test strip carrier must at all times be clean and free of any dirt or dust which might cause incorrect readings. How often cleaning is needed will depend on frequency of use: it is recommended that the carrier, in particular, should be cleaned once a week during periods of intermittent use, or daily during particularly heavy periods of use. The test strip carrier can be removed from the read-head for cleaning by opening the hatch and then, with the forefinger, pushing the top of the hinged retaining ‘tongue’ away from the carrier, in the same direction as the hatch opening. This will cause the test strip carrier to be lifted out of position, so that it can then be removed by gripping it between thumb and forefinger and pulling it vertically upwards (see drawing sequence on next page). To replace the carrier afther cleaning, simply re-insert it vertically into the read-head, ‘click; it into position, and close the hatch. The carrier can be cleaned with a damp soft cloth, or washed in soap and water if necessary. The read-head surface should also be carefully cleaned with a small brush, dampened if necessary, ensuring that all deposits are removed from this area. Very particular care must be taken if/when cleaning its small optical windows: never use a screwdriver or any other hard or sharp implement which might scratch or break these surfaces. Ensure that all surfaces are thoroughly dry before replacing the carrier. 7.2Checker The Nitrachek is supplied with a small plastic checker to enable a simple test to be carried out from time to time to confirm the meter’s calibration. The checker should be protected from excessive daylight, extremes of temperature, and from scratches and dirt. If it is damaged or becomes discoloured in any way, a replacement from your supplier is recommended. To check Nitrachek’s performance, open the hatch and select Lot 5 if not already selected. Fully insert the checker, dark side facing away from the meter, in the same way that a test strip would normally be inserted. Close the hatch: the meter should accept the checker as if it were an unused test strip, and display GO. Open the hatch and remove the checker. At the end of the timing period, when an exposed test strip would normally by read, insert the checker again, but this time with the dark side facing towards the meter. Close the hatch: the result obtained should be within the limits printed on the back of the meter. If the reading is out of range, examine the checker for damage and check that the test strip carrier and read-head are clean. Try again in case the checker has been inserted incorrectly. If incorrect readings are still obtained, consult your supplier. Remember to re-set the meter’s lot number, if applicable, after a checker test. Nothing in this publication may be reproduced and/or made public by means of print, photocopy, microfilm or any other means without previous written permission from Eijkelkamp Agrisearch Equipment. Technical data can be amended without prior notification. Eijkelkamp Agrisearch Equipment is not responsible for (personal damage due to (improper) use of the product. Eijkelkamp Agrisearch Equipment is interested in your reactions and remarks about its products and operating instructions.