1
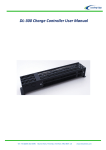
Specifications
Battery voltage:
Max. PV charging current:
Max. DC load current:
Max. Power consumption:
Temperature sensor:
12 / 24V (automatic selection)
8A
8A
3 mA
in-built
Gas control deactivated (factory setting)
Boost charge voltage:
Float charge voltage:
Charging voltage restart at:
14,5 V/29 V
13,7 V/27,4 V
12,4 V/24,8 V
Gas control activated
Charging voltage:
14,1 V/28,2 V
Deep discharge disconnection
DC output disconnected at:
DC output reconnected at:
11,1 V/22,2 V
12,6 V/25,2 V
Temp. compensation
-4 mV/K/cell
Fuse
Temperature range
Measurements (L x B x H)
Weight approx.
10 A
-25 °C - +50 °C
95 x 95 x 35 mm
214 g (without packaging)
OPERATING INSTRUCTIONS
PSR8 type solar charge controller
12/24 V - 8A
Dear Customer,
Thank you for buying our product. You have bought one of the most powerful, compact and reliable units of its
class. Please read the operating instructions carefully before use.
WARNING!!! Safety Instructions!!!
-
-
-
Do not use the unit:
In places, which are dusty, damp, in a high-humidity area (over 80% rel. humidity), at temperatures
above 50°C, in areas containing inflammable materials (liquids/solvents, gas). Do not immerse in water.
Use only in closed, dry areas.
Should the unit fail to operate, or show signs of not operating properly unplug immediately and make sure
that the unit is not put into further operation. Do not use the unit when visible signs of damage - due to
transport or inadequate storage are noticeable.
To prevent the risk of explosion by overcharging, install the battery in a well-ventilated place.
Use only solar cells as power source.
To prevent a short-circuit between solar charger unit and battery, install a fuse on the positive battery
pole.
Equipment, which on account of its function must not be switched off by means of load disconnection
(e.g. navigation lights), must be connected directly to the battery and fused.
When recharging sealed lead acid batteries, switch off the gas-control (see Factory settings).
Follow installation instructions strictly when connecting the unit!
The unit should be disconnected in reverse order (see installation procedures).
Description of operation
Solar Charge Controller Unit 12/24V 8A with:
−
−
−
−
−
12 / 24 V automatic battery selection
Dynamic protection against battery deep discharging
Protection against battery overcharging
Gas control function for sensitive SLA batteries
Temperature compensation
The use of lead-batteries is common for the storage of solar energy (photovoltaic solar systems). Lead-batteries
require protection against overcharging and deep discharging. This unit satisfies both requirements.
12/24 V automatic battery voltage selection
The solar regulator can be used for 12V and 24V battery systems, manual adjustment is not required, the unit
automatically detects battery voltage and adjust itself accordingly. All system components (PV modules,
batteries, inverter, DC loads) must be selected for the same voltage (12 or 24V) rating!
Subject to alteration
July 2010
Panelectron Ltd., Osztály u. 16-18/E, H-1087 Budapest, Hungary
Tel/Fax: +36 1 215 9116; E-mail: [email protected]; URL: http://www.panelectron.hu
Protection against battery deep discharging
Lead-Batteries need to be protected against being deep-discharged, otherwise damage can occur to the battery
cells. The solar battery charger unit protects lead-batteries from deep discharging by disconnecting the DC
loads when the battery’s voltage has decreased to a certain voltage level. As soon as the batteries are recharged
by the solar cells, the load is automatically reconnected.
Protection against overcharging
Exceeding the max. charging voltage levels (14,5V or 14.1V) would lead to the formation of gas, which could
damage the batteries. The amount of gas developed within the battery depends on the temperature. The inbuilt
temperature-sensor automatically regulates the charging voltage in accordance with the temperature in the area
of use/operation. The battery is not yet fully charged when the charging voltage is reached. The charging
current should not be completely switched off, instead reduced, so that the charging voltage is not exceeded.
This is accomplished by the Solar Charger Unit. The charging process - „IU-charging” recharges the batteries
evenly and quickly. The „IU-charging” is achieved by a very quick temporary short-circuiting procedure - also
known as the pulse-width modulation (PWM) shunt procedure!
Gas control function
As a factory setting, the regulator charges the battery with a 14.5V boost-charge voltage. When this voltage is
reached, the controller reduces it charging voltage to 13.7V float charge voltage which will be maintained until
battery voltage sinks to 12.4V when the regulator start charging again with 14.5V. Some sealed lead-acid
battery types require lower than 14.5V charging voltage as higher voltage would cause undesirable gas
formation within the battery. Please consult with your battery manufacturer about the max. battery charging
voltage if unsure. In case you should reduce the max. charging voltage you have the possibility to activate the
built in gas control function (see “gas control activation” section). By doing so, the regulator uses a lower
14.1V charging voltage which will be maintained during the entire charging cycle with the charging current
gradually reduced. This would protect batteries sensitive to higher charging voltage.
Temperature compensation
The temperature compensator circuitry adjusts and regulates the charging voltage of the batteries in accordance
with the temperature in area of use. The sensor is built-in.
Connection and operating elements
1.
2.
3.
4.
5.
6.
Green LED: Charging indication, illuminates when
the battery is being charged. At night there is no
indication while there is no charging current from the
solar modules.
Red LED: Load disconnected. In case of battery
deep discharge the loads are disconnected. As soon
as the battery is recharged, the dc loads are switched
back on and the LED stops illuminating.
+/- battery connection terminals
+/- load connection terminals
10A fuse, prevention against reversed polarity
connection of battery terminals, load terminals and
overloading.
+/- solar module connection terminals
Warning:
Should the terminals be reverse polarity connected to the load output, can units <10 A (fused) be completely
damaged. Each individual system component must be fused.
Factory settings
Upon delivery is the Solar Charger Unit installed as follows:
- Gas control deactivated (see “gas control function”)
Warning!!!
When charging certain types of sealed lead acid batteries make sure that gas control is switched off! Please
consult your battery dealer to establish your optimal charging voltage!
gas control activation
1. Remove the 2 screws on the Solar Charger Unit (which keeps the top piece in place) and carefully remove
cover.
2. Cut the J6 wire bridge situated on the printed circuit board. The gas-control function is now activated.
Installation - Warning: Make sure of the right polarity!!!
The solar charger unit should be placed in close proximity to the battery and be sufficiently protected against
the weather. Take care to place the battery in a well-ventilated place. To guarantee that the unit functions
properly it must be connected to the solar generator, the lead-battery and the load.
Each part of the system - solar generator, lead battery, DC load and solar charger unit - should have the same
nominal operating voltage (12 or 24V). Please check each component before installation, when in doubt,
contact a Specialist! Take careful attention of the following installation instructions:
1.
1
SOLAR charge
controller with deep
discharge protection
12V / 24V – 8A
1
0
2
1
0
3
Panel
6
Battery
Load
+ - +
- + -
CS 2
CS 1
5
2.
3.
Connect the battery to the corresponding terminals on the solar charger unit. To prevent voltage losses in
the cabling, please use min. 4 mm² cable diameter (up to 6 m). Only when an additional "short-circuitprotection" device is already installed, can the battery be operated without a fuse. Otherwise must a fuse
be connected to the battery +terminal/pole in order to prevent possible short circuit of the battery cables.
Both components must be installed close together in the same room.
Connect the solar module to the corresponding terminals on the solar charger.
Connect the load to the solar charger unit. The connection diagrams are printed on the solar charger.
The Solar System fails to function - possible reasons.
4
Battery terminals are reverse connected: The fuse has blown, replace with a same type.
Module terminals are reverse connected: Avoid at all costs!!!
Load terminals are reverse connected: The equipment can be seriously damaged before the fuse blows.
Batteries contain considerable amounts of electrical energy. A short-circuit can result in a large build-up of
heat leading to FIRE!