1
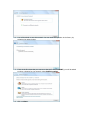
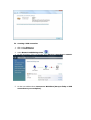
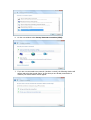
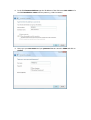
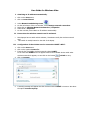
User Guide for Windows Vista
I. Obtaining an IP address automatically.
1. Click on the Start menu.
2. Click on Control Panel.
3.
4.
5.
6.
7.
Select Network and Sharing Center
.
On the left column of the new window, select Manage network connection.
Right Click on Wireless Network Connection \ Properties.
Select IPV4 \ Properties.
On the new tab, select obtain an IP address automatically.
II. Ensure that the wireless network card is activated.
•
•
Most laptops have a switch which activates / deactivates easily the wireless network
card.
This switch is usually located on the side of the laptop.
III. Configuration of the wireless card to access the UCNET’s Wi-Fi.
1. Click on the Start menu.
2. Click on the option Connect To.
3. From the list of available wireless networks, select UCNET.
In the case that UCNET does not appear between the available choices while other
wireless networks do appear, we can click on the button
4. Click on Connect.
refresh to retry.
5. A warning message will appear that the wireless network UCNET is insecure. We select
the option Connect Anyway.
6. You will be asked to save this network. You can avoid this question in the future, by
selecting the options below.
7. If this is the first time that you connect to the Wi-Fi network UCNET, you will be asked
to select a location for the network. Select Public Location.
8. Click on Close.
IV. Creating a VPN connection
1. Click on the Start menu.
2. Click on Control Panel.
3. Select Network and Sharing Center
.
4. On the left column of the new window select Set up a connection or network.
5. On the new window select Connect to a WorkPlace (Set up a dialup or VPN
connection to your workplace).
6. On the next window select Use my Internet Connection (VPN).
7. If you are not connected to any network (wireless or wired), the following window will
appear and select the second option. In case that you are already connected to a
network, the window below will not appear.
8. In the field Internet Address type the IP address of the VPN server 192.168.1.1. In
the field Destination name enter any name e.g. VPN Connection.
9. Next, type your user name and your password that are stored in LDAP and click on
Create.