1
OLP
User’s Manual
OLPy version 0.9.7 (March XXth, 2004)
OLP document QL1971-ILS-IN-C-097-a4
Draft Version 1 Revision 4
Athanassios Protopapas
February 2004
OLP User Manual v0.1.4
March 2004
Contents
1.
2.
Purpose and overview ............................................................................................ 6
Definitions.............................................................................................................. 7
2.1.
Users: Clients and Therapists......................................................................... 7
2.2.
Therapy schedules and their contents............................................................. 7
2.3.
Therapy items and levels................................................................................ 7
2.4.
Types of activities .......................................................................................... 8
2.5.
Providing models to imitate ........................................................................... 8
2.6.
Keeping track: Descriptions and Notes.......................................................... 8
2.7.
Wrapping up................................................................................................... 8
3. Installation............................................................................................................ 10
3.1.
System requirements .................................................................................... 10
3.2.
First-time installation of the complete system ............................................. 11
3.3.
Optional and special components................................................................. 13
3.3.1. Database Updater .................................................................................... 13
3.3.2. Using the database updater...................................................................... 14
3.3.3. Video animations on Windows XP ......................................................... 14
3.4.
Installation of OLPy only............................................................................. 15
3.5.
OLPy update................................................................................................. 15
3.5.1. Clean update: remove old version and then install new version ............. 16
3.5.2. Incremental update: install new version and keep your data .................. 16
3.6.
Installation of STAPtk.................................................................................. 17
4. Running OLPy as Therapist ................................................................................. 19
4.1.
Entering new therapist information.............................................................. 19
4.2.
Selecting a therapist ..................................................................................... 20
4.3.
Running therapist tasks ................................................................................ 21
4.4.
Therapist administration............................................................................... 22
4.5.
Entering new client information................................................................... 24
4.6.
Selecting a client .......................................................................................... 24
4.7.
Client administration .................................................................................... 25
4.8.
Running a client session............................................................................... 27
4.9.
Viewing results for a client .......................................................................... 29
5. Running OLPy as Client ...................................................................................... 30
5.1.
Running sessions as a client ......................................................................... 30
5.2.
Viewing results as a client............................................................................ 30
5.3.
Notes on client registration and schedule setup ........................................... 31
6. Schedules.............................................................................................................. 32
6.1.
Adding exercises to a client’s schedule........................................................ 32
6.2.
Creating new exercises for a client’s schedule............................................. 34
6.3.
Configuring exercises................................................................................... 36
6.4.
Modifying pre-existing exercises for a client............................................... 39
6.4.1. Restricting stimulus sets.......................................................................... 39
6.4.2. Entering content to fully generic designs................................................ 39
6.5.
Removing exercises from the schedule........................................................ 40
6.6.
Exercise administration (activation & deactivation).................................... 40
7. Tasks, Tools, and Exercises ................................................................................. 42
7.1.
Levels of therapy.......................................................................................... 42
7.2.
The logic of exercises................................................................................... 43
3
OLP User Manual v0.1.4
March 2004
7.3.
Available tools.............................................................................................. 43
7.4.
Tool configuration........................................................................................ 44
7.4.1. Pitch/volume configuration ..................................................................... 44
7.4.2. Recorder configuration............................................................................ 45
7.4.3. Recogniser configuration ........................................................................ 46
7.5.
Graphical interfaces...................................................................................... 49
7.6.
The target bar ............................................................................................... 50
7.7.
Creating new tasks ....................................................................................... 56
8. Stimuli .................................................................................................................. 58
8.1.
Stimulus libraries and stimulus selection ..................................................... 58
8.2.
Entering new stimuli .................................................................................... 59
8.3.
SAMPA pronunciation coding ..................................................................... 60
9. The recorder ......................................................................................................... 62
10.
Speech recognition ........................................................................................... 66
10.1.
Basic concepts .......................................................................................... 66
10.1.1. Training ................................................................................................. 66
10.1.2. Matching................................................................................................ 67
10.1.3. Voice dependence ................................................................................. 68
10.2.
Data collection considerations ................................................................. 69
10.3.
Training modes......................................................................................... 70
10.3.1. Distinct stimuli training......................................................................... 70
10.3.2. Selected attempts training ..................................................................... 71
10.4.
Using the trainer ....................................................................................... 72
10.5.
Definition of training tasks....................................................................... 74
10.6.
Functional definition of recogniser uses .................................................. 74
11.
Phonetic mapping............................................................................................. 76
11.1.
Recording sounds for the creation of phonetic maps ............................... 76
11.1.1. Choosing a recorder .............................................................................. 76
11.1.2. Using the OLPy recorder....................................................................... 77
11.1.3. Using the STAPtk recorder ................................................................... 78
11.2.
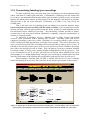
Transcribing (labelling) your recordings.................................................. 80
11.3.
Designing and training a new map........................................................... 83
11.4.
Using an existing map .............................................................................. 85
11.4.1. Explore mode ........................................................................................ 85
11.4.2. Saving and selecting maps .................................................................... 87
11.4.3. Monitor mode........................................................................................ 88
11.5.
Notes on phonetic map tasks in OLPy ..................................................... 89
11.6.
The Data Collection tool .......................................................................... 90
11.7.
Configuration of phonetic map (OPTACIA) exercises & tasks............... 91
12.
Pitch and loudness exercises ............................................................................ 95
12.1.
Working with the leds interface ............................................................... 95
12.2.
Working with the bubbles and balloon interfaces.................................... 95
12.3.
Practising stress patterns with the blocks interface.................................. 95
12.4.
Viewing tools ........................................................................................... 98
12.5.
Statistics ................................................................................................... 98
12.6.
Tracking Client progress .......................................................................... 98
13.
Remote therapy ................................................................................................ 99
13.1.
Therapist-side functionality.................................................................... 100
13.1.1. Therapist registration on the server..................................................... 100
13.1.2. Registering a new client on the server ................................................ 100
4
OLP User Manual v0.1.4
March 2004
13.1.3. Uploading a client’s schedule for remote practise .............................. 101
13.1.4. Downloading clients’ results from the server ..................................... 101
13.2.
Client-side functionality......................................................................... 101
13.2.1. Client registration on the server .......................................................... 101
13.2.2. Downloading a schedule from the server............................................ 101
13.2.3. Uploading results to the server for the therapist to view..................... 101
14.
Implementation of therapy strategies ............................................................. 102
14.1.
Progressive attainment of target............................................................. 102
14.2.
Training for consistency......................................................................... 102
14.3.
Using non-client models......................................................................... 102
14.4.
Generalisation considerations ................................................................ 102
14.5.
Other guidelines ..................................................................................... 102
15.
Quick run through common OLPy usage....................................................... 103
15.1.
Set up a client’s schedule ....................................................................... 103
15.2.
Configure exercises ................................................................................ 104
15.3.
Configure tasks....................................................................................... 105
15.3.1. Recorder task....................................................................................... 105
15.3.2. Recogniser task ................................................................................... 105
15.3.3. Any STAPtk task (STAPtk recording task shown here but the same
applies to all) 106
15.4.
Session with existing client (with defined schedule) ............................. 106
15.5.
Client session.......................................................................................... 107
15.6.
Phonetic map tasks ................................................................................. 107
15.6.1. Record in STAPtk ............................................................................... 107
15.6.2. Transfer OLPy recordings to STAPtk................................................. 108
15.6.3. Label (transcribe recordings) in STAPtk ............................................ 108
15.6.4. Create (design & train) map ................................................................ 109
15.6.5. Practise on a phonetic map.................................................................. 109
16.
Notes............................................................................................................... 110
Appendix A: Glossary and abbreviations................................................................ 111
Appendix B: SAMPA symbols ............................................................................... 112
Appendix C: Library codes ..................................................................................... 113
Appendix D: Installation Quick Reference ............................................................. 115
5
OLP User Manual v0.1.4
1.
March 2004
Purpose and overview
OLP is a computer-based system to supplement (not replace) traditional speech
therapy for problems at the level of articulation. The system is meant to supplement therapy
in two ways: First, by making available to the therapist innovative technological tools for
speech sound processing and feedback display, that is, by providing new kinds of exercises
for the clients to practice. Second, by allowing clients to practice at a more intensive schedule
without the need for constant supervision by the therapist, even at their own home if desired,
that is, by increasing total therapy time without increasing human resources needs (the
therapist herself). The role of OLP is not to take over a therapist’s job, or to organize all of a
therapist’s activities. Rather, OLP offers a set of exercises based on specific technological
tools, wrapped in a flexible package of monitoring and administration which allows the
therapist-users to define and customize exercises that best suit the needs of their clients.
In general, using OLP in speech therapy proceeds as follows: The therapist first
installs the software and registers her/himself in the system. After that, each new client is
registered and a schedule is created for her/him. The schedule contains sequences of activities
that will be carried out to provide automated feedback to the client about her/his speech
productions. The schedule is designed by the therapist with the specific speech therapy goals
appropriate for this client. After an initial “familiarisation” phase, many activities can be
carried out by the client without supervision, so the therapist may send a client parts of a
schedule via the Internet, for home practise. Either on-site or remotely, the computer will
provide displays to show graphically and numerically client progress in each assigned task.
Frequent assessment of client progress and regular (traditional) speech therapy activities will
typically take place in parallel with OLP-supported activities. Schedules can be updated as
often as necessary with new or different activities. In this way, the computer can play a longterm role in supporting extended practise for a client with areas of special importance or need.
In the following chapters, the OLP system and its use are presented in great detail.
Some of the content may appear tiring at first because of the lack of familiarity of the users
with the system. However, it is essential that each user reads this document thoroughly, at
least once, to gain a sense of how the system is to be used, and what options and functions are
available. After the initial reading, the user may prefer to refer to Chapter 15, where the most
basic and frequent activities are presented graphically in brief, and only read text sections of
the manual when necessary to look up a particular function of the software. It is strongly
recommended that Chapter 2 is read and understood first, because here all the terms are
properly defined and their usage explained. This section forms the basis for understanding
how to use the software. Then you can follow through the remaining sections one by one,
becoming more familiar with the software as you proceed.
The OLP developers hope that you will enjoy reading the manual and then that you
will find using the software a pleasant and rewarding experience, you will exploit the
potential offered by speech technology for therapy, and in general will consider OLP helpful
for you and for your clients.
6
OLP User Manual v0.1.4
2.
March 2004
Definitions
Although OLP is designed to use terms and procedures familiar to speech therapists, it
is only meant to concern one part of therapy and one that is new at that. The terms necessary
to understand and use OLP efficiently may have more specific meanings than the common
usage of these words in practice and everyday language. In this section, an overview of
speech therapy using OLP is given in the form of definitions. Terms that are important for
OLP, and have a particular meaning within the OLP system, are shown emphasized in the
text. The relations among these terms and between these terms and traditional therapy will
eventually become second nature with experience; until then, you can always refer back to
this section for clarification or to refresh your memory.
2.1. Users: Clients and Therapists
Speech therapy involves therapy providers, the therapists, and therapy recipients, the
clients. Face-to-face interactions between a therapist and a client, occupying a particular
length of time, are called sessions (therapy sessions). Firstly, the therapist needs to perform a
standard professional assessment of the client’s speech. Based on this assessment, the
therapist sets objectives for a course of therapy. To achieve these objectives, the therapist
designs activities to be carried out in sessions or assigned to the client for home practice.
2.2. Therapy schedules and their contents
The OLP activities designed are grouped together for each individual client in a
schedule. Each client has one schedule, which contains a set of exercises. An exercise is a
sequence of steps that need to be carried out in order to set up and perform an activity
targeting one of the client’s therapy objectives. These steps are called tasks and are performed
using the OLP system tools. There is a range of tools to support the core practice tasks as
well as the necessary tasks involved in setting up the practice activities. Tasks are either
client tasks, carried out with a client, or therapist tasks, for which the presence of the client is
not required. In general, a client task is an activity that includes interaction of the client with
the OLP system, whereas for therapist tasks client presence is not necessary. Importantly,
tasks are strictly ordered within an exercise, that is, the definition of the exercise determines
the sequence in which tasks must be carried out and this cannot be changed when the exercise
is performed. In contrast, exercises are not ordered within a schedule, therefore the therapist
can always choose which exercise to perform next during a session. Each task produces some
output, which is termed that task’s result. Results can be viewed by the therapist for each
client and, on the basis of these results, the therapist may update or revise the client’s
schedule, that is, the list of exercises planned for this client.
2.3. Therapy items and levels
Many tasks involve the use of verbal material such as words or syllables, to be listened
to, recorded, repeated, etc. In OLP, these verbal items are collectively called stimuli, whether
they are displayed as actual stimuli to elicit a response from the client or they are stored as a
record of what a client is expected to produce or used in the identification of an automatic
speech recognition tool. In most cases, the word “stimulus” could be replaced by either
“speech sound,” “word” or “syllable,” so what it means to you depends on the level of
therapy at which you work. Therapy levels refer to the size of the speech unit worked on,
ranging from level 1 (single sounds) through level 6 (multisyllabic words). Additional levels
are conceivable but OLP tools cannot be used to construct exercises at higher levels (e.g.,
phrases, passages etc.), so they are not included in the system.
7
OLP User Manual v0.1.4
March 2004
2.4. Types of activities
At each level of therapy, there are certain categories of exercises (and corresponding
categories of tasks), which refer to the types of activities that are available for this level.
There are two main categories of activities: First, there is automatic speech recognition, that
is, activities built around speech recognition technology, often referred to as speech
recogniser or, in OLP, named GRIFOS. This category involves using an automatic speech
recognition program that attempts to determine whether repeated client productions conform
to a trained target model. Second, there is visualization of the speech sound via phonetic
mapping, named OPTACIA, in which the client’s speech is continuously displayed
graphically on a special phonetic map trained to correspond to particular sounds of interest,
called targets. In addition, there is a data collection category for tasks, which refers to
collecting instances of a client’s speech via sound recording on the computer. This is
available at all therapy levels, as well as at a special “data collection level” meant to support
recordings for assessment, should a therapist desire to use OLP to collect and organize speech
recordings from her/his clients. Finally, there are special task categories for level 1 (single
sounds), which correspond to the training of voice pitch and volume, and use special
corresponding tools.
2.5. Providing models to imitate
During therapy, and in particular during practice using an OLP tool, in an OLP task,
the client typically attempts to produce a stimulus, that is, a given speech sound or larger
verbal unit including a particular sound. The desired production is the client’s target and
there can be two kinds of physical instances of it: A client model is a recorded production of
the client attempting to produce the desired stimulus, judged by the therapist to be better than
most attempts. Since the client produced it, it is guaranteed to be feasible but not guaranteed
to be “correct” or even intelligible. A therapist model, on the other hand, is a recorded
production of the therapist pronouncing the desired stimulus in a correct way that is
appropriate for this client. Since the therapist produced it, it may be outside the client’s reach.
2.6. Keeping track: Descriptions and Notes
At several points in OLP, the therapist is asked to provide descriptions and notes.
Descriptions are short phrases associated with an item (usually the definition of an exercise or
a task) that are meaningful to the therapist. The computer pays no attention to the contents of
a description, so the therapist is at once free to describe the item in any way desired and also
obliged to describe it in such a way that it will be easily identified in the future. Since
descriptions are the main way in which the system presents items to the therapist for selection
or confirmation, it is important that descriptions be clear, specific and unambiguous. Notes,
on the other hand, are optional text fields in which the therapist may add whatever s/he feels
is useful or necessary for clarification or for the record. For example, notes in an exercise
may explain how the task sequence in this exercise serves the therapy objective, how best to
carry out the exercise, or how to handle potential problems that might arise. Session notes
may include observations related to a client’s performance for that day or other comments.
Since notes are not used in item identification they may be as unclear (or empty) as the
therapist wishes.
2.7. Wrapping up
Summing up, OLP therapy involves the following steps: a therapist registers a client
and constructs a schedule for him/her, that is, defines a set of exercises to be performed by the
client in order to reach specific therapy objectives identified on the basis of the client’s
8
OLP User Manual v0.1.4
March 2004
assessment. Therapist and client get together in client sessions, the therapist selects which
exercise to run at any given time, and the system supports execution of the client tasks in the
selected exercise in the specified order, including some automatic feedback and assistance.
Outside of client sessions, the therapist can review the results for her/his clients, revise their
schedules, and carry out therapist tasks for all clients.
9
OLP User Manual v0.1.4
3.
March 2004
Installation
If OLP is already installed on your computer you may skip this section and jump
ahead to “running OLPy”(Chapter 4 starting on page 19)
Installation of OLP requires availability of a number of software packages (including
interpreters for the scripting languages python and incr-Tcl/Tk as well as graphical and sound
libraries for them). Fortunately the installation procedure is very easy and simple, only
requiring from the user a few double-clicks and then lots of clicking on “Next.”
In this manual (and on your computer desktop) you will see the OLP system being
referred to as OLPy (with a lowercase ‘y’ after OLP). This is not a typographical error but
follows from a programmer’s convention. The OLP “kernel,” that is, the part of the OLP
system keeping track of clients, schedules, tasks, etc., communicating with the system
database, where everything is stored, and deploying the appropriate tools when tasks are to be
carried out, is written in a programming language called python. It is customary to name
programs written in python with a quirk involving the “py” suffix and OLP is particularly
suited for that since it already ends in ‘P.’ This way we can easily distinguish between the
project (OLP) and the computer program (OLPy), although it must be emphasized that there
is much more in the OLP system than the OLPy kernel you see and run – all the behind-thescenes tools that perform the speech processing and other tasks, the database, etc.
If you have previously installed OLPy on a particular PC you do not need to reinstall
any of the prerequisite packages since they are left active between OLP updates unless you
specifically take action to remove them, so for re-installing or upgrading OLPy you should
skip Section 3.2 and move on to Section 3.4 or 3.5, accordingly.
3.1. System requirements
OLPy will run on any PC with Microsoft Windows 2000 (recommended) or Windows
XP operating system. If your PC is powerful enough to run satisfactorily these operating
systems then it is powerful enough to run OLPy. OLPy is known to run acceptably on a 400
MHz Pentium II system with 256 MB of RAM. However, a Pentium III processor running at
600 MHz or higher is recommended for best performance. With respect to memory, it may be
possible to obtain acceptable performance with less than 128 MB of RAM, but because of the
great memory demands placed on the computer by the Windows operating system, consider
upgrading to 256 MB or at least 128 MB for consistent problem-free operation.
OLPy takes up some disk space (90 MB for version 0.9, plus 5 MB for STAPtk) and
the prerequisite software needed to run OLPy takes up disk space as well (around 55 MB). So
you need at least 150 MB to install OLPy on your PC. However, this is not of major
importance on any modern system with several Gigabytes of hard disk storage. On the other
hand, OLPy needs a lot of disk space to store audio files from your clients’ recordings, so it is
not inconceivable that you may run out of space after a long time of using OLPy with several
clients making lots of recordings. Count on having several Gigabytes available and keep an
eye on disk space as client recordings accumulate over time.
To use OLPy you need an audio card in the computer, to record and play out sounds,
as well as a microphone and headphones. It is rare to find a computer without an audio card
these days, so no special equipment is needed other than a headset that incorporates
headphones and a microphone. It is strongly recommended that you avoid using speakers or
table-mounted microphones. Speakers cannot overcome common ambient noise in presenting
the sounds to the client and may impede therapy progress due to insufficient auditory
feedback. Headphones make it much easier to work in quiet but not specially acoustically-
10
OLP User Manual v0.1.4
March 2004
treated spaces. As for microphones, distance from the mouth and direction are of extreme
importance, particularly in speech recognition. Using any microphone that is not headmounted is likely to reduce speech recognition performance to unacceptable levels.
Therefore, a combination headset is ideal for working with OLPy.
Note: OLPy will not run on computers using operating systems such as Apple
Macintosh (MacOS or OS X), Linux and so on. OLPy may seem to run but will not in fact
function correctly on older versions of the Microsoft Windows operating system such as
Windows 95, Windows 98, or Windows ME (millennium edition).
3.2. First-time installation of the complete system
The complete system includes, besides the OLPy programme itself and associated
modules created in the OLP project, a set of packages (tools and programming languages) that
interpret and execute the OLPy commands. These packages are all very easy to install – a
typical installation includes one double-click on the appropriate icon and then clicking on
“Next” a few times. However, the packages must be installed in the exact order indicated in
order to function correctly.
Installation begins by gaining access to the installer packages, either by downloading
them through the Internet or by inserting an OLP CD-ROM in your computer. To download
the packages through the Internet you will have to be connected to the Internet and use a web
browser such as the Microsoft Internet Explorer. It is easiest to use the OLP project web site
at www.xanthi.ilsp.gr/olp and click on “Private” on the left hand side to access the internal
“ftp” server, that is, the file depository for OLP project documents and programmes. You will
need to enter the password for the private web section (and click on “submit”) in order to gain
access to the ftp server. Once you are given the ftp option (highlighted “ftp.ilsp.gr”), click on
it to reach the file server. Software packages needed for OLP will be found in the “swinst”
folder which appears there. Double-click on it to see the available files. Here is the list of
files you will need:
ActivePython-2.2.1-222.msi
wxPythonWIN32-2.4.2.4u-Py22.exe
snack22p.exe
Numeric-22.0.win32-py2.2.exe
PST-1.2.exe
chaco-0.1.0_alpha_37.776.win32-py2.2.exe
For each of these files, right-click on it and then select “Copy to folder…” in the little
menu that pops up. A folder selection panel titled “Browse for folder” will then appear.
Click on “Desktop” in it and you will see the word “Desktop” appear in the blank space titled
“Folder:” at the bottom of the browser panel. Then click on “OK” and the file from the ftp
server will be transferred onto your desktop. Some of the files are quite large so the transfer
may take a while. When a transfer is completed, go on with the next file until you have
downloaded all of the files indicated above and you can see them on your desktop.
Note: If you know what you are doing you may want to create a special folder on your
computer, either on your desktop or under your documents or somewhere else, and put the OLP
installation files in there. That’s quite alright but since you will not need to keep these files after the
installation, it is not a problem to just put them temporarily on the desktop and then delete them after
the installation. Since this is the simplest option, it is the one recommended in the instructions. Be
sure to follow the indicated order of installation for the packages even if you do know what you are
doing, it is really important because there are prerequisite conditions among them.
Once all the files are present on your desktop, you are ready to proceed. Alternatively,
if you are installing from a CD-ROM, use Microsoft Windows Explorer (not the Internet
11
OLP User Manual v0.1.4
March 2004
Explorer) or double click on “My Computer” on your screen to navigate to your CD-ROM
drive (probably titled “OLP”) where the installer packages (the files listed above) are found.
Then follow these steps:
Double-click on ActivePython-2.2.1-222.msi
A small "preparation" window pops up and disappears
The setup wizard appears and welcomes you to Active Python
Click on Next>
The end-user license agreement appears
Click on the white circle next to "I accept the terms..."
The black dot moves from below and "Next>" is activated
Click on Next>
You are offered a selection between Typical or Custom
Click on Next>
The Wizard is ready to install the program
Click on Install
This will take a while.
When all copying is done, the setup wizard is completed
Click on Finish
Back in the folder where you've downloaded the sources...
Double-click on wxPythonWIN32-2.4.2.4u-Py22.exe
The setup wizard appears and welcomes you to wxPython
Click on Next>
The license agreement appears
Click on Yes
You are asked to select the Destination Directory
The default selection should end in Python22\\Lib\site-packages
Click on Next>
You are asked to select components
Full installation should be selected, with all components checked
Click on Next>
Installation will proceed through copying, creating icons etc.
When done, a screen with three checked options will appear
Click on the checked box next to "View README.txt" to uncheck it
The other two boxes "Compile..." and "Create..." remain checked
Click on Finish
A black DOS console window will briefly appear, lots of text
will scroll through, and then it will go away and be done
Back in the folder where you've downloaded the sources...
Double-click on snack22p.exe
The screen turns blue and you are welcomed to Snack
Click on Next>
You are asked to select the Destination Directory
Click on Next>
The system is ready to install
Click on Next>
After a brief "copying" window, installation is completed
Click on Finish
12
OLP User Manual v0.1.4
March 2004
Back in the folder where you've downloaded the sources...
Double-click on Numeric-22.0.win32-py2.2.exe
The screen turns blue and a Setup window appears
Click on Next>
You are asked to select the Python Directory and the Installation Directory
Click on Next>
The system is ready to install
Click on Next>
If you are asked whether to overwrite pre-existing files, click “Yes”
After a brief "copying" window, installation is completed
Click on Finish
Back in the folder where you've downloaded the sources...
Double-click on PST-1.2.exe
A couple of small windows appear briefly and disappear automatically
You are welcomed to InstallShield Wizard for Python Support Tools
Click Next>
Files are copied and then PST installation is complete
Click Finish
Back in the folder where you've downloaded the sources...
Double-click on chaco-0.1.0_alpha_37.776.win32-py2.2.exe
The screen turns blue and a Setup window appears
Click on Next>
You are asked to select the Python Directory and the Installation Directory
Click on Next>
The system is ready to install
Click on Next>
If you are asked whether to overwrite pre-existing files, click “Yes”
After a brief "copying" window, installation is completed
Click on Finish
Everything OLPy needs to run is now installed. You may proceed with installation of
OLPy according to instructions in the next section. Note that none of the above steps need to
be repeated when upgrading OLPy in the future.
3.3. Optional and special components
3.3.1. Database Updater
If you have Microsoft Access 2000 (or later) installed on your system you will be able
to update the contents of the OLP system database with future definitions, additions and
revisions, by running a special programme supplied along with OLPy. Microsoft Access is
part of Microsoft Office Professional and is usually installed along with Microsoft Word and
Microsoft Excel if you get the “Professional” version. If, however, you have the “Home”
version, then Microsoft Access is not included along with Word and Excel. In the latter case,
as well as in case you don’t have Microsoft Office at all, you should install the Microsoft
Access “Runtime Library” to be able to use the Database Update utility. The file you need is:
ART2KMin.exe
13
OLP User Manual v0.1.4
March 2004
Download this file to your computer and then run it by double-clicking on it. Then let
it extract the install files in the default folder (destination “C:\ART2KMin Setup”) as follows:
Double-click on ART2KMin.exe
The WinZip Self-Extractor window appears,
prompting you to unzip the files in “C:\ART2KMin Setup”
Click on Unzip>
The WinZip Self-Extractor informs you when files are successfully extracted.
Click on OK, and then
Click on Close, to close the WinZip Self-Extractor.
Then navigate to this folder (from “My Computer” Æ “C:” Æ “ART2KMin Setup” or
using the Microsoft Explorer) and locate “Setup.exe” in there.
Double-click on setup.exe
A small “preparation” window pops up and disappears
A setup wizard welcomes you to Microsoft Access 2000 Runtime.
Click on the icon to the left of “Install Now”
A setup process indicator screen will appear.
On the following screen,
Click on OK to end the setup.
As soon as this setup is finished, the OLPy Database Updater icon (in Start Menu Æ
Programs Æ OLPy) will be functional.
Note: Do not install this component if you already have Microsoft Access or if you
don’t want to update your system database with future contents distributed by the developers.
3.3.2. Using the database updater
To start the Database Updater, click on the shortcut:
Start Menu Æ Programs Æ OLPy Æ OLPy Database Updater.
A form will be displayed with two large buttons.
Click on the larger button labelled “Click here to update your Database”
When the process is completed, the message “Update finished” will appear.
Click on OK
Click on “Exit”
3.3.3. Video animations on Windows XP
If you work on Windows XP (instead of Windows 2000) you will probably also need
to install a special decoder for the video animations since Microsoft apparently messed up
multimedia support between versions of Windows. The file you need for this is:
iv5setup.exe
Download this file to your computer and then run it by double-clicking on it. Follow
the instructions on the screen. When prompted to select installation, choose “Typical.”
Note: Do not install this component if you use Windows 2000 unless specifically
instructed to do so during the installation of OLPy.
14
OLP User Manual v0.1.4
March 2004
3.4. Installation of OLPy only
To install OLPy, all you need is to run a single executable installer package. The
name of the OLPy installer file is of the form OLPy_XXXXXXXX_Setup.exe, where the Xs
stand for the date of the release, e.g., 20040114 for the version released on January 14th, 2004
(the full file name would be OLPy_20040114_Setup.exe). This file can be found on the
internal ftp server reachable from the private section on the OLP web site. Follow the
instructions in the previous section to reach the ftp server and then enter the “kernel” folder
by double-clicking on it. Download the file by right-clicking and selecting your desktop, and
then follow these steps to conclude the installation:
Double-click on OLPy_XXXXXXXX_Setup.exe
A window titled “OLPy InstallShield Wizard” appears, “Extracting files.”
When done, you are asked to select installation language.
Select your language from the drop-down list.
Click on “OK”
You are welcomed by the “InstallShield Wizard”
Click on Next>
You are asked to choose destination location
Click on Next>
You are asked to select setup type, either “Therapist” or “Client”
Read the on-screen description for each option to remember their purpose
Click on either “OLP client installation” or “OLP therapist installation”
Click on Next>
You are asked to select program folder
Click on Next>
The wizard is ready to start copying files
Click on Next>
Installation proceeds and when finished the screen turns black
The OLP logo appears on the screen for a few seconds.
You are asked if you saw the OLP logo
Click on “Yes” if you saw the logo or “No” if you did not.
If you clicked “Yes” then you are informed that your system displays OLP
video correctly (needed for exercise reward animations).
If you clicked “No” then you are informed that you need to install a video
component in order for OLP to display animations correctly. (This will not be
done automatically; you should install manually according to the instructions in
Section 3.3.3 below.)
Click on “OK”
Installation is complete.
Note: The software needed for creating and using phonetic maps, OPTACIA, now under the
STAPtk package, is installed separately from OLPy using a different executable installer package,
named STAPTK000.exe (000 standing for a version number), found in the “staptk” folder of the ftp
server and of the OLP CD-ROM (and not in the “swinst” or “kernel” folders). Instructions for
installing this are provided below.
3.5. OLPy update
Upgrading OLPy involves installation of a newer version than the one already
installed. This task is automated in the installer, as follows: When you run an OLPy installer
(according to the instructions in the previous section), if OLPy is already installed on the
15
OLP User Manual v0.1.4
March 2004
system, you are asked if you want to remove it from your system or if you would rather
“repair” it with the newer version. If you agree to remove, then OLPy is erased and you are
left with a system without OLPy on it. Then you run the same OLPy installer again and this
time it finds no OLPy on the system and it installs the new version. In this way, upgrading
OLPy simply involves running a more recent installer twice. If you want to keep your
existing data (therapist and client information, schedules, exercises, session data and results),
then you should not remove your current installation but take the “Repair” option instead.
3.5.1. Clean update: remove old version and then install new version
You should choose this option when you do not need to keep any of your previous
data, such as for example if you have only used an installation for your own testing and for
familiarizing yourself with the system. In such a case it is preferable to get rid of all the
useless data generated in the process of “playing around” with the programme.
It is assumed that you have first downloaded the new OLPy version in the usual way.
Double-click on OLPy_XXXXXXXX_Setup.exe
The “OLPy InstallShield Wizard” appears, “Extracting files.”
When done, you are asked to select installation language.
Select your language from the drop-down list.
Click on “OK”
You are welcomed by the “InstallShield Wizard”
You are given three options: Modify, Repair, or Remove
Select “Remove”
Click on Next>
You are asked to confirm file deletion
Click on OK
The existing installation of OLPy is deleted from your system.
Click on Finish
Note: If you remove OLPy the pre-requisite and support programmes installed
separately before it are not removed. This means that if you want to reinstall OLPy in the
future you need not re-install the pre-requisite programmes. It also means that if you want to
remove everything then you’ll have to uninstall each of the pre-requisite programmes
individually after uninstalling OLPy.
3.5.2. Incremental update: install new version and keep your data
You should choose this option when you need to keep your existing data, such as for
example if you have created exercises for clients or if you have results from client sessions
which you need to examine and use. In such a case it is necessary to update the programme
without affecting all the useful data generated in the process of using it.
It is assumed that you have first downloaded the new OLPy version in the usual way.
Double-click on OLPy_XXXXXXXX_Setup.exe
The “OLPy InstallShield Wizard” appears, “Extracting files.”
When done, you are asked to select installation language.
Select your language from the drop-down list.
Click on “OK”
You are welcomed by the “InstallShield Wizard”
You are given three options: Modify, Repair, or Remove
Select “Repair”
16
OLP User Manual v0.1.4
March 2004
Click on Next>
The OLPy installation is upgraded with the new version.
Click on Finish
This procedure leaves your existing data intact. If the new version includes revisions
or additions to the system database you will have to upgrade the database separately. See
Section 3.3.2 above on Using the Database Updater to update system data.
Note: Never select the “Modify” option in the installer. No good can result from it.
3.6. Installation of STAPtk
STAPtk stands for “speech technology applications toolkit.” It is the software
component responsible for creating and using phonetic maps in speech therapy. STAPtk
comes in its own installation package and requires installation of one pre-requisite software
component. The corresponding two installer files can be found in a folder named “staptk” in
your OLP CD-ROM or at the OLP ftp site. They are:
mgrtl.exe
staptk118.exe
The prerequisite component is the “Matlab runtime library” and is needed for the
display of results coming from practising on maps. To install this component:
Double-click on mgrtl.exe
The “Setup installation wizard” appears, “Extracting files.”
When done, the screen turns blue and you are welcomed
Click on Next>
A text window appears, titled “Readme”
Click on Next>
You are asked to choose destination location
Click on Next>
You are asked to confirm setup settings before copying files
Click on Next>
Setup of the Matlab libraries is complete.
Click on Finish
Then install STAPtk proper, as follows:
Double-click on staptk118.exe
The “Setup installation wizard” appears, “Extracting files.”
When done, the screen turns blue and you are welcomed
Click on Next>
The License Agreement appears
Click on YES to mark your acceptance of the license terms
Click on Next>
You are asked to choose destination location
Click on Next>
A “Set File Association” window appears
Click on Next>
A “Set Program Shortcuts” window appears
17
OLP User Manual v0.1.4
March 2004
Click on Next>
You are asked to confirm setup settings before copying files
Click on Next>
Setup of STAPtk is complete.
Uncheck the “Display README” box by clicking on it
Click on Finish
STAPtk is now installed and ready to run, either independently or from OLPy in
appropriately defined phonetic map exercises and corresponding tasks.
Note: If you need to upgrade STAPtk after initial installation, repeat only the latter
part of this procedure (with the newer staptkXXX.exe file). The Matlab libraries (mgrtl.exe)
need not be re-installed, ever.
18
OLP User Manual v0.1.4
4.
March 2004
Running OLPy as Therapist
Installation of OLPy ends with the placement of an OLPy icon on your
desktop. This icon, shown on the right, bears a shrunken version of the OLP project
logo, an easily distinguishable yellow face speaking in front of a computer screen. If
you selected “Therapist installation” when installing OLPy, then double-clicking on
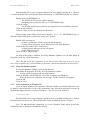
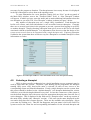
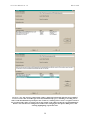
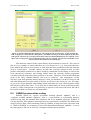
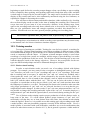
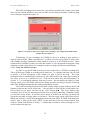
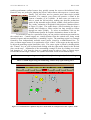
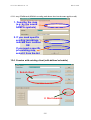
this desktop icon brings up the main OLPy screen, shown in Figure 1.
The Main OLP screen is split into two parts: the upper Therapist panel and the lower
Client panel. The Client panel includes the client’s Schedule section. From this screen, the
therapist can choose to concern her/himself with activities related to a particular client, in
which case the client must be selected (or entered, if new), or to go through administration
activities or therapist tasks for all clients. Naturally, actions related to a specific client are
initiated from the lower client panel on the main screen, whereas actions not related to one
client are initiated from the upper therapist panel.
OLPy features pop-up help for all of its functions. Just move the mouse cursor over
any button or field in an OLPy window and you will see a brief explanation of the purpose of
the button or field. Note that this only works for currently active locations. Locations are
active if they make sense in the given context. For example, a “remove” option will not
appear active unless something removable is selected (highlighted or otherwise), the “start
session” button will not be active unless a client is selected to run the session with, and so on.
Figure 1. The main OLPy screen as displayed at programme startup.
4.1. Entering new therapist information
The first thing a therapist is to do when using OLPy is to enter her/his information in
the system. With the exception of the therapist name, the rest of the information is not
19
OLP User Manual v0.1.4
March 2004
necessary for the program to function. The therapist name is necessary because it is displayed
in the list of therapists to select from at the opening screen.
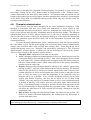
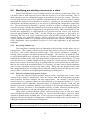
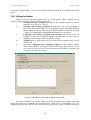
To enter information for a new therapist, simply click on “New” on the top panel of
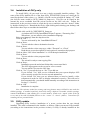
the Main OLPy window, next to the “Therapist Name” field. A “New Therapist” window
will appear, in which you may enter the name and as much additional information about the
new therapist as you wish. The “New Therapist” window is shown in Figure 2 below.
Any number of therapists may use a single OLPy installation. Each therapist has
her/his own clients, and client information is not accessible between therapists. Currently
there are no security provisions in the program to prevent a person from logging on to OLPy
as another therapist. Simply choosing a therapist name gives access to the user to all clients
associated with the selected therapist. It is important to note, however, that the design of the
system restricts each client to be associated with a single therapist only. If privacy protection
is added to the system then there will be no way for a therapist to see another therapist’s client
information or results.
Figure 2. New Therapist window to enter information about a new therapist into OLPy
4.2. Selecting a therapist
OLPy is always used by a therapist, but a single installation (on one computer) may be
used by more than one persons. Therefore, upon starting up the programme, the therapist
running OLPy must verify that her/his name is selected, in order to have access to the
corresponding clients and related information. If only a single therapist uses the system, then
this person should be defined as the “default therapist” (see therapist administration, section
4.4 below) to avoid selecting her/himself every time. In case the current user of the system is
not the default therapist, then s/he must select the appropriate therapist name form the list of
active therapists. This is displayed in the field next to “therapist name” on the top section of
the main OLPy window (the “therapist” section). Click once on the name displayed in this
area and a drop-down list of names appears. These are the available active therapists. Select
your name by clicking on it. Then the list disappears and your name is left in the field. The
system accesses the client list and corresponding information for the selected therapist and
20
OLP User Manual v0.1.4
March 2004
you are ready to proceed with therapist tasks (Section 4.3), registration of a new client
(Section 4.5), or selection of an existing active client (Section 4.6).
4.3. Running therapist tasks
Therapist tasks are activities, using associated software tools, which are performed (or
may be performed) in the absence of a client. In contrast to client tasks, which require client
interaction with the computer, therapist tasks are typically administrative, monitoring,
configuration and setup tasks which are necessary for the client to carry out their scheduled
exercises. Examples of therapist tasks include listening to a client’s recorded productions and
selecting the best (and poorest) ones in order to build a customized speech recognition system
tailored to the needs of this particular client and current therapy objectives; or designing a
layout for a client’s practice such as assigning visual targets to speech recognition results or to
phonetic maps. Each therapist task typically results from an exercise in a client’s schedule, so
therapist tasks are associated with particular clients. However, since they do not require
client presence to be carried out, they are grouped in OLPy under the therapist, so that they
can be performed by the therapist outside of client sessions. For example, after a day’s
sessions, the therapist may go over any pending therapist tasks for all clients without having
to go through each client’s schedule to check if any therapist tasks are pending.
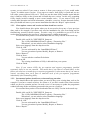
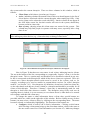
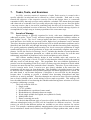
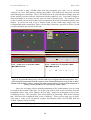
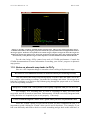
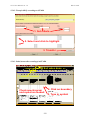
Clicking on the therapist tasks button brings up the corresponding panel, shown in
Figure 3 below.
Figure 3. Therapist tasks panel with tasks for two clients, and a selected task ready to run.
In this example, there are five pending therapist tasks, for two clients. The names of
the clients and the exercises in which the pending tasks belong are shown to help the therapist
identify and select tasks to carry out. To run a therapist task, first select it by clicking once on
it (anywhere on the line). When it becomes highlighted it is also displayed below in the
“selected task” field. Then it can be carried out by clicking on the “Run” button next to it.
Running a task involves a corresponding tool, so the appearance on the screen of the task
execution will depend on the type of task. Different kinds of tasks are discussed and
illustrated in later sections.
21
OLP User Manual v0.1.4
March 2004
When a therapist has completed all therapist tasks s/he planned to carry out for the
time being, clicking on the “Exit” button results in disappearance of the “Therapist Tasks”
window and return to the main OLPy Main window. Any therapist tasks not carried out will
remain in the pending list and will reappear when the therapist tasks window is invoked again
in the future, along with any additional therapist tasks which may have become ready for
execution in the meantime.
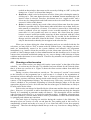
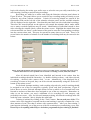
4.4. Therapist administration
OLPy can be used by many therapists on the same installation (computer). Each
therapist is associated with their own clients and information of those clients is only
accessible through the respective therapist. However, therapists may come and go (e.g., at a
clinic); or the person using an OLPy installation most of the time may change. The therapist
administration option of OLPy allows control over (a) the list of therapists appearing as
choices when the system is started; (b) the therapist showing as a first option by default, that
is, when no particular choice has been made; and (c) the information associated with each
registered therapist.
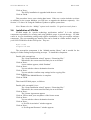
To access therapist administration, select “Administration” from the top line menu on
the “OLP Main” screen. Do this before going on to work with clients, because administration
changes may invalidate other work you may have already done. In the drop-down list of
options that appears, move over “Therapist” and select this by clicking on it. The “Therapist
Administration” window appears, in which you can see all therapists entered in the system.
There are four columns in this window, titled as follows:
• Therapist Name, which shows just what you’d expect
• Active, indicating whether the named therapist in this row should appear in the list
of therapist choices when starting up OLPy. Only active therapists can be selected
to work with OLPy. Inactive therapists do not appear in the OLP Main screen list,
but their clients and the results of their clients still exist in the system, should they
become useful at a later time.
• Default, showing which therapist should be shown as the “default” option when
starting up OLPy. Only one of the displayed boxes may be checked. The therapist
name on the checked row will be pre-selected when OLPy starts. Therefore, this
column should be set for the most frequent user of the system, so that s/he will not
have to select the name every time the programme is run. Naturally, only one
therapist can be set as default. If two or more therapists routinely use the same
system with similar frequency, and they do not agree on one of them being
“default,” they may choose to set another name (even of a non-existent therapist)
as default so that they will both be forced to select their name when starting up
OLPy. If no therapist name is selected as “default” then the first (top) name on the
list will automatically be displayed when the programme starts. This choice does
not affect any other aspect of OLPy beyond pre-selecting a therapist to start the
programme with.
• Date of entry, showing when this therapist name was entered in the system. Not
likely to be useful with small installations, this column may help find people in
systems with many users.
Recommendation: Invoke administration activities immediately upon starting OLPy and not
after making any other choices (e.g., client selection) or therapy-related work.
22
OLP User Manual v0.1.4
March 2004
Figure 4. Therapist administration panel with 10 registered therapists, all but one active.
To change the status or other information about a therapist, three special buttons are
provided, which are visible on the right side of this window. Before clicking on any of these
buttons you must select a therapist to affect, by clicking on the corresponding name. The
name becomes selected, as indicated by the rectangle surrounding it (as opposed to
highlighting). The functions of the buttons are:
• Configure, which is used to edit a therapist’s information. Clicking on this button
after selecting a therapist name brings up the therapist data window, which is the
same as the one used to enter New Therapist information (see Section 4.1). Make
any changes needed on that window, then return to this screen by clicking on
“OK” (to keep the changes) or “Cancel” (to discard the changes).
• Deactivate, which is used to deactivate an active therapist, after selecting the name
by clicking on it. This same button becomes an “Activate” button automatically if
an inactive therapist is selected. Therefore, this button acts as a “toggle switch”
and a therapist may be changed back and forth between the active and inactive
state with successive clicks on this button.
• Delete, to remove entirely any record of the selected therapist name from the
system. Deletion is possible only for therapist names under which there are no
clients. If a client is entered in a therapist’s name then it is not possible any more
to remove this therapist from the system, because removal would necessitate
removing the client and it cannot be known whether any of the data associated
with this client (such as tasks and configurations) may be needed for the definition
of therapy activities with other clients in the future. Therapists with client data
under them can only be deactivated so that they do not appear in the selection list.
When you are done editing the therapist information and you are satisfied with the list
selections, you may click on “Exit” to return to the OLP Main screen. Any changes you have
made are automatically entered in the system database and influence the programme
immediately (e.g., the main screen is updated upon return from therapist administration and
the default therapist appears pre-selected). It is not possible to cancel changes made in
therapist administration but this should never be a cause for concern since activation and
default settings are very easy to change, while deletion of therapists with data under their
name is never allowed. Therefore any mistakes can be quickly rectified without any data loss.
23
OLP User Manual v0.1.4
March 2004
4.5. Entering new client information
In OLPy, everything that happens is about a client. In particular, tasks, always
belonging to exercises, are carried out by, with, or for a specific client. Therefore, in order to
define and carry out any activities, a corresponding client entry must be present and active in
the system. This means that whenever a new client is involved, information about this person
must be entered into the system in order to create the required corresponding fields in the
database. In order to define a new client for receiving therapy with OLPy (or for creating data
needed for other persons), the therapist clicks on the “New” button in the client region of the
main OLPy window (remember that each client “belongs” to a single therapist, so the new
client information may be entered by the currently active therapist whose name is displayed at
the top of the main OLPy window).
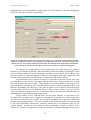
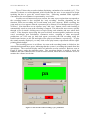
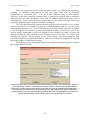
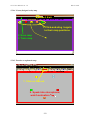
Clicking on the “New” button next to the “Client name” field brings up the “New
Client” window, shown in Figure X below.
Figure 4. New Client window to enter information about a new client into OLPy
As with new therapist information, the client name is obligatory because it will be
used in all displays where the therapist will have to select schedules, exercises, tasks,
recognisers etc. Therefore it is advisable to enter a complete and real name in order to avoid
difficulties in remembering later what incomplete names or codes refer to. The remaining
fields are optional and may be filled out if the therapist wants OLPy to serve as a filing tool in
addition to supporting the special therapy tasks.
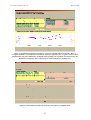
4.6. Selecting a client
Therapy-related activities are carried out with, by, or for a client. To select a client,
from the list of registered clients, a drop-down menu is available in the main OLPy window.
The client name field will be either blank, if no client has been previously selected since
starting the programme, or with the previously selected client name, otherwise. Click on the
24
OLP User Manual v0.1.4
March 2004
client name field and a list of names will appear as a drop-down menu. These are all the
active clients for the therapist displayed above, in the therapist name field. Select the desired
client name by clicking on it once. The drop-down list will disappear and the selected name
will remain in the client name field. Upon selection of a client name, the programme fetches
all information related to this client. If a schedule has been previously defined for this client,
it will appear below the client name, in the schedule field. If there are pending exercises in
this client’s schedule, then the programme will be ready to begin a session with the selected
client. In other words, if you are the default (or only) therapist using a computer, in order to
start a new session with a previously registered client for whom a schedule has been defined,
all you have to do is start the programme and select the client name before going on to “start
session.”
Figure X. Main OLPy window during client name selection (drop-down list active)
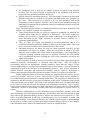
4.7. Client administration
Each therapist will use OLPy with several clients; over time it is likely that
information for, and data from, many clients will accumulate in the programme. However, at
any given point in time only a few of all the registered clients will be actively using the
system, as part of their undergoing therapy. Old clients need not appear in the programme
selection lists since they are not likely to be selected. In addition, a client may interrupt
therapy for a long period of time, during which s/he may rightfully be considered “inactive.”
The client administration option of OLPy allows control over (a) the list of clients appearing
as choices when a therapist is selected to work with the system; and (b) the information
(history, diagnosis, etc.) associated with each registered client.
To access client administration, select “Administration” from the top line menu on the
“OLP Main” screen. Do this before going on to select a client and work with a client, because
administration changes may invalidate other choices you may make or work you may do. In
the drop-down list of options that appears, move over “Client” and select this by clicking on
it. The “Client Administration” window appears, in which you can see all clients entered in
25
OLP User Manual v0.1.4
March 2004
the system under the current therapist. There are three columns in this window, titled as
follows:
• Client Name, which shows just what you’d expect
• Active, indicating whether the named client in this row should appear in the list of
client choices associated with the current therapist when starting up OLPy. Only
active clients can be selected to work with OLPy. Inactive clients do not appear in
the OLP Main screen list, but their results still exist in the system, should they
become useful at a later time.
• Date of entry, showing when this client name was entered in the system. This
column may help find people in systems with many users, especially after a long
time of use.
Recommendation: Invoke administration activities immediately upon starting OLPy and not
after making any other choices (e.g., client selection) or therapy-related work.
Figure X. Client administration panel for therapist Athanassios Protopapas.
Note in Figure X that there are two names in red colour, indicating inactive clients.
The one at the bottom of the list, corresponding to a supposedly “inactive” client, is in fact the
therapist’s name. This is a system entry and should never be modified or altered in any way.
In fact it corresponds to the therapist for which all the above clients are registered. There are
certain cases where therapist-related results must be saved in the system, such as, for
example, recordings to be used as models in pronunciation exercises (so called “therapist
models”; see Section 7.4.3). Now therapists, by definition, do not have results but clients do;
on the other hand, such data are clearly related to a therapist and should be accessible for all
clients of this therapist. Therefore a “dummy” client entry is automatically made for each
therapist to hold such data whenever needed. The therapists using OLPy need not do
anything about it; indeed, it is not necessary to even know about it, other than to be warned
not to tamper with this fake client entry.
To change the status or other information about a client, three special buttons are
provided, which are visible on the right side of this window. Before clicking on any of these
buttons you must select a client to affect, by clicking on the corresponding name. The name
becomes selected, as indicated by highlighting. The functions of the buttons are:
• Configure, which is used to edit a client’s information. Clicking on this button
after selecting a client name brings up the client data window, which is the same as
the one used to enter New Client information (see Section 4.5). Make any changes
26
OLP User Manual v0.1.4
•
•
March 2004
needed on that window, then return to this screen by clicking on “OK” (to keep the
changes) or “Cancel” (to discard the changes).
Deactivate, which is used to deactivate an active client, after selecting the name by
clicking on it. This same button becomes an “Activate” button automatically if an
inactive client is selected. Therefore, this button acts as a “toggle switch” and a
client may be changed back and forth between the active and inactive state with
successive clicks on this button.
Delete, to remove entirely any record of the selected client name from the system.
Deletion is possible only for client names under which there are no data, that is, no
tasks started (or completed, of course). If a session is entered by a client and any
result is produced (even one response or one recorded utterance) in the client’s
name then it is not possible any more to remove this client from the system,
because removal would necessitate removing all data associated with this client
(such as tasks and configurations), which may be needed for the definition of
therapy activities with other clients in the future. Clients with data under them can
only be deactivated so that they do not appear in the selection list.
When you are done editing the client information and you are satisfied with the list
selections, you may click on “Exit” to return to the OLP Main screen. Any changes you have
made are automatically entered in the system database and influence the programme
immediately (e.g., inactive clients do not show up in the client name selection list). It is not
possible to cancel changes made in client administration but this should never be a cause for
concern since activation and default settings are very easy to change, while deletion of clients
with data under their name is never allowed. Therefore any mistakes can be quickly rectified
without any data loss.
4.8. Running a client session
To run a client session, you simply click on the “start session” to the right of the client
schedule. A session may be run only if a schedule has been defined for the selected client,
that is, if there are exercises in it. Figure X shows the client session window from which the
session is controlled.
During a session, client tasks are carried out. The concept of “session” is not central
to the hierarchy of the programme but is used because it is central in the organisation of
interactions between therapists and clients. That is, clients typically visit the therapists and
have therapy sessions with them, during which certain therapy activities take place. In the
context of OLP-supplemented therapy, the therapist may select any exercise(s) from the
client’s schedule to be performed, depending on what the therapist judges to be the most
appropriate objectives to strive for at the time and also what types of interactions are likely to
be most useful for the client.
Each session can always be identified by the client name and the date on which it took
place. However, it is possible to add a description for a session that may help the therapist
identify it if something in particular stands out about it. This description will be available
when sessions are browsed (e.g., to search for particular results). In addition, a therapist may
add notes related to a session, either about a client’s performance or other observations about
it, optionally and without any restriction.
The basic logic of carrying out activities during the sessions is the following: The
therapist selects an exercise to work on and then the first pending task in this exercise is
automatically selected and ready to be run (if it is a client task and if it has been properly
configured). Therefore the therapist should always at the very least do two things during a
session:
27
OLP User Manual v0.1.4
March 2004
1. Select an exercise from the client’s schedule (on the top panel) by clicking once
on it – the selected exercise is then highlighted.
2. Click on “Run” on the right hand side of the window under the tasks list, in order
to run the “current” task, which automatically appears in the corresponding field.
Figure X. Client session control window, displaying a client’s schedule (top right) and the tasks in a
selected (highlighted) exercise (middle right)
It is important to remember that you cannot select a particular task in the exercise,
therefore it is useless to click on tasks in the middle window; such clicks have no effect. The
reason for this is the strict sequential logic of the exercises (see section 7.2), which allows the
programme to guide you through tasks to reach your therapy objectives but necessarily
restricts you to the preconfigured steps.
Also, remember that exercises are selected within the session, since it is during the
client session that the exercises are carried out. Therefore any exercise selections you may
have made while on the main OLPy window have no bearing on the execution of tasks during
the session. The two windows serve different functions and should not be confused. When
you highlight an exercise in the client’s schedule on the main OLPy window, it is for the
purpose of modifying, configuring, or removing that exercise, that is, for the purpose of
affecting the schedule. In contrast, when you highlight an exercise in the client’s schedule on
the Client Session window, it is for the purpose of carrying out tasks in this exercise in order
to reach therapy objectives, that is, for the purpose of guiding client performance. Even
though the same schedule appears in both cases, its function differs according to context.
Certain tasks are designated as “repeatable,” which means that they can be performed
may times using the same configuration. This can be very useful when you need to continue
the same type of practice until some goal is reached. The computer cannot judge when your
goal is reached, although it can provide useful feedback to help you decide the extent to
which your goal is approached or attained. As long as client performance is not sufficiently
high (or stable), you may repeat whatever task was performed last by clicking on the “Repeat
28
OLP User Manual v0.1.4
March 2004
last” button instead of the “Run” button. Remember that the “Run” button always executes
the next pending task in the series defined for this exercise, whereas the “Repeat last” button
always executes the last completed task.
The following restrictions apply while in a client session:
• Only “pending” tasks can be run using the “Run” button, therefore tasks which are
“not configured” or “completed” cannot be run. Because of the strict sequential
restrictions on tasks in an exercise, if the task immediately after the last completed
task is “not configured” then you cannot continue with the exercise. In order to
keep the logic of the programme (and of your interaction with it) as simple as
possible, you are required to perform the configuration from the main OLPy
window, by selecting this exercise in the schedule, clicking “configure” (for the
exercise), then selecting the unconfigured task in the Exercise window, clicking
“configure” (for the task), and taking any action necessary in there (see section 6.3
for exercise configuration and section 7.4 for task configuration).
Note: This may change in future versions, allowing some control over
configurations during a client session.
• Therapist tasks should not routinely be run by clicking on “Run” during a client
session, since the whole point of the client session is to carry out tasks in which
the interaction of the client with the computer is needed. When the next pending
task in the currently selected (highlighted) exercise is a therapist task, then
“therapist task” appears in the “current task” field. Therapist tasks are carried out
from the special “Tasks” button on the therapist section of the main OLPy
window. From that button you have access to all pending therapist tasks for all
clients. For the cases in which a quick therapist would more conveniently be
carried out during a client session to enable continuation of therapy with the client
in the same session, the “Run” button allows execution of therapist tasks.
However, therapists would probably find it more convenient in the long run to use
the Therapist Tasks most of the time, with the clients not present.
When all activities for a session are completed, you may return to the main OLPy
window by clicking on “End Session.” The “Cancel” button is only useful if you enter a
session by mistake and you wish to exit immediately without carrying out any tasks.
4.9. Viewing results for a client
To view a client’s results, click on “View Results” on the OLP main screen when the
client is selected. In the results window that appears you can select the exercise(s) for which
you wish to view results and either view results task by task or view a graphical display for all
repetitions of each practise task. See Chapter 0 “Results and Outcomes” (on page 96) for
more details.
29
OLP User Manual v0.1.4
5.
March 2004
Running OLPy as Client
Running OLPy as Client is done by double-clicking on the desktop OLP icon, if you
selected “OLP client installation” when you first installed the programme. The main OLP
screen then has the following appearance, shown in Figure X (instead of the main therapist
screen shown in Figure X, Section X, with all the therapist, client, and schedule options.)
Figure X. OLP main screen for a client installation.
A client installation needs a client defined in the system database in order to run.
Registration of a client is done either via the Internet (see section X on Remote Therapy) or
via the Therapist interface from the Start Menu (as explained below). If you double-click on
the desktop icon to start the programme in a client installation before registering a client then
nothing will happen. When a client is found, the programme starts with the screen like the
one shown above, in which the available client’s name is printed on top.
5.1. Running sessions as a client
The “Start Session” button on the right hand side of the client main screen starts a
session for this client. The client session is identical in appearance and in function to the one
activated from the therapist main screen (described in Section X and shown in Figure X on
page X). From the session screen the client can select exercises and run (or repeat) tasks in
them. Ending a session returns the user to the main screen shown above.
5.2. Viewing results as a client
The “View Results” button on the right hand side of the client mains screen brings up
the results screen for this client. The client results screen is identical in appearance and in
function to the one activated from the therapist main screen (described in Section X and
shown in Figure X on page X). From the results screen the client can select exercises or tasks
30
OLP User Manual v0.1.4
March 2004
and view cumulative or single results, respectively. Exiting a results screen returns the user to
the main screen shown above.
5.3. Notes on client registration and schedule setup
Setting up as client installation is meant for a client using a computer at home, that is,
without therapist supervision. Therefore all configuration and selection options are
deactivated to prevent a client from inappropriate actions. This includes selecting a client –
after all, the client installation is made with the idea of a single client using it, therefore there
is no point in the typical user always selecting her/himself each time the programme starts.
For this reason, OLP Client automatically starts with the last client found in the database. In
the intended-for case, there will be only one client defined, which will also be the last one, so
this client will always be selected. In case the same computer (e.g., a laptop) is taken from
one client and given to another, the “new” client will be defined and set up after the “old” one
is done, therefore the “new” one will be correctly selected. Therefore you need do nothing
about selecting client as long as you register clients when they are about to take possession of
the computer and be the only users of it.1
The Client installation is designed for use over the Internet. This means that the
interface offers the means to (a) register as a new client; (b) download schedule information
created remotely by the therapist; and (c) upload results for the therapist to see. More details
on Internet use are given in Section X on remote therapy. However, it is possible to use a
client installation without an Internet connection. Obviously, in this case the therapist must be
physically present to set up the client and schedule. To enter a client installation as therapist,
use the Windows Start Menu (at the bottom left corner of the screen). Click on Start Æ
Programs Æ OLPy Æ Therapist and you will see the familiar OLP main screen for the
therapist. From this you can set up a new client, define a schedule for her/him, and configure
the exercises in the usual way. Remember that the client will have no way of configuring
anything so be sure to configure all tasks you want the client to carry out. Deactivate any
exercises that are not meant to be carried out presently, since their appearance in the session
screen will only confuse the client. You can always enter a client installation as a therapist
for modifications, additions, maintenance, results viewing etc.
1
If for any reason a client installation is to be shared among clients, then you will have to enter the
programme as a therapist and activate only the correct client each time, deactivating all others.
31
OLP User Manual v0.1.4
6.
March 2004
Schedules
OLP-supplemented therapy is organised around schedules. There is one schedule per
client, which contains the exercises defined for this client. Exercises may be added to the
schedule of an active client at any time, but cannot be removed after they have been initiated.
Modifications are possible for “future” parts of exercises only, that is, you may not change
(remove or modify) completed tasks but you may modify a partially completed exercise by
modifying, adding, or removing tasks that have not yet been carried out. Figure X below
shows a client’s schedule as it appears on the main OLPy window. Note that each exercise in
the schedule is associated to a status: “Pending” and “Not Configured” are two possibilities
(more about exercise status in the Exercise section).
Figure 6.1. The main OLPy window displaying a client’s name and schedule
The client schedule is the basic unit of organisation for working with a client using
OLPy. In this section we discuss the basic schedule operations that allow you to define and
modify it by adding, configuring, removing, and creating new exercises.
6.1. Adding exercises to a client’s schedule
To add an exercise to a client’s schedule means to select an exercise from a list of
predefined exercises and make a copy of it for the current client’s schedule. In this context, a
“predefined exercise” is any exercise that has been previously defined in the system, either as
it came with system installation, or as it was created by the user-therapist for a client in the
past. This means that any exercise you create for a client will be available in the future for
any other client as well, thus saving you from duplicating efforts and also allowing you to
build easily a library of exercises for all your clients. For a relatively uniform caseload, it will
be simple as part of the regular course of using OLPy, to end up quickly with a full set of
exercises most useful to you, since you will have to define them in the beginning anyway to
work with your first OLP clients.
32
OLP User Manual v0.1.4
March 2004
Note: Since “adding” exercises refers to predefined exercises only, if you need to add an
exercise to the schedule that has not been previously defined you must choose “create” instead of
“add” in the schedule menu (see next section).
The next Figure shows the “Add Exercise” window, which is used to select
appropriate exercises for the client’s schedule. Since therapy is structured in levels (see
section X), in order to avoid long lists of mostly irrelevant exercises, adding an exercise is
done through the levels.
Figure X. Exercise selection window, as it first appears (left) and after selecting a level, when exercise
categories for this level are displayed (right).
To add a predefined exercise to a client’s schedule, in the “Add Exercise” window,
follow these steps:
1.
Click on the “Level” field (initially displaying the word “Select”) and select
the desired level in the drop-down list that appears by clicking once on it.
The selected level will then appear in the field.
2.
Click on the “Category” field (initially displaying the word “Select”) and
select the desired exercise category from the drop-down list that appears by
clicking once on it. The available categories will differ depending on the
level, since different types of exercises are reasonable and/or possible on
different levels. The selected category will appear in the field.
3.
Examine the list of exercises that appears in the originally blank panel below
the level and category fields. Find the exercise you are looking for and
select it by clicking once on it. The selected exercise then becomes
highlighted.
4.
Click on the “Add” button at the bottom of the “Add Exercise” window.
You will see a message “Adding exercise…” appearing briefly while the
programme updates the client’s schedule with a copy of the selected
exercise. Wait until “Adding exercise…” disappears before you proceed!
5.
Repeat the above steps as many times as necessary. If you want more
exercises from the same level, repeat only steps 3 and 4. If you want
exercises from another level, repeat from step 1 on. When you are done
adding predefined exercises to this client’s schedule, click on “Exit” at the
33
OLP User Manual v0.1.4
March 2004
bottom of the window. This will take you back to the client’s schedule on
the main OLPy window.
Figure X. Exercise selection for Level 1, Pitch category, and Level 2, Speech recogniser category. The list
of available predefined exercises in each case is displayed in the bottom region of the window.
6.2. Creating new exercises for a client’s schedule
When you first start to use the programme you may find out that an exercise you want
does not exist in the system, that is, it has not been predefined for you. This means that you
will have to define it so that it will be available for the current client, whose schedule you are
preparing, and for more clients in the future. Since the concept of the exercise is
straightforward (a sequence of tasks performed using special tools) it is also straightforward
to create a new exercise as long as you understand the logic of how exercises are meant to
serve their therapy objectives (see Chapter 7 for a discussion of exercises, tasks & tools).
To create a new exercise you start at the main OLPy window, viewing a client’s
schedule, and instead of clicking on “Add” (which adds a predefined exercise to the
schedule), click on “Create” to bring up the “New Exercise” window which you will use to
create your exercise. Figure X below shows the “New Exercise” window.
In the “New Exercise” window, you first have to provide a brief description for the
exercise you want to create. This description is extremely useful for you because it will be
your only means of identifying this exercise in the future in the list of available exercises. It
will be the “official” name for this exercise. So it must be sufficiently descriptive and
specific but not overly restrictive (e.g., it should not contain references to a particular client
and, if you plan to use it more generally, it should probably contain no references to particular
configuration features). At least it should express as clearly as possible the set of tasks it
includes and/or the therapy objective it is designed to serve. The description should be
sufficiently short so you can read it in the programme lists, so a few words should be enough.
The “explanation notes” field allows much more space in which you can explain in more
detail the purpose and any other relevant characteristics of the exercise.
As noted, each exercise serves a particular therapy objective at a specific level of
therapy, so exercises are internally grouped by levels. Here you have to define the therapy
level for which you are creating this exercise. Click once on the blank field next to “select
level” and then click once on the desired level, which will subsequently appear in this field.
34
OLP User Manual v0.1.4
March 2004
Figure X. Top: OLPy Window providing the functionality necessary to build a new exercise using
predefined tasks or new tasks created for this purpose. Bottom: The same window after typing a
description and explanation, selecting level and category for the new exercise, and adding three tasks to it.
For each level, certain types of exercises are possible or reasonable, depending on the
characteristics of the tools available for the practice tasks. Therefore you should define here
the exercise category by taking into account the kind of practice you have in mind (for
example, if it will be based on real time phonetic mapping visualisation or on automatic
35
OLP User Manual v0.1.4
March 2004
speech recognition). Click once on the blank field next to “select category” and then click
once on the desired exercise category, which will subsequently appear in the this field.
Defining the exercise means to define a specific sequence of tasks. Therefore what
remains to be done is to add each task (in order). If you want to add a pre-existing
(previously defined) task, then you should click on the “Add” button. If you need a task that
has not been previously defined, then you should click on the “Create” button instead. This is
similar to the Add/Create exercise options. When adding a predefined task, a list of all
available tasks will appear (See Figure X below). Note that the Task Level and Category are
selected automatically based on your settings for the exercise.
Identify the task you want by using the slide bar to the right of the task list if you need
to see more tasks (this can be a long list). You have to select the desired task by clicking once
on it, so that it becomes highlighted. Then click on “OK” to add this task to the task list in
your new exercise. Of course you can always change your mind and click on “Cancel” to
close whatever window is currently in front of you.
Figure X. Task selection panel for adding predefined tasks to an exercise
Back to the New Exercise panel, if you want to remove a task from the list you must
first select it by clicking once on it, so it becomes highlighted, and then click once on the
“Remove” button.
6.3. Configuring exercises
Each exercise entered into a client’s schedule attains automatically a status of “not
configured.” This is intended to ensure that therapists check settings for the exercises before
using them with a client to avoid starting improperly defined exercises or insufficiently
specified exercise templates. In some cases there is nothing that can (or should) be
configured, if all tasks in the exercise are fully pre-specified. There is no way for the
programme to know that, however, because users (therapists) can always add their own tasks
and exercises. Therefore it cannot be guaranteed that available exercises are properly preconfigured, even if some of the few predefined exercises coming with the system in fact are
completely specified. Therefore, every exercise must be configured before the tasks in it can
be carried out, whether setting any configuration parameters is actually involved or merely
going through the configuration panel will suffice.
36
OLP User Manual v0.1.4
March 2004
Exercise configuration entails selecting the exercise, clicking on “configure,” checking
and optionally configuring individual tasks, and finally clicking “OK” in the Exercise
configuration window to return to the schedule in the main OLPy window. Clicking “OK” in
the Exercise window causes the programme to consider this exercise “configured” regardless
of what was actually done with the tasks. Therefore it is still possible to mistakenly activate
misconfigured exercises since the programme has no way of knowing the therapist’s desired
configuration. The only exception is if tasks themselves are not fully specified with default
values, in which case they (the tasks) appear as “not configured” (inside the exercise) and
cannot be run in the course or carrying out the exercise during a session.
So, to configure an exercise:
1. You must be at the level of the main OLPy window viewing the selected client’s
schedule with the exercises in it. You must not be running a client session or
other administrative activities.
2. Select the exercise you wish to configure (or otherwise modify) by clicking once
on it. The exercise becomes highlighted. You may do this whether the exercise
has not been already configured or not.
3. Click on the “Configure” button – it is the top button to the left of the schedule in
the client section of the main OLPy window.
4. An Exercise window appears. An example of such a window is shown in Figure
X below.
5. Change the exercise description to best suite your intended purpose and defined
set of tasks.
6. Optionally, add explanation notes to remind yourself or other users in the future
what this exercise is about, the logic or special means to achieve its objective, or
notes for task configuration.
7. Examine each task and optionally configure it according to the instructions (see
section 7.4 on task configuration) using the corresponding tool.
8. Optionally, add and remove tasks as appropriate for this client. To remove a task,
select it by clicking once on it. Adding a task from the configuration window is
possible (at the end of the current task list) but not recommended for most cases
because the interface is not designed to facilitate such radical modifications as
inserting or deleting tasks affecting the exercise sequence.
9. When satisfied that the exercise is fully and correctly defined for the particular
client in whose schedule it is included, click on “OK” to return to the main OLPy
window.
Figure X, top, shows an exercise configuration window as it appears when first
invoked for the predefined Level 5 exercise “Rec-Train-Recog,word level,WF bilabial stops
(p,b),”. At the bottom of the same figure the same window is shown after modification of the
description, addition of an explanatory note, and selection of a task for individual
configuration. Note that the general name of the predefined exercise, covering all bilabial
stops, serves to identify this exercise in the list of available exercises, but is not appropriate to
leave in the client’s schedule as such, because not all available words with word-final bilabial
stops are actually used. Therefore, the exercise description is changed to reflect exactly what
the exercise contains for this particular client, and the same is also done for the tasks in it (see
also below, Exercise modification and Task configuration).
Recommendation: Always rename an exercise, by modifying its description, as you enter its
configuration screen. Use a name that will accurately reflect what this exercise contains and
what therapy objective it is designed for; a name that will be easy to identify and select from
the client’s schedule: Make it as short as possible with identifying information early on.
37
OLP User Manual v0.1.4
March 2004
Figure X. Top: The Exercise configuration window, displaying information and tasks for predefined
Level 5 exercise “Rec-Train-Recog,word level,WF bilabial stops (p,b),” including a recording task to
collect word-final bilabial stop attempts at the word level, a training task to create a recogniser based on
the recorded words, and a recogniser task for the trained words which can then be repeated indefinitely.
Bottom: The same Exercise configuration window after changing the description, adding notes, and
selecting (highlighting) a particular task.
38
OLP User Manual v0.1.4
March 2004
6.4. Modifying pre-existing exercises for a client
Practical modification of pre-existing exercises can take two main forms: First, you
can add or remove tasks from an exercise once the exercise is in a client’s schedule. This is
done using the exercise configuration panel as described in the previous section. Therefore,
you can first add an exercise to a schedule, and then change the tasks in it (but as already
mentioned this option is not as flexible as could be). Second, you can modify the contents,
and therefore the therapy objectives, of an exercise, by affecting the configuration of the tasks
in it. This means that you first add a “generic” exercise to a client’s schedule, and then you
enter the necessary contents and parameters for its tasks to produce a specific, highly targeted
exercise for therapy objectives appropriate to the particular client. This second option is very
flexible and, supported by a well-designed set of general exercises, can be very useful for
practical speech therapy using OLPy. In this section two approaches to this option are
discussed: The first is to select a general exercise with specified content and to reduce the
content serving your particular purpose, and the second is to select a completely generic
exercise and enter content to it, keeping only the predefined task structure and sequence. The
OLPy distribution offers predefined exercises to cover both approaches in the supported
languages.
6.4.1. Restricting stimulus sets
The restriction of stimulus sets was illustrated in the preceding section about exercise
configuration. The example offered in the screen shots involves an exercise defined at the
word level, with words ending in bilabial stops. This exercise included a recording, a
training, and a recogniser task and was named accordingly. The exercise was meant for work
on word-final bilabial stops, obviously, but the set of stimuli contained in its recording task
included all available items with word-final bilabial stops from the system library. In most
cases the full set of available stimuli will be too much for a client exercise. A therapist will
likely want to choose from the full set or perhaps add new items specifically for this client,
that are not coded in the predefined library. For example, you may want to add an important
name or other significant word to work with a client. Either way, the therapist has to enter
task configuration for the recording task and tailor the stimulus list to suit the specific needs.
(See Section 7.4.2 below on configuring and modifying recording tasks.)
6.4.2. Entering content to fully generic designs
In the case that no relevant general exercise exists, a therapist may create a new
exercise from scratch or, alternatively, select an exercise with the desired general structure
(task sequence) and then configure the tasks appropriately. For example, a therapist may
want to work on a recogniser trained on a client-specific set of important words (e.g., a set of
envinromental control commands, important names, or significant objects). Such sets, not
defined on the basis of phonetic makeup, are not likely to be found pre-defined in the OLPy
library. However, the more or less standard sequence of tasks “Record-Train-Recognise”
need not be defined anew each time a therapist has specific word sets to work on.
OLPy offers certain predefined “empty” exercises for these cases. In each level where
speech recognition tasks are possible, there are “Record-Train-Recognise” exercises, which
contain no stimuli in the recording task. These exercises are meant to be added to a client’s
schedule, and then during their configuration, modified according to the specific needs, by
adding the appropriate words to the recording task.
Recommendation: Before creating a new exercise, check whether any of the predefined
generic exercises suits your purpose. If yes, add it to the schedule and configure it as needed.
39
OLP User Manual v0.1.4
March 2004
6.5. Removing exercises from the schedule
An exercise can be removed from a client’s schedule, whether configured or not, as
long as no task in it has initiated execution, that is, as long as no results have been produced
by it. When a task is started, a permanent record for its output is created. This record may be
connected to configurations that may be needed in the future, for the same client or for other
clients, and the programme has no way of knowing what types of configurations or results
will be useful in the future. Therefore deletion is prevented for all of them.
To remove an exercise from a client’s schedule, you must be on the Main OLP screen
viewing a client’s schedule. Simply select it by clicking once on it as it appears in the
schedule, and then click on the “Remove” button to the left of the schedule. You may also
remove exercises from the schedule using the special exercise administration screen (see next
section).
6.6. Exercise administration (activation & deactivation)
As you progress in therapy with a particular client, you will be adding and using new
exercises and moving on to higher objectives and so on. Previous exercises, from lower
levels, now completed, will not be needed in the schedule and will unnecessarily clutter the
session and other panels making your work difficult. In addition, you may have entered
exercises in the schedule experimentally, only to find out after running a task that they are not
exactly what the client needs, or that an error has been made. Since modifications are not
possible in tasks that have been started, these exercises will merely be in the way as far as the
schedule is concerned. To alleviate these problems without creating more by deleting
potentially useful data, OLPy includes an exercise administration screen. This exercise
administration screen is reached through the “Administration” menu from the OLP Main
screen. Figure X below shows this screen for the client used in the previous examples.
Figure X. The Exercise administration window for a client, showing details of the client’s schedule and
allowing deletion, activation and deactivation of exercises.
Exercise administration allows you to specify certain exercises in a client’s schedule
as “inactive.” This has the effect of removing these exercises from the OLP Main screen list
40
OLP User Manual v0.1.4
March 2004
(the client’s schedule) and from the Client Session screen, so that you can concentrate on
viable options, either for configuration or for therapy. It is possible to deactivate any active
exercise or to activate any inactive exercise, without regard to its status (e.g., whether it is
configured, pending, or completed). Thus the therapist has complete freedom in selecting
which exercises will be visible at any stage in therapy. It is even possible to define in
advance several exercises for a client and then to activate subsets of them as therapy
progresses, simultaneously deactivating previously completed exercises. However, as always,
increased flexibility is inherently accompanied by increased danger: the therapist is not
protected from mistakenly deactivating a needed exercise. Therefore you should be very
careful about what you deactivate. If you discover that a needed exercise is missing, it may be
a good idea to check exercise administration before recreating it, since it may have been
accidentally deactivated.
To affect the activation status of an exercise, simply select it by clicking on it once
with the mouse, such that it becomes highlighted. Then the activate/deactivate button will
switch it from one activation status to the other, indefinitely. Additionally, it is possible to
delete exercises from this panel, by using the “Delete” button on a selected (highlighted)
exercise, provided that the selected exercise has not yet produced any results, that is, not tasks
in it have been initiated.
Since exercise administration affects a particular client’s schedule, in order to access
the exercise administration it is necessary to select a client first. The Exercise option in the
Administration option will not be active unless a client is selected on the OLP main screen.
Remember: Make sure you have selected a client before entering exercise administration.
41
OLP User Manual v0.1.4
7.
March 2004
Tasks, Tools, and Exercises
In OLPy, exercises consist of sequences of tasks. Each exercise is created with a
specific objective in mind and can be entered in a client’s schedule. Each task is a step
towards the objective of the respective exercise. Due to this design, there is a structural
constraint in OLPy that only exercises can be added to a schedule. This means that you cannot
add a bare task to a schedule, but if you really only need a single step you are forced to define
a one-step exercise, that is, an exercise containing only the task you are interested in. There
are also several predefined exercises of this sort, for the cases in which a therapy objective is
accomplished in a single step (or in many repetitions of the exact same step).
7.1. Levels of therapy
Speech therapy is typically organised in levels, with more fundamental abilities
addressed at earlier, “lower” levels, and more integrated communicative abilities address at
later, “higher” levels. The “level” concept implies that there is a hierarchy of organisation
such that lower-level skills are necessary before higher-level performance can be attained.
Therefore, therapists typically begin at the lowest level in which articulation problems can be
identified, and work their way through increasing levels and thus increasing task complexity.
For speech production planning and execution, low levels concern the production of single
sounds and high levels concern production of larger and semantically complete units such as
phrases. In fact, the first level of therapy, Level 1, includes the domains of sound production,
articulator control, respiration, phonation etc., which are skills necessary for even the most
rudimentary articulation of phonemes, before words and phrases can be formed.
OLP follows standard therapy design in that available tasks and exercises are
organised in a progression of levels, in order to help therapists identify quickly the material
that they need at each therapy stage. The programme does not constrain application of
practise exercises depending on the level, since it is always up to the therapist to decide which
exercises are most relevant for a particular client’s situation. Therefore, if you wish to enter a
Level 6 exercise and a Level 1 exercise at a new client’s schedule at the same time, the
programme will not stop you from doing that. This flexibility is desirable because it cannot
be foreseen what a competent and experienced therapist will deem appropriate for a client. On
the other hand, it can become dangerous if discipline is not exercised by the therapists,
because there is nothing to prevent a schedule from becoming disorganised and thus
ineffective or merely unusable. Therefore therapists are advised to enter exercises gradually
into a client’s schedule and to avoid mixing levels as much as possible. This strategy will
have the added benefit of not cluttering the schedule and allowing faster selection of exercises
to practise with during a session.
The levels coded in OLP are:
1. Single sound
2. CV/VC syllables
3. Diadochokinesis: repetition of same sound
4. Diadochokinesis: alternation between sounds
5. Word (single-syllable for English, two-syllable for Greek)
6. Multisyllabic word
7. Phrase (currently not used)
It is obvious that different types of exercises will be useful at different levels, and that
different technological tools (in OLP) will be beneficial for different exercises. For this
reason, you will see that different options are available as you select exercises for various
levels. For example, continuous phonetic mapping makes sense when a client needs to learn
how to articulate a sound out of context, but recognition of larger spoken units, such as whole
42
OLP User Manual v0.1.4
March 2004
words, will be relevant when generalisation of the sound to different phonetic contexts is
desired. Be prepared, therefore, to exploit the OLP technologies differently depending on the
various levels of therapy that you need to apply to your clients.
7.2. The logic of exercises
To be completed.
7.3. Available tools
OLP is created around a set of technological tools. Some of them are “core” tools,
opening up a real technological potential for therapy, such as automatic speech recognition
and real-time visual phonetic mapping of speech sounds on the two dimensions of the
computer screen. Other tools are auxiliary programmes which serve to configure the
technology or to give access to different aspects of it. Think of a tool as the “engine” of a
task. In OLPy terms, a task is an activity that you or your client do in the context of working
towards an objective (that is, in the course of an exercise). Each activity uses some special
software to be performed, and this special piece of software is the corresponding tool.
Whenever you set up a task, you must specify a tool – if you prefer, you could even conceive
of the tasks as just a “wrapper” for using the software tools. Here is the point to remember:
Each task used in a therapy exercise uses a software tool to run.
Therefore, the range of possible tasks is largely determined by the set of available software
tools. The following table shows what tools are available and what kinds of tasks can be
constructed to take advantage of them.
Tool
Recorder
Function(s)
Records sound from the microphone
saving the recordings as audio files
Trainer
Creates a speech recogniser based on
a set of recorded sounds (audio files)
Matches sounds from the
microphone to a set of “known”
words learned previously during
“training” and displays the result
graphically in the context of a “video
game”
Recogniser
STAPTK
Supports the user in recording
sounds, labelling them, designing,
creating, and using phonetic maps.
Pitch display
Displays graphically the pitch of a
voice detected at the microphone
43
Example tasks
Record words (for assessment).
Record single sounds (to train
phonetic maps).
Record words (to train recognisers).
Train syllable recogniser.
Train word recogniser.
Evaluate production of the syllable
“ba” (vs. “da” or “ga”) using a
“Box” display.
Evaluate production of the word
“fundamental” using a “Fish” displ.
Evaluate production of one
command word from a word set
relative to confusable others
Label recorded sounds
Design a phonetic map display
Train a phonetic map
Display degree of match between
spoken sound and a set of targets
on a phonetic map.
Evaluate ability of the client to
produce a rising pitch contour.
Evaluate ability of the client to
produce a steady pitch.
OLP User Manual v0.1.4
March 2004
Loudness
display
Displays graphically the loudness of
whatever sound is picked up at the
microphone
Recogniser
configuration
tool
Sound
selector
Supports the user in setting options
for using the recogniser tool
Displays and selects from available
recordings (sound files) according to
criteria specified by the user
Evaluate ability to sustain
sufficiently loud phonation.
Evaluate ability of the client to
produce rising loudness contour
Transfer recordings made with the
OLPy Recorder to be used with
phonetic maps (STAPtk)
7.4. Tool configuration
In the context of exercises, configuration refers to setting up both the set of tasks and
the parameters of the tasks that will serve the purpose of the exercise. Therefore,
configuration of an exercise necessarily entails configuration of the individual tasks in it, to
the extent that particular tasks contain parametrically adjustable features. Since tasks are
performed by software components called tools, and some of these tools are called to perform
the particular tasks in one of potentially many ways, the configuration of the tools is an
important step in defining the specifics of a client’s therapy schedule. Because different tools
have different features and different requirements, there are several different types of
configuration windows that match the individual features in each case.
Tool configuration can be invoked from the exercise configuration window (see
Section 6.3) through the client’s schedule, from the exercise creation window, when tasks are
added, or from the task creation panel, for new tasks. Configuration of a tool is always
related to a particular task that uses the tool, so configurations can be saved along with other
task information in the client’s schedule. The type of task to be configured determines which
tool configuration panel will be automatically activated. To configure a task from an exercise
screen, select it by clicking on it once in the list of tasks for the exercise in which it belongs,
and then click on “Configure” to the right of the task list. The corresponding tool
configuration window will appear, in which you may enter your desired parameters.
7.4.1. Pitch/volume configuration
Figure X below shows the configuration windows for pitch tasks and volume tasks,
which for the time being are almost identical, the sole exception being that “pitch” range
(minimum and maximum pitch value) for the pitch configuration tool is replaced by “volume”
range in the power configuration tool.
Figure X. Configuration windows for the volume (power) and pitch tools after entering appropriate
parameters in the fields for a low male voice and a certain microphone volume setting.
44
OLP User Manual v0.1.4
March 2004
7.4.2. Recorder configuration
Figure X shows the configuration panel for a recording task, using the recorder tool
(see Chapter 9). This panel is divided in two regions, easily distinguished by colour, to help
separate the various functions needed for full and flexible specification of a recording task.
Figure X. Recorder configuration panel, with current list of stimuli and parameters on the left (yellow
panel), and stimulus addition interface on the right (green panel).
On the left side of the recorder configuration panel, the yellow region corresponds to
the current “contents and settings” of the tasks, that is, the current task configuration. On top
there is the “Task description,” which should be modified to express the actual nature of the
task. This serves as an identifying name in the exercise in which it is used and in any future
task lists. Under the description there is the stimulus panel, which contains the stimuli (or
prompts, see Chapter 9) to be used for recording. This list of items can be modified as
follows:
• An item can be removed from the list by first highlighting it with a single mouse
click and then clicking on the “Remove” button under the list.
• An item can be moved up, towards the beginning of the list, or down, towards the
end of the list, by first highlighting it with a single mouse click and then clicking
on the appropriate up-arrow or down-arrow button next to the “Remove” button
under the list.
• More items can be added to the list using the stimulus selection/addition
functionality of the right side of the screen (the green region). To enable stimulus
addition, start by pressing one of the orange buttons, either “Insert from list” or
“Insert new.” Inserting from list means to add a stimulus from the system library
according to criteria specified in the selection fields. The list of available items
satisfying the set criteria is presented in alphabetical order. Highlight any items
45
OLP User Manual v0.1.4
March 2004
you want by clicking once on them and then click on “<< Insert” to add them to
the stimulus list. Multiple items can be selected and inserted simultaneously using
Shift-click (for continuous blocks of items) or Control-click (for many individually
selected items) as per standard Windows conventions. Inserting new means to add
a stimulus not found in the system library, for which an appropriate specification
must be entered. Again, once specified in the “Orthography” and “Phonetic”
fields, the button “<< Insert” adds the new item to the recording list. See Chapter
8 below on Stimuli for more information about the contents of the system library
and about using the criteria to select and enter items.
In addition to modifying the list of items to be recorded, a recording task needs
specification of the order in which the items should be recorded. If the items should be
repeated in the exact order shown in the list, then “Fixed” should be selected. If a random
order is preferred, then “Random” should be selected.
The items will be presented for a number of repetitions each. This number is specified
in the corresponding field, either by clicking on the up/down arrows or by typing directly the
desired value into the field.
If the items are to be recorded more than once, which will almost always be the case,
there are two options: The first is to present all items once before presenting them for the
second, then third time, and so on. This is called “blocked” presentation and can be specified
for fixed or for random order. Alternatively, in fixed presentation, the therapist may want all
repetitions of each stimulus to be recorded one after the other (e.g., to focus on a particular
production). This would be the “no-blocking” option. For random presentation, no blocking
would mean that the full list of stimuli, repeated as many times as specified, will be shuffled
together, so that each time it will be completely unpredictable which item will be next.
7.4.3. Recogniser configuration
For practise tasks, such as speech recognition (GRIFOS), or pitch/volume tasks,
typical parameters in need of configuration include the type of graphical interface desired, the
number of attempts available to the client, and the number of hits desired before a reward is
offered. These are adjusted depending on the particular needs and abilities of each client.
Depending on the type of tool, additional parameters may be needed, such as specification of
a target item among known words, selection of a particular phonetic map, or adjustment of
limit values. Figure X below shows the configuration window for recogniser (GRIFOS) tasks.
For a recogniser task, relevant information includes, first of all, the trained recogniser
that will be used. Selection of a recogniser is initiated by pressing the yellow button labelled
“Select Recogniser” on the recogniser configuration screen. The recognition selection panel
comes up, as shown in Figure X below. To allow flexibility in the programme, it is possible
to use in a task a recogniser built previously, using recordings either from the same client of
from a different client (or model “client”). There is no restriction from the programme as to
which recogniser may be used, since all recognisers that have been created remain stored in
the system for possible future use. This allows you to build your own library of “model”
recognisers, if you wish, build using a range of model speakers whose voice and/or
pronunciation may be appropriate for different clients and circumstances.
Each recogniser is identified by (a) the client whose recorded productions were used
to train the recogniser; (b) the stimuli (words, syllables) that were recorded and used to train
the recogniser, which the recogniser presumably can now recognise; and (c) the date of
training which created the recogniser. Based on this information, you can select a recogniser
from your system. The recogniser selection panel allows you to enter restricting criteria for
these three recogniser properties in order to identify the recogniser you need. Then you select
46
OLP User Manual v0.1.4
March 2004
(highlight) the desired recogniser by clicking once on it, and transfer it onto the configuration
screen by clicking on “Select” at the bottom.
Figure X. Configuration window for recogniser tasks. Here you can select an existing trained recogniser
and define the interface and interaction parameters with which it will be used. Note the red buttons: they
indicate that use of a therapist model has been dictated (box checked) but no appropriate sound file has
been selected yet. The user has the option to record a new model or to select an existing file.
To complete the configuration of the recogniser task you must specify the graphical
interface to use and the parameters of the interaction, such as the number of attempts a client
is given and the number of successful attempts at which a special reward will be offered. See
the next section on Graphical Interfaces for more information about their appearance and
rewards. Other parameters include the type of instructions and models offered.
Use instructions can be spoken or written. It is possible to have both at the same time
or to skip both (e.g. for a client experienced with the interaction). Target models serve to help
the client produce the correct target. They include (a) a written display of the target; (b) a
target production recorded by the client him/herself; and (c) a target production made by the
therapist. Presumably the latest type is the most accurate, as far as desired sound properties
are concerned, but for severely disabled clients it may be more useful to use one of their
“best” productions as model because it is achievable whereas the therapist production may be
an unattainable, hence demotivating, target model.
Target models can be selected based on the target stimulus as specified for the
recogniser. For example, if you configure the recogniser to consider “ba” as the target, then
you can select from a list of recorded “ba” sounds to designate one as the client model and
another as the therapist model. The idea is that the client model will indeed be a production
by the client her/himself whereas the “therapist” model can be a production made by any
“model speaker” relevant for this particular client (potentially a friend or relative of the
client). The selection of appropriate sounds for models is facilitated through special panels
47
OLP User Manual v0.1.4
March 2004
shown in Figure X. In addition, the therapist is given the option to record a target model on
the spot for use with this recogniser. This recorded therapist target model is then saved and
can be re-used in future recogniser configurations through the recording selection panel.
Figure X. Recogniser selection screen. Available recognisers are retrieved based on the criteria
entered on the left: “description” (that is, the stimuli used in training the recogniser), “client” (who spoke
the sounds used for training), and “date” range (for the training – not the recordings!). All recognisers
found in the system that satisfy the given criteria appear in the list on the right side. Here a “ba,da”
recogniser made with speech from “Demo Client” on December 12th, 2003, has been selected (highlighted)
and is available for the configuration via the yellow “Select” button.
Figure X. Selection panel for recordings to serve as target models. Selection criteria entered on the left
result in retrieval of conforming lists on the right, on which stimuli can be played out (by double clicking
on the speaker icon), highlighted (by clicking once), and selected for use in the recogniser (yellow button).
48
OLP User Manual v0.1.4
March 2004
7.5. Graphical interfaces
Each client task is performed using a special tool, and the special tool always has a
graphical appearance which is meant to make the client task easily understandable, to provide
a supporting situation or scenario, if necessary, for the feedback and rewards, and to simplify
the interaction between the computer and the client. This graphical appearance, along with
the functionality it serves, is called a “graphical user interface” or GUI for short. There are
two quite distinct characteristics in which GUIs may differ. One concerns the superficial
appearance, for example, if the screen shows a house or a bicycle or a set of buttons etc. This
usually gives the GUI its name, so you will see for example the “box” GUI, the “fish” GUI
etc. The second characteristic concerns the underlying functionality which the GUI serves,
that is, what is to be accomplished using this GUI and how the interaction takes place. For
example, one GUI may present a “correct” and a “wrong” option and the client tries to
pronounce a word using the correct form while avoiding the wrong form (or another
confusable word). Another GUI may present a set of locations which correspond to different
productions (words or pronunciations of a word) and the client may aim for particular
locations at different times according to the instructions of the programme and/or the
therapist. Another GUI may present a single dimension which corresponds to the goodness of
fit between the client’s production and the internal “model” of a correct production, such that
the success of the client will be depicted along the single visual dimension. In each case,
what the client does, and how s/he attempts to achieve a target behaviour is somewhat
different. (This can be so even though the same trained recogniser may be used in each case:
do not confuse the tool with the GUI!) In short, for each tool, there is a set of appearances
which support different kinds of interactions.
Depending on the function each GUI serves, there may different parameters that need
to be set for its configuration. In most cases GUIs support some sort of repeated practice
aiming to achieve a goal, so the number of attempts has to be specified. The therapist should
determine how many repetitions will be sufficient, balancing motivation, attentional capacity,
and training intensity. When cumulative rewards are involved, the number of hits to reach
them should be specified, taking into account similar factors (motivation, attention etc.).
Other parameters may be specific to certain GUIs, for example, a GUI supporting many
alternative targets (or one “correct” and one or more “incorrect” locations) needs to assign
locations to stimuli, that is, to associate particular productions with positions on the screen
and associated feedback. In other cases with a single target, the programme needs to know
what counts as “correct.” For the time being the following GUIs are available:
1. The “box”: Used with automatic speech recognition, it supports a single “correct”
word or syllable and an “incorrect” position to which everything else is mapped.
After the specified number of hits, a jack-in-the-box appears. Emphasises
discriminant production.
2. The “fish”: Used with automatic speech recognition, it supports a single word and
displays the degree to which the client’s production matches this one target.
Emphasises gradual attainment of a specific difficult target by presenting the
progress visually.
3. The “magician”: Used with automatic speech recognition, it supports a single
“correct” word and two specific “incorrect” words, meant to be assigned to
frequent errors (confusable words). Emphasises discriminant production among
multiple items.
4. The “bicycle”: Used with automatic speech recognition, it supports a single word
and displays, in steps, the degree to which the client’s production matches this one
target. Similar to the fish, it emphasises gradual attainment of a target but includes
intermediate steps.
49
OLP User Manual v0.1.4
March 2004
5. The “soup”: Used with automatic speech recognition, it supports a single
“correct” word or syllable and an “incorrect” position to which everything else is
mapped (similar to the “box”). After the specified number of hits, a table appears
on which the soup is served. Emphasises discriminant production.
6. The “radio”: Used with automatic speech recognition, will be available soon.
7. The “diver”: Used with automatic speech recognition, it supports a single
“correct” word or syllable, two “incorrect” positions to be assigned optionally to
certain frequent or important errors, and a default “error” response. Emphasises
discriminant production among few items. In its full version, available soon, it
will support multiple levels of graphical appearance for the same interaction and
settings, in order to retain client motivation through greater numbers of attempts.
8. The “reversi”: Used with automatic speech recognition, meant for adults. It
displays a score (out of 10) for each production, and a running total. It supports a
single “correct” word. There is no visual reward other than the “high score.”
9. The “balloon”: Used with pitch and volume training, it visualises the chosen
dimension (pitch or volume is mapped onto balloon height). The goal is to
maintain phonation and raise the chosen dimension gradually to reach the escape
point.
10. The “bubbles”: Used with pitch and volume training, it visualises the chosen
dimension (pitch or volume is mapped onto bubble height). Similar to the
balloon, it helps to achieve a rising pitch curve (or rising volume) and accumulate
points for a reward.
11. The “leds”: Used with pitch and volume training, it visualises the chosen
dimension (pitch or volume is mapped onto height of the running line). The goal
is to pass over all the circles and accumulate a high score.
12. The “blocks”: Used with volume training, to help distinctions of intonation and
stress. It can visualise two to four intervals, each with a “high” or “low” target
(user configurable). The goal is to touch the targets by rapidly alternating voice
volume. The final version will be available soon.
The figures in the following pages illustrate some of these GUIs.
7.6. The target bar
In tasks using speech recognition, the target production is available to the client in
multiple forms: Written, spoken by the client her/himself, spoken by the therapist, or as an
image. Figure X below shows the “target bar” with the spoken model buttons on the left. The
little head figure is associated with the client model.
The target bar also displays task progress by filling up a colour bar under the written
target, to indicate how far through the task the client is, relative to the specified number of
attempts for this task. For tasks that are terminated upon success, the target bar may not fill
up completely when the task is finished.
This bar is displayed at the bottom region of every recogniser interface.
Figure X. The “target bar” for practise using the recogniser. The leftmost button plays out the therapist
model when clicked while the second button from left plays out the client model. The target is printed in
the central area (here displaying “apple”) and there is room on the right side of the bar to add an image of
the target (in case of imageable words). The progress bar under the written target fills up, gradually
becoming yellow, to indicate proportional achievement relative to the specified number of attempts.
50
OLP User Manual v0.1.4
March 2004
Figure X. The “box” GUI. Readiness is indicated by the wand sparkling. A production matching the
target model well causes the wand to touch the green box and add a check mark in the reward box. A
jack-in-the-box appears when the predetermined number of hits is reached.
Figure X. The “fish” GUI. Readiness is indicated by the appearance of the fish. The fish moves up
towards the opening in proportion to how well the client’s production matches the target model. It exits
to join the nearby fish school after a particularly close match.
51
OLP User Manual v0.1.4
March 2004
Figure X. The “magician” GUI: Readiness is indicated by the magician pointing the wand and looking
towards the objects. The “magic aura” travels to the object assigned to the identified word, the hat and
cup corresponding to particular types of incorrect productions. A cumulative reward is given from the
green box when the predetermined number of hits is reached.
Figure X. The “bicycle” GUI: The bicycle travels towards the house on the right side in proportion to how
well the client’s production matches the target model, collecting food supplies along the way. It enters the
house to produce a reward after a particularly close match.
52
OLP User Manual v0.1.4
March 2004
Figure X. The “soup” GUI: Vegetables fly into the pot upon correct productions or into the garbage bin in
case of incorrect productions. Soup is served when the predetermined number of hits is reached.
Figure X. The “radio” GUI.
53
OLP User Manual v0.1.4
March 2004
Figure X. The “balloon” GUI. Readiness is indicated by the appearance of a balloon on the grass. Voice
volume is translated into height such that producing loud sound raises the balloon. The target is to reach
the upper right corner following the diagonal course marked by the clouds.
Figure X. The “bubbles” GUI. Readiness is indicated by the bubble rind standing up. Pitch is translated
into height such that producing a higher-pitched voice raises the bubble with the trapped “greenly” inside
it. The target is to reach the pink arrow on the window frame following a diagonal (rising) course. The
wooden train departs after a predetermined number of hits.
54
OLP User Manual v0.1.4
March 2004
Figure X. The “diver” GUI (intermediate level): Readiness is indicated by the diver appearing on the
screen swimming in from the left. The diver swims to the location assigned to the identified word (mound
for correct productions), rocks or jellyfish for particular types of incorrect productions. Sealife rewards
are retrieved from the mound for each successful production. When the predetermined number of hits is
reached the diver swims out of the screen into the next level of the game (not shown).
Figure X. The “leds” GUI for pitch and volume training. The red circles form a path to be followed
(constant level in the displayed example; can also be rising, falling, or more complex). The voice of the
client controls a path marker making its track through the screen from left to right. Each circle touched
is changed to yellow colour and adds one point to the total score.
55
OLP User Manual v0.1.4
March 2004
7.7. Creating new tasks
Some times, especially during the early period of your OLP use, you may need to
define new tasks in the system because the task library coming with the installation will
probably not cover all your specific needs. New tasks can be created easily, in the course of
creating a new exercise. There is no special task creation section in the programme since it
would add complexity without adding much function: when you create a new task you must
be using it for a new exercise, since old exercises already have old tasks! Therefore the place
where you’ll need to be able to create new tasks is when you define new exercises. In the
unlikely case that you just want to create a few tasks for later use in exercises, you can set up
a “dummy” new exercise and create the new tasks for it, and never actually run this exercise.
If you have set up a “dummy” client for your own practice then you can use this “client’s”
schedule for experiments and to create new tasks and exercises.
Task definition conforms to the general logic of the OLPy entities as described in
Section 2.2. That is, tasks are activities carried out by therapists and/or clients using software
tools, and are meant to produce results or intermediate outputs as needed to carry out
exercises, which, in turn, have specific therapy objectives. Tasks do not have self-contained
therapy objectives but are used to serve the needs of exercises objectives. In order to define a
task you have to specify whether it is a therapist or client task, the level of therapy it will be
used for and the exercise category for which it is created, the tool to carry it out, and any
specific prerequisites and/or content.
Figure X shows the “Create new task” window in which you define a new task. At the
top of this window there is a blank field called “Task description.” This is very important
because whatever you type in here will be used as a label for you to identify this task when
you insert it in future exercises. Therefore it is critical that this field be concise, accurate, and
sufficiently descriptive for you. The computer has no way of checking what you type as
description and no way of producing or proposing appropriate descriptions automatically, so
you are free to enter anything you consider appropriate.
Figure X. The window offering the necessary functionality for creating a new task using the existing OLPy
tools and stimulus libraries. It allows specification of all task parameters and, optionally, configuration.
56
OLP User Manual v0.1.4
March 2004
Task definition involved specification of the following fields:
1. Task type, either client or therapist. Client tasks are those that are carried out
by/with the client (during a client session) and therefore require client presence.
Click once on the blank field to see the two options and then select the desired
option by clicking once on it.
2. Task level or, more appropriately, the therapy level of the exercise this task is
created for. Click once on the blank field to see the levels and then select the
desired level by clicking once on it.
Note: This field is typically filled out automatically with the level of the exercise under
which the task is created. Normally this should be the best option so, unless you really
know what you are doing, you should not modify this field when creating a new task.
3. Task category, describing the kind of activity this tasks serves or relates to. This
is useful primarily for searching through tasks in the future, when creating new
exercises (the corresponding search/filter functionality has not yet been
implemented). Click once on the blank field to see the available options and then
select the desired option by clicking once on it.
Note: This field is typically filled out automatically with the category of the exercise
under which the task is created. Normally this should be the best option so, unless you
really know what you are doing, you should not modify this field when creating a task.
4. Tool, that is, the software component that is used to perform this task. Each
option in the tools list corresponds to a different type of programme, possible with
different interface options. Remember that GUIs are properties of tools and are
specified in the tool configuration, not in the task definition. Here you just have
to specify which kind of programme should be called for this task. Common
options include the automatic speech recogniser (also called GRIFOS), the 2-D
online phonetic mapping (also called OPTACIA), the trainer that creates
recognisers, the recorder for collecting audio data etc. Click once on the blank
field to see the available options and then select the desired tool by clicking on it.
5. Status, that is, whether the new task will be considered configured (and thus ready
to be carried out) or will require configuration later. If you (a) know exactly what
parameters you want to set; (b) have all the necessary pre-requisites, e.g., existing
pre-trained recognisers, if necessary; and (c) fully configure a task at the creation
stage, then you may set this field as “pending,” allowing the task to be carried out
without further configuration. Note that setting a new task as “pending” makes it
always ready to run, even if entered in more exercises in the future, even if you
will later want to make modifications to it. Of course it is possible to make
modifications in the future, in other exercises, through the exercise configuration
screen, but the tricky part will be to remember which “pending” tasks actually
need to be modified and which need not. This is not trivial, even if you are very
careful with naming your new tasks, so you are not advised to create new pending
tasks unless you really know what you are doing. The only exception to this
advice is for training tasks, which should always be entered “pending” since for
the time being they cannot be configured.
When you define all these fields you may click on “Configure” to enter configuration
parameters for your new task. Depending on the tool you have selected, the corresponding
configuration panel will appear, allowing you to set the parameters you wish for the new task.
When you have completed specification of your new task, click on “OK” to have it
inserted in the exercise currently under definition and to return to the “New Exercise”
window. If you click on “Cancel,” then task definition is aborted, no new task is entered in
the exercise, and you are returned to the “New Exercise” window.
57
OLP User Manual v0.1.4
8.
March 2004
Stimuli
In OLP, things that are displayed as prompts for a client to speak are called “stimuli.”
These are typically words or syllables, but may also be representations of single sounds or
short phrases, at the discretion of the therapist. The notion of “stimulus” is important because
it is different from whatever result might come out of the prompting, for example, a recording
(audio file) of a pronunciation of the particular word or syllable or whatever. So “stimulus”
refers to a label for spoken material and not to the sound produced when the material is
spoken. Thus keep in mind that when you select “stimuli” you will be selecting labels and not
sounds. On the other hand, since sounds are produced in response to prompting by stimuli,
sound files are associated with their corresponding labels, otherwise you wouldn’t know what
sound is contained in a file without listening to it.
8.1. Stimulus libraries and stimulus selection
Stimuli are typically selected to be displayed during a recording session, to inform the
client of what s/he should produce. So the main use of stimulus selection will be for
recording tasks. Since therapy is structured around articulatory targets you will probably
want to select stimuli according to some relevant criteria, such as phonetic features or other
structural characteristics (number of syllables, position of a certain segment of interest etc.).
Therefore a special interface is available in OLP, in the context of recording task
configuration, to let you apply phonetic criteria for stimulus selection when you create a new
recording task or when you modify an existing task.
Figure X. Stimulus selection panel, displaying selection criteria on the far right and a list of items
satisfying the active criteria in the middle panel, to the left of the green region.
58
OLP User Manual v0.1.4
March 2004
8.2. Entering new stimuli
On the one hand, OLPy would be quite restricted if it did not allow use of items not
predefined in the software distribution. So it is necessary for the user to be able to add new
stimuli that suit their particular assessment and therapy needs. On the other hand, the power
of OLPy stimulus selection lies in the flexible, relevant (phonetic) criteria that can be
specified, resulting in an appropriate list of the subset of available stimuli that satisfy the
criteria. So it is important for the user to include this information when entering new stimuli,
in order to be able to find the new stimuli again using the phonetic criteria. A special
interface has been built to allow addition of new stimuli in the system library, along with
specification of the relevant fields at the user’s discretion. This means that it is possible to
add new items in the system library without specifying all of the corresponding fields (or, in
fact, any of the fields).
Giving the user an option to skip entering this information allows for some flexibility
in the type of stimuli entered (perhaps not all fields are relevant) or the planned use (perhaps
some items are really meant to be one-off and the user does not expect to want to find them
again in the future using the phonetic criteria). Or perhaps the new items are special in some
way so that they do not belong in any of the phonetically defined lists that result when the
search criteria are specified. Should this option be abused, by falling in the habit of entering
new stimuli without specifying their phonetic properties, the user is likely to end up with a
disorganised library of items that cannot be used efficiently or located in well-defined groups
when needed. You have been warned!
As in stimulus selection, the contents of the various criteria fields are meant to refer to
a single segment in the item. If more than one segment is important for a given item, then this
item must be entered more than once in the library. This is necessary to allow a relatively
efficient coding of the items in the library without sacrificing search flexibility. Therefore, it
is normal for certain items to be repeated in the library. Note that only the spelling and
pronunciation pattern of the item is repeated (“orthography” and “phonetic,” respectively).
The other fields are different in the two repetitions since they refer to different segments
(indeed, this is the reason for the repetition in the first place).
Item repetition is useful when the same item (word) can be used for speech therapy
work with different phonemes. As an example, suppose you like to use the word “stop” for
training (or assessing) production of the word-final [p], of the in-cluster [t], and also of the
word-initial in-cluster [s]. These three cases correspond to different levels of difficulty for the
three segments but there is no reason that one word should not be used for all of them. Indeed,
on the basis of this it may appear to be an extremely useful word, especially for assessment.
To enter such an item in the library, you’d need to insert three new records, that is, to “add a
new stimulus” three times. The orthography “stop” and phonetic coding “stQp” will be used
all three times. However, the remaining fields would be used to specify [p], [t], and [s],
respectively, the latter two as part of a cluster. This way, the word “stop” will come up in the
selection list when you request word-initial or word-final stops, or fricative clusters etc.
Figure X shows the stimulus addition panel. The procedure is very simple: Just type
the new item in the orthography field and then fill out as many fields as you want from the
rest. Click “Insert” to use this new stimulus in your task and also to permanently commit it to
the OLPy library.
Recommendation: Always fill out all relevant information fields when entering new stimuli.
59
OLP User Manual v0.1.4
March 2004
Figure X. Stimulus addition panel, displaying values fields for the search criteria. In this example, the
word “bodyguard” is entered in the OLPy library, with fields referring to its initial segment [b], therefore
“bodyguard” will come up as an option in the future when word-initial bilabial stops are required. To be
able to select “bodyguard” when word-final alveolar stops are required, the same word would have to be
entered with the information for the final [d] also.
Note that once entered in the system library an item cannot be removed. The reason is
that it is very complex to ensure that there are no references to it, e.g., from tasks that have
been defined and await to be executed, or from tasks that have produced results and need this
item as a result label. Actually, chances are that once you have entered an item you also
produce information related to it so that it would be catastrophic for the library to remove this
item (unresolved references and missing linked items can seriously disrupt programme
execution and will most likely cause problems to no end.) Therefore, it has been decided that
items in the OLPy stimulus libraries can never be removed. One consequence of this
decision, apart from guarding library integrity, is that you should be careful in what you add
and what information you enter about it, because it will stay in the system for ever. So it pays
to give a bit of extra attention when adding stimuli and make sure your efforts produce results
that will be useful at later times. Try to keep this in mind when you decide to build new tasks
on the fly, with a client present, in a great hurry to squeeze in one more task before the end of
the session (which is seriously not recommended)!
8.3. SAMPA pronunciation coding
SAMPA stands for “speech assessment methods phonetic alphabet” and is a
“computer readable phonetic alphabet,” that is, a specification of representing phonetic
symbols using only the standard latin characters and a few standard typewriter symbols. It
was developed to allow phonetic transcriptions to be represented in computer files without the
need for special fonts, while remaining relatively readable, at least after some experience with
it. Think of SAMPA as a computer version of the International Phonetic Alphabet – it serves
the same purpose and can be stored in a computer without special symbols.
60
OLP User Manual v0.1.4
March 2004
SAMPA is used in OLPy to store the pronunciations of the stimulus items (words,
syllables etc) that are predefined to be used for assessment and therapy. All items in the
predefined libraries distributed with OLPy are pronunciation-coded using SAMPA. When
adding items, it is not obligatory to include their pronunciation but it may prove useful in the
future if you want to be able to search on pronunciations using more complex criteria than the
single-sound specification set coded in the stimulus library by default. Incorrect information
can be worse than lack of information, especially if you have to count on this information for
serious tasks such as assessment and therapy. Therefore, you should only add SAMPA
pronunciations if you have sufficient understanding of the phonetic transcription system and
knowledge of the symbols – or at least if there is a reference handy.
To assist you in understanding and using the SAMPA way of coding pronunciations,
here is a chart of the sounds found in most European languages.
A. Chart of consonants (partial)
Bilabial
Stop,
affricate
p
b
Fricative p\
B
f
v
Dental Alveolar
T
Palatal
Velar
Uvular
Glottal
t
d
tS
dZ
c
J\
k
g
q
G\
?
s
z
S
Z
C
j\
x
G
X
R\
h
J
N
Lateral
l
L
5
Rhotic
4 r r\`
Semi
vowel
F
D
Post
alveolar
n
Nasal
m
Labio
dental
h\
R
w
j
H
B. Chart of vowels
Front
Closed or
high
Half
closed
Half open
Open or
low
i
I
e
Central
y
Y
2
Back
1
}
@\
8
7
u
U
o
3\
V
O
&
A
Q
M
@
E
9
3
6
{
a
The complete charts and much more information on SAMPA can be found at the
SAMPA web pages at UCL (http://www.phon.ucl.ac.uk/home/sampa/home.htm) and
Wikipedia (http://en.wikipedia.org/wiki/SAMPA), on which the above charts were also based.
61
OLP User Manual v0.1.4
9.
March 2004
The recorder
The recorder is one of the most important tools for therapy, not because of any special
technical capability but because it will be a frequent requirement that client productions be
collected in an organised manner. Client productions are needed for assessment, monitoring,
as well as for the creation of automatic speech recognisers and phonetic mapping networks, so
the recording tool is the one you will end up using a lot in the context of different types of
exercises. It is therefore very important that the recorder is convenient and easy to use while
sufficiently flexible to serve all the requirements. In the design of the recorder we have tried
to minimise user effort and maximise information provided back to the user for guidance.
The purpose of the recorder is to collect sound files, presumable containing speech
productions by clients (or model speakers). The recorder tool generally is called to carry out
a task and is given a list of stimuli in a specific order, which is to be displayed to the user for
recording. The order and number of items in the stimulus list is determined outside the
recorder and depends on the configuration of the corresponding task. Therefore,
randomisation is completed before the recorder is started and so you cannot affect the order of
the stimuli once inside the recogniser unless you decide to move around the list on your own
and not based on the automatic progress feature. Keep in mind that the computer has no way
of judging whether a production matches the displayed stimulus so it is up to you to ensure
the quality of the data (recordings) that will go into the database. For this reason, the recorder
is not designed to be used unattended (i.e., by the client alone), and has been implemented in
the therapist-style GUI. This design choice also allows for more flexibility in the functions of
the programme.
Figure X. The recorder tool waiting to begin recording an instance of the syllable “pa.”
62
OLP User Manual v0.1.4
March 2004
Figure X shows the recorder window displaying a stimulus to be recorded (“pa”). The
stimulus is shown on red background, which means that the user is not supposed to begin
speaking but has to press the record button first. Following standard audio appliance
conventions, the record button is represented by a red circle.
In order to avoid unnecessary user actions, the same screen region that corresponds to
the recording button is also assigned the “stop recording” function, depending on the
situation: When not recording, the record button (red circle) appears. While recording, the
(stop and) save icon appears instead, represented by a diskette on red background (see Figure
X below). Note that there are no separate “stop” and “save” buttons, since each recording is
automatically saved as soon as the recording is stopped. This allows the user to move quickly
through a list of stimuli, clicking once to begin saying each stimulus and once when done
with it. If the therapist supervising this process detects an unacceptable production (wrong
word, exceedingly poor articulation, extraneous noises, coughing or other non-speech
productions etc.) s/he may go back and repeat (overwrite) the bad recording using the
back/forward arrows (to the left and right of the play/record buttons, respectively). To play
the sound currently displayed, you may click on the play button, represented with the rightpointing black triangle.
The recording process is as follows: As soon as the recording button is clicked on, the
stimulus background turns green, indicating that the system is recording the sounds from the
microphone. The waveform display and level indicator are also activated. Both are seen in
Figure X below, under the stimulus region. The waveform display is useful to check the
loudness and other characteristics of the recorded sounds, while the level indicator serves to
monitor the volume in real time.
Figure X. The recorder while recording a “pa” production.
63
OLP User Manual v0.1.4
March 2004
If the speech volume is too low, only dark green bars will appear at the level indicator
and the “bumps” in the waveform display will be very small. In such a case it is advisable to
repeat the recording because too low levels of sound are difficult to work with, and may cause
problems for the recorder and trainer tools. If, on the other hand, the signal volume exceeds
the available range, then you will see red bars appearing in the level indicator (see Figure X
below) while the waveform will enter the redish region at the edge. This means that the
resulting audio file will be unusable due to “clipping” and the programme will refuse to store
this file, prompting you to re-record instead. Figure X shows the panel that appears on the
screen to inform you of this situation.
Figure X. Appearance of the recorder during the production of a sound exceeding the available volume
range. Notice the red bars on the level indicator (right) and extent of the waveform into the edge region.
Figure X. Notification window after a recording has exceeded the available volume range.
64
OLP User Manual v0.1.4
March 2004
When this window appears, click on “OK” to dismiss it and then repeat the same
recording following the usual procedure (click on the recording button, have the client speak
when the stimulus background turns green, then click on the stop & store button).
Note that a progress bar appears on the recorder to let you know how far you are into
the designated recording list. The initially white region titled “task progress” gradually turns
blue in proportion to the number of items recorded.
There are three buttons at the bottom of the recorder window: “Cancel,” “Interrupt,”
and “Done.” If you click on “Cancel” then the recording task is considered by the programme
as not performed, regardless of how many sounds you may have actually recorded. This
means that the same recording task will appear as “pending” in the corresponding exercise
list, and therefore the same recording task, starting at the beginning, will be carried out the
next time you click on “Run” on the Client Session window with the same exercise selected.
The recorded sounds (audio files) are not deleted from your computer, but are not considered
as contributing to the completion of the task.
If you click on “Interrupt” the situation is different, because the task attains an
“Interrupted” status. This differs from “Completed” because this same task will be the one to
be carried out if you press “Run” on the Client Session window with the same exercise
selected. It also differs from “Pending” because the tasks will not be started from the
beginning but from the point left off at the time “Interrupt” was pressed. In other words, this
button allows you to temporarily suspend a recording task and resume at a later session,
without losing the data. This functionality is offered to allow you to keep useful recordings in
case something unforeseen happens, and should not be used routinely as a means to present
recording tasks in smaller chunks. If you want to separate recording of different words, create
distinct tasks, each with the corresponding words. If you want to split recording of the same
words over two sessions, create two distinct identical tasks, each with half the total number of
repetitions required. The reason is that handling of dates and list orders is not perfect under
interruption, because splitting a task across sessions violates the hierarchical structure of
OLPy entities and may create difficulties for you later in searching for and using recordings.
So use it sparingly only when necessary.
Finally, clicking on “Done” renders the task “completed” regardless of how many
sounds have been recorded. The reason is that you may want to schedule for several
repetitions but then realise, after fewer than planned, that the collected material is sufficient.
So by pressing “Done” you denote that you need no more recordings from this task. The next
time you click on “Run” on the Client Session window with the same exercise selected, the
next task will be the one “current” to be carried out. In the most usual case, as soon as the full
list of stimuli to be recorded is completed, you will receive a notification, the “Interrupt” and
“Cancel” buttons will be inactivated, and your only option will be to click on “Done” and
return to the Client Session window (unless you wish to examine or re-record the last
stimulus).
Navigation through the stimulus list and automatic modes will be discussed in a later
version of the document.
65
OLP User Manual v0.1.4
March 2004
10. Speech recognition
Speech recognition refers to a certain computer technology that allows the PC to
match speech sounds to certain patterns, typically word-based. In simpler terms and in the
context of OLPy, this means that the computer can check the sound coming in from the
microphone against stored utterance patterns created using a “training” procedure. Thus you
can speak to the computer and the computer will decide what pre-existing pattern best
matches your speech.
10.1. Basic concepts
There are certain concepts you need to understand in order to use speech recognition
successfully with OLPy and to avoid being disappointing by having the wrong expectations.
These concepts include (a) training, (b) matching, and (c) voice dependencies. They are
explained in the following sections as they apply specifically to OLPy and the speech
recognition technology incorporated in it. Do not consider the following explanations as
applying to all automatic speech recognition in general, but consider them as accurate and
definite with respect to OLPy-supported speech therapy in particular.
10.1.1. Training
Training refers to the creation of stored speech patterns based on speech recordings.
That is, a speaker pronounces the items (words, syllables, even short phrases) that are meant
to be recognizable by the computer, the produced utterances are recorded, and the audio files
that are created by the recordings are used by a special programme, called “trainer.” The
trainer processes the recordings statistically and calculates a sort of “average” pronunciation
for each item taking into account the variability of the item, that is, small differences in the
way the speaker pronounced the same item. Such differences may include different
intonation patterns, speech rate, clarity of articulation etc. Of course the computer cannot
identify the source or type of variability, which is why the files are processed statistically.
The goal of training is to create a “model” in the computer describing the sound produced by
the speaker for each item. Therefore it is important to have a sufficient number of repetitions
and it is best if the repetitions are not identical. This gives the computer a better estimate of
the speaker’s speech and facilitates subsequent recognition performance. The OLP trainer is
actually prevented from starting unless there are at least six repetitions of each item.
However, it is recommended that you have ten or more repetitions of each item. To provide a
proper range of variability, you may split recordings over two or more sessions, with
repetitions of the same item not blocked together, or you may ask the speaker to vary the rate,
pitch, and pronunciation of the items while speaking.
This requirement for variability is relevant for a speaker who has adequate control of
the articulators and who will normally produce identical repetitions of an item if uninstructed.
Clearly, this is not the case with dysarthric speakers. In the case of dysarthria, there is
typically the opposite problem of too much variability in the spoken repetitions. This makes
it difficult, if at all possible, for the computer to construct a valid model for the spoken items.
This difficulty can be circumvented somewhat by choosing among the recorded repetitions
those that best match the intended item, or that at least sound more consistent with one
another. In this case, it helps to record all repetitions of an item blocked together at the same
time and strive for consistency.
So the input to the trainer consists of audio files, created by recording a speaker
pronouncing the items several times. What is the output, that is, the result of training? The
trainer produces a set of speech models, corresponding to the items that were recorded. This
set of models is combined with the matching programme to produce a speech recogniser. In
66
OLP User Manual v0.1.4
March 2004
OLPy the output of the trainer is simply called “recogniser” and corresponds to what you’ll
then have to use in a practise exercise. Schematically, here is the sequence of entities:
Recordings
Training
Recogniser
10.1.2. Matching
Matching is a very important concept because the way a computer “recognises”
speech is very different from the way a human does. One aspect of the difference with very
significant implications for your use of the technology is that there is in fact no “recognition”
taking place, but “classification.” What does this mean? Suppose that you’ve trained a
recogniser with the words “table,” “chair,” and “house.” Then you use this recogniser to
practise saying “table” and you make a pronunciation error, for example saying “take” or
“taste” instead. Possibly, in fact very likely, the computer will respond as if your production
was successful, with an appropriate reward, even though you have clearly mispronounced the
target word. Why is this? Before you blame the recogniser technology, you should take a
moment to think about what is going on inside the computer.
Recall that you produced a set of recordings with a certain number of repetitions for
each word. Then you used the trainer to create a recogniser. The recogniser contains stored
patterns for the statistical averages of your repeated productions (for “table,” “chair,” and
“house”). Then you start your practice and produce an utterance. The computer compares
this utterance to its three models and selects the one that matches best. The computer cannot
know if you have produced a different word since the concept of different word does not
exist. The computer knows “table,” “chair,” “house,” and “nothing/noise” (the latter is
produced by default but is not specific to any voice pattern). This is all the available
vocabulary. Therefore “able,” “taste,” “tape,” and certainly a whole bunch of other words
will be rewarded as correct productions of “table” since they are much more like “table” than
like “chair.”
Unfortunately, it is not possible to use absolute criteria for comparing productions to
internal models. That is, the computer cannot reliably determine how good a production is
just by comparing it to its stored model. The variability of speech is such, that trying to
identify specific words without reference to other potential candidates results in practice in
very poor performance. This happens because we don’t really understand how the brain
recognises the speech and so we try to build approximate statistical models and procedures in
the computer, which, naturally, are very far from perfect. So the only practical route we have
for building recognisers is to use “relative” recognisers, which don’t really recognise but only
select from among a set of potential “recognised” words. This solution has been found to
work very well in practice, making infrequent errors in the selection, but is necessarily
restricted by the need to foresee all words that might be spoken or tolerate certain errors in
case of out-of-vocabulary words.
Likely, even the utterance “take the money and put it on the label” might well be
considered a correct production of “table.” It might appear ridiculous at first blush, but again
you’ll have to consider what happens inside the computer. Due to the unavoidable variation
in speech rate, the computer is programmed to match utterances to its internal trained models
by stretching and/or expanding as much as necessary. There is no good a priori criterion to set
correct limits to this stretching function, and in fact when dealing with isolated and relatively
short stimuli, such as in OLP, it makes no sense to impose such restrictions. So by tricking
the computer with a long phrase it does not expect, we are again posing a problem outside of
the domain the recogniser was made to solve. Therefore it should be no surprise that the
67
OLP User Manual v0.1.4
March 2004
computer fails to solve it. Strictly speaking, these problems are not failures of the software
but are the consequences of design decisions made with specific objectives and circumstances
in mind. These decisions lead to improved performance as long as the system is used as
intended but are the cause of errors when stepping outside of the predefined boundaries.
The therapist need not be a speech recognition engineer to use the software – in fact it
is doubtful whether being an engineer would result in any improvement in the aforementioned
respects. Here are the guidelines that should be followed when working with the recogniser:
1. Do not expect the recogniser to reject words it was not trained with.
2. If possible, foresee likely mistakes and include them in training.
3. Discrimination improves as the number of trained words increases.
4. It is best to train with specific successful and unsuccessful productions.
5. If you need to work with single words and cannot include potential mistakes in the
training, use as long words as possible.
10.1.3. Voice dependence
The voices of different people sound different – sufficiently different that it is very
easy for us to tell them apart and to identify the voices of people we know. This sound
difference between voices is rarely a problem for speech perception since it does not confuse
our phonetic interpretation of utterances. For the computer it is not so simple. Differences in
sound due to voice cannot be distinguished from differences due to phonetic content. That is,
whether the same person speaks another word or a different person speaks the same word can
be all the same to a computer, since they are both sound changes of some sort. The actual
picture is slightly more complicated but it does not make much of a difference for the point
that needs to be made here. When automatic speech recognition systems are built with the
purpose to function in a wide range of situations and with many potential speakers, such as
for an automated call centre, for example, many hours of recorded speech from hundreds of
speakers are needed as training data, just to expose the trainer statistically to all the voicedependent variation it should expect. For a personal speech therapy support system, such data
collection is clearly out of the question, so this kind of technology cannot be used.
The technology used in OLP is often called speaker-dependent, since the training data,
that is, the recorded speech, pretty much determines who can successfully use the resulting
recogniser. Most of the time this means that a recogniser can only be used with the person
who produced the training data, otherwise significant drops in performance are very likely.
(To a slightly lesser extent, this is also true of the phonetic mapping software, as explained
separately in Section X.) But if a person can pronounce a word well enough to train the
computer to recognise it, then there’s probably no need to practise this word. Conversely, if a
person cannot pronounce this word and needs to practise it then no recogniser can be built for
her/him since there are no training data with the correct production. There are certain
approaches toward sidestepping this problem, which may or may not be adequate in the
specific circumstances you will encounter.
One option is to build a recogniser using the speech of a different person. This option
can be used if there is no other way to get a client started, and can be expected to have some
success. In this case it becomes very important to select an appropriate voice for creating the
recogniser. Ideally, you would find a person of the same gender, age, size, dialect, voice
pitch and perceived voice quality as your client. All of these factors matter, and all of them
should be taken into account. The closer you can match a client’s voice with a voice model,
the better recogniser performance you will obtain. Most of the time the therapist will be a
completely inappropriate voice model for speech recognition purposes, so don’t waste your
time recording yourself other than for becoming familiar with the recording, training and
practice procedures. As soon as a client improves sufficiently to select certain of her/his own
68
OLP User Manual v0.1.4
March 2004
productions for training, discard the other-voice model and build a new recogniser with the
client’s own voice. Either way you will get less than perfect recogniser performance but
when using the client’s own voice the feedback will be more consistent because the same
voice features are present.
A second option is to record many repetitions of the target words by the client until
there is a sufficient number of correct or approximately correct productions of each item.
This option can be used if there are occasional correct productions. In this case you can select
only the best productions when running the trainer, so that the recogniser will be built with
the appropriate targets. The trainer lets you select which stimuli to use for building the
recogniser, as explained below, therefore taking this option is straightforward.
Finally, there is the option of incremental training (explained in detail below in
Section 14.1), based on a client’s currently “best” productions, even when these are far from
perfect. This option can be used only when there is sufficient variability in the client’s
productions, such as in cases of dysarthria, for example, but not when there is consistent
mispronunciation, such as in cases of phonological articulatory disorders. You will learn,
with time, which option to select for each client, by judging the situation, in order to make the
best of speech recognition technology for your speech therapy.
10.2. Data collection considerations
In order to build speech recognition models for use in exercises, recordings need to be
made. There are two ways of doing this: First, recordings can be made of a normal speaker,
e.g., a therapist, family, or friend. The client would then be working towards a normal target
(useful for mildly impaired speakers). Second, recordings can be made from the client, and
then the “best” recordings are selected by the therapist so that the client is working towards
producing a word in the best way he/she can more frequently. The task of recording can be
used as part of the therapy process, with the therapist helping the client to produce the stimuli
in the best way that he/she can, or to improve this production. Recordings of good examples
for that client are then available for building speech recognition models, and thus enabling a
client to continue to practise these better productions with frequent feedback.
In addition to careful design of the set of items to be recorded, as outlined above in
Section 10.2, there are certain considerations that need to be kept in mind when making the
recordings, in order to ensure the best recogniser performance possible. They can be
summarised as follows:
Make sure each recording includes all of the intended item, pronounced correctly
and using up the available range, and nothing else.
If you follow this advice, then your recordings will lead to useful recognisers. More
specifically, you should take care to avoid any extraneous noises during recording – and also
during practice, of course. There should be no music in the background, no television or
radio playing, no other people talking, and no trucks or motorcycles passing by just outside
the window. During the brief times when the recorder tool is recording sounds, there should
not even be a speech therapist making comments, praising, encouraging or criticising the
client’s speech. If there is coughing, sneezing, sniffing, snorting, hesitation, “umm”-ing or
any other extraneous vocalisation, the recording should be discarded and repeated
(overwritten). If any noise sticks out of the background during the recording of an item, the
recording should be discarded and repeated. The importance of working with “clean”
recordings cannot be overemphasised.
In addition to excluding unwanted sounds from your recordings, it is important to
ensure all of your intended sounds in sufficient resolution. This boils down simply to not
69
OLP User Manual v0.1.4
March 2004
beginning to speak before the recorder prompt changes colour, not clicking to stop recording
before completely done speaking, and speaking sufficiently loudly that most of the available
vertical range is occupied by the recorded signal. The range can be checked in the waveform
display of the recorder and can be also continuously monitored using the level indicator, as
explained in Chapter 9 discussing the recorder.
You will learn to discern many undesirable situations, either auditorily or by checking
the waveform display on the recorder, at the time of making the recording, but if some noise
creeps into some of your items it is not necessarily a disaster. In the training stage, listen
again to the recordings and select only those without noise to be used for the recogniser. If
there are few problematic items and enough repetitions recorded, this should not be a
problem. Which leads us to one more general principle guiding your recording plans:
Record more repetitions than you plan to need, in fact as many as possible.
Perhaps there exist situations in which recording extra repetitions may be unnecessary
or detrimental, but I don’t know what these situations might be.
10.3. Training modes
Two types of training are available: Training for a set of distinct stimuli, or training for
selected attempts. Distinct stimuli training is used when recordings of different items (words)
are available and the target of speech therapy is to examine production of one (or more) of the
words as contrasted with the others. In contrast, selected attempts training is used when
recordings of a single item (word) are available, and the target of speech therapy is to make
progress in the production of this one word. The decision of which training type to use rests
with the therapist, based on the therapy objectives. However, the prerequisites for the two
types are different and perhaps can best be illustrated through an example.
10.3.1. Distinct stimuli training
In order to train distinct words you need a set of recordings elicited with distinct
prompts. For example, you may want to train a recogniser to distinguish between “pat” and
“cat”, therefore you need a set of “pat” recordings and a set of “cat” recordings. This means
that a recording task is necessary, in which the “pat” and “cat” stimuli are included, and a
client speaks the words “pat” and “cat” when prompted by the recorder display. After this
recording task, there is a set of sounds in the computer, some of which are associated with the
label “pat” and the others with the label “cat”. This set can be fed to the trainer so that a
recogniser is created that can keep the two labels (“pat” and “cat”) and associate them with
the subgroups of sounds as recorded. The therapist can listen to the sounds to make sure that
only proper productions of “pat” and “cat” are selected, but there is no way that the preassigned label can be changed. In other words, if “pat” was once mispronounced as “cat” it is
not possible to change this recording and make it part of the “cat” set. It remains simply as a
mispronounced “pat” and should be ignored (that is, not selected) during training for the “pat”
word.
Use of distinct words training requires proper production of all the distinct words, at
least some of the time. If a client cannot produce proper instances of “pat” and “cat”
sufficiently well that they are at least distinct from each other, then distinct word training
cannot be applied. However, it is possible to use this training type with recordings made from
a model speaker, who can presumably pronounce correctly all the different words. Use of a
model speaker is associated with some difficulties, and there are several considerations that
need to be taken into account (see Section 10.1.3), but in general it presents a viable model of
70
OLP User Manual v0.1.4
March 2004
distinct word training when the productions of a client are not good enough to allow selection
of a proper training set.
The result of distinct words training is a recogniser that can apply the known labels to
incoming speech. Therefore, a trainer made with “pat” and “cat” will choose among these
two labels and apply the one matching best each production of the client when used during
speech therapy. (See also section 10.1.2 about the matching concept.)
10.3.2. Selected attempts training
An alternative to distinct stimuli training is selected attempts training. By “selected
attempts” one means “selected attempts at pronouncing a single item.” In other words,
instead of training the recogniser to select among distinct sets of more than one stimulus
(word/item), we can train the recogniser to select between “good” (or otherwise selected and
designated) and “bad” attempts at producing the one and same item. This makes no
difference to the training or recognition technology underneath, but it makes a lot of
difference on using it: On setting up a recording, on examining and selecting the stimuli, and
on using the resulting recogniser.
The idea behind selected attempts training is gradual improvement, or progressive
attainment of a target. This type of training is meant for productions which are (a) too far
from perfect to construct useful target models from, and (b) sufficiently inconsistent that some
can be clearly designated as better than others. In this mode, the therapist collects a large
number or repetitions from the client attempting to produce a particular target. It is very
important that all repetitions be made in response to the same prompt, therefore be associated
with the same label. As previously noted, once a recording is made in response to a specific
prompt, e.g. to the string “cat” then it is forever associated with this prompt in the OLP
database, therefore it is an instance of “cat” as far as the system is concerned, whether or not
the client actually said “cat” or said it well or poorly.2 Remember this:
Record many repetitions at a single stimulus to use selected attempts training.
Productions of “dog” sufficiently poor that they actually sound like “cat” cannot ever
be used as “cat” instances by OLP. Therefore, when you plan to use selected attempts
training, use only a single stimulus label. Then import recordings from this stimulus label into
the trainer and select the best ones as “good” and a large representative set of the others as
“bad.” You need not have an equal number of “good” and “bad” productions (in fact it is
highly unlikely that this will be the case). You do need to have a minimum of six, and
preferably ten or more, “good” productions, and much more than that, “bad” productions, in
order for the training to produce useful models. Note that you may import productions of the
same target recorded in different session, if you wish, by appropriately modifying the
selection criteria in the trainer stimulus import panel.
The result of selected attempts training is a recogniser that can pick out and reward
productions that are closer to the client’s previous best productions than to the client’s
previous less successful productions, thus “pushing” client performance towards the best
range and increasing the probability that a better production will be made. Then, once
performance achieves some standard of consistency on the current “best” criterion, you repeat
the process of selecting and training for the “best,” thus moving the bar a notch towards the
2
So if you expect a set of good productions only, you should go back and repeat poor attempts at the
time of recording!
71
OLP User Manual v0.1.4
March 2004
acceptable. In this manner, you can conceivably gradually approach an originally impossible
target.
10.4. Using the trainer
Figure X below shows the trainer screen as it first appears when a training task is
started. Using the trainer involves the following steps:
1.
Selecting the type of trainer you want to use (distinct stimuli or selected
attempts, see Section 10.3 above)
2.
Selecting and inserting recordings (sound files) to be used in training. If
the trainer immediately follows a recording task then it automatically loads
the recordings of the previous task as a default, should you wish to use them
– alone or in combination with additional stimuli you can import.
3.
Listening to the listed recordings and selecting which ones to use for
training. In the case of selected attempts training, this step also involves
assigning each selected item to its proper category.
4.
Training proper, during which you sit back and the computer takes care of
all the work.
5.
Optionally, configuring the resulting recogniser, at the system’s prompt.
This is most useful if a recogniser task follows in the same exercise, so you
won’t have to get out of the session and into the schedule to configure the
recogniser task for this exercise.
Figure X. The Trainer screen upon startup of a trainer task.
Selection of trainer type is made simply by clicking on the desired option. Note that
setting the trainer type automatically and necessarily resets the list of recordings, so if you
change trainer type you will lose any item selection you may have made. Therefore, be sure to
72
OLP User Manual v0.1.4
March 2004
begin with selecting the trainer type and be sure to select the one you really want before you
start inserting, listening to and selecting recordings.
Recordings are added to a trainer task using the Stimulus selection panel shown in
Figure X below. This panel allows you to search for any recordings made previously on your
system by any client, without restriction. Criteria for retrieving stimuli are entered in the
appropriate fields on the left side of the stimulus selection panel, and the available stimulus
sets are displayed on the right side. Note that this panel does not select individual recordings.
Therefore, the items displayed on the right are not sounds but stimulus labels, under which
one or many recorded repetitions may be stored. Identification of individual sounds is done
after selecting the stimulus labels, within the trainer screen. Highlight the stimuli that seem
relevant and click on “Insert” on the bottom of the panel to enter the corresponding recordings
into the current trainer task. This may be repeated as many times as you wish. There is no
preset limit to the number of stimuli or to the number of recordings that may be entered in the
trainer.
Figure X. Recorded stimulus selection panel, to retrieve recording sets for a training task under group
stimulus labels based on user-specified criteria related to recording creation (client, label, date).
After all desired stimuli have been identified and inserted in the trainer then the
individual recordings should be listened to – by double-clicking on them – and either selected
for training – checked, with a mouse click – or not. Alternatively, if the displayed list of
recordings is known to be good, they can all be selected automatically using the “Select All”
button on the trainer screen.
For Selected Attempts training, each recording selected to be used for training should
be assigned to one of the two categories, typically “good” and “bad” productions. Figure X
below shows an active Selected Attempts trainer screen on which a set of sounds have been
listened to and most of them have been assigned to one of the two categories. Remember: in
order to use the trainer, you need a minimum of six recordings in each category, and
preferably ten or more. Also, for Selected Attempts training, all selected recordings must fall
under the same “stimulus,” that is, display the same label.
Training is initiated by clicking on the “Train” button. Do not rush your clicks! The
trainer can be a bit sluggish to respond, but the actual training is typically completed in a very
short amount of time (less than a minute with common tasks). After you start training, a
panel appears informing you of the success of the file creation process and asking you to wait.
Do not try to do anything with OLPy or with other programmes before training is finished!
73
OLP User Manual v0.1.4
March 2004
Figure X. An active Selected Attempts trainer screen. Recorded repetitions for the label “ba” are
assigned either to the “good sample” category or the “bad sample” category. Atypical sounds need not be
categorised to avoid confusing the system. Once all available sounds are checked then training can be
started by clicking on the “Train” button on the bottom.
When training is completed, you are informed of the success of the process and asked
to configure the resulting recogniser. This configuration is not obligatory and is only included
to speed up your work if a recogniser immediately follows in the same exercise and you plan
to use this recogniser immediately. If not, skip the configuration stage by clicking on “No.”
10.5. Definition of training tasks
You really shouldn’t ever have to define your own training tasks, since generic
training tasks are pre-defined in levels 2, 5 and 6, and can be added to any exercise you create.
If you need for some reason a new training task, the standard new task panel allows
specification of the trainer as tool, presumably in a “speech recogniser” task category.
10.6. Functional definition of recogniser uses
As discussed in Section 7.5 on recogniser interfaces, there are several different
“games” using speech recognition technology. The differences between them are not merely
aesthetic, and care must be exercised when selecting an appropriate interface or when
switching from one interface to another to combat boredom.
Each graphical user interface implements a specific functional interaction between the
client and a set of stimulus evaluations. In English, this means that each interface has a
different focus on what the user is supposed to do (or discouraged from doing). In a case such
as the fish (or the bike), the goal is to help the user reach one particular, difficult target, most
likely a long word. This goal is supported by the following design elements:
• Linear depiction of user achievement related to the target, so that the matching
score is represented as distance along which the fish swims.
74
OLP User Manual v0.1.4
March 2004
•
No alternatives; that is, there are no distinct locations or actions in the depicted
scenario. The fist swims forward in proportion to the goodness-of-fit between
target and client production and then swims out.
• Special reward for individual successes. This interaction is meant to be used with
difficult words that are worked on repeatedly and approached only gradually by
the client. Thus successes are expected to be few and infrequent, and strong
motivating reward is required. Therefore each event of good match to the target is
individually rewarded with an animation, instead of summing successes to provide
a cumulative reward.
These functional design choices are completely different from those behind the box
interface, for example, in which, by comparison:
• Target achievement focuses on yes/no as opposed to gradation, by reducing the
available linear range and its sensitivity to differences. The result is that poor
matches are not likely to approach the target sufficiently, even though there is
some movement in the “right” direction to provide positive feedback for a
reasonable approximation.
• There is a clear “no” region corresponding to incorrect production, that is, to a
production matching alternative models as opposed to the target model. The wand
moves to let the user know that a production was off the mark.
• Individual successes are noted, to keep the client motivated, but they are not
immediately rewarded very highly. Since this interaction is meant to be used
when an item is within reach of the client (if approximately – also depending on
recogniser training), frequent successes are expected. Therefore the client should
not be rewarded all the time, retaining the value of the cumulative reward for the
higher achievement.
The box interface, as well as the soup, are meant to be used when a particular target is
produced erratically, inconsistently, or confused with other items. Still, the target is
occasionally, and not too infrequently, actually produced. (Note that the “target” in this
context might simply be a client’s best production and not necessarily a “perfect” production
comparable to that of the therapist or an unimpaired speaker.) Thus a clear separation is
defined between successful and unsuccessful attempts, and the client is encouraged to
produce the target more frequently (and not to produce it better, as was the case with fish).
Further along this notion of distinctive training, the magician interface defines specific
errors to be avoided – up to five of them. This is useful if a client makes specific mistakes to
be avoided and not just inconsistent or unclear productions. The recogniser is trained with the
alternatives and the errors are given specific locations on the screen, so that the client can tell
when a particular error is made. The client is not informed which error was made since there
is no point in reinforcing incorrect productions with additional associations. Still, it will be
clearly evident when a known error was made, and therapy objectives can be set such that the
“distracting” objects be specifically avoided (after they are assigned to specific errors, of
course).
Therefore, although there is some redundancy between interfaces, and they all use the
same underlying speech recognition technology, the therapist must take into account at each
stage what is the particular therapy objective and use the interfaces best suited for it. This
choice is greatly influenced by the type of training and by the set of stimuli available (and
selected for training), so the therapist should work with the system to gain an understanding
of how best to construct sets of models that support specific therapy objectives; for example,
when and which errors need to be trained into the system as separate models.
75
OLP User Manual v0.1.4
March 2004
11. Phonetic mapping
Phonetic mapping is done using the STAPtk package. For details about STAPtk and
all its uses, see the documentation provided by Athanassios Hatzis of Sheffield University.
Here we deal only with defining, configuring, and carrying out phonetic map tasks from
within OLPy, in the standard client schedule scheme.
To use phonetic maps you first have to create them, that is, you have to assign certain
regions of the screen to particular sounds (phones). In order to achieve that, you need to (a)
record the sounds you want assigned on the map; (b) transcribe your recordings by marking
on the audio files the starting and ending point of the desired sounds; (c) define the points on
the screen associated with the sounds; and then (d) use the resulting map. Use of a map
entails, optionally, customising it for a certain client, by adding manually new regions
associated with the existing sounds (see more details below on practise using maps).
11.1. Recording sounds for the creation of phonetic maps
11.1.1. Choosing a recorder
To record sounds for use with phonetic maps you can use either the standard OLPy
recorder, described in Chapter 9, or the recorder function of the STAPtk package, at your
option. There is no restriction or recommendation based on any technical considerations, it is
just a matter of what you are most comfortable with. However, since STAPtk is not fully
integrated with OLPy, you may want take into account the following:
• STAPtk has a special “default” location of its own where it looks for recordings,
maps, etc. It is possible to use other locations (folders) but it would be more
complicated to do so and would make some things likely to break (unless
everything is found at the expected locations). Therefore:
o If you make recordings with the recorder then you will have to transfer
them over for STAPtk to use them. Transferring is done in a separate
“transfer” task with a special “Data collection” tool, so the process takes
one extra step with the OLPy recorder than with STAPtk.
o If you make recordings with STAPtk then OLPy will be unable to access
them, so they cannot be used for anything else (e.g., training a recogniser)
and they will remain unknown to the rest of the system.
• You may use this “Data collection” tool to transfer to STAPtk recordings made
previously in any sessions from any clients, without restrictions, if you want to.
There is no technical requirement that recordings be made especially for STAPtk.
• The OLPy recorder has a maximum duration of 10 seconds per recording, since it
is oriented towards recording of single items. This is not a problem unless you
want all of your map sounds to exist in the same file (STAPtk does not require it).
• The OLPy recorder follows a structured approach so it needs to display a prompt
for you to record. Then you can identify previous recordings based on their labels
(the prompts). STAPtk does not require any specification of you, it displays no
prompts and allows you to name your recordings anything you want, after the fact.
It also takes no care of you and keeps track of nothing, so it is easy to forget what
names and folders you used and what went where. Therefore:
o If you want to use the OLPy recorder you’ll have to set up a recording task
as usual, with lists of stimuli as prompts. You may have to define new
“items” corresponding to the sounds you need to produce for the maps, at
least the first time you create each type of map. This is an extra
76
OLP User Manual v0.1.4
March 2004
complication associated with use of the OLPy recorder.
o If you want to use the STAPtk recorder you are responsible for specifying
your own folders and file names, for using appropriate names and places
and for remembering them later when you need to make the map. All this
is done through the STAPtk menus so you will have to learn how to use
those as well. This is the complication associated with STAPtk.
11.1.2. Using the OLPy recorder
In order to use the OLPy recorder to make recordings to be used in the making of
phonetic maps, you need (a) a recording task and (b) a transfer-recordings task. There are
pre-defined exercises with these tasks but you can also add them to new exercises you create.
The recording task must be configured, in the usual way, with a list of prompts to
display, and recording parameters such as the number of repetitions and order of presentation.
Since the recorder keeps track of what’s recorded and when, it may prove more useful if you
only include a single sound (or syllable) in each recording, instead of going through the
pronunciation of all the sounds you want for the map in a single go. In this way you will have
manageable, correctly labeled recordings and you’ll be able to select them in the future for
other maps in different combinations, while OLPy will keep track for you of what went
where. So, for example, if you want to create a five-vowel map, set up the recorder task for
stimuli “a” “e” “i” “o” and “u” (entered as “new” on the configuration screen the first time
you use them), each repeated two or three times (see Figure X). However, keep in mind that
you need not recorded isolated sounds for the phonetic maps. You may use sounds spoken in
context (e.g., recorded words) or any other clearly produced stimuli as you deem appropriate.
Figure X. Configuration of a recording task to include single isolated vowels, entered as prompts
via the “Enter New” functionality of the interface. That is, after clicking on “Enter new” and setting the
Level field to “Single sounds” (that is, Level 1), each isolated vowel is typed appropriately in the phonetic
and orthographic representation fields and then entered in the recording list using the “<< Insert” button.
Number of repetitions and order of presentation remain to be specified.
77
OLP User Manual v0.1.4
March 2004
When this recording task is carried out, you will be prompted with a single vowel each
time, and you should sustain it for several seconds, for best map performance, while keeping
it at an adequate amplitude (Figure X).
Figure X. Using the recorder for a single vowel according to the configuration defined in the
example shown in Figure X.
Transferring of your recordings for STAPtk to access in making a map requires a
separate task using the “Data collection tool,” in which you can select, based on client, date,
and stimulus (prompt) information which sounds to copy over to the STAPtk section. These
sounds will be available for other uses after the transfer, so you can transfer them again, along
with other sounds, in the future, for example to make new maps in different combinations.
11.1.3. Using the STAPtk recorder
In order to use the STAPtk recorder you only need to have a STAPtk recording task.
This will bring up STAPtk in recording mode when run. To configure this task, all you need
to specify is a brief description of the sounds you plan to put on the map. This same
description will be automatically transferred to all related tasks in the same map creation &
use series, to serve as a reminder for you. Find out more about this “brief description” in
Section 11.7 on configuring phonetic map tasks, below. Do not modify the folder or other
settings, unless you really know what you are doing, because you may prevent the following
tasks from finding automatically the required information or data.
The actual recording procedure in STAPtk is fairly simple, despite all those menus and
buttons present on the screen all the time. You only have to click on the record button ( ),
talk as much as you want, and then on the “next” button (X ). The “next” button stops
recording, saves it in a file, and prepared for the next recording (advancing a filename counter
you need not worry about). If you have more speech to produce for this map, go ahead and
repeat the procedure as many times as necessary: Click on record, speak, then click on next.
When you are done, exit STAPtk through the menu selection EXIT Æ Finish Task (Return to
OLPy). That is, click on the word “EXIT” on the menu bar at the top of the window, then
click on “Finish Task (Return to OLPy).” Confirm that you want to exit by clicking on “Yes”
on the window that pops up.
78
OLP User Manual v0.1.4
March 2004
Figure X. Using STAPtk to record speech. Top: Initial state of STAPtk when called for a
recording task. Note the row of buttons for recording functions, the waveform and spectrogram display
areas, and the Windows-style standard menu at the top of the screen. Bottom: This image was captured
while recording an utterance composed of isolated vowels [a]-[e]-[i]…. Note the depressed recording
button and the real-time display of the waveform and spectrogram of the sound being recorded.
79
OLP User Manual v0.1.4
March 2004
11.2. Transcribing (labelling) your recordings
To make a phonetic map, you must mark your recordings to let the programme know
where each kind of sound begins and ends. Unfortunately, technology has not reached the
level where it can automatically determine which speech sound is spoken (or not) at each time
instant, and whether this sound is spoken properly for the language (and dialect) in question.
Therefore this is the job of the therapist. Fortunately, it is made a very easy job by the
STAPtk tools.
This is the basic rule in preparing speech recordings to be used for phonetic maps:
Label each portion of each recording with the sound it contains, if it is a sound you need for
the map you plan; label all other portions using the “hash” symbol (#), indicating that you are
not interested in these sounds for your map. “Not interesting” includes portions of silence,
external noises and non-speech sounds (hesitations, coughing), improper pronunciation of
sounds, or irrelevant sounds.
To transcribe a recording, set up a “labeling” task in OLPy. Several map-related
exercises come predefined with a labeling task in them. Labelling tasks need not be
configured separately when they follow recordings (or recording transfer) tasks, because
OLPy will direct STAPtk appropriately to find the correct sounds. This will be the usual case,
since you will always need some recordings which you will label in order to use for a map. If
labeling is the first task in an exercise, however, you will need to direct STAPtk to the proper
place where the desired files will be found. This can happen if you have somehow obtained
recordings outside of OLPy (or by running STAPtk independently of OLPy exercises). This
is not recommended at all. If you do it you will have to find out where STAPtk looks for its
files (perhaps in “C:\staptk\data\training”) and put your recordings in a folder under that, then
enter the folder name in the labeling task configuration (and may the force be with you!).
When running a labelling task, STAPtk is started with the first of your recordings
loaded and displayed in two parts: the waveform on top and the spectrogram on the bottom.
Figure X. Appearance of STAPtk when started for a labeling task. Note the display of the waveform and
spectrogram of the complete recorded utterance and the white band in the middle, the “label zone.”
80
OLP User Manual v0.1.4
March 2004
Between these two displays of your sound, there is a blank band on which the labels
will be entered. Let’s call this the “label zone.”
Click on the “play” button (X
X) to listen to your recording. Click on the “stop” button
() when playout is done, because the “play” button does not automatically return to its rest
position when the sound ends. To listen to a selected portion of the recording, select it by
clicking and dragging the mouse pointer over the corresponding screen region.
Figure X. Playout of a portion of a recording while labeling. Note the “selected” region, between two
yellow markers, which was highlighted by clicking and dragging the mouse over it, and the depressed
“play” button. The red marker indicates the current point in time during playout.
Labelling is done as follows: Click on the label zone at the point where a relevant
sound starts. (Remember: a sound is “relevant” when you want it for the map and is
pronounced well.) This will put a vertical black line in the label zone. To the left of this line
will be the beginning of the file up to the beginning of a sound you want. To the right of this
line will be the sound you want and everything that follows it in the recording. Do not move
the mouse outside the label zone. Type the hash character on the keyboard (Shift-3, that is,
hold down the Shift key and press the number-3 key). This will enter the “#” symbol to the
left of the vertical line. This means that the recording, up to the line, will be labeled as “not
relevant.” Now move to the right, while still in the label zone, and click on the time point
where this relevant sound ends (or where it merges into another sound, or is not produced so
well any more). This way you have marked the beginning and end of a desired sound. Type
the symbol (or symbols) corresponding to this sound, in the way you want it to appear on the
map. It is recommended that you use SAMPA phonetic coding for consistency but you are
free to choose anything that will look useful to the client who will use the map.
You have now “labeled” (or “transcribed”) a single sound. If there are more sounds
you want in this same recording, repeat this procedure. That is, move to the beginning of the
next relevant sound, click inside the label zone, and type “#” (Shift-3). Then move to the end
of the same sound, click inside the label zone, and type the symbol for the sound you just
marked. When done labeling all the sounds you need, click near the end of the file inside the
81
OLP User Manual v0.1.4
March 2004
label zone and enter the symbol “#” for the last time. This tells STAPtk to ignore this last part
of your file (and you should always do it). That’s all there is to labeling: Click on the limit
point and enter the corresponding symbol – repeat until done. Remember:
Always click inside the label zone and enter a symbol for the left side of where you are.
Figure X. Labelling in STAPtk. Left: Note the placement of the yellow marker at the end of the stable [i]
region. Typing the letter “i” will complete labeling of this vowel. Right: Seeking the beginning of the next
useful region of the recording (the vowel [o]). The red marker follows the mouse movement and becomes
yellow with a mouse click to indicate a selected point. Remember to click inside the middle (label) zone.
Figure X. A completely labeled (“transcribed”) five-vowel recording in STAPtk.
When you are finished with a file, click on the “next” button (X ) to save your labels
and advance to the next file. Repeat the same procedure for each file. When you are done
you will know it because clicking on “next” will load an already labeled file and you will see
the symbols you entered in the label zone. At this stage your labeling task is completed, so
82
OLP User Manual v0.1.4
March 2004
exit STAPtk to return to OLPy with the “Finish” option. Or, if you leave labeling unfinished
and want to continue later, be sure to exit with the “Abort” option in order to leave this
labeling task “pending” for OLPy, and thus be able to re-enter it later.
11.3. Designing and training a new map
Before you can use a phonetic map you must “design and train” it. These two
activities are collectively referred to as “building” or “creating” a map. Either way, this means
that you have to assign points in space to correspond to your chosen sounds. To create a map
you need a set of labeled recordings, therefore a “create map” task typically follows a labeling
task (which typically follows some recording or sound transfer task). In the typical case
where this is true, that is, when “create map” follows “label recordings,” OLPy takes care of
file names and locations automatically, so you need not worry about where your recordings
are or which ones to choose. This means that you don’t actually have to configure anything at
all for a “create map” task that follows a “label recordings” task.
If you wish to create a map with recordings made and labelled in different exercises
then you will have to specify where those recordings are. Recordings made under the control
of OLPy are placed in a folder at a known place (and you need know none of it). Therefore,
when configuring a “create map” task you will be able to choose the correct folder, based on
its name, from a list of available folders. This includes recordings made using the STAPtk
recorder in a corresponding “STAPtk recording” task in an OLPy exercise. Recordings made
outside of OLPy may be anywhere and it is your responsibility to place them where OLPy
expects them to be so as to direct STAPtk appropriately as to where to look for them. As
previously noted, “C:\staptk\data\training” is a likely place to check, but there is no guarantee.
If you don’t let OLPy keep track of things for you then it’s your responsibility to do your own
housekeeping.
Figure X. Beginning of a “Create map” task, with the target sounds automatically obtained from the
labeled recordings and presented at the “Design” state. The targets should be dragged to their positions.
83
OLP User Manual v0.1.4
March 2004
To create a map, STAPtk starts that task presenting you with a set of coloured
“markers” in a row. Each marker contains one symbol. The symbols are those that you used
when labeling your recordings. That is, STAPtk looks at all your labeled recordings, pulls out
all the symbols you have entered, and presents all the symbols to you. Your task is simply to
drag each marker to a location on the screen to form a phonetic map. The location on the
screen to which you pull each symbol will correspond to the sound you marked with the same
symbol. If you do not wish to use a labeled sound for the current map, simply leave the
corresponding marker untouched. That is, do not drag it anywhere, just leave it where it is and
it will not be taken into account in the map.
Figure X. Top left: End of design stage, with the sound targets dragged to their desired positions. Top
right: Saving the designed map from the “Optacia” menu. Bottom left: Result of saving a map, at which
point the map should be “trained.” Bottom right: End of map creation task with successful completion of
training. STAPtk should now be exited with the “Finish” option.
Once you are happy with the spatial arrangement of the sound markers you are ready
to complete the creation of the map. To do this, you need to click on two selections from the
programme menu. First, select Optacia Æ Save Map. Some text will appear on the screen,
occluding you map. This is normal. Then select Optacia Æ Train Map. Wait for the message
that “You have now completed 1000 cycles of training.” When you see that, you are done.
Your map is ready to use in practise (explore and monitor) tasks. Exit STAPtk with the
“Finish” option to return to OLPy.
To create a map: drag targets to their positions; save the map; train the map; exit.
84
OLP User Manual v0.1.4
March 2004
11.4. Using an existing map
Once a map is created, you can use it to practise producing the sounds in it. There are
two “practise” modes available for phonetic maps. One is termed “explore” mode and the
other “monitor” mode. Having two distinct modes of practise available allows for different
settings to take full advantage of the map functionality for different situations. Specifically,
explore mode is used when you want to adjust a map for a client and when a client first
becomes accustomed to a particular map or set of sounds. Monitor mode, on the other hand,
is used with the “customised” maps for the client and keeps track of the client’s performance,
providing you each time with quantitative information about reaching certain map targets.
The two practise modes are discussed separately below. Keep in mind that certain
things are a matter of setting up the STAPtk tasks rather than a matter of practise mode. The
differences between modes and the specifics of practise and software function are meant to
reflect the way STAPtk tasks are set up to work when called from OLPy. If you use STAPtk
independently, that is, not to run tasks from OLPy exercises, then both function and
appearance may be different, and you will have to control your own STAPtk configurations.
11.4.1. Explore mode
Practising with STAPtk phonetic maps in explore mode begins with the trained targets
as you arranged them when creating the map. To use explore mode, click on the record
button (z) and speak into the microphone – rather, have the client speak into the microphone.
In explore mode, your primary concern would be to check the client’s productions against the
trained map positions. This allows you to customise a map made with recordings from
another client, such as a matched voice, or even by yourself. Have the client practise all the
sounds that are seen on the map.
Figure X. Practise producing speech sounds using the phonetic map. Left: The “sprite” animation, where
a “Pac-Man” figure indicates the current mapping of your speech. Right: The “snake” animation, where
a line helps to see trajectories from one sound to the other. Here, a successful production of [ai].
Visualisation of speech production on the map can be done to emphasise current
position, cumulative performance, or trajectories. Current position is best seen using the
“Sprite” animation (shown in Figure X, left). This is a “Pac-Man”-shaped object that is
moved in real time by the speech acoustics and shows the corresponding position on the
phonetic map. The sprite offers rapid response and accurate continuous tracking of speech
production but does not allow good estimation of overall performance. That is, it is not easy
to judge how often the sprite is on a target, or how close to a target it usually gets. To see
this, you need permanent marks on the map. Therefore, cumulative performance is visualised
better using the “black dots” instead of the sprite. The black dots are not convenient for
85
OLP User Manual v0.1.4
March 2004
tracking performance online because they quickly swamp the screen with indistinct blobs.
However, they are perfect for judging the client’s achievement with respect to a certain map.
Finally, you will often need to practise more than single isolated
phonemes. For example, your client will practise a sound in the
context of another, or in a syllable. In these cases you want to be
able to watch the full trajectory making sure that the productions
touch all the intended targets (initial, middle, final) and not others.
The “snake” animation is designed for this purpose (illustrated above
in Figure X, right). The snake draws a line accounting for about a
second, brief enough to follow online but long enough to follow
through an entire syllable. To select an animation, click on the
STAPtk menu Optacia Æ Graphics Animation, shown on the left.
To customise a map for a particular client, you can position custom targets matched to
the trained ones. Custom targets are visually distinct from the trained ones, being round
instead of square and surrounded by a “matching” region. The matching region is a rectangle
formed by four independently movable corner points, joined by a dashed-dotted line. To
place a custom target means (a) to position the circle “centre” of the target on the map and (b)
to adjust the matching region around the circle. The centre region is placed by holding down
the “Control” key on your keyboard and clicking with the right mouse button at the desired
place on the map. Adjustment of the surrounding rectangle is done by clicking on a corner
and dragging it. You must be close to a trained target in order to place a custom target,
because the custom target “inherits” the symbol and colour of the closest trained target.
Place a custom target using control-right click; adjust the region by click-and-drag.
Move a custom target using click-and-drag; remove it by right clicking on it.
Figure X. Customisation of a phonetic map for a client based on actual practise in the “explore” mode.
86
OLP User Manual v0.1.4
March 2004
To decide on where to place a custom target, select the “black dots” animation and ask
your client to produce the corresponding sound. Then place the custom target and adjust its
region such that most, but not necessarily all, of your client’s productions are inside the
custom target region. Repeat the same procedure for every target on the map. Since monitor
mode does not display the trained targets you should place custom targets even if the original
(trained) ones are adequate. See the STAPtk documentation for more details on setting and
using targets. Note that practise tasks can be repeated (from the OLPy session screen) even if
considered “completed,” so you can return to a certain map and finish customisation at a
different time, as long as you have not moved on to the next task in the same exercise.
11.4.2. Saving and selecting maps
To keep your modifications and customisations on a phonetic map, for future use, you
must save the customised map. This is done by clicking on “Optacia” Æ “Save map” from
the STAPtk menu, before exiting STAPtk! Your modifications and customisations are saved
along with the original map information and each time you re-use this map you will see all
your additional custom targets and their regions. This means that if you later want to make
different adjustments or customise the same original map for another client, you will not be
presented with the original map but with the already customised one, and you will not be able
to share the same map with two different customisations.
Therefore, when you customise a map for a client it may be sensible to save the
modified (customised) map with appropriate identifying information. This is particularly
useful if you start with a map made from recordings of another person (client or yourself), or
with older or somehow different recordings. Suppose you have previously created a certain
map, such as a fricative-vowel map, based on recordings of client A. This might be called
something like “sz-aiu_ClientA_20Jan2004.map” (a semi-automatically created map name
which makes sense to you, as well as to the computer). Now you want to use this map for
Client B. First of all, set up a task for Client B of the type “practise using existing phonetic
map” and configure it to use this particular map, by selecting it from the drop-down list of
maps appearing in the configuration screen. Client B practises this task and you customise
the map for her. Then you save the customisation not by using the “Save map” selection but
using “Save map as…” instead (found under the same “Optacia” menu). When you save this
customised map with the “Save map as…” option you will have to enter a name for it. So you
add to the original name what is needed to distinguish and later remember and identify it. For
example, you call it “sz-aiu_ClientA_20Jan2004-customClientB.map” or something like that.
Later, when you set up Client B for her monitor practise tasks, you’ll load this latter map on
the configuration screen instead of the original one. It will be as if you have two entirely
distinct maps, one for/from Client A, available to be re-customised for other clients in other
ways, and one specially made for Client B, which will not be mixed with anyone else’s.
Selecting a map is allowed in practise (explore and monitor) tasks. If you are working
through a complete phonetic map exercise, from recording through use, then all names are
automatically created and transferred for you, and all you need to type (once) is a description
of the sounds to be represented on the map (such as “sz-aiu” in the previous example). In this
case it is not advisable to alter map names, since they are designed to help you identify them
later. In contrast, when you only want to run “practise” tasks, then you have to select a map
for your task from the list of available maps. Since STAPtk is not very well integrated with
OLPy, it is not possible for OLPy to keep track of everything and help you choose according
to your own criteria, so you will have to select maps based on their names. The list on the
configuration screen shows you all the available maps. Choose what you need and, if you
modify it during your task (e.g. customise for a client or a particular occasion), be sure to save
with a different name so that the original map will still be available.
87
OLP User Manual v0.1.4
March 2004
11.4.3. Monitor mode
Once you have customised a map for a client you can use this map for practise in
monitor mode. There are specially defined STAPtk tasks for this, called “Practise using
phonetic map (monitor mode).” They are found at the end of complete phonetic map
exercises (record, create, use map) but they can also be entered in your own exercises. They
can be repeated as many times as you wish with the same configuration, using the “Repeat
task” button in the client session.
Practise in monitor mode is initiated with only the custom targets shown. Trained
targets are not displayed. They are turned off by default, but you can turn them back on if
you wish from the menu selection “Optacia” Æ “Trained targets.” Figure X shows a monitor
practise screen as it starts up for a new task. Notice the custom targets and their matching
regions, as they were defined in a previous “explore mode” practise task.
Figure X. A customised phonetic map ready to use in a practise task (monitor mode). Note that only the
adjusted targets are visible. The original targets used to train the map have been turned off.
Actually, when a monitor practise task begins, you see a “scoring” screen such as the
one shown in Figure X. Push this screen out of sight so that you can practise – to achieve
this, either click on a visible edge of the map to the side of the scoring screen or click on the
“minimise” button ( ) of the scoring screen at the top right corner of the window. The
scoring screen comes up at the end of each “practise run,” that is, when you press the stop
button to interrupt phonetic mapping or when the maximum practise time or 30 seconds has
been reached.
The scoring screen shows the percentage of time spent inside each of the displayed
target regions. Here, by “target regions” we refer to the adjusted rectangles and not only the
circles with the symbols in them. Thus when you adjusted the matching regions for each
target in the explore task, you primarily affected what counts as success with respect to each
target location for the particular client at that particular time. Making the task difficult but not
impossible is important for efficient training, so be sure to adjust the target regions properly.
88
OLP User Manual v0.1.4
March 2004
Figure X. “Scoring” screen for STAPtk monitor practise tasks. This is a bar graph (a pie chart may be
available in the future) showing the proportion of time the speech production was mapped inside each of
the target regions. Each bar corresponds to one custom target (compare to Figure X where the targets are
displayed). The last bar, titled “OUT” shows the proportion of time (here, 40%) the produced speech did
not match any of the phonetic targets on the map but was in intermediate locations outside them all.
For the time being, OLPy cannot keep track of STAPtk performance. Consult the
STAPtk documentation for more information on tracking your clients’ progress on phonetic
map practise.
11.5. Notes on phonetic map tasks in OLPy
Here are a few important things to remember when working with phonetic maps:
Do not move on to additional activities in STAPtk without first returning to OLPy.
This will ensure that OLPy keeps track properly of what’s done and what’s left to do.
For example, when making recordings, just make the recordings and return. Do not go on to
label the recordings or to design a map without going through the proper task as it’s defined
in the corresponding schedule.
Always use “Finish Task” when you have successfully completed what you set out to do.
For example, in a recording task, as soon as recordings as done, you have been
successful, and OLPy needs to know that. Unfortunately, STAPtk is not fully integrated with
OLPy, therefore it is required of you to exit properly. Conversely:
Leave STAPtk through the “Abort Task” option when you have not finished the task.
Since the “Finish” option on exit tells OLPy that you have completed the task, it is
important to avoid clicking on “Finish” when you are not in fact done. For example, if you
had some difficulty and need to check or correct something and get back to this task later, or
89
OLP User Manual v0.1.4
March 2004
if you had to interrupt your activity and plan to continue at a future time. In these cases, you
don’t want the task considered “completed” but still “pending.” Exiting STAPtk through the
“Abort” option makes OLPy consider this task unfinished, so it will still be the first pending
task when you come back to this exercise, and you will have another chance to complete it.
Figure X. STAPtk exit procedure. Left: The EXIT menu on STAPtk, where you can see the “Finish”
(highlighted) and “Abort” options, for leaving STAPtk after successfully completing a task or before
completion (or without success), respectively. Right: The confirmation dialog that comes up as soon as an
exit option is selected from the previous menu. Clicking on “Yes” will complete the exit process.
As any development-grade software, STAPtk can be unstable at times. If STAPtk
crashes during execution of a task (e.g., while saving or training a map) then OLPy might
erroneously consider the task completed. If this happens, don’t run the next task since it will
typically depend on the results of the one that was not completed and so cause more
problems. Use the “Repeat Task” button on the client session screen to re-enter tasks that
were not completed due to software failure. OLPy will consider STAPtk tasks as repeatable
so you can always try again to complete them. Most of the time you will find that repeating a
task, without any modification, will be sufficient for successful completion. Don’t ask why.
If STAPtk crashes during a task, use “Repeat task” from OLPy session to try again.
11.6. The Data Collection tool
Recordings made with the OLPy recorder at any time are available for use in creating
phonetic maps. To make such recordings accessible to STAPtk you will use the “Data
collection” tool in tasks called “Transfer Recordings” or “Select recordings and transfer to
STAPtk.” The transfer task itself needs to be configured with a brief description of the
sounds to be displayed in the map you plan to make. This brief description is then passed on
to subsequent labelling, design & train, and practise tasks, so that STAPtk knows where to
look for your recordings, where to place and find maps etc. The “selected directory” field
shown on the top region of the data collection tool should not, in most cases, be modified
manually. Keep its automatically determined contents unless you know what you are doing.
The data collection tool is shown in Figure X. To find the recordings you want to
transfer, enter what you know about them as search criteria. This could be the name of the
recorded client, the date of the recording, or the stimulus prompt (label) used at the recording.
With each criterion the list of available stimuli is adjusted to display only matching files.
When the files you want to transfer appear on the list, highlight them by clicking on them.
You can select multiple files in the usual Windows way: Shift-click selects an entire range,
from the previously selected item through the current clicked-on item; Control-click adds the
current selection to the list of selected items. When you click on “Transfer” the selected files
are transferred to the specified folder under STAPtk. You may repeat this process as needed,
for example to transfer recordings of other sounds, or recordings from different dates, or
clients. Note that transferred files are greyed out and when selected again they do not activate
the “Transfer” button, to avoid multiple transfers and overwrites.
Click on “Finish” to exit the data collection tool when done transferring recordings to
STAPtk.
90
OLP User Manual v0.1.4
March 2004
Figure X. The data collection tool used to select and transfer over to STAPtk recordings made
using the OLPy recorder. Here a set of isolated vowel recordings made by Client “Demo Client” is
displayed and is available for selection (highlighting) and transfer.
11.7. Configuration of phonetic map (OPTACIA) exercises & tasks
Phonetic map configurations in OLP can be found predefined to accomplish either an
entire series of map creation and usage or only certain components of the process. The entire
process includes recording (and/or transfer of recordings), labelling (transcription), designing
and training (map building), and practise (first in explore, then in monitor mode). To
facilitate work with some pre-existing materials, some of the pre-defined exercises begin with
labelling or with design. Use the available exercises to familiarise yourself with the options.
After entering a phonetic map exercise in a client’s schedule, like with any other
exercise, you are expected to configure it. Figure X below shows the configuration screen for
a full-series phonetic map exercise including making new recordings with the OLPy recorder.
As always, the first thing to do in configuring an exercise is to give it a more
descriptive name depending on the intended configuration. Here the sounds to be included in
the map were added to the exercise name: “aiu” standing for the three vowels (or “aeiou” for
five vowels). Note that phonetic map tasks are registered with the “Optacia” tool. For the
purposes of this manual, “Optacia” and “STAPtk” refer to the same thing, that is, the software
supporting all the phonetic map functionality. For more accurate descriptions, see the
STAPtk (and Optacia) documentation.
Recorder configuration is discussed in detail in other chapters. Here we only discuss
configuration of phonetic map tasks. In Figure X below you see a configuration screen for a
phonetic map task. This same screen is used for all phonetic map tasks, adjusted as needed by
activating or deactivating certain fields (such as “map” or “folder”).
91
OLP User Manual v0.1.4
March 2004
Figure X. Configuration screen for a phonetic map exercise. The exercise name has been modified
already, with the addition of the map sounds, but none of the tasks have been configured yet.
Figure X. STAPtk task configuration. In this case, a recording task using the STAPtk recorder. Note that
“aeiou” has been manually entered as “short description” for the intended map and the other fields (task
description, folder name) determine their contents automatically.
92
OLP User Manual v0.1.4
March 2004
In Figure X, the task under configuration is a recording task, that is, a task to record
sounds using STAPtk. The “Task type” and “Task description” fields appear predefined as
appropriate for the recording task. The “short description” field appears blank and is the one
field you must absolutely fill out – and fill it out carefully, to make sure it will be easy to
identify in the future. The point of the short description field is to help you find your map and
sound files. The short description must contain the basic map information, that is, the sounds
to be used in this map. In the figure, the description is “aeiou,” indicating that the map will
contain targets for these five vowels. Information about the client recording the sounds and
about the date of recording are added automatically to the folder and map names, as you can
see in the “folder name” field in the figure, which was created automatically as soon as the
short description was entered. Normally you will not need to modify this “folder name” field.
As soon as you are finished configuring a phonetic map task, click on “OK” to return
to the exercise configuration window. At that point, every phonetic map task that follows the
one configured in the same exercise “inherits” the corresponding parameters from the one you
configured. So as soon as you configure a phonetic task, all subsequent phonetic tasks become
“pending” automatically and you need not configure them individually. Preceding tasks are
not affected. Therefore, if you configure the first phonetic map task in an exercise, all tasks
will be configured. Note that configuration transfer works across phonetic map tasks only.
Therefore, configuring a recorder task does not cause subsequent tasks to become pending.
Enter a short description for the map sounds to configure the first phonetic map task
and all subsequent tasks in the same exercise will be configured automatically.
Figure X. Configuration of a phonetic map exercise, including a recording task (with the OLPy recorder),
transfer of the recordings, the series of task to create and use a map (as in Figure X above). Configuration
of the recorder is done in the same way as for exercises using the speech recogniser. Configuration of the
STAPtk tasks is done automatically as soon as the first STAPtk task is given a description of the sounds
intended for the map. Here, the “transfer recordings” task has just been configured and all the tasks that
follow have “inherited” automatically their parameters for it and are all in the pending state.
93
OLP User Manual v0.1.4
March 2004
There are certain exceptions to the automatic transfer of configuration parameters,
including (a) automatic determination of map and folder fields and (b) automatic
configuration or subsequent tasks. The rule is that filled-out fields are not replaced.
Therefore, if you have manually selected a map, it will not be replaced with an automatic
name based on the short description, and it will not “inherit” another map name from a
preceding task. This is meant to protect your settings for the cases when you want to set
parameters manually and override the automatic mechanism.
The preceding discussion concerns phonetic map exercises in which a series of tasks
has to be carried out, for example to prepare the sounds, design the map etc. In other cases,
indeed perhaps the most cases, you will just want to use an existing map, optionally customise
it, and then apply it repeatedly to practise producing the sounds. In such cases you do not
need to transfer configurations and to co-ordinate a series of tasks but, rather, to locate and
identify the map you need and then instruct STAPtk to use it for practise. To achieve that,
configure the “practise” task by clicking on the “Name of map:” field and selecting the map
you want from the list of options that appears. This list contains all the maps that are found in
the location where STAPtk looks for maps.
Don’t forget to enter a short description for the sounds in the selected map to complete
the configuration of the task.
Figure X. Phonetic map practise task configuration during map selection. Note that the active contents of
the “Name of map:” field are determined automatically from the “short description” and client/date
information, but after clicking on this field a selection list has appeared, displaying all available maps. A
map can be selected from this list to be used in the practise task (explore mode) under configuration.
It is also possible to type in a map name into this field but this is not recommended because it cannot be
ensured that there will be a map with that name by the time this task is carried out.
94
OLP User Manual v0.1.4
March 2004
12. Pitch and loudness exercises
bla
12.1. Working with the leds interface
bla
12.2. Working with the bubbles and balloon interfaces
bla
12.3. Practising stress patterns with the blocks interface
bla
95
OLP User Manual v0.1.4
March 2004
Results and outcomes
OLP therapy tasks produce results that can be viewed to assess performance. For
example, recogniser tasks keep track of how many times the target sound was recognised and
how well each successful production matched the target model in the recogniser. Pitch and
volume tracking tasks register on-track performance as a count of intersected targets (circles).
And so on. To view such results, select a client on the OLP main screen and click on “View
results.” A “Client Results” window will then appear, like the one shown here in Figure X.
Figure X. Client Results screen displaying a client name and schedule of exercises, as well as the tasks in a
selected exercise. The bottom region is blank until a certain type of display is requested.
The Client Results screen displays the name and schedule of the client for whom
results are displayed. Exercises in the schedule are sorted and coloured to help finding useful
information quickly. Completed exercises are displayed on top, then pending exercises, and
not configured exercises are displayed last (and obviously there can be no results for them).
As soon as an exercise is clicked on, it becomes highlighted and the tasks in it appear inside
the task region on the right. Clicking on a task highlights it as well.
When a selected (highlighted) exercise contains more than two tasks that have
produced viewable results, then the “Display graph” button becomes activated. Clicking on
this button the results for the series of therapy tasks in the selected exercise and presents them
graphically by session date. In this way you can track a client’s progress through time on
tasks they repeat a lot. For recognition tasks there are two lines in the display (see Figure X):
The blue line shows percent correct, that is, the percentage of attempts in which the target was
successfully recognised. The magenta line shows the average confidence score for these
successful attempts, that is, how close a match they were to the recogniser model.
When a selected (highlighted) task has produced results then the “View” button
becomes activated. Clicking on this button presents the results for this task in numerical form,
as in Figure X below.
96
OLP User Manual v0.1.4
March 2004
Figure X. Graphical presentation of results for a series of repeated tasks in an exercise. Here, a
“recognise syllables” exercise has been selected, in which five repetitions of a recogniser task have been
completed, but only four of them have produced results (perhaps one repetition was aborted early on).
Results are arranged by date so that progress can be tracked on a calendar basis.
Figure X. Numerical presentation of results for a task, here a recognition task.
97
OLP User Manual v0.1.4
March 2004
12.4. Viewing tools
The concept of viewing tool is related to the task type. Recall the each type of task is
carried out by a corresponding tool, such as the speech recogniser with graphical interface, the
recorder, or the pitch/volume display tool. Each type of task produces a corresponding type
of outcome, or results, and these results can be viewed using the corresponding viewing tool.
For the time being, recording tasks produce recordings, which can be examined (“viewed”)
with the recorder itself, in “play” mode. That is, the recorder is also the viewing tool for
recordings. Results of recogniser practise tasks are viewed with the progress graph tool
(discussed above), as are results of scored pitch and volume tasks. STAPtk results are not
viewable from OLPy due to the incomplete integration between the corresponding software
components.
More details to follow awaiting implementation on the basis of available results.
12.5. Statistics
Awaiting implementation
12.6. Tracking Client progress
Awaiting implementation
98
OLP User Manual v0.1.4
March 2004
13. Remote therapy
OLP is designed to allow remote supervision of speech therapy. This means that a
therapist can assign and transfer tasks to a client who is located off-site, and the therapist can
view the client’s results after the client has practised. The client can retrieve assigned
exercises and practise at home, and send off the results to the therapist as desired. The general
flowchart of remote supervision is defined as shown in the following diagram (Figure X):
1. Therapist with client
at office or clinic
Assessment, schedule,
recordings, exercises
3. Therapist uploads to
the OLP server client
sub-schedule (client
information, exercise
setup, configurations,
target models (audio)
7. Therapist downloads
client data, messages,
reviews results and
usage statistics.
OLP remote server (TELEMACHOS)
2. Therapist updates
client’s schedule and
selects parts of it for
remote administration
4. Client registers on the
network, downloads
information, messages
and subschedule
5. Client selects exercise
from subschedule,
practices at will,
reviews own results
6. Client uploads to the
OLP server usage
statistics, results
(metrics), audio data?
Figure X. Remote OLP use scenario.
In addition to the regular therapy supervision process, shown in the diagram, the therapist and
client must make themselves known to the OLP main server, that is, the central repository
through which all data exchange takes place. Therefore, there are certain registration steps to
be taken before therapy data exchange can take place. In the following sections, both
registration and therapy supervision are explained in detail.
99
OLP User Manual v0.1.4
March 2004
13.1. Therapist-side functionality
As you may recall from the installation of the OLP software, there is a distinction
between therapist and client installation. Remote therapy supervision is the main purpose of
this distinction. Thus a client can install a scaled-down version of OLPy that supports
receiving predefined schedules through the Internet, without having to deal with unnecessary
the complexities related to selecting clients, creating schedules and configuring exercises. In
order for the client to be able to practise remotely, the therapist must
a) register her/himself on the remote OLP server (once only, not for each client!);
b) register the client in question on the remote OLP server and obtain a clientspecific registration code to pass on to the client;
c) prepare a set of exercises (sub-schedule) for the client up to the point where there
are pending client tasks on which the client can practise unsupervised;
d) upload the sub-schedule by selecting the appropriate exercises to send off to the
client;
e) retrieve practise results after the client has gone through some unsupervised
practice.
13.1.1. Therapist registration on the server
The OLP server is a computer located outside of all therapists’ installations. Initially,
this computer knows no therapist or client, so each potential user (therapist or client) must
make her/himself known to it. This means that each therapist who wants to use the server to
exchange information with clients over the Internet must first register on the server. To
register, the therapist simply clicks on “Internet Registration” in the Therapist section of the
main OLP screen (just under the new therapist button; see Figure X on page X). If the
computer is not connected to the Internet the therapist will be asked to connect; obviously,
registration is not possible without an active Internet connection. Registration is carried out
automatically. When completed, the therapist may disconnect from the Internet, and go on
using OLP locally, exit, or proceed with further Internet activities.
Once a therapist is registered, the registration button is deactivated for this therapist
and cannot be used again. This is necessary to ensure proper connection to one’s clients, both
locally and remotely.
The therapist code provided by the remote server is uniquely
associated with this particular therapist installation and with the clients entered on this
installation. The code cannot be duplicated, either on other computers or even on the same
computer after OLP is completely removed. If this computer is replaced, or a new OLP
system is installed, then information about previous remotely supervised clients will be lost
and their data will not be available for retrieval or display (e.g., of results). Therefore
therapists are advised to be conservative with their primary OLP installation to be used for
remote therapy supervision.
13.1.2. Registering a new client on the server
To transfer exercises to a client for remote practice, the therapist must first register the
client on the server, so that this client’s schedule will be stored and identified properly and
will not be mixed up with other clients’ schedules. To register a client on the server, you
must first have entered the client’s information in OLPy (as for the usual, local use of the
software). Then you just click on “Internet Registration” in the Client section of the main
OLP screen (just under the new client button; see Figure X on page X). As in therapist
registration and every other remote function, you need an active connection to the Internet to
register your client(s).
Registration is carried out automatically. When completed, the
Internet registration button for this client will display the client’s registration code as provided
by the remote server. This code will be permanently associated with this client and is needed
100
OLP User Manual v0.1.4
March 2004
for the client to make her/his own installation of the OLP software known to the remote server
as corresponding to your registration. So you will have to give this code to your client in
exactly the same form as it is provided by the therapist software. Client registration may take
place at any moment after a new client is entered in the OLPy database, not necessarily
immediately but possibly after a period of local therapy only.
Once a client is registered by the therapist, the registration button is deactivated for
this client and cannot be used again. This is necessary to ensure proper syncrhonisation of a
client’s data, locally and remotely. The client code provided by the remote server is uniquely
associated with this particular therapist installation and with this particular client. The code
cannot be duplicated, either on other therapist computers or even on the same computer after
OLP is completely removed. If this computer is replaced, or a new OLP system is installed,
then information about this remotely supervised client will be lost and her/his data will not be
available for retrieval or display (e.g., of results). Therefore remote therapy administration for
a particular client can be performed from a single therapist computer only, the computer from
which this client was originally registered on the server.
13.1.3. Uploading a client’s schedule for remote practise
bla
13.1.4. Downloading clients’ results from the server
bla
13.2. Client-side functionality
bla
13.2.1. Client registration on the server
bla
13.2.2. Downloading a schedule from the server
bla
Reminder: Be sure to connect to the Internet before initiating any remote functions.
13.2.3. Uploading results to the server for the therapist to view
bla
101
OLP User Manual v0.1.4
March 2004
14. Implementation of therapy strategies
This chapter is meant to provide guidelines and instructions on how using the software
allows the therapist to implement special strategy and achieve specific goals for certain types
of clients.
14.1. Progressive attainment of target
Guidelines on building and using progressions of good-bad recognisers.
Need therapist input
14.2. Training for consistency
Instructions specific to clients with inconsistent productions (e.g., dysarthrics)
Need therapist input
14.3. Using non-client models
Guidelines for using spoken models recorded by the therapist or a client’s peers.
Need therapist input
14.4. Generalisation considerations
Guidelines and recommendations to facilitate generalisation of trained productions.
Need therapist input
14.5. Other guidelines
Possible topics: Need for phonation training; relevance for hearing impairment;
special considerations for cleft palate; special considerations for low variability.
102
OLP User Manual v0.1.4
March 2004
15. Quick run through common OLPy usage
15.1. Set up a client’s schedule
1. Select client
2. Add exercises
to schedule
1. Select therapy level
2. Select exercise type
3. Select exercise
4. Add to schedule
103
OLP User Manual v0.1.4
March 2004
15.2. Configure exercises
1. Select not configured exercise
2. Configure
1. Modify exercise name
2. Select not configured task
3. Configure
104
OLP User Manual v0.1.4
March 2004
15.3. Configure tasks
15.3.1. Recorder task
1. Modify task name
2. Check
and adjust
list of items
3. Optionally, add items,
from library or new
4. Adjust presentation
15.3.2. Recogniser task
1. Select recogniser
2. Select target
and interface
3. Adjust models,
repetitions,
instructions
105
OLP User Manual v0.1.4
March 2004
15.3.3. Any STAPtk task (STAPtk recording task shown here but the same applies to all)
1. Describe the map
(e.g. by the sound
SAMPA symbols)
2. If you need specific
existing recordings,
indicate their location
OR
If you need a specific
pre-existing map,
select it from the list
15.4. Session with existing client (with defined schedule)
1. Select client
2. Start session
106
OLP User Manual v0.1.4
March 2004
15.5. Client session
1. Select exercise
2. Run pending task
15.6. Phonetic map tasks
15.6.1. Record in STAPtk
Exit when done
1. Click on Record
3. Click to save and
advance to next
2. Speak into microphone;
watch waveform, spectrogram
107
OLP User Manual v0.1.4
March 2004
15.6.2. Transfer OLPy recordings to STAPtk
1. Set criteria
2. Select and click to highlight
3. Transfer
15.6.3. Label (transcribe recordings) in STAPtk
Exit when done
1. Listen to sound
Check spectrogram
and repeat as needed:
108
2. Click on boundary
3. Type in symbol
OLP User Manual v0.1.4
March 2004
15.6.4. Create (design & train) map
4. Exit
1. Click-and-drag targets
to their map positions
2. Save map
3. Train map
15.6.5. Practise on a phonetic map
1. Click on Record
2. Speak into microphone;
watch animation
109
OLP User Manual v0.1.4
March 2004
16. Notes
multilinguality
110
OLP User Manual v0.1.4
March 2004
Appendix A: Glossary and abbreviations
To be added in a later version.
111
OLP User Manual v0.1.4
March 2004
Appendix B: SAMPA symbols
To be copied from Chapter X (maybe get the full charts)
112
OLP User Manual v0.1.4
March 2004
Appendix C: Library codes
The following table shows the codes used for items in the system “lexicon,” that is,
the library of items used as stimuli for recording and other tasks. These codes correspond to
the criteria available for item selection.
English
L
Library
E
Greek
English
G
Ελληνικά
S
M Manner
P
Place
V Voicing
Cl
Swedish
Swedish
1
stop
κλειστά
stop
2
fricative
τριβόµενα
fricative
3
affricate
προστριβόµενα
lateral
4
approximant
υγρά
tremulant
5
short vowel
--
nasal
6
long vowel
φωνήεντα
short vowel
7
diphthong
δίφθογγοι
long vowel
8
nasal
ρινικά
unrounded
9
--
--
rounded
a
bilabial
διχειλικά
bilabial
b
labiodental
χειλοδοντικά
labiodental
c
dental
µεσοδοντικά
dental
d
alveolar
φατνιακά
postalveolar
e
post alveolar
--
alveolopalatal
f
velar
--
palatal
g
high
--
velar
h
mid
υπερωικά
laryngeal
i
low
--
close
j
front
ουρανικά
close-mid
k
back
πρόσθια
open-mid
l
central
κεντρικά
open
m
--
οπίσθια
front
n
--
--
central
o
--
--
back
v
h
--
--
+
voiced
ηχηρά
voiced
-
voiceless
άφωνα
voiceless
L
Cluster
Συµπλέγµατα
Cluster
113
OLP User Manual v0.1.4
S
Po
Level
Word
position
March 2004
U
Single sound
Μεµονωµένοι ήχοι
Single sound
V
CV/VC
W
DDK level 3
X
DDK level 4
Y
Word
Syllable
Repeating
same syllable
Repeating
different syllable
Single word
Z
Multisyllabic
P
Phrases
Συλλαβές ΣΦ/ΦΣ
∆ιαδοχοκίνηση,
ένα στοιχείο
∆ιαδοχοκίνηση,
εναλλάξ
∆ισύλλαβες λέξεις
Λέξεις 3 και άνω
συλλαβών
Φράσεις
A
Word initial
Αρχή λέξης
Word initial
B
Word medial
Μέσα στη λέξη
Word medial
C
Word final
Τέλος λέξης
Word final
114
Polysyllabic word
Phrases
OLP User Manual v0.1.4
March 2004
Appendix D: Installation Quick Reference
To install everything from scratch, you need these files:
ActivePython-2.2.1-222.msi
wxPythonWIN32-2.4.2.4u-Py22.exe
snack22p.exe
in folder swinst
Numeric-22.0.win32-py2.2.exe
PST-1.2.exe
chaco-0.1.0_alpha_37.776.win32-py2.2.exe
mgrtl.exe
in folder staptk
staptk118.exe
OLPy_2004XXXX_Setup.exe
in folder kernel
Install in this order. Run each file by double clicking on it and click through
everything selecting “Next>” (or “Yes” or “OK” as appropriate) to accept default selections.
If you don’t have Microsoft Access installed and you do want to be able to update
your OLP database with a newer version distributed by the OLP developers in the future
without losing previously existing client information and therapy data, then you will have to
install ART2KMin.exe (in folder swinst) according to the instructions in Section 3.3.1.
If you don’t see the OLP logo during OLPy installation and you are instructed to
install a video decoding component, you will have to install iv5setup.exe (in folder
swinst) by simply clicking through.
To upgrade OLPy, run the newer OLPy_2004XXXX_Setup.exe and select
“Repair” if you want to keep your client information and therapy data. If you don’t want to
keep anything, select “Remove” and then re-run to install anew. Do not remove or reinstall
any of the other programmes listed above unless explicitly instructed to do so.
115