1
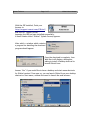
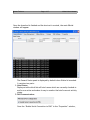
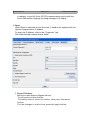
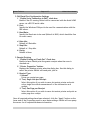
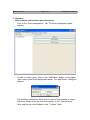
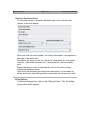
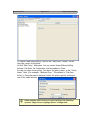
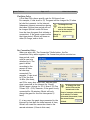
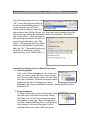
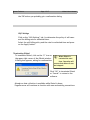
Romat Telecom
Page: 1/17
GHotel User's Manual
Romat Telecom – GHotel
User's Manual
October 2004
Author: Daniel Shlezinger
1. Description
GHotel is a management and billing tool, designed to interface to Romat
Telecom's Hydra and/or Pegasus servers (on the application side), and to the
hotel's PMS server (on the hotel side). GHotel provides multiple options for
creating various billing models and policies (Flat Rate, Per Connection or
Accumulative Time, and any combination thereof). It can post charges to
the hotel's PMS system, or interface a standalone printer in the absence of
such system. GHotel is written in Java and deployed using Java Web Start,
and requires no installation (aside from installing the Java Runtime
Environment itself), and can be updated automatically over the Internet
whenever a new version is released.
2. Features
1. Easy to use, Friendly GUI application which requires no installation.
2. Automatically upgradeable with no user interaction.
3. Supports a serial connection to the hotel's PMS Software.
4. Supports Printing of receipts (Either automatically when a guest checks
out, or at any later time using the Charge History Feature).
5. Supports re-transmission of past charges using the Charge History Feature.
6. Built-in billing policies provide a wealth of options for any number of
possible scenarios.
Romat Telecom
Page: 2/17
GHotel User's Manual
3. Installation
Minimal system requirment:
Windows version
: 98SE
CPU
: Pentium III 500Mhz
Memory
: 128Mb
GHotel is based on Java.In order to run GHotel, A Java runtime Environment
(JRE) must be installed. If it is installed, please proceed to the next step. If
not, please follow these instructions:
4.
1. Point your web browser to http://java.sun.com/j2se/1.5.0/download.jsp
2. On this page, Several sections appear. Scroll down to the section titled
“J2SE 5.0 JRE”. Under this section, there is a link to download the JRE
(“Download JRE”).
3. The following page presents the Sun Microsystems License Agreement.
Select “Accept” on the lower right corner of the window, and click
“Continue”.
4. The following page presents several download links. Click on “Windows
Off line Installation, Multi-Language”. The download should begin shortly.
Save the file to a temporary directory.
5. When the download has finished, locate the file you have just
downloaded and execute it. It should present you with an installation
wizard for the JRE.
6. Click “Next” through all installation phases (Default JRE Installation
options are fine for GHotel).
Romat Telecom
Page: 3/17
GHotel User's Manual
With the JRE installed, Point your
browser to
http://support.romat.com/GHotel/,
and click on “Launch GHotel”.
Assuming the JRE has been installed successfully,
A Small window titled “GHotel” (Splash Screen) appears.
After which, a window which contains
a progress bar detailing the download
progress should appear:
Once the download is complete, Java
Web Start will display a dialog box,
asking to install a Desktop shortcut to
launch GHotel from.
Answer “Yes” if you would like to have a desktop and start menu shortcuts
for GHotel created. From now on, you can launch GHotel from your desktop
shortcut or Start menu, without the need to launch the web browser:
Romat Telecom
Page: 4/17
GHotel User's Manual
Once the download is finished and the shortcut is created, the main GHotel
window will appear:
The General Status panel is displayed by default when GHotel is launched.
It contains two parts:
1. Hotel Status:
Displays a table which lists all hotel rooms which are currently checked-in
and/or are active and makes it easy to monitor the hotel's current activity
status.
2. PMS Communication:
Once the “Enable Serial Connection to PMS” in the “Properties” window ,
Romat Telecom
Page: 5/17
GHotel User's Manual
is checked, a log of all Serial (RS-232) communication activity with the
hotel's PMS system (Outgoing/incoming messages) will display.
4. Setup
When GHotel is launched for the first time, It needs to be supplied with the
Hydra or Pegasus server IP Address.
To enter the IP Address, click on the “Properties” tab.
The Properties tab contains several fields:
1. Server IP Address:
Add one or more Hydra or Pegasus Servers.
To add press the plus button.
To remove select a server for delete, then press the minus
button.
For the changes to take action, press the apply button.
Romat Telecom
Page: 6/17
GHotel User's Manual
2. PMS Serial Port Configuration Settings:
1. “Enable Serial Connection to PMS” check box:
Enable if the PC running GHotel will be connected with the Hotel's PMS
server via a RS-232 serial cable.
2. Port:
Specify the Windows COM port to be used for communication with the
PMS server.
3. Baud Rate:
Specify the Baud rate to be used (Default is 9600, which should be fine
for most cases).
4. Data bits:
Default is 8 Data bits.
5. Stop Bits:
Default is 1 Stop bits.
6. Parity:
Default is None.
3. Receipt Printing:
1. “Enable Printing on Check-Out” Check box:
Enable to have GHotel print the guests receipts when the room is
checked out.
2. “Printer Properties” button:
Displays the Windows printer selection dialog box. Use this dialog to
select the printer GHotel will send print jobs to.
3. Receipt Type:
1. Normal:
Prints one receipt per page.
2. Text, Single Line per Receipt:
Select this option if you wish to use a dot-matrix printer and print
only a single line which summarizes all of the information as a
receipt.
3. Text, One Page per Receipt:
Select this option if you wish to use a dot-matrix printer and print an
entire page as a receipt.
Once all required settings have been selected, click the “Apply” button on the
lower end of the Properties panel to save these settings. GHotel will now query
the server for all required hardware information.
Romat Telecom
Page: 7/17
GHotel User's Manual
5. Operation
Room creation and hardware port association:
Click on the “Room Management” Tab. The Room management panel
appears:
In order to create rooms, Click on the “Add Rooms” button, on the upper
right corner of the Room Management panel. The “Add Rooms” dialog box
appears:
The Add Rooms dialog box allows you to create a large number of rooms
with ease. Simply enter the first room number in the “Start At Room”
field, and the last room number in the “To Room” field.
Romat Telecom
Page: 8/17
GHotel User's Manual
Once you click “OK”, the rooms are created and added to the room tree
which is displayed on the left. To see the newly created rooms, expand the
room tree by double-clicking the “Hotel Rooms” folder.
i
All newly created rooms are associated with the default room
group, which is called “Default Group”.
All of the hotel's room groups appear under the “Hotel Rooms” Root folder.
The newly created rooms are currently inside the “Default Group” folder.
Double click it to display all of the newly created rooms:
The Room tree folders can be
Collapsed (closed) and Expanded
(opened) by double clicking the folder
icon with the mouse pointer.
i
In order to create additional room groups, and
to associate the hotel rooms to these groups,
Click on the “Add Room Group” button.
In the “Add a new Group”
dialog box, type in the name of
the group in the “Group Name”
text field, and then proceed to
select the rooms to be
associated with this room
group.
To select multiple
rooms, hold the
“Ctrl” key while
selecting rooms using the
mouse.
i
Romat Telecom
Page: 9/17
GHotel User's Manual
Hardware Port Association
To associate a room to a specific hardware port, first click the room
number in the tree display.
When you click the room number, the “Room Information” box appears to
the right of the Room tree.
First select the sever ip from the “Server Ip” drop-down list, then select
from the “Associated Hardware Port” drop-down list, server's avilable
port.
Repeat this step in order to associate the rest of the rooms to their
appropriate hardware ports.
Once all of the hardware ports have been associated, It is necessary to
define and create new billing policies to associate the various room with.
Billing Policies
To define billing policies, click on the “Billing Policies” Tab. The billing
policy editor panel appears.
Romat Telecom
Page: 10/17
GHotel User's Manual
To create a new billing policy, click on the “Add Policy” button, on the
top right corner of the panel.
On the “Edit Policy” dialog box, You can create three different billing
policies: Flat Rate, Per Connection, and Accumulative Time.
In order to create a new policy, first enter the policy name, in the “Policy
Name” field, (For example: “Business Floor”. The default is “Flat Rate
Policy”). Once the name is entered, select the policy type by clicking on
one of the radio buttons.
i
GHotel decides which currency to use according to the Operating
system's “Regional and Language Options” configuration.
Romat Telecom
Page: 11/17
GHotel User's Manual
Flat Rate Policy
A Flat-Rate Policy has a specific rate for 24 Hours of use.
For example, If rate is set to $5, The guest will be charged for $5 when
he/she first connects to the Internet.
To change the rate,
Subsequent Internet connections during
click on the Arrows
that same 24-Hour time period will not
next to the amount to
be charged (GHotel counts 24 Hours
from the time the guest first initiates a increase or decrease the
connection). If the guest connects after charge by
$0.10.
that time period, GHotel will issue an
other $5 charge, and so forth.
i
Per Connection Policy
When you select the “Per Connection” Radio button, the Per
connection Policy editor appears. Per-Connection policies contain two
time periods, each
with its own rate
attached to it. The
guest is billed
according to the
amount of time
he/she stays
connected. For
example, If rate is set
to $5 for the first
1h:00m (One hour),
and $5 for every hour after that, and the guest
stays connected to the Internet for 3 hours,
To change the time
GHotel issues a charge for $15 (1 Hour X $5, Plus
period, click on the
2 Hours X $5 = $15). However, if the guest is only
arrows next to the
connected for 30 minutes, GHotel will only
time to increase or decrease
charge the guest for the first time period (1
by 1 minute. For faster
hour).
increment/decrement, leave
i
If, at any case, the guest stays connected to the
Internet for less than the initial amount of time,
GHotel will round the connection time to the
nearest minimum (1 Hour in this case).
the mouse button
clicked.
Romat Telecom
Page: 12/17
GHotel User's Manual
1. Accumulative Time Policy
To create an Accumulative
Time Policy, click on the
“Accumulative Time”
Radio button.
The Accumulative Time
policy has three different
time periods for charging
the guest. The first two
time periods can be cut
into slices, with a rate set
for each slice, while the
3rd time period is charged
only when the guest stays
connected for longer than
the first two time periods.
The policy also has a
Maximum Cost option, to
set an upper limit on the
charge (So the guest will
not be charged for more than the said amount, even if he/she has been
connected for a very long period of time). This policy also has various
options that affect the way that GHotel calculates and produces the
charge:
1. Per Day: Policy calculation is restarted every 24 Hours, at the
time which the user first connected to the Internet, or at a
different time, which is set using the “Day Start Hour” check box
and spinner.
2. Per Connection: Policy calculation is restarted every connection.
3. Per Stay: The policy calculation is performed when the guest
checks out.
Romat Telecom
Page: 13/17
GHotel User's Manual
Once the billing policy is all set, click
“OK” to save the policy and add it to
the list of defined billing policies. To
review the policy and any other
policies that are defined, select the
policy name in the “Billing Policies” list. Selecting a policy displays the policy
data to the right. Below the description field are two buttons, “Edit Policy”
and “Delete Policy”, which are used for
policy editing and deletion (To edit the
currently selected policy, click “Edit
Policy”. This brings up the Policy editor.
Modify any existing data to your liking
and click “OK”. The modified policy will
be saved. To delete the currently
selected policy, click “Delete Policy”).
Associating a billing policy to a Room/Room Group
1. Room Assignment
Click on the “Room Management” tab. Select the
room you wish to assign the policy to by clicking
on the room number on the tree to the left. Once
the room is selected, The Room Information panel
appears on the right. A billing policy can be
assigned to the room by selecting it from the “Associated Billing Policy”
drop down list.
2. Group Assignment
To assign a billing policy to an entire group, select
the room group from the Room tree by clicking
the Folder icon. In the Group information panel
that appears on the right, Select a billing policy
from the “Associated Billing Policy” pull down list.
Once selected, the same billing policy will be
associated with every room within that group.
Romat Telecom
Page: 14/17
GHotel User's Manual
Checking In/Checking Out Rooms
Hotel Rooms can be checked in or checked out in two ways:
1. Using the Room Information Panel
The Room Information panel contains Check-In and Check-Out buttons.
When clicking the “Check In” Button, the
Check-In panel appears. The Check-In
panel contains several fields for relevant
guest information, such as First and Last
names, address, E-Mail and phone and fax
numbers. When all of the guest
information is entered, click “OK”. The
room icon in the
room tree display
is changed to
indicate that the
room is currently checked in.
When clicking the “Check Out” button, the
room is checked out and the Room tree
icon is changed to indicate that the room
is currently vacant.
Please allow a minimum of 2 minutes between check out and a new
check in to the same room, waiting less then 2 minutes can lead to
erroneous calculation values.
2. PMS Communication
When the Hotel's PMS software sends a check-in or a check-out message
to GHotel, GHotel checks the room in (using the guest information
provided by the PMS software) or out.
On check out, GHotel produces a charge
GHotel enables a
and optionally prints a receipt (If so
room's associated
defined in the properties panel).
hardware port when it
is checked in. Similarly,
After a room has been checked in, A line
When a room is checked
containing the room number, Check-In date,
out, it's associated hardware
Guest name and activity information is added port is disabled.
to the table in the General Status panel,
which makes it easy to monitor the guest
i
Romat Telecom
Page: 15/17
GHotel User's Manual
Internet activity status.
Activity Monitoring
To monitor normal guest activity, click on the “General Status” tab.
The General Status panel features a status table which lists all checked-in
rooms. Active rooms have activity counters which display the Internet
connection duration:
When the room status changes to “Active” after the user
has connected to the Internet, the Room Editor icon
changes to indicate that the room is currently active.
Reviewing GHotel's Charge History
In order to view all of the charges made, click on the “Charge History” Tab.
The Charge History panel displays a table which lists all of the charges,
sorted by the time the charge was originally issued:
Charges can be Printed (to re-issue receipts, in case the original receipt was
lost or not issued), Transmitted to the PMS software (If the PMS computer
was disconnected or disabled at the time the charge was made), or deleted.
To Print a charge:
Select a charge and click on the “Print
To Select multiple
Charge” button. Depending on the print
charges, click the first
preferences, the selected charge will be sent
charge and move the
to the attached printer.
mouse cursor down the
table until it reaches the last
To Transmit a charge to the PMS:
charge, or hold the “Ctrl” key
Select a charge and click on the “Post
while selecting.
i
Romat Telecom
Page: 16/17
GHotel User's Manual
Charge to PMS” button. The selected charge will be sent to the PMS
software.
To Delete a charge:
Select a charge and click on the “Delete
Charge” button. The charge will be deleted
from the GHotel database.
i
Deleted charges are
LOST FOREVER and
cannot be recovered!
To Delete a room:
Click on the “Room Management” tab. Select the room you wish to
delete and press on the 'Delete Room' button.
You probably get this confirmation dialog:
To Delete some rooms:
Click on the “Room Management” tab.
Press on the 'Remove Rooms' button.
You get this dialog:
To delete some rooms, select the appropriate rooms and press on
Romat Telecom
Page: 17/17
GHotel User's Manual
the 'OK' button.you probably get a confirmation dialog.
Wifi Settings
Click on the “Wifi Settings” tab, for determine the policy of wifi users
and the billing rate for unlimited time.
Select the wifi billing policy and the rate for unlimited time and press
on the 'Apply' button.
Terminating GHotel
To terminate GHotel, click on the “X” icon on
the upper right corner of the GHotel window.
A Dialog box appears, asking for confirmation:
When GHotel is
restarted the next
time, Operation will
resume from where it was
last stopped.
i
Click “OK” to terminate GHotel
or “Cancel” to return to the
software.
Altough no data collection is available while Ghotel is down,
Pegasus server will continue to function with new and existing connections.