1
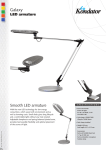
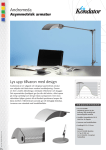
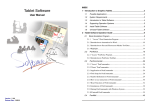
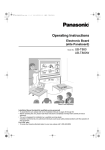
MANUAL – User’s manual User’s Manual Page 1 of 18 Copyright CONCEPTUM 2012 MANUAL – User’s manual LMA i-Interactor Users Manual I. i -Interactor System………………………………01 II. i-Cam User Instruction…………………………02 III. i-Pen User Instruction…………………………….03 IV. “i -Interactor Control Panel” Instruction……….04 V. “Screen Pen” Instruction…………………………10 VI. FAQ…………………………………………………11 Page 2 of 18 Copyright CONCEPTUM 2012 MANUAL – I. LMA User’s manual -Interactor System 1.i-Cam 2.i-Pen 3.USB cable 4.Manual and driver CD 5.Hosting bracket 6.LMA-tool (may be provided as a download file) Page 3 of 18 Copyright CONCEPTUM 2012 MANUAL – User’s manual II. i-Cam User Instruction 1. Lens: Adjust the lens to get clear images. 2. Screw:Lossen it and rotate i –Cam to make sure i –Cam can see the whole projection field. And then, fasten screw and lock current i –Cam position. 3. Suckers: Press i –Cam , it can stick on the flat table steady. 4. USB port: Connecting i-cam with PC. Hosting Operation: 1. Metal strap 2. Connection bolt 3. Metal bracket Nomal Hositing:As shown in left above figure, wrap the metal strap around the projector steeve and connect with the bolt. Upside down Hoisting: As shown in right above figure, remove the i –Cam screw firstly. Upsidedown the i –Cam. Install the screw again and the other operation is same with Page 4 of 18 Copyright CONCEPTUM 2012 MANUAL – User’s manual normal hositing. III. i-Pen User Instruction 1. LED:Infared LED with a scuff sleeve, make sure i –Cam can see it when writing. 2. The latest all the direction touch switch: ensure naturally and smooth writing.. 3. Right mouse key: Press it and send a right mouse message to PC. 4. PageUp key. 5. PageDown key. 6. Battery cell: Using 2-AAA batteries. Operation Mode: Touching operation: Touch the penpoint on wall or screen slightly. Touchless operation: Press the penpoint with finger, make sure the penpoint is visible to i –Cam. Well working within a distanc 10 cm to the screen or wall. The scuff sleeve is removable when it is badly weared. Page 5 of 18 Copyright CONCEPTUM 2012 MANUAL – IV. User’s manual INSTALLATION OF DRIVERS: Run the driver Choose language Page 6 of 18 Copyright CONCEPTUM 2012 MANUAL – User’s manual Follow the Next steps Page 7 of 18 Copyright CONCEPTUM 2012 MANUAL – User’s manual Choose the complete installation mode and install: Page 8 of 18 Copyright CONCEPTUM 2012 MANUAL – User’s manual “i -Interactor Control Panel” Instruction Press Finish to complete and see the icon on your desktop. Page 9 of 18 Copyright CONCEPTUM 2012 MANUAL – User’s manual 1. Calibration Open the “i -Interactor Control Panel” and adjust it position to let it see the entire projection field as shown in the following picture:. Auto Calibration Press , the projector will display an 8×6 chess-board picture for automatically calibration. If the calibration is completed successfully, one dialog box will appear for the user selection. In default, the system will start in 5 seconds. If the calibration failed, it will turn to Manually Calibration automatically. Note:Do not block the projection field when doing calibration. Page 10 of 18 Copyright CONCEPTUM 2012 MANUAL – User’s manual Manually Calibration When the Auto. Calibration procedure failed, please use the Manu function instead by pressing . In this procedure, the projector will display 9 calibration Red points sequentially. The user is required to click these points’ centers one by one with the pen. When all the points have been clicked, the system can be calibrated ready. Page 11 of 18 Copyright CONCEPTUM 2012 MANUAL – User’s manual Note:When the system is calibrated ready. Do not move i –Cam or projector. Otherwise, you have to re-calibrate the system. Page 12 of 18 Copyright CONCEPTUM 2012 MANUAL – User’s manual 2. Run When the system has been calibrated, it will start in 5 seconds, or the user can run it by pressing instead. And the control panel will be hided to the bottom toolbar. Under the Running status, the interactive pen is active. The user can use it as a mouse. If you want to use the control panel, just double click the icon on the bottom toolbar. Press , the system will be paused and the button will also change to . Click it the system will continue to work. 3. Running Status In default, when the system is running, the camera image will not be displayed. If you want to see it for system debug, please click . Default, the Status toolbar will not be displayed. To display it, please press , the toolbar is showed as: The Status contains: current frame rate, the pen’s coordinate, status of left mouse key and the speckle size etc. The sample time slider is used to adjust the frame rate value. Note: 1. Do not display the camera picture when system is running to improve system speed. Page 13 of 18 Copyright CONCEPTUM 2012 MANUAL – 2. User’s manual According to the user’s computer performance, please adjust the Sample Time value to make the Frame Rate between 30-40, and get the best system performance. 4. Advanced Settings Press , the advanced settings dialog will be displayed as: If your PC connects with more than one camera, please select the camera of i –Cam . Exposure Time: Control the exposure time of i –Cam. Smaller value gets darker picture and vice versa. Default value is -8. When the value is changed, calibration is required. Threshold:Small value means the IR speckle or pen can be detected easier. But it also increases the possibility of ambient light disturbance. The suggestion adjust range is 150-200, default value is 180. Speckle size (min): Minimum size of the IR speckle size (in pixel) that the system can detect. smaller value can improve the system sensitivity but also increases the possibility of ambient light disturbance. Default value is 5. Speckle size (max): Maximum size of the IR speckle size (in pixel unit) that the system can detect. It is designed to filter some big high reflection region. Default value is 1000. Tolerance: Improve this value can increase the stability of the system, but also decreases its sensitivity. Default value is 0. Page 14 of 18 Copyright CONCEPTUM 2012 MANUAL – User’s manual Enable left mouse button:Default, when the pen is pressed down, it is assumed as the left mouse button down. Auto-code: When the pen is pressed down, it will send a authentication code to the i-Cam. Note: General users are NOT suggested to modify these parameters. Page 15 of 18 Copyright CONCEPTUM 2012 MANUAL – User’s manual V. ScreenPen User Instruction Double click the icon , the user interface as shown below: 1. Screen draw: draw on the screen directly. 2. Create a new white drawing region. 3. Pen tool: switch to drawing mode. 4. Brush tool: switch to brush mode. 5. Set the pen width. 6. Set the pen color. 7. Clear the drawing board. 8. Save the drawing: the screen content will be saved to the folder specified by the user, default, it will be saved in ‘/img’ of the program installation directory. 9. Open the soft keyboard. 10. Open the help document. 11. Quit. Note: To the Windows7 users, please set the program compatibility of the ScreenPen as follows: Right click on icon of Screen Pen Select properties Select the compatibility tab Check ‘Disable desktop composition’. Page 16 of 18 Copyright CONCEPTUM 2012 MANUAL – User’s manual VI. FAQ Under the running status, if the pen is not touched the screen, the video picture should be very dark or black. If it is not, please adjust the Exposure Time to make it darker. When the pen has touched the screen, there should be a bright spot on the video picture, if it is not, please adjust the Exposure Time to a greater value. If the system cannot detect the pen position, please try a smaller Threshold or a smaller Speckle size (min) When the projection distance or projection screen is small, and the system cannot work correctly, the user can adjust the exposure time lower, say -9 or -10. When the exposure time has been changed, the user should calibrate the system again to active the exposure setting. If the there is frequent delay in the pen buttons, and the penpoint is not damaged, please consider change the new battery. There will be abrasion to the penpoint in the touching operation. But it will not affect its usage. If there are many 2.4G devices in the environment, it may affect the use of the system. The user can disable the ‘Advanced Setting Auto-code’. Then, the buttons on the pen may ineffective, but will not affect the writing function of the pen. Page 17 of 18 Copyright CONCEPTUM 2012 MANUAL – User’s manual How to locate LMA-interactor DISTRIBUTOR CONCEPTUM S.A. 12 Cheyden str 104 34 Athens Greece Tel. +30 210 88 38 858 Fax +30 210 88 38 691 [email protected] Page 18 of 18 Copyright CONCEPTUM 2012