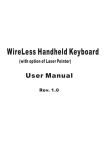
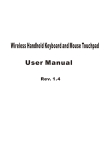
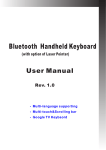
1
User Manual
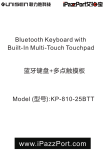
Bluetooth Handheld
Keyboard and Mouse touchpad
TM
- IPazzPort I
Rev: 01
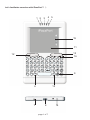
Let’s familiarize ourselves with iPazzPort™ Ⅰ:
1 2
4 5
3
15
11
12
F1
!
F2
1
:
F8
@
#
;
,
2
F10
3
$
%
.
”
4
Q
+
A
W E
*
S D
/
\
|
}
Z
X
{
C
R
F
V
5 6
T
=
^
Y
’
?
G H
[
~
U
<
J
-
8
(
PU
page 1 of 7
PD
P
BS
M
Alt
SF RF
Del
10
8
)
0
.
N
6
9
I` O
>
L
K
]
B
Esc Ctrl Cap
7
&
7
14
13
16
9
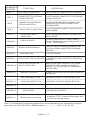
NUMBERED
FEATURE
OPERATION
FUNCTION
LED 1
RECHARGE INDICATOR
LED 2
CONNECTED TO EXTERNAL
POWER SOURCE
LIGHTS WHEN CONNECTED TO EXTERNAL
POWER SOURCE.
LED 3
CONNECTION ESTABLISH
STATUS INDICATOR
BLINKS WHEN BUILDING CONNECTION,
AND GOES OUT WHEN CONNECTION
ESTABLISHED.
LED 4
INPUT SWITCH INDICATOR
LIGHT GOES OUT WHEN FULLY CHARGED
LIGHT ON WHEN CHANGE TO SWITCH KEY
INPUT MODE
LED 5
CAPS LOCK INPUT
INDICATOR
LIGHT ON WHEN CHANGE TO CAPS LOCK
INPUT MODE.
ARROW 6
CAPS LOCK KEY
1.CAPS LOCK ON/OFF SWITCH KEY,
2.Active Multimedia control keys and F1; F2
F4; F8 . LED5 light on.
ARROW 7
ARROW 8
Bluetooth Reset Button
PRESS TO RE-ESTABLISH CONNECTION
IF DEVICES DISCONNECTED FOR SOME
REASON
FOR RECHARGE
MINI USB JACK
ARROW 9
BACK LIGHT FOR KEYBOARD TURNS BACK LIGHT ON/OFF BY PRESSING
THIS KEY
ARROW 10
THE SF KEY IS FOR THE
INPUT SWITCH KEY
ARROW 11
MOUSE TOUCHPAD
ARROW 12
LEFT MOUSE BUTTON
OPERATES LIKE LEFT MOUSE BUTTON
ARROW 13
RIGHT MOUSE BUTTON
OPERATE LIKE RIGHT MOUSE BUTTON
ARROW 14
ARROW 15
ARROW 16
MOST KEYS HAVE TWO INPUT OPTIONS.
PRESS THIS KEY WHEN YOU WANT TO
SWITCH TO THE SECOND KEY MEANING.
WATCH LED4
SLIDING YOUR FINGER ACROSS PAD MOVES
THE MOUSE
POWER SWITCH
TURNS UNIT ON AND OFF
PULL PAGE UP OR DOWN BY SLIDE YOUR
FINGER ON THIS AREA
SCROLL BAR
Multimedia control keys
press key "CAP" to active those keys and
control your media player
Note: The following keys operate identically to the standard keys on a personal computer
keyboard: Ctrl; Esc; Del; Enter; BS(Backspace); ↑; ↓; ←; →; Alt; F1; F2; F4; F8
page 2 of 7
What is iPazzPort™ Ⅰ and what is it for?
iPazzPort™ Ⅰis also known as Bluetooth Handheld Keyboard and Mouse Touchpad, it is the smallest
wireless keyboard and mouse touchpad in the world for the moment, with built-in Bluetooth Device,
iPazzPort™ I provides wireless short range communication with other Bluetooth device instead of pysical
cable connection that traditionally link electronic devices.
As a compromise of Bluetooth Technology, QWERTY keyboard, and mouse touchpad, iPazzPort™ Ⅰ
provides a so much convenient and capable tool for:
■ The one who want to be apart from his computer yet must control it for his presentation, lecturing,
teaching and training with large screen or projector. With iPazzPort™ Ⅰyou can go around and
communicate with your people to make your presentation lively, and create a good atmosphere for
your presentation.
■ The one who want to sit in his easy and comfortable chair to enjoy his Home Theater Personal Computer,
or view internet content, IPTV, even chat with your family or friends via Skype, MSN …and so on.
iPazzPort™ I provides a good solution of wireless operation for the computer, It is really a computer
remote controller.
What's in your Package?
In the package with iPazzPort™ Ⅰ you will find a USB cable for charging the iPazzPort™ Ⅰand this manual.
Features and specifications:
Bluetooth remote controls of your computer with distance about 10M.
Smart and portable size: 85mm x 135mm x 10mm
Backlit keyboard for the convenient operation in darkened room
Large PAD for hand writing.
Bluetooth standard: Bluetooth V2.0; HID V1.0
QWERTY keyboard
Weight: 60g
Starting with iPazzPort™ Ⅰ:
1. Pairing and establishing connection. Let's take Microsoft Bluetooth Software as an example to describe Bluetooth
Search,Pairing and Connection, other Bluetooth software please refer to its own user manual.
1.1 Turn on unit by moving the power switch to ON, (see arrow 14), wait about 2 seconds, backlit will light on and
then go out then you will see LED3 flash, that means your unit is trying to build connection with other Bluetooth
device. if you see LED3 flash one time and then go out, this is normal, you can push Bluetooth Reset Button
indicated by arrow7 to re-build connection.
1, 2 Click “Start”, “Control Panel” (make sure you're in Classic View), and then double-click Bluetooth Devices.
1.3, Click “Add”.
1.4, In the Add Bluetooth Device Wizard, select the “My device is set up and ready to be found check box”, and then
click “Next”.
1.5, After icon of “Bluetooth iPazzPort” appear, click “Bluetooth iPazzPort”, and then click “Next”.
1.6, When the wizard asks you which passkey you want to use, click “Choose a passkey for me”. Then click “Next”.
page 3 of 7
1.7 After you are prompted to enter your passkey, please type the passkey on iPazzPort™ I, and then
press Enter. You also can choose no passkey to go next step.
! Important: When you are prompted to type a passkey, you must do so and press Enter within 30 seconds.
1.8, In the final page of the wizard, click Finish, and then click OK. iPazzPort™ I should now be successfully paired with
your PC and ready to use.
1.9 LED3 will goes out when connection is established successfully
2. Arrow 10 points to the Input Switch Key
When this key is pressed LED 4 will light up. This LED will stay on until this key is pressed again. That
means while this light is on any key you press will use its secondary input rather than its primary input.
For example the key B is normally B or b, but when you press the SF key it becomes the number 0. When
you have selected the Input Switch Key LED 4 will light up. When you are in normal mode LED4 will be
turned off.
3. Switch between upper-case and lower-case input mode:
If you are in lower-case input mode, press key
, This way you can turn to upper-case input mode , LED 5
will light up, In order to return to lower-case input mode, press the key again after you completed your
upper-case input, the LED 5 goes out.
4. Recharge your iPazzPort™ Ⅰ:
iPazzPort™ I is equipped with a rechargeable battery and USB cable, plug mini USB into mini USB jack on
the iPazzPort™ Ⅰand another end to your PC USB port, it means recharging when LED1 and LED2 light up.
LED1 will go out when it is fully recharged. If you unplug the mini USB from your PC, the LED2 will go out too,
as indicated by arrow 14 above. During charging, LED 1 & 2 will light up with a steady on.
5. Active the backlit: If you wish to operate this iPazzPort™ Ⅰin a darkened room then you will want to use
the Backlight keyboard feature. In order to activate the Backlit feature please press
. Indicated by
arrow 9. Press this key again, backlit will go out.
6.The Touch Mouse Pad (TMP) is quite versatile. To create input with the TMP place your finger on the pad. Just
move your finger on the TMP as though you were using your mouse pad. Watch the mouse move to where you want
it, then use the keyboard for whatever action you desire. You can draw patters using the TMP if you have installed
MS Paint ,ScreenPen or other Paint software
.
7.Scroll your file or web page: iPazzPort™ Ⅰtouchpad indicated by arrow 15, put your finger on scroll bar and
slide your finger up and down, this way you can view your page quickly.
8. Active multimedia control keys and F1; F2; F4; F8 indicated by arrow15, first make sure your unit is
powered on and connected to your PC, then press key "Cap" indicated by arrow 6 and LED5 will
light on. this way you can use these keys to operate your PC or control your Multimedia player on PC.
page 4 of 7
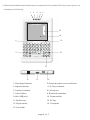
9. Bluetooth handheld keyboard and mouse touchpad also has standard USA key layout. please see
attachment as following:
1
3
2
4
5
iPazzPor t
15
14
13
6
_
!
@ # $
&
%
(
)
Q W E R T Y^ U
I O P
1 2 3 4
:
5
+ - * /
A S D F G H J K L ;
= ? < > ″
6
7 8 9 0
Z X C V B N M , . ′
7
Ctrl
Cap
Esc
~
Del
BS SF
Alt
12
RF \ |
`
11
8
9
10
1. Recharge indicator
2.External power source indicator
3. Signal indicator
4. S.F key indicator
5. Cap key indicator
6.Left mouse
7. Cap lock key
8. Bluetooth reset key
9. Mini USB jack
10. Power switch
11. Backlit key
12. SF key
13. Right mouse
14. Touchpad
15. Scroll bar
page 5 of 7
WEEE Directive & Product Disposal:
At the end of its serviceable life, this product should not be treated as household or
general waste. It should be handed over to the applicable collection point for the
recycling of electrical and electronic equipment, or returned to the supplier for disposal.
Notice to customers:
This symbol on the battery indicates that the battery is to be collected separately.
The following apply only to users in European countries.
This battery is designed for separate collection at an appropriate collection point.
Do not dispose of as household waste
For more information, contact the retailer or local authorities in charge of waste management.
Caution:
Changes or modifications not expressly approved by the party responsible for compliance could void
the user's authority to operate the equipment.
Compliance statement:
1: This device is verified to comply with Part 15 of the FCC Rules. Operation subject to the following two
conditions:
(1) this device may not cause harmful interference, and (2) this device must accept any interference
received, including interference that may cause undesired operation.
2: This equipment has been tested and found to comply with the limits for a Class B digital device, pursuant
to Part 15 of the FCC Rules. These limits are designed to provide reasonable protection against harmful
interference in a residential installation. This equipment generates, uses and can radiate radio frequency
energy and, if not installed and used in accordance with the instructions, may cause harmful interference
to radio communications.
However, there is no guarantee that interference will not occur in a particular installation. If this equipment
does cause harmful interference to radio or television reception, which can be determined by turning the
equipment off and on, the user is encouraged to try to correct the interference by one or more of the
following measures:
-- Reorient or relocate the receiving antenna.
-- Increase the separation between the equipment and receiver.
-- Connect the equipment into an outlet on a circuit different from that to which the receiver is connected.
-- Consult the dealer or an experienced radio/TV technician for help
page 6 of 7
page 7 of 7