1
Operating Instructions
MEW01361
Revision 3
TLON Manager V2.0.x
Author:
Jan Pettersson
Date of issue: 2010-12-23
Date of rev:
2013-02-08
This page has deliberately been left blank.
Panasonic Eco Solutions Nordic AB
MEW01361 Rev: 3
Operating Instructions TLON Manager V2.0.x
Table of contents
1
Introduction________________________________ 3
1.1
Definitions ________________________________________ 3
2
3
TLON Manager kit 5095 _____________________ 4
Echelon LNS Server _________________________ 5
3.1
Installation of the Echelon LNS Server__________________ 5
4
5
Installation of TLON Manager ________________ 6
Echelon OpenLDV driver ____________________ 7
5.1
Installation of the Echelon OpenLDV driver _____________ 7
6
Project ____________________________________ 8
6.1
Planning a Project __________________________________ 8
6.1.1
EBL512 network _______________________________ 8
6.1.2
EBL512 G3 network ____________________________ 9
6.1.3
Channels _____________________________________ 9
6.1.4
Routers ______________________________________ 9
6.1.5
EBL512 / EBL512 G3 units (nodes) ________________ 9
6.2
Planning / Creating a project _________________________ 10
7
Create a New Project _______________________ 11
7.1
Installation of a Project _____________________________ 15
8
9
Add a Channel ____________________________ 18
Add a Router ______________________________ 19
9.1
Installation of Routers ______________________________ 21
10
11
Add a Unit ________________________________ 23
File menu _________________________________ 24
11.1
11.2
11.3
11.4
11.5
11.6
11.7
11.8
New ____________________________________________ 24
Open ___________________________________________ 24
Close ___________________________________________ 24
Delete __________________________________________ 24
Import __________________________________________ 24
Export __________________________________________ 25
Copy project _____________________________________ 26
Exit ____________________________________________ 26
12
Remove___________________________________ 27
12.1
12.2
12.3
Remove EBL512 / EBL512 G3 units (nodes) ____________ 27
Remove Channels _________________________________ 27
Remove Routers __________________________________ 28
13
Maintenance and troubleshooting _____________ 29
13.1
13.2
13.3
Install ___________________________________________ 29
Online __________________________________________ 29
Wink ___________________________________________ 29
1
Panasonic Eco Solutions Nordic AB
MEW01361 Rev: 3
Operating Instructions TLON Manager V2.0.x
13.4 Status ___________________________________________ 30
13.5 Update __________________________________________ 30
13.5.1 Update all ___________________________________ 31
13.6 Replace _________________________________________ 31
13.7 Remove _________________________________________ 31
13.8 Move ___________________________________________ 31
13.9 Offline __________________________________________ 31
13.10
Restart ________________________________________ 31
13.10.1
Restart All units_____________________________ 32
13.11
Detail Information _______________________________ 32
13.12
Properties _____________________________________ 33
14
15
Examples _________________________________ 35
LNS Device credits _________________________ 37
15.1
15.2
15.3
15.4
How many LNS Device credits remains? _______________ 37
How to order LNS Device credits _____________________ 38
Application Key __________________________________ 39
Request form - example ____________________________ 39
16
Revision history ____________________________ 45
2
Panasonic Eco Solutions Nordic AB
MEW01361 Rev: 3
1
Operating Instructions TLON Manager V2.0.x
Introduction
TLON Manager is an installation and maintenance tool for the
TLON Network used for fire alarm systems EBL512 and EBL512 G3.
TLON Manager 2.0 will replace TLON Manager 1.X.x since that
program needs a PCMCIA card as a network interface. New Laptop
PCs normally don't have any PCMCIA card slot. Both programs can
be used with both EBL systems and projects created in TLON
Manager 1.X.x can be opened in TLON Manager 2.0, which uses a
USB network interface and has been updated to be more user friendly.
This Operating Instruction describes how to install the PC program
TLON Manager V2.0.x. (At the Date of issue or the Date of rev. x =
0.) It also describes how to create a new TLON project, how to install
it and the maintenance of a TLON network. It is not a complete
description of the TLON Manager. Basic knowledge of windows and
windows applications are required as well as knowledge of the fire
alarm system respectively.
1.1
Definitions
USB network interface type 75010:
An Echelon network interface to be plugged in a laptop PC's
USB port, for connection to the TLON Network.
Unit:
A physical device connected to the network, e.g. an EBL512 or
an EBL512 G3 unit – containing a TLON connection board
1590 / 5090.
Node:
A logical part of the network. (E.g. a unit, see above.)
Channel:
A physical part of the network, i.e. the wires to which the units
(nodes) are connected. (Compare with a COM loop and the
connected loop units.) In system EBL512 up to six units
(nodes) can be used per Channel. Each "side" of a Router is a
Channel. Two or more Routers are connected via a Backbone
net (one Channel without other units). In system EBL512 G3
with redundant network (two parallel networks) are Routers
normally not required but can be used when a longer network
cable is required – longer than the max. length for one Channel
or for extra security reasons.
Router / Repeater:
Normally a repeater will forward all valid data and a router will
forward all valid data based on its destination address. It is
normally the same unit, configured as a repeater or as a router.
In a TLON Network it doesn't matter because all valid data will
be forwarded.
3
Panasonic Eco Solutions Nordic AB
MEW01361 Rev: 3
2
Operating Instructions TLON Manager V2.0.x
TLON Manager kit 5095
The TLON Manager kit 5095 contains the following:
U10 USB Network interface type 75010R
Network connection cable.
USB Memory stick, containing Echelon LNS Server, the PC
program TLON Manager V2.0.x, documentation, etc.
Also a USB extension cable is supplied.1
License (for 64 credits per PC)2.
The USB network interface is via the Network connection cable
connected to the modular RJ-45 connector in EBL512 / EBL512 G3.
1
The USB extension cable is normally used with the USB Network interface
but can of course be used for the USB memory stick if required.
2
Credit = LNS Device credit. One credit is consumed for each Neuron ID
(number) in the network, e.g. each TLON connection board 1590 (p.c.b. no.
9302-xx) but not for the succeeding TLON connection board 5090 (p.c.b. no.
> 9310-xx). (Routers will not consume any LNS Device credits.)
How to check the LNS Device credits ("Licensed credits") status and how to
order new credits, see page 36.
4
Panasonic Eco Solutions Nordic AB
MEW01361 Rev: 3
Operating Instructions TLON Manager V2.0.x
3
Echelon LNS Server
3.1
Installation of the Echelon LNS Server
NOTE! It is highly recommended to uninstall any old TLON
Manager version and also the drivers (Echelon OpenLDV x.xx) before
the installation of this Echelon LNS Server and TLON Manager 2.0.
It is also important that this Echelon LNS Server is installed before the
installation of TLON Manager 2.0.x
Before installation, be sure that no other application is running on
your PC.
The USB Memory stick contains the Echelon LNS Server 3.27, the
TLON Manager V2.0.x software, the OpenLDV driver and
documents3.
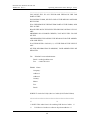
Put the USB Memory stick in one of your PC's free USB ports.
<USB-drive>
LNS Server 3.27
OpenLDV x.xx
Operating instructions
TLON Manager 2.0.x
Select the LNS Server 3.27 folder.
Double click the Setup.exe file name and follow the installation
instructions.
3
Operating Instructions TLON Manager V2.0.x, MEW01361 (i.e. this
document) in PDF format.
5
Panasonic Eco Solutions Nordic AB
MEW01361 Rev: 3
4
Operating Instructions TLON Manager V2.0.x
Installation of TLON Manager
It is important that before the installation of TLON Manager 2.0, the
Echelon LNS Server is installed, see chapter "Echelon LNS Server",
page 5.
Before installation, be sure that no other application is running on
your PC.
Before installation of this version – V2.0.x4, uninstall any other
version of TLON-Manager V2.X.x.
The USB Memory stick contains the Echelon LNS Server 3.27, the
TLON Manager V2.0.x software and documents5.
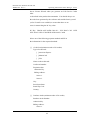
Put the USB Memory stick in one of your PC's free USB ports.
<USB-drive>
LNS Server 3.27
OpenLDV x.xx
Operating instructions
TLON Manager 2.0.x
Select the TLON Manager 2.0.x folder.
Double click the Setup.exe file name and follow the installation
instructions.
Click "Finish" to finish the TLON Manager installation.
The program will normally be installed in the following folder:
C:\Program Files\Panasonic Electric Works Nordic AB\TLON
Manager 2.0.x
It is recommended to send a "Shortcut" to the desktop.
NOTE!
After a program installation it is always recommended to restart the
PC.
It is also recommended to check that the path is correct. Do as
follows (could vary depending on the type of Windows that is used):
In Windows Explorer, use the right mouse button and click "(My)
Computer", in the menu select (System) Properties. In "System
Properties" open the "Advanced" (System Settings) tab and click
"Environment Variables". Check in "User variables" that the Path is:
C:\LonWorks\bin
(If not, add it.)
4
At the Date of issue or the Date of rev. x = 0.
5
Operating Instructions TLON Manager V2.0.x, MEW01361 (i.e. this
document) in PDF format.
6
Panasonic Eco Solutions Nordic AB
MEW01361 Rev: 3
5
Operating Instructions TLON Manager V2.0.x
Echelon OpenLDV driver
NOTE! This installation of the driver (OpenLDV ≥ 4.00) is
necessary to support 64-bit Windows versions. If a 32-bit Windows
version is used, this installation is optional.
NOTE! To support 64-bit Windows versions TLON Manager V2.0.1
or later is necessary.
5.1
Installation of the Echelon OpenLDV driver
An older version of the driver (OpenLDV 3.4) was automatically
installed during the installation of Echelon LNS Server 3.27. Before
installation of the new driver (OpenLDV ≥ 4.00), uninstall the old
driver (OpenLDV 3.4)
The USB Memory stick contains the Echelon LNS Server 3.27, the
TLON Manager V2.0.x software, the OpenLDV driver and
documents6.
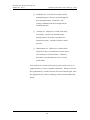
Put the USB Memory stick in one of your PC's free USB ports.
<USB-drive>
LNS Server 3.27
OpenLDV x.xx
Operating instructions
TLON Manager 2.0.x
Select the OpenLDV x.xx folder.
Double click the ....._OpenLDVXxx.exe file name and follow the
installation instructions.
NOTE! It is highly recommended to have the computer connected to
the internet during the installation of the driver (OpenLDV ≥ 4.00).
Connect the USB Network interface U10 to an available USB port.
The installation of the USB driver should start automatically. If a
Windows Update dialog box tells you to install the driver, choose any
of the three Windows Update options at your preference. Click Next
to continue.
Select “Install the software automatically (Recommended).” Click
Next to continue.
A dialog box appears. Click Finish.
6
Operating Instructions TLON Manager V2.0.x, MEW01361 (i.e. this
document) in PDF format.
7
Panasonic Eco Solutions Nordic AB
MEW01361 Rev: 3
6
Operating Instructions TLON Manager V2.0.x
Project
Normally (often), the network planning is carried out "in your office".
Afterwards, during the commissioning "on site", the TLON network
"installation" can be performed. As an alternative the planning and
the "installation" can be carried out at the same time ("on site").
TLON network "installation" = download of the project / network data
to the network units (EBL512, EBL512 G3 and Routers).
6.1
Planning a Project
A TLON Network can consist of two or up to thirty EBL512 /
EBL512 G3 units.
In an EBL512 TLON Network are normally, for safety reasons,
Routers used, see below.
In an EBL512 G3 TLON Network can one TLON Network – with or
without Routers – be used or two parallel TLON Networks, i.e. a
redundant network, see below.
It is possible to have one TLON Network with a mix of EBL512 and
EBL512 G3 units, i.e. a mixed system. In such a case the EBL512
units have to have the software version 2.7.x and the EBL512 G3
units have to have the software United version 2.7.x.
6.1.1
EBL512 network
For safety reasons, it is recommended not to have more than six nodes
on one Channel. To get one more Channel a Router has to be added,
i.e. one Router per six EBL units. A Router can also be added in order
to obtain a total cable length that is two times the normal cable length
for one Channel.
In rough outline, there are three types of networks:
a) Up to six EBL512 units (nodes) on one Channel, i.e. no Router.
b) Up to twelve EBL512 units (nodes) and one Router, i.e. one
Router and two Channels. One Router can also be used in order to
obtain a total cable length that is two times the normal cable length
for one Channel.
c) Up to thirty EBL512 units (nodes) and a number of Routers,
connected to each other via a Backbone net.
Make a schematic drawing of the network, i.e. a drawing showing all
the EBL512 units (nodes), cables, Channels and required Routers.
(The fire alarm system's installation drawings can be useful as well as
the planning made with Win512, e.g. system name, control unit
numbers, cables, etc.)
For safety reasons, it is recommended to place all the Routers and the
backbone net together in a locked cabinet / room.
See also chapter "Examples", page 35.
8
Panasonic Eco Solutions Nordic AB
MEW01361 Rev: 3
6.1.2
Operating Instructions TLON Manager V2.0.x
EBL512 G3 network
Redundant network
For safety reasons the EBL512 G3 units have the possibility to use
two TLON connection boards (type 1590 / 5090) in order to get two
parallel TLON Networks (Network no. 0 and 1), i.e. a redundant
network.7
Normally, TLON Network no. 0 is used for communication and
TLON Network no. 1 is in a supervised quiescent state. TLON
Network no. 1 will be used for communication only in case of a fault
condition (cut-off or short circuit) on TLON Network no. 0.
If a redundant network is used there is no need for Routers if not a
cable length longer than the normal cable length for one Channel, is
required (see b) above).
6.1.3
Channels
Two or more EBL512 / EBL512 G3 units (nodes) are physically
connected to each other via a network cable.8 In the LonWorks
vocabulary this is called a Channel. (Compare with a COM loop and
connected loop units.)
In a network type a) there is only one Channel, i.e. Channel_1.
No Channel has to be added. (Channel_1 is default.)
In a network type b) there is one Channel on each side of the Router,
i.e. Channel_1 and Channel_2. Channel_2 has to be added.
In a network type c) there is one Channel for each Router and one
Channel for the Backbone net between the Routers, i.e. Channel_1,
Channel_2, Channel_3 and so on. Required numbers of Channels
have to be added.
How to add Channels to the Project, see chapter "Add a Channel",
page 18.
6.1.4
Routers
After the Channels have been added, the Routers have to be added to
the Project if it is a type b) or c) network. See chapter "Add a
Router", page 19. Use Channel_2 for the Backbone net.
6.1.5
EBL512 / EBL512 G3 units (nodes)
After the Channels and the Routers have been added, the EBL512 /
EBL512 G3 units (nodes) have to be added to the Project, see chapter
"Add a Unit", page 23.
7
In a redundant network two Projects have to be created and installed. The
Projects have to be identical but with different Project names. One has to be
installed for Network no. 0 and one installed for Network no. 1.
8
One TLON connection board 1590 / 5090 is required in each EBL512 unit.
In EBL512 G3 one 1590 / 5090 board per TLON Network.
9
Panasonic Eco Solutions Nordic AB
MEW01361 Rev: 3
6.2
Operating Instructions TLON Manager V2.0.x
Planning / Creating a project
Here follows a rough overview:
Create a New Project. (File | New) 7
Add required Channel(s). (Network | Channel…)
Add required Router(s). (Network | Router…)
Add the nodes. (Network | Unit…) or (Click "Add") Normally
EBL512 / EBL512 G3 units (or TLONDDE Server or Securimaster
1.43 connection).
Installation. 7 All the network data will be downloaded to the units
(EBL512 / EBL512 G3, etc.). Installation order:
1. Routers. (Router | Install)
2. Nodes. (Node | Install)
Update all. (Click "Update all") All network data will be updated
and saved in all the units, i.e. all the units will get information about
all other units.
NOTE! In EBL512 / EBL512 G3 some data will be saved in the
TLON connection board 1590 / 5090 and some data in the Main board
1556 / 4556.
Wink. (Click "Wink") This is a way to check if a unit is correctly
connected and installed in the network. The buzzer will sound for a
second in the unit respectively.
10
Panasonic Eco Solutions Nordic AB
MEW01361 Rev: 3
7
Operating Instructions TLON Manager V2.0.x
Create a New Project
This example will show how to connect two EBL512 / EBL512 G3
units (CU00 and CU01) in a TLON network. 7
Start TLON Manager, i.e. double click the
desktop.
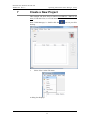
1.
Select "New" in the File menu.
A dialog box displays:
11
icon on your PC's
Panasonic Eco Solutions Nordic AB
MEW01361 Rev: 3
Operating Instructions TLON Manager V2.0.x
Name
Type a name for the project. Normally, use the same name as
the "System Name" in Win512 / WinG3, e.g. System_xyz.
Max. 23 characters.
Path
The path will be automatically created when you type the name,
i.e. C:\lm\db\
NOTE! Do not change this data base path!
Network interface
Engineered Mode This mode shall be selected when TLON
Manager (i.e. your PC) is not connected to any TLON Network,
e.g. when creating a new Project in your office.
LON1 This is the TLON USB Network interface for TLON
Manager 2.0 installed on your PC.9 Select this interface
(LON1) when you shall connect TLON Manager (i.e. your PC)
to a TLON Network.
PCCLON1 This is the TLON Network interface (PCMCIA
card) for TLON Manager 1.x (shown only if installed on your
PC). Must not be used for TLON Manager 2.0.
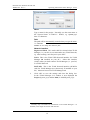
2.
Click "OK" to save the settings and close the dialog box.
In the "TLON Manager 2.0" window is now displayed the
Project (System_xyz) and the Path (C:\lm\db\System_xyz):
9
Normally only one interface is installed but if also TLON Manager 1.x is
installed, LON1 might be used for that interface.
12
Panasonic Eco Solutions Nordic AB
MEW01361 Rev: 3
Operating Instructions TLON Manager V2.0.x
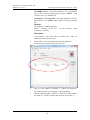
3.
In this example, no Channels have to be added. Now the
EBL512 / EBL512 G3 units have to be added. In the
"Network" menu select "Unit…" or click "Add".
4.
The following dialog box displays:
Name
Use the default name or type a name. Max. 14 characters.
Number
The number can be 00-29, i.e. CU00-CU29. Normally use the
same number as in the name.
Type
EBL512 / EBL512 G3 Select this alternative for an EBL512 /
EBL512 G3 unit.
13
Panasonic Eco Solutions Nordic AB
MEW01361 Rev: 3
Operating Instructions TLON Manager V2.0.x
TLONDDE Server Select this alternative for a TLONDDE
Server (for a security management system). NOTE! Only
valid for "Unit_29" (Number 29).
Securimaster 1.43 connection Select this alternative only for
Securimaster 1.43. NOTE! Only valid for "Unit_29" (Number
29).
Channel
See chapter 6.1 Planning a Project.
Select a Channel in the list.
"Channel_1" (default).
In this example, select
Description
A description of the node may be written here.
characters divided on three rows.
Max. 64
5.
Click "OK" to save the settings and close the dialog box.
The following will be shown in the List View:
6.
Unit_0 is now added on Channel_1. Status "No Response"
shows that this unit is not installed / is not responding.
7.
Add the wanted number of EBL512 / EBL512 G3 units (nodes)
the same way. In this example, add one more unit (Node_1).
14
Panasonic Eco Solutions Nordic AB
MEW01361 Rev: 3
Operating Instructions TLON Manager V2.0.x
The window shows the Project "System_xyz" with two units
(Unit_0 and Unit_1) on Channel_1.
8.
7.1
This "project" is now created and can be closed (in menu "File"
select "Close") and later installed (see "Installation of a Project"
below).
Installation of a Project
The TLON Network cable installations have to be finished and the
EBL512 / EBL512 G3 units connected to the TLON Network.10
NOTE! In a Project with Routers, they have to be installed before the
EBL512 / EBL512 G3 units, see chapter "Installation of Routers",
page 21.
Plug the TLON USB network interface cable into any of the EBL512 /
EBL512 G3 units on Channel_1.11 The modular connector (RJ-45)
"J2" in EBL51212 / "J10" – Network no. 0 and "J11" – Network no. 1
in EBL512 G313 are to be used.
9.
Start TLON Manager. In the "File" menu select "Open".
10
One TLON connection board 1590 / 5090 is required in each EBL512
unit. In EBL512 G3 one 1590 / 5090 board per TLON Network.
11
From now on, it is recommended to use the same Channel at all times.
12
It is situated close to the connector "J1" (for PC / Win512 connection), i.e.
below and to the right of the keypad on the EBL512 front.
13
Situated down to the right on the main board 5010.
15
Panasonic Eco Solutions Nordic AB
MEW01361 Rev: 3
Operating Instructions TLON Manager V2.0.x
10.
Click to see the list of Projects and select one, e.g.
"System_xyz".
Click to see the list of Network Interfaces and select one,
normally LON1.
11.
Click "OK".
12.
In this example we have no Routers and only one Channel, i.e.
Channel_1. (Routers have to be installed before EBL512 /
EBL512 G3 units.)
Select a unit, click "Install" and the following window will be
displayed:
13.
Click "Yes" and the following dialog box displays:
16
Panasonic Eco Solutions Nordic AB
MEW01361 Rev: 3
Operating Instructions TLON Manager V2.0.x
("Activate service pin" is blinking.)
14.
In the EBL512 / EBL512 G3 unit that is intended to be number
zero (CU00), shunt momentarily the "Service" pins, in EBL512
"JP 3" on the main board 1556 / in EBL512 G3 "JP 1" (for
Network no. 0) or "JP 2" (for Network no. 1) on the main board
5010. A "Neuron ID (number) will be transmitted and for a
second shown in the "Neuron ID" field.
Since the check box "Start installation automatically when
service message is received" is marked, TLON Manager will
automatically start binding the node in the database.14
The EBL512 / EBL512 G3 "Unit_0" is now created and
installed in the network.15 When the binding process is
completed, the "Status" will be "CnfgBypass" until all units are
"Online" (see below).
Do the same for the EBL512 / EBL512 G3 "Unit_1".
15.
In this example are now all units installed. Click "Update all".
TLON Manager will now re-connect and update all the units
installed in the network. The Network information will now
also be saved in each EBL512 / EBL512 G3 unit, one by one.
(Some information will be saved in the "TLON connection
board" 1590 / 5090 memory and some in the "Main board"
1556 / 5010 memory.)
16.
When all nodes are updated, click "All Online".
17.
It is highly recommended to restart each EBL512 / EBL512 G3
unit e.g. in menu "All Units" select "Restart".
14
If the check box is un-marked you will have to click "OK" to continue.
The time is depending on the number of nodes.
15
To check this you can select the EBL512 / EBL512 G3 unit and click
"Wink". The buzzer in the EBL512 / EBL512 G3 unit respectively shall
sound for approx. one second.
17
Panasonic Eco Solutions Nordic AB
MEW01361 Rev: 3
8
Operating Instructions TLON Manager V2.0.x
Add a Channel
Regarding Channels in a TLON Network, see chapter "6.1 Planning a
Project", page 8.
In the "Network" menu select "Channel..." and the following dialog
box displays.
Name
Next Channel in order to be added. Normally the default name is used
but can be changed.16
Type
The type used with EBL512 / EBL512 G3 units is TP/FT-10 (default).
If a fibre optic network is to be used (via Fibre Optic/Twisted Pair
LonWorks Routers), the type is FO-10. Other units may use other
types of communication.
Existing
A list of the existing Channels in the Project.
Add
Click "Add" to add the Channel shown in the "Name" field (e.g.
Channel_2).
Remove
Removes (deletes) a selected Channel in the list.
Close
Saves the data and closes the dialog box when the required number of
channels is added.
16
E.g. Channel_2_Backbone.
18
Panasonic Eco Solutions Nordic AB
MEW01361 Rev: 3
9
Operating Instructions TLON Manager V2.0.x
Add a Router
Regarding Routers in a TLON Network, see chapter "6.1 Planning a
Project", page 8.
Two or more Routers have to be connected via a "Backbone net".
Use Channel_2 for the Backbone net.
In the "Network" menu select "Router..." and the following dialog box
displays.
Name
Default is "Router_1". Write another name or add some information
for the router (e.g. Router_1. Building A, Level 1).
Type
Repeater This type should normally be selected. (No learning
function. All messages except faulty messages will go
through.)
Learning Router This type could be selected. It learns – after
some time – the messages that shall go through to the other
channel. (Only the required messages and no faulty messages
will go through. Learns if a new unit is added to the channel.)
Configured Router This type could be selected. It has no
learning function. (The programming is followed to 100% and
no faulty messages will go through.)
Bridge Not used in a TLON Network.
Permanent Repeater Not used in a TLON Network.
Permanent Bridge Not used in a TLON Network.
19
Panasonic Eco Solutions Nordic AB
MEW01361 Rev: 3
Operating Instructions TLON Manager V2.0.x
Near, Far
A router must be installed between two Channels. If there is only one
Channel in the list (see above), required new channels must be added
before a router can be added, see chapter "8 Add a Channel", page 18.
A router has connections for one Near channel (e.g. Lon A) and one
Far channel (e.g. Lon B).
Select a channel in the drop-down list respectively.
Near: On Router_1, the channel where the TLON Manager PC
is to be connected (often Unit_0 on Channel_1). On any other
router, the channel nearest Router_1.
Far: On Router_1, the Backbone net channel (Channel_2). On
any other router, the channel on the other side of the router
respectively.
Click "Add" to have the router shown in the list.
"List field"
A list of the existing Routers in the Project.
Name The name of the router.
Type Type of router.
Near Near Channel.
Far Far Channel.
Status No response / CnfgBypass / Online / Offline
Add
Adds the Router, Type and Channels to the list ("List field").
Remove
Removes (deletes) the selected router (in the "Name" column).
20
Panasonic Eco Solutions Nordic AB
MEW01361 Rev: 3
Operating Instructions TLON Manager V2.0.x
Install
Installs the selected Router (in the "Name" column). A dialog box
"Install" displays. See chapter "Installation of Routers" below.
Reset
Sends a reset message that will clear some statistics and configuration
data.
Update
Updates the selected router. See "Update" below.
Replace
When an existing Router has to be replaced, you do not have to
remove (delete) the existing Router and then add a new Router.
Replace will start the same procedure as for "Install". See chapter
"Installation of Routers" below.
Status
The status for the selected Router (in the "Name" column) will be
shown in the "Status" column.
Close
Will save and close the dialog box.
9.1
Installation of Routers
The TLON Network cable installations have to be finished and the
Routers have to be power supplied and connected to the network.
NOTE! The Routers have to be installed before the EBL512 /
EBL512 G3 units can be installed otherwise there will be no
communication with the units connected on the Channels "on the other
side" of the Router(s).
Plug the TLON USB network interface cable into any of the EBL512 /
EBL512 G3 units on Channel_1.17 The modular connector (RJ-45)
"J2" in EBL51218 / "J10" – Network no. 0 and "J11" – Network no. 1
in EBL512 G319 are to be used.
1. Start TLON Manager. In the "File" menu select "Open".
2. Select Project and Network Interface (normally LON1) and click
"OK".
3. In menu "Network" select "Router…".
17
From now on, it is recommended to use the same Channel at all times.
18
It is situated close to the connector "J1" (for PC / Win512 connection), i.e.
below and to the right of the keypad on the EBL512 front.
19
Situated down to the right on the main board 5010.
21
Panasonic Eco Solutions Nordic AB
MEW01361 Rev: 3
Operating Instructions TLON Manager V2.0.x
4. In the dialog box select a Router (in the "Name" column) and
click "Install".
The following dialog box will be displayed:
Click "Yes".
5. A dialog box displays:
("Activate service pin" is blinking.)
On the specified Router, push the "Service" button. A Neuron
ID (number) will be transmitted and (for a second) shown in
the "Neuron ID" field.
Since the check box "Start installation automatically when
service message is received" is marked, TLON Manager will
automatically start binding the router in the database.20
The Router_1 is now created and installed in the network.
When the binding process is completed, the "Status" will be
"CnfgOnline".
6. When all Routers are installed, click "Update all". TLON
Manager will now re-connect and update all the routers
installed in the network.
7. When all the Routers are installed, the EBL512 / EBL512 G3
units can be installed, see chapter "Installation of a Project",
page 15.
20
If the check box is un-marked you will have to click "OK" to continue.
22
Panasonic Eco Solutions Nordic AB
MEW01361 Rev: 3
10
Operating Instructions TLON Manager V2.0.x
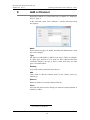
Add a Unit
Regarding EBL512 / EBL512 G3 units (nodes) in a TLON Network,
see chapter "Planning a Project", "EBL512 / EBL512 G3 units
(nodes)", page 8.
In the "Network" menu select "Unit…" or click "Add".
The following dialog box displays:
The dialog box and the following actions are described in the example
in chapter "Create a New Project", page 13 and continues in chapter
"Installation of a Project", page 15.
NOTE! When all the EBL512 / EBL512 G3 units (nodes) have been
installed, it is very important that you click "Update all" and "All
Online" as described in the example. After that it is recommended to
restart each EBL512 / EBL512 G3 unit.
23
Panasonic Eco Solutions Nordic AB
MEW01361 Rev: 3
11
File menu
11.1
New
Operating Instructions TLON Manager V2.0.x
Creates a new Project. Se chapter "Create a New Project", page 11.
11.2
Open
Opens an existing Project in TLON Manager's common data base.
Select a project in the list, select a Network Interface and click "OK".
11.3
Close
Closes the project that is open.
11.4
Delete
Deletes an existing Project in TLON Manager's common data base. In
the list select the project to be deleted and click "OK".
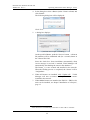
11.5
Import
To be able to open a Project that for example has been copied from
another PC or to be able to open an "old Project" when a new
version of TLON Manager has been installed, the Project has to be
imported to TLON Manager's common database.
Select "Import..." and the following dialog box displays:
Find and select the folder (Project) to be imported. As default, TLON
Manager 2.0 saves all projects in: C:\lm\db\.
As default, TLON Manager 1.x saves all projects in: C:\lns\.
The Project name will be the same as the folder name. You may use
this name or change it.
24
Panasonic Eco Solutions Nordic AB
MEW01361 Rev: 3
11.6
Operating Instructions TLON Manager V2.0.x
Export
Used when you want to export a Project. You will get a copy of the
Project in another folder. From this folder it is possible to copy the
project. Export can also be used if you want a backup of the project21
or want to use the Project in another PC.
Select "Export..." and the following dialog box displays:
Select the Project to export. Click "OK".
Find and select the folder to which the Project is to be exported. (As
default, TLON Manager suggests: C:\lm\db)
The "File name" (Project name) will be the same as the folder name.
You may use the current name or change it.
Click "OK". The project will now be copied to the selected folder.
21
NOTE! It is not possible to "upload" data from the TLON Network to
TLON Manager.
25
Panasonic Eco Solutions Nordic AB
MEW01361 Rev: 3
11.7
Operating Instructions TLON Manager V2.0.x
Copy project
Used when you want a copy of an existing Project, but with a new
name. This is useful when a new similar Project is to be created.
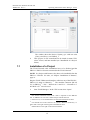
Select "Copy project..." and the following dialog box displays:
Select the Project to copy. Click "OK". The following dialog box
displays:
Select a folder, accept the "file name" or write another. Click "Save"
and the project will be copied.
11.8
Exit
Select "Exit" to close TLON Manager 2.0.
NOTE! First close the project.
26
Panasonic Eco Solutions Nordic AB
MEW01361 Rev: 3
12
Operating Instructions TLON Manager V2.0.x
Remove
Everything added to the network, i.e. EBL512 / EBL512 G3 units,
Channels, Routers, etc. may also be removed (deleted).
NOTE!! After removing something you have to "Update all".
12.1
Remove EBL512 / EBL512 G3 units (nodes)
There are two ways to remove a node:
a) Select the unit to be removed and click the right mouse button to
get a pop-up menu. Select "Remove".
b) Select the unit and click "Remove".
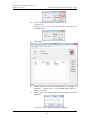
12.2
Remove Channels
In the "Network" menu select "Channel...". The following dialog box
displays:
27
Panasonic Eco Solutions Nordic AB
MEW01361 Rev: 3
Operating Instructions TLON Manager V2.0.x
Select the Channel to remove and click "Remove".
12.3
Remove Routers
In the "Network" menu select "Router...". The following dialog box
displays:
Select the router to remove and click "Remove".
28
Panasonic Eco Solutions Nordic AB
MEW01361 Rev: 3
13
Operating Instructions TLON Manager V2.0.x
Maintenance and troubleshooting
Some TLON information is saved in the TLON connection board
(1590 / 5090) memory and some in the EBL512 / EBL512 G3 Main
board (1556 / 5010) memory.
- If only the Main board (1556 / 5010) is replaced: Do Update for the
unit. (Select the unit, right click and select "Update" in the pop-up
menu.)
- If the TLON connection board (1590 / 5090) is replaced: Do
Replace and Update for the unit.
There are a number of functions that are useful for network
maintenance and troubleshooting. The most common are described
below.
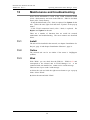
13.1
Install
The unit will be installed in the network, see chapter "Installation of a
Project", page 15 and chapter "Installation of Routers", page 21.
13.2
Online
The selected unit can be set Online if the status is CnfgBypass
(Offline).
13.3
Wink
With "Wink" you can check that the EBL512 / EBL512 G3 unit
corresponds to the selected unit in TLON Manager 2.0. A not
connected node, not installed, etc. cannot receive a wink message.
There are two ways to send a wink message:
a) Select the unit and click the right mouse button to get a pop-up
menu. Select "Wink".
b) Select the unit and click "Wink".
29
Panasonic Eco Solutions Nordic AB
MEW01361 Rev: 3
Operating Instructions TLON Manager V2.0.x
EBL512
In the selected EBL512 unit (node) the wink message turns on the
buzzer and all the front LEDs for approx. 1 sec.
EBL512 G3, Network no. 0
In the selected EBL512 G3 unit (node) the wink message turns on the
buzzer and the front LED "Test mode" for approx. 0.4 sec.
EBL512 G3, Network no. 1
In the selected EBL512 G3 unit (node) the wink message turns on the
buzzer.) and the front LED "Test mode" for approx. 2 sec.
13.4
Status
The status for the selected unit will be updated, i.e. no change no
change of the status.
13.5
Update
Normally you update a unit (i.e. the network configuration data is
downloaded to the physical unit) after it has been installed, see chapter
"Installation of a Project", page 15. Update can also be used when
you suspect that the configuration data in a unit is incorrect.
When a TLON connection board 1590 / 5090 is replaced and/or the
Main board 1556 / 5010 is replaced in an EBL512 / EBL512 G3 unit,
the unit have to be updated.
Select the unit and click the right mouse button to get a pop-up menu.
Select "Update".
After "Update" the information is:
30
Panasonic Eco Solutions Nordic AB
MEW01361 Rev: 3
Operating Instructions TLON Manager V2.0.x
OK(0) = Update OK (0 unsuccessful attempts)
OK(1) = Update OK (after 1 unsuccessful attempt)
OK(2) = Update OK (after 2 unsuccessful attempts)
NG = Update not good
13.5.1
Update all
All the units in the Network can be updated (see above) with only one
command. Click "Update all". (See also chapter "Installation of a
Project", page 15.)
13.6
Replace
When a TLON connection board 1590 / 5090 is replaced in an
EBL512 / EBL512 G3 unit, select the unit and click "Replace". After
that you have to "Update", see above.
13.7
Remove
The selected unit will be removed (deleted) from the project. See
chapter "12 Remove", page 27.
13.8
Move
A node can be moved from one Channel to another. In the dialog box
that opens, specify the "New location" (Channel) and click "OK".
NOTE! The Channels have to added before.
13.9
Offline
The selected unit can be set Offline (CnfgBypass) if the status is
(Online).
13.10
Restart
You can restart a unit in the network with the restart command. In a
TLON Network this command works only with EBL512 / EBL512 G3
units.
Select the unit and click the right mouse button to get a pop-up menu.
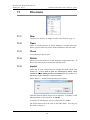
Select "Restart".
The following dialog box displays:
31
Panasonic Eco Solutions Nordic AB
MEW01361 Rev: 3
Operating Instructions TLON Manager V2.0.x
Click "Yes" to restart the unit.
13.10.1
Restart All units
You can restart (see above) all the units in a TLON Network.
In the menu "All units" select "Restart". The following dialog box
displays:
Click "Yes to restart the unit.
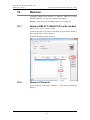
13.11
Detail Information
This command asks a unit in the Network a series of questions, which
will be presented in a dialog box.
Select a unit and click the right mouse button to get a pop-up menu.
Select "Detail Info".
The following dialog box displays:
The dialog box contains a lot of information and a deeper knowledge
of the TLON Network is required to be able to understand some of it.
The information of interest for the average user is explained below.
(In case of no contact, the information is: "No contact with node".)
32
Panasonic Eco Solutions Nordic AB
MEW01361 Rev: 3
Operating Instructions TLON Manager V2.0.x
Name
The name given to the unit when it was created.
Type
The type given to the unit when it was created (see page 13).
(If an old project is opened in TLON Manager 2.0.x the type
shown here might be different than the type given to the unit
when it was created.)
Status
Shows the status of the unit.
"CnfgOnline".
The normal status is
Neuron ID
The TLON connection board 1590 / 5090 Neuron ID number.
Channel
Shows the Channel the unit is installed on, e.g. Channel_1.
Unit Number
The number given to the unit when it was created.
Description
The Description given in the "Create unit" dialog box (if any).
Last reset cause
Shows the reason for latest restart of the unit.
Transaction Timeouts
Shows the number of messages sent but not acknowledged by
all other nodes in the network. The number should be 0 after
the unit has been installed. The number may increase if new
units are installed. Reset the value (and all the others) by
clicking "Reset".
Transmission Errors
After a reset of values (by clicking "Reset"): Must not increase
during a 10-minutes interval.
Test
Shall normally be "Good".
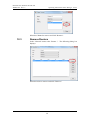
13.12
Properties
Select a unit and click the right mouse button to get a pop-up menu.
Select "Properties". The following dialog box displays:
33
Panasonic Eco Solutions Nordic AB
MEW01361 Rev: 3
Operating Instructions TLON Manager V2.0.x
For explanation of Name, Number (Unit Number), etc. see the above
chapter.
Click "OK" to save and close the dialog box.
34
Panasonic Eco Solutions Nordic AB
MEW01361 Rev: 3
14
Operating Instructions TLON Manager V2.0.x
Examples
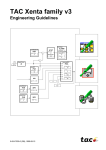
Some examples of TLON Networks:
Two networks with eight EBL units.
System EBL512
System EBL512 G3
> 6 units, i.e. one Router
is required.
Redundant network
i.e. two networks.
Channel_1 and Channel_2
Channel_1
512
512 G3
|
| |
512
512 G3
|
| |
512
512 G3
|
| |
512
512 G3
|
| |
Router_1
512 G3
|
| |
512
512 G3
|
| |
512
512 G3
|
| |
512
512 G3
|
512
Each Channel has to start and end with a termination resistor, 105R,
1%, 1/8W.
35
Panasonic Eco Solutions Nordic AB
MEW01361 Rev: 3
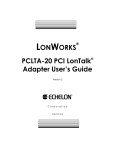
Operating Instructions TLON Manager V2.0.x
An example of an EBL512 network with three Routers connected via
a Backbone net. Four Channels are required.
Channel_2 (Backbone net)
Router_1 -------------------- Router_2 ------------------ Router_3
|
|
|
512
512
512
|
|
|
512
512
512
|
|
|
|
|
|
Channel_1
Channel_3
Channel_4
Each Channel has to start and end with a termination resistor, 105R,
1%, 1/8W.
36
Panasonic Eco Solutions Nordic AB
MEW01361 Rev: 3
15
Operating Instructions TLON Manager V2.0.x
LNS Device credits
With every TLON Manager kit 5095 (TLON Manager V2.0) comes a
license with 64 LNS Device credits.
One LNS Device credit is consumed for each Neuron ID (number) in
the network, e.g. each TLON connection board 1590 (p.c.b. no. 9302xx) but not for the succeeding TLON connection board 5090 (p.c.b.
no. > 9310-xx). (Routers will not consume any LNS Device credits.)
15.1
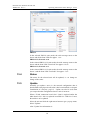
How many LNS Device credits remains?
Open any project (in menu "File" select "Open"). In menu "Help"
select "License status" and the following dialog box opens:
Days remaining: As long as there are LNS Device credits ("Licensed
credits") this field will show Sufficient credits. When all the LNS
Device credits ("Licensed credits") are consumed and TLON Manager
V2.0 has started to use "Deficit credits" this field will show the
number of days (0-14) before the license will expire. If the number of
days = 0 the LNS Server will cease to operate until new LNS Device
credits ("Licensed credits") are added.
Deficit credits: As long as there are LNS Device credits ("Licensed
credits") this field will show 0. When all the LNS Device credits
("Licensed credits") are consumed, TLON Manager V2.0 will start to
use Deficit credits. This field will then show the number of Deficit
credits being used (0-500).
Licensed credits: The number of LNS Device credits added.
Licensed type: Always Standard Mode in TLON Manager 2.0.
Max deficit credits: The number of "Deficit credits" allowed. If this
number is exceeded, the LNS Server will cease to operate until
sufficient LNS Device credits are added.
Used credits: The number of the LNS Device credits ("Licensed
credits") consumed. This number does not include the number of
"Deficit credits" currently being used.
37
Panasonic Eco Solutions Nordic AB
MEW01361 Rev: 3
15.2
Operating Instructions TLON Manager V2.0.x
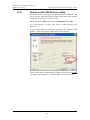
How to order LNS Device credits
Before the license will expire you should purchase additional LNS
Device Credits. Panasonic Electric Works Nordic AB's article number
for additional LNS Device Credits is 5096.
The article number 5096 corresponds to 50 LNS Device Credits.
(It is also possible to order LNS Device Credits directly from
Echelon.)
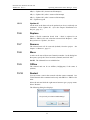
In your "Start" menu you will find a program group "Echelon LNS
Utilities". Start the program "LNS Server Licence Wizard".
In the "Credit Order" frame enter the number of LNS Device Credits
you want to add / purchase, i.e. normally 50. Then click "Next >":
38
Panasonic Eco Solutions Nordic AB
MEW01361 Rev: 3
Operating Instructions TLON Manager V2.0.x
Click "Copy to Clipboard".
Open your favourite email program (or word processor) and paste the
clipboard contents (the Request form) into the email message (or
document). Send that Request form together with your article
number 5096 order to:
[email protected].
If you order from Echelon directly, fill in the requested information in
the Request form before you send it to [email protected]
15.3
Application Key
You will receive an "Application Key" via a return email.
Start the "LNS Server Licence Wizard" and proceed to the second
dialog box containing the "Copy to Clipboard" button. Copy the
"Application Key" from the return email into the "Application Key"
field. Click "Finish".
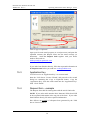
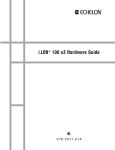
15.4
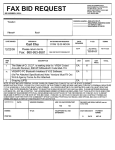
Request form - example
The Request form shall be send together with the article 5096 order.
NOTE! If you order article number 5096, Panasonic ESN AB will fill
in the requested information in the top part of the form. If you order
from Echelon directly, fill in the requested information.
Here follows an example of a Request form generated by the "LNS
Server Licence Wizard":
39
Panasonic Eco Solutions Nordic AB
MEW01361 Rev: 3
Operating Instructions TLON Manager V2.0.x
________________________________________________________
YOU MUST FILL IN ALL THE BLANK FIELDS IN THE TOP
PART OF THE
FOLLOWING FORM, SELECT ONE OF THE BILLING OPTIONS
BY FILLING
IN A CHECKBOX IN THE BOTTOM PART OF THE FORM, AND
FILL IN THE
BLANK FIELDS IN THE SELECTED BILLING OPTION. IF YOU
ARE
ORDERING NO CHARGE CREDITS, YOU MUST FILL IN ONE
OF THE
CHECKBOXES EXPLAINING THE REASON FOR THE ORDER.
A BLANK FIELD
IS A FIELD WITH A COLON (":") AT THE END OF THE LINE. IF
ANY
OF THIS INFORMATION IS MISSING, YOUR ORDER WILL BE
DELAYED.
TO:
Echelon License Administrator
Email: [email protected]
Fax:
+1-408-790-3833
FROM: Name:
Company:
Address1:
Address2:
Country:
Phone:
Fax:
Email:
SUBJECT: Order for LNS(r) Device Credits (LNS Turbo Edition)
*****************************************************
**
**
** NOTE: This order form is for ordering LNS Device Credits. **
**
LNS Device Credits are software keys that authorize **
40
Panasonic Eco Solutions Nordic AB
MEW01361 Rev: 3
Operating Instructions TLON Manager V2.0.x
**
an LNS Server to Commission or Recover additional **
**
devices.
**
**
**
**
This form CANNOT be used to order LonMaker Credits. **
**
Consult the LonMaker documentation for instructions **
**
for ordering LonMaker Credits.
**
**
**
**
Also, this form CANNOT be used to register the LNS **
**
Application Developer's Kit product. If you have
**
**
licensed the LNS Application Developer's Kit
**
**
product, consult the documentation for instructions **
**
on how to register the product.
**
**
**
********************************************************
Please process the following order:
Number of LNS Device Credits ordered: ADD 50
Number of LNS Device Credits to be delivered (if less than
the quantity ordered):
Product: LNS Device Credits
Model Number: 34400
Price Each:
Total Amount:
Following are the list prices. These prices are subject to
change. Contact your distributor for current and local pricing.
Your distributor may also provide you with an alternate mailing
address for this order.
List price: US$1.50
Price for authorized free uses: No charge (see agreement below)
The following PC key value is filled in automatically by the LNS
41
Panasonic Eco Solutions Nordic AB
MEW01361 Rev: 3
Operating Instructions TLON Manager V2.0.x
Server License Wizard when you generate an LNS Device Credit
order
as described in the product documentation. You should always use
the order form generated by the software and send the form by email
(or fax if email is not available) to ensure that there are no
errors in transcribing the PC key value.
PC Key: DBCB A65E 06FB C480 50 - 71D7 D287 C5C1 C5FE
8E71 DCA5 82E5 CCD4 DE8E 61DD 9A8C CA8B
Select one of the following payment methods and fill in
the information for the requested method:
[ ]
Credit Card (minimum order of 50 credits)
Type of credit card:
[ ] American Express
[ ] MasterCard
[ ] Visa
Name on the credit card:
Credit card number:
Expiration date:
Authorized by:
Billing Address:
Street 1:
Street 2:
City:
Providence/State:
Postal/Zip Code:
Country:
[ ]
Purchase Order (minimum order of 50 credits)
Purchase Order Number:
Authorized by:
Billing Address:
Street 1:
42
Panasonic Eco Solutions Nordic AB
MEW01361 Rev: 3
Operating Instructions TLON Manager V2.0.x
Street 2:
City:
Providence/State:
Postal/Zip Code:
Country:
[ ]
No charge evaluation, development, test, support,
production, training, or replacement credits (check
all that apply). By submitting an order for free
credits, you agree that you will use these free
credits only for the authorized purposes that you
have checked below, and you agree that you will
provide Echelon with information as reasonably
requested by Echelon to verify that the use of
these LNS Device Credits is limited to the authorized
uses. There is no minimum order size; maximum
order size is indicated below.
[ ] Evaluation use. LNS Device Credits used for
evaluation purposes. Limited to 500 free
credits per company per year.
[ ] Internal development and test use. LNS Device
Credits used for the development and testing
of devices that will solely will be used for
development, or that will be shipped in the
unconfigured state. Limited to 500 free credits
per device type per year.
[ ] Support use. LNS Device Credits used by a support
engineer to provide support to a customer. The
customer must have paid for the LNS Device Credits
used for the customer's devices. Limited to 500
free credits per support engineer per year.
43
Panasonic Eco Solutions Nordic AB
MEW01361 Rev: 3
Operating Instructions TLON Manager V2.0.x
[ ] Production use. LNS Device Credits used for
manufacturing test. Devices must be shipped in
the unconfigured state. Limited to 1 free
credit per manufactured device shipped in the
unconfigured state.
[ ] Training use. LNS Device Credits used solely
for training. Any devices installed during
training must not be used in a production or
operational system. Limited to 500 free credits
per class.
[ ] Replacement use. LNS Device Credits used to
replace LNS Device Credits that were lost due to
a PC hardware or software failure. Limited to
the number of credits that were lost as a result
of the failure.
Your LNS Device Credits will be sent to you by email or fax as an
Application Key (a series of numbers and letters). When you receive
the Application Key, run the LNS Server License Wizard again, enter
the Application Key on the second page of the wizard and then click
Finish.
44
Panasonic Eco Solutions Nordic AB
MEW01361 Rev: 3
16
Operating Instructions TLON Manager V2.0.x
Revision history
When possible, the revised information is written in red font colour.
Revision 1
Revised / added info. in the following chapters:
2. TLON Manager kit 5095, footnote 2.
15. LNS Device credits (The whole chapter is revised.)
Revision 2
Company name, etc. revised.
TLON connection board 1590 is revised to 1590 / 5090.
Revised / added info. in the following chapters:
3.1
5
6.1
6.1.2
6.2
7
13
13.3
Info. added.
Info. revised.
Info. added (mixed system)
Info. and footnote added
Footnote added.
Footnote added.
Info. deleted.
Info. added.
Revision 3
New chapter 5 about installation of the driver (OpenLDV ≥ 4.00),
which is necessary to support 64-bit Windows versions.
45
This page has deliberately been left blank.
Panasonic Eco Solutions Nordic AB
Jungmansgatan 12, SE-211 19 Malmö, Sweden
Tel.:+46(0)40 697 70 00 Fax: +46(0)40 697 70 99
E-mail: [email protected] Internet: pesn.panasonic.se