1
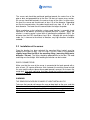
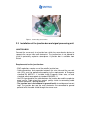
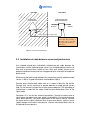
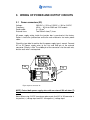
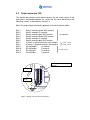
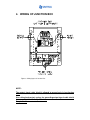
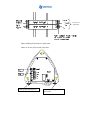
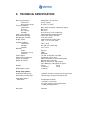
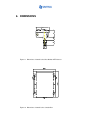
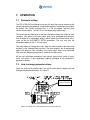
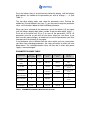
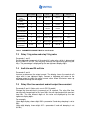
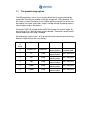
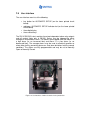
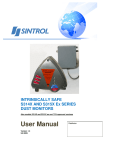
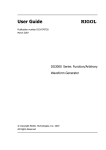
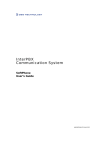
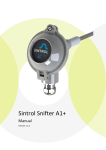
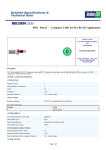
INTRINSICALLY SAFE
S311X AND S313X Ex Series
DUST MONITORS
User Manual
Version 1.3
08/09/2009
Distributor
Table of Contents
1.
INTRODUCTION ......................................................................................... 4
1.1
Safety ....................................................................................................... 4
1.2
Product overview ..................................................................................... 4
1.3
How does it work? ................................................................................... 5
2.
INSTALLATION .......................................................................................... 6
2.1
Selection of installation location ............................................................. 6
2.2
Installation of the sensor ......................................................................... 7
2.3
Installation of the junction box and signal processing unit .................. 9
2.4
Installation of cable between sensor and junction box ...................... 10
3.
WIRING OF POWER AND OUTPUT CIRCUITS .................................. 12
3.1
Power connectors (X3) ......................................................................... 12
3.2
Output connector (X5) .......................................................................... 13
4.
WIRING OF JUNCTION BOX ................................................................. 14
5.
TECHNICAL SPECIFICATION ............................................................... 16
6.
DIMENSIONS ............................................................................................ 18
7.
OPERATION ............................................................................................. 19
7.1
Parameter setting .................................................................................. 19
7.2
How to change parameter values ........................................................ 19
7.3
Relay 1 trig value and relay 2 trig value .............................................. 21
7.4
4mA trim and 20 mA trim ...................................................................... 21
7.5
Relay filter time constant and mA output time constant .................... 21
7.6
Automatic setup ..................................................................................... 22
7.7
The manual range option...................................................................... 23
7.8
User interface ........................................................................................ 24
ZENER BARRIER REQUIRED PARAMETERS ............................................... 25
NOTES .................................................................................................................. 27
1. INTRODUCTION
This manual refers to SINTROL’s Triboelectric Dust Monitors. Sintrol
welcomes any comments or suggestions relating to this document.
This manual is intended as a guide to the use and installation of the
product. Sintrol shall not be liable for any loss or damage whatsoever
arising from use of any information or details therein, or omission or
error in this manual, or any misuse of the product.
1.1
Safety
This equipment operates from either 115 VAC, 50/60 Hz or 230 VAC, 50/60 Hz
or 24 VDC. In either case, the voltages employed must at all times be treated
as lethal and suitable precautions taken whenever carrying out any form of
installation or maintenance, particularly when the cover of the unit is removed.
S300 Ex Series dust monitors are virtually maintenance free. The customer
under no circumstances should attempt to replace any component or the PC
board. If there is a fault in monitor contact your local distributor or the
manufacturer.
It is essential that the equipment be properly grounded! (See section 3)
It is possible that the sensor is installed in duct containing particulate which is
hazardous to health. The particulate may be inflammable or explosive.
Particulate could be toxic or contained in a high temperature gas.
Connection to the power supply is fixed installation with no separate mains
disconnector. Customer has to arrange mains disconnector to the power line to
be able to shut it off (if required). The electrical installation must be carried out
following all applicable regulations.
Unless the process conditions are known to be entirely safe, suitable
precautions must be taken before any entry is made into the duct for
installation or maintenance purposes.
1.2 Product overview
The S311X and S313X intrinsically safe dust monitors are microprocessorbased, self-adjusting devices, equipped either with two alarm relays or one
relay and 4-20 mA signal output. Sensor is designed for explosive
environments fulfilling Atex certificate requirements, II ½ GD EEx ia IIC T6,
IP65 T 85 °C. It is a measurement system with the Eex sensor, junction box
and signal processing unit (measuring instrument), that has been specifically
designed for easy installation and operation.
The sensor is intended to measure the dust particle density in gas, which is
flowing in the duct. The EEx-type sensor unit consists of a probe and a
preamplifier, and is intended to be used with various SINTROL DUST
MONITOR 300 Ex series measuring instruments.
Using of zener barrier devices between the preamplifier and main electronics is
necessary. Any commercially available zener barrier devices with
specifications fulfilling the requirements stated in the user manual may be
used.
The probe is a steel rod, which is inserted in a duct or pipe. The dust particles
flowing in the duct, which are electrically charged, induce a charge in the
sensor rod, when passing by the rod.
1.3
How does it work?
The S300 Ex Series Dust Monitors utilise the proven and reliable triboelectric
technology whereby the interaction of particles with the sensor rod causes a
small electrical charge transfer to occur between the particulate and sensor. It
is this small charge which provides the signal which is monitored by the
electronics. Provided that the material type remains constant, the signal
generated is proportional to the mass flow rate of solid particles even if an
accumulation of dust forms on the sensor. Experience has shown that this
method of solids flow monitoring will provide accurate results with minimal
maintenance.
2. INSTALLATION
2.1 Selection of installation location
The best position to install the S300X Series sensor is in a section of duct or
pipe where the particulate has an even distribution and the flow is linear. This
is to ensure that the sensor rod comes into contact with a representative flow
of particles. This would ideally be in a vertical or horizontal section of duct/pipe,
having no bends, valves, dampers or other obstructions for at least three duct
diameters downstream and upstream (preferable 5 x duct diameter). In some
applications, a compromise must be made and the sensor would be fitted in a
position which satisfies the majority of above requirements. The S300X Series
sensor must be mounted to metal ductwork in order to be electrically shielded
from interference and to provide a ground reference. The monitor should not
be mounted in direct sunlight or in areas where the ambient temperature is
above 45 oC. If you need temperature range higher than 45 oC, you should
use 24VDC model. Please contact your local distributor or Sintrol if you require
further advice.
Figure 1.
S300X Series Intrinsically Safe Dust Monitor recommended installation location
The sensor rod should be positioned pointing towards the centre line of the
pipe or duct and perpendicular to the flow. For ducts of square cross-section,
the sensor should be located in the centre of one of the sides. In either case,
the tip of the sensor rod should reach at least 1/3 of the diameter. Depending
on the dust concentration, the probe length could vary from 1/3 to 2/3 of the
duct diameter. The lower the dust concentration the longer the probe.
When monitoring a dust collection system, good location is generally found
upstream of the blower (assuming a negative pressure system). When the
monitor is used to control system with an electrostatic precipitator (ESP), the
distance from the ESP should be at least 20 m. Although the sensor (lengths
under 1m) is immune to the effects of vibration, very high vibrations should be
avoided.
2.2 Installation of the sensor
Once the location has been selected, the mounting fitting (socket) must be
welded to the pipe or duct. The first step is to cut a hole in the pipe/duct
slightly larger than the OD of the mounting fitting, (mounting fitting outer
diameter = 38 mm). The fitting should be perpendicular to the flow. The weld
and fitting must be airtight. After welding the monitor can be inserted.
EARTH CONNECTIONS
Make sure that the case of the sensor is connected to the local ground, with a
wire at least 1,5 square millimetres thick, between the earthing screw outside
the case and the closest place where good ground is present, for instance the
metal duct. Use earth connector that goes round the earthing screw to avoid
earth wire to slip off.
WARNING!
THE SENSOR ENCLOSURE IS MADE OF LIGHT METAL ALLOY!!
Take care that you do not hammer the case or drop tools on the case, and that
there does not exist danger of things to hit the case after installation, because
this can cause danger of explosion. Make sure that the warning label, which is
attached on the case, is clearly visible after installation is complete.
NOTE!
Diameter of the
hole in the duct
must be
minimum 38 mm
Figure 2. Sensor installation
1.
2.
3.
4.
5.
6.
7.
8.
9.
Sensor probe
Lock nut
Cable (2 pairs) to junction box and main electronics
Cover
Enclosure
Duct wall
Mounting fitting (socket)
Weld
Grounding wire
Sensor printed circuit board connections:
Connector X1 position1:
Connector X1 position2:
cable pair shield drain wire
cable pair shield drain wire
Connector X2 position 1:
Connector X2 position 2:
Vout - signal output
Vref 1- signal reference output, internally connected to
2
ground
V+ 1- supply voltage1, +2,5V nominal
V- 2- supply voltage2, -2,5V nominal
Connector X2 position 3:
Connector X2 position 4:
3
4
Figure 3. Connecting sensor wires
2.3 Installation of the junction box and signal processing unit
JUNCTION BOX
Connect the sensor only to a junction box, which has zener barrier devices to
separate the sensor from main electronics. The junction box is not allowed to
install in potentially explosive atmosphere. A junction box is available from
Sintrol.
Requirements for the junction box:
- EMC regulations require use of the metallic junction box.
- Cable connections and separation between the safe side and the non-safe
side (EEx) must be performed according to the requirements of European
standard EN 60079-11, if installed inside European Union area, or local
standard, which corresponds to standard EN 60079-11.
- Use EEx-type gland for the cable between the junction box and the explosion
proof sensor. Cable gland has contact springs inside to connecting cable
shield to enclosure = ground potential.
- The junction box is not allowed to ground locally to avoid ground current
loop. The junction box and the main electronics are connected to ground
potential with the cable shield through the sensor case.
EEx AREA
SAFE AREA
JUNCTION BOX AND
MAIN ELECTRONICS
SENSOR AND
PREAMPLIFIER
mA / relay
OUTPUT
mains
POWER
GROUNDING
SCREW
2 pairs signal/sensor voltage cable
100-200 m
DO NOT ground junction
box locally. The grounding of
the junction box is done with
the signal cable shield and
drain wires.
Figure 4.Sensor and Junction box
2.4 Installation of cable between sensor and junction box
Use shielded twisted pairs, individually shielded two pair cable between the
junction box and the explosion proof sensor. Use crimped bootlace ferrules on
wire ends to prevent loose strands of wire. Wire ends without ferrules are a
potential explosion hazard, and are not approved to be used with the explosion
proof sensor.
Maximum tested cable length between the junction box and the explosion proof
sensor is 100 m. In good interference free conditions 200 m.
Connect outer shield of both cable ends as is shown in figure 5a, 5b and 5c.
Connect only sensor enclosure to ground potential to avoid ground current
loop. Do not connect junction box to local ground potential. The grounding of
junction box is made with the cable shield and uninsulated drain wires of the
signal cable.
Connector X2 is for the four external connections. Connect the other ends to
zener barrier hazardous area side, which is marked blue. Use two dual channel
zener barrier devices; see zener specification at the end of manual. Connect
the signal and the signal reference wires to one zener barrier, and the sensor
supply voltages to the other zener barrier. Connect uninsulated drain wires to
the ground of zener barriers.
Make sure that you do not lay the wiring so that distance between bare metal
in the safe side and the hazardous side may become less than 50 millimeters.
Cable gland installation for the cable between the sensor and the
junction box.
Figure 5a
-Strip cable
-Expose braided shield
Figure 5b
-Feed cable through dome
nut and clamping insert
-Fold braided should over
clamping insert
-Make sure braided shield
overlaps O-ring
Figure 5c
-Push clamping insert into
body in tighten dome nut
3. WIRING OF POWER AND OUTPUT CIRCUITS
3.1
Power connectors (X3)
Voltage:
Frequency:
Power cable:
External fuses:
230 VAC +/- 20 V or 115VAC +/- 10V or 24 VDC
45 Hz … 65 Hz for 230V and 110V models.
3 x 1,5 mm2
Two 200 mA slow (T) fuses
All power supply wiring inside the junction box is pre-wired at the factory.
Power is fed to the junction box and to the main electronics via mains power
cable.
Check the type label to confirm that the power supply type is correct. Connect
AC or DC power supply wires to the first and third pin of the external
connector. Polarity is free. The middle pin of the connector is for the earth wire,
but the earth wire is not required.
AC1
AC2
Figure 6.power connector X3
NOTE: Protect both power supply wires with an external 200 mA slow (T)
fuse !!
Note: When using 24 VDC transformer please note that AC2 in X3 connector is
for positive (+) voltage input and AC1 for negative (-) voltage input.
3.2
Output connector (X5)
The junction box contains zener barrier devices for the sensor signal. A two
pair cable is connected between the sensor and the zener barrier blue end
connector screws, as described in section 2.4.
Note: The output signal functionality depends on the dust monitor model.
Slot 1
Slot 2
Slot 3
Slot 4
Slot 5
Slot 6
Slot 7
Slot 8
Slot 9
Slot 10
Slot 11
Slot 12
Relay1 normally closed (NC) terminal.
Relay1 common (C) terminal.
Relay1 normally open (NO) terminal.
ALL MODELS
Relay2 normally closed (NC) terminal.
Relay2 common (C) terminal.
Relay2 normally open (NO) terminal.
4-20 mA (+) positive terminal, active output
S312X, S313X,
S314X, S315X
4-20 mA (-) negative terminal, active output.
RS 485 output
(+) terminal
RS 485 output
(-) terminal
S314X, S315X
RS 485 input
(+) terminal
RS 485 input
(-) terminal
X5 - Output connector
terminal
SLOT 12
SLOT 1
Figure 7. Output connector in main electronics
4. WIRING OF JUNCTION BOX
Figure 8. Wiring layout of Junction Box
NOTE:
The output signal cable shield is allowed to ground only in junction box
end!!
Use cable gland contact springs for grounding output signal cable shield
to same potential with the junction box
See picture 6.
From sensor
equivalents
Figure 9.Wiring of Zener barriers in junction box
Figure 10. Sensor enclosure and connections
Connect cable shield to case
Connect grounding
wire to here
5. TECHNICAL SPECIFICATION
Measurement objects:
Particle size:
Measurement range:
Process Conditions:
Temperature:
Pressure:
Gas velocity:
Humidity:
Input surge protection:
Measurement principle:
Damping time constant:
Output signals:
Ambient conditions:
Temperature:
Humidity:
Vibration:
Materials:
Probe:
Insulation of sensor:
Enclosure:
Power Supply:
External fuse requirement:
Power consumption:
Wiring connections:
Solid particles in a gas flow
0.3 µm or larger
0.1 mg/m3 to 1 kg/m3
Max. 100°C (standard) / 200-350°C (option)
Max. 2 bar
Min. 4 m/s
95 % RH or less (non-condensing)
Under 20 kA pulses limited to 90 V
Electrostatic charge detection
10 to 180 seconds
isolated 4-20 mA (N/A in S301)
relay 5 A , 24 V AC or DC
-20 to + 45oC
95% RH (non-condensing)
2
5 m/s or less
Monitor warm up time
SS 316 L
PEEK
Aluminium
115 VAC or 230 VAC or 24 VDC
two 200 mA slow (T) fuses
8 W for AC models, 3 W for 24VDC model
External mains connector
DIN rail connector for output signals
PG11 EMC-type cable glands for signals
Sensor
2.0 kg
Junction box
3.5 kg
15 minutes
Range setup options:
Normal measuring range:
Extended measuring range
-automatic, based on average measured dust flow
-manual range setup (not in model S315X)
Weight:
Relay alarm options:
- Alarm level:
Offset trim:
two alternative methods:
-automatic, set at factory
(based on average measured dust flow)
-set with operating terminal
automatic
FULFILLS FOLLOWING ATEX REQUIREMENTS:
Li : 10 µH
Ui : 10 V
Ci : 1 nF
Ii : 150 mA
Compliance with the Essential Health and Safety Requirements has been
assured by compliance with the standards
EN 60079-0 (2006)
EN 60079-11 (2007)
EN 60079-26 (2007)
EN 61241-1 (2004)
EN 61010-1:2001, LVD
IEC 61326-1:2005 (First Edition) , EMC
6. DIMENSIONS
Figure 11. Dimensions of S300X series Dust Monitor ATEX Sensor
Figure 12. Dimensions of S300X series Junction Box
7. OPERATION
7.1
Parameter setting
The S311X/S313X Dust Monitor measures the dust flow rate by measuring the
current induced in the probe by charged solid particles impacting or passing by
the probe. The S313X instrument has a 4…20 mA output, and two relay
contact alarm outputs. The S311X has two alarm relay outputs only.
The measured dust flow value is low pass filtered to remove the effect of short
variations, like spikes in the input signal, with a user selectable time constant,
then changed to a milliampere output, which follows the filtered value with a
scale set by the AUTOMATIC SETUP procedure. The user may trim the
milliampere output of the 4…20 mA signal.
The relay output(s) change their state, when the measured dust flow rate value
exceeds a user selected alarm trig level. The relay output(s) are also protected
against the effect of short variations in the input signal, with a user selectable
time constant (damping parameter 5), common for both relays.
All the user selectable parameters have factory setup values, which in many
cases will suffice. If your application requires changing of the parameters,
proceed as follows.
7.2
How to change parameter values
Open the cover of the junction box. You see the front panel, display unit and
three parameter change button. (A, B and C)
Parameter change
buttons A, B and C
Figure 13.S300 Ex series Dust Monitor front panel in junction box
Press the leftmost (key A) of the three keys below the display, until the leftmost
digit indicates the number of the parameter you wish to change, 1 .. 8. (See
Table 1).
The two other display digits now show the parameter value. Pushing the
middle key (B) and rightmost key (key C), you may now change the parameter
value, see instructions below for each individual parameter.
When you have selected all the parameters, push the leftmost (A) key again
until the leftmost display digit shows number 8 and two other digits shows - -.
Push one of the other keys (B or C) to save all the parameters. NOTE: All
parameters must be as you wish to have them, when you save them. If you
want to make more changes, or decide not to save the parameters you have
changed, push the leftmost (A) key again.
If any parameter value is different from the values which you have saved, when
you return from changing parameters, the value will remain in effect until next
power down. The saved parameter values will then be in effect after power
supply is connected again.
PARAMETER CHANGE TABLE
DISPLAY
LEFT NUMBER
RANGE
KEY EFFECT
KEY B
KEY EFFECT
KEY C
FACTORY
DEFAULT
1
1…99%
add 10%
add 1%
5%
2
1…99%
add 10%
add 1%
60%
4 mA trim
3
-
increase
current
decrease
current
(Not in use model
S311X)
20 mA trim
4
-
increase
current
decrease
current
(Not in use model
S311X)
add 10s
-
0
add 10s
-
0
(Not in use model
S311X)
PARAMETER
Relay 1 trig
value
Relay 2 trig
value
Relay filter
time constant
Current filter
time constant
5
6
10…180
s
10…300
s
set to 4 mA
set to 20 mA
Manual range
7
0…5
Next range
Previous range
0
Save
parameters
8(-SP)
--
save all
save all
-
Table 1. PARAMETER CHANGE TABLE FOR S311X-model.
DISPLAY
LEFT NUMBER
RANGE
KEY EFFECT
KEY B
KEY EFFECT
KEY C
FACTORY
DEFAULT
1
1…99%
add 10%
add 1%
5%
2
1…99%
add 10%
add 1%
60%
4 mA trim
3
-
4
-
decrease
current
decrease
current
set to 4 mA
20 mA trim
increase
current
increase
current
add 10s
-
0
add 10s
-
0
PARAMETER
Relay 1 trig
value
Relay 2 trig
value
Relay filter
time constant
Current filter
time constant
Percent level of
full Range*
5
6
10…180
s
10…300
s
increase 10 % decrease 10 %
set to 20 mA
7
10-50 %
20 %
Manual range
8
0…5
Next range
Previous range
0
Save
parameters
9(-SP)
--
save all
save all
-
Table 2. PARAMETER CHANGE TABLE for S313X-model.
7.3
Relay 1 trig value and relay 2 trig value
Parameter 1 and 2
Set the trig levels in percent of the output full scale value, which is determined
by AUTOMATIC SETUP. You may only increase the trig value by pressing the
keys. The percentage is displayed by the two rightmost display digits.
7.4
4mA trim and 20 mA trim
Parameter 3 and 4
Increase or decrease the output current. The display shows the nominal mA
value with its two rightmost digits. Connect a calibrated mA meter to the
milliamp output to check the actual current value. Allow 30 minutes warm up
time before trimming the mA output.
7.5
Relay filter time constant and mA output time constant
Parameter 5 and 6 (latter not in use in S311X-model)
Change the time constant in increments of 10 seconds. The relay filter time
constant will change back to 10s from 180s, the mA signal output time constant
from 60s. The two leftmost digits of the value are displayed by the two
rightmost display digits.
For example:
(three digit display shows digits 506 = parameter 5 and relay damping is set to
60s)
(three digit display shows digits 612 = parameter 6 and mA damping is set
to120s)
7.6
Automatic setup
To be able to detect variations in dust flow, and to set alarm in case of
excessive dust flow variation, the dust monitor needs to know the typical dust
flow in your application, when your process operates normally.
The dust monitor has an AUTOMATIC SETUP function. With this, you set the
measuring range of the dust monitor such that typical dust flow in your
application corresponds to 20% of the dust monitor output full scale.
The 4…20 mA output at the typical dust flow rate will then be 4 mA + 20% of
16 mA (20 mA– 4 mA) which makes 7.2 mA. If the dust flow rate is 5 times the
typical value or higher, the output will be 20 mA, and if the dust flow rate is
zero, the output will be 4 mA.
Parameter 7 (Only in model S313X)
If you want to change the default percent of full Range (factory default value is
20%) for some reason, it is possible to change it in steps of 10 % from 10 to
50%, see Table 2.
For AUTOMATIC SETUP you need to know that the process is running with a
normal dust flow rate. Then open the cover of the dust monitor, and initiate
AUTOMATIC SETUP by pressing the small white key button near the indicator
lamp, on the lower printed circuit board (see Figure 13). NOTE: the indicator
lamp should be green before you press the key.
The dust monitor starts collecting data of the dust flow. This takes an hour or
less. The three digit display counts down towards zero, and the indicator lamp
is red as long as the data are being collected. To avoid interference from the
background electrical noise, you should close the cover of the junction box
enclosure right after having initiated the AUTOMATIC SETUP. Cover of the
sensor enclosure located in Ex - area must be closed during automatic setup.
After an hour, the setup is ready and the dust monitor is in normal operation. If
your environment is not electrically noisy, you may check the indicator lamp. It
turns back to green, when setup is ready.
The manual range option
7.7
The MR parameter is not in use as factory default, but it can be activated by
using other than 00 value and by saving the change with –SP command. The
MR setup is used if the process is not stabile and the automatic set up can not
be made or if the auto setup 100% range is not big enough to monitor the dust
concentration range in the process.
Parameter 7(S311X) and parameter 8(S313X) changes the manual range. By
pressing key B or C desired range can be selected. Parameter value 0 means
normal mode and auto setup is needed.
All fixed ranges (values from 1 to 5) do not need auto setup on commissioning
because range settings are set at factory.
Parameter
8
Value
Gain
Mode
0
Dynamic 5x
Automatic
1
1x
fixed
2
10x
fixed
3
100x
fixed
4
1000x
fixed
5
10000x
fixed
Dust level
Auto setup
all
concentrations
Very high dust
concentration
High dust
concentration
Moderate dust
concentration
Low dust
concentration
Very low dust
concentration
auto setup is
needed to do
NOT NEEDED
NOT NEEDED
NOT NEEDED
NOT NEEDED
NOT NEEDED
7.8
User interface
The user interface consists of the following:
•
•
•
•
key button for AUTOMATIC SETUP (on the lower printed circuit
board)
red/green AUTOMATIC SETUP indicator led (on the lower printed
circuit board)
three digit display
three control keys
The S311X/S313X Ex dust monitors have two independent alarm relay outputs
and mA output (latter only in S313X). Relays may be triggered by either
average or instantaneous levels. The alarms are arranged such that Alarm 1 is
a high alarm (i.e. on increased flow) and Alarm 2 is a low alarm (i.e. on
decreased flow). The average alarms may be used to effectively provide an
alarm delay facility, preventing alarms on short-term deviations from the normal
conditions. The alarms are fully programmable and may be set to Normally
Open or Normally Closed.
Figure 14. User interface of main electronics in the junction box
ZENER BARRIER REQUIRED PARAMETERS
Channels
Type
Rmax
4 (4 one channel devices, 2 two channel devices or 1 four channel device)
BIPOLAR (STAR CONFIGURATION)
100 ohm
PROPERTIES OF THE SENSOR ELECTRONICS:
All voltages in the sensor are between -2,75 V and +2,75 V, nominal. All currents in the sensor
are less than 10 mA, nominal.
The sensor tolerates 10 V or less zener barrier channel to channel voltage.
The sensor tolerates 100 ohm or less zener barrier series resistance per channel.
The sensor tolerates 150 mA or less current limit per channel.
THE MAXIMUM INPUT VALUES OF THE TWO INTRINSICALLY SAFE CIRCUITS ARE:
Ui
Ii
Li
Ci
=
=
=
=
10 V
150 mA
10 µH
1 nF
RECOMMENDED DEVICE:
STAHL INTRINSPAK 9002/77-093-300-001
Type star configuration, dual channel
Rmax 82,1 ohm
Un
6,0 V
Uo
9,3V
Io
150 mA/channel, 300 mA both channels
Po
0,35 mW/channel, 0,7 mW both channels
Lo
1,3 mH/channel, 0,2 mH both channels
Co
4,1 uF/channel, 4,1 uF both channels
This device may only be connected to appliances, where no voltage higher than AC 250 V
can occur.
Figure 15. Two dual channel STAHL INTRINSPAK 9002/77-093-300-001
Zener barriers in junction box
SPECIFICATION OF CABLE BETWEEN SENSOR UNIT AND JUNCTION BOX
Use cable that fulfills below specification or equivalent. Manufacturer of below cable is Belden
Inc. http://bwcecom.belden.com/
PART NUMBER
DESCRIPTION
8162 Paired - Low Capacitance Computer Cables for EIA R232/422
24 AWG stranded (7x32) tinned copper conductors, twisted pairs,
individually shielded with 100% Beldfoil®, 24 AWG stranded tinned copper drain wire,
Datalene® insulation, overall Beldfoil® shield plus 65% tinned copper braid shield, PVC
jacket.
CONDUCTOR
Number of Pairs:
Total Number of Conductors
AWG:
Stranding:
Conductor Material:
2
4
24
7x32
TC - Tinned Copper
INSULATION:
Insulation Material Trade Name:
Insulation Material:
Datalene®
FPE - Foam Polyethylene
PAIR:
Pair Lay Length:
Pair Twists/ft.:
Pair Shield Material Trade
Name
Pair Shield Type:
Pair Shield Material:
Pair Shield % Coverage:
PAIR SHIELD DRAIN WIRE:
Pair Shield Drain Wire AWG
Pair Shield Drain Wire
Stranding:
Pair Shield Drain Wire
Conductor Material:
1 in.
12
Beldfoil®
Tape
Aluminum Foil-Polyester Tape
100 %
24
7x32
TC - Tinned Copper
PAIR COLOR CODE CHART:
Number
Color
1
Black & Red
2
Black & White
OUTER SHIELD:
Outer Shield Material Trade Name:
Beldfoil® (Z-Fold®)
Outer Shield Type:
Tape/Braid
Layer Number
Material Trade Name
Type
1
Beldfoil®
Tape
2
Braid
OUTER JACKET:
Outer Jacket Material
Material
Aluminum Foil-Polyester Tape
TC-Tinned Copper
PVC - Polyvinyl Chloride
MECHANICAL CHARASTERISTICS:
Operating Temperature Range:
-40°C To +60°C
Non-UL Temperature Rating:
60°C (UL AWM Style 2493)
ELECTRICAL CHARASTERISTICS:
Nom. Characteristic Impedance:
Nom. Capacitance Conductor to Conductor @ 1 KHz
Nom. Cap. Cond. to Other Cond. & Shield @ 1 KHz:
Nominal Velocity of Propagation:
Nom. Conductor DC Resistance @ 20 Deg. C:
Ind. Pair Nominal Shield DC Resistance @ 20 Deg. C
Nominal Outer Shield DC Resistance @ 20 Deg. C:
Max. Operating Voltage - UL:
Max. Recommended Current:
100 Ω
12.5 pF/ft
22 pF/ft
78 %
24.0 Ω/1000 ft
18 Ω/1000 ft
4.3 Ω/1000 ft
300 V RMS
1.8 Amps per conductor @ 25°C
% Coverage (%)
100
65
NOTES
______
Sintrol Oy
Ruosilantie 15
FI 00390 Finland
Tel. +358 9 5617 360
Fax +358 9 5617 3680