1
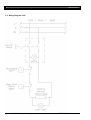
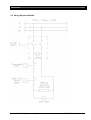
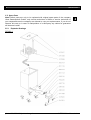
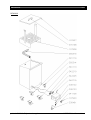
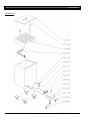
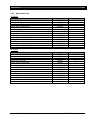
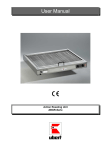
User Manual
RoFry Soak Tank
RF 8030
Contents
3
1 Contents
1
2
Contents ................................................................................................................................... 3
Important References ............................................................................................................... 4
2.1 General .............................................................................................................................. 4
2.2 Dimensions ........................................................................................................................ 4
2.3 Technical Data ................................................................................................................... 4
2.4 Product Description ............................................................................................................ 4
3 Installation and Starting Up....................................................................................................... 5
3.1 Unpacking .......................................................................................................................... 5
3.2 Installation .......................................................................................................................... 5
3.3 Electrical Connection.......................................................................................................... 5
3.4 First Operational Test ......................................................................................................... 6
3.5 Starting Up ......................................................................................................................... 6
4 Operation .................................................................................................................................. 7
5 Maintenance ............................................................................................................................. 8
5.1 Cleaning and Upkeeping .................................................................................................... 8
5.2 Trouble Shooting ................................................................................................................ 9
5.3 Wiring Diagram 120V ....................................................................................................... 10
5.4 Wiring Diagram 208-240V ................................................................................................ 11
5.5 Spare Parts ...................................................................................................................... 12
printed: 09/2010 Subject to change!
< RF8030UserManual.doc
4
Important References
2 Important References
2.1 General
Before starting up your new Soak Tank, you should read this operation manual thoroughly.
UBERT’s machinery is manufactured with high quality materials and therefore meets an excellent
quality standard.
2.2 Dimensions
2.3 Technical Data
Dimensions (width x height x depth): 455mm x 810mm x 530mm
Weight: 23.5 kg
Power: RF 8030 2.0 kW, 230 V AC
Power: RF 8030-2 1.9 kW, 120 V AC
Noise emission < 70 dB (A)
2.4 Product Description
The Soak Tank is an electrically heated tank with a thermostatically control and a safety temperature limiter (high limit control). It has a capacity of approximately 100 liters. The unit is equipped
with two casters which can be fixed in order to avoid an unintentional moving. The cleaning mixture
can be drained off by a bowl faucet at the bottom of the tank.
It is used for the cleaning of all removable parts of the RoFry except the fresh air filter.
printed: 09/2010 Subject to change!
< RF8030UserManual.doc
Installation and Starting Up
5
3 Installation and Starting Up
In general the RoFry Soak Tank is secured for transportation after the final inspection so that it will
reach the place of destination without any damage. Nevertheless we recommend to check the unit
for its good condition when it is unpacked.
Note! Please inform us immediately about visible damages!
3.1 Unpacking
Remove carefully the packaging and filling material from the RoFry Soak Tank to prepare it for the
installation.
Take out all movable parts and check them for completeness.
Please learn the supply schedule from the delivery note.
3.2 Installation
During the installation of the Soak Tank, please pay attention to the following points:
• The machine has to be lined up horizontally and vertically.
• Please use the casters in a fixed position.
• Install the Soak Tank where the area around it can be cleaned easily.
• You are only allowed to use the Soak Tank for commercial purposes.
• An adequate specialist staff member has to operate the Soak Tank.
• Please use the Soak Tank only for its own special purpose.
3.3 Electrical Connection
Please learn the electrical connected value and the detailed technical data from the identification
plate. You will find it on the left side of the switch box. The unit has always to be installed by a licensed electrician according to the local regulations. In order to connect the Soak Tank to electrical
power a power-supply plug has to be used so that in case of emergency the unit can be disconnected.
•
Check the correspondence of electricity kind and mains voltage with the relevant information on
the type sign.
•
Please be sure that the supply lead (3-core, min. cross section 1,5 o) to the plug box is separately protected with 16 ampere
•
The local electrical connection has to be laid in that way that an unintentional contact to hot
parts is excluded.
•
Further information please check with the circuit diagram (chapter 5.3).
printed: 09/2010 Subject to change!
< RF8030UserManual.doc
6
Installation and Starting Up
3.4 First Operational Test
Before starting up the Soak Tank, please clean all removable single parts as well as the unit itself
with a fat loosening cleaning detergent very thoroughly.
Note! Do not use any inflammable liquids for the cleaning. Do not clean the Soak
Tank with a jet of water, a steamjet- or a high pressure cleaner. In the chapter
Cleaning and Maintenance we will give you detailed instructions.
With this first basic cleaning the formation of smoke and smell will be minimized. So you will work
with this Soak Tank in a secure and hygienic manner.
3.5 Starting Up
•
Place the unit at its position and fix the casters.
•
Fill a clean pail with approximately 10 liters of hot water.
•
Stir the soda (4kg) into the hot water until it is completely dissolved.
•
Pour the suds into the unit.
Note! The bowl faucet has to be closed!
•
The unit has to be filled with water up to the MAX.-marking.
•
Put in the plug.
•
Switch on the unit; the yellow control light on the main switch shows the operating condition of
the Soak Tank.
•
The lighting up of the yellow control light on the upper side of the switchbox shows the heating
phase.
•
If necessary, fill in 1 cup of usual dishwasher detergent (corresponds to 3 detergent tabs).
printed: 09/2010 Subject to change!
< RF8030UserManual.doc
Operation
7
4 Operation
As the soda mixture develops its optimal cleaning effect at about 85 °C (=185 F), the control thermostat is already fixed on this temperature by UBERT.
If the time of standstill of your RoFry should be often shortly we recommend to switch on the soaking tank already 3 hours before putting in the parts to be cleaned in order to preheat the soda mixture on operation temperature.
Depending on the dirtiness of the parts the cleaning should be left in the liquid for 3 - 4 hours on
operation temperature.
Please proceed the putting in as follows:
• Take the basket and the basket holder out of the RoFry, put these down on a convenient place
and draw the basket out of the basket holder up to the end.
• Take the airguiding metal and oil drawer out of the RoFry.
• Remove the knurled nut, take it out as well as the fan wheel and put both parts into the basket,
now push the basket back into the basket holder.
• Take the drip-bowl from the door and empty it.
• Always put firstly the basket and the basket holder into the soaking tank.
• Now you can put in all other parts.
• When you put out the cleaned parts please work reverse, i.e. take the basket and the basket
holder out of the soaking tank always last.
• Rinse all parts with clear water.
Note! The soak tank is not convenient for the fresh air filter of the RoFry, as this is
made from aluminum!
printed: 09/2010 Subject to change!
< RF8030UserManual.doc
8
Maintenance
5 Maintenance
Following you will find some important notes concerning the maintenance, eventually interference
eliminations as well as a service case with your soaking tank.
5.1 Cleaning and Upkeeping
Note! Before you start with cleaning the unit has to be disconnected!
5.1.1
General notes
•
Use only cleaning- and maintenance detergents which are completely harmless in connection
with food, even if there are very persistent dirt residues.
•
After using of detergents all single parts have to be rinsed with clear water and rubbed dry with
a towel. All detergent residues have to be removed.
•
It is to observe the following principles in order to secure the life and durability of
a stainless steel unit:
- Keep the stainless steel surface clean.
- Keep the stainless steel surface thoroughly ventilated.
- Avoid any touch of the surface with rusty parts.
Note! Do not use any bleaching or chlorine containing detergents. In any case do
never use scouring or scraping cleaning detergents or -equipment for the pipe heater.
5.1.2 Cleaning- and Maintenance Detergents
In order to guarantee a quick and easy cleaning, we recommend our special cleaning- and maintenance detergents being part of our product range.
•
•
Grill detergent
Apply the grill detergent evenly and let it soak for approximately 10 - 15 minutes. Then rinse the
part completely with water.
Stainless Steel Maintenance Detergent
Spray it on the surface with a distance of about 25 cm and then wipe it off with a smooth and
dry towel. If there are only small surfaces spray directly on a clean duster and wipe. So you will
achieve an easy cleaning with a gleaming result.
printed: 09/2010 Subject to change!
< RF8030UserManual.doc
Maintenance
9
5.2 Trouble Shooting
If your Soak Tank does not work satisfactorily we would like to give a first help with
the following checklist. Only after checking these points you should contact
a)
your responsible service partner
or
b)
directly the company:
UBERT GASTROTECHNIK GmbH
Werk II Gewerbegebiet Nord
Vennekenweg 17
46348 Raesfeld
Tel.:(49) 02865 / 602-226
Service-Tel.:0172 / 2 82 86 31
Fax:(49) 02865 / 602-102 (or -103)
Note! Only these two companies are allowed to carry out service work and replacement of defect parts. If you do not observe this note or in case of manipulation of a
third party any claims for guarantee will become invalid.
5.2.1 Malfunction Check List
Interference
Soaking Tank does not
work
Soak Tank does not heat
up
Possible Cause
Remedy
a. Energy supply is not o.k.
Check the plug.
Control the automatic cut-out!
b. Fuses are defect
Inform your local electrician
a. Safety Temperature Limiter
has tripped
Let the unit cool down, unscrew
the black protective cap at the
front of the switch box, push the
reset button of the STL
b. Thermostat defect
Inform the Service technician
c. Heating element defect
Inform the Service technician
printed: 09/2010 Subject to change!
< RF8030UserManual.doc
10
Maintenance
5.3 Wiring Diagram 120V
printed: 09/2010 Subject to change!
< RF8030UserManual.doc
Maintenance
11
5.4 Wiring Diagram 208-240V
printed: 09/2010 Subject to change!
< RF8030UserManual.doc
12
Maintenance
5.5 Spare Parts
Note! Defect parts are only to be replaced with original spare parts of the company
Ubert Gastrotechnik GmbH, only service technicians of Ubert or service technician of
your responsible service company are allowed to carry out replacements. If you do not
observe this note or in case of manipulation of a third party any claims for guarantee
will become invalid!
5.5.1 Explosion Drawings
RF8030-1
printed: 09/2010 Subject to change!
< RF8030UserManual.doc
Maintenance
13
RF8030-2
printed: 09/2010 Subject to change!
< RF8030UserManual.doc
14
Maintenance
RF8030-208
printed: 09/2010 Subject to change!
< RF8030UserManual.doc
Maintenance
15
5.5.2 Spare Parts Lists
RF8030-1
Description
Access Plate
Cover
Inner Bottom-Charge
Strain Relief Counter Nut
Strain Relief
Control light (yellow)
Main Switch 240V
plug
Thermostat
Safety Temperature Limiter
Heating Element 2000W/230V
Bowl Faucet
Handle
Castor Wheel (with fixing)
Support Castor Wheel
Part No.
107920
107927
107928
338132
338133
340715
341108
341301
342211
342225
355313
355314
370108
381113
381119
Amount
1
1
1
1
1
1
1
1
1
1
1
1
1
2
2
Part No.
107920
107927
107928
330401
338132
338133
340715
341136
342211
342225
355314
355315
370108
381113
381119
Amount
1
1
1
1
1
1
1
1
1
1
1
1
1
2
2
RF8030-2
Description
Access Plate
Cover
Inner Bottom-Charge
Field Wire 120V (UL)
Strain Relief Counter Nut
Strain Relief
Control light (yellow)
Main Switch 120V
Thermostat
Safety Temperature Limiter
Bowl Faucet
Heating Element 1900W/120V (UL)
Handle
Castor Wheel (with fixing)
Support Castor Wheel
printed: 09/2010 Subject to change!
< RF8030UserManual.doc
16
Maintenance
RF8030-208
Description
Access Plate
Cover
Inner Bottom-Charge
Field Wire 250V (UL)
Strain Relief Counter Nut
Strain Relief
Control light (yellow)
Main Switch 240V
Thermostat
Safety Temperature Limiter
Heating Element 2000W/230V
Bowl Faucet
Handle
Castor Wheel (with fixing)
Support Castor Wheel
printed: 09/2010 Subject to change!
Part No.
107920
107927
107928
330400
338132
338133
340715
341108
342211
342225
355313
355314
370108
381113
381119
Amount
1
1
1
1
1
1
1
1
1
1
1
1
1
2
2
< RF8030UserManual.doc