1
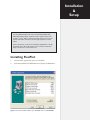
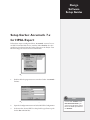
U se r G u id e
Ioline FlexPlot
User Notice
Trademarks
Ioline and FlexJet are trademarks of Ioline Corporation. HP is a trademark of the Hewlett-Packard Company. All images and names related to Gerber™ Accumark™ are the property of Gerber. All images and
names related to Lectra JustPrint are the property of Lectra. All images and names related to PAD Plot
Network are the property of PAD. Other product names, logos, designs, titles, words or phrases mentioned within this publication may be trademarks, service marks, or trade names of Ioline Corporation or
other entities and may be registered in certain jurisdictions including internationally.
Ioline Disclaimer
IOLINE CORPORATION PROVIDES THIS MANUAL “AS IS” WITHOUT WARRANTY OF ANY KIND,
EITHER EXPRESS OR IMPLIED, INCLUDING BUT NOT LIMITED TO THE IMPLIED WARRANTIES
OR CONDITIONS OR MERCHANTABILITY OR FITNESS FOR A PARTICULAR PURPOSE. IN NO
EVENT SHALL IOLINE, ITS DIRECTORS, OFFICERS, EMPLOYEES OR AGENTS BE LIABLE FOR ANY
INDIRECT, SPECIAL, INCIDENTAL, OR CONSEQUENTIAL DAMAGES (INCLUDING DAMAGES
FOR LOSS OF PROFITS, LOSS OF BUSINESS, LOSS OF USE OR DATA, INTERRUPTION OF BUSINESS
AND THE LIKE), EVEN IF IOLINE HAS BEEN ADVISED OF THE POSSIBILITY OF SUCH DAMAGES
ARISING FROM ANY DEFECT OR ERROR IN THIS MANUAL OR PRODUCT.
Limit of Liability Statement
It is the responsibility of the operator of the software to monitor performance and maintain it in proper
working condition by following the instructions in this User Guide. It is the responsibility of the operator
of the printer to follow all safety precautions and warnings that are described in this User Guide and the
FlexJet User Guide. Ioline Corporation is not responsible for injuries that may occur as a result of unsafe
use. Ioline Corporation is not responsible for substandard operational performance as a result of failure to
maintain the software or printer as described in this User Guide and the FlexJet User Guide. Ioline makes
no warranty regarding the accuracy of the documentation or system.
© 2003-2008 Ioline Corporation. All rights reserved. This manual may not be copied, photocopied, reproduced, translated, transmitted or converted to any electronic or machine-readable form in whole or in
part without prior written approval of Ioline Corporation.
Service and Support
If you require assistance with an Ioline product, your local Ioline dealer or authorized service center is ready to
help. Support information is also available 24/7 on the Ioline Web site—or you may contact Ioline directly:
Ioline Corporation
14140 NE 200th Street
Woodinville, Washington 98072 U.S.A.
Ioline Customer Service Department
Monday through Friday
7:00 A.M. - 5:00 P.M. U.S. Pacific Time
Voice: 1.425.398.8282
Fax: 1.425.398.8383
[email protected]
www.ioline.com
Part Numbers: (Print) 108212 Rev. 4 • (File) 108211 Rev. 4
Ioline FlexPlot
U se r Gu i d e
Table of Contents
Table of Contents
Installation & Setup
Installing FlexPlot ...................................................................................................................... 5
Setup ................................................................................................................................................ 6
Import Marker Files ............................................................................................................... 7
Print Markers .......................................................................................................................... 7
Using Automatic Queue ....................................................................................................... 8
Command Index ........................................................................................................................ 9
Main Window .......................................................................................................................... 9
Marker Queue ...................................................................................................................... 10
Setup Window ....................................................................................................................... 11
Piece Plot Optimization Window ............................................................................. 12
Design Software Setup Guides
Setup Gerber™ Accumark™ 7.x for HPGL Export ....................................................
Setup FlexPlot to find the files ..........................................................................................
Setup Lectra™ JustPrint™ for ASTM 6959 File Export ...........................................
Installation Option 1: Installing the JustPrint Software for the First Time ...............
Install the First Printer ........................................................................................................
Testing the Installation .........................................................................................................
Installation Option 2: Adding a Printer to an Existing JustPrint Installation ..........
Setup JustPrint (for options 1 and 2) ...............................................................................
Printing a File .........................................................................................................................
Setup PAD™ Plot Network™ for HPGL File Export .................................................
Setup PAD System™ for HPGL Export ............................................................................
Setup FlexPlot to find the files ..........................................................................................
13
15
16
16
16
18
19
19
19
20
20
21
Installation
&
Setup
The Ioline FlexPlot Software will convert and send HPGL, DM/PL, DXF,
ASTM 6959 and MicroMark™ output files to Ioline apparel printers. Users
of Gerber™, Lectra™, PAD™ and many other design systems can now create
markers with familiar software but use Ioline apparel printers for marker
output.
System requirements: 32 bit version of Windows 2000/XP/Vista, ~25 MB
of hard disk space, 1024 x 768 minimum screen resolution and an Ioline
FlexJet connected to a communication port.
Installing FlexPlot
1.
Close all other applications prior to installation.
2.
Insert the installation CD-ROM into the computer CD-ROM drive.
Figure 1. Insert the Installation Disk in your CD-ROM drive to install FlexPlot.
6
Ioline FlexJet User Guide
3.
The installation program should start automatically. If not,
go to the Start Menu, and click on Run. Browse the CD-ROM
drive (usually D:\), and double left-click on iosetup.exe.
4.
Follow the self-guided installation procedure. The default settings are acceptable for most users. Ioline recommends that
you install the manuals and the Adobe® Acrobat® viewer along
with the FlexPlot software. (See Figure 1.)
Figure 2. The Main FlexPlot Window.
Setup
1.
The Ioline FlexPlot program icon
is stored on the desktop or under Start/Programs/Ioline. Start
FlexPlot by clicking the program
icon. The main program window
will appear. (See Figure 2.)
2.
Determine the serial port number
on the PC that is used to send data
to the printer. The FlexPlot software can use COM 1 through 8.
3.
Press the Setup button to open the Setup Window. (See Figure 4.)
4.
Choose the port and communication baud rate on the Device
Communications dialog box. The default baud rate is 38,400
for the FlexJet and 9600 for the 600Ae, 28Ae, and 600AeX. Default
settings for the other features typically work best for most users.
See the Command Index for a description of each feature in the
setup window.
5.
Press the OK button.
6.
Exit when the settings are complete.
Figure 3. The FlexPlot icon.
7
Figure 4. The FlexPlot Device Communications Setup Window.
Import Marker Files
1.
Start the FlexPlot software if it is not already running. The
main program window will appear. (See Figure 2.)
2.
Choose the location of the files to import in the folder and file
lists on the left side of the FlexPlot window. If the files are not
visible, choose the correct file type in the Import File Type list.
3.
Left click on the desired file name then press the Load Import
File button to convert the file and send it to the Marker Queue
shown in the spooler window. Use the CTRL and SHIFT keys
to select multiple files at a time. The FlexPlot software creates a
new file in the queue with the source file name but with a .PLX
file extension.
Print Markers
1.
The current Marker Queue is shown in the bottom window,
Figure 5. Markers added in Step 3 above are displayed in the
Marker Queue list. (The file will stay in the list until the Send
button is pressed or the file is deleted.)
Hint
The default FlexPlot file location
is C:\HPGL\.
Hint
Hint: Choose All File Types (*.*) in
the Import File Type list to see all
the files in the folder. FlexPlot
will automatically recognize files
that it is compatible with when
they imported.
Figure 5. The FlexPlot Marker Queue.
8
Ioline FlexJet User Guide
2.
Make sure that FlexJet power is on, loaded with paper and an
Origin is set (OK = Green). See the FlexJet User Guide for details
on preparing the FlexJet to print.
3.
Press the Send button in the spooler window to send all of the
markers listed in the Current Marker Queue to the printer. The
file at the top of the list is sent first followed by the other files in
the order they are shown.
4.
Press the Abort button if you ever need to stop printing. Position the carriage and press Set Origin on the FlexJet keypad to
reset the printer and prepare to send new markers.
Using Automatic Queue
Hint
The Move Up and Move Down
buttons in the Send Queue
move the selected file printing
order up or down one position.
Hint
The Send and Save Queues
can hold many marker files. After
the Send button is pushed, each
file is printed in the order that it
is displayed in the queue. The top
files are printed first. Files added
before the queue is emptied are
included in the active queue.
Automatic Queue provides a way for users to automatically send
files to the FlexJet without having to interact with the FlexPlot software. Once Automatic Queue is active, any file copied to the queue
folder is automatically imported and sent to the FlexJet. Multiple
users can all copy marker files to the same location on a network and
FlexPlot will add them to the queue in the order that they appear in
folder. To Enable Autoqueue:
1.
Choose the queue folder in the Browse window where users
will copy marker files to. This folder can reside on the local
hard drive or a network.
2.
If the Automatic Queue button is grayed out, select the Enable
Automatic Queue option in the Setup window..
3.
Press OK then Start when you are ready to start importing files
and sending them to the FlexJet.
Hint
Once Automatic Queue
imports and converts a file, it
deletes it from the queue folder.
Figure 6. The FlexPlot Marker Queue.
4.
When a file is written to the folder shown in the Browse
window, it is automatically shown in the Automatic Queue
Window (may take a few seconds). The first file in this window
is sent directly to the printer then removed from the list. As
files are added to the folder, they will appear in the Automatic
Queue Window where you can reorder them. Only the file
that FlexPlot is currently sending to the printer is shown in the
Send Queue Window.
5.
Press the Abort button if you ever need to stop printing. Position the carriage and press Set Origin on the FlexJet keypad to
reset the printer and prepare to send new markers.
9
Command Index
Main Window
About
Displays program and version information.
Automatic Queue
Opens the Automatic Queue window. Files
sent to the current Browse location are automatically converted and sent to the FlexJet. If
this button is disabled, go to the Advanced
Options tab in Setup to enable it.
Browse
This window shows the current folder and
drive (volume) list.
Exit
Exits the FlexPlot software.
File Information
Displays length, width and name of the imported file. When using STD files, the Micromark Info button is activated. Pressing it
shows detailed information about the marker.
Help (?)
Enable/Disable help buttons for pop-up tips.
Import File Type
Lists the file types compatible with FlexPlot.
Selecting a single file type from the list will
make only that file type appear in the Import
Marker File window. Choose All Files (*.*) to
display all files in the folder.
Import Marker File
The selected file name is displayed in the
top window and other available files in the
Browse folder are displayed in the smaller
window below.
Load Import File
Loads the currently selected file into the
FlexPlot software. File length, width, etc. is
displayed in the File Information Window.
See also, Using Automatic Queue in this chapter.
Load/Save All
Automatically converts all files in the current
folder and adds them to the Marker Queue.
Marker Gap
Add a gap (blank space) after each marker.
Micromark Info
When importing STD files, the Micromark
Info button is activated. Pressing it shows detailed information about Micromark markers.
Piece Plot
Optimization
Conserve paper by stacking narrow piece jobs or
other small markers across a wider marker. See
the Piece Plot Optimization Window below.
Scale
Adjust the scale of the imported marker. The
Save button makes the settings permanent.
Setup
Displays the FlexPlot Setup window. See Setup
Window, below.
Size of Panels
Displays the width of the Y (carriage motion) and
length X (paper motion) panels. Setting these values smaller than the imported marker will break
it into smaller pieces. Smaller Y makes multiple
columns for printing extra wide markers on narrow printers. Smaller X speeds up printing.
Hint
FlexPlot breaks a wide marker
into columns if the width (Y) of
the file is larger than the Y value
shown in the Size of Panels
box. Each column is stored in the
queue as a separate file with the
same name but with a number
after each one indicating the
column number. This way, the user
can print markers that are wider
than the printer.
10
Ioline FlexJet User Guide
Marker Queue
Hint
Press the Set Origin button
after aborting a print job. This
clears the memory and prepares
the printer for the next plot.
Abort
Stops sending data to the printer. The FlexJet
will halt after printing the data in its buffer.
Press Start/Stop on the keypad to immediately
stop printing.
Browse
Choose a queue on a hard disk or network
volume.
Change Start Frame
If the FlexJet runs out of paper or ink before
completing a marker, you can reprint the
marker from the Frame at which the media
ran out to save time and consumables. See
side bar for more information.
Copy
Creates multiple copies of the selected marker.
Delete
Remove the selected marker from the Marker
Queue list.
Delete All
Removes all markers from the Marker Queue
list.
Insert Stop
Places a stopping point between the selected
marker and the next marker in the list. The
FlexPlot stops sending print data after the
marker with the <PAUSE> symbol is complete
then waits for the user to press the OK button to
continue printing.
Marker Information
Displays length, width, and progress data for
files in the queue.
Marker Queue
Shows the queue to which files are saved and
sent.
Move Up/Down
Change the order markers are listed (and sent)
in the queue. These buttons do not work on the
marker currently printing.
New
Create a new queue.
Preview Marker
Displays a preview of the currently selected
marker.
Send
Sends all files listed in the Marker Queue window. Files at the top of the list are sent before
files listed below them.
Hint
To use Change Start Frame,
select the file in the Send
Queue list then press the
Change Start Frame button.
Determine a Starting Frame Number. The frame size and starting
point is displayed under the file
name. Example: A marker failed
125 inches from the beginning
and it has 46 inch frames. The first
two frames printed 92 inches (46
x 2) of the marker. Enter ‘3’ in
the Start Frame Number box so
that the two frames are skipped
and the missing portion of the
third frame (between 92 inches
and 136 inches) is printed.
L
Note
To stop printing immediately,
press Start / Stop on the FlexJet
keypad. Consult the FlexJet User
Guide for more information on
pausing and cancelling printing.
Setup Window: Device Communications
L
Baud Rate
Choose the speed of communication over the
port connected to the FlexJet. This must match
the baud rate in the printer. See the FlexJet
User Guide for more information. The default is
38,400.
Flow Control
Choose FlexJet (software) for printers or Ae
Plotter (Hardware/CTS) for a pen plotter. The
default is FlexJet (software).
Select Port
Choose the computer communication port
connected to the FlexJet. COM1 is the default.
Note
The Insert Stop command
does not pause the FlexJet in the
middle of printing. The printer
will continue to print all the data
in the buffer until it encounters
a Pause Marker at the end of
a file.
11
Setup Window: System Control
Delete Source File
Remove the original plot file from the Import
Marker folder after loading and converting the
file in the queue folder. This option is default
OFF.
Empty Converted
File Archive
When files are converted by FlexPlot, an
archive copy of the output PLX file is stored
in C:\Ioline\Converted\. Pressing this button
will delete all the copies from this folder. Press
the Show Archive Size button before deleting
the files to see how much space the files use.
In Preview, ...
When checked, text labels in markers are
displayed in the Preview Window. While useful, slower computers may take a long time to
show this information. The default is OFF.
Max Plotter Width
86-in
Increase maximum Y panel width from 72-in to
86-in (for 2.2m eX models). This option is default OFF.
Overwrite Files...
When checked, the FlexPlot will automatically
overwrite duplicate files in the C:\Ioline\Converted\ folder without asking the user. This
feature is default ON.
Save a Copy...
When checked, a copy every marker
file converted by FlexPlot is stored in
C:\Ioline\Converted\. This is useful as an archive of past jobs. The folder size can get very
large. Use the Show Archive Size and Empty
Converted buttons to manage the Converted
archive. This option is default ON.
Show Archive Size
When files are converted by FlexPlot, an
archive copy of the output .PLX file is stored
in C:\Ioline\Converted\. Pressing this button
will show how much space the archive files
are using. Press the Empty Converted button
to delete the files.
Show Total Inches... Displays the total inches printed on an inkjet
(does not work on pen plotters). Make sure
the printer is turned on and not in use before
checking this value.
Suppress Normal...
Enabling this feature will hide the non-critical
messages that FlexPlot displays. These are
related to verification for overwriting files,
sending files to the printer, etc. This feature is
default OFF.
Units
Choose between inches or centimeters. The
default setting is inches. The default is inches.
L
Note
Some markers do not use label
commands and show the labels
as pure vectors. The In Preview,...
setting will NOT affect labels of
this type.
12
Ioline FlexJet User Guide
Setup Window: Import Options
DXF Scale Factor
Some DXF files use non-typical scaling commands that FlexPlot cannot interpret. When
that is encountered, use the scale factor box to
make adjustments to correct the converted file
size. This option is default OFF.
DXF Use Dimen...
Uses image boundary settings imported from
the DXF file. These are usually much larger
than the image and can cause problems. Occasionally they are required for images from
some CAD programs or the image is clipped.
This option is default OFF.
Enable Rotation
When checked, HPGL files that use the rotation command are properly printed. This option is default ON.
Shift Origin
Move marker data to positive space. This option
is default OFF.
Setup Window: Advanced Options
Enable Automatic... Enables the Automatic Queue button on the
main screen. This option is default ON.
Reset Defaults
Restores all default values to the Setup options.
Save Plot Log file
Saves a diagnostic log file into the C:\Ioline
folder. Only required if requested by Ioline
Customer Service. This option is default OFF.
Send End_Queue...
When checked, a file called End_queue.plt
(stored in the C:\Ioline folder) is sent whenever a queue finishes the last file. The user
may modify the file as desired. This feature is
default OFF.
Show Plot Progress... When checked, the progress bar is displayed
during plotting. Requires up-to-date firmware
and only works in printers. This option is
default ON.
Hint
The Piece Plot Optimization
window uses whatever folder
was selected in the main FlexPlot
window as the source for files to
optimize.
Piece Plot Optimization Window
Add to Piece Plot...
Add highlighted files to the Piece Plot File
list.
Delete Piece Source... Deletes the source file after it is converted and
added to the optimized list.
Cancel
Abandon conversion and exit the window.
Clear Piece Plot...
Remove all files from the list.
Clear Selection
Remove highlighted files from the list.
Convert
Convert files in the list to .PLX files and send
file to Marker Queue.
Select All
Highlights all files in the Import folder.
Design
Software
Setup Guides
Setup Gerber Accumark 7.x
for HPGL Export
™
™
Follow these steps to configure Gerber™ Accumark™ version 7 to create HPGL formatted files for use with the Ioline FlexPlot. It is also
possible to plot direct from the Gerber Software to the FlexJet. Visit
the Ioline Support website for more information.
Figure 6. The Gerber™ Accumark™ Menu.
1.
Double-click the program icon to start the Gerber™ Accumark™
Utilities.
Hint
Figure 7. Accumark™ DOS Configuration.
2.
Open the Configuration menu and select DOS File Configuration.
3.
In the window choose HPGL as the plot file type. Enter a path
for the Plot and Cut files.
Use the folder C:\HPGL for the
Plot Destination Path if you
want to store the Gerber output
files in the default input folder for
the FlexPlot.
14
Ioline FlexJet User Guide
Export HPGL Files From Gerber™ Accumark™
1.
Start the Gerber™ System Management program by double
clicking the program icon.
Figure 8. Accumark™ Storage Area.
2.
Choose the Storage Area where the marker files are stored.
Choose Enter when finished. (Figure 8.)
Figure 9. Accumark™ Plot Window.
3.
Choose Plot to open the Plot Window. (Figure 9.)
Figure 10. Accumark™ Marker Plot button.
4.
Press the Marker Plot button to open the marker plot export
utility. (Figure 10.)
Figure 11. Accumark™ Plot Destination button.
15
5.
Click on the Plot Destination button until it reads DOS FILE.
(Figure 11.)
Figure 12. Accumark™ Marker Name Window.
6.
Enter the plot file names in the Marker Name Window. Use the
F4 key to browse. (Figure 12.)
Figure 13. Accumark™ Process button.
7.
After all of the plot file names are entered, click the Process
button. The files are saved with the first eight characters of the
marker name. They typically have numeric extensions like, .000
or .001. (Figure 12 & 13.)
8.
Exit the System Manager program by pressing Exit three times.
Setup FlexPlot to find the files
1.
Open FlexPlot.
2.
Use the Browse Window to find the folder where Accumark™
will store the files (chosen above). You may have to choose a
new hard drive or mapped network location from the drive
window before you can see the folder.
3.
Once the folder is selected, use the normal methods of importing files. AutoQueue is also compatible with this method.
16
Ioline FlexJet User Guide
Setup Lectra™ JustPrint™
for ASTM 6959 File Export
Installation Option 1: Installing the JustPrint Software
for the First Time (if required)
1.
Install JustPrint and IManager as instructed in the documentation from the vendor.
2.
When the installation is complete, a small box will appear
labeled Configuration Assistant Step 2.1.
3.
Follow the steps shown in Install the First Printer below.
Install the First Printer
1.
Choose the default language and unit system, pressing Next
after making a selection.
Figure 14. Lectra™ connection mode.
Hint
Use the folder C:\HPGL for the
Plot Destination Path if you
want to store the ASTM6959
output files in the default input
folder for the FlexPlot.
2.
When the Configuration Assistant reaches Step 2, Choose
HPGL Generator from the list. (Figure 14).
3.
Give the peripheral a name and place a check in the box next to
Yes to make this the default. (Figure 15).
4.
Click Next in the Summary Window. A Configuration Recap
Window will appear. (Figure 16).
5.
Choose a Generation Directory (the default location where
marker files are stored by the program). You will setup
FlexPlot to look in this location later. If the folder is located on
a network, you may have to provide login information. Also
remember to uncheck the Vectorize the Character Font box.
(Figure 17).
17
Figure 15. Assign a peripheral name.
Figure 16. The system will confirm the peripheral name.
Figure 17. A Generation Directory where FlexPlot will find the files.
18
Ioline FlexJet User Guide
Testing the Installation
Figure 18. The Plot Test Window.
1.
Press the Plot Test button to ensure that the program can write
a file to the chosen location. (Figure 18).
Figure 19. Accept settings if the test was successful.
Otherwise, go back to make adjustments.
2.
Press Finish if the test was a success. If there was a problem,
return to the previous step to make any adjustments necessary.
3.
Click Next, then Finish.
4.
If there are no more peripherals to install, press No.
5.
Installation is complete.
19
Installation Option 2: Adding a Printer to an Existing
JustPrint Installation
1.
Open the folder Start>Lectra>PlotterList V5xxxx, where xxxx
represents the version number.
2.
Click on ‘New Plotter’
3.
Choose HPGL Generator from the list then press Next.
4.
Give the Peripheral a name like “HPGL Printer” and place
a check in the box next to Yes to make this the default. Click
Next.
5.
Click Next in the summary window.
6.
Click Next.
7.
Choose a Generation Directory which is the default location
where marker files are stored by the program. You will setup
FlexPlot to look in this location later. If the folder is located on
a Network, you may have to provide log in information. Also
remember to uncheck the Vectorize the Character Font box.
8.
Click Finish to exit the program. Close the PlotterList application.
Setup JustPrint (for options 1 and 2)
1.
Open JustPrint.
2.
Select Tools>Activity Management.
3.
Click on Create.
4.
Type a name into the Activity window, then choose the plotter name from the list that matches what was used in the steps
above. Choose Roll 180 in the Paper Format box. Do not check
the Plots in a File Window. Click Save. Click Close. The changes will show up in the Activity window. Click Close again.
Printing a File
1.
Choose the Activity name from the drop down list.
2.
Click Add and choose the markers that you wish to print. Press
Add to Batch.
3.
When all markers are added, click Close.
4.
Click on the Plot button to generate HPGL files in the default
folder chosen during setup.
5.
Close JustPrint, open FlexPlot, choose the files from the folder
and send them to the FlexJet.
Should you require any additional information concerning the installation procedure, please contact Lectra™ support.
20
Ioline FlexJet User Guide
Setup PAD™ Plot Network™
for HPGL File Export
Setup PAD System™ for HPGL Export
1.
Open Pad System™ Plot Network
Figure 20. PAD™ System splash screen.
2.
Select File > Preferences > Plotter
Figure 21. Pick Plotter from the File
Menu.
3.
In the plotter window select:
a.
Plotter: HPGL2
b.
Plotter Port: File…
b.
Click OK.
Figure 22. Select a plotter and port.
21
4.
When the Plotting to a File window comes up, choose a
default location to store the files created by the program. You
will setup FlexPlot to look in this location later. If the folder is
located on a network, you may have to provide log in information. Click OK to close this window.
Figure 23. Choose a default file folder.
5.
Back on the plotter window, under Plotter Parameters, make
sure METRIC is selected. As for the rest of the settings:
a.
Paper Width: Actual width of the paper installed on the
plotter
b.
Frame Length: Ioline recommends 35 inches.
Figure 24. Select the metric measurement system.
Setup FlexPlot to find the files
1.
Open FlexPlot
2.
Use the browse window to find the folder where PAD Systems™
will store the files (chosen above). You may have to choose a
new hard drive or mapped network location from the drive
window before you can see the folder.
3.
Once the folder is selected, use the normal methods of importing files. AutoQueue is also compatible with this method.
Hint
For more information on the rest
of the settings, please consult the
user’s guide provided by PAD
Systems™.
22
Ioline FlexJet User Guide
NOTES