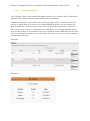
1
Bedford College Electronic Learning Blue Print Administration User Guide
Electronic Learning Blue Print
Administration User Guide
Conn Warwicker
[email protected] [email protected]
Bedford College Electronic Learning Blue Print Administration User Guide
1
Contents
1.
Installation Guide ............................................................................................................. 3
1.1.
System Requirements ............................................................................................... 3
1.2.
The Blocks ...................................................................................................................3
1.3.
Installing the Block(s) ................................................................................................ 5
1.4.
Setup...........................................................................................................................6
1.4.1.
Main Configuration ........................................................................................... 7
1.4.2.
Environment........................................................................................................ 8
1.4.3.
Settings Configuration....................................................................................... 8
1.4.4.
MIS Settings .......................................................................................................10
1.4.5.
Plugins................................................................................................................11
1.4.6.
Actions ..............................................................................................................11
1.5.
2.
Permissions/Capabilities .........................................................................................12
Installing/Managing Plugins ..........................................................................................14
2.1.
Core Plugins .............................................................................................................14
2.1.1.
Student Profile ..................................................................................................14
2.1.2.
Targets ...............................................................................................................19
2.1.3.
Tutorials..............................................................................................................21
2.1.4.
Attendance ......................................................................................................22
2.1.5.
Attachments ....................................................................................................29
2.1.6.
Comments ........................................................................................................31
2.1.7.
Register..............................................................................................................32
2.1.8.
Course Reports .................................................................................................36
2.1.9.
Additional Support ..........................................................................................38
2.1.10. Challenges .......................................................................................................40
2.1.11. Learning Styles..................................................................................................41
2.1.12. Custom Plugins .................................................................................................43
2.2.
3.
External Plugins ........................................................................................................50
2.2.1.
BKSB ...................................................................................................................50
2.2.2.
BKSB Live ...........................................................................................................51
2.2.3.
Timetable ..........................................................................................................51
2.2.4.
Grade Tracker ..................................................................................................57
Known Issues ...................................................................................................................61
Bedford College Electronic Learning Blue Print Administration User Guide
4.
5.
2
3.1.
Querying SQL Server MIS connection, from a Linux server................................ 61
3.2.
Moodle Text Editors Attributes ...............................................................................61
3.3.
Moodle 2.8+ .............................................................................................................62
Tips and Tricks ..................................................................................................................62
4.1.
The Dock ..................................................................................................................62
4.2.
Centre the ELBP.......................................................................................................62
4.3.
Command Line .......................................................................................................63
4.4.
Clear the Popup Window ......................................................................................63
Data Import Specifications ...........................................................................................63
5.1.
Attendance .............................................................................................................63
5.2.
Register .....................................................................................................................64
5.3.
Timetable .................................................................................................................65
5.4.
Student Profile .........................................................................................................66
Bedford College Electronic Learning Blue Print Administration User Guide
3
1. Installation Guide
The following instructions are aimed at the Moodle administrators who will be
installing the ELBP block and the other blocks that come packaged with it
(Dashboard, BKSB and Timetable).
1.1.
System Requirements
Moodle Version
Moodle Database
PHP Version
PHP Extensions
2.4, 2.5, 2.6, 2.7
MySQL, SQL Server, PostgreSQL
5.3.2 +
fileinfo
Settings/Modules
mod_rewrite enabled
php short tags enabled
jQuery Version
jQuery UI Version
1.9.1
1.10.3
In addition to these requirements, if you wish to make connections to external
databases (MIS connections), you will need to ensure your server has the required
extensions to do so. Once you have installed the block, you will see a list (on the MIS
settings page) of the extensions you will need for various different database
connections.
If you are using Moodle 2.4, please refer to this Forum Topic.
1.2.
The Blocks
There are 4 blocks which come with the ELBP system, though you do not have to use
all of them if you don’t wish to, but some of them do rely on the code-base of others
to function.
ELBP
This is the core ELBP block which holds all the functionality to use the ELBP.
Bedford College Electronic Learning Blue Print Administration User Guide
4
ELBP_BKSB
The elbp_bksb block is a plugin of the ELBP block. Within the ELBP it will show students
BKSB results, however you can also add the block itself to a page to allow for more
functionality, such as the ability for students to take assessments through Moodle, for
teachers to be able to view all the BKSB results of their students, etc…
This block itself is not required if you do not want to use it.
This block requires the ELBP block in order to function.
ELBP_BKSBLIVE
The elbp_bksblive block is a plugin very similar to the elbp_bksb block, however this
has been developed to work with BKSB’s new BKSB Live hosted system.
ELBP_TIMETABLE
The elbp_timetable block is a plugin of the ELBP block. Within the ELBP it will show a
student’s timetable in a grid format, with options to look at a Daily view, Weekly
view, Monthly view or Yearly view. The block itself can also be added to a page,
which will show the student’s lessons that day, as well as a link to view their full
timetable.
This block itself is not required if you do not want to use it.
This block requires the ELBP block in order to function.
BC_DASHBOARD
The bc_dashboard block is a separate block which is bundled with the ELBP. If it is
installed, some of the ELBP functionality will be overwritten to use the dashboard
instead. For instance it will override the “My Students” list, and use a nicer looking
one in the Dashboard with more functionality. This block also allows you to create
your own custom reports, bringing in pretty much any data from the ELBP and its
various plugins.
This block is not required, but it is recommended for a better ELBP experience.
This block does not require the ELBP block in order to function, however without it
there will be very little it can do.
Bedford College Electronic Learning Blue Print Administration User Guide
1.3.
Installing the Block(s)
Once you have ensured that your server meets the system requirements outlined
above, unzip the zip file and upload these the folders you wish to use to your
“blocks/” directory. For the sake of this explanation, we will assume you are using all
4 blocks supplied with the ELBP.
Once the folders have been uploaded, go to your Administration Settings block on
your Moodle site and click on “Notifications” in order to run the install of the blocks.
If you experience any problems installing the blocks, please contact
[email protected] and we will try our best to assist you.
Once the blocks have successfully installed, turn editing on and add the ELBP block
to the course. Generally we recommend having one instance of the block on the
front page, but if you prefer to have the block on individual courses that is fine.
As a site administrator you should have a “Configuration” link on the block’s menu,
which we will use shortly to setup the ELBP.
If you install the bc_dashboard block, you will need to enable mod_rewrite on your
server, as the block makes use of fancy urls, e.g. /blocks/bc_dashboard/report/1/view
5
Bedford College Electronic Learning Blue Print Administration User Guide
1.4.
6
Setup
The first thing you will want to do once the block is installed is to create some new
system roles. We will need 2 new roles, one for Personal Tutors and one for Additional
Support Tutors.
The Personal Tutors role will be used to assign staff members to individual students in
a mentor/mentee relationship.
The Additional Support Tutor role will be used for the same reason, but to assign
students who need additional support.
If your institution does not require either of these, you can skip this part.
To create the new roles go to your Moodle Administration Settings block -> Site
Administration -> Users -> Permissions -> Define Roles.
Duplicate the editingteacher role twice and we will use those as our Personal Tutor
and Additional Support Tutor roles. Set the “context types where this role may be
assigned” to User.
Bedford College Electronic Learning Blue Print Administration User Guide
7
Give them their new names, and adjust any permissions that you would like
adjusted.
Now we are ready to move onto the actual ELBP setup.
If you go to your ELBP block you should see a “Configuration” link at the bottom, if
you are a site admin. Click that and it will take you through to the Configuration
settings.
Here you should see there are 5 tabs along the top: Main, Environment, Settings, MIS
and Plugins.
1.4.1. Main Configuration
These settings allow you to customise the main settings of the block, such as its
display name, as some institutions may have been using blocks previously called
“Personal Learning Plan” or “Individual Learning Plan”, etc… so they may wish to
rename this block to avoid confusion amongst their staff and students.
The next setting allows you to turn gradients on or off, this is just a minor styling choice
on the ELBP. Without gradients will just use solid colours.
Next we have jQuery configuration. The ELBP system requires jQuery and jQuery UI to
function (as mentioned in system requirements). By default the required versions
come with the ELBP block and will be loaded up whenever they are required,
however it is possible that you may be using a theme which includes its own jQuery,
in which case this could lead to conflicts and cause it not to work. So, if your theme
does include jQuery, you can tick this setting so that the ELBP does not load up its
own jQuery files. You will however need to ensure that the jQuery and jQuery UI in
your theme matches the required versions, otherwise you may find that certain
aspects of the system do not work as expected.
Next is the alerts configuration. This allows us to enable or disable email alerts within
the ELBP system. If they are enabled, staff will be able to set up customised alerts
which they want to receive, for example they may want an alert when Student X
misses a target deadline, or when any student on Course Y has their attendance
drop below 90%.
Lastly we have the Student Progress Bar configuration, where you can
enable/disable the Student Progress Bar, which is a progress bar at the top of each
student’s ELBP, which displays their overall progress, based on what requirements
you have defined (these are defined in the plugins themselves).
These requirements can be set in the Main tab of any Plugins which support it. Each
requirement also lets you set an importance score, so that you can set different
requirements to be worth more in the percentage calculation than others.
Bedford College Electronic Learning Blue Print Administration User Guide
8
1.4.2. Environment
The Environment page will show you some details about your Moodle server and
your installation of the ELBP block.
The first section “PHP Extensions” will list any additional PHP extensions which are
required by any of the plugins you have installed, and whether or not you have
them installed on your server.
The second section lists all the database tables in the ELBP, the number of records in
them and the size, so that you can keep an eye on them to see if they are getting
too large at any point. If a table is highlighted red there is a problem with it, which
you should be able to view by hovering over the red icon to the right. This will
probably just be something like the table doesn’t have any indexes.
1.4.3. Settings Configuration
These general settings allow you to define system settings for the ELBP.
Firstly you have the Academic Year setting. Rather than archive off old data at the
end of each year, you can simply set the start date of the current academic year,
and then all data (where possible) before that date is hidden. (This can be overwritten by individual plugins in their own Settings).
Bedford College Electronic Learning Blue Print Administration User Guide
9
You should next see four roles for you to fill out: Front Page Teacher, Personal Tutor,
Additional Support Lecturer and ELBP Admin.
If you followed the instructions up to this point, you will already know about the
Personal Tutor and Additional Support roles, so if you want to use them you can
enter in their shortnames here. There are also 2 more roles which we didn’t mention
before, as depending on how you setup and use your Moodle site, they may not be
relevant to you, but their descriptions are below.
The Front Page Teacher role is used so that staff members can be assigned that role
on the front page course, so that the ELBP system can correctly work out permissions
if you place the block on the front page. If you place the block on individual courses
instead, this role probably won’t be necessary. Users should be assigned this role on
the front page course.
The Personal Tutor role is what will be used when staff members assign individual
students to themselves as “Mentees”. Users should be assigned this role on the front
page course.
The Additional Support Lecturer role is identical to the Personal Tutor role, except it is
used to assign students as “Additional Support Mentees” or whatever you wish to call
them. Users should be assigned this role on the front page course.
The ELBP Admin role is used for anyone who wants to have system-wide permissions
to view/edit any student’s ELBP without having to be their course teacher or
personal tutor (e.g. Course/Area Managers). Anyone with this role will also be able
to see more reports. Users should be assigned this role on the front page course.
Next we have the exclude courses setting. If you have any courses that you do not
want to show up in things like course reports, course attendance, etc… that students
may be on (e.g. you may have an “All_Students” course or any number of other
generic courses), then you can exclude them by course ID here.
Finally we have the Logo setting. A lot of the ELBP plugins can be printed off, and
you may want to have your institution’s logo at the top of the print outs, so you can
upload that here. If there is a red warning that says your directory is not writable, that
means that your webserver does not have the permissions to write files to that
directory, so it won’t be able to upload anything unless you change the permissions
on that directory.
Bedford College Electronic Learning Blue Print Administration User Guide
10
1.4.4. MIS Settings
Various ELBP plugins allow you to connect to an external data source to bring in
data, rather than using the Moodle database. On this page you can setup
connections to those data sources and assign them to any installed plugins.
The ELBP currently supports connecting to the following databases: MySQL, SQL
Server, Oracle, Microsoft Access, PostgreSQL, Firebird, SQLite.
The top section of this page shows you which PHP Extensions are required to
connect to various different databases, and which ones you have installed. If you
wish to connect to a database but do not have any of the required extensions
installed, you will need to install them before you can connect.
The next section lists any MIS connections you have created.
The next section allows you to create a new MIS connection.
Firstly give it a unique name.
Then select what database type you are connecting to.
Then fill out the connection details: host, username, password, database name. The
host field will different depending on the type of database connection. If you are
unsure what to put here, click on the little help icon next to “Create New MIS
Connection” for some examples.
Once you have filled out the connection details, you can “Test” the connection to
see if it works. If it does, you can then save it.
Once you have saved it, the next section allows us to assign MIS connections to ELBP
plugins to be used, but you won’t have any plugins installed yet, so this can be done
later.
Bedford College Electronic Learning Blue Print Administration User Guide
11
1.4.5. Plugins
This is where we install and manage all the ELBP plugins. By default none of them are
installed when the block is installed, as different institutions may want to use different
plugins, so it’s totally up to you which ones you want to install.
To install a new plugin select it from the drop down menu. All core ELBP plugins are
listed under the “Core” option, whilst any plugins that may come with external
blocks (e.g. the BKSB block or the Timetable block that are provided by Bedford
College along with this ELBP block) can be found by navigating the blocks in the
drop down menu.
The plugin should install very quickly and will populate its settings with default values
which you can change if you wish.
Once the plugin is installed it will appear in the “Manage Plugins” section below,
though it will be disabled for the time being, until you are happy that you want
people to be able to start using it.
To manage the settings of a plugin, click the “Settings” link next to it, and to uninstall
a plugin, click the red cross in the uninstall column.
See section #2 for details on each individual plugin.
Once you have installed and configured all the plugins you want, you will need to
create a plugin “Group”. It’s up to you how you want to do this – you may want all
plugins to be displayed on the same page, in which case you could just create one
group called “ELBP” (or whatever you like) and add all plugins to that. Or you may
want to separate the plugins out into different categories. Either way, create your
group and add whatever plugins you want to it. Lastly you will need to enable all the
plugins that you want to use, by clicking the little eye icon in Manage Plugins.
1.4.6. Actions
The Actions tab allows you to run ELBP-related actions against users.
Firstly you can reset changes to plugin box colours, either of all users or a specific
user.
Next you can set individual capabilities, to override a user’s role capabilities. For
example, one particular student may be abusing the ability to add comments to
Targets, and rather than create a new role to PREVENT that capability and add him
to that role, you can just go to Actions and set his capability to PREVENT.
Bedford College Electronic Learning Blue Print Administration User Guide
1.5.
12
Permissions/Capabilities
Finally, you will need to set up what user roles have what permissions.
If you are going to have your ELBP block on the front page, you will need to use the
elbp_frontpageteacher role, or if you already have a role to define staff on the front
page, then use that in the ELBP settings.
You will need to adjust the permissions for this role so that everything under “ELBP
Block” is set to ALLOW, except the following which should be set to PREVENT:
-
elbp_admin – PREVENT
If you are using the Bedford College BKSB block as well, front page teachers should
have the “bksb_student” permission set to PREVENT and everything else ALLOW.
If you are adding the ELBP block to individual course pages, then the permissions
should be okay as they are, but it’s probably best to double check the student and
teacher roles just to make sure. (When a teacher sees the block they should see “My
Students”, then a student sees it they should see “My ELBP”).
Personal Tutors and Additional Support Lecturers (if you are using either or both)
don’t need to be added to their roles, the role just needs to be created so that we
have a specific role to attach students to them with.
Now if you browse your list of students (we highly recommend using the Bedford
College Dashboard block to integrate with the ELBP in this case), you can view the
ELBP of a student, which should look something like this (once you have some plugins
installed):
Bedford College Electronic Learning Blue Print Administration User Guide
13
There are various other settings and configuration options you can play with, such as
hooking data from one plugin into another (e.g. hooking Targets into Tutorials so that
you can assign targets to tutorials, hooking attendance data into Tutorials or Course
Reports, etc…).
If you have any further questions on setup or use or the ELBP, or any problems,
please contact either [email protected] or [email protected]
Bedford College Electronic Learning Blue Print Administration User Guide
14
2. Installing/Managing Plugins
This section will go into more detail regarding each individual plugin and how to set
it up. Most of them should be very similar and easy to do.
2.1.
Core Plugins
2.1.1. Student Profile
The Student Profile plugin sits at the top of the ELBP and displays information about
the student as well as a Student Information area which the students can fill out like
a kind of mini profile.
Unlike all other plugins, it does not appear as a box, and cannot be added to a
plugin group.
To install this plugin, choose “Core Plugins” from the drop down menu on the
“Plugins” tab of the “Configuration” page, then choose “StudentProfile” and then
click “Install”.
Once it has been installed, click “Settings” and we will set it up.
In the “Main” tab we can enable/disable the plugin (this can also be done with the
eye icon on the previous page). Next we can change the display name of the
plugin, if we want it to appear as something else. Next we also have the Student
Progress configuration (if you have enabled the Student Progress Bar in the main
ELBP configuration). This lets you define any Student Profile related requirements
which will count towards the students’ overall progress. And then we have the Extras
Configuration, where you can enable or disable any extras on the Student Profile,
such as Badges.
The “Profile Fields” tab allows you to add new fields that you want to be displayed
on the students’ profiles. For example:
-
Full name
Address
Contact Number
Emergency Contact
Emergency Contact Number
Date of Birth
Etc…
Bedford College Electronic Learning Blue Print Administration User Guide
15
Each field can have a different Confidentiality level, to define who can and cannot
see that field. For more information on Confidentiality levels, hover over the little help
icon.
Here you can also choose whether or not the profile can be edited, as you may just
want to use it to display data rather than have it changed by anyone.
The “MIS” tab allows us to choose whether or not this plugin uses the Moodle
database, or if it draws data out of an external database, most probably your
MIS/SIS system.
If you want to use the Moodle database you do not have to do anything on this tab,
you can ignore it.
If you do want to draw data out of another system, the first thing you will need to do
is to go back to the ELBP Configuration page, go to the MIS tab and create a new
MIS connection (unless you have already created one you want to use) and assign it
to the StudentProfile plugin.
Once you have assigned a valid MIS connection to the StudentProfile plugin, come
back to the MIS settings and changed “Moodle Database” to “MIS” and save the
settings, this will then load up additional MIS settings so that we can map our Plugin
to the MIS data.
We should now see the next setting is “MIS Table/View Name”, here we need to
define the name of the table or view we are going to be querying.
Next we can define any SQL we want to be executed after connecting, for example
setting a particular charset if you need to. This is optional.
Next we need to choose how we are going to be looking up data when we load up
a student’s ELBP. Are we going to be looking for their “username” or their
“idnumber”?
Next we have the “MIS Field Mapping” section, where we can map our fields to
those fields/columns in our external data source.
Firstly we have “ID”, this should contain a unique ID field in the defined table/view.
Then we have “Username”, this should contain either the student’s “username” or
“idnumber” as defined in previous setting.
Then we have a mapping for each of the Profile Fields we set up.
For this example I have used the Profile Fields: “Full Name”, “Address” and “Date of
Birth”.
Bedford College Electronic Learning Blue Print Administration User Guide
So for the sake of example, let us assume I am connecting to another MySQL
database that stores our MIS information. And the table I want to query is this:
The settings I would put into this page would be:
16
Bedford College Electronic Learning Blue Print Administration User Guide
17
Then I would save these settings and run an MIS test at the bottom of the page.
If I were to then enter “dduck” as my username in the MIS test, it will run a query
based on all the settings we have input to try and find all the information about a
user with the username “dduck”, which for me would return:
Anon Object
(
[Full Name] => Daffy Duck
[Address] => 789 Some Road
Some Place
Some County
AB1 2CD
[Date of Birth] => 1926-01-13
)
However, the Date of Birth is not in a particular nice format, so let’s change that. This
is where it becomes a little more complex and we have to start using the Field
Functions and Aliases. You also have to know some SQL.
How this would work differs greatly depending on the type of database we are
connecting to, however for this example we are using MySQL. So basically what we
want to do is rather than just return the value in the “dob” field, we want to run it
through a function first instead. In MySQL to convert a date into a different format
we would use the DATE_FORMAT() function. For example if we do this in our MySQL
database we can see how we can change the format:
So what we will do here is for the “Date of Birth” field, we will add that function call
into the “Field Function” box, and then add an alias so we get both the original and
the new versions:
Bedford College Electronic Learning Blue Print Administration User Guide
18
Now let’s save those settings and run our MIS test again and see what results we get:
Anon Object
(
[Full Name] => Daffy Duck
[Address] => 789 Some Road
Some Place
Some County
AB1 2CD
[Date of Birth] => 13/01/1926
)
So you can see now we have the Date of Birth in a different format.
So if I now went to the ELBP of a user with the username of “dduck”, this is the data it
would retrieve from the MIS system.
Also on this page we have an MIS Contact section. If we are allowing students to
edit their profiles, but we are also using an MIS connection, we do not really want
them to be able to directly UPDATE the MIS database, as this may cause problems.
So instead what we can do is specify a user to be emailed with the details whenever
a student updates their profile information, so they can then amend the MIS
database.
Once you have finished setting up the Student Profile and made sure it is enabled,
you should be able to see it has appeared on the ELBP when you view a student.
Bedford College Electronic Learning Blue Print Administration User Guide
19
2.1.2. Targets
The Targets plugin is used so that students can have individual targets set for them to
achieve.
To install this plugin, choose “Core Plugins” from the drop down menu, then choose
“Targets” from the next drop down, then click “Install”.
Once it has installed, click “Settings” for the Targets plugin and we will set it up.
The “Main” tab of the plugin settings allows you to enable/disable the plugin, to
change its display title and to change its background and font colours to be used in
each plugin header bar. If for some reason your browser does not support the HTML
“color” input type and the colour script included doesn’t work for your browser, you
will see just a blank input box for these colour options, in which case you will need to
enter a colour hex code.
Next we also have the Student Progress configuration (if you have enabled the
Student Progress Bar in the main ELBP configuration). This lets you define any Target
related requirements which will count towards the students’ overall progress.
Next we can choose whether or not to display a progress bar of Targets for the
student when they look at the block, to see how many targets they have achieved.
Next we have the settings: “Progress/Achieved Automation” and
“Achieved/Progress Automation”. Basically this means that if a target is set to 100%
progress, do you want it to automatically be set to achieved? And visa-versa.
And lastly we have the “Integrate with Calendar” setting. If this is ticked then any
new targets added for students will be added into their Moodle calendar.
The “Settings” tab allows us to customise our Target Statuses, Attributes and
Instructions. On installation of the plugin it should have created some default values
for you, which you may wish to keep or you may wish to change.
The Target statuses allow you to define the status of each target, by default these
options are “To Be Achieved”, “Partially Achieved”, “Achieved” and “Withdrawn”.
There are some check boxes next to each status as well, which allow you to define
which of these statuses should be considered “Achieved/Complete/Met”, which of
these statuses should be ignored and won’t be checked for its deadline, nor will it be
included in progress reports. And “List in Summary” means that the last 5 targets of
this status will be listed on the student’s Target summary on the ELBP.
Bedford College Electronic Learning Blue Print Administration User Guide
20
Attributes are done in the same way across any plugin which uses them, they are
pieces of information you want to be stored against a given record (a target in this
case). Our default values here should be: “Target Type” and “Target. You can select
the type of attribute, which accepts most common HTML form elements, as well as a
few custom ones such as coursepicker and userpicker. If your type requires options
(e.g. a select menu or a checkbox, then you will have some additional inputs where
you can choose what options it should have), then you can choose what validation
it should have (if any). For example, here you may want to add another attribute to
store any Student comments so they can record what they think about the target.
So you would add a new Attribute of type “Textbox” and call it “Student
Comments”.
In the Targets plugin we also have the “Target Hover” setting, which lets us define
which of our attributes is our main target content so that we can display it in tooltips
from other plugins. By default this will be the “Target” attribute.
And finally we have Target Instructions which is displayed at the top of the New
Target form, as instructions for creating a new Target.
Once you have finished setting up your Plugin, you will need to add it to a Plugin
Group and ensure it is enabled.
Then if you view a student’s ELBP, you should see the Targets plugin is now available.
Bedford College Electronic Learning Blue Print Administration User Guide
21
2.1.3. Tutorials
The Tutorials plugin is used so that Personal Tutors can set Tutorial records for a
student, recording what was discussed, any targets that were set, etc…
To install this plugin, choose “Core Plugins” from the drop down menu, then choose
“Tutorials” from the next drop down, then click “Install”.
Once it has installed, click “Settings” and we will set it up.
The “Main” tab of the plugin settings allows you to enable/disable the plugin, to
change its display title and to change its background and font colours to be used in
each plugin header bar. If for some reason your browser does not support the HTML
“color” input type and the colour script included doesn’t work for your browser, you
will see just a blank input box for these colour options, in which case you will need to
enter a colour hex code.
Next we can choose whether or not to display a progress bar of Tutorials for the
student when they look at the block, to see how many targets they have achieved.
Next we also have the Student Progress configuration (if you have enabled the
Student Progress Bar in the main ELBP configuration). This lets you define any Tutorial
related requirements which will count towards the students’ overall progress.
Finally we can set how many of the most recent tutorials we want to display in the
summary list, by default this is 5.
The “Settings” tab allows us to define attributes to be included in Tutorials, so we can
record whatever data we want. By default these will be set to: Tutor Comments and
Student Comments.
Attributes are done in the same way across any plugin which uses them, they are
pieces of information you want to be stored against a given record (a target in this
case). You can select the type of attribute, which accepts most common HTML form
elements, as well as a few custom ones such as coursepicker and userpicker. If your
type requires options (e.g. a select menu or a checkbox, then you will have some
additional inputs where you can choose what options it should have), then you can
choose what validation it should have (if any).
Next we have the “Tutorial Hooks” section, which allows us to hook in data from
other plugins. Supported hooks for Tutorials: Targets, Attendance (Avg/Total).
For example, if we have no hooks, when we set up a Tutorial it will just be a box for
the date, a box for Tutor Comments and a box for Student comments. But if we
enable the Hook to the Targets plugin, then we can add Targets specifically to that
Tutorial (they will also appear in the Targets plugin box).
Bedford College Electronic Learning Blue Print Administration User Guide
22
Finally we have the “Tutorial Instructions” for when people are setting up new
Tutorials.
Once you have finished setting up your Plugin, you will need to add it to a Plugin
Group and ensure it is enabled.
Then if you view a student’s ELBP, you should see the Tutorials plugin is now available.
2.1.4. Attendance
The Attendance plugin is used to display the students Attendance, Punctuality,
etc… so that they and any of their tutors can see it.
To install this plugin, choose “Core Plugins” from the drop down menu, then choose
“Attendance” from the next drop down, then click “Install”.
Once it has installed, click “Settings” and we will set it up.
The “Main” tab of the plugin settings allows you to enable/disable the plugin, to
change its display title and to change its background and font colours to be used in
each plugin header bar. If for some reason your browser does not support the HTML
“color” input type and the colour script included doesn’t work for your browser, you
will see just a blank input box for these colour options, in which case you will need to
enter a colour hex code. Next we also have the Student Progress configuration (if
you have enabled the Student Progress Bar in the main ELBP configuration). This lets
you define any Attendance related requirements which will count towards the
students’ overall progress.
Bedford College Electronic Learning Blue Print Administration User Guide
23
The “Settings” tab allows us to customise how our Attendance plugin will work – what
types of data it will store (e.g. Attendance, Punctuality, Lateness, Whatever, etc…),
what periods of time to store it against (e.g. Term 1, Term 2, Last 7 Days, Last 28 Days,
etc…).
The first Settings section lets us choose what courses we want to display Attendance
information for. If you do not use Meta/Child courses, then just tick “Both” for this.
And also choose which name you want to be displayed for the course.
Next we have the “Record Types” section, where we can define the record types
we want to record. By default this will be “Attendance” and “Punctuality”, but you
can change them to whatever you want, e.g. “Absent”, “Late”, “Present”, “Lizard”,
etc… They should also have a 1 or 2 character short code, which should be unique,
e.g. if you have “Attendance” and “Absent”, they should not both have the short
code “A”.
Next we have the “Record Periods” section, where we can choose what periods of
time we are storing the data against. By default this will be “Last 7 Days”, “Last 28
Days” and “Total”, but again, you can change them to whatever you want.
Next we have the “Tracking” section, which lets us setup Attendance tracking. This is
only available when using the Moodle database, not when using an MIS
connection. If you enable this, you can choose the date to start tracking, what
period of time it should show tracking for, and what period of time it should be
before it writes changes to the database. For example if I set:
-
Track changes every 7 days
Tracking period 60 days
Start date 21-09-2014
That would mean that, starting on 21-09-2014, every 7 days it would store in a
tracking table what the student’s current Attendance data is. Then on the ELBP we
would be able to look back over the previous 60 days and see what the
Attendance was at every 7 day interval.
NOTE: The tracking table in the database gets VERY large.
Example:
Bedford College Electronic Learning Blue Print Administration User Guide
24
Lastly we have the “Profile Summary” section. If you have the Student Profile plugin
installed and enabled, this will allow us to display a summary of the Attendance
data in the Student Profile. To do so, simply choose which period you would like to
be displayed for each Type. We generally recommend having a “Total” or “Overall”
period, for just such an occasion.
The “MIS” tab lets us connect to an external data source to bring in the Attendance
data, rather than using the Moodle database to store it. If you don’t want to use an
MIS connection, you can skip this bit.
To setup the plugin to use an MIS connection, firstly you will need to go back to the
main Configuration page and create an MIS connection (unless you have already
created one you wish to use), then assign it to the Attendance & Punctuality plugin.
Now return to the MIS tab on the Attendance & Punctuality settings and change the
tick box from “Moodle Database” to “MIS” and save the change. Then you should
see various extra settings for the MIS connection.
In order to use the MIS option instead of the Moodle database, your table/view that
we will be querying must be in the format of: (id, username, course, type, period,
value), though the column names can be different if you want, that is what they
must contain. So there must be a new row for each combination of Type and Period
for a student. Example:
Where the course is “NULL” denotes the overall data for that student, not specific to
an individual course.
Bedford College Electronic Learning Blue Print Administration User Guide
25
In the future we will attempt to broaden the requirements of this plugin, so that if
your Attendance data is in a very different format, it will still work without having to
create a view to format it like this.
So to setup the MIS connection, first we need to enter the name of the table or view
what we will be querying. Then – optionally – any SQL you need to be executed
after the connection is established.
Next we need to choose how we are going to find a user in the table/view, will it be
by their Moodle username or their Moodle idnumber field?
Then similarly for the courses, how are we going to find a course in the table/view?
Will it be by the Moodle shortname or Moodle idnumber field?
Next we have the “MIS Field Mapping” section, where we define what the column
names are in our table/view so that we can SELECT the correct data.
The “ID” field should refer to a unique id column (this is optional, but helpful).
The “username” field should refer to a column containing data that will match the
user’s Moodle username or Moodle idnumber, depending on which you chose in
that setting previously.
The “course” field should refer to a column containing data that will match the
course’s Moodle shortname or Moodle idnumber, depending on which you chose in
that setting previously.
The “type” field should refer to a column that will contain a valid Type, as defined in
your plugin’s settings (e.g. “Attendance”, “Punctuality”, etc…)
The “period” field should refer to a column that will contain a valid Period, as
defined in your plugin’s settings (e.g. “Last 7 Days”, “Last 28 Days”, “Total”, etc…)
The “value” field should refer to a column that will contain the numeric value (most
likely a percentage) for this particular user/course/type/period.
Example:
Bedford College Electronic Learning Blue Print Administration User Guide
26
Now after we have saved these changes, we can run a test MIS query to make sure
it is returning the correct data. For example, using the MIS database view I showed
you earlier, I can run a test query looking for any data related to the user with the
username “271040”, and I get the following output:
Array
(
[0] => Anon Object
(
[username] => 271040
[course] =>
Bedford College Electronic Learning Blue Print Administration User Guide
[type] => Attendance
[period] => Last 28 Days
[value] => 80
)
[1] => Anon Object
(
[username] => 271040
[course] =>
[type] => Attendance
[period] => Last 7 Days
[value] => 70
)
[2] => Anon Object
(
[username] => 271040
[course] =>
[type] => Attendance
[period] => Total
[value] => 90
)
[3] => Anon Object
(
[username] => 271040
[course] =>
[type] => Punctuality
[period] => Last 28 Days
[value] => 11
)
Etc……………
)
27
Bedford College Electronic Learning Blue Print Administration User Guide
28
So we can see that it is SELECTing the correct data.
The “Data” tab allows us to import Attendance data directly into our Moodle
database, using a CSV spreadsheet. You can download an example csv and a
template csv to fill out with data to be imported.
You can also choose what to do should the import script come across any users or
courses that don’t actually exist in Moodle.
You could use this to manually import Attendance data every day/week/etc… but if
possible, the best thing to do (if you want to use the Moodle database) would be to
setup a cron, using the “Crons” tab.
To setup a cron, first choose to enable it. Then choose when you want the cron to
run. You can choose either a specific time, or to run “Every…”
For example if you choose:
-
Timing: Specific Time
Hour: 05
Minute: 30
Then the cron will run at 05:30 every day.
If you choose:
-
Timing: Every…
Hour: 01
Minute: 15
Then the cron will run every 1 hour and 15 minutes.
Lastly all you have to do is specify where on your server the CSV file will be located
to process and import.
The cron will use the exact same script to import the data as is run when you run the
import manually from the “Data” tab. So the best thing to do is to test it first using the
“Data” tab to ensure that your CSV is in the correct format and working, and then
set it up as a cron.
If the cron attempts to run but cannot find the file specified, it will fail.
Best practice would be to have the CSV automatically generated and placed in
that location every night, or every [whatever period you want it to run].
Once you have finished setting up your Plugin, you will need to add it to a Plugin
Group and ensure it is enabled.
Bedford College Electronic Learning Blue Print Administration User Guide
29
Then if you view a student’s ELBP, you should see the Attendance plugin is now
available.
2.1.5. Attachments
The Attachments plugin is used to allow staff members to upload documents
specifically for that student.
To install this plugin, choose “Core Plugins” from the drop down menu, then choose
“Attachments” from the next drop down, then click “Install”.
Once it has installed, click “Settings” and we will set it up.
The “Main” tab of the plugin settings allows you to enable/disable the plugin, to
change its display title and to change its background and font colours to be used in
each plugin header bar. If for some reason your browser does not support the HTML
Bedford College Electronic Learning Blue Print Administration User Guide
30
“color” input type and the colour script included doesn’t work for your browser, you
will see just a blank input box for these colour options, in which case you will need to
enter a colour hex code.
Next in the “Attachments Configuration” section we can choose what document
types we want to allow to be uploaded. By default none of these will be selected, so
you will need to choose some. You can also specify others if the type you are
looking for isn’t listed anywhere, but it must be a valid MIME type.
The “Max File Size” setting cannot be edited, it just uses the web server’s setting.
Once you have finished setting up your Plugin, you will need to add it to a Plugin
Group and ensure it is enabled.
Then if you view a student’s ELBP, you should see the Attachments plugin is now
available.
Bedford College Electronic Learning Blue Print Administration User Guide
31
2.1.6. Comments
The Comments plugin is used to allow staff members to write comments about the
student. These could be positive comments, such as praising the student for working
hard, or negative comments to do with behaviour, attendance, quality of work,
etc…
To install this plugin, choose “Core Plugins” from the drop down menu, then choose
“Comments” from the next drop down, then click “Install”.
Once it has installed, click “Settings” and we will set it up.
The “Main” tab of the plugin settings allows you to enable/disable the plugin, to
change its display title and to change its background and font colours to be used in
each plugin header bar. If for some reason your browser does not support the HTML
“color” input type and the colour script included doesn’t work for your browser, you
will see just a blank input box for these colour options, in which case you will need to
enter a colour hex code. We can also choose whether or not the number of
comments the student has should be shown when they look at the ELBP block.
Finally we can set how many of the most recent comments should be shown in the
summary of the plugin. By default this will be 5.
The “Settings” tab allows us to define what data will be stored against each
comment, by setting up Attributes.
Attributes are done in the same way across any plugin which uses them, they are
pieces of information you want to be stored against a given record (a comment in
this case). Our default values here should be: “Category”, “Description” and “Action
Taken”. You can select the type of attribute, which accepts most common HTML
form elements, as well as a few custom ones such as coursepicker and userpicker. If
your type requires options (e.g. a select menu or a checkbox, then you will have
some additional inputs where you can choose what options it should have), then
you can choose what validation it should have (if any).
To remove an existing Attribute, simply leave its name blank and when you save
them it will be removed.
Lastly here we have the “Title Attribute” setting, which just lets us choose which of
the Attributes we will use as a kind of title for each comment’s summary.
Once you have finished setting up your Plugin, you will need to add it to a Plugin
Group and ensure it is enabled.
Then if you view a student’s ELBP, you should see the Comments plugin is now
available.
Bedford College Electronic Learning Blue Print Administration User Guide
32
2.1.7. Register
The Register plugin is used to display a student’s register information, so that both the
student and staff can see which lessons the student was present/absent/etc… for.
To install this plugin, choose “Core Plugins” from the drop down menu, then choose
“Register” from the next drop down, then click “Install”.
Once it has installed, click “Settings” and we will set it up.
The “Main” tab of the plugin settings allows you to enable/disable the plugin, to
change its display title and to change its background and font colours to be used in
each plugin header bar. If for some reason your browser does not support the HTML
“color” input type and the colour script included doesn’t work for your browser, you
Bedford College Electronic Learning Blue Print Administration User Guide
33
will see just a blank input box for these colour options, in which case you will need to
enter a colour hex code.
The “Settings” tab allows us to define the start and end of our academic year, so
that we can display the weeks correctly.
For example, your academic year might start on 01-09-2014, which you would want
to be displayed as “Week 1”. So for “Start Date/Week” you would set the date to
“01-09-2014” and the week number to “1”. And do the same for the end of the
academic year.
Next we have the “Value Settings” section where we can define codes and what
they mean on the register. For example, your institution might use the following
codes on your registers:
“/” Present
“L” Late
“A” Absent
“E” Excused
Etc…
So here is where you would setup the codes and their titles.
The “MIS” tab allows us to setup the plugin to draw in data from an external data
source, rather than using the Moodle database. If you want to use the Moodle
database instead, you can skip this bit.
To set up the Register plugin to use an MIS connection, you must first go back to the
main Configuration page and create an MIS connection (unless you have already
done so) and link it up to the Register plugin. Then come back to the “MIS” tab in the
Register settings and change “Moodle Database” to “MIS” and save the change,
then you should see some extra MIS settings.
So to setup the MIS connection, first we need to enter the name of the table or view
what we will be querying. Then – optionally – any SQL you need to be executed
after the connection is established.
Next we need to choose how we are going to find a user in the table/view, will it be
by their Moodle username or their Moodle idnumber field?
Next we have the “MIS Field Mapping” section, where we define what the column
names are in our table/view so that we can SELECT the correct data.
Bedford College Electronic Learning Blue Print Administration User Guide
34
The “ID” field should refer to a unique id column (this is optional, but helpful).
The “username” field should refer to a column containing data that will match the
user’s Moodle username or Moodle idnumber, depending on which you chose in
that setting previously.
The “Day Name” field should refer to a column containing the name of the day that
particular record is for.
The “Day Number” field should refer to a column containing the number of the day
that particular record is for, e.g. where Monday = 1 to Sunday = 7, or Monday = 0 to
Sunday = 6. This is so we can order it by day.
The “Course” field should refer to a column containing data that will match the
course’s Moodle shortname or Moodle idnumber, depending on which you chose in
that setting previously.
The “Description” field should refer to a column containing a description of the
event/lesson/etc… This will probably be the title of the course, whereas the “course”
field is a code.
The “Start Time” field should refer to a column containing the start time of that
particular event. This should be in the format: 00:00, e.g. 12:30
The “End Time” field should refer to a column containing the end time of that
particular event. This should be in the format: 00:00, e.g. 13:30
The “Week” field should refer to a column containing the week number of that
particular record.
The “Value” field should refer to a column containing the value the student has for
that particular record. This should match one of the Values you previously set, such
as “/”, “A”, “L”, etc…
Once you have saved these changes, we can run a test MIS query at the bottom of
the page, to see if it is returning the data you think it should be.
The “Data” tab allows us to import Register data directly into our Moodle database,
using a CSV spreadsheet. You can download an example csv and a template csv
to fill out with data to be imported.
You can also choose what to do should the import script come across any users or
courses that don’t actually exist in Moodle.
Bedford College Electronic Learning Blue Print Administration User Guide
35
You could use this to manually import Register data every day/week/etc… but if
possible, the best thing to do (if you want to use the Moodle database) would be to
setup a cron, using the “Crons” tab.
To setup a cron, first choose to enable it. Then choose when you want the cron to
run. You can choose either a specific time, or to run “Every…”
For example if you choose:
-
Timing: Specific Time
Hour: 05
Minute: 30
Then the cron will run at 05:30 every day.
If you choose:
-
Timing: Every…
Hour: 01
Minute: 15
Then the cron will run every 1 hour and 15 minutes.
Lastly all you have to do is specify where on your server the CSV file will be located
to process and import.
The cron will use the exact same script to import the data as is run when you run the
import manually from the “Data” tab. So the best thing to do is to test it first using the
“Data” tab to ensure that your CSV is in the correct format and working, and then
set it up as a cron.
If the cron attempts to run but cannot find the file specified, it will fail.
Best practice would be to have the CSV automatically generated and placed in
that location every night, or every [whatever period you want it to run].
Once you have finished setting up your Plugin, you will need to add it to a Plugin
Group and ensure it is enabled.
Then if you view a student’s ELBP, you should see the Register plugin is now available.
Bedford College Electronic Learning Blue Print Administration User Guide
36
2.1.8. Course Reports
The Course Reports plugin allows teaching staff to create reports as an overview of
how the student is performing on their course. They can also create periodical
reports (e.g. termly) and combine individual reports into one large report.
To install this plugin, choose “Core Plugins” from the drop down menu, then choose
“CourseReports” from the next drop down, then click “Install”.
Once it has installed, click “Settings” and we will set it up.
The “Main” tab of the plugin settings allows you to enable/disable the plugin, to
change its display title and to change its background and font colours to be used in
each plugin header bar. If for some reason your browser does not support the HTML
Bedford College Electronic Learning Blue Print Administration User Guide
37
“color” input type and the colour script included doesn’t work for your browser, you
will see just a blank input box for these colour options, in which case you will need to
enter a colour hex code. Next we also have the Student Progress configuration (if
you have enabled the Student Progress Bar in the main ELBP configuration). This lets
you define any Course Reports related requirements which will count towards the
students’ overall progress.
The “Settings” tab allows us to firstly choose what type of courses we want to be
able to store Course Reports against. If you do not use Meta/Child courses, or are
unsure, just tick “Both”. Then choose which field should be used to display the name
of the course.
Next in the “Course Reports Attributes” section we can create attributes.
Attributes are done in the same way across any plugin which uses them, they are
pieces of information you want to be stored against a given record (a Course
Report in this case). You can select the type of attribute, which accepts most
common HTML form elements, as well as a few custom ones such as coursepicker
and userpicker. If your type requires options (e.g. a select menu or a checkbox, then
you will have some additional inputs where you can choose what options it should
have), then you can choose what validation it should have (if any).
Next we can edit the “Review Questions” and their possible values. These are a
series of options the staff member will be able to fill out when creating the report, to
summarise how the student is doing in those various areas.
Next we can put in some instructions for staff to see when creating a new Course
Report.
And finally we can hook data into our course reports from other plugins, if it is
supported.
The supported hooks for Course Reports are currently:
-
Attendance – This will bring through the student’s Attendance data for that
course
Grade Tracker – If you have the Bedford College Gradetracker block
installed, you can bring through Unit information, Target Grades and Final
Grades into the Course Report.
The “Periodical” tab allows us to setup Periodical Reports. We can enable/disable it,
and also choose which data to hook into the Periodical Reports.
Once you have finished setting up your Plugin, you will need to add it to a Plugin
Group and ensure it is enabled.
Then if you view a student’s ELBP, you should see the Course Reports plugin is now
available.
Bedford College Electronic Learning Blue Print Administration User Guide
38
2.1.9. Additional Support
The Additional Support plugin is similar to the Tutorials plugin, and allows staff
members assigned to a student as Additional Support Tutors to record support
sessions they have with the student, in the same way the Personal Tutor records
Tutorial sessions.
To install this plugin, choose “Core Plugins” from the drop down menu, then choose
“Additional Support” from the next drop down, then click “Install”.
Once it has installed, click “Settings” and we will set it up.
The “Main” tab of the plugin settings allows you to enable/disable the plugin, to
change its display title and to change its background and font colours to be used in
each plugin header bar. If for some reason your browser does not support the HTML
“color” input type and the colour script included doesn’t work for your browser, you
will see just a blank input box for these colour options, in which case you will need to
enter a colour hex code.
Next we have the “Additional Support Configuration” section where we can set any
instructions we want to be displayed to the staff member when creating a new
support session. Then we can set the number of most recent sessions to be displayed
in the summary box, by default this is 5. Then we can enable/disable Confidence
levels, which lets the student set how confident they are at achieving the targets set
for them, as well as the score maximum, by default this is 1-5. Then various other
Bedford College Electronic Learning Blue Print Administration User Guide
39
settings such as should the Targets lock for editing after the deadline has passed?
Should the Targets be deleted if the session is deleted? And do you want a box to
be able to email the session details to other interested parties, such as the students
Personal Tutor, Teaching Staff, etc…
The “Settings” tab allows us to define form fields so store whatever data we want
against the Session, by creating Attributes.
Attributes are done in the same way across any plugin which uses them, they are
pieces of information you want to be stored against a given record (a Support
Session in this case). You can select the type of attribute, which accepts most
common HTML form elements, as well as a few custom ones such as coursepicker
and userpicker. If your type requires options (e.g. a select menu or a checkbox, then
you will have some additional inputs where you can choose what options it should
have), then you can choose what validation it should have (if any).
We can also hook data into our Support Sessions from other plugins, if it is supported,
such as Attendance data, Targets, etc…
If you want the Support Session to be able to have Targets created for it and
assigned to it, you will need to hook in “Targets”.
Once you have finished setting up your Plugin, you will need to add it to a Plugin
Group and ensure it is enabled.
The student will have to have at least 1 staff member assigned to them via the
Additional Support Tutor otherwise it will simply say that they are not assigned for
Additional Support. This can be done through the dashboard, by following the My
Students link on the ELBP block.
Bedford College Electronic Learning Blue Print Administration User Guide
40
2.1.10. Challenges
The Challenges plugin allows the student to highlight areas that they feel may
impact upon their academic success, such as Home Life, Finances, Health, etc…
To install this plugin, choose “Core Plugins” from the drop down menu, then choose
“Challenges” from the next drop down, then click “Install”.
Once it has installed, click “Settings” and we will set it up.
The “Main” tab of the plugin settings allows you to enable/disable the plugin, to
change its display title and to change its background and font colours to be used in
each plugin header bar. If for some reason your browser does not support the HTML
“color” input type and the colour script included doesn’t work for your browser, you
will see just a blank input box for these colour options, in which case you will need to
enter a colour hex code.
The “Settings” tab lets us define what possible Challenges the students can choose
from, by giving them a name and an icon. By default these challenges will be:
Alcohol/Substance Abuse, Child/Adult Care, Communication Skills, Computer Skills,
Cultural Issues, Disability, English Skills, Exam Anxiety, Family Life, Finances, Grief/Loss,
Health, Housing/Shelter, Legal Issues, Motivation, Relationship Problems, Stress, Time
Management, Transportation, Unclear Goals/Career Choices.
You can assign icons to them by supplying an image URL as well.
Once you have finished setting up your Plugin, you will need to add it to a Plugin
Group and ensure it is enabled.
Then if you view a student’s ELBP, you should see the Challenges plugin is now
available.
Bedford College Electronic Learning Blue Print Administration User Guide
41
2.1.11. Learning Styles
The Learning Styles plugin allows the student to take a short questionnaire, which will
then calculate their Learning Style. This is based on a custom questionnaire
developed for the ELBP, which in future versions you will be able to customise.
To install this plugin, choose “Core Plugins” from the drop down menu, then choose
“Learning Styles” from the next drop down, then click “Install”.
Once it has installed, click “Settings” and we will set it up.
The “Main” tab of the plugin settings allows you to enable/disable the plugin, to
change its display title and to change its background and font colours to be used in
each plugin header bar. If for some reason your browser does not support the HTML
“color” input type and the colour script included doesn’t work for your browser, you
will see just a blank input box for these colour options, in which case you will need to
enter a colour hex code.
Bedford College Electronic Learning Blue Print Administration User Guide
42
The “Settings” tab allows us to see the default questions and answers, which are
used to calculate the user’s Learning Style.
This Learning Style plugin uses the VAK (Visual [Linguistic, Spatial], Auditory,
Kinesthetic) Learning Styles paradigm, so each answer gives points to a certain style,
which are then averaged out at the end. At the moment you cannot change these
without changing things directly in the database, but in future versions you will be
able to edit/add/delete questions, answers and possibly styles.
Once you have finished setting up your Plugin, you will need to add it to a Plugin
Group and ensure it is enabled.
Then if you view a student’s ELBP, you should see the Learning Styles plugin is now
available.
Bedford College Electronic Learning Blue Print Administration User Guide
43
2.1.12. Custom Plugins
As well as all the plugins supplied with the ELBP, you can create your own
customised ones if there is something else you would like on the students’ ELBPs
which isn’t covered by any of our plugins.
To create a Custom Plugin, go to the “Plugins” tab of the main Configuration. To
create a new one from scratch, give it a title and click “Create”. Or if someone has
exported a Custom Plugin for you to import, you can choose the XML file to import it
from instead.
We will be creating a new one from scratch for this example.
Once you have created the plugin, it should appear in the “Manage Plugins” list,
highlighted yellow. Click on “Settings” and we will set it up.
The “Block Configuration” section has the usual settings, where you can change the
plugin’s display name and colours.
Now onto the “Plugin Structure” section. This is where we decide what type of plugin
we are creating. You have 5 options to choose from:
-
-
-
-
-
Single Report – This is a single set of form fields, which the user can fill out. They
can update their responses whenever they like, but there is only one instance
of them. Think of it like the Student Profile. That might have fields like Date of
Birth, Address, etc… You only fill them out once, although you can change
them later on.
Multi Report – This is a set of form fields which can be filled out numerous
times, creating new instances. Think of it like a Tutorial. You have boxes to fill
out like “Description”, “Comments by Tutor”, “Comments by Student”, etc…
but then a few weeks later you want to fill out another new tutorial, using the
same boxes.
Incremental Report – This is a set of form fields which can be used to append
data to a report. Think of it like a table, with each new instance being a row
you are adding to the table.
Internal DB Report – This lets you define an SQL query to run on your Moodle
database, and field mappings so that you can display the information. For
example you could set it up to run a query to display all the students courses
they are enrolled on, or all the assignments they have submitted on their
courses, etc… It is up to you what you want the query to do.
External DB Report – This is the same as the Internal DB Report, except that
instead of running it against your Moodle database, you setup an MIS
connection and run it against an external database.
Next we have the “Summary Configuration” section, where we can set a summary
title (this is what appears in the summary box, e.g. “Your Targets”, “Your Tutorials”,
Bedford College Electronic Learning Blue Print Administration User Guide
44
etc…) and you can upload an icon to appear in the box (should be 64x64 pixels like
the other icons).
Once you have chosen what plugin structure to use, we can edit the settings of the
Custom Plugin.
2.1.12.1. Single Report
The “Settings” tab of the Single Report allows us to define a set of Attributes to
appear in the plugin, which can be filled out by the student.
Attributes are done in the same way across any plugin which uses them, they are
pieces of information you want to be stored against a given record. You can select
the type of attribute, which accepts most common HTML form elements, as well as a
few custom ones such as coursepicker and userpicker. If your type requires options
(e.g. a select menu or a checkbox, then you will have some additional inputs where
you can choose what options it should have), then you can choose what validation
it should have (if any).
Example:
Becomes:
Bedford College Electronic Learning Blue Print Administration User Guide
45
2.1.12.2. Multi Report
The “Settings” tab of the Multi Report allows us to define a set of Attributes to appear
in the plugin, which can be filled out by the student.
Attributes are done in the same way across any plugin which uses them, they are
pieces of information you want to be stored against a given record. You can select
the type of attribute, which accepts most common HTML form elements, as well as a
few custom ones such as coursepicker and userpicker. If your type requires options
(e.g. a select menu or a checkbox, then you will have some additional inputs where
you can choose what options it should have), then you can choose what validation
it should have (if any).
It also allows you to choose which of the attributes should be used as a title for each
instance created.
Example:
Becomes:
Bedford College Electronic Learning Blue Print Administration User Guide
46
2.1.12.3. Incremental Report
The “Settings” tab of the Incremental Report allows us to define a set of Attributes to
appear in the plugin, which can be filled out by the student.
Attributes are done in the same way across any plugin which uses them, they are
pieces of information you want to be stored against a given. You can select the
type of attribute, which accepts most common HTML form elements, as well as a
few custom ones such as coursepicker and userpicker. If your type requires options
(e.g. a select menu or a checkbox, then you will have some additional inputs where
you can choose what options it should have), then you can choose what validation
it should have (if any).
Example:
Becomes:
Bedford College Electronic Learning Blue Print Administration User Guide
47
2.1.12.4. Internal DB Report
The “Settings” tab of the Internal DB Report structure allows you to input an SQL
query to be run for the student. You can use various placeholders to insert things like
the student’s id, username, etc…
You can then choose whether the query is going to return 1 row, or multiple rows
which should be looped through.
Finally you can then create the field mappings for the fields that you want to be
displayed on the ELBP.
You can also run a test query to make sure it is returning the data you expect, but for
testing purposes you will need to replace any placeholders with actual values.
Example:
Becomes:
Bedford College Electronic Learning Blue Print Administration User Guide
48
2.1.12.5. External DB Report
To use an External DB report, first you will need to go back to the “MIS” tab of the
main configuration and create a new MIS connection (unless you already have one
you want to use) and assign it to the Custom Plugin.
Now the “Settings” tab of the External DB Report will allow you to setup the SQL
query and field mappings.
Example:
Bedford College Electronic Learning Blue Print Administration User Guide
49
Becomes:
The “Permissions” tab for the Custom Plugin will allow you to define what users can
and cannot do with the plugin, based on their role. What permissions are shown
depends on the Structure of the plugin, as some Structures allow for more things to
be done with them, than others.
The permissions check on the student’s ELBP will go through System roles, Course
roles, User roles and Front Page roles to see if the user has a given permission.
For example, say we were looking at the ELBP of student ID 123, on course ID 4. Also
say that you are the Personal Tutor of that student, and finally say the permissions
were set so that only Teachers can print the plugin off and only Personal Tutors and
Students can edit the plugin.
When checking if the logged in user can print, it will say:
-
In the System context are we a teacher? – No
Are we a teacher on Course ID 4? – No
Are we assigned to User ID 123 as a Teacher? – No
Are we a teacher on Course ID 1 (Front page)? - No
When checking if the logged in user can edit, it will say:
-
In the System context are we a Personal Tutor or a Student? – No
Are we assigned to Course ID 4 as a Personal Tutor? – No
Are we a student on Course ID 4? – No
Are we assigned to User ID 123 as a Personal Tutor? – Yes
So the permission is granted.
Bedford College Electronic Learning Blue Print Administration User Guide
2.2.
50
External Plugins
There are a couple of other plugins offered with the ELBP system, which are in their
own separate blocks, so that they can be displayed on their own on Moodle
courses. This also lets anyone create an ELBP Plugin based on their own blocks, so
that they can be installed into your ELBP system.
2.2.1. BKSB
The BKSB plugin is an external plugin that comes in its own elbp_bksb block, which
allows staff and students to view BKSB results through Moodle, also allows students to
complete BKSB assessments embedded within Moodle, without having to login to
the external BKSB portal.
This plugin is written by Bedford College and is not endorsed or supported by BKSB
themselves.
To install this plugin, choose “External Plugin” from the drop down menu, then select
“Block” and then “elbp_bksb” and click Install.
The first thing we need to do now is setup the MIS connection to our BKSB server. As
far as I know BKSB only supports being run on Microsoft SQL Server, so the BKSB plugin
is hard-coded to use an SQL Server database.
To setup the MIS connection, go to the “MIS” tab of the main configuration and
follow the instructions, then link the MIS connection to the BKSB plugin at the bottom
of that page.
Once you have setup and linked your MIS connection, click on “Settings” and we
will setup the BKSB plugin.
The “Main” tab of the plugin settings allows you to enable/disable the plugin, to
change its display title and to change its background and font colours to be used in
each plugin header bar. If for some reason your browser does not support the HTML
“color” input type and the colour script included doesn’t work for your browser, you
will see just a blank input box for these colour options, in which case you will need to
enter a colour hex code.
Then in the “Web Links” section we can paste in the links to the BKSB Portal and BKSB
Reporting sites on our network (remember to include the trailing slash).
Then in the “Assessment IDs” section we can specify which assessment type should
link to which assessment id in the BKSB database. If you leave this blank, it will
attempt to work it out based on name. Most of the time that should work, but
sometimes if you have had lots of BKSB upgrades and have various different versions
Bedford College Electronic Learning Blue Print Administration User Guide
51
of assessments, it might pick the wrong one, so you would need to find out its id from
the BKSB database and assign it here.
Once you have finished setting up your Plugin, you will need to add it to a Plugin
Group and ensure it is enabled.
Then if you view a student’s ELBP, you should see the BKSB plugin is now available.
2.2.2. BKSB Live
The BKSB Live plugin is very similar to the BKSB plugin, however it has slightly different
functionality due to the BKSB Databridge client database not storing all the same
information as the old system did. However, your users shouldn’t really notice any big
differences.
2.2.3. Timetable
The Timetable plugin is an external plugin that comes in its own elbp_timetable
block, which allows staff and students to the student’s timetable in daily, weekly,
monthly and yearly views.
Bedford College Electronic Learning Blue Print Administration User Guide
52
To install this plugin, choose “External Plugin” from the drop down menu, then select
“Block” and then “elbp_timetable” and click Install.
Then click “Settings” and we will setup the Timetable plugin.
The “Main” tab of the plugin settings allows you to enable/disable the plugin, to
change its display title and to change its background and font colours to be used in
each plugin header bar. If for some reason your browser does not support the HTML
“color” input type and the colour script included doesn’t work for your browser, you
will see just a blank input box for these colour options, in which case you will need to
enter a colour hex code.
The next setting allows us to set whether or not we want courses brought back by
the Timetable to try and link to Moodle courses, and if so, by which field.
Next we have the “Time Settings” section, where we can define what hour the
Timetable should start and end, and how many minutes should it be broken down
by.
Next we have the “Colour Settings” where we can choose the default colours for
each day on the Timetable (users can change these individually as well).
If you want to use the Moodle database to store your Timetable information, you
can skip the “MIS” tab and move onto the “Data” tab. If you do want to use an
external database, you can skip the “Data” and “Crons” tabs and go to the “MIS”
tab.
The “MIS” tab lets you setup the Timetable to draw in data from an external
database. To do this, the first thing you will need to do is return to the “MIS” tab of
the main configuration and create a new MIS connection (unless you already have
done so) and link it up to the Timetable plugin. Now if you return to the “MIS” tab in
the Timetable settings and change the tickbox from “Moodle Database” to “MIS”
and save the change, now we should see some extra MIS settings.
So to setup the MIS connection, first we need to enter the name of the table or view
what we will be querying. Then – optionally – any SQL you need to be executed
after the connection is established.
Next we need to choose which day numbering system our external database is
using: 0-6 (Sun-Sat), or 1-7 (Mon-Fri).
Next we need to choose how we are going to find a user in the table/view, will it be
by their Moodle username or their Moodle idnumber field?
Bedford College Electronic Learning Blue Print Administration User Guide
53
Then we move onto the “MIS Field Mappings”, where we define what columns in the
external database we need to return.
The “ID” field should refer to a unique id column (this is optional, but helpful).
The “Day Number” field should refer to a column containing the number of the day
that particular record is for, e.g. where Monday = 1 to Sunday = 7, or Sunday = 0 to
Saturday = 6. This is so we can order it by day.
The “Day Name” field should refer to a column containing the name of the day that
particular record is for.
The “Username” field should refer to a column containing data that will match the
user’s Moodle username or Moodle idnumber, depending on which you chose in
that setting previously.
The “Lesson Name” field should refer to a column containing the title of the lesson, to
be displayed.
The “Teaching Staff” field should refer to a column containing a string of all the
teachers that are relevant for this particular lesson.
The “Course” field should refer to a column containing data that will match the
course’s Moodle shortname or Moodle idnumber (if you chose to try and link to
Moodle courses by one of these fields).
The “Room” field should refer to a column containing the name of the room this
lesson will be taking place in.
The “Start Time” field should refer to a column containing the time that this lesson
starts. This must be in the format “00:00”, e.g. “12:30”.
The “End Time” field should refer to a column containing the time that this lesson
ends. This must be in the format “00:00”, e.g. “17:00”.
The “Start Date” field should refer to a column containing the date that this lesson
series starts. This must be in the format “dd-mm-yyyy”, e.g. “21-09-2014”.
The “End Date” field should refer to a column containing the date that this lesson
series ends. This must be in the format “dd-mm-yyyy”, e.g. “31-06-2015”.
Once we have saved these settings, we can run a test MIS query at the bottom of
the page, by supplying a username to be queried against, so that we can see what
data is being returned.
Example: Given the following external database table/view:
Bedford College Electronic Learning Blue Print Administration User Guide
We can see what columns we need to link up to which field mappings. However,
the start and end dates are in the wrong format, so to get them into the dd-mmyyyy format, we will need to apply a function and alias to that field.
So our MIS settings would be:
54
Bedford College Electronic Learning Blue Print Administration User Guide
55
Now if we run a test MIS query, we can see that the correct data is being returned:
ID: 1
UserID: 3
User Full Name: Test Student
Course: C001-14
Description: Testing Stuff
Start Date: 01-03-2014
End Date: 01-03-2015
Start Time: 09:00
End Time: 11:00
Day Number: 2
Staff: Conn, Mark, Nadine
Room: A16
etc…
If you prefer to use the Moodle database, the “Data” tab allows you to import
Timetable data manually into your database, using a CSV spreadsheet (example
and template available on this page).
You can also choose what the script should do if it comes across any users or courses
that do not exist in your Moodle system.
Whilst you can just use this to manually import data as and when you need to, the
best thing to do would be to setup a Cron to run automatically to import the data.
To setup a cron, first choose to enable it. Then choose when you want the cron to
run. You can choose either a specific time, or to run “Every…”
For example if you choose:
-
Timing: Specific Time
Hour: 05
Minute: 30
Then the cron will run at 05:30 every day.
If you choose:
-
Timing: Every…
Hour: 01
Minute: 15
Then the cron will run every 1 hour and 15 minutes.
Lastly all you have to do is specify where on your server the CSV file will be located
to process and import.
The cron will use the exact same script to import the data as is run when you run the
import manually from the “Data” tab. So the best thing to do is to test it first using the
“Data” tab to ensure that your CSV is in the correct format and working, and then
set it up as a cron.
Bedford College Electronic Learning Blue Print Administration User Guide
If the cron attempts to run but cannot find the file specified, it will fail.
Best practice would be to have the CSV automatically generated and placed in
that location every night, or every [whatever period you want it to run].
Once you have finished setting up your Plugin, you will need to add it to a Plugin
Group and ensure it is enabled.
Then if you view a student’s ELBP, you should see the Timetable plugin is now
available.
56
Bedford College Electronic Learning Blue Print Administration User Guide
57
2.2.4. Grade Tracker
If you are using the Bedford College Grade Tracker block (see:
http://moodlegrades.bedford.ac.uk) there are an additional 4 plugins you can
install onto your ELBP system.
2.2.4.1.
Grade Tracker
The Grade Tracker plugin is an external plugin which comes with the Bedford
College Grade Tracker block. It can be used to display tracking grids on a student’s
ELBP.
To install this plugin, select “External Plugin” from the drop-down menu, then “block”,
then “bcgt”. Then, next to the install button, where it displays the path to the file it is
attempting to install from, click on that and it should become a text box. Change
“bcgt.class.php” to “elbp_bcgt.class.php” and then click “Install”. Next we also
have the Student Progress configuration (if you have enabled the Student Progress
Bar in the main ELBP configuration). This lets you define any Tutorial related
requirements which will count towards the students’ overall progress.
Then click on “Settings” and we will setup the Grade Tracker plugin.
The “Main” tab of the plugin settings allows you to enable/disable the plugin, to
change its display title and to change its background and font colours to be used in
each plugin header bar. If for some reason your browser does not support the HTML
“color” input type and the colour script included doesn’t work for your browser, you
will see just a blank input box for these colour options, in which case you will need to
enter a colour hex code.
There is no other setup required for this plugin, as it is just displaying data from the
bcgt block. All setup for that, is done through the bcgt block itself.
Once you have finished setting up your Plugin, you will need to add it to a Plugin
Group and ensure it is enabled.
Then if you view a student’s ELBP, you should see the Grade Tracker plugin is now
available.
Bedford College Electronic Learning Blue Print Administration User Guide
2.2.4.2.
58
Prior Learning
The Prior Learning plugin is an external plugin which comes with the Bedford College
Grade Tracker block. It can be used to display a student’s qualifications on entry.
To install this plugin, select “External Plugin” from the drop-down menu, then “block”,
then “bcgt”. Then, next to the install button, where it displays the path to the file it is
attempting to install from, click on that and it should become a text box. Change
“bcgt.class.php” to “elbp_prior_learning.class.php” and then click “Install”.
Then click on “Settings” and we will setup the Prior Learning plugin.
The “Main” tab of the plugin settings allows you to enable/disable the plugin, to
change its display title and to change its background and font colours to be used in
each plugin header bar. If for some reason your browser does not support the HTML
“color” input type and the colour script included doesn’t work for your browser, you
will see just a blank input box for these colour options, in which case you will need to
enter a colour hex code.
There is no other setup required for this plugin, as it is just displaying data from the
bcgt block. All setup for that, is done through the bcgt block itself.
Once you have finished setting up your Plugin, you will need to add it to a Plugin
Group and ensure it is enabled.
Then if you view a student’s ELBP, you should see the Prior Learning plugin is now
available.
Bedford College Electronic Learning Blue Print Administration User Guide
2.2.4.3.
59
Aspirational Grades
The Aspirational Grades plugin is an external plugin which comes with the Bedford
College Grade Tracker block. It can be used to assign Target/Aspirational grades to
student’s qualifications and courses through the ELBP.
To install this plugin, select “External Plugin” from the drop-down menu, then “block”,
then “bcgt”. Then, next to the install button, where it displays the path to the file it is
attempting to install from, click on that and it should become a text box. Change
“bcgt.class.php” to “elbp_target_grades.class.php” and then click “Install”.
Then click on “Settings” and we will setup the Prior Learning plugin.
The “Main” tab of the plugin settings allows you to enable/disable the plugin, to
change its display title and to change its background and font colours to be used in
each plugin header bar. If for some reason your browser does not support the HTML
“color” input type and the colour script included doesn’t work for your browser, you
will see just a blank input box for these colour options, in which case you will need to
enter a colour hex code.
There is no other setup required for this plugin, as it is just displaying data from the
bcgt block. All setup for that, is done through the bcgt block itself.
Once you have finished setting up your Plugin, you will need to add it to a Plugin
Group and ensure it is enabled.
Then if you view a student’s ELBP, you should see the Aspirational Grades plugin is
now available.
Bedford College Electronic Learning Blue Print Administration User Guide
2.2.4.4.
60
Assessment Calendar
The Assessment Calendar plugin is an external plugin which comes with the Bedford
College Grade Tracker block. It can be used to view a calendar of
assignments/quizzes/etc… which a particular student, course or qualification has
attached to them.
To install this plugin, select “External Plugin” from the drop-down menu, then “block”,
then “bcgt”. Then, next to the install button, where it displays the path to the file it is
attempting to install from, click on that and it should become a text box. Change
“bcgt.class.php” to “elbp_assessment_calendar.class.php” and then click “Install”.
Then click on “Settings” and we will setup the Assessment Calendar plugin.
The “Main” tab of the plugin settings allows you to enable/disable the plugin, to
change its display title and to change its background and font colours to be used in
each plugin header bar. If for some reason your browser does not support the HTML
“color” input type and the colour script included doesn’t work for your browser, you
will see just a blank input box for these colour options, in which case you will need to
enter a colour hex code.
There is no other setup required for this plugin, as it is just displaying data from the
bcgt block. All setup for that, is done through the bcgt block itself.
Once you have finished setting up your Plugin, you will need to add it to a Plugin
Group and ensure it is enabled.
Then if you view a student’s ELBP, you should see the Assessment Calendar plugin is
now available.
Bedford College Electronic Learning Blue Print Administration User Guide
61
3. Known Issues
Due to the complexity of the system, especially in connecting to various different
database engines, there are some issues which we are aware of which you may or
may not come across.
3.1.
Querying SQL Server MIS connection, from a Linux server
If your Moodle server is running on Linux and you are connecting an MIS database
which is running on SQL Server, you may find issues with some queries not working,
possibly giving you fatal errors. For example if you use the BKSB or BKSB Live plugins,
which have SQL Server queries built into them.
This will most likely be due to how your Linux server is trying to connect to the
Windows server.
We recommend using the php_odbc driver, with the FreeTDS library, as this
configuration has had the least amount of problems in our testing, though it is by no
means brilliant and if you find a better solution, by all means let us know.
If you have created a custom External DB plugin, you may also find that test queries
work, but once you add variables into the queries they do not return any data. If
that is the case, try changing any “=” operators to “LIKE”, e.g. SELECT * FROM
myTable WHERE username LIKE %uname% instead of SELECT * FROM myTable
WHERE username = %uname%
If you require help getting this setup, contact [email protected] and
we can provide you with support, or – if you prefer – just some documentation on
the processes to follow.
3.2.
Moodle Text Editors Attributes
In some version of Internet Explorer, if you use a Moodle Text Editor (the rich text
editor) as one of your plugin attributes, it can cause problems, such as being unable
to load up the plugin from the dock, or for example, being unable to re-load the
tutorial form or the additional support form after having clicked to add a target.
This is due to a core bug in jquery, in the way Internet Explorer handles retrieving the
data from iframes, and is not something we can easily fix.
Bedford College Electronic Learning Blue Print Administration User Guide
62
We believe it works in IE 10 and above, but in lower versions you may run into this
problem, in which case it would be best to change the attribute to use a simple
textbox instead.
It has also been reported that in other browsers the Text Editors do not load properly,
though so far we are unable to get to the bottom of what is causing this. If it occurs
for you, we would again recommend changing to a simple textbox.
3.3.
Moodle 2.8+
There are a few known issues with Moodle 2.8 and above, again related to the
Moodle Text Editors, such as them having a very small default height and
duplicating themselves when you load something up from the Dock.
We would recommend using the simple Text Box instead for the time being.
4. Tips and Tricks
4.1.
The Dock
At the bottom of a student’s ELBP you will see there is a blue bar. This is the Dock.
Whenever you close an expanded popup view, the current state will be saved into
the dock. Opening up from the Dock will open this last saved state, whereas
opening from the normal plugin box will always reset this state and open the plugin
up fresh.
For example, let’s say you were typing out a Target, but then realised you need to
check their Attendance. If you close the Target popup, then check their
attendance, then open up the Target popup in the normal way, you will have lost
everything you typed. However if you close the Target popup, check their
Attendance, then open it up from the Dock at the bottom of the page, it will still
have everything you typed.
4.2.
Centre the ELBP
If you drag and drop an expanded popup off the screen so that the dragable
handle is no longer visible and it gets stuck there, you can centre it by pressing:
Bedford College Electronic Learning Blue Print Administration User Guide
63
Ctrl + Shift + | (Pipe character)
4.3.
Command Line
You can bring up the ELBP command line on any student’s ELBP by pressing:
Ctrl + Shift + @
You can then type help for a list of available commands.
4.4.
Clear the Popup Window
You can clear the popup window and transparent overlay on any student’s ELBP by
pressing:
Ctrl + Shift + Enter
5. Data Import Specifications
Some plugins allow you to import data with CSV files and setup crons to
automatically import the data.
Fields must be enclosed in double quotes and separated with commas. If you are
creating the CSV in Microsoft Excel or a similar program this will almost certainly be
done automatically, however if you are using a script to generate the CSV file
manually, you will need to ensure that this is done, E.g. “col1”,”col2”,”col3”, etc…
If a field is Optional, the column must still exist in the CSV, it just means it doesn’t
need to have any data in it.
Note: Data Import is not the same as an MIS connection.
5.1.
Field
username
Attendance
Data Type
Alphanumeric
Required/Optional
Required
Example
123456
Notes
This must match
either a “username”
or “idnumber” of a
user, depending on
Bedford College Electronic Learning Blue Print Administration User Guide
type
Alphanumeric
Required
Attendance
period
Alphanumeric
Required
Last 7 Days
courseshortname
Alphanumeric
Optional
X101_14
value
5.2.
Integer
Required
75
64
which field you
choose in your data
settings.
This must match one
of the “Types” as
defined in your
Attendance
settings.
This must match one
of the “Periods” as
defined in your
Attendance
settings.
If set, this must
match either the
“shortname” or
“idnumber” of a
course, depending
on which field you
choose in your data
settings.
If blank, the record
will assume this is an
Overall record.
This is the value you
are setting.
Register
Field
username
Data Type
Alphanumeric
Required/Optional
Required
Example
123456
courseshortname
Alphanumeric
Optional
X101_14
eventcode
Alphanumeric
Required
ABC/123
Notes
This must match
either a “username”
or “idnumber” of a
user, depending on
which field you
choose in your data
settings.
If set, this must
match either the
“shortname” or
“idnumber” of a
course, depending
on which field you
choose in your data
settings.
If left blank, the
Register record will
not be linked to a
Moodle Course.
This is a unique
code for this register
event (this lesson on
this day at this time).
Bedford College Electronic Learning Blue Print Administration User Guide
eventdescription
Alphanumeric
Optional
A2 English
dayname
Alpha
Required
Wednesday
daynumber
Integer (1)
Required
3
starttime(hhmm)
Integer (4)
Required
0900
endtime(hhmm)
Integer (4)
Required
1230
weeknumber
Integer (1-2)
Required
13
value
Alphanumeric
Required
A
5.3.
65
This will probably
come from your
external Timetabling
system.
This is the simple title
of the event.
This is the full name
of the day
This is the number of
the day. E.g. where
Monday = 1,
Tuesday = 2, etc…
This is used for
ordering the
Register events.
This is the 24-hour
time that the lesson
starts.
This is the 24-hour
time that the lesson
ends.
This is the week
number, as defined
in your Register
settings.
This is the value you
are setting for this
record.
Timetable
Field
username
Data Type
Alphanumeric
Required/Optional
Required
Example
123456
courseshortname
Alphanumeric
Optional
X101_14
Notes
This must match
either a
“username” or
“idnumber” of a
user, depending
on which field
you choose in
your data
settings.
If set, this must
match either the
“shortname” or
“idnumber” of a
course,
depending on
which field you
choose in your
data settings.
If left blank, the
Timetable record
will not be linked
to a Moodle
Bedford College Electronic Learning Blue Print Administration User Guide
description
Alphanumeric
Optional
English
startdate(yyyymmdd)
Integer (8)
Required
20140627
enddate(yyyymmdd)
Integer (8)
Required
20150301
starttime(hhmm)
Integer (4)
Required
0900
endtime(hhmm)
Integer (4)
Required
1230
daynumber
Integer (1)
Required
3
staff
Alphanumeric
Optional
HK, JW
room
Alphanumeric
Optional
A16
5.4.
66
Course.
This is the simple
title of the event.
This is the start
date of the
lesson in the
format
YYYYMMDD
This is the end
date of the
lesson in the
format
YYYYMMDD
This is the 24-hour
time that the
lesson starts.
This is the 24-hour
time that the
lesson ends.
This is the number
of the day. E.g.
where Monday =
1, Tuesday = 2,
etc… This is used
for ordering the
Timetable events.
This is the staff
who teach this
lesson, in
whatever format
you want.
This is the room
name/code of
the lesson
Student Profile
Field
username
Data Type
Alphanumeric
Required/Optional
Required
Example
123456
field
Alphanumeric
Required
dob
Notes
This must match
either a “username”
or “idnumber” of a
user, depending on
which field you
choose in your data
settings.
This must match the
“Field Name” of
one of the Profile
Fields you define in
your Student Profile
Bedford College Electronic Learning Blue Print Administration User Guide
value
Alphanumeric
Required
13-04-1983
67
configuration.
This is the value you
are setting for this
field.