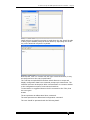
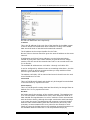
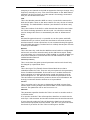
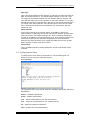
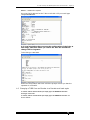
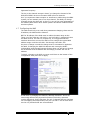
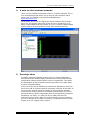
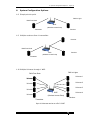
1
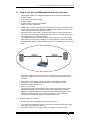
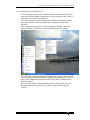
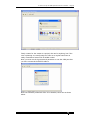
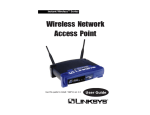
eDMX and TUBE
Operators Manual
1. Avo eDMX Manual - Page 2
Useful Avolites phone numbers:Avolites England
Sales and service*
(+44) (0) 20 8965 8522
Service out of hours*
(+44) (0) 78 3117 8888
Fax
(+44) (0) 20 8965 0290
Email
[email protected]
Website
http://www.avolites.com
Distribution of Avolites products in USA:Avolites America
Sales and service*
(+1) 423 938 2057
Fax
(+1) 423 938 2059
*Before contacting Avolites for service enquiry please ensure that you have the
product serial number and the Software version.
The latest version of this manual (in Microsoft Word or PDF format) and
Console
Software
can
be
downloaded
from
the
website
www.avolitesdownloads.com
The small print :
No Liability for Consequential Damages
Avolites has a policy of continuous product and documentation improvement. As such the
detail within this manual may not match the operation of the product this manual describes.
In no event shall Avolites be liable for any direct, indirect, special, incidental, or consequential
damages or loss whatsoever (including, without limitation, damages for loss of profits,
business interruption, or other pecuniary loss) arising out of the use or inability to use the
product this manual describes even if Avolites Ltd. has been advised of the possibility of such
damages. Because some jurisdictions do not allow the exclusion or limitation of liability for
consequential or incidental damages, the above limitation may not apply to you.
Reprint and revision history:
First version CC 10 May 2004
RS Imported to Avolites Template 10 May 2004
Uploaded to web 10 May 2004
eDMX Operators Manual 16/08/2007 13:29:00
1. Avo eDMX Manual - Page 3
1.
2.
AVO EDMX MANUAL
1.1
About
HOW TO SET UP AN EDMX SYSTEM FROM OUT OF THE BOX.
1.2
Working with the Tubes
1.3
TUBE facilities and connectors.
1.4
Connecting the Tubes to a PC.
1.5
Configuring the Tubes
1.6
Changing a TUBE from an Encoder to a Decoder and back again
3. WORKING WITH THE WAP
4.
1.7
Configuring the WAP
A NOTE ON OTHER WIRELESS NETWORKS.
4
4
5
5
6
7
12
13
15
16
17
5.
RUNNING A SHOW
17
6.
SYSTEM CONFIGURATION OPTIONS.
18
1.8
1.9
1.10
1.11
1.12
Simple point to point
Multiple receivers from 1 transmitter.
Multiple Universe through 1 WAP
Multiple universes split across multiple waps
Extending WAP’s using cable
eDMX Operators Manual 16/08/2007 13:29:00
18
18
18
19
19
1. Avo eDMX Manual - Page 4
1.
Avo eDMX Manual
1.1 About
eDMX was designed to allow users to construct a wireless network over
which dmx could be streamed to enable said users to get over obstacles
that otherwise prevented them from deploying lights in certain locations.
The hardware and software were designed by dAFTdATA Ltd for Avolites
Limited.
dAFTdATA have considerable experience within the IT networks world as
well as lighting industry working in the fields of design and installation.
Avolites have considerable experience with the manufacture of lighting
related products, as such it seemed a natural partnership.
eDMX is designed to allow people everywhere to use the now readily
available IEEE standard of 802.11 wireless Ethernet as a transport
mechanism for USITT DMX 512.
The construction of a simple wireless network allows users to send their
dmx wirelessly within the constraints of the wireless network instantly with
no response difference from that of using cables.
As the standard for 802.11 differs for countries across the world
respectively it is the responsibility of the user to familiarise themselves
with the available local frequencies and to work with them accordingly.
Wireless Ethernet 802.11 systems can cause interference to and receive
interference from amongst other things:
•
•
•
•
•
Other Wireless Ethernet Systems
Microwave Ovens
Bluetooth enabled devices
Some football stadium floodlight ballasts
Cordless Analogue and Digital Telephone Systems
Finally as a word of precaution, eDMX systems should ONLY be used
where it is not possible to run cable systems.
eDMX Operators Manual 16/08/2007 13:29:00
2. How to set up an eDMX system from out of the box. - Page 5
2.
How to set up an eDMX system from out of the box.
The Avolites eDMX kit is shipped containing the following components:
•
•
•
•
2 eDMX Tubes
1 Wireless Access Point (WAP)
3 Mains Cables
2 eDMX Serial Configuration Cables
Overview of the equipment:
•
eDMX Tube: A device that takes in USITT DMX 512 and converts the data
into IP (Internet Protocol) packets embedded within Ethernet Frames for
delivery across a wireless Ethernet system.
Wireless Access Point (WAP): A device that allows for the construction of
an infrastructure topology wireless Ethernet system. The WAP acts as the
central point for the wireless network.
The standard twin aerials of the Linksys WAP provides a diversity system
that allow for the signal to radiate in a circular fashion out from the WAP.
Provided the Tubes are placed within this area of coverage the system will
work.
•
300m
300m
One Tube is preconfigured to act as an encoder and one as a decoder. To
enable the system to work from the box the following steps need to be
followed:
•
•
•
•
Connect the Tube labelled as the encoder to the lighting console.
Connect the Tube labelled as the decoder to the lighting fixtures
Install the WAP and power up.
Power up the Tubes
The system should now transfer the dmx data from the encoder to the
decoder seamlessly. If the system seems to be performing less than
perfectly it might be that your system is experiencing interference from
another wireless network, to overcome this move to the section on
configuring the WAP and switch to another frequency.
1.2 Working with the Tubes
Some key points regarding the design of the Tubes:
•
•
The Tubes are designed to be the entry and exit points for the dmx data
working over the wireless network.
A wireless network as a single entity can support up to 250 Tubes.
eDMX Operators Manual 16/08/2007 13:29:00
2. How to set up an eDMX system from out of the box. - Page 6
•
•
•
•
It is possible for a Tube to act as either an encoder or a decoder
It is possible to have one encoder talking to 249 decoders on the same
wireless network.
It is possible to have 4 encoders talking to 60 decoders each all on the
same wireless network.
It is possible to extend the system to cover more than 4 universes by the
addition of more wireless access points and the subsequent creation of
more wireless networks.
1.3 TUBE facilities and connectors.
•
•
•
•
•
•
•
•
Mains voltage inlet connector: Provides a means to connect the Tube to a
mains power supply in the range of 90-260 v(AC)
DC connector - for battery usage: Allows for the power for the Tube to
come from a DC battery source, this provides excellent range checking
facilities of the Tubes. The suggested battery supply is a PP9 battery.
XLR Input connector – for usage when the Tube is acting as an encoder
XLR Output connector – for usage when the Tube is acting as a decoder
RS232 port – for usage as an initial configuration connection. The usage of
RS232 allows for the Tube to be configured by connection to any computer
with an RS232 9 pin Serial port, or via USB with the appropriate
converter.
3 stack LED indicator – for analysis of system operation. The three LED’s
provide indication of termination, data receive or transmit rate, and
system status.
Mode LED indicator – provides “at a glance” indication of encoder/decoder
selection
Terminator Switch – to enable termination of the dmx line, when the Tube
is in encoder mode and is in line after some fixtures that require
termination.
Before shipping the Tubes are preconfigured to with their factory settings
that allows for usage straight from the box.
If the Tubes are to be used in a different configuration or in conjunction
with another system, or simply to extend the functionality of an existing
system then the Tubes must be reconfigured accordingly.
The configuration of the Tubes is dealt with overleaf…
eDMX Operators Manual 16/08/2007 13:29:00
2. How to set up an eDMX system from out of the box. - Page 7
1.4 Connecting the Tubes to a PC.
The first operation that must be performed when reconfiguring the Tubes
from their default shipping configuration is the connection of the Tube to a
hyperterminal session on a suitable PC.
The Tubes require no special configuration software, instead they utilise
the HyperTerminal session software which is shipped with Microsoft
Windows.
This can be found under any normal installation of Windows under the
Start- Programs – Accessories- Communications sub menu choices.
The user must connect the dedicated RS232 cable supplied with the Tubes
to a PC running Windows and with an available 9 pin serial port. If a 9 pin
port is not available then a USB port can be used with a suitable USB to
RS232 converter.
Once the serial cable is connected between the computer and the Tube,
and both systems are powered up, a Hyper Terminal session may be
started.
eDMX Operators Manual 16/08/2007 13:29:00
2. How to set up an eDMX system from out of the box. - Page 8
Firstly a name for the session is required, this can be anything, but if the
user is planning on reconfiguring the Tubes on a regular basis then an
easily remembered name such as eDMX is ideal.
Next you must set the hyperterminal parameter to use the COM port that
you have connected the RS232 cable to.
Next the hardware parameters have to be detailed, these are as shown
below.
eDMX Operators Manual 16/08/2007 13:29:00
2. How to set up an eDMX system from out of the box. - Page 9
Finally when a successful connection is made then the user should be able
to bring up the WENDI prompt as shown below by depressing the return
key on the attached computer’s keyboard.
Now that the Tube is in contact with the hyper terminal interface, it may
be configured as to the user’s specification.
The Tube has a simple RS232 interface which allows it to accept and
display configuration data from command prompt style instructions. The
interface has been developed to allow communication in a manner similar
to the configuration scripts of most network switches.
To start with it is suggested that on the PC connected to the Tube, that
the user types:
sh conf
The
sh
represents an abbreviated show command.
The
conf
represents an abbreviated configuration command.
The user should be presented with the following detail.
eDMX Operators Manual 16/08/2007 13:29:00
2. How to set up an eDMX system from out of the box. - Page 10
We will now detail each line respectively:
IP Address
This is the IP address of the unit. One of the benefits of the eDMX system
is that it utilises full IP addresses which enable the routing of the eDMX
data across all kinds of switched and unswitched networks.
The IP address is the unique identifier for the Tube.
No two Tubes or devices should be given the same IP address on the same
network.
IP addresses work like a fixture address in moving light terminology,
instead of giving each Tube a start address we give each one a unique
number, thus we can tell the network that Tube 1 is an encoder and Tube
2 is a decoder.
The available IP addresses are 192.168.X.1 through 192.168.X.250
X can be configured by advanced users to something other than 1, but the
default is 1 and we strongly recommend that you keep with this unless
there are good reasons to change.
The address 192.168.1.255 is reserved and as such should never be used
as an IP address of a Tube.
Subnet Mask
This is a TCP/IP specific detail and should only be changed from its default
of 255.255.255.0 by experienced users.
Default Gateway
This is a TCP/IP specific routing detail and should only be changed from its
default of 0.0.0.0 by experienced users.
Wifi Mode
Wifi Mode specify the topology of the wireless network. The standard way
is to use the system in Infrastructure mode, which utilises the WAP as a
data marshal and signal booster. In Ad Hoc mode the Tubes communicate
with each other directly, although this might sound easier with less things
to go wrong the power of transmission and reception is seriously limited
with the Tubes communicating with each other directly and every Tube
must stay in communication with every other for the network to work.
Finally by using the Infrastructure mode switching physical frequencies via
the allocated channels within 802.11 can be performed simply by
eDMX Operators Manual 16/08/2007 13:29:00
2. How to set up an eDMX system from out of the box. - Page 11
assigning a new channel to the WAP as opposed to having to change every
frequency manually on every Tube. More information on the WAP channel
allocation can be found later on in this manual. We strongly recommend
that you use Infrastructure Mode.
SSID
This is the Wireless networks SSID or name, it must be the same as the
WAP and all other Tubes on the same network for every device to function
accordingly. The default SSID is avolites (note that this is all lower case)
Channel.
This is the number of the 802.11 radio channel that should be used when
the Tubes are being operated in Ad Hoc mode. You should not normally
need to change this since it is automatically set when in Infrastructure
Mode.
WEP
Wireless Encryption Protocol, it is possible to run the system with WEP
enabled should you wish to protect the dmx data as it travels across the
wireless network. Unless required we do not recommend using Encryption
since this adds processing overhead and it is unlikely that anyone will wish
to steal your DMX data!
WEP KEY
This is the same key code that the WAP has stored within its configuration
and as such it must be entered exactly as the WAP has it stored. Finally
you must either run a system that is WEP enabled or not WEP enabled you
must never attempt to run boxes that are not WEP enabled on a WEP
enabled wireless network.
Shared Key Authority
This is a wireless encryption protocol parameter and as such should only
be changed by experienced users.
HTTP
This is the Hyper Text Transfer Protocol based Web Server that is
embedded within the Tube. There are only two options for this parameter,
those of enabled and disabled. If the web server is enabled it allows for
status reporting to be achieved through a typical web browser such as
Internet Explorer etc. The Web Server can detail the parameters of the
Tube and allows a quick and easy means to access such information. We
strongly recommend that the web server is kept enabled.
Universe
This is a number set by the user to distinguish one DMX universe from
another when running multiple universes of DMX over the same wireless
network. This parameter can be set from one to 10.
DMX Mode
This parameter specifies whether the Tube is to work in encoder mode or
in decoder mode.
If in encoder mode the Tube will accept dmx data from a console via the
male 5 pin XLR connector and encode the data onto the wireless network.
If set to decoder mode the Tube will decode the data from the wireless
network and output DMX from the female 5 pin XLR. The green LED under
the female 5 pin will be lit if the Tube is working as a decoder.
eDMX Operators Manual 16/08/2007 13:29:00
2. How to set up an eDMX system from out of the box. - Page 12
DMX Target
This is the target address of the decoder to which the encoder will send its
data across the network to. The default target address is 192.168.1.255.
The usage of the address ending with 255 dictates that the encoder will
send the dmx data out to every decoder on the same network. If you only
wanted the encoder to send the dmx data out to one specific decoder then
you would enter the IP address of the decoder that is to receive the data
here. Unless there are special circumstances you should leave the last
number at 255.
DMX RefreshRate
If the Tube is acting as an encoder then it is possible to reduce the
network traffic by reducing the refresh rate that the encoder accepts data
from the console. The default setting is 40, which represents frames per
second. It is possible to reduce this down to 10 when working with moving
head fixtures without any noticeable degradation in the performance.
However the usage of faster, more responsive DMX devices such as LED
lights requires a refresh rate of 40 frames.
Advertisement
This is a WENDI specific message parameter and as such should not be
changed.
1.5 Configuring the Tubes
To configure the Tube having connected to it via the RS232 port it is
simply a case of using the command syntax.
If you type help ?
The Hyperterminal screen should detail the available commands, which are
listed below:
Disable
Enable
– Disables a parameter
– Enables a parameter
Load
– Loads a flash ROM file into the web browser
Save
– saves the configuration to non volatile memory
Set
– Sets the respective parameter
Show
– details the relevant parameter
eDMX Operators Manual 16/08/2007 13:29:00
2. How to set up an eDMX system from out of the box. - Page 13
Reboot
– restarts the system
So to set the IP address for the Tube to 192.168.0.35 you would type
“set ip=192.168.0.35”
It is now imperative that you save the configuration of the Tube at
this stage, otherwise when you reboot the Tube the IP address
change will be forgotten.
To do this type
“save conf”
When the configuration has been saved the prompt will tell you that the
operation is successful.
1.6 Changing a TUBE from an Encoder to a Decoder and back again
To set the Tube to decoder mode you simply type “set DMXMode=decoder”
Then type “save conf”
To set the Tube to encoder mode you simply type “set DMXMode=encoder”
shown below:
eDMX Operators Manual 16/08/2007 13:29:00
as
2. How to set up an eDMX system from out of the box. - Page 14
Now that the Tube knows that it is an encoder it is important to set the
target address so that the Tube knows where to send the data.
The Tube can either send the data to a single other Tube or it can send its
data to multiple Tubes through the usage of the local network broadcast
address.
To send the data to one other Tube you would type set
DMXTarget=IPAddress of receiver, so if we have two Tubes whose IP
addresses are 192.168.1.1 and 192.168.1.2, if we make 192.168.1.1 the
encoder we can set the target to be 192.168.1.2 and thus the encoder
192.168.1.1 will only send its data to 192.168.1.2.
If however we wish to send the data from one Tube to many others we
would set the target address as w.x.y.255, so in the previous example we
would set the target address to 192.168.1.255, this ensures that any Tube
on the 192.168.1.X range between 192.168.1.1 and 192.168.1.250 will
receive the same data.
So our command through the hyperterminal interface would look like:
Again at this stage it is imperative to save the config to non volatile
memory using the “save conf” command
All other parameters are to be changed by experienced users only, as such
this document will not detail every possible parameter change, however
eDMX Operators Manual 16/08/2007 13:29:00
3. Working with the WAP - Page 15
more information can be found through the help files. To find help on any
other parameter simply type show X, where X is the name of the
parameter, for example show IP details the following:
3.
Working with the WAP
The WAP comes with its own configuration setup software which should be
run according to the accompanying manual.
However, after connecting to the WAP either wirelessly or via a cable
through a switch or cat5 cross cable it should be able to reach the web
interface. For the Linksys WAP11 the interface should look like.
Here it can be seen that this WAP has its SSID set to A and its Channel is
set to 1. If the SSID of the Tubes are also set to A then the system will
work and the encoder Tube will route its airborne DMX data via the WAP, if
there is any discrepancy it will not work, please note the SSID is cAsE
SeNsItIvE.
The Channel is the physical frequency which the WAP operates on, there
are different numbers of channels available in different countries around
the world and it is the users responsibility to check that they are using a
eDMX Operators Manual 16/08/2007 13:29:00
3. Working with the WAP - Page 16
legitimate frequency.
The key to the channel concept is that if you change the channel of the
WAP then EVERY device on the same SSID will move channels.
So if you experience data corruption or interference whilst using the eDMX
system you can instantly move to a clear channel. This ability to change
channels during the show and ‘on the fly’ is one of the great advantages of
the eDMX system above other similar systems and above traditional older
wireless systems.
1.7 Configuring the WAP
The WAP should only ever need three parameters changing, these are the
IP address, the SSID and the Channel.
NB The IP address of the WAP must be within the same range as the
Tubes, so if the Tubes are 192.168.1.1 and 192.168.1.2 respectively then
the WAP must be 192.168.1.X respectively. It is suggested that the
numbers above 240 are used for WAP’s so for example the typical WAP
address range would be 192.168.1.240 through 192.168.1.249
Any time a change is made the change must be committed or applied to
the WAP, if changing the WAP’s IP address and viewing the WAP’s
configuration page through Internet Explorer then you will have to change
the IP address in the IE address bar accordingly to reflect the new IP
address.
To Apply a change to the WAP you must scroll down to the bottom of the
configuration utility and click on Apply.
A final note on changing the channels, although channels 1 and 2 are
numerically different the physical frequencies which they represent
overlap. Effectively for the UK there are only 3 channels that are complete
non overlapping and independent, they are 1,6 and 11 and as such these
are the only channels that are recommended.
eDMX Operators Manual 16/08/2007 13:29:00
4. A note on other wireless networks. - Page 17
4.
A note on other wireless networks.
There is a tool available as freeware known as “network stumbler” This is
a PC based package that allows you to discover other networks which
might exist. The software is free and downloadable from
www.netstumbler.com.
The software can be run on a laptop and shows instantly what channels
are in use, the signal to noise ratio of the devices in question etc. It is
highly recommended that this program is run on a wireless capable laptop
at show time to show the presence of any other wireless networks.
5.
Running a show
To enable maximum flexibility at show time it is recommended that a
wireless networked enabled laptop is present and running both the WAP
configuration software and the latest version of netstumbler. This allows
for identification of rogue wireless networks and offers the instant ability
to switch channels instantly.
At the end of the day the likelihood of interference depends on where you
are in the world. A wireless networks convention would not be the place to
use a wireless network without the ability to switch channels instantly.
Conversely an outdoor festival on an airfield would be ideal. The level of
protection that you afford is dependant upon how much safety equipment
and backup you deploy, if a cable can be run safely then this will
inherently be more secure than any wireless system, however if there is
the risk of damage to the cable or running it is impossible then the eDMX
system gives you a highly secure system.
eDMX Operators Manual 16/08/2007 13:29:00
6. System Configuration Options. - Page 18
6.
System Configuration Options.
1.8 Simple point to point
DMX to Light
DMX From Desk
WAP
(Wireless Access Point)
Transmitter
Receiver
1.9 Multiple receivers from 1 transmitter.
Receiver
DMX From Desk
WAP
Receiver
(Wireless Access Point)
Transmitter
1.10 Multiple Universe through 1 WAP
DMX to Lights
DMX From Desk
Universe 1
Universe 1
Universe 2
Universe 2
Universe 3
Universe 3
Universe 4
WAP
Universe 4
(Wireless Access Point)
Receiver
Transmitter
Up to 4 Universes can be run off of 1 WAP
eDMX Operators Manual 16/08/2007 13:29:00
6. System Configuration Options. - Page 19
1.11 Multiple universes split across multiple waps
DMX to Lights
DMX From Desk
Universe 1
Universe 1
Universe 2
Universe 2
Universe 3
Universe 3
Universe 4
Universe 4
WAP
Receiver
Transmitter
1.12 Extending WAP’s using cable
DMX to Light
DMX From Desk
CAT5 Cable Link
Receiver
Transmitter
Extending WAP’s using the Internet
DMX to Light
DMX From Desk
Recei
ver
Transmitter
CAT5 Cable Link
route
r
route
r
INTERNE
T
eDMX Operators Manual 16/08/2007 13:29:00